
In Chapter 15, "Programming with ADO.NET," you learned about the two basic classes for interacting with databases: The Connection class provides the members you need to connect to the database, and the Command class provides the members you need to execute commands against the database. A data-driven application also needs to store data at the client, and you know how to use a DataReader to grab data from the database and how to use a DataAdapter to populate a DataSet at the client.
In addition to the DataSets you created in Chapter 17, "Using the Data Entity Model," Visual Studio also allows you to create typed DataSets. A typed DataSet is designed with visual tools at design time, and its structure is known to the compiler, which can generate very efficient code for the specific type of data you're manipulating in your application. Another advantage of typed DataSets is that they can be bound to Windows controls on a form. When a field is bound to a Windows control, every time you move to another row in the table, the control is updated to reflect the current value of the field. When the user edits the control on the form, the new value replaces the original value of the field in the DataSet. The form is said to be bound to the data source, which is usually a DataSet.
Data binding is a process for building data-driven applications with visual tools: You map the columns of a table to controls on the form, and Visual Studio generates the code for displaying the data on the bound controls, as well as updating the DataSet when the user edits the value of a bound control. These applications are called data bound, and they're similar to the applications you designed in the previous chapter. The difference is that Visual Studio generates the necessary code for you.
In this chapter, you'll learn how to do the following:
Design and use typed DataSets
Bind Windows forms to typed DataSets
Compare a LINQ query used to filter data with an eSQL dynamic query
The DataSets you explored in the preceding chapter were untyped: Their exact structure was determined at runtime, when they were populated through the appropriate DataAdapters. In this chapter, I'll discuss typed DataSets in detail. A typed DataSet is a DataSet with a known structure because it's created at design time with visual tools. The compiler knows the structure of the DataSet (that is, the DataTables it contains and the structure of each DataTable), and it generates code that's specific to the data at hand.
The most important characteristic of typed DataSets is that they allow you to write strongly typed code and practically eliminate the chances of exceptions due to syntax errors. Whereas in an untyped DataSet you had to access the DataTables by name with an expression such as DS.Tables ("Products"), the equivalent typed DataSet exposes the name of the table as a property: DS.Products. To find out whether a specific field of an untyped DataSet is Null, you must use an expression like the following:
DS.Tables ("Products").Rows (0).Item ("UnitPrice").IsNullWith a typed DataSet, you can declare a variable that represents a row of the Products table like this:
Dim prod As NorthwindDataSet.ProductsRow =
             DS.Products.Rows(0)
You can then access the fields of the row as properties, with expressions like this: prod.ProductName, prod.UnitPrice, and so on. To find out whether the UnitPrice field is Null, call the method prod.IsUnitPriceNull. You can also set a field to Null with a method call: prod.SetUnitPriceNull. As you can guess, after the structure of the DataSet is known, the editor can generate a class with many members that will enormously simplify the coding of the application using the typed DataSet. You can count on IntelliSense to help you reference table columns, represented as properties on a generated Row class. The code you will have to write will be a lot terser and easier to understand. The typed DataSet is a class that's generated by a wizard on the fly, and it becomes part of your solution.
Let's start by looking at the process of generating typed DataSets with visual data tools. Then you'll see how to bind Windows controls to typed DataSets and generate functional interfaces with point-and-click operations.
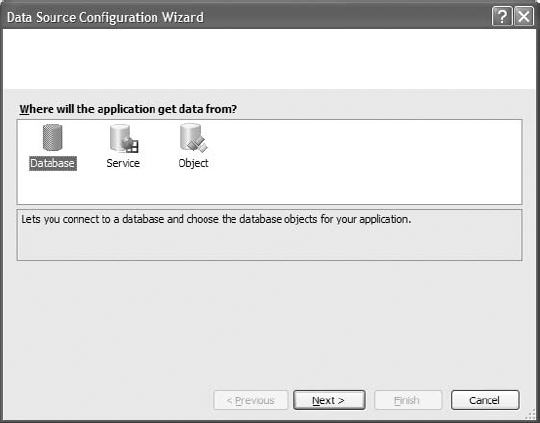
In this section, you'll create a typed DataSet with the three basic tables of the Northwind database: Products, Categories, and Suppliers. Create a new Windows Forms Application project, the DataSetOperations project. (This is the same name as the sample project you can download from www.sybex.com/go/masteringvb2010.) Then open the Data menu, and choose the Add Data Source command. You will see the Data Source Configuration Wizard, which will take you through the steps of building a DataSet at design time. In the first page of the wizard, you'll be asked to select the data source type; it can be a database, a service (such as a web service), or an object, as in Figure 18.1. Select the Database icon, and click the Next button.
The Service option on the page shown in Figure 18.1 creates a DataSet that retrieves its data from a service (usually a web service). The Object option allows you to create a DataSet from a collection of custom objects.
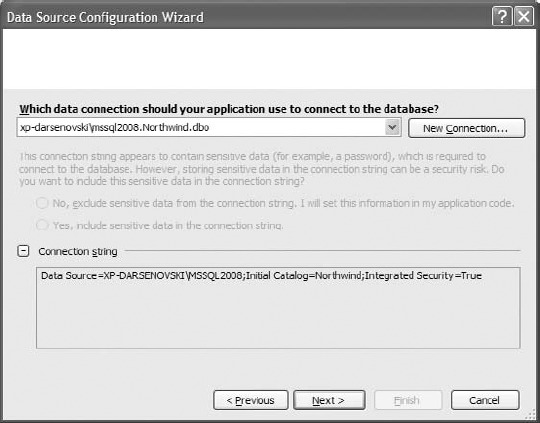
On the next page of the wizard, shown in Figure 18.2, you must specify a connection string for the database you want to use. Click the New Connection button to create a new connection only if there's no connection for the database you want to use. If you've experimented already with the visual tools of Visual Basic, you may already have an existing connection, in which case you simply select it from the drop-down list.
To create a new connection, you must specify your credentials: whether you'll connect with a username and password or use Windows authentication. Once connected to the server, you can select the desired database from a ComboBox control. If you click the New Connection button to create a new connection to the Northwind database, you will see the Add Connection dialog box, as shown in Figure 18.3. This dialog box is not new to you; it's the same dialog box you use to create a new data connection in Server Explorer window. If you haven't created a connection to the Northwind database yet, do it now. Otherwise, select the existing connection.
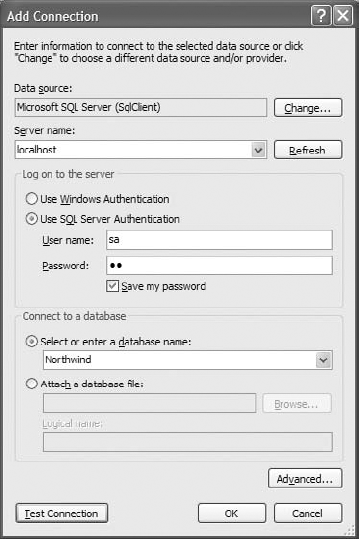
Figure 18.3. Using the Add Connection dialog box to specify a new connection to the Northwind database
It's recommended that you use Windows authentication to connect to the database. If this isn't possible because the database server is not in the local network, you must specify a username and password in the boxes shown in Figure 18.3. In this case, the wizard will ask whether you want to store sensitive information (the account's password) to the connection string. You can choose to either include the password in the connection string (not a very safe approach) or supply it from within your code. You can always set the Password property of a Connection object in your code. To secure the password, you can prompt the user for a password when the application starts and save it to an application variable. This way, the password isn't persisted anywhere; it only exists in computer memory as long as the application is running. Alternatively, you can store an encrypted version of the password and decrypt and use it from within your code. The best approach for a local network is to use Windows authentication.
Click the OK button to close the Add Connection dialog box, and then click Next; you will see a dialog box with the default connection name: NorthwindConnectionString. This is the name of a new application setting that will store the connection information. You can edit this, as well as the other application settings, on the Settings tab of the project's Properties pages. (To see the project's Properties pages, choose Project Properties from the Project menu.)
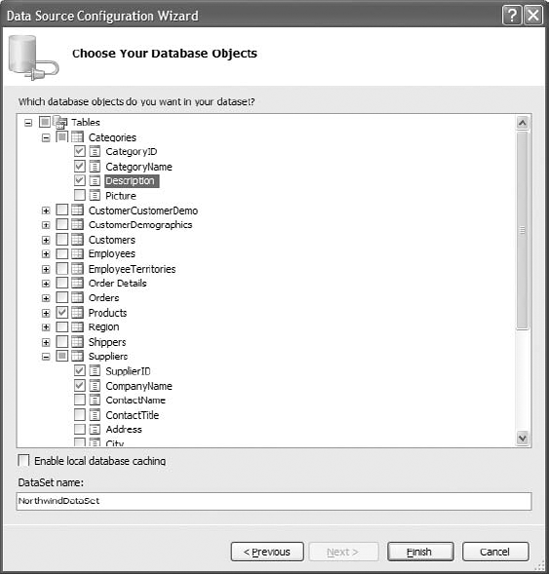
Click Next again, and you will see the Choose Your Database Objects page, shown in Figure 18.4, where you can select the tables and columns you want to load to the DataSet. Notice that you can't use a SELECT statement to select the data you want from a table: You must select the entire table. Of course, you can write a stored procedure to limit your selection and then select it in the dialog box. If you select multiple tables and they're related, the relationship between them will also be imported for you (no need to create a DataRelation object for each relationship between the DataSet tables). For this example, select the Categories, Suppliers, and Products tables of the Northwind database. Select all columns of the Products and Categories tables, except for the Picture column of the Categories table. From the Suppliers table, select the SupplierID and CompanyName columns.
At the bottom of the dialog box shown in Figure 18.4, you can specify the name of the DataSet that will be generated for you. I'll use the default name, NorthwindDataSet. Click Finish to close the wizard and create the DataSet, which will be added automatically to the Solution Explorer window.
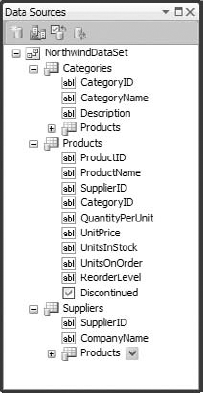
In the Data Sources window, shown in Figure 18.5, you will see a tree that represents the tables in the DataSet. The DataSet contains three DataTables, and each DataTable is made of the columns you selected in the wizard. This DataSet is typed, because it knows the structure of the data you're going to store in it. The interesting part of this tree is that it contains the Products table three times: in the first level along with the Categories table, as its own table, and once again under the Categories and Suppliers tables. (You must expand these tables to see it, as in Figure 18.5.) Whereas the Products table on the first level represents the entire table, the nested ones represent the products linked to their categories and their suppliers, respectively. You will see later in the chapter how to use the multiple Products DataTables.
The typed DataSet is actually a class that is generated on the fly. It's no longer a generic DataSet we will populate at runtime with any table we want through a DataAdapter; it's a specific object that can be populated only with the tables we specified in its design. If you want to see the code of the class generated by the wizard, click the Show All Files button in Solution Explorer window, and double-click the NorthwindDataSet.Designer.vb item under the Northwind DataSet. You shouldn't edit the code, because if you decide to edit the DataSet (you'll see how you can edit it with visual tools), the wizard will create a new class, and your changes will be lost. If you want to add some custom members to the Northwind class, create a new Partial class with the custom members, and name it NorthwindDataSet.vb.
Let's exercise the members of the typed DataSet a little and see how the typed DataSet differs from the equivalent untyped DataSet. The operations we'll perform are similar to the ones we performed in the preceding chapter with an untyped DataSet; you should focus on the different syntax. The code shown in this section belongs to the DataSetOperations sample project. This project contains three forms, and you will have to change the project's Startup object to view each one.
Figure 18.6 shows Form1 of the project, which demonstrates the basic operations on a typed DataSet, including how to populate it, edit some of its tables, and submit the changes to the database. They're basically the same operations you'd perform with an untyped DataSet, but you will see that it's much simpler to work with typed DataSets.
To populate the three DataTables of the DataSet, you need three DataAdapter objects. Instead of the generic DataAdapter, the class generated by the wizard has created a TableAdapter class for each DataTable: the CategoriesTableAdapter, SuppliersTableAdapter, and ProductsTableAdapter classes. Declare three objects of the corresponding type at the form level:
Dim CategoriesTA As New _
  NorthwindDataSetTableAdapters.CategoriesTableAdapter
Dim SuppliersTA As New _
  NorthwindDataSetTableAdapters.SuppliersTableAdapter
Dim ProductsTA As New _
  NorthwindDataSetTableAdapters.ProductsTableAdapter
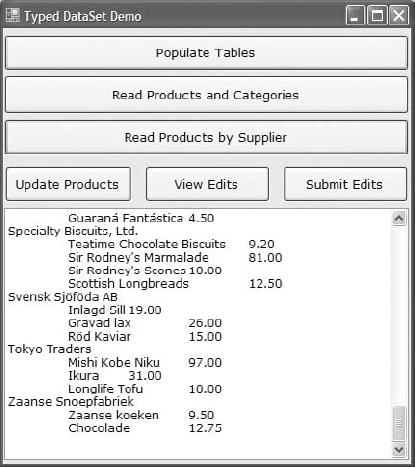
Figure 18.6. Form1 of the DataSetOperations project demonstrates the basic operations on a typed DataSet.
The classes create the three objects that will retrieve the data from the database and submit the edited rows to the database from the SELECT statements you specified with point-and-click operations. These objects derive from the TableAdapter class, which in turn is based on the DataAdapter class. If you examine the code of the Northwind class, you will find the code that creates the SQL statements for querying and updating the three tables and how these statements are used to create a DataAdapter object. The code is similar to the code we used in the preceding chapter to create DataAdapters from within our code.
You must also create a DataSet object to store the data. This time, however, you can use a specific type that describes the structure of the data you plan to store at the client, not a generic DataSet. Insert the following declaration at the form level:
Dim DS As New NorthwindDataSet
Now place the Populate Tables button on the form, and insert the code shown in Listing 18.1 in its Click event handler.
Example 18.1. Populating a typed DataSet with the proper TableAdapters
Private Sub bttnPopulate_Click(...) Handles bttnPopulate.Click
    Dim categories As Integer = CategoriesTA.Fill(DS.Categories)
    Dim suppliers As Integer = SuppliersTA.Fill(DS.Suppliers)
    Dim products As Integer = ProductsTA.Fill(DS.Products)
As you can see, the Fill method doesn't accept any DataTable as an argument; instead, the type of its argument is determined by the TableAdapter object to which it's applied. The Fill method of the ProductsTA TableAdapter accepts as an argument an object of the ProductsDataTable type. The event handler of the sample project includes a few more statements that print the count of rows in each of the three tables.
To go through the rows of the Products table, write a simple loop like the following:
Dim prod As NorthwindDataSet.ProductsRow
For Each prod In DS.Products.Rows
    TextBox1.AppendText(prod.ProductName & vbTab &
         prod.UnitPrice.ToString("#,###.00") & vbCrLf)
Next
As you can see, the names of the fields are properties of the ProductsRow class. Some products may have no price (a Null value in the database). If you attempt to access the UnitPrice property of the ProductsRow class, a NullReferenceException exception will be thrown. To prevent it, you can make sure that the field is not Null from within your code, with an IIf function like the following:
TextBox1.AppendText(
        IIf(prod.IsUnitPriceNull,
        "Not for sale!",
        prod.UnitPrice.ToString("#,###.00")))
To read data from linked tables in a hierarchical way, you don't have to specify the relationship between the tables as you did with untyped DataSets, because the typed DataTables expose the appropriate methods.
Now place another button on your form, the Read Products By Supplier button, and in its Click handler insert the code shown in Listing 18.2 to iterate through suppliers and related products. Notice that the SuppliersRow class exposes the GetProductsRows method, which retrieves the Products rows that are associated with the current supplier. The GetProductsRows method is equivalent to the GetChildRows of an untyped DataSet, only with the latter you have to supply a relationship name as an argument. Moreover, the GetProductsRows method returns an array of ProductsRow objects, not generic DataRow objects.
Example 18.2. Iterating through linked DataTables
Private Sub bttnSuppliersProducts_Click(...) Handles
                       bttnSuppliersProducts.Click
    TextBox1.Clear()
    Dim supp As NorthwindDataSet.SuppliersRow
    For Each supp In DS.Suppliers.Rows
        TextBox1.AppendText(supp.CompanyName & vbCrLf)
        Dim prod As NorthwindDataSet.ProductsRow
        For Each prod In supp.GetProductsRows
            TextBox1.AppendText(vbTab &
                  prod.ProductName & vbTab &
prod.UnitPrice.ToString("#,###.00") & vbCrLf)
Next
Next
End SubThe ProductsRow object exposes the SuppliersRow and CategoriesRow methods, which return the current product's parent rows in the Suppliers and Categories DataTables.
The most useful method of the typed DataTable is the FindByID method, which locates a row by its ID in the DataTable. To locate a product by its ID, call the FindByProductID method, passing a product ID as an argument. The method returns a ProductsRow object that represents the matching product. The method's return value is not a copy of the found row but instead is a reference to the actual row in the DataTable, and you can edit it. The code behind the Update Products button, which is shown in Listing 18.3, selects a product at random by its ID and prompts the user for a new price. Then it sets the UnitPrice field to the user-supplied value.
Example 18.3. Updating a row of a typed DataTable
Private Sub bttnUpdate_Click(...) Handles bttnUpdate.Click
    Dim selProduct As NorthwindDataSet.ProductsRow
    Dim RND As New System.Random
    selProduct = DS.Products.FindByProductID(RND.Next(1, 77))
    Dim newPrice As Decimal
    newPrice = Convert.ToDecimal(InputBox(
                  "Enter product's new price",
                   selProduct.ProductName,
                   selProduct.UnitPrice.ToString))
    selProduct.UnitPrice = newPrice
End Sub
As you can see, manipulating the rows of typed DataTables is much simpler than the equivalent operations with untyped DataSets, because the fields are exposed as properties of the appropriate class (the ProductsRow class for rows of the Products DataTable, the CategoriesRow class for rows of the Categories DataTable, and so on).
Let's look at the code for updating the database. The first step is to retrieve the edited rows with the GetChanges method, which returns a typed DataTable object, depending on the DataTable to which it was applied. To retrieve the modified rows of the Products DataTable, use the following statements:
Dim DT As NorthwindDataSet.ProductsDataTable
DT = DS.Products.GetChanges
You can pass an argument of the DataRowState type to the GetChanges method to retrieve the inserted, modified, or deleted rows. Because this is a typed DataSet, you can write a For Each loop to iterate through its rows (they're all of the ProductsRow type) and find the edits. One feature you'd expect to find in a typed DataTable is a method for retrieving the original versions of a row by name. Unfortunately, the class generated by the wizard doesn't include such a method; you must use the Item property, passing as an argument the name of the row. A row's original field versions are given by the following expression:
prod.Item("UnitPrice", DataRowVersion.Original)To submit the edited rows to the database, you can call the appropriate TableAdapter Update method. The code behind the Submit Edits button does exactly that, and it's shown in Listing 18.4.
Example 18.4. Submitting the edited rows of a typed DataTable to the database
Private Sub bttnSubmit_Click(...) Handles bttnSubmit.Click
    If DS.HasChanges Then
        Dim DT As NorthwindDataSet.ProductsDataTable =
            DS.Products.GetChanges
        If DT IsNot Nothing Then
            Try
                ProductsTA.Update(DT)
            Catch ex As Exception
                MsgBox(ex.Message)
                Exit Sub
            End Try
            MsgBox(DT.Rows.Count.ToString &
                   " rows updated successfully.")
        End If
    End If
End Sub
Typed DataSets are quite convenient when it comes to coding. The real advantage of typed DataSets is that they can simplify enormously the generation of data-bound forms, which is the main topic of this chapter.
Data binding is the process of linking the contents of a field to a control on the form. Every time the application modifies the field's value, the control is updated automatically. Likewise, every time the user edits the control's value on the form, the underlying field in the DataSet is also updated. Sometimes, this two-way linking of the data is referred to as bidirectional data binding. The DataSet keeps track of the changes (the modified, added, and deleted rows), regardless of how they were changed. In short, data binding relieves you from having to map field values to controls on the form when a row is selected and from moving values from the controls back to the DataSet when a row is edited.
In addition to binding simple controls such as TextBox controls to a single field, you can bind an entire column of a DataTable to a list control, such as the ListBox or ComboBox control. And of course, you can bind an entire DataTable to a special control, the DataGridView control. You can build a data-browsing and data-editing application by binding the Products DataTable to a DataGridView control without a single line of code.
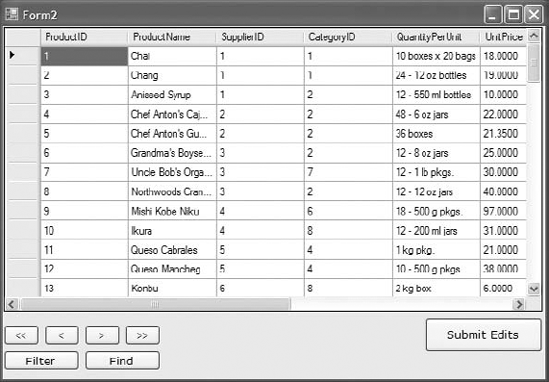
To explore the basics of data binding, add a second form to the project, and make it the project's startup object. Figure 18.7 shows the new form of the DataSetOperations project, Form2.
Then drop a DataGridView control on the form, and set the control's DataSource property to bind it to the Products DataTable. Select the DataGridView control on the form, and locate its DataSource property in the Properties window. Expand the DataSource property, and you will see the project's data sources. The form contains no data source for the time being, so all data sources are listed under Other Data Sources. Expand this item of the tree to see the Project Data Sources item, which in turn contains the NorthwindDataSet data source (or whatever you have named the typed DataSet). Expand this item, and you will see the names of the DataTables in the DataSet, as shown in Figure 18.8. Select the Products DataTable.
The editor will populate the DataGridView control with the table's columns: It will map each column in the Products DataTable to a column in the DataGridView control. All columns have the same width and are displayed as text boxes, except for the Discontinued column, which is mapped to a CheckBox control. (This is the last column of the controls, and you will see it at runtime, because you can't scroll the control at design time.) The control's columns were named after the DataTable columns, but we'll change the appearance of the grid shortly. Press F5 to run the application, and the form will come up populated with the Products rows! Obviously, the editor has generated some code for us to populate the control. The code generated by the editor is a single statement in the form's Load event handler:
Me.ProductsTableAdapter.Fill(Me.NorthwindDataSet.Products)
As far as browsing the data, we're all set. All we have to do is adjust the appearance of the DataGridView control with point-and-click operations. You can also edit the rows, but there's no code to submit the edits to the database. Submitting the changes to the database shouldn't be a problem for you; just copy the corresponding code statement from Form1 of the project. Place the Submit Edits button on the form, and in its Click handler insert the following statements:

If NorthwindDataSet.HasChanges Then
    Dim DT As NorthwindDataSet.ProductsDataTable =
        NorthwindDataSet.Products.GetChanges
    If DT IsNot Nothing Then
        Try
            ProductsTableAdapter.Update(DT)
        Catch ex As Exception
            MsgBox(ex.Message)
            Exit Sub
        End Try
        MsgBox(DT.Rows.Count.ToString &
              " rows updated successfully.")
    End If
End If
I changed the name of the DataSet from DS to NorthwindDataSet and the name of the TableAdapter from ProductsTA to ProductsTableAdapter. And where did these names come from? If you switch to the form's Designer, you'll see that while you were setting the DataGridView control's properties, three items were added to the Components tray of the form: the NorthwindDataSet component (which is the typed DataSet), the ProductsTableAdapter (which is responsible for populating the control and submitting the edited rows to the database), and the ProductsBindingSource (which is the liaison between the DataGridView control and the DataSet). The ProductsBindingSource is basically a data source, and it's discussed in the following section.
To understand the functionality of the BindingSource class, look up its members. Enter its name and the following period in the code window, and you will see a list of members. The Position property reads (or sets) the current item's index in the underlying DataTable. The DataGridView control doesn't maintain the order of the rows in the underlying table; besides, you can sort the DataGridView control rows in any way you like, but the DataTable rows won't be sorted. Use the Position property to find out the index of the selected row in the DataTable. The MoveFirst, MovePrevious, MoveNext, and MoveLast methods are simple navigational tools provided by the BindingSource class. You can place four buttons on the form and insert a call to these methods to move to the first, previous, next, and last rows, respectively. The four navigational buttons at the lower-left corner of the form shown in Figure 18.7 call these methods to select another row on the grid.
The two most interesting members of the BindingSource class are the Find method and the Filter property. The Filter property is set to an expression similar to the WHERE clause of a SQL statement to filter the data on the grid. Place a new button on the form, set its caption to Filter, set its name to bttnFilter, and insert the following statements in its Click event handler to filter the rows of the grid with their product names:
Private Sub bttnFilter_Click(...) Handles bttnFilter.Click
    Dim filter As String
    filter = InputBox("Enter product name, or part of it")
    ProductsBindingSource.Filter =
         "ProductName LIKE '%" & filter.Trim & "%'"
End Sub
Run the application, and click the Filter button to limit the rows displayed on the grid by their product names. If you're searching for products that contain the string sauce in their name, the Filter property limits the selection as if you had requested products with the following WHERE clause (the percent sign is a SQL wildcard that matches any string):
WHERE ProductName LIKE '%sauce%'
To restore the original selection, set the filter expression to a blank string. You can design an auxiliary form on which users can enter multiple criteria and filter products by their price or stock, their supplier, and so on. With a bit of programming effort, you can apply multiple criteria, such as products of a specific category that are on order, out-of-stock items from a specific supplier, and so on.
The Find method searches a value in a specific column. Both the column name and search argument are specified as arguments to the method, and the return value is the row's position in the DataTable. To select the row, set the BindingSource object's Position property to the value returned by the Find method. The code behind the Find button in the sample project is the following:
Dim search As String
search = InputBox("Enter exact product name")
Dim idx As Integer =
      ProductsBindingSource.Find("ProductName", search)
ProductsBindingSource.Position = idx
The Find method is not the most convenient search tool, because you have to specify the exact value of the field you're looking for. To retrieve the current row in the DataTable mapped to the BindingSource, use the Current property; to determine the number of rows in the same DataTable, read the value of the Count property. The Current property returns an object, which you must cast to the DataRowView type and call its Row property:
CType(ProductsBindingSource.Current, DataRowView).Row
This expression returns a DataRow object, which you can cast to a ProductsRow type. You will see examples of using the Current property of the BindingSource class to access the underlying row in the DataTable later in this chapter.
If you attempt to add a row to the DataGridView control, the new row's ID will be −1 (or another negative value if you have added multiple rows). This is a valid value for an Identity column, as long as its AutoIncrement property is set to −1. But the ProductID column in the database has an AutoIncrement value of 1 — why is it different in the DataSet? When the editor created the DataSet, it changed this setting to avoid conflicts during the updates. If new products were assigned valid IDs (positive values following the last ID in the DataSet) at the client, consider what might happen when the edits were submitted to the database. The IDs provided by the DataSet might be taken in the database, and the Insert operation would fail. To avoid this conflict, the DataSet uses negative identity values. When these rows are submitted to the database, they're assigned a new ID by the database, which is a positive value.
However, a problem remains. The new ID isn't transferred back to the client, and the DataSet displays negative IDs. One solution is to populate the DataSet again; however, there's a lot more to learn about submitting edited rows to the database, and we'll return to this topic later in this chapter.
You can experiment with this form in the DataSetOperations project by editing the products, adding new ones, and deleting rows. If you attempt to add a new row, you'll get an error message indicating that the Discontinued column doesn't accept nulls. The default value of the check box on the DataGrid control is neither True nor False (it's Null), and you must validate its value. The simplest solution to the problem is to apply a default value to the Discontinued column, and the following section describes how to edit the properties of the DataSet.
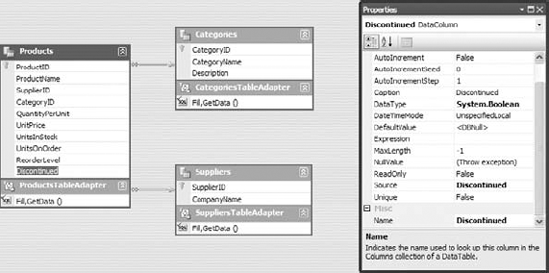
To adjust the properties of the DataSet, right-click the DataSet in the Data Sources window, and choose Edit DataSet With Designer from the context menu. The DataSet Designer window, shown in Figure 18.9, will appear.
Right-click the header of the Discontinued column in the Products table, and choose Properties to see the properties of the DataColumn. One of them is the DefaultValue property, which is set by default to Null. Change it to 0 or False to impose a default value for this column. In the DataSet Designer, you can examine the data types of the columns of each table, drop or create new relations between tables, and set other interesting properties, such as the Caption property of a column, which will be used to name the column of the bound DataGridView control, or the NullValue property, which determines how the DataSet will handle Null values. The default value of the NullValue property is Throw Exception. Every time the application requests the value of a Null field, a runtime exception is thrown. You can set it to Empty (in which case an empty string is returned) or Nothing (in which case a Nothing value is returned). You can also set the autoincrement values of Identity columns here. If you select the ProductID column in the Products table, you'll see that the wizard has set the column's AutoIncrementSeed and AutoIncrementStep to −1, for the reasons explained already.
While you're in the DataSet Designer, right-click the Product DataTable, and choose Configure. This starts the TableAdapter Configuration Wizard. The first page of the wizard, shown in Figure 18.10, shows the SQL statement that the Data Source Configuration Wizard generated while you were selecting the columns you wanted to include in the DataSet. You can edit this statement by adding more columns, a WHERE clause to limit the number of rows to be selected, and an ORDER BY clause. To edit the SELECT statement, you modify it right on this page, or you can click the Query Builder button to view the Query Builder dialog box that lets you specify complicated queries with visual tools.
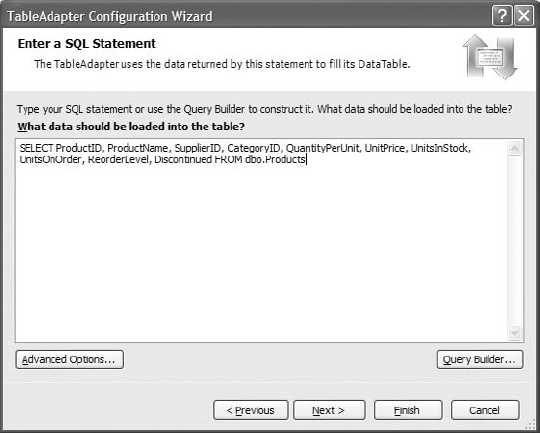
Figure 18.10. Editing the SELECT statement that populates the Products DataTable with the TableAdapter Configuration Wizard
If you click the Advanced Options button, you will see the Advanced Options dialog box, shown in Figure 18.11. Here you must specify which statements should be generated by the wizard. If you're developing a browser application, deselect the first check box: Generate Insert, Update, And Delete Statements. If you clear this option, the other two options will be disabled.
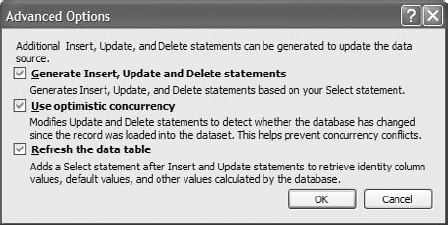
Figure 18.11. The Advanced Options dialog box lets you know how the TableAdapter will submit the updates to the underlying tables.
The Use Optimistic Concurrency option affects the UPDATE and DELETE statements generated by the wizard. If this check box is selected, the two statements will not update or delete a row if it has been edited by another user since it was read. The wizard will generate two long statements that take into consideration the values read from the database into the DataSet at the client (the row's original values), and if any of the row's columns in the database are different from the original version of the same row in the DataSet, it won't update or delete the row. By using optimistic concurrency, you're assuming that it's rather unlikely that two users will update the same row at the same time. If the row being updated has already been modified by another user, the update operation fails. If you clear this option, the UPDATE/DELETE statements take into consideration the row's primary key and are executed, even if the row has been modified since it was read. In effect, the last user to update a row overwrites the changes made by other users.
The last option in the Advanced Options dialog box specifies whether the TableAdapter reads back the inserted/updated rows. You should leave this check box selected so that the identity values assigned by the database to new rows will be read back and update the DataSet.
Curious about the statements that take into consideration the original values of the row being updated? Here's the DELETE statement for the Products row that uses optimistic concurrency:
DELETE FROM [dbo].[Products]
WHERE (([ProductID] = @Original_ProductID) AND
      ([ProductName] = @Original_ProductName) AND
((@IsNull_SupplierID = 1 AND
[SupplierID] IS NULL) OR
([SupplierID] = @Original_SupplierID)) AND
((@IsNull_CategoryID = 1 AND
[CategoryID] IS NULL) OR
([CategoryID] = @Original_CategoryID)) AND
((@IsNull_QuantityPerUnit = 1 AND
[QuantityPerUnit] IS NULL) OR
([QuantityPerUnit] = @Original_QuantityPerUnit)) AND
((@IsNull_UnitPrice = 1 AND
[UnitPrice] IS NULL) OR
([UnitPrice] = @Original_UnitPrice)) AND
((@IsNull_UnitsInStock = 1 AND
[UnitsInStock] IS NULL) OR
([UnitsInStock] = @Original_UnitsInStock)) AND
((@IsNull_UnitsOnOrder = 1 AND
[UnitsOnOrder] IS NULL) OR
([UnitsOnOrder] = @Original_UnitsOnOrder)) AND
((@IsNull_ReorderLevel = 1 AND
[ReorderLevel] IS NULL) OR
([ReorderLevel] = @Original_ReorderLevel)) AND
([Discontinued] = @Original_Discontinued))The same statement with the optimistic concurrency off is quite short:
DELETE FROM [dbo].[Products]
WHERE ([ProductID] = @Original_ProductID)
Examine the long statement to understand how optimistic concurrency is handled. The first term in the WHERE clause locates a single row based on the product ID, which is unique. This is the row that should be deleted (or updated by the UPDATE statement). However, the statement will not select the row if any of its fields have been edited since you read it from the database. If another user has changed the price of a specific product, the following term will evaluate to false, and the WHERE clause will return no row to be deleted.
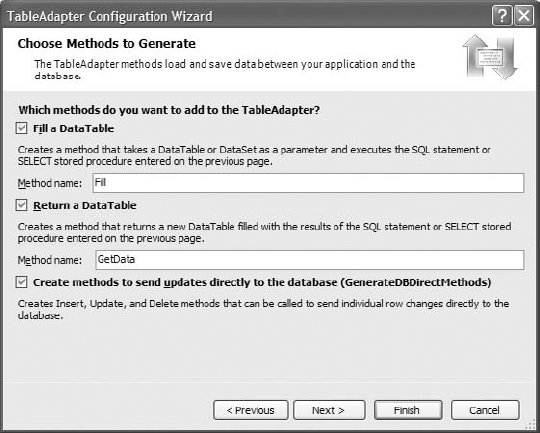
When you return to the configuration wizard, click Next, and you will see the dialog box shown in Figure 18.12, where you can specify the methods that the wizard will generate for you. The Fill method populates a DataTable, and the GetData method returns a DataTable object with the same data; the last option in the dialog box specifies whether the DataSet will expose methods for inserting/updating/deleting rows directly against the database.
Click Next again, and the wizard will regenerate the NorthwindDataSet class, taking into consideration the options you specified in the steps of the wizard.
In the following section, we'll let the editor build simple data-driven applications for us. You're going to see how to bind other controls to typed DataSets and how to customize the DataGridView control.
Instead of binding the DataGridView control through its properties, you can let Visual Studio perform the binding for you:
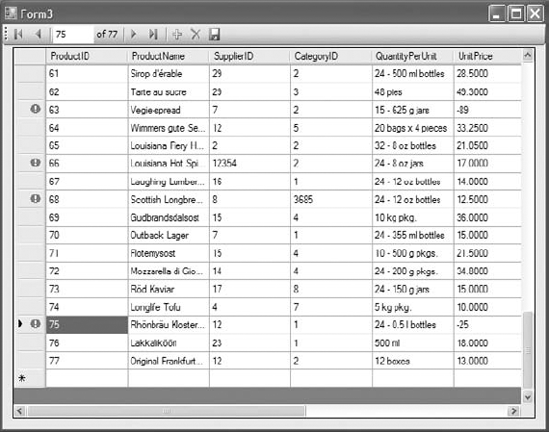
Add a third form to the DataSetOperations sample project, the
Form3form, and make it the project's Startup object.To display the rows of the Products table on a DataGridView control, open the Data Sources window, and select the Products table. As soon as you select it, an arrow appears next to its name. Click this arrow to open a drop-down list with the binding options for the DataTable. The DataTable can be bound to the following:
A DataGridView control, which will display all rows and all columns of the table
A ListBox or ComboBox control, which will display a single column of all rows
A number of TextBox controls (the Details option), one for each column
Select the DataGridView option, and then drop the
ProductsDataTable on the form.
The editor will create a DataGridView control and bind it to the Products DataTable. In addition, it will create a toolbar at the top of the form with a few navigational and editing buttons, as shown in Figure 18.13 (shown at design time so you can see the components generated by the editor). Notice that the toolbar contains one button for deleting rows (the button with the X icon) and one button for submitting the edits to the database (the button with the disk icon). The Filter, Find, and Refresh Data buttons were not generated by the editor; I've added them to the toolbar and inserted the appropriate code in their Click event handlers. You've already seen the code that implements all three operations.
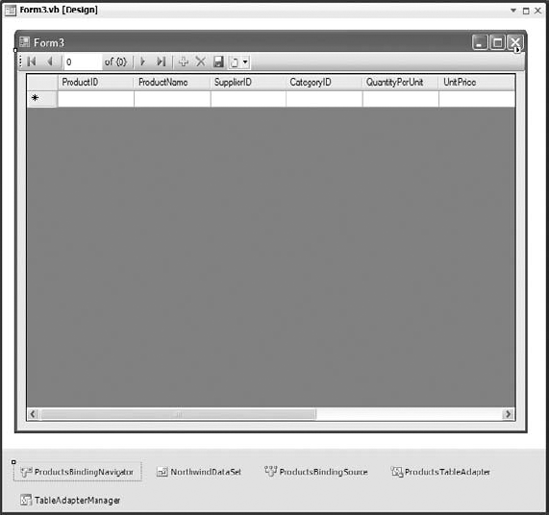
The Designer will also generate the components listed in Table 18.1; these will appear in the Components tray.
As for the code generated by the editor, here it is:
Private Sub ProductsBindingNavigatorSaveItem_Click(...) Handles
             ProductsBindingNavigatorSaveItem.Click
    Me.Validate()
    Me.ProductsBindingSource.EndEdit()
    Me.TableAdapterManager.UpdateAll(Me.DSProducts)
End Sub

Private Sub Form2_Load(...) Handles MyBase.Load
    'TODO: This line of code loads data into the 'NorthwindDataSet.Products' table.
    'You can move, or remove it, as needed.
    Me.ProductsTableAdapter.Fill(Me.DSProducts.Products)
End Sub
In the form Load event handler, the Products DataTable is filled with a call to the ProductsTableAdapter class's Fill method. The other event handler corresponds to the Click event of the Save button on the toolbar, and it calls the TableAdapterManager class's UpdateAll method. This is all it takes to submit the changes made to the data at the client.
Table 18.1. Designer-generated components
Description | |
|---|---|
NorthwindDataSet | This is the typed DataSet for the data specified with the Data Source Configuration Wizard. |
ProductBindingSource | This is a BindingSource object for the Products table. |
ProductsTableAdapter | This is an enhanced DataAdapter that exposes the methods for reading data from the database and submitting the changes made at the client to the database. The TableAdapter class differs from the DataAdapter class in that its |
TableAdapterManager | This encapsulates the functionality of all TableAdapter objects on the form. If you drop additional tables on the form, the editor will create the corresponding TableAdapter for each one. The TableAdapterManager encapsulates the functionality of all individual TableAdapter objects and exposes the |
ProductsBindingNavigator | This component represents the toolbar added to the form. The toolbar is a ToolStrip control with custom items and the appropriate code. The navigational tools generated by the editor are rather primitive, and you can remove them from the control. Just keep the code for the Save button, which you'll need if your application allows editing of the data. |
Let's see how far this autogenerated application will take us. Run the application, and edit a few products. Change a few names, set a couple of prices to negative values, set a product's category to an invalid category ID (any value exceeding 7 is invalid, unless you have added new categories), add a couple of new products (they will be assigned negative IDs, as expected), and delete some products. As you can guess, you can't delete rows from the Products table, because they're all referenced by the Order Details table, but this table doesn't exist in the DataSet, so it's perfectly legal to delete products in the context of the DataSet. When the edits are submitted to the database, the deletions will be rejected, of course.
Let's see how the Save button on the toolbar handles the updates. Click the Save button on the toolbar, and you will get an error message indicating that a row has violated a referential or check constraint, depending on the order in which the rows were submitted to the database. The UpdateAll method of the ProductsTableAdapter object will give up after the first failure.
As you recall, the DataAdapter class, on which the TableAdapter class is based, exposes the ContinueUpdateOnError property. Unfortunately, the TableAdapter class doesn't expose this property. However, you can access the underlying DataAdapter through the Adapter property, and set the ContinueUpdateOnError property to True. Insert the following method in front of the statement that calls the UpdateAll method:
Me.TableAdapterManager.ProductsTableAdapter.
           Adapter.ContinueUpdateOnError = True
Run the application again, edit the data on the grid, and submit the changes to the database. This time the application won't crash with an error message. Instead, the rows that failed to update the underlying table in the database will be marked with an exclamation mark icon in the row's header, as shown in Figure 18.14. We managed to submit all the rows to the database, regardless of whether they successfully updated the Products table, through the ProductsTableAdapter object. The UpdateAll method retrieved the error messages returned by the DBMS and displayed them on the control. To see the reason why each row failed to update the Products table, hover the pointer over the error icon, and you will see the description of the error in a ToolTip box.
You can also create a list of the rows that failed to update their underlying table along with the error message returned by the database. The code for iterating through a table's rows and examining the RowError property was presented in the preceding chapter. You can easily add an extra button on the toolbar and use it to display an auxiliary form with the update errors.
By the way, the error messages displayed on the DataGridView control are the ones returned by the DBMS (SQL Server in our case). If you want, you can set each row's RowError property to a different, more meaningful description.
The navigational tools on the BindingNavigator are quite primitive. Let's enhance the toolbar at the top of the form by adding two buttons, the Filter and Find buttons of the preceding section. Stop the application, and open Form3 in design mode.
To add a new element to the ToolBar control, expand the combo box that's displayed at design time after the existing elements. From the drop-down list, select the Button item to add a Button control to the toolbar. Select the newly added button, and set its DisplayStyle property to Text. (Normally this property is set to Image, because the items on a toolbar are identified by an icon; you should find a few good icons and use them in your applications.) Set its Text property to Filter and its name to bttnFilter. Follow similar steps for the Find button as well. Then copy the code of the two buttons in Form2, and paste it in the Click event handlers of the two ToolStrip buttons. You just added a filtering and search feature to your application.
The Find feature isn't very practical with product names, because users have to specify the full and exact product name. This feature should be used with fields such as IDs, book ISBNs, and email addresses. To find a product by name, most users would use the Filter button to limit the selection on the grid and then locate the desired product.
You can also use two TextBox controls in place of the two Button controls on the toolbar. If you'd rather allow users to enter their search and filter arguments on the toolbar, you must intercept the Enter keystroke from within the respective control's KeyUp event and call the same code to filter or search the rows of the grid.
Now, add yet another button to the toolbar, and set its caption to Refresh Data. This button will reload the data from the database by calling the Fill method of the TableAdapter. Before loading the data, however, you must make sure that the DataSet doesn't contain any changes by examining the HasChanges property. If it's True, you must prompt the user accordingly. Notice that if a row failed to update the database, the DataSet will contain changes, even though the edits were submitted to the database. Some of the changes can be undone, but not all of them. A deleted row, for example, is no longer visible on the control, and users can't restore it. Listing 18.5 shows the code behind the Refresh Data button.
Example 18.5. Refreshing the DataSet
Private Sub bttnRefreshData_Click(...) Handles bttnRefreshData.Click
    If NorthwindDataSet.HasChanges Then
        Dim reply As MsgBoxResult =
             MsgBox("The DataSet contains changes." &
             vbCrLf & "Reload data anyway?",
             MsgBoxStyle.YesNo Or MsgBoxStyle.Exclamation)
        If reply = MsgBoxResult.No Then Exit Sub
    End If
    Me.ProductsTableAdapter.Fill(
                Me.NorthwindDataSet.Products)

End Sub
We developed a fairly functional application for browsing and editing one of the basic tables of the Northwind database, the Products table. The interface of the application is a bit rough around the edges (that's the least you can say about an interface that displays category and supplier IDs instead of category and supplier names), but we'll come back and adjust the interface of the application in a moment. First, I'd like to discuss another way of using the DataGridView control, namely, how to bind related tables to two or more DataGridView controls. This arrangement is the most common one, because we rarely work with a single table.
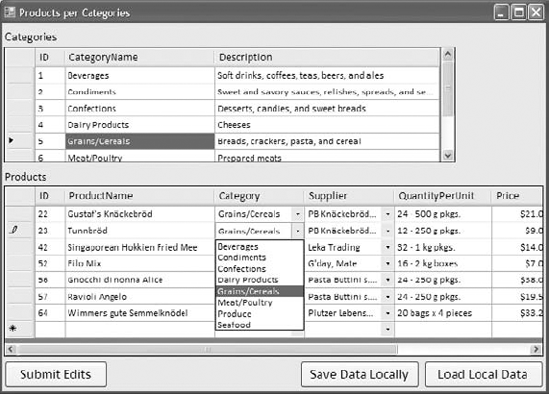
In this section, you'll build an interface to display categories and products on two DataGridView controls, as shown in Figure 18.15. The top DataGridView control is bound to the Categories DataTable and displays all the category rows. The lower DataGridView control displays the products of the category selected in the top control. In effect, you'll create two DataGridView controls linked together.
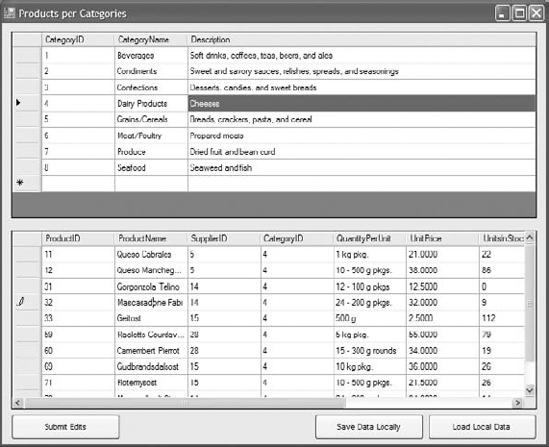
Figure 18.15. Viewing related data on two DataGridView controls with the LinkedDataTables application
Follow these steps:
Start a new Windows Forms Application project (it's the LinkedDataTables project available for download from
www.sybex.com/go/masteringvb2010), and create a new DataSet that contains the Products, Categories, and Suppliers tables. Uncheck thePicturecolumn from the Categories table. Name it DS.In the Data Sources window, select each table, and set its binding option to
DataGridView.Drop the Categories table on the form. The editor will place an instance of the DataGridView control on the form and will bind it to the Categories table. It will also create a BindingNavigator object, which we don't really need, so you can delete it. When you drop multiple tables on a form, the editor generates a single toolbar. The navigational buttons apply to the first DataGridView control, but the Save button submits the changes made in all DataTables.
Locate the Products table under the Categories table in the Data Sources window, and drop it onto the form. If you drop the Products table of the original DataSet onto the form, you'll end up with two grids that are independent of one another. For a more meaningful interface, you must link the two grids so that when the user selects a category in the upper grid, the corresponding products are shown automatically in the lower grid. The Products table under the Categories table in the data source represents the rows of the Products table that are related to each row of the Categories table. Just drag the Products table under the Categories table, and drop it onto the form to add the grid and show the Product data in a linked fashion.
Now you can run the application and see how it behaves. Every time you select a category, the selected category's products appear in the lower grid. If you change the CategoryID field of a product, that particular product disappears from the grid, as expected, since it belongs to another category after the CategoryID changes. You must select the category with the CategoryID you assigned to a product to see the product in the Products grid. Obviously, this is not the best way to edit the category of a product. You will see how to handle lookup tables in the "Displaying Lookup Columns in a DataGridView Control" section later in the chapter.
Experiment with the new interface. Start editing the two tables on the form. Add new categories, and then add products that belong to these categories. If you attempt to delete a category, the DataGridView will happily remove the row from its table. But didn't the DataSet pick the relationships from the database's definition? Now that both tables are at the client as DataTables with a relationship between them, shouldn't the DataSet reject this operation?
Let's take a look at the properties of the relationship between the two tables. Right-click the DS DataSet in the Data Sources window, and from the context menu, select Edit DataSet In Designer to see the DataSet Designer window. Right-click the line that connects the Products and Categories tables (this line represents the relationship between the two tables), and select Edit Relation to open the Relation dialog box, shown in Figure 18.16.
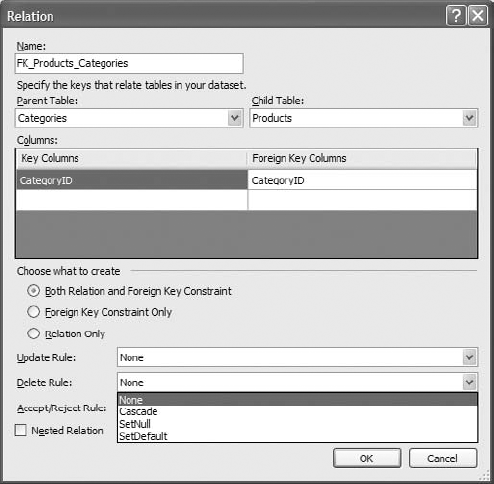
The FK_Products_Categories relation is marked as Relation Only. In the database, this is a relation and a foreign key constraint. The relation simply relates the two tables if their CategoryID fields match. Most importantly, the constraint won't let you insert a product that points to a nonexisting category or delete a category that has related rows in the Products table. Select the radio button Both Relation And Foreign Key Constraint, and then close the dialog box.
Try to run the application. If you receive the following error:
"ConstraintException was unhandled: Failed to enable constraints. One or more rows
contain values violating non-null, unique, or foreign-key constraints."
right after running the application, make sure that the data is loaded in the right order in the form Load event. The Categories DataTable should be filled first, and the Products DataTable should be filled second:
Private Sub Form1_Load(...) Handles MyBase.Load
    Me.CategoriesTableAdapter.Fill(Me.DS.Categories)
    Me.ProductsTableAdapter.Fill(Me.DS.Products)
End Sub
Foreign key constraints are subject to three rules: the Update, Delete, and Accept/Reject rules, as shown in Figure 18.16. These rules determine what should happen when a parent row is removed from its table (the Delete rule), when a parent ID is modified (the Update rule), and when users accept or reject changes in the DataSet (the last rule). A rule can be set to None (no action is taken, which means that a runtime exception will be thrown), Cascade (the child rows are updated or deleted), SetNull (the foreign keys of the related rows are set to Null), and SetDefault (the foreign keys of the related rows are set to their default value).
I usually don't change the rules of a relationship in the DataSet, unless I've used rules in the database. Leave them set to None, and run the application again. You should avoid setting the Delete and Update rules to Cascade, because this can lead to irrecoverable errors. If you delete a category, for example, it will take with it the related products, and each deleted product will take with it the related rows in the Order Details table. A simple error can ruin the database. There are other situations, which aren't as common, where the Cascade rule can be used safely. When you delete a book in the Pubs database, for example, you want the book's entries in the TitleAuthors table to be removed as well. No rows in the Authors table will be removed, because they're primary, and not foreign, keys in the relation between the TitleAuthors and Authors tables.
Let's return to the interface for editing products and categories. Attempt again to remove a category. This time you'll get a lengthy error message that ends with the following suggestion:
To replace this default dialog please handle the DataError event.
Let's do exactly that to avoid displaying a totally meaningless message to our users. Open the DataError event handler for both controls, and insert the following statement:
MsgBox(e.Exception.Message)
Run the application again, and delete a category. This time you'll see the following error message, and the program won't remove the category from the DataGridView, because it can't remove it from its DataSet:
Cannot delete this row because constraints are enforced
  on relation FL_Products_Categories, and deleting this
  row will strand child rows.
You can still delete products and set their prices to negative values. These two operations are invalid in the context of the database but quite valid in the client DataSet.
As you recall, binding a DataGridView control to a DataTable is possible by setting the control's DataSource property. Binding to two related tables is a bit more involved, so let's see how it's done (short of dropping the two tables on the form and letting the editor handle the details).
To link the two DataGridView controls, you must create a BindingSource object for each one. The BindingSource class encapsulates a data source and is itself a data source. Initialize an instance of this class by setting its DataSource and DataMember properties for the Categories table:
Dim categoriesBS As New BindingSource
categoriesBS.DataSource = DS
categoriesBS.DataMember = "Categories"
Then set the upper grid's DataSource property to the categoriesBS object. As for the lower grid, you must create a new BindingSource object and set its DataSource property not to the actual DataSet but to the BindingSource object of the upper grid:
Dim productsBS As New BindingSource
productsBS.DataSource = categoriesBS
Now here's the tricky part: The DataMember property must be set to the name of the relationship between the two tables in the DataSet so that it's linked to the products of the category selected in the upper control:
productsBS.DataMember = "FK_Categories_Products"
After the two BindingSource objects have been set up, assign them to the DataSource property of their corresponding controls:
DataGridView1.DataSource = categoriesBS
DataGridView2.DataSource = productsBS
These actions were performed for you automatically, as you dropped the two tables on the form. If you want to bind two related tables of an untyped DataSet, you must set these properties from within your code.
The DataGridView control is bound to a single table as soon as you drop the table on the form, but its default appearance leaves a lot to be desired. To begin with, we must set the widths of the columns and hide certain columns. The product IDs, for example, don't need to be displayed. The numeric fields should be formatted properly and aligned to the right, and the foreign key fields should be replaced by the corresponding descriptions in the primary table. We also should display category and supplier names, instead of IDs.
The DataGridView control exposes a large number of properties, and you can experiment with them in the Properties window. They have obvious names, and you can see the effects of each property on the control as you edit it. Beyond the properties that apply to the entire control, you can also customize the individual columns through the Edit Columns dialog box.
To tweak the appearance of the columns of the DataGridView control, select the control with the mouse, and open the Tasks menu by clicking the little arrow in the upper-right corner of the control. This menu contains four check boxes that allow you to specify whether the user is allowed to add/edit/delete rows and reorder columns. To adjust the appearance of the grid's columns, click the Edit Columns hyperlink in the menu, and you will see the Edit Columns dialog box, shown in Figure 18.17, where you can set the properties for each column.
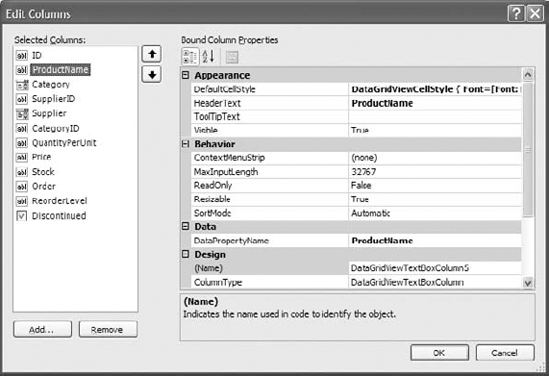
Figure 18.17. Use the Edit Columns dialog box to customize the appearance of the DataGridView control.
In the Edit Columns dialog box, you can set each column's header and width, as well as the minimum width of the column. (Users won't be allowed to make the column narrower than its minimum width.) You can also set the AutoSize property to True to let the control decide about column widths, but this may result in a very wide control. You can lock certain columns during editing by setting their ReadOnly property, or you can make other columns invisible with the Visible property.
To make the appearance of two grids more uniform on the Products per Category form in your LinkedDataTables projects, make both grids of the same width. This will leave the Categories grid with some empty, grayed-out space, since it has a smaller number of columns than the Products grid. This space can be easily covered by Category's Description property. Open the Edit Columns dialog box, and set the AutoSizeMode of the Description column to Fill.
The most interesting setting in this dialog box is the ColumnType property, which is the type of the column. By default, all columns are of the DataGridViewTextBoxColumn type, unless the corresponding field is a Boolean or Image type. A DataGridView column can be one of the following types:
- DataGridViewButtonColumn
This displays a button whose caption is the bound field. Use buttons to indicate that users can click them to trigger an action. To program the
Clickevent of a button column, insert the appropriate code in the control'sCellContentClickevent handler. Your code must detect whether a column with buttons was clicked and, if so, act accordingly. Change the column that displays the product names into a button column, and then insert the following statements in theCellContentClickevent handler of the DataGridView control:Private Sub ProductsDataGridView_CellContentClick( ByVal sender As System.Object, ByVal e As System.Windows.Forms.DataGridViewCellEventArgs) Handles ProductsDataGridView.CellContentClick If e.ColumnIndex = 1 Then MsgBox(ProductsDataGridView.Rows(e.RowIndex). Cells(e.ColumnIndex).Value.ToString) End If End SubThe code shown here reads the caption of the button that was clicked. You can just as easily read the product's ID and use it to retrieve product details and display them on another form.
- DataGridViewCheckBoxColumn
This column type is used with True/False columns (the bit data type in SQL Server). The
Discontinuedcolumn of the Products table, for example, is mapped automatically to a DataGridView column of this type.- DataGridViewComboBoxColumn
This column type is used for foreign keys or lookup fields. You will shortly see how to change the
CategoryIDandSupplierIDcolumns into ComboBox columns so that users can see category and supplier names instead of IDs. When editing the table, users can expand the list and select another item, instead of having to enter the ID of the corresponding item. Figure 18.18 shows the DataGridView control for displaying products with aComboBoxcolumn for categories and suppliers.- DataGridViewLinkColumn
This is similar to the DataGridViewButtonColumn type, only it displays a hyperlink instead of a button. Use the same technique outlined earlier for the Button columns to detect the click of a hyperlink.
- DataGridViewImageColumn
Use this column type to display images. In general, you shouldn't store images in your databases. Use separate files for your images, and include only their paths in the database. Keep in mind that all rows of a DataGridView control have the same height, and if one of them contains an image, the remaining cells will contain a lot of white space.
- DataGridViewTextBoxColumn
This is the most common column type, and it displays the field in a text box.
Notice that as you change the style of a column, the Bound Column Properties pane of the Edit Columns dialog box is populated with the properties that apply to the specific column type. For a combo box column, for example, you can set the DropDownWidth and MaxDropDownItems properties. You can even populate the combo box with a set of values through the Items property, just as you would with a regular combo box on the form.
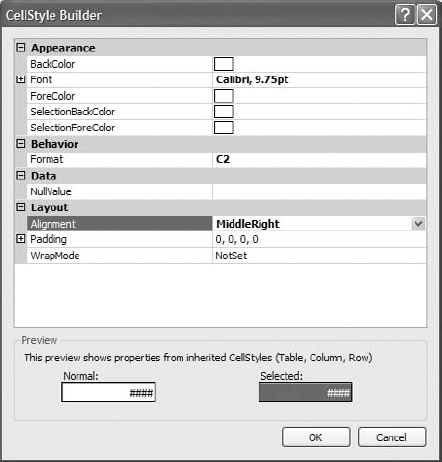
There aren't any properties in the Edit Columns dialog box to adjust the appearance of the selected column. To change the appearance of a column, select the DefaultCellStyle property, and click the button with the ellipses next to it to see the CellStyle Builder dialog box, which is shown in Figure 18.19.
In the CellStyle Builder dialog box, you can set the column's font, set its foreground and background colors, specify whether the text should wrap in its cell, and determine the alignment of the cell's contents. Turning on the wrap mode with the WrapMode property doesn't cause the rows to be resized automatically to the height of the tallest cell. To have rows resized automatically, you must set the control's AutoSizeRowsMode property to All. The other possible settings for this property are None, AllHeaders, AllCellsExceptHeaders, DisplayedHeaders, DisplayedCellsExceptHeaders, and DisplayedCells. Finally, you must set the Format property for all numeric and date fields and size the columns according to the data that will be displayed on the control.
This feast of customization techniques is possible because the DataGridView control is bound to a typed DataSet. If you want to use the techniques of the previous chapter to bind a DataGridView control to an untyped DataSet, you can still use the Edit Columns dialog box to add and customize the control's columns, but the process isn't nearly as convenient. You must also remember to set the control's AutoGenerateColumns property to False and each column's DataPropertyName property to the name of the database column that will be mapped to the corresponding grid column. If the AutoGenerateColumns property is left to its default value, which is True, the control will generate a new column for each data column in its data source.
In this section, you're going to change the way a product's category and supplier are displayed. Instead of IDs, you must display category and supplier names. Moreover, you will display each product's category and supplier in a ComboBox control so that users can quickly select another value when editing the product. Let's return to the LinkedDataTables project and set up the bottom GridView control.
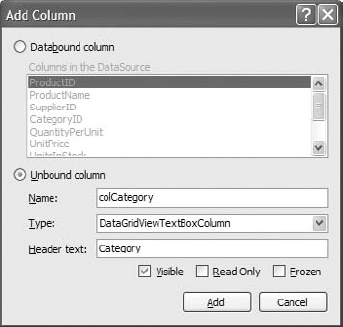
Select the DataGridView control with the products, and from the Task menu choose Edit Columns. In the Edit Columns dialog box, select the CategoryID column, and make it invisible by setting its Visible property to False. Then click the Add button to add a new column. In the Add Column dialog box, which is shown in Figure 18.20, click the Unbound Column radio button, and set the column's Name property to colCategory and its HeaderText property to Category. Click Add to add the column to the DataGridView control and then Close to close the dialog box.
Back in the Edit Columns dialog box, move the new column to the desired position by using the arrow buttons. You must now set up the new column so that it displays the name of the category that corresponds to the CategoryID column of the selected product. Locate the DataSource property, and click the arrow to expand the data sources. Select the CategoriesBindingSource entry. Then set the DisplayName property to CategoryName and the ValueMember to CategoryID. Click OK to close the dialog box. If you run the application now, you'll see that the CategoryID column has been replaced by the Category column, which displays a ComboBox with the list of all categories. However, the product's category isn't automatically selected; you have to drop down the items in the combo box to see the categories, and you still don't know the selected product's category. To link the appropriate category name to the selected product's CategoryID value, you must set yet another property, the DataPropertyName property. If you expand the list of available columns for this property, you'll see the columns of the Products table. Select the CategoryID column so that the combo box will display the category name that corresponds to the category ID of the selected product row. Now you have a much better interface for editing the products. You no longer need to enter IDs; you see the name of the selected product's category, and you can select a product's category from a drop-down list by using the mouse.
Of course, you must do the same with the Suppliers table. Right-click the NorthwindDataSet object in the Data Sources window, and choose Edit DataSet With Designer from the context menu to open the DataSet in design mode.
To be able to display the meaningful column (typically the Name column) of the lookup table entry, you need to make the data in the lookup table available to the application. If the table with the lookup values isn't part of your DataSet, you can easily add a new DataTable to the DataSet. Right-click somewhere on the DataSet Designer's surface, and choose Add
In the case of lookup tables, you would choose the ID column so that the relationship can be maintained and the Name column whose value will be displayed in the grid. In your LinkedDataTables project, you added the Suppliers table when you created the DS DataSet.
Let's make the lookup table data available for an update operation on the Products grid. The following steps are similar to the steps performed when making categories displayed using the ComboBox inside the DataGridView in the previous section.
Hide the SupplierID column of the Suppliers table, and replace it on a grid with a ComboBox column that contains the names of the suppliers. Select the Edit Column command from the Products grid's Tasks menu, and set the properties for a newly added Suppliers column as listed in Table 18.2.
Notice that the ValueMember property is the SupplierID column of the Suppliers table, but the PropertyName property's value is the SupplierID column of the Products DataTable, because the control is bound to the Products table. The Designer will replace the name of the Suppliers DataTable with the SupplierBindingSource object. Run the application now, edit a few products, and then save the edits. You can also edit the categories (names and descriptions only). As a reminder, even the DataSet that was generated by the wizard doesn't enforce check constraints, and you can set the price of a product to a negative value. When you attempt to submit the changes to the database, a runtime exception will be thrown.
The code behind the Submit Edits button isn't new to you. The code sets the ContinueUpdateOnError property of the underlying DataAdapter objects to True and then calls the UpdateAll method of the TableAdapterManager to submit the changes made to all tables.
The rows that will fail to update the underlying tables in the database will be marked as errors. The DataGridView control marks the rows in error with an icon of an exclamation mark in the column's header, as shown earlier in Figure 18.14. If you hover over this icon, you'll see a description of the error in a ToolTip box.
Updating hierarchical DataSets isn't as simple as calling the Update or UpdateAll method. In the LinkedDataTables sample project, I've called the UpdateAll method of the TableAdapterManager class, which submits first the changes in the parent table (the Categories table) and then the changes in the related table(s). Unless you commit the new rows to the Categories table first, the database will refuse to insert any products that use the IDs of the categories that do not exist in the Categories table. But even if you update the Categories table first and then the Products table, it's not guaranteed that all updates will take place. The order of updates in a hierarchical DataSet is very important, and here's why: Let's say you've deleted all products of a specific category and then the category itself. As soon as you attempt to remove the specific row from the Categories table in the database, the database will return an error indicating that you can't delete a category that has related rows, because the relevant products haven't been removed from the Products table in the database yet.
The proper update order is to submit the deleted rows of the Products table, then perform all updates in the Categories table, and finally submit the insertions and modifications in the Products table. You'll see shortly how to retrieve deleted/modified/new rows from a DataTable at the client (we'll use each row's DataRowVersion property) and then how to pass these rows to the Update method.
In the meantime, you can experiment with the LinkedDataTables project and perform a few updates at a time. Let's say you want to delete all products in a specific category and then the category itself. To submit the changes without violating the primary/foreign key relationship between the two tables, you must first delete the products and then update the database by clicking the Submit Edits button. After the Products table is updated, you can delete the category from the Categories table and then submit the changes to the database again.
In this section, you've built a functional interface for editing the categories and products of the Northwind database. You started by creating a DataSet with the three tables, then dropped them on the form to instantiate two DataGridView controls, and then tweaked the appearance of the two controls with point-and-click operations. We even managed to display combo boxes right in the DataGridView control without a single line of code. The DataGridView control provides the basic editing features, and you were able to put together an interface for your data without any code. You did have to write a bit of code to submit the changes to the database, because the code generated by the wizard couldn't handle anything but the best-case scenario. Real-world applications must take into consideration all possible scenarios and handle them gracefully.
Data binding allows you to write data-driven applications quickly, mostly with point-and-click operations, but the default interfaces generated by the wizards are not perfect. You'll see shortly how to use data binding to produce more-elegant interfaces, but they'll require a bit of code. Another problem with data binding is that in most cases you'll end up filling large DataSets at the client — and this is not the best practice with data-driven applications. If your application is going to be used by many users against a single server, you must retrieve a relatively small number of rows from the database and submit the edits as soon as possible. If you keep too much data at the client and postpone the submission of edited rows to the database, you're increasing the chances of concurrency errors. Other users may already have changed the same rows that your application is attempting to update. Of course, you can disable optimistic concurrency and overwrite the changes made by other users, if the nature of the data allows it.
The most common approach is to design a form with search criteria, on which users will specify as best as they can the rows they need. Then you can populate the client DataSet with the rows that meet the specified criteria. If you're writing a connected application, submit the changes to the database as soon as they occur. If you want the users to control when the updates are submitted to the database, display the number of modified/inserted/deleted rows in the form's status bar. You can even pop up a message when the number of edited rows exceeds a limit.
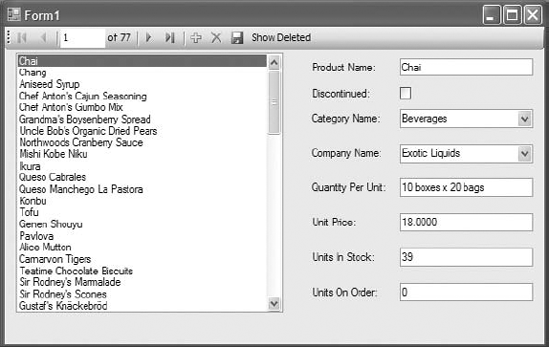
Editing large tables on a grid isn't the most flexible method. In this section, you'll build an alternate interface for editing the Products table, as shown in Figure 18.21. This is the form of the Products sample project, which uses a data-bound ListBox control to display product names and text boxes for the individual fields. The toolbar at the top allows you to add new rows, delete existing ones, and submit the changes to the database. All the controls on the form are data bound, and the application contains very little code.
Here's how to get started:
Start a new Windows Forms Application project, the Products project, and create a new DataSet,
NorthwindDataSet, with the three usual tables: Products, Categories, and Suppliers.Change the binding option for the Products DataTable to ListBox. First, select the Products DataTable in the DataSources window. After selecting the
ProductsDataTable, a ComboBox-style arrow will become visible for theProductsDataTable that you can expand. Click the arrow. Next, select the Customize option in the Data Sources view on theProductsDataTable to open the Options window. Expand the Windows Forms Designer node in the Options list. Select the Data UI Customization node. Select List For Data Type. In the Associated Controls list, select the ListBox.Drop the
ProductsDataTable onto the form. In the Properties window, you must make sure that the ListBox control is properly bound: ItsDataSourceproperty has been set to the ProductsBindingSource object that was generated by the editor when you dropped the DataTable on the form, itsDisplayMemberproperty has been set toProductName(because it's the first text column in the table), and itsValueMemberproperty has been set toProductID(because it's the table's key). If you want to display a different field to identify the products, change theDisplayMemberproperty.Now drop all the fields of the
ProductsDataTable onto the form. The editor will create the appropriate text boxes and bind them to their fields.Rearrange the controls on the form, and delete the text boxes that correspond to the
CategoryIDandSupplierIDcolumns. Place two ComboBox controls in their place. By the way, even if you set the binding option for theCategoryIDandSupplierIDcolumns to ComboBox, you'll end up displaying IDs in the corresponding controls, not category and supplier names. You can't use any data-binding techniques to automatically set up two lookup fields.Drop two instances of the ComboBox control on the form, and name them cbCategoryName and cbCompanyName. Select the first one, and set the data-binding properties as follows:
The
DataSourceis where the control will get its data, and it should be CategoriesBindingSource, because we want to populate the control with all the category names.The
DisplayMemberproperty is the column you want to view on the control and must be set to theCategoryNamecolumn of theCategoriesDataTable.The
ValueMemberproperty is the column that will bind the contents of the combo box control to the related table and must be set to theCategoryIDcolumn of theCategoriesDataTable.Finally, you must set the
SelectedValueproperty, in the DataBindings section of the Properties window, to the matching column of the child table, which is theCategoryIDcolumn of the ProductsBindingSource. The control will automatically select the row of the Categories table whose category ID matches theCategoryIDcolumn of theProductsDataTable.
Perform similar steps with the other combo box, which displays the
CompanyNamecolumn of theSuppliersDataTable and is bound to theSupplierIDcolumn of the ProductsTable.
Run the application, and see how it behaves. Every time you select a product in the list, the product's details appear in the data-bound text boxes, and its category and supplier are displayed in the two combo box controls. Use the list to navigate through the products, the Add button to add a new product, and the Delete button to delete a product. You can edit the product's fields on the form, and the edits will be written to the DataSet as soon as you move to another row.
You have created a functional application for selecting products and viewing their details. If all you need is a browsing application for the products, you can set the ReadOnly property of all TextBox controls on the form to True.
If you attempt to enter a new product and leave its Discontinued column set to Null, a runtime exception will be raised. This problem is easy to fix by specifying a default value for the Discontinued column. To do so, open the DataSet in the Designer, locate the Discontinued column in the Products table, and select Properties from the context menu. The DefaultValue property's value is DBNull. Set it to False so that unspecified fields will be automatically set to False.
You'll also get an error message if you attempt to submit the edits and the DataSet contains a product with a negative price. Such trivial errors can be caught and handled from within your code — no need to send the rows to the database and get an error message. Write a few statements to detect trivial errors, such as negative prices (or negative stocks, for that matter). First, decide how to handle these errors. Do you want to pop up a message box every time you detect an error condition? This will drive users crazy. Do you want to reject changes until the user enters a valid value? It's a better approach, but remember that data-entry operators don't look at the monitor. They expect that the Tab (or Enter) key will take them to the next field. The best approach is to do what the DataGridView control does: display an error icon next to the control in error.
Add an instance of the ErrorProvider control on the form. This control displays the exclamation mark icon next to a control. To display the error icon, you must call the control's SetError method, passing as arguments the control in error and the message for the error. (The message will be displayed in a ToolTip box when users hover over the icon.)
To detect errors from within your code, you need to insert some code in the CurrentItemChanged event handler of the ProductsBindingSource. Insert the statements shown in Listing 18.6 in this event handler.
Example 18.6. Catching data-entry errors in your code
Private Sub ProductsBindingSource_CurrentItemChanged(
            ByVal sender As System.Object,
            ByVal e As System.EventArgs) Handles
            ProductsBindingSource.CurrentItemChanged
    If Not IsNothing(queryResult) AndAlso queryResult.Count < 1 Then Exit Sub
    ErrorProvider1.Clear()
    Dim product As NorthwindDataSet.ProductsRow
    product = CType(CType(
              ProductsBindingSource.Current,
              DataRowView).Row, NorthwindDataSet.ProductsRow)
If Not product.IsUnitPriceNull AndAlso
Convert.ToDecimal(product.UnitPrice) < 0 Then
ErrorProvider1.SetError(UnitPriceTextBox,
"PRICE CAN'T BE NEGATIVE!")
End If
If ProductNameTextBox.Text.Trim.Length = 0 Then
If CType(ProductsBindingSource.Current,
DataRowView).Row.RowState <>
DataRowState.Detached Then
ErrorProvider1.SetError(
ProductNameTextBox,
"PRODUCT NAME CAN'T BE BLANK!")
End If
End If
End SubThis code segment requires some explanation. The CurrentItemChanged event is fired every time the user selects another row or column on the control. The code in this event handler retrieves the current row with the Current property of the ProductBindingSource object. This property returns an object, which is a DataRowView object. This is why I cast it to the DataRowView type, then retrieve its Row property, and finally cast it to the ProductsRow type. The product variable represents the currently selected row in the DataSet. This is a typed variable, and I can access the columns of the current row as properties. If the UnitPrice column has a negative value, the code sets an ErrorProvider control to display the error next to the corresponding text box.
One unique aspect of this interface is that it provides a button to display the deleted rows. These rows exist in the DataSet, but they're not shown on the interface. The inserted and modified rows are on the ListBox control, and users can review them. You may even provide a button to display the old and new versions of the edited rows. But users have no way of reviewing the deleted rows. You can resolve this by showing the deleted rows in the auxiliary form:
Add a new button to the
ProductsBindingNavigatorToolStrip, and set its name tobttnShowDeleted.Set the text of the button to
Show Deleted.Add a new form (
Form2) to the project.Add a CheckListBox control to
Form2.Add a button called
button1toForm2, set the button'sTextproperty toRestore Selected Rows, and closeForm2in the button's default event handler.
The Show Deleted Rows button in the ToolStrip opens an auxiliary form (Form2), like the one shown in Figure 18.22, which displays the deleted rows in a CheckedListBox control. Users are allowed to select some of the deleted rows and restore them.
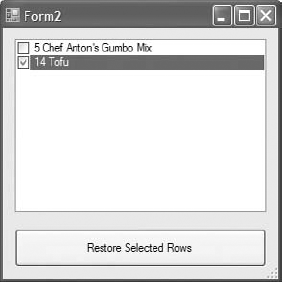
Listing 18.7 shows the code that retrieves the deleted rows and displays them on the auxiliary form.
Example 18.7. Retrieving and displaying the deleted rows
Private Sub bttnShowDeleted_Click(...) Handles bttnShowDeleted.Click
    Form2.CheckedListBox1.Items.Clear()
    For Each row As DataRow In NorthwindDataSet.Products.Rows
        If row.RowState = DataRowState.Deleted Then
            Form2.CheckedListBox1.Items.Add(
            row.Item("ProductID",
            DataRowVersion.Original) & " " &
            row.Item("ProductName",
            DataRowVersion.Original))
        End If
    Next
    Form2.ShowDialog()
    Dim SelectedIDs As New ArrayList
    For Each itm As String In Form2.CheckedListBox1.CheckedItems
        SelectedIDs.Add(Convert.ToInt32(
           itm.Substring(0, itm.IndexOf(" ") + 1)))
    Next
    Dim cust As NorthwindDataSet.ProductsRow
    For Each cust In NorthwindDataSet.Products
        If cust.RowState = DataRowState.Deleted
            AndAlso SelectedIDs.Contains(cust.Item(
            "ProductID", DataRowVersion.Original)) Then
            cust.RejectChanges()
        End If
    Next
End Sub
The code goes through the Rows collection of the Products DataTable and examines the RowState property of each row. If its value is RowState.Deleted, it adds the row's ProductID and ProductName fields to the CheckedListBox control of the auxiliary form. Then it displays the form modally, and when the user closes it, the code retrieves the IDs of the selected rows into the SelectedIDs ArrayList. The last step is to restore the selected rows. The code goes through all rows again, examines their RowState properties, and if a row is deleted and its ID is in the SelectedIDs ArrayList, it calls the RejectChanges method to restore the row. The restored rows are automatically displayed in the ListBox control because this control is bound to the DataSet.
A practical feature you can add to the interface of a disconnected application is the ability to review the modifications. You can display the original and proposed versions of the inserted/modified rows, as well as the original versions of the deleted rows on an auxiliary form, as we have done in the preceding example.
If you don't mind writing a bit of code, you can display the original values of the edited rows in the same controls on your form. Because the controls are data bound, you can't display any different values on them; if you do, they'll be stored in the DataSet as well. But you can place nonbound controls, such as Label controls, in the place of the data-bound control. The Labels normally will be invisible, but when the user presses a function key, they can become visible, hiding the regular editable controls. When the user requests the original versions of the fields, you must populate the Labels from within your code and display them by toggling their Visible properties. You must also hide the regular controls on the form.
Another approach would be to suspend data binding momentarily by calling the SuspendBinding method of the BindingSource class. After data binding has been suspended, you can populate the text boxes on the form at will, because the values you display on them won't propagate to the DataSet. To display the bound values again, call the ResumeBinding method.
Another interesting feature you can add to a data-driven application is to display the state of the current row in the form's status bar. You can also give users a chance to undo the changes by clicking a button on the status bar. All you have to do in this button's Click event handler is to call the RejectChanges method on the current row. Use the Current property of the ProductsBindingSource to retrieve the current row and cast it to the ProductsRow type, and then call the RejectChanges method.
You can select one of the data-editing applications presented in this chapter, perhaps the Products application, and add as many professional features as you can to it. Start by adding a status bar to the form, and display on it the state of the current row. For modified rows, display a button on the toolbar that allows users to view and/or undo the changes to the current row. Program the form's KeyUp event handler, as explained in Chapter 4, "GUI Design and Event-Driven Programming," so that the Enter key behaves like the Tab key. Users should be able to move to the next field by pressing Enter. Finally, you can display an error message for the current row on a label in the form's status bar. Or display a message such as Row has errors as a hyperlink and show the actual error message when users click the hyperlink. Test the application thoroughly, and insert error handlers for all types of errors that can be caught at the client. Finally, make the edited rows a different color in the two DataGridView controls on the form of the LinkedDataTables sample project. To do so, you must insert some code in the control's RowValidated event, which is fired after the validation of the row's data. You'll need to access the same row in the DataSet and examine its RowState property by retrieving the Current property of the ProductsBindingSource object, as shown in Listing 18.8.
Example 18.8. Coloring the edited and inserted rows on the DataGridView control
Private Sub ProductsDataGridView_RowValidated(...)
            Handles ProductsDataGridView.RowValidated
    Dim row As DS.ProductsRow
        row = CType(CType(ProductsBindingSource.Current,
              DataRowView).Row, DS.ProductsRow)
    If row.RowState = DataRowState.Modified Then
        ProductsDataGridView.Rows(e.RowIndex).
             DefaultCellStyle.ForeColor = Color.Green
    Else
        ProductsDataGridView.Rows(e.RowIndex).
             DefaultCellStyle.ForeColor = Color.Black
    End If
    If row.RowState = DataRowState.Added Then
        ProductsDataGridView.Rows(e.RowIndex).
             DefaultCellStyle.ForeColor = Color.Blue
    Else
        ProductsDataGridView.Rows(e.RowIndex).
             DefaultCellStyle.ForeColor = Color.Black
    End If
End Sub
The code in the listing sets the foreground color of modified rows to green and the foreground color of inserted rows to blue. From within the same event's code, you can set the text of a Label on the form's status bar to the row's error description. If you run the application now, you'll see that it paints modified and inserted cells differently, but only while you're working with products of the same category. If you select another category and then return to the one whose products you were editing, they're no longer colored differently, because the RowValidated event is no longer fired. To draw rows differently, you must duplicate the same code in the control's RowPostPaint event as well.
If you carefully test the revised application, you'll realize that the DataGridView control doesn't keep track of modified rows very intelligently. If you append a character to the existing product name and then delete it (without switching to another cell between the two operations), the DataGridView control considers the row modified, even though the original and proposed versions are identical. As a result, the application will render the row in green. Moreover, the UpdateAll method will submit the row to the database.
For a truly disconnected application, you should give users a chance to store the data locally at the client. The LinkedDataTables application's main form contains two more buttons: the Save Data Locally and Load Local Data buttons. The first one saves the DataSet to a local file via the WriteXml method of the DataSet, and the second button loads the DataSet via the ReadXml method. The application uses the tmpData.#@# filename in the application's folder to store the data. It also uses an overloaded form of the two methods to accept an additional argument that stores not only the data but the changes as well. Here's the code behind the two buttons:
Private Sub Button1_Click(...) Handles Button1.Click
    DS.WriteXml("tmpData.#@#", XmlWriteMode.DiffGram)
End Sub

Private Sub Button2_Click(...) Handles Button2.Click
    ProductsBindingSource.SuspendBinding()
    DS.ReadXml("tmpData.#@#", XmlReadMode.DiffGram)
    ProductsBindingSource.ResumeBinding()
End Sub
Let's explore now how data binding can be used in combination with Language Integrated Query (LINQ) query syntax.
You are surely convinced by now that LINQ is a fundamental part of .NET query infrastructure. You have explored LINQ in detail in Chapter 14, "An Introduction to LINQ," where I also mentioned the LINQ to DataSet technology.
The great thing about LINQ is that once you learn how to write queries, you can apply the same syntax to any data source that supports LINQ. DataSets and typed DataSets also support LINQ, and you can apply the same syntax you saw used to query objects in LINQ to Objects and in LINQ to SQL to typed DataSets.
So far in this chapter you saw how data binding can make life a lot easier for a programmer developing data-centric applications. And you have already witnessed the power of LINQ. The two can be used in combination as a powerful tool for data manipulation.
The central class for binding support is the DataView class. It represents a bindable and customizable view of data and provides a number of data manipulation methods. Using DataView, data can be filtered, searched, sorted, edited, used for navigation, and so on.
LINQ to DataSet queries are capable of returning the DataView instance by means of the AsDataView extension method. Thanks to this extension method, you can set the query as a DataSource of a BindingDataSource class like this:
mybindingSource.DataSource = (From product In NorthwindDataSet.Products
                               Select product).AsDataView()
Now you see how you will be able to add some sophisticated querying capabilities to your data bound applications. Let's illustrate this by adding some querying features to our Products application, as shown earlier in the chapter in Figure 18.21.
In cases where data operators have to manage a large number of entries, listing all of these on the form with navigation capability can prove not to be very practical. Users will be forced to spend a lot of time while navigating between records. In such cases, providing some filtering capability can prove to be very beneficial.
Let's add some filtering features to our form in the Products project. I will use following criteria for the filtering functionality:
Category selected by user
Units in stock less than the number entered by the user
Units on order greater than the number entered by the user
This way, users will be able to filter products by category and by some important operational data. They will be able to see when the numbers of units in stock is low or what product units for an order are piling up. Figure 18.23 shows the new version of the Products interface.
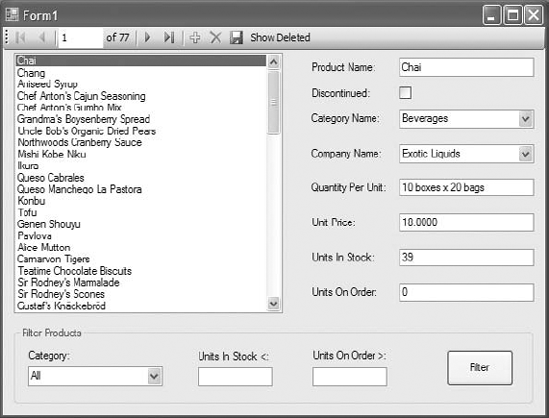
You can use these criteria in any kind of combination. To know whether criteria should be applied or not, it is best to count on some special value. If the Units In Stock Less and Units On Order Greater text boxes are empty, then they should not be used in a query. For the category, the special value of the combo box is the text All. To add this value to Combobox, it has to be populated by your application and not through the data binding. The following code populates the Categories Combobox and is placed inside the Form_Load event handler:
cboCategoryFilter.DisplayMember = "CategoryName"
cboCategoryFilter.ValueMember = "CategoryID"
cboCategoryFilter.Items.Insert(0, "All")
For Each category In NorthwindDataSet.Categories
        cboCategoryFilter.Items.Insert(category.CategoryID, category)
   Next
Now you are ready to write the LINQ query that uses these criteria. Because these criteria can be used in any combination, writing the query might prove to be a bit trickier than you initially thought.
The solution is to use the special value of criteria inside the query itself. For example, the expression cboCategoryFilter.Text = "All" is true if the user does not want to apply the categories criteria. As you can see, I have named the categories ComboBox cboCategoryFilter. If you combine this statement with product.CategoryID = categoryId using the OrElse operator, then you can use the cboCategoryFilter.Text = "All" expression to turn off the categories criteria when the user selects All in the Categories combo. The complete statement to be put in the Where part of the LINQ query for Categories combo is as follows: cboCategoryFilter.Text = "All" OrElse product.CategoryID = categoryId.
The same pattern can be applied to rest of conditions. For other criteria, the special value is an empty string. You can take a look at the complete code for the Filter button in Listing 18.9.
Example 18.9. Coloring the edited and inserted rows on the DataGridView control
Private Sub bttnFilter_Click(...) Handles bttnFilter.Click
    Dim categoryId As Integer
    If Not cboCategoryFilter.Text = "All" Then
        categoryId = CType(cboCategoryFilter.SelectedItem,
                NorthwindDataSet.CategoriesRow).CategoryID
    End If

    queryResult = From product In NorthwindDataSet.Products
                  Where ((cboCategoryFilter.Text = "All" OrElse
                        product.CategoryID = categoryId) And

(String.IsNullOrEmpty(txtUnitsOnOrderFilter.Text) OrElse
                        product.UnitsOnOrder >
CInt(txtUnitsOnOrderFilter.Text)) And

(String.IsNullOrEmpty(txtUnitsInStockFilter.Text) OrElse
                        product.UnitsInStock <
CInt(txtUnitsInStockFilter.Text)))
                        Select product

    ProductsBindingSource.DataSource = queryResult.AsDataView()

End Sub- Design and use typed DataSets.
Typed DataSets are created with visual tools at design time and allow you to write type-safe code. A typed DataSet is a class created by the wizard on the fly, and it becomes part of the project. The advantage of typed DataSets is that they expose functionality specific to the selected tables and can be easily bound to Windows forms. The code that implements a typed DataSet adds methods and properties to a generic DataSet, so all the functionality of the DataSet object is included in the autogenerated class.
- Master It
Describe the basic components generated by the wizard when you create a typed DataSet with the visual tools of Visual Studio.
- Bind Windows forms to typed DataSets.
The simplest method of designing a data-bound form is to drop a DataTable, or individual columns, on the form. DataTables are bound to DataGridView controls, which display the entire DataTable. Individual columns are bound to simple controls such as TextBox, CheckBox, and DateTimePicker controls, depending on the column's type. In addition to the data-bound controls, the editor generates a toolbar control with some basic navigational tools and the Add/Delete/Save buttons.
- Master It
Outline the process of binding DataTables to a DataGridView control.
- Compare a LINQ query used to filter data with an eSQL dynamic query.
You can use the
AsDataViewextension method of the DataTable class to enable binding of the LINQ query results when querying the DataSet in LINQ to DataSet technology. In this chapter, you have seen how a LINQ query can be used to provide filtering capabilities on a data-entry form.Entity SQL (eSQL) is a query language with syntax similar to Transact-SQL. Entity SQL queries can be embedded inside the Visual Basic code and can be used to query the Entity Data Model provided by the Entity Framework. You saw how to use Entity SQL to construct dynamic queries in Chapter 17.
- Master It
Compare LINQ queries to queries written in Entity SQL. Explain the main benefits and drawbacks of each technology.