
Activating the iPhone
Turning the device on and off
Locking your iPhone
Mastering multitouch
Cutting, copying, and pasting
Using voice
Spotlighting search
By now you know that the iPhone is very different from other cell phones. If you got caught up in the initial iPhone frenzy of 2007, you may have plotted for months about how to land one. After all, the iPhone quickly emerged as the ultimate fashion phone. And the chic device hosted a bevy of cool features. (Keep reading this book for proof.)

To snag the very first version, you may have saved your pennies or said, "The budget be damned." Owning the hippest and most-hyped handset on the planet came at a premium cost compared with rival devices.
Something else was different about the iPhone purchasing experience in 2007: the way it was activated. No salesperson was going to guide you through the process, whether you picked up your newly prized possession in an Apple retail store, an AT&T retail store, or on the Web. Instead, you had to handle activation solo, in the comfort of your home.
Unless you were among those people who experienced activation hiccups in the days soon after the phone was released in June 2007, the process of getting up to speed with the iPhone was (for the most part) dirt simple and fun — as it is with most products with an Apple pedigree.
Well, forget all that has gone before. You no longer have to break the bank. Apple has lowered the price — a lot. As of this writing, the cheapest iPhone for new customers starts at $99 — $500 below its stratospheric launch price. (Although we are obliged to point out that AT&T's monthly service plans are higher — thus eliminating the cost savings over the course of the required two-year contract.) For existing iPhone 3G customers in the United States, the upgrade price for a new 3GS phone depends on how far you're into your previous contract with AT&T, how prompt you are at paying your bill, and other factors.
Something else has changed — the way you activate the phone. Kindly read on.
You're now supposed to activate the iPhone in the Apple, or AT&T Wireless, Best Buy, or Walmart store where you bought the thing, just as you do with other cell phones. You'll choose your desired monthly bucket of voice minutes and SMS or text messages.
If you're already an AT&T subscriber, the salesperson will give you the option of keeping your current phone number.
Note
It's not surprising why Apple and AT&T want you in their stores: After they get you in the door, they have the opportunity to sell you other stuff. And they can help crack down on those techies who want to unlock or "jailbreak" the iPhone to defect to a rival carrier.
Otherwise, this time around, the same two prerequisites for enjoying the iPhone are in place as with the original release — at least for U.S. customers. First, there's the aforementioned business of becoming an AT&T (formerly Cingular) subscriber, unless you're already in the fold. You'll have to ink that new two-year term. If you're in the middle of a contract with a rival carrier, read the sidebar titled "The Great Escape: Bailing out of your wireless contract."
Second, make sure you download the latest version of iTunes software onto your PC or Mac. Apple doesn't supply the software in the box, so head to www.apple.com/itunes if you need to fetch a copy, or launch your current version of iTunes and then choose Check for Updates. You can find it under the Help menu on a Windows machine and on the iTunes menu on a Mac.
For the uninitiated, iTunes is the nifty Apple jukebox software that iPod owners and many other people use to manage music, videos, and more. iTunes is at the core of the iPhone as well, because an iPod is built into the iPhone. You'll employ iTunes to synchronize a bunch of stuff on your computer and iPhone including: applications, photos, podcasts, videos ringtones, and (of course) music.
We get into all that syncing business in Chapter 3.
Apple has taken the time to partially charge your iPhone, so you'll get some measure of instant gratification. After taking it out of the box, press and hold the Sleep/Wake button on the top-right edge. (Refer to Chapter 1 for the location of all buttons.) The famous Apple logo should show up on your screen, followed a few seconds later by a stunning image of Earth.
Not so subtle, as messages go: Apple has ambitious aspirations about capturing global market share.
To turn the device completely off, press and hold the Sleep/Wake button again until a red arrow appears at the top of the screen. Then drag the arrow to the right with your finger. Tap Cancel if you change your mind.
Carrying a naked cell phone in your pocket is asking for trouble. Unless the phone has some locking mechanism, you may inadvertently dial a phone number. Try explaining to your boss why he or she got a call from you at 4 a.m. Fortunately, Apple makes it a cinch to lock the iPhone so this scenario won't happen to you.
In fact, you don't need to do anything to lock the iPhone; it happens automatically, as long as you don't touch the screen for a minute.
Can't wait? To lock the iPhone immediately, press the Sleep/Wake button. To unlock it, press the Sleep/Wake button again. Or press the Home button on the front of the screen. Either way, the on-screen slider appears but you can't do anything until you drag the slider to the right with your finger and then in some cases also enter a passcode.
By now, you're picking up on the idea that your fingers play an instrumental role in controlling your iPhone. We talk more about the responsibility your digits have later in this chapter.
Until the iPhone came along, virtually every cell phone known to mankind had a physical (typically plastic) dialing keypad, if not also a more complete QWERTY-style keyboard, to bang out e-mails and text messages. The iPhone dispenses with both. Apple is once again living up to an old company advertising slogan to "Think Different."
Indeed, the iPhone removes the usual physical buttons in favor of a multitouch display. It is the heart of many things you do on the iPhone, and the controls change depending on the task at hand.
Unlike other phones with touchscreens, don't bother looking for a stylus. You are meant, instead — at the risk of lifting another ancient ad slogan — to "let your fingers do the walking."
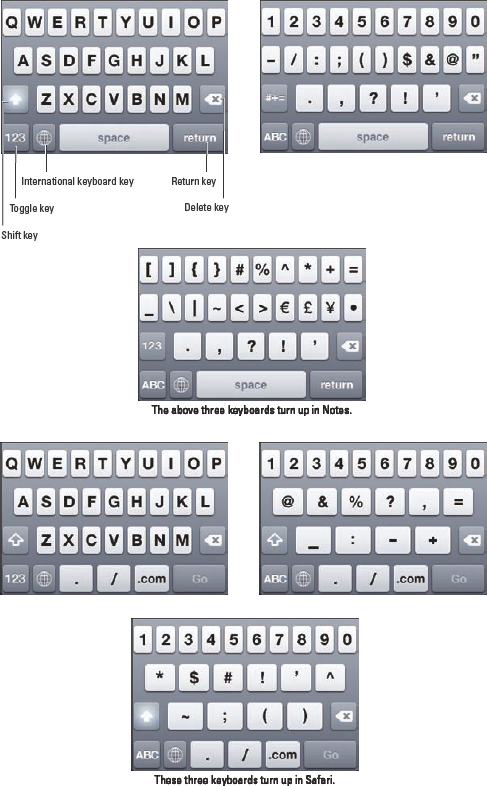
It's important to note that there are several keyboard layouts in English, all variations on the alphabetical keyboard, the numeric and punctuation keyboard, and the more punctuation and symbols keyboard. Six keyboards are shown in Figure 2-1. The layout you see depends on the application you are working in. For instance, the keyboards in Safari differ from the keyboards in Notes.
The iPhone keyboard contains five keys that don't actually type a character: Shift, Toggle, International keyboard, Delete, and Return:
Shift key: If you're using the alphabetical keyboard, the Shift key switches between uppercase and lowercase letters. If you're using keyboards that just show numbers and symbols, the traditional Shift key is replaced by a key labeled #+= or 123. Pressing that key toggles between keyboards that just have symbols and numbers.
Tip
To turn on Caps Lock and type in all caps, you first need to enable Caps Lock. You do that by tapping the Settings icon, then tapping General, and then tapping Keyboard. Tap the Enable Caps Lock item to turn it on. After the Caps Lock setting is enabled (it's disabled by default), you double-tap the Shift key to turn on Caps Lock. (The Shift key turns blue whenever Caps Lock is on.) Tap the Shift key again to turn off Caps Lock. To disable Caps Lock completely, just reverse the process by turning off the Enable Caps Lock setting (tap Settings, General, Keyboard).
Toggle key: Switches between the different keyboard layouts.
International keyboard key: Only shows up if you've turned on an international keyboard, as explained in the sidebar titled "A Keyboard for all borders."
Delete key: Erases the character immediately to the left of the cursor.
Tip
If you hold down the Delete key for a few seconds, it begins erasing entire words rather than individual characters.
Return key: Moves the cursor to the beginning of the next line.
A keyboard for all borders
Apple continues to expand the iPhone's reach globally. English isn't the primary language for many overseas customers, if they speak English at all. Fortunately, Apple doesn't take a parochial approach with iPhone. As part of iPhone 3G, iPhone 3GS, and version 3.0 of iPhone software, the company now supplies international keyboard layouts for more than 30 languages as of this writing. To access a keyboard that isn't customized for Americanized English, tap Settings, General, Keyboard, and International Keyboards — and then flick through the list to select any keyboard you want to use. (Alternatively, tap Settings, General, International, and Keyboards.) Up pops the list shown in the figure included here, with custom keyboards for Russian, Swedish, Thai, Turkish, and numerous other languages. Apple even supplies two versions of Portuguese to accommodate customers in Brazil and Portugal, three versions of French (including keyboards geared to Canadian and Swiss users), and two versions of Chinese. Heck, there's even a U.K. version of English. And let's not forget "right-to-left" languages such as Arabic and Hebrew.
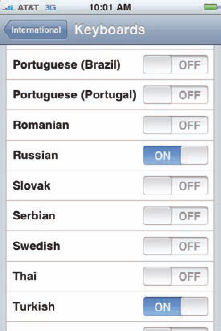
Have a multilingual household? You can select as many of these international keyboards as you might need by tapping the language in the list so that the On button appears in blue. Of course, you can call upon only one language at a time. So when you're inside an application that summons a keyboard, tap the little international keyboard button sandwiched between the toggle and space keys (refer to Figure 2-1) until the keyboard you want to call on for the occasion shows up. Tap again to pick the next keyboard on the corresponding list of international keyboards that you turned on in Settings. If you keep tapping, you come back to your original English keyboard.
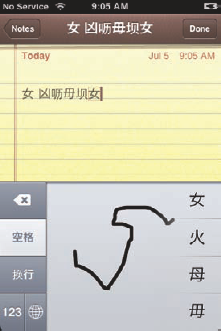
One more note about the Chinese keyboards: You can use handwriting character recognition for simplified and traditional Chinese, as shown here. Just drag your finger in the box provided. We make apologies in advance for not knowing what the displayed characters here mean (neither of us speaks nor reads Chinese).
Before you consider how to actually use the keyboard, we'd like to share a bit of the philosophy behind its so-called intelligence. Knowing what makes this keyboard smart will help you make it even smarter when you use it:
It has a built-in English dictionary that even includes words from today's popular culture.
It adds your contacts to its dictionary automatically.
It uses complex analysis algorithms to predict the word you're trying to type.
It suggests corrections as you type. It then offers you the suggested word just below the misspelled word. When you decline a suggestion and the word you typed is not in the iPhone dictionary, the iPhone adds that word to its dictionary and offers it as a suggestion if you mistype a similar word in the future.
It reduces the number of mistakes you make as you type by intelligently and dynamically resizing the touch zones for certain keys. You can't see it, but it is increasing the zones for keys it predicts might come next and decreasing the zones for keys that are unlikely or impossible to come next.
Rice Krispies has Snap! Crackle! Pop! Apple's response for the iPhone is Tap! Flick! and Pinch! Yikes, another ad comparison.
Fortunately, tapping, flicking, and pinching are not challenging gestures, so you'll be mastering many of the iPhone's features in no time:
Tap: Tapping serves multiple purposes, as will become evident throughout this book. You can tap an icon to open an application from the Home screen. Tap to start playing a song or to choose the photo album you want to look through. Sometimes you will double-tap (tapping twice in rapid succession), which has the effect of zooming in (or out) of Web pages, maps, and e-mails.
Flick: Just what it sounds like. A flick of the finger on the screen itself lets you quickly scroll through lists of songs, e-mails, and picture thumbnails. Tap on the screen to stop scrolling, or merely wait for the scrolling list to stop.
Pinch/spread: Place two fingers on the edges of a Web page or picture to enlarge the images or make them smaller. Pinching and spreading (or what we call unpinching) are cool gestures that are easy to master and sure to wow an audience. If you need practice, visit the Apple iPhone blogs at
www.theiphoneblogs.com/2007/01/12/practice-your-apple-iphone-pinch/
The Home screen we discuss back in Chapter 1 may not be the only screen of icons on your phone. After you start adding apps from the iTunes App Store (which you discover in Chapter 14), you may see two or more tiny dots between the Phone, Mail, Safari, and iPod icons and the row of icons directly above them, plus a tiny Spotlight search magnifying glass to the left of the dots. Those dots denote additional screens, each containing up to 16 additional icons. To navigate between screens, either flick from right to left or left to right across the middle of the screen or tap directly on the dots.
Tip
You must be very precise, or you'll open one of the application icons instead of switching screens.
The number of dots you see represents the current number of screens on your iPhone. The dot that's all white denotes the screen you're currently viewing. Finally, the four icons in the last row — Phone, Mail, Safari, and iPod — are in a special part of the screen known as the dock. When you switch from screen to screen as described above, these icons remain on the screen. In other words, only the first 16 icons on the screen change when you move from one screen to another.
Press the Home button to jump back to the first screenful of icons or the Home screen. Pressing a second time brings you to a handy new Search feature that arrived with iPhone OS 3.0 software. We'll address Search later in this chapter.
Apple's multitouch interface just might be considered a stroke of genius. And it just might as equally drive you nuts, at least initially.
If you're patient and trusting, you'll get the hang of finger-typing in a week or so. (We've gotten quite good at it by now.) You have to rely on the virtual keyboard that appears when you tap a text field to enter notes, compose text messages, type the names of new contacts, and so forth.
Tip
Apple's own recommendation — with which we concur — is to start typing with just your index finger before graduating to two thumbs.
As we've already noted, Apple has built a lot of intelligence into its virtual keyboard, so it can correct typing mistakes on the fly and take a stab at predicting what you're about to type next. The keyboard isn't exactly Nostradamus, but it does a pretty good job in coming up with the words you have in mind.
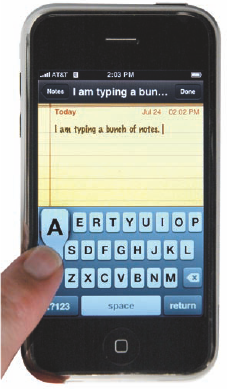
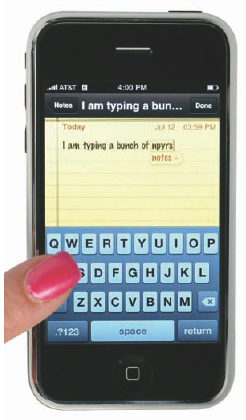
As you press your finger against a letter or number on the screen, the individual key you press gets bigger and practically jumps off the screen, as shown in Figure 2-2. That way, you know that you struck the correct letter or number.
Tip
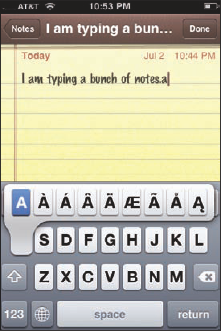
Sending a message to an overseas pal? Keep your finger pressed against a letter, and a row of keys showing variations on the character for foreign alphabets pops up, as shown in Figure 2-3. This lets you add the appropriate accent mark. Just slide your finger until the key with the relevant accent mark is pressed.
Meanwhile, if you press and hold the .com key in Safari, it offers you the choice of .com, .net, .edu or .org. Pretty slick stuff.
Alas, mistakes are common at first. Say that you meant to type a sentence in the Notes application that reads, "I am typing a bunch of notes." But because of the way your fingers struck the virtual keys, you actually entered "I am typing a bunch of npyrs." Fortunately, Apple knows that the o you meant to press is next to the p that showed up on the keyboard, just as t and y and the e and the r are side by side. So the software determines that notes was indeed the word you had in mind and places it in red under the suspect word, as shown in Figure 2-4. To accept the suggested word, merely tap the Space key. And if for some reason you actually did mean to type npyrs instead, tap on the suggested word (notes in this example) to decline it.
Tip
Because Apple knows what you're up to, the virtual keyboard is fine-tuned for the task at hand. If you're entering a Web address, the keyboard inside the Safari Web browser (Chapter 10) includes dedicated period, forward slash, and .com keys but no Space key. If you're using the Notes application (Chapter 5), the keyboard does have a Space key. And if you're composing an e-mail message, a dedicated @ key pops up on the keyboard.
Warning
When you're typing notes or sending e-mail and want to type a number, symbol, or punctuation mark, tap the 123 key to bring up an alternative virtual keyboard. Tap the ABC key to return to the first keyboard. It's not hard to get used to, but some may find this extra step irritating.
Tip
See Chapter 18 for a slick trick (the slide) that avoids the extra step involved in moving between the 123 and ABC keys.
As part of the 3.0 software upgrade, you can now rotate the iPhone so that its keyboard changes to a wider landscape mode in certain applications, specifically Mail, Messages, and Notes. The feature was already present in Safari. Since the keys are slightly larger in landscape mode, this is a potential boon to those of you who do a lot of typing or have largish fingers.
It's a good idea to type with abandon and not get hung up over mistyped characters. The self-correcting keyboard will fix many errors. That said, plenty of typos will likely turn up, especially in the beginning, and you'll have to make corrections manually.
Tip
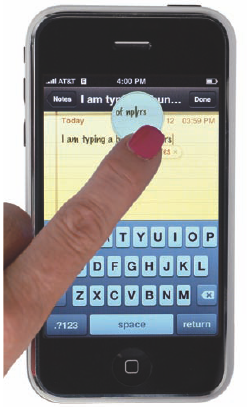
A neat trick for doing so is to hold your finger against the screen to bring up the magnifying glass shown in Figure 2-5. Use it to position the pointer to the spot where you need to make the correction.
Being able to copy and paste text (or images) from one place on a computer to another has seemingly been a divine right since Moses, but getting to this Promised Land on the iPhone has taken awhile. Apple added Copy and Paste (and Cut) as part of OS 3.0. In its own inimitable way, Apple brought pizzazz to this long-requested feature.
On the iPhone, you might copy text or images from the Web, and paste them into an e-mail, text, a message, or a note. Or you might copy a bunch of pictures or video into an e-mail.
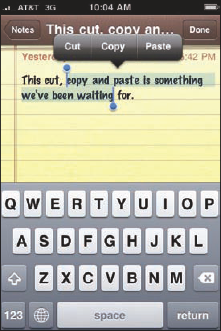
Here's how to exploit the feature. Say you're jotting down ideas in the Notes application that you'll eventually copy into an e-mail. Double-tap a word to select it, as shown in Figure 2-6, then drag the blue grab points or handles to select a larger block of text or to contract the text you've already selected. After you've selected the text, tap Copy. (If you want to delete the text block, tap Cut instead).
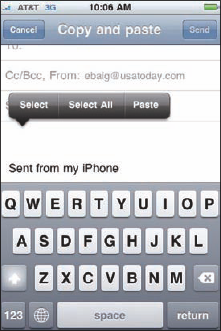
Now open the Mail program (Chapter 11) and start composing a message. When you decide where to insert the text you just copied, tap the cursor. Up pops commands to Select, Select All, and Paste, as shown in Figure 2-7. Tap Paste to paste the text into the message.
Here's the pizzazz part. If you made a mistake when you were cutting, pasting, or typing, shake the iPhone. It undoes the last edit.
Several cell phones of recent vintage let you dial a name or number by voice. Bark out "Call Mom" or "Dial 212-555-1212" and such handsets oblige. Although some third-party applications added voice dialing to the iPhone, Apple got around to it only as part of OS 3.0.
As you'll see in Chapter 7, Apple took voice controls a step beyond dialing by number or finding people in your address book. You can also issue voice commands to control music in the iPod.
You have two ways to summon Voice Control:
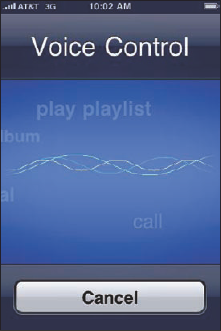
Press and hold the Home button until the Voice Control screen shown in Figure 2-8 appears. It has wavy lines that move as you speak. Scrolling in the background are some of the commands you can say out loud ("Play Artist," "Previous Track," and so on). Don't blurt out anything until you hear a quick double-beep. The iPhone will repeat the command it thinks it heard.
Press and hold the Center button on the wired headset. Once again, wait for an audible cue and then tell the iPhone what you have in mind.
While Voice Control works quite nicely with the wired headset that's included with your iPhone, it does not work with a Bluetooth headset. In other words, if you use a wireless headset you'll have to hold the phone up to your lips if you want it to respond to voice commands.
Warning
You definitely want to wait for the voice confirmation after you've spoken. In our experience, Voice Control isn't perfect, especially in a noisy environment. So if you're dialing a name or number, make sure the iPhone is indeed calling the person you had in mind. There's no telling what kind of trouble you might get into otherwise.
Using the Safari browser (Chapter 10), you can search the Web via Google or Yahoo!. But yet another new feature that arrived with OS 3.0 lets you search for people and programs across your iPhone or within specific applications. We show you how to search within apps in the various chapters dedicated to Mail, Contacts, Calendar, Notes, and iPod.
Searching across the iPhone, meanwhile, is based on the Spotlight feature familiar to Mac owners. To access Spotlight, flick to the left of the main Home screen (or as mentioned earlier in this chapter, press the Home button from the Home screen).
In the bar at the top of the screen that slides into view, enter your search query using the virtual keyboard. The iPhone starts spitting out results the moment you type a single character, and the list gets narrowed as you type additional characters.
The results are pretty darn thorough. Say you entered "Bell" as your search term, as shown in Figure 2-9. Contacts whose names have Bell in them will show up, along with folks who work for companies named Bell. If your iTunes library has the song "One Last Bell to Answer" or music performed by violinist Joshua Bell, those will show up, too. Same goes for a third-party iPhone app called The Bell.

Tap any listing to jump to the contact, ditty, or application you're searching for.
There — you've survived basic training. Now the real fun is about to begin.