
WHAT'S IN THIS CHAPTER?
Understanding how WCF supports long-running business processes
Creating a declarative workflow in Visual Studio
Implementing service contracts in XAML and calling external services during the workflow
Setting up the SQLWorkflowInstanceStore
Working with Send and Receive activities and correlating outgoing and incoming messages
This chapter is an interactive walkthrough on how to create a business process in Visual Studio 2010 using WCF and workflow services. It starts with defining requirements for a case and shows how to develop the solution step by step. At the end of this chapter, you will have developed the business process, a host for the process, the clients, and other services that interact with this process. This is a complete example so you can test the process and see it in action.
Let's take a simple process (see Figure 13-1). This should be a kind of proof-of-concept to learn how to develop workflow processes. It's a classic example of a business process that deals with holiday requests.
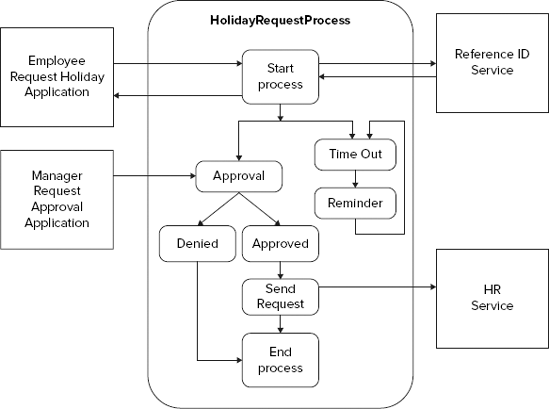
A company wants to expose a workflow as a service that receives a holiday request from its employees, waits for approval from a manager, and sends the request to the HR service.
This workflow is started by the request from the employee and the requester receives a reference ID for further reference. The reference ID is unique and is calculated by another service. The employee can use this reference ID to check the status of the request later. When the process starts it calls out to this service to obtain the ID and sends it as the answer to the requester. After this step the process waits for the approval (or denial) for this holiday request by a manager. The process only waits for this approval for a configurable amount of time. The manager uses another application where he/she needs to input this reference ID and approve or deny the holiday request. This action results in a call to the same instance of the already running process as a signal that it can continue. When this signal arrives at the process, it continues and sends the holiday request to another service as part of the HR application that is expecting only approved requests. This step completes the process and the employee can take his holiday. When the manager does not approve or deny the request within one week, the process sends an e-mail as a reminder and waits again for the approval or denial from the manager. This can be repeated three times. If the manager does not approve or deny within three weeks, the process ends.
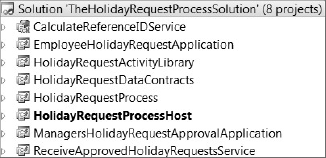
For this solution you need to create multiple projects in one solution. Start by creating a solution called TheHolidayRequestProcessSolution.
In this solution you need to add the following eight projects:
HolidayRequestDataContracts: A class library which contains the WCF data contracts needed for this solution.HolidayRequestProcess: This is a workflow activity library. It contains the definition of the process for the holiday request declared as XAML. You can select this template in the workflow section of the installed templates.EmployeeHolidayRequestApplication: A Windows forms application. This application is used by the employee to request the holiday and start the process.CalculateReferenceIDService: A WCF service application. This web service calculates the reference ID. You can find the template in the web sections of the installed templates.ManagersHolidayRequestApprovalApplication: A Windows forms application that allows approving or denying the holiday requests by filling in the reference ID.HolidayRequestProcessHost: A console application that hosts the process and exposes the complete process as a service.HolidayRequestActivityLibrary: Another workflow activity library that contains a reference to other services and has workflow activities for the calls to the methods in these services. These activities are used in theHolidayRequestProcessactivity library.ReceiveApprovedHolidayRequestsService: A console application that hosts a service that receives the approved request. This is a simulation of a real web service in the HR department.
The complete solution should look like Figure 13-2.
Every solution that uses WCF starts with defining the data contracts. This is the base for defining the other parts of the solution. It's clear you need a stable set of data contracts before continuing with the rest of the development. You will create a class file in the HolidayRequestDataContracts project that contains all the needed contracts.
Four data contracts in this case are recognized:
A contract as input for the holiday request containing the
EmployeeID, the start date, and end date of the requested holiday.A contract as the return for this request containing the reference ID calculated by the external service.
A contract for the approval or denial of the holiday request by the manager containing the employee ID of this manager, the reference ID of the holiday request being approved, and a flag indicating whether the request was approved or denied.
A contract as the return for this approval. For this case it contains the start date and the end date again.
First you need to add a reference to the System.Runtime.Serialization library to the HolidayRequestDataContracts project. This allows you to use the attributes to declare classes as WCF data contracts:
Add a class file to the project, name it HolidayRequestDataContract.cs and write following code in this file.
[DataContract]
public class HolidayRequestDataContract_Input
{
    [DataMember]
    public int EmployeeID { get; set; }
    [DataMember]
    public DateTime HolidayStartDate { get; set; }
    [DataMember]
    public DateTime HolidayEndDate { get; set; }
}

[DataContract]
public class HolidayRequestDataContract_Output
{
    [DataMember]
    public int ReferenceID { get; set; }
}

[DataContract]
public class HolidayApprovalDataContract_Input
{
    [DataMember]
    public int ManagerID { get; set; }
    [DataMember]
    public int ReferenceID { get; set; }
    [DataMember]
    public ApprovedOrDeniedEnum ApprovedOrDenied { get; set; }
}

[DataContract]
public enum ApprovedOrDeniedEnum
{
    [EnumMember]
    Approved,
    [EnumMember]
    Denied
}

[DataContract]
public class HolidayApprovalDataContract_Output
{
    [DataMember]
    public int EmployeeID { get; set; }
    [DataMember]
    public DateTime HolidayStartDate { get; set; }
    [DataMember]
    public DateTime HolidayEndDate { get; set; }
}
Code snippet CreatingtheBusinessProcess.zip
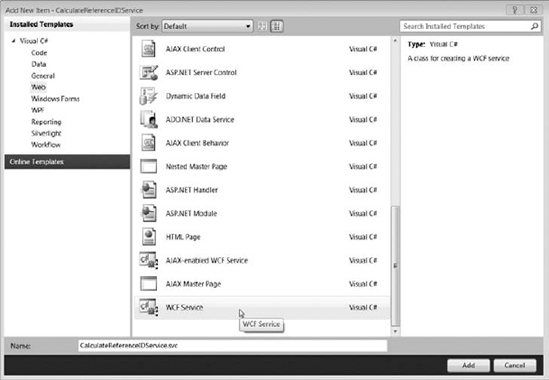
This external service calculates the reference ID for the holiday request. Visual Studio added a service named Service1.svc, a code-behind file named Service1.svc.cs, and an interface IService1.cs. You can delete these three files by doing the following:
Add a new WCF service named CalculateReferenceIDService.svc (see Figure 13-3).
In the ICalculateReferenceIDService.cs, delete the
DoWorkoperation generated by the template together with theOperationContractattribute.Replace it with a signature for your
GetNewReferenceIDmethod.
[ServiceContract]
public interface ICalculateReferenceIDService
{
    [OperationContract]
    int GetNewReferenceID();
}
In the CalculateReferenceIDService.svc.cs you can also delete the DoWork method and replace it with the implementation for your GetNewReferenceID method:
For this implementation as proof-of-concept for this chapter we will not add complex logic to calculate a unique reference ID now. To make the process work we just return an integer in a somewhat hardcoded way. This allows testing the process soon. Later on you need to add the behavior to calculate a unique reference ID. This could be done based on a table in a database with an identity field.
public int GetNewReferenceID()
{
return 42;
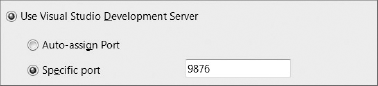
}Configure the properties of this project so the service will run on a specific port instead of an auto-assigned port. This allows the service to be found by the process on exactly the same port.
Open the properties of the CalculateReferenceIDService project, switch to the Web tab, check Specific port, and enter the 9876 as the port number (see Figure 13-4). You can test if this service is exposing its metadata correctly. In solution explorer, right-click the CalculateReferenceIDService.svc file and select the View in Browser menu option.
This opens a browser to CalculateReferenceIDService.svc. Click the link http://localhost:9876/CalculateReferenceIDService.svc?wsdl. Now you should see the WSDL for this service. Should the browser only show the directory listing, you need to click on the link to CalculateReferenceIDService.svc first.
You created the ReceiveApprovedHolidayRequestService as a console application instead of a web application. This is done for testability reasons as it's easier to debug and show results to the tester of the service when it's created as a console application. In this console application, the code for opening the host and declaring the service interface and the implementation of this service interface will be present together. This makes it a self-service host. The reason you use a self-service host is to see the result of the call to the service operation in the console. This is convenient in this proof-of-concept stage but in production this could change to an IIS serviced service with the same contract and configuration.
Add the references to the System.ServiceModel and System.Runtime.Serialization libraries.
Add a class file called ReceiveApprovedHolidayRequestService.cs and add the following code:
[ServiceContract]
public interface IReceiveApprovedHolidayRequestService
{
    [OperationContract]
    void ReceiveApprovedHolidayRequest(ApprovedHolidayData approvedHolidayData);
}

public class ReceiveApprovedHolidayRequestService :
              IReceiveApprovedHolidayRequestService
{
public void ReceiveApprovedHolidayRequest
(ApprovedHolidayData approvedHolidayData)
{
Console.WriteLine("Got Approved Holiday Request");
Console.WriteLine(
string.Format(" by employee {0}, approved by {1}, from {2} to {3}",
approvedHolidayData.EmployeeID.ToString(),
approvedHolidayData.ApprovedByManagerID.ToString(),
approvedHolidayData.HolidayStartDate.ToShortTimeString(),
approvedHolidayData.HolidayEndDate.ToShortTimeString()));
}
}
[DataContract]
public class ApprovedHolidayData
{
[DataMember]
public int EmployeeID { get; set; }
[DataMember]
public int ApprovedByManagerID { get; set; }
[DataMember]
public DateTime HolidayStartDate { get; set; }
[DataMember]
public DateTime HolidayEndDate { get; set; }
}Code snippet CreatingtheBusinessProcess.zip
This file now contains the data contract, the service contract, and the implementation of the operation together.
Add an application configuration file to the project. This app.config file should contain following configuration:
<system.serviceModel>
<behaviors>
 <serviceBehaviors>
  <behavior name="ExposeMetadata">
   <serviceMetadata
     httpGetEnabled="true"
     httpGetUrl=
      "http://localhost:9875/ReceiveApprovedHolidayRequestsService/MEX"/>
   </behavior>
  </serviceBehaviors>
 </behaviors>
 <services>
  <service
    name=
     "ReceiveApprovedHolidayRequestsService.ReceiveApprovedHolidayRequestService"
    behaviorConfiguration="ExposeMetadata">
    <endpoint
      address="http://localhost:9875/ReceiveApprovedHolidayRequestsService"
      binding="basicHttpBinding"
bindingConfiguration=""
contract=
"ReceiveApprovedHolidayRequestsService.
IReceiveApprovedHolidayRequestService" />
</service>
</services>
</system.serviceModel>Code snippet CreatingtheBusinessProcess.zip
To host the service, add this code to the main method in the program.cs file:
try
{
    Console.WriteLine("HOST : ReceiveApprovedHolidayRequestsService");
    ServiceHost serviceHost;
    serviceHost = new ServiceHost(typeof(ReceiveApprovedHolidayRequestService));
    serviceHost.Open();
    Console.WriteLine("started");
}
catch (Exception ex)
{
    Console.WriteLine(ex.Message);
}
Console.ReadKey();
You can now test that this console application is exposing the WSDL file correctly. First build and then start this application outside Visual Studio. You need to start as administrator. Browse to the directory where the executable is placed, right-click it and select the Run As Administrator option.
Now open a browser and type in the URL configured in the serviceMetaData behavior of the configuration file, which is http://localhost:9875/ReceiveApprovedHolidayRequestsService/MEX.
You should see the WSDL in the browser.
The HolidayRequestActivityLibrary project will only contain two service references to the services you just created. It will not contain anything else. So you can delete the Activity1.xaml file.
Adding service references to a workflow activity library results in the creation of reusable activities to call operations in these services. These activities become visible in the workflow designer of other workflow activity libraries that reference this project, such as your HolidayRequestProcess project. This is a good design approach and separates the activities as wrappers to service calls from the workflow itself.
This leads to reusability of activities in other business processes.
Adding service references here also generates the configuration for client endpoints in the app.config file. This configuration has no use here as this project is a library. You will see later that you need to copy this configuration to the project which is hosting the workflow process.
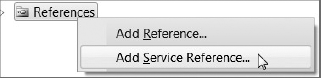
To add a reference to the CalculateReferenceIDService, right-click References and select Add Service Reference (see Figure 13-5). This opens the Add Service Reference dialog box.
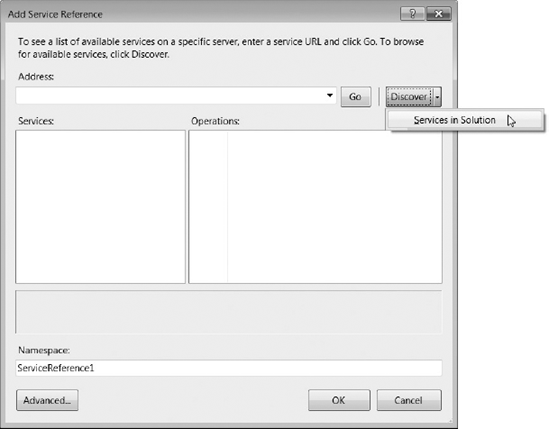
Now click the Discover button and select Services in Solution (see Figure 13-6). This results in an overview of the interface containing the operations in this service.
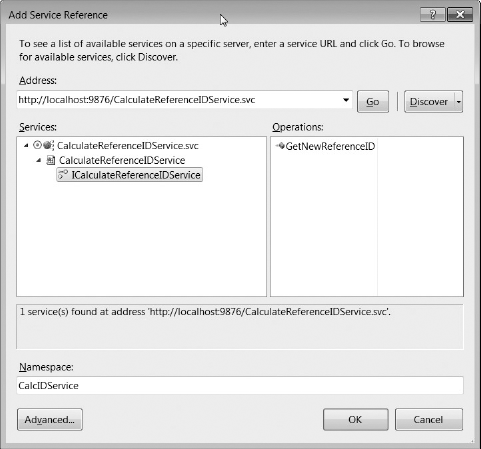
You should see the GetNewReferenceID operation (see Figure 13-7). Set the namespace to CalcIDService.
Click OK and Visual Studio now generates the proxies and adds an endpoint to the configuration file.
Add a second service reference to the ReceiveApprovedHolidayRequestsService. Visual Studio cannot detect the WSDL from the solution as this is a self-hosted service. You have to start the ReceiveApprovedHolidayRequestsService outside Visual Studio. Remember to do this as administrator.
The address for this service is http://localhost:9875/ReceiveApprovedHolidayRequestsService/MEX.
Use HRService as a namespace for this service reference.
Now have a look at the app.config file of the HolidayRequestActivityLibrary project. It should contain two endpoints like this:
<endpoint
    address="http://localhost:9876/CalculateReferenceIDService.svc"
    binding="basicHttpBinding"
    bindingConfiguration="BasicHttpBinding_ICalculateReferenceIDService"
    contract="ICalculateReferenceIDService"
    name="BasicHttpBinding_ICalculateReferenceIDService" />
<endpoint
    address="http://localhost:9875/ReceiveApprovedHolidayRequestsService"
    binding="basicHttpBinding"
bindingConfiguration="BasicHttpBinding_IReceiveApprovedHolidayRequestService"
contract="IReceiveApprovedHolidayRequestService"
name="BasicHttpBinding_IReceiveApprovedHolidayRequestService" />It's okay to now to close the console application hosting the ReceiveApprovedHolidayRequestsService.
The HolidayRequestProcess contains the definition of workflow and needs references to a number of system libraries: System.Activities, System.Runtime.Serialization, System.ServiceModel, and System.ServiceModel.Activities.
This project also needs a reference to the HolidayRequestActivityLibrary library and the HolidayRequestDataContracts library. This is needed as the first one contains the activities to call the operation in the external services (CalcIDService and HRService) and the HolidayRequestDataContracts contains the data contracts that define the input parameters and output parameters for the service operations you develop in the workflow.
In this workflow service you create two service operations, RequestHoliday and ApproveRequest, by dropping activities to the workflow designer. This is a workflow-first approach and allows you to define the service contract while developing the business process.
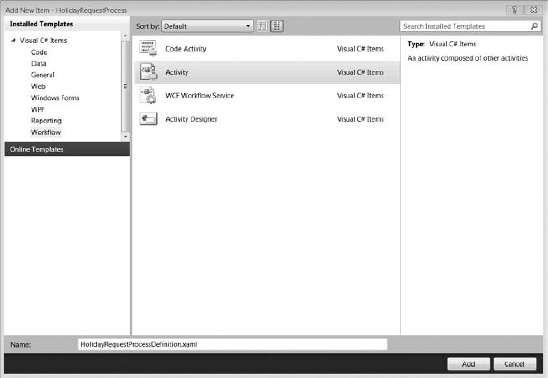
Add a workflow activity to the project. You can select the template in the workflow part of the installed templates in the Add New Item dialog box (see Figure 13-8). Name this workflow activity HolidayRequestProcessDefinition.xaml.
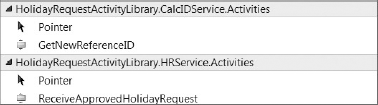
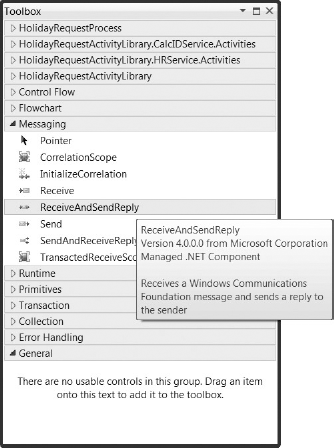
Now to build the complete solution, open the activity, and make the toolbox visible. This toolbox should now contain two activities as wrappers to the operations in the two services — see Figure 13-9. At this moment the designer canvas is empty. Add a ReceiveAndSendReply activity from the toolbox to the designer.
You can find this activity in the Messaging section of the Toolbox. See Figure 13-10. Simply drag the activity into Drop Activity Here.
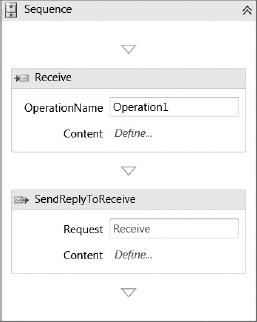
This results in two separate activities — see Figure 13-11.
The first one is a
Receiveactivity that defines the incoming parameters for the operation.The second one is a
SendReplyactivity that defines the return type for the operation.
Before configuring the activities in detail for the workflow, you need to create variables to contain the data you are getting as input from the activities and to contain the data you are sending back as answers.
A variable is also needed to contain the reference ID obtained from the external service. You also need a variable to contain the number of iterations waiting for the timeout that has been executed.
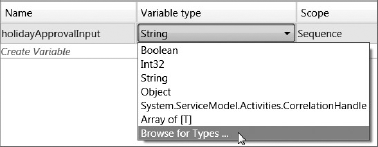
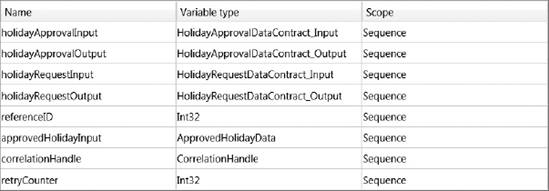
Add six variables — to create those variables, click the sequence activity to set the scope and click the Variables button in the lower-left part of the designer, as seen in Figure 13-12. Every variable needs a type. These types are either defined in the HolidayRequestDataContracts library, a type generated by the proxies in the HolidayRequestActivityLibrary library, or simply an integer for the reference ID and retryCounter.
Selecting a type for the variable is done in the Browse and Select a .NET Type dialog box. This dialog box can be opened by selecting the Browse for Types option in the Variable type column in the variables list — see Figure 13-13.
Create the variables named holidayApprovalInput, holidayApprovalOutput, holidayRequestInput, holidayRequestOutput, approvedHolidayInput, referenceID, and retryCounter. Select the appropriate type in the dialog box (see Figure 13-14).
The variables and their types are shown here:
holidayApprovalInput: HolidayApprovalDataContract_InputholidayApprovalOutput: HolidayApprovalDataContract_OutputholidayRequestInput: HolidayRequestDataContract_InputholidayRequestOutput: HolidayRequestDataContract_OutputreferenceID: Int32approvedHolidayInput: ApprovedHolidayDatacorrelationHandle: CorrelationHandleretryCounter: Int32
The result should look like Figure 13-15.
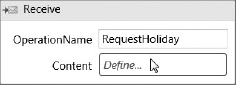
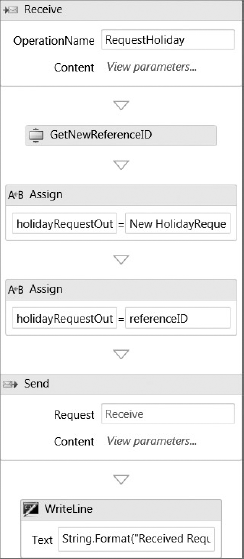
Change the Operation Name to RequestHoliday — see Figure 13-16. To define the parameters for this operation, click the Define box.
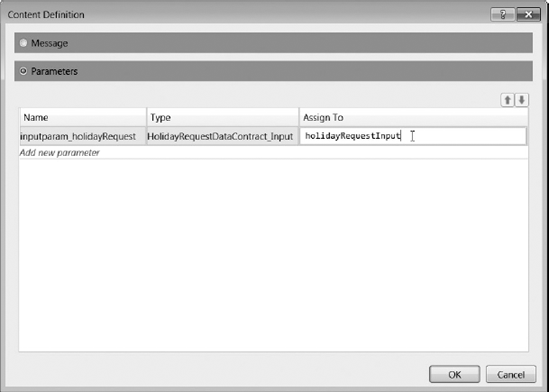
This opens the Content Definition dialog box. Check the Parameters radio button. Click the Add New Parameter link. Name the parameter inputparam_holidayRequest. To define the type of the parameter, select the Browse for Types option in the drop-down. The type is HolidayRequestDataContract_Input in the HolidayRequestDataContracts namespace.
Back in the Content Definition dialog box, type the name of the variable for this incoming data. The name of the variable is holidayRequestInput (see Figure 13-17).
Notice that this input box supports intellisense and lets you find the name of the variable easily.
Close the Content Definition dialog box.
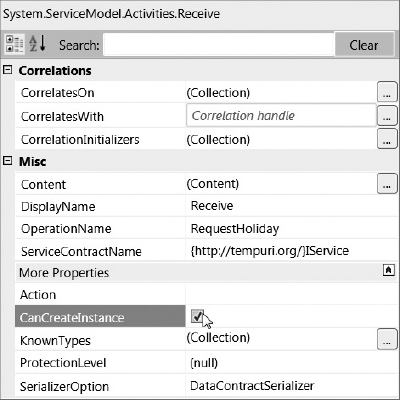
Back in the designer, open the property window of the Receive activity and check the CanCreateInstance property. This indicates that calling this operation creates a new instance of the workflow. See Figure 13-18.
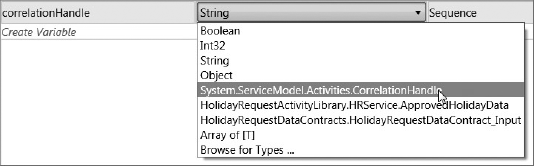
Before configuring the Send activity, you need to add a correlation variable. This variable is used in the configuration of the SendReply activity and later in the Receive activity for the ApproveRequest operation. In the designer, activate the sequence again to set the scope and open the variables list.
Add a variable called correlationHandle and set the type to CorrelationHandle. See Figure 13-19. Now click the define link in the Content input box of the Send activity.
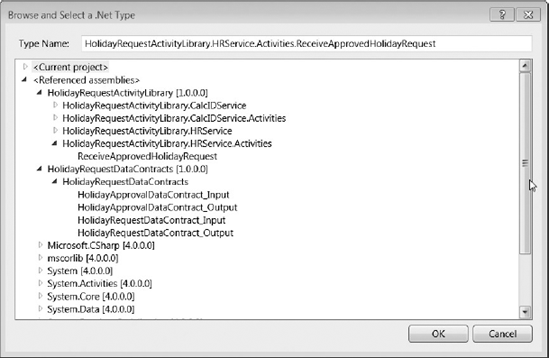
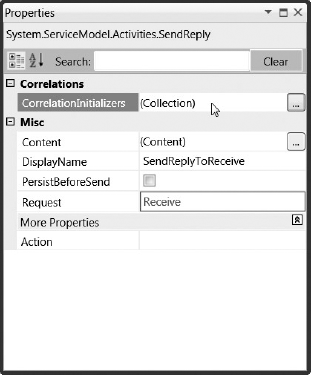
This opens the Content Definition window. In this window select parameters, add a new parameter called outputparam_holidayRequest, and set the type to HolidayRequestDataContract_Output by using the Browse for Types option — which opens the Select a .NET Type dialog box. Set the value to the holidayRequestOutput variable. In the designer, open the property window of the Send activity, and open the Add Correlation Initializers window by clicking the ellipsis button of the CorrelationInitializers property (see Figure 13-20).
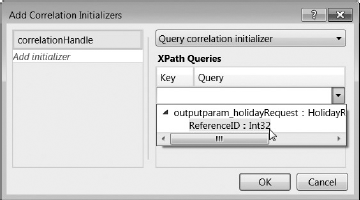
In this dialog box, click the Add Initializer link and type in correlationHandler. This is the name of the variable you created to correlate the Send activity to the Receive activity of the ApproveRequest operation. Leave the drop-down list on Query correlation initializer and open the drop-down under XPATH Queries. In this drop-down, select ReferenceID from the outputparam_holidayRequest parameter. See Figure 13-21. Call to the CalcIDService.
Between the Receive and the Send Activities, you need to call the CalcIDService to obtain the reference ID and you need to assign the value of it to the return value of the operation.
Drag and drop the GetNewReferenceID activity from the toolbox between the Receive and the Send Activities.
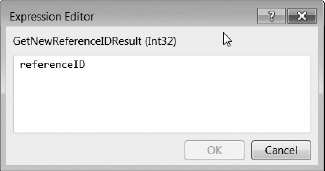
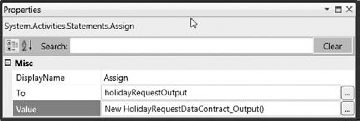
Open the property window of this activity and click the ellipsis button of the GetNewReferenceIDResult property. This opens the Expression Editor. In this editor, enter referenceID. This is the name of the variable that holds the value of the referenceID — see Figure 13-22. Now you need to assign the obtained referenceID to the output parameter for the Send activity. For this you need to drop two Assign activities between the GetNewReferenceID and the SendActivity activities. The Assign activity can be found in the toolbox in the Primitives part. The first Assign activity instantiates the variable holidayRequestOutput and the second Assign activity sets the referenceID to the output value of the GetNewReferenceID activity.
Open the Properties window of the first Assign activity and configure these properties (see Figure 13-23):
To:
holidayRequestOutputValue:
New HolidayRequestDataContract_Output()
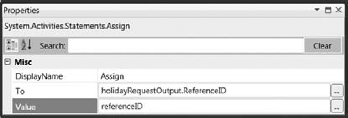
Open the Properties window for the second Assign activity and configure these (see Figure 13-24):
To:
holidayRequestOutput.ReferenceIDValue:
referenceID
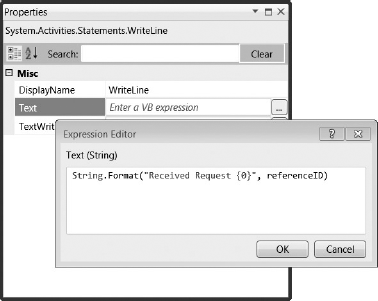
We add a WriteLine activity after the Send activity to see when the RequestHoliday operation is called and what the referenceID from the service is. You can drag the WriteLine activity from the Primitives part in the toolbox — see Figure 13-25.

This WriteLine activity is here for testing purposes. The activity writes a string of data to the console application which is hosting this workflow service. You can delete this activity when the workflow is compiled for production.
Open the Properties of this activity and configure the text so it contains a formatted string displaying the obtained referenceID. You can configure the text in the Expression Editor after clicking the ellipsis button of the text property. Add this code in the editor — see Figure 13-26.
String.Format("Received Request {0}", referenceID)The sequence should now look like Figure 13-27.
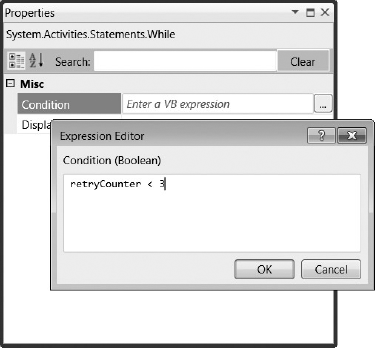
Now add a while activity as the next step in the process. You can find the while activity in the Control Flow part of the toolbox.
This while activity allows the steps to be defined and repeated while a condition is true. This condition is based on the retryCounter variable. Only if the retryCounter is less than three, will the steps be repeated. The retryCounter will be incremented or changed by the activities in the while activities.
Open the Properties of the while activity and set the value of the condition property to a Boolean Condition. Specify that the retryCounter should be less than 5 (see Figure 13-28).
Use this condition:
retryCounter < 3
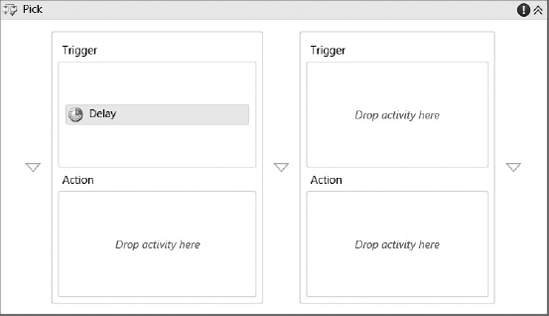
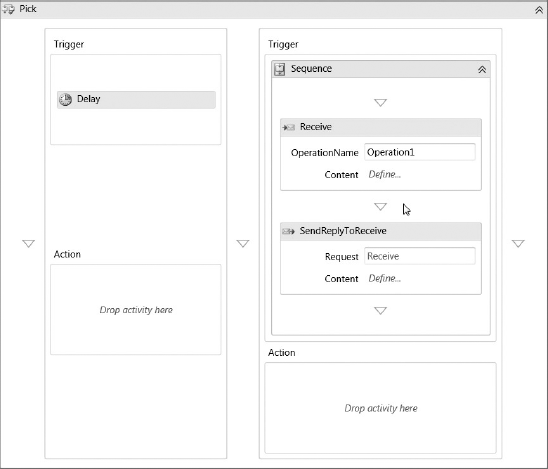
The next step is to add a Pick activity in the body of the while activity. A Pick activity allows the process to wait for a trigger before continuing. In this case the process needs to wait for either a timeout configured by a Delay activity or the received approval or denial of the holiday request from the managers.
This Pick activity can be found in the Control Flow section of the toolbar.
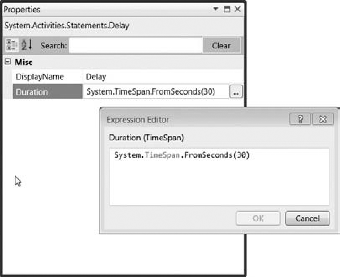
Now drag a Delay activity to the Trigger area in the left branch of this Pick activity (see Figure 13-29).
Open the Properties window of the Delay activity and configure the duration property by clicking the ellipsis button. The duration is defined as a VB.NET expression. For the first test, use a duration of 30 seconds by entering System.TimeSpan.FromSeconds(30).
In production you should set this to a higher delay expressed in weeks — see Figure 13-30.
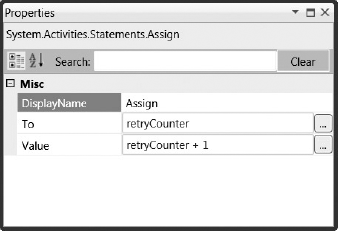
In the action area of the right branch of the Pick activity, below the delay, add a Sequence activity. This activity contains two activities. The first is a WriteLine activity to write the console that the delay has expired. This is temporary and only there to see how the delay works. The second one is an Assign activity to increment the retryCounter variable.
Add a WriteLine activity and set the text to delayed. Add an Assign activity and set the To property to retryCounter and the Value property to retryCounter+1. See Figure 13-31.
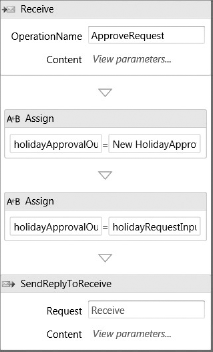
In the Trigger area of the sequence in the right branch of the Pick activity, drop another ReceiveAndSendReply activity. See Figure 13-32. This will create the second operation in the workflow service and will receive the approval or denial of the holiday request. This operation is called by the ManagersHolidayRequestApproval application.
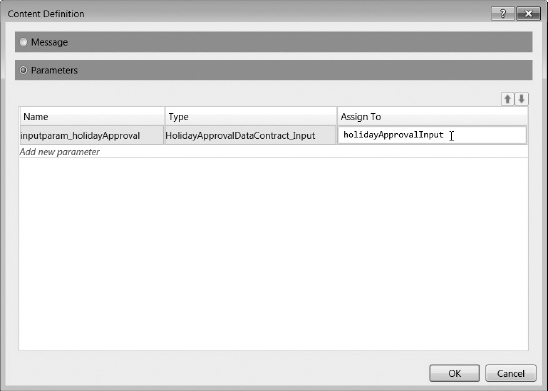
Now set the OperationName to ApproveRequest. Click the Define link to set the content of the Receive activity. In the Content Definition window, check the Parameters radio button. Add a parameter called inputparam_holidayApproval, set the type to HolidayRequestDataContract_input, and assign this parameter to the holidayApprovalInput variable. See Figure 13-33.
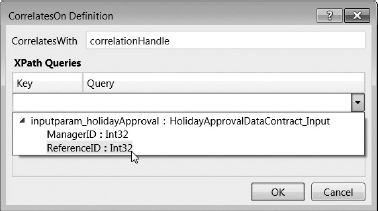
Configure the correlation by setting the CorrelatesWith to correlationHandle.
Open the CorrelatesOn Definition window by clicking the ellipsis button of the CorrelatesOn property. In the XPath Queries drop-down, select ReferenceID as the parameter to correlate. See Figure 13-34.
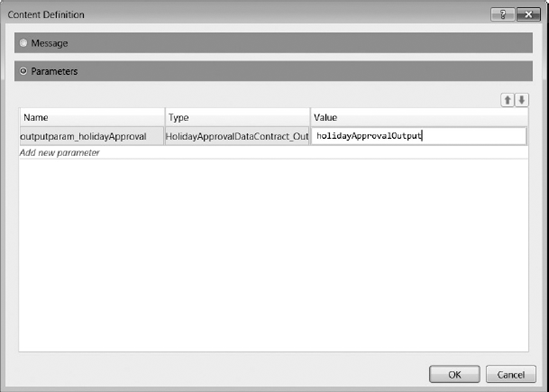
Configure the SendReply activity. Open the Content Definition window, select Parameters, and add a parameter called outputparam_holidayApproval. Set the type to HolidayApprovalDataContract_Output, found in the HolidayRequestDataContracts, and assign this to the holidayApprovalOutput variable. See Figure 13-35.
In-between the Receive activity and the SendReply activity, drop two Assign activities. The first Assign activity instantiates the output variable. The second Assign activity sets the EmployeeID as a property of this variable. It is set to the EmployeeID which is received as input for the approval request:
holidayApprovalOutput                New HolidayApprovalDataContract_Output()
holidayApprovalOutput.EmployeeID     holidayRequestInput.EmployeeID
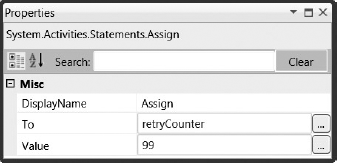
After the SendReply activity, add an Assign activity that sets the retryCounter variable to 99. The result should look like Figure 13-36.
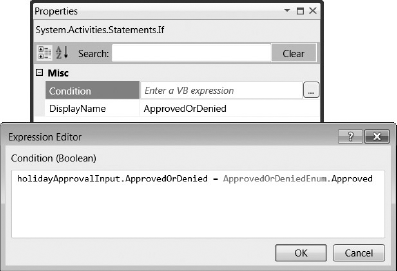
This is a value higher than the value used in the condition of the while activity and will stop the while activity (see Figure 13-37). In the Action part of the right branch of the Pick activity, add an If activity. You can find this in the Control Flow Section of the toolbox. This activity will check the holidayApprovalInput variable to see whether it was approved or denied.
Change the DisplayName to ApprovedOrDenied. Edit the condition and enter the following condition:
holidayApprovalInput.ApprovedOrDenied = ApprovedOrDeniedEnum.Approved
See Figure 13-38 for the result.
In the Then branch of the If activity, drop a Sequence activity to group all needed activities when the holiday request is approved. Also drop a Sequence activity in the Else branch.
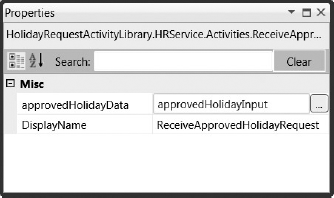
Add the ReceiveApprovedHolidayRequest activity from the toolbox to the left Sequence. The call to the HRService only executes when the holiday request is approved.
Set the approvedHolidayData property of this activity to the approvedHolidayInput variable. See Figure 13-39.
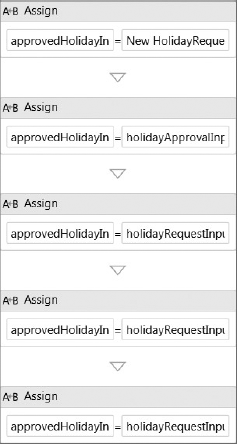
Add these five assigned activities to the action part before the ReceiveApprovedHolidayRequest activity. These activities construct the approvedHolidayInput variable. Configure the To and Value properties for these activities as follows:
To: approvedHolidayInput
Value: New HolidayRequestActivityLibrary.HRService.ApprovedHolidayData

To: approvedHolidayInput.ApprovedByManagerID
Value: holidayApprovalInput.ManagerID

To: approvedHolidayInput.EmployeeID
Value: holidayRequestInput.EmployeeID

To: approvedHolidayInput.HolidayStartDate
Value: holidayRequestInput.HolidayStartDate

To: approvedHolidayInput.HolidayEndDate
Value: holidayRequestInput.HolidayEndDate
See Figure 13-40.
Add a WriteLine activity to each of the branches indicating what the result of the managers is to the console screen.
In the HolidayRequestHost, add references to HolidayRequestActivityLibrary, HolidayDataContracts, and HolidayRequestProcess.
The console application also needs references to System.Activities, System.ServiceModel, System.Runtime.Serialization, System.ServiceModel.Activities, and System.ServiceProcess (see Figure 13-41).

Add an application configuration file to the project. Copy/Paste the complete content of the app.config file of the HolidayRequestActivityLibrary project into this configuration file.
In the program.cs file, add code to the main method to instantiate a WorkflowServiceHost; add a SqlWorkflowInstanceStoreBehavior to the WorkflowServiceHost; add ServiceMetadataBehavior; and then set the timeToUnload interval to 0 seconds:
try
{
  WorkflowServiceHost workflowServiceHost;
  workflowServiceHost = new WorkflowServiceHost(
   new HolidayRequestProcess.HolidayRequestProcessDefinition(),
   new Uri(@"http://localhost:9874/HolidayRequestProcess"));

  workflowServiceHost.Description.Behaviors.Add(
   new SqlWorkflowInstanceStoreBehavior(
      "Data Source=.;
       Initial Catalog=SqlWorkflowInstanceStore;Integrated Security=True"));

  ServiceMetadataBehavior serviceMetadataBehavior;
  serviceMetadataBehavior = new ServiceMetadataBehavior();
  serviceMetadataBehavior.HttpGetEnabled = true;
  workflowServiceHost.Description.Behaviors.Add(serviceMetadataBehavior);

  WorkflowIdleBehavior workflowIdleBehavior = new WorkflowIdleBehavior()
  {
      TimeToUnload = TimeSpan.FromSeconds(0)
  };
  workflowServiceHost.Description.Behaviors.Add(workflowIdleBehavior);

  workflowServiceHost.Description.Behaviors.Find<ServiceDebugBehavior>().
   IncludeExceptionDetailInFaults = true;

  workflowServiceHost.Open();

  Console.WriteLine("WorkflowServiceHost started.");

}
catch (Exception ex)
{
Console.WriteLine(ex.Message);
if (ex.InnerException != null)
{
Console.WriteLine(ex.InnerException.Message);
}
}
Console.ReadKey();Code snippet CreatingtheBusinessProcess.zip
Start the HolidayRequestProcessHost application outside Visual Studio. Make sure you start it as administrator. Open a browser and browse to http://localhost:9874/HolidayRequestProcess. This should show a page with a link to http://localhost:9874/HolidayRequestProcess?wsdl. See Figure 13-42. Develop the EmployeeHolidayRequestApplication application.
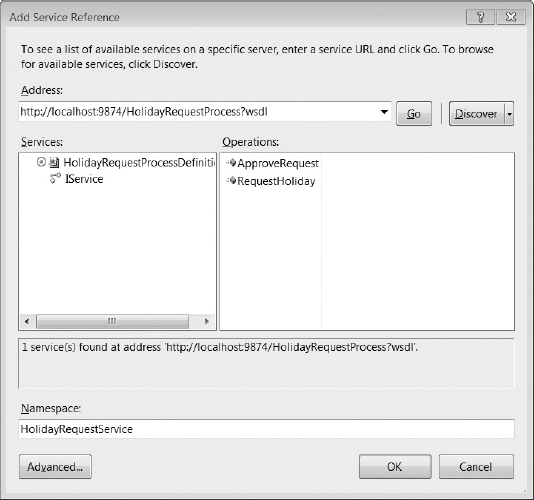
While the HolidayRequestProcessHost is running outside Visual Studio, open the EmployeeHolidayRequestApplication and add a service reference to the HolidayRequestProcess service. In the Add Service Reference window, set the address to http://localhost:9874/HolidayRequestProcess?wsdl and set the namespace to HolidayRequestService. See Figure 13-43.
Add a button to the form and write the following code as code-behind:
HolidayRequestService.ServiceClient client;
client = new HolidayRequestService.ServiceClient();
HolidayRequestService.HolidayRequestDataContract_Output output;
output = client.RequestHoliday(
  new HolidayRequestService.HolidayRequestDataContract_Input()
    { EmployeeID = 101,
      HolidayEndDate = System.DateTime.Now,
      HolidayStartDate = System.DateTime.Now
    });
MessageBox.Show(output.ReferenceID.ToString());
This is not really the final code, just a test client as part of the proof-of-concept. In real life, the EmployeeHolidayRequestApplication would have a more complex interface. But this application allows us to test the workflow. The code just calls the RequestHoliday method of the proxy which starts the workflow you developed and is hosted by the workflowservicehost in the HolidayRequestProcessHost. The result of the call, the received EmployeeID, is shown in a message box.
This application is the test application where a manager approves or denies the holiday request. Again this is a test application and would have a more complex user interface in real life.
Add a reference to the HolidayRequestProcess service as you did for the employee application. In the Add Service Reference dialog, use http://localhost:9874/HolidayRequestProcess as the address and type in HolidayRequestService as the namespace for the service.
Add a button and a textbox to the form. The textbox is needed for the referenceID. For the button, add the following code:
HolidayRequestService.ServiceClient client;
client = new HolidayRequestService.ServiceClient();
HolidayRequestService.HolidayApprovalDataContract_Input input;
input = new HolidayRequestService.HolidayApprovalDataContract_Input();
input.ManagerID = 1;
input.ReferenceID = int.Parse(textBox2.Text);

HolidayRequestService.HolidayApprovalDataContract_Output output;
output = client.ApproveRequest(input);

MessageBox.Show(output.EmployeeID.ToString());
You need to create a SQL database to store the state of the process. This SQL database can be running under SQL Express or SQL Server. This database needs to contain the appropriate tables and stored procedures so the workflowservicehost can store and retrieve the state of the process. The name of the database must be specified in the connectionstring you gave to the SqlWorkflowInstanceStoreBehavior you added to the WorkflowServiceHost.
To create the needed tables and stored procedures, you need to run two scripts on the database, which can be found in the C:WindowsMicrosoft.NETFrameworkv4.0.30128SQLen. directory. The scripts are SqlWorkflowInstanceStoreLogic.sql and SqlWorkflowInstanceStoreSchema.sql.