
Your digital camera contains all the lighting controls, shooting modes, and metering modes you need to realize your creative vision and make stunning images. Today's cameras come equipped with an impressive array of microprocessors and sophisticated metering systems that evaluate the light and instantly choose the exposure settings for your images. As a creative photographer, you decide when to use the ISO, aperture, and shutter speed settings that give your images the power you want to convey to your viewers. You also decide which exposure and metering modes to use to get the best results for your intended subjects. This chapter helps you understand how your digital camera manages and interprets light in specific ways, which makes your images stand out from the rest.
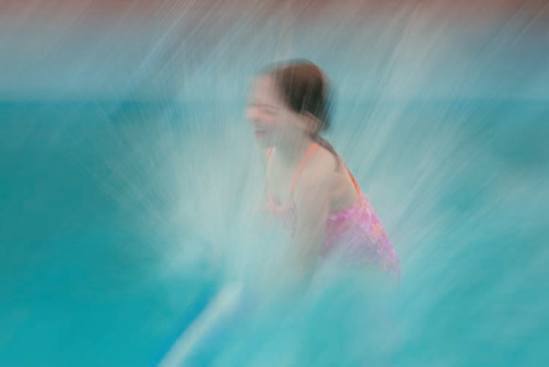
I wanted to capture an active, dynamic image of my daughter jumping into a swimming pool to convey the fun of being a child in the summertime. I purposely chose a shutter speed that was slow enough to blur certain elements in the photo but still retain some sharpness in her body. Exposure: ISO 100, f/22, 1/13 second.
The ISO settings on your digital camera control light by changing the sensitivity of the sensor to the light reaching it, in much the same way that ISO had rated a film's sensitivity to light in the past. By raising the ISO number, you increase the sensor's sensitivity to light and by lowering it you decrease the sensor's sensitivity. ISO affords the photographer another way to control light along with aperture and shutter speed when confronted with very bright or low-lit environments. Understanding ISO and its relationship to light will help you know when to use the high or low ISO settings of your camera.
The term ISO comes from the photographic film days and stands for the International Organization for Standardization. In the past, you would use a film with an ISO rating of 100 for bright and sunny days, and a more light-sensitive ISO 400 or above film for shooting in low-light conditions. Each of these films had limitations. 100 speed films needed a fair amount of light to make a usable image and ISO 400 pictures would show an obvious increase in grain. The same holds true today in digital photography in that a lower ISO setting will yield photos with the least amount of noise and a higher ISO setting will increase the likelihood of producing noise in your images.
Once the light passes the shutter, it strikes the image sensor of the camera and creates the picture. That sounds easy, but a lot happens in that split-second of taking the picture. The image sensor inside your digital camera works by converting the incoming light (photons) into an electrical charge that is proportional to the amount of photons that struck each pixel. This electrical charge is then converted to a voltage, which is then sent to a processor for conversion into the 1s and 0s that make up a digital image. In this process, electrical circuit noise is added to the voltage and as that voltage is amplified by increasing the ISO settings, more noise is produced in the image.
Although you have the option of increasing the ISO sensitivity at any point in shooting, the trade-off in increased amplification or the accumulation of an excessive charge on the pixels is an increase in digital noise. And the result of digital noise is an overall loss of resolution and image quality.
This is easy to understand if you equate it to your home stereo and the sound coming out of your speakers. If you only turn on the amplifier part of the stereo and no other components and then slowly turn up the volume knob all the way, you begin to hear a hum that gets louder and louder. The electrical signal from the stereo to the speakers is amplified more and more. This is the audible equivalent to digital noise.

Figure 2.1. If any digital noise is present in your image it is readily apparent in the darker or the smooth continuous toned areas of your photo as in image of a squirrel feasting on an acorn. In this image, you will notice noise in the green of the background more so than in the textured surface of the squirrel's fur. Exposure: ISO 4000, f/5.6, 1/2000 second.
As stated previously, the higher the ISO setting you choose, the greater the chance of producing digital noise in your images. To counteract this, some digital cameras employ in-camera high ISO noise reduction software that works extremely well to reduce unwanted noise artifacts from degrading your image's quality. This sounds like a good feature to use all the time but in reality using this setting significantly adds to the time it takes to write the image data from your camera's buffer to your memory card when shooting a sequence of images. Your burst rate or frames per second will not be affected unless the buffer is full. Then the camera will not allow you to shoot until enough space has been freed up in the camera's buffer after writing the images to your memory card.
Many times, you find that you have to use higher ISO settings because there is no other way to make the image. This is all too evident in shooting concert photography and low-light images. To avoid blurred elements in your photos you need to pick a fast enough shutter speed while still allowing the proper exposure to make the image. If you are already using your widest aperture, your only other alternative is to increase the ISO setting.
As you shoot more of these types of images you find that digital noise is most evident in the dark areas of your images. Colored pixels called artifacts are more visible as the ISO increases. Using the camera's onboard noise reduction software is a good idea when you may want to quickly upload photos to a gallery or social media Web site and don't want to spend any time reducing noise in post-processing. You should know though that this can use up more battery power, take a longer time to write the images to your memory card, and cause noticeable degradation to the sharpness of an image. Image processing software such as Apple's Aperture and Adobe's Photoshop and Lightroom include noise reduction modes if you would rather perform it to individual images when you process them. Specialized software packages such as PictureCode's Noise Ninja, which I use, are available for trial downloads to gauge their effectiveness on your images before you buy.
By changing the shutter speed you change the amount of time the sensor in your camera is allowed to gather light and thus how much action is frozen or blurred in the photo. There are certain shooting situations that demand the proper shutter speed for a successful picture and these are outlined in the following sections.
Note
Chapter 3 is devoted entirely to shutter speeds as an extremely powerful tool to manage light and motion in your photographs.
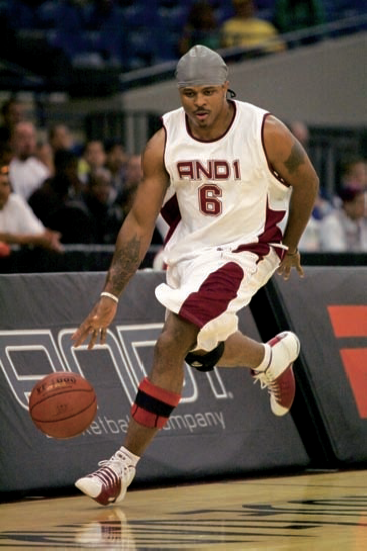
Fast shutter speeds are used when you want to freeze action and only photograph a tiny sliver of time. Shutter speeds are considered fast at any setting over 1/125 second and extremely fast from 1/1000 to 1/4000 second. Some higher end cameras are even capable of shooting at 1/8000 second, the fastest shutter speed a digital camera is capable of at this time.
Fast shutter speeds are a necessity when shooting fast action and sports photos but require a large amount of light because you are only opening the shutter for a very short time. The subject distance from the camera also helps you determine how fast of a shutter speed you need to freeze the action. Being very close to the action or using a longer focal-length lens necessitates the use of faster shutter speeds than something farther away or shot so as to appear smaller in the frame.
Medium shutter speeds are considered the norm for subjects that are stationary, such as portraits of still life images, and generally fall in the 1/30 to 1/125 second range. These shutter speeds are not slow enough to blur action or fast enough to freeze action of moving subjects, which makes them ideal for landscapes or product photography. These are the default shutter speeds for many cameras when using the onboard pop-up flash or in any of the Auto modes and can be used for a broad range of subjects as long as the subject is not moving.

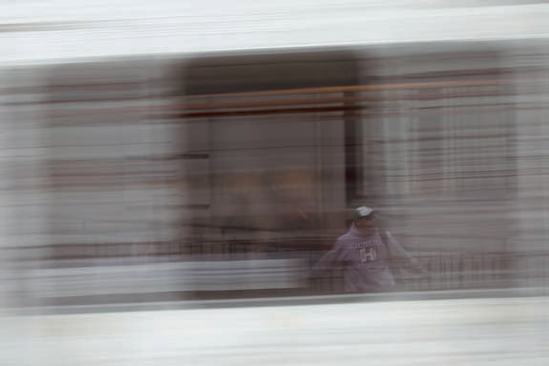
Slow shutter speeds are considered anything from 1/30 second down to 1 second. Using shutter speeds in this range leads to many creative possibilities to depict motion but can also have a detrimental effect of too much unintentional blur. Shooting in this range takes a bit of practice to pull off sharp handheld shots without too much subject blur or when panning with your subject. A tripod will keep your camera steady and is usually recommended when shooting anything stationary at speeds below 1/30 second such as a landscape. When panning with slow shutter speeds, I prefer to shoot without a tripod to free me up to move and more easily track my moving subject. When shooting in this range of shutter speeds, it's also a good idea to turn on your camera's Image Stabilization (Canon), Vibration Reduction (Nikon), or SteadyShot (Sony) systems if your camera or lens includes it, to correct any camera or subject movement.
You can also mimic the effect of a tripod with your body position. Start by keeping your feet slightly apart to match the width of your shoulders with your left hand supporting the camera and lens and right hand holding the camera grip with your elbows tucked in. Regulate your breathing. Very gently press the Shutter Release button to avoid moving the camera as much as possible. A tabletop, bike seat, fence post, doorway, or any solid surface can also be used to steady the camera when shooting with these speeds.
Aperture affords the photographer as many creative possibilities as shutter speed does for capturing light but differs in the fact that it determines depth of field as well. (Depth of field is the area in front of and behind what you are focusing on that will be in acceptable focus.) By changing the aperture you control the intensity of light entering the camera and thereby the amount.
Note
See Chapter 4 for more detail on controlling light with aperture selection to make your images extraordinary.
The aperture (also known as the iris or diaphragm) in a camera lens is a device that opens and closes to allow more or less light to pass through the lens during the exposure. As you peer through the viewfinder to compose a photograph, the aperture remains fully open in order to allow you a nice bright view of the scene, and also to allow a sufficient amount of light into the camera so that it can calculate exposure and focus. At the precise moment of the exposure, the lens stops down to the specified f-stop and returns to its wide open position once the exposure has been made. Some camera models are equipped with a Depth-of-Field Preview button that allows you to view your subject or scene with the selected f-stop applied to check focus range. This tends to darken the display in the viewfinder and make your subject difficult to see. Learning to master aperture control is a huge step to fully realizing photography's extraordinary potential.
Large apertures let lots of light into the camera to form the image on your sensor. They also provide the shallowest depth of field, which when used creatively blurs the background or foreground and places all the emphasis on your subject. Lenses that have maximum apertures of f/2.8 and larger are often called fast glass for their ability to allow you to shoot at faster shutter speeds because they let so much light into the camera.

Medium apertures range from f/6.3 to f/11 and are believed to provide the sharpest images the lens is capable of. Medium apertures are the preferred choice for a host of subjects ranging from portraits to product shots. They afford a fair amount of depth of field while still managing to isolate the subject at the focus point and give modest separation of the background and foreground elements.
Apertures from f/13 and above are considered small, yielding the deepest depth of field and also allowing the least amount of light to enter the camera and strike the image sensor. When you want everything in the frame to be in sharp focus, such as when shooting landscape photos or panoramic, use a small aperture to provide a deep depth of field. The trade-off when using these smaller lens openings is that you need a brightly lit scene, a slower shutter speed, a tripod, or some combination of all three.
An added benefit to using smaller apertures is that any spectral highlights such as streetlights, stars, or holiday lights in the photo have star points that can be very attractive. You can even create this effect with the sun by placing a solid object in front of it and only letting a tiny portion of the sun peek through.
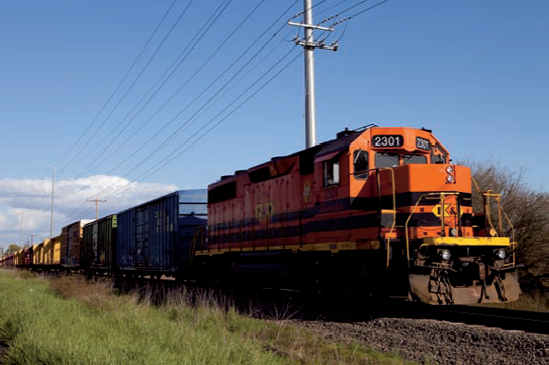
Figure 2.6. To get the deepest depth of field for this shot of a freight train and still maintain maximum sharpness, I dialed in a small aperture and shot the image. Exposure: ISO 200, f/14, 1/200 second.
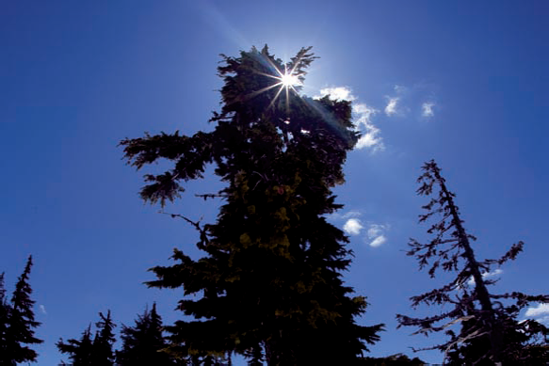
Figure 2.7. You can create a very attractive star point in the photo with the sun by placing most of it behind a solid object such as a tree branch or building and only letting a small amount show through. Letting too much light show through can cause lens flare, which introduces unwanted halos, hexagons, or octagons in your image. Exposure: ISO 100, f/22, 1/160 second.
Many digital cameras come equipped with exposure and scene modes to make your shooting faster and more enjoyable under special circumstances or when shooting certain subjects. Several manufacturers offer Portrait, Landscape, Close-up, Sports, and Night Portrait Scene modes for those exact situations. These modes set the shutter speed/aperture combinations to predetermined parameters that help you get the most desirable depth of field and exposure for each subject. While these modes are tailored to specific shooting situations, the broader shooting modes of Programmed Auto, Aperture Priority, Shutter Priority, and Manual modes provide a greater amount of lighting control for a much wider range of usage.
Digital cameras set to Programmed Auto mode decide both the aperture and shutter speed values and in some cases even the ISO. This is the default setting for many photographers because unlike full Auto mode, it allows you to have some say in the exposure values by giving you the choice of shifting the combination one way or the other for greater or lesser depth of field or faster or slower shutter speeds. Some cameras retain the new settings once the program has been shifted and some revert back to the original setting once the picture has been made, requiring you to do it again for the next picture.
Shutter Priority mode allows the photographer to pick the shutter speed first and the camera then chooses the aperture to go along with it to provide the best possible exposure. You want to use this mode when shooting in situations when you know for sure what shutter speed you want to use to freeze or blur the action or for those times when shutter speed is more important to you than aperture selection. Shutter Priority is an ideal mode to use when shooting sports or in low-light situations where you must use a particular shutter speed to maintain image sharpness.
In Aperture Priority mode, you pick an aperture and the camera selects the proper shutter speed to go along with it. Controlling the aperture also controls the depth of field in the image. By controlling the amount of light that enters the camera and is allowed to strike the image sensor with Aperture Priority mode, you determine how much visual separation your subject has from the background and/or foreground elements. Aperture Priority can also be used effectively when you want to shoot wide open and require the fastest possible shutter speed under the present lighting conditions.
Manual mode lets you control all the exposure settings and gives you the greatest creative control but can also leave you alone to create under- or overexposed images. The camera's built-in light meter still is on the job to give you feedback about your settings compared to what it thinks is the correct exposure. Being able to set both the shutter speed and aperture values gives you a broader range of creative freedom but can lead to disaster if you do not pay attention to what the camera's exposure scale tells you. Manual mode is useful in a variety of shooting scenarios, including shooting fireworks or interiors when you want to intentionally underexpose or overexpose a part of the scene, or when you want a consistent exposure across a series of photos such as for a panoramic series.
Your digital camera includes a built-in light meter for measuring the amount of light coming into the lens to help you adjust the camera's aperture and shutter speed controls to make a properly exposed image. Most cameras today have three ways of doing this and these methods are called metering modes. Understanding each method and applying the most appropriate one to each shooting situation you encounter makes your images stronger and improves your knowledge of light and its effect on your pictures.
Different manufacturers refer to Scene metering mode by different names, but they all do basically the same thing. Canon calls it Evaluative metering mode, Nikon calls it Matrix metering, and Sony refers to it as Multi-segmented metering. No matter what they call it, Scene metering mode seeks to intelligently decipher the light coming into the camera from the various areas of the scene and select an exposure setting to best render the scene. This is my overall default metering mode for a host of subjects.
With the advancement to digital processing and memory speeds, the light meters in today's digital cameras have become smarter and work faster than ever before. In Scene metering mode, the camera's light meter analyzes the scene before it, and by analyzing separate light readings from all over the frame, attempts to make an intelligent determination of the appropriate exposure for whatever you are photographing.
This happens so quickly you never even know it's happening. The newer face detection software and blink detection capabilities are prime examples of this new technology at work. By attempting to work out the exposure values in milliseconds and predict what you are photographing, today's digital cameras deliver more keepers and less poorly executed images.
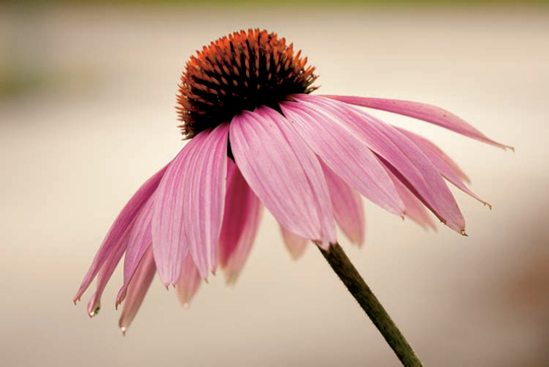
Center-weighted metering mode places most of the exposure emphasis on the center part of the frame (assuming that's where your subject is) and pays less attention to the lighting values on the edges of the scene. Several camera models allow changing the size of this center spot to varying degrees so you can tweak this mode to suit your tastes and subject matter. This mode is ideal when you are composing scenes with your subject as the center of attention in the middle of the scene such as those of flowers or centered faces.
Spot metering mode bases the exposure of the entire image on only a small fraction of the overall scene and thus reads only a small amount of light entering the camera. When Spot metering is chosen, it measures less light and therefore is unaffected by other areas of the scene, which may contain overly bright or dark colors. Some cameras use the area of the scene around a preselected focus point, allowing you to move the Spot metering circle around by changing the focus point to make sure the exposure is based on the most important element in your frame.
This mode is ideal when shooting subjects against very dark or light backgrounds such as a spot-lit performer on a dark stage. It bases all the exposure calculations on the performer in the center of the spot and disregards any exposure information coming from the darker surrounding areas of the scene.
Exposure compensation involves consciously changing the exposure values either positively or negatively away from the camera's recommended exposure by dialing more or less of it in the camera. This is used when you know that certain areas of your photo are going to get more or less exposure than they require. Most digital cameras include controls to set exposure compensation between −3 to +3 stops of light in 1/3-stop increments, and top-end cameras allow the exposure to be changed by up to 5 stops in either direction. Check your camera manual to see the range available for your camera. Exposure compensation works in Programmed Auto, Aperture Priority, and Shutter Priority modes. It has no effect in Manual mode because the camera's internal light meter has no control over aperture or shutter speed in Manual mode and turns all that control over to you. Take a brief look at what exposure compensation does in each of the modes it works in:
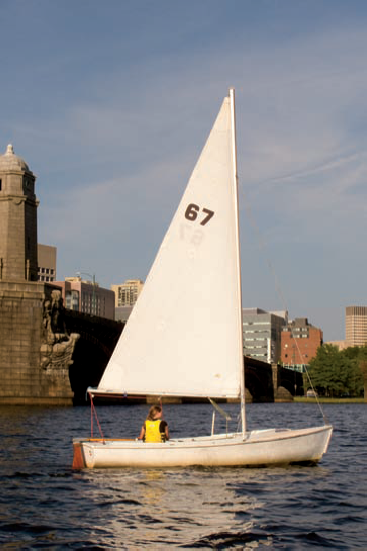
Figure 2.11. Spot metering mode was used to maintain detail in the bright white sail and not blow out the highlights in this shot of a sailboat. Exposure: ISO 100, f/4.5, 1/1600 second.
Programmed Auto mode.In Programmed Auto mode, the camera's light meter seeks to give you the best possible settings depending on the brightness of the scene. When exposure compensation is applied, the camera attempts to apply this compensation equally across both the shutter speed and the aperture values unless you reach the end of your range for that control, such as your largest aperture or fastest shutter speed. Then the camera changes only the control that can still be adjusted.
Aperture Priority mode. With this mode, you pick the aperture and the camera selects the proper shutter speed based on the reflected light readings of the camera's meter. When you dial in exposure compensation in Aperture Priority mode the camera only adjusts the shutter speed in greater or lesser amounts to match the amount of compensation you have specified to maintain the amount of depth of field relative to the chosen f-stop. Changing the shutter speed via exposure compensation may have more of an effect on freezing the action or creating motion blur.
Shutter Priority mode. In this mode, you select the shutter speed and the camera picks the aperture. When you apply exposure compensation, the camera opens or closes down the aperture to the amount you have dialed in, up to the limits of the aperture range. These settings also change the depth of field you have in the image.
Bracketing your exposures is an approach to take when you are confronted with a very difficult lighting situation and is the first step to creating High Dynamic Range (HDR) images. Bracketing means taking several pictures at, above, and below the camera's recommended exposure values by changing the aperture or shutter speed in three, five, or seven sets. Several models of digital cameras may have a bracketing feature in the camera. Check your camera manual for instructions of how to set this.
Bracketing is not the ideal method to use in all problem photo situations, however, and I always stress taking the time to get the exposure correct in the camera. Moving subjects involving fashion, sports, or action do not benefit from this approach because very often the best exposure could be the least pleasing composition and vice versa. Bracketing is best used for static subjects, such as nature or landscapes, where the only thing changing is the exposure.
I use bracketing in the studio for static product shots when I want to see varying degrees of depth of field on the set. When using flash, as I am in the studio, changing the shutter speed has no effect on the scene, so I am locked in to bracketing by changing the aperture, reducing the power output of the flashes, or moving them closer or farther away from the subject. Outdoors, I am free to change either of the values when bracketing exposures to produce a range of exposures.
Figure 2.12. This example shows three bracketed images in full-stop increments. The camera's recommended exposure is in the middle, along with a 1-stop underexposed image on the left and a 1-stop overexposed image on the right. Exposures: ISO 100, f.5, 1/400, 1/200, and 1/100 second.
Another time you would employ bracketing an image is when creating images to combine into a High Dynamic Range (HDR) photograph. HDR photography involves combining several differently exposed images in specialized software such as Photomatix or Photoshop to produce one image with a much wider exposure range. The software takes the best values of the lighter, darker, and middle-toned areas and merges them into one photo using a process called tone mapping.
Note
For more on HDR imagery, see Chapter 11.
Histograms are helpful for analyzing the exposure of a captured image by showing you where pixels fall between pure black and pure white. Horizontally, the histogram shows you the distribution of pixels across a range of tones, while the vertical axis shows you the amount of pixels that occupy each tone. Some digital cameras offer two types of histograms: a brightness or luminance histogram and an RGB histogram that shows the tonal values for the Red, Green, and Blue color channels. The histogram is a great tool built in to your camera for evaluating the exposure of your images.
The brightness or luminance histogram is a simple bar graph that shows you the distribution of pixels across the tonal range. Reading a histogram is important while shooting because it gives you a graphical representation of what the camera's sensor recorded. Making exposure adjustments based on the histogram, rather than how the image looks on your camera's LCD monitor, is a much better technique for gauging exposure. Several cameras display the histogram differently, but the information they present to you is basically the same.
The left edge of the histogram shows you the amount of pixels in the darkest values of the tonal scale (level 0), and the brightest values (level 255) on the right edge with the midtones in the middle. You can notice some important things about your exposure by studying the histogram to see where the pixels fall. If the pixels are crowded against the left edge of the histogram and do not extend all the way over to the right edge, the image will be underexposed with a loss of detail in the shadows. Conversely, if you notice more pixels touching the right edge of the histogram, your image will be overexposed and a loss of detail in the highlights will be evident. This is indicated on some cameras as a highlight alert and the areas that have lost detail and are beyond the range that the sensor can capture will blink in the LCD monitor's image display. Some photographers have referred to these areas as the blinkies and avoid them at all costs.
For this reason, you want a fairly even distribution of pixels across the range of the histogram with the highlight or shadow pixels just barely touching the left and right edges of the histogram respectively. When a high concentration of pixels starts at either of the top corners of the histogram and slopes down toward the center, it means that some of the highlight or shadow tones have been exposed beyond the range of the image sensor's capabilities, resulting in an image that does not make full use of your camera's exposure range. This is what photographers mean when they say that the image's highlights are blown out or the shadows have blocked up.
Some cameras allow the display of separate histograms of the Red, Green, and Blue color channels of an image, along with a combined histogram showing all three in relation to each other. The three color histograms may all have the proper exposure but will all look slightly different due to the different amounts of each color in the image. You read these histograms in a similar fashion as you do the brightness histogram. More pixels on the left means that the color is darker and more obvious in the photo and more pixels on the right means that the color is lighter and less dominant in the image.
Different types of shooting will determine which type of histogram display is more beneficial to you. For most of my outdoor landscape, nature, and wedding photography, a brightness histogram is more useful to determine highlight detail. When shooting fashion, art creations, or catalog work where the color rendition must be highly accurate, the RGB histogram provides better feedback of the image exposure.
The basic idea for evaluating exposure when using either type of histogram is to avoid clipping, which is indicated by a spiking of pixels on either of the far edges of the histogram scale. This spiking on the histogram will represent a loss of detail in either the highlights, shadows, or both. If you take a picture in a very bright situation and the histogram displays spiking on the far right of the scale, you will have lost subtle detail in the highlights of the image. Conversely, when an image is made in a low-light situation or is underexposed and a spike appears on the left edge of the histogram, you may have lost a considerable amount of shadow detail.
Keep in mind that the histogram is dependent on the tonality of the image and some scenes where the lighting contrast is so high that it may be beyond the range of tones on both sides of the histogram scale. Unless you add supplemental light such as from a speedlight or reflector, you may have to accept some loss of highlight or shadow detail in the image. In many cases, the best exposure will show an even distribution across the tonal scale, but this does not always occur. Take for example a photograph of a polar bear in a snowstorm. In this photo there may be no dark tones in the image, so none will show on the far left edge of the histogram. Minor overexposure of small details such as the edges of clouds or the sun are usually not too bad but avoid creating images that only have pixel information on the left half of the histogram because in addition to being underexposed you run the risk of adding more digital noise to the image.
The file format you choose determines whether the images are stored on your memory card in JPEG or in RAW format and the quality level you choose determines the number of images you can store on the card, as well as the overall image quality and the sizes at which you can enlarge and print images.
Your choice of file format and quality usually is assignment- and/or output-specific. For example, I always shoot RAW images during portrait sessions, industrial location shoots with mixed lighting, and so on. Then I might switch to Large/Fine JPEG format for a wedding or luncheon reception because I know that these images likely are printed no larger than 5 × 7 inches. For most other assignments, where I know I have the time to post-process them, I shoot only RAW images to get the highest image quality and to have the widest latitude for converting and editing images later on. Other times when I need to upload images right away, I will shoot RAW + JPEG or just JPEG if I need to produce the images quickly and speed is of the essence.
It took me a while to work out storage and workflow issues and to see the differences in image quality and file management between the two. The following sections look at the differences between JPEG, RAW, and TIFF file formats.
RAW files are stored in a proprietary format that produces image files that are significantly larger than JPEG image files. Because the images are stored in this format, they can be viewed only in programs that support your camera's RAW image file format. RAW files save the data that comes off the image sensor with little internal camera processing. Because many of the camera settings have been noted but not applied to the data in the camera, you have the opportunity to make changes to key settings, such as exposure, white balance, contrast, hue and saturation when you convert the RAW files on the computer. The only camera settings that the camera applies to RAW files are ISO, shutter speed, aperture, and Shooting mode.
This means that during RAW image conversion, you control the image rendering, including the colorimetric rendering, tonal response, sharpening, and noise reduction. Plus, you can take advantage of saving images in 16 bits per channel when you convert the RAW images in your camera's software program, Simply put, the higher the bit depth, the finer the detail, the smoother the transition between tones, and the higher the dynamic range (the ability of the camera to hold detail in both highlight and shadow areas) in the image.
JPEG, which stands for Joint Photographic Experts Group, is called a lossy form of compression but a highly portable file format that enables you to view the images on any computer platform. Your camera probably includes several levels of compression and file sizes to choose from in the JPEG format. The lossy file format means that some image data is discarded when saving the files and while compressing image data to reduce file size for storing images on your memory card. Because JPEG images are compressed to a smaller file size, more images can be stored on the memory card. However, as the compression ratio increases, more image data is discarded and the image quality degrades accordingly. Additional image data is discarded each time you save the file when you edit JPEG images on the computer.
In addition to losing image data during compression, JPEG files are automatically converted from 12- to 8-bit and are preprocessed by the camera's internal hardware/software before they are stored on the memory card. As a result of the low bit depth and preprocessing, color in general, and skin tones in particular, as well as subtle tonal gradations suffer. By the time you get the JPEG image on the computer, you have less latitude for editing with moves in tones and color becoming exaggerated by the lower bit depth.
Which format you decide to shoot depends on a variety of factors and what you intend to do with the images once they are captured. The JPEG format enjoys universal acceptance, which means that the images can be displayed on any computer, opened in any image-editing program, uploaded faster to the Web and social media sites or printed directly from the camera or the computer. RAW capture affords you the largest image file size in a format that can be processed in a variety of different ways, retains wide exposure and color adjustment latitude, but takes longer to write to your camera's memory card and also takes up more room so you will be able to fit fewer images on the card than with JPEG capture. You can also set your camera to shoot RAW and JPEG images of the same image for the best of both worlds. Both formats have their pros and cons that need to be considered for your type of shooting and workflow.
Another type of file format is the TIFF format. TIFF stands for Tagged Image File Format and is the standard file format for desktop publishing and the publishing industry in general. This file format is included in some digital cameras for its ability to save an uncompressed image file with all the camera's settings applied to the file although these cameras are rare. The largest of the three file formats, TIFF files are considered lossless in that they retain all the image file data no matter how many times they are opened up and then saved, thereby maintaining superb image quality and a heftier file size.
For the highest quality and long-term storage, my workflow includes shooting the images in RAW format, using computer software to process the RAW files and then saving them to disk or hard drive as a TIFF file. Because of their lossless quality and large file size, TIFF images are widely used in the publishing industry and can then be used in many computer software applications without any further processing. For example, all the images you see in this book were supplied to the publisher in the TIFF file format.