
In just a moment in time, with a click, a lasting memory is captured forever. But just how long that moment is recorded is controlled by the photographer and his or her choice of shutter speed. The shutter is a device in front of your camera's image sensor that controls the duration of time that light is allowed to strike the sensor. The amount of time the shutter is open determines the amount of light that reaches the sensor as the scene is captured. Shutter speed also controls other characteristics such as the depiction of movement, speed, and time. This chapter explains controlling light with shutter speed, including special techniques such as time exposures, freezing action, and panning the camera.
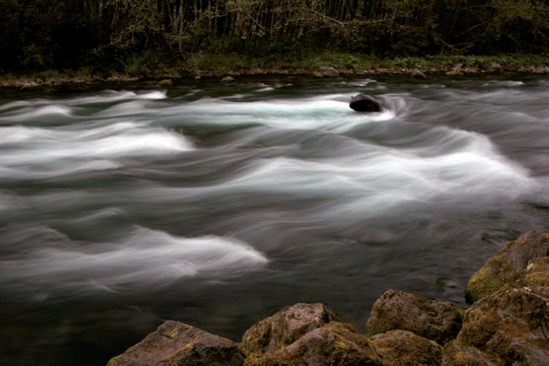
Along the banks of the McKenzie River in southwestern Oregon, I made this image from my favorite campsite. I purposely chose a long shutter speed to produce the silky effect to the moving river. If you look very closely, you can even see a small bird on the large rock poking out of the water. Exposure: ISO 100, f/4, 1.3 seconds.
Several times in my manual digital photography classes and workshops I remind my students that their subjects can often clue them in to what the camera settings should be. As they look through their viewfinders I gently ask them if anything important in the frame is moving, and if so, shutter speed becomes an initial priority.
It could be something as simple as a flower softly swaying in a slight breeze or a Little Leaguer chasing a hot grounder that makes the selection of shutter speed an important consideration. Photographs in which the subject is blurry are caused by subject movement or camera shake and the easiest way to avoid this is by choosing the best shutter speed for the situation.
Any time you have a moving subject or movement in the image, shutter speed has to be considered primarily in the ultimate exposure mix, but which way you go with it is entirely up to you. Sure, many times you want to freeze an action or an event, but what if you want to slow down time as in the image that opened this chapter, where the rushing water of the McKenzie River traveled several feet between the time the shutter open and closed, resulting in the lush, silky rendition of the water? This is how photographers convey the feeling of motion in a static image. By stretching out the amount of time the shutter is open, objects can move within the frame that, ideally, support the photographer's intent.
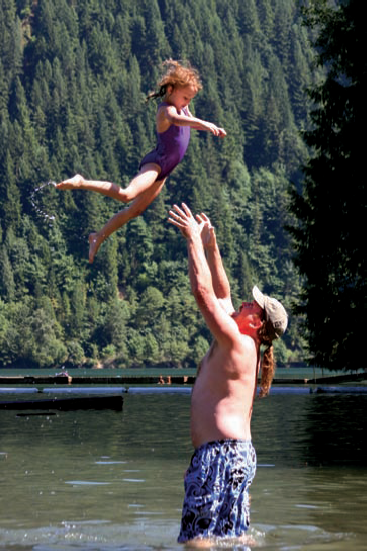
Figure 3.1. My daughter Brenna enjoying being thrown into the air by our good friend Bob "BBQ" Kuhn. Direct top lighting separates them from the darker background. Even with a fast shutter speed to freeze Brenna and the water droplets in midair, Bob's legs are slightly blurred. Exposure: ISO 400, f/5.6, 1/800 second.
Your dSLR camera is equipped with an array of shutter speed choices, and knowing how to choose the most appropriate one for the feeling you want to give your image is key to understanding what happens once you press the Shutter Release button.

Figure 3.2. Even though it was midday, I still needed a long shutter speed with a tripod and remote switch to properly expose this remodeled kitchen for an interior design client. Exposure: ISO 100, f/22, 10 seconds.
Most dSLR cameras, and even several point-and-shoot cameras, have shooting modes that greatly influence the selection of shutter speed, such as Programmed Auto mode, Shutter Priority mode, Aperture Priority mode, and Manual mode. You can access and control these modes through your camera's menu system or with buttons or dials on the outside of the camera. Refer to the original operating manual that came with your camera, or better yet, check out the Digital Field Guide that is specific to your camera model.
Many of the aspects of these different shooting modes are discussed in Chapter 2, but a few additional points are addressed here. The green-box Full Auto mode on several manufacturers' cameras should be avoided in all shooting situations by serious photographers because it gives you absolutely no creative control of ISO, shutter speed, or aperture combinations and picks what it thinks are the best settings for the light it perceives coming into your lens.
In Programmed Auto mode, usually signified by a "P" on your camera, you can adjust the shutter speed/aperture combination that the camera has selected by turning a dial or pressing a button and turning a dial. This provides some creative input from the eye behind the viewfinder to help you get the shot you want. You can select a faster or slower shutter speed and the camera then adjusts the aperture to an appropriate opening for the new shutter speed. This is performed on an image-to-image basis and is not a good mode to use if you are going to be shooting a lot of images of the same subject, tediously adjusting the exposure between every shot.
A better approach is to use Shutter Priority mode to lock your camera into a predetermined shutter speed whereby the camera selects the appropriate aperture to go along with it. This is the best shooting mode to use when you are only concerned with shutter speed and its effect on your subject. As you make the shutter speed faster, the camera selects a wider and wider aperture. At a certain point, you reach the largest setting for your particular lens, and if you continue increasing the shutter speed your pictures become darker and darker because an inadequate amount of light is reaching the image sensor. In this situation you'd be wise to increase your ISO setting to change the sensitivity of your sensor, but look out for additional digital noise the higher in ISO range you go.
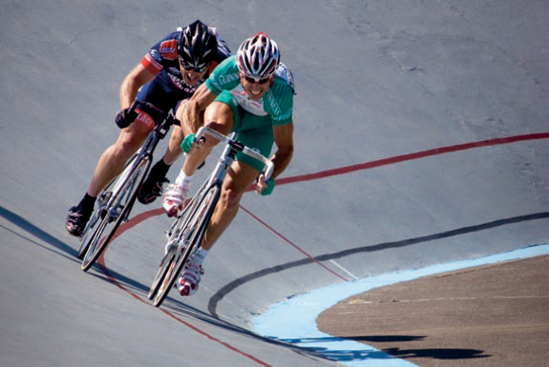
Figure 3.3. Bicycle racers come out of the fourth turn at the Alpenrose Velodrome and pour it on for the finish. A fast shutter speed freezes the closing moments of the race. Exposure: ISO 500, f/5.6, 1/4000 second.
Shutter Priority is also my go-to mode for shooting sports and action because I want to freeze the action to create a tack-sharp image. I like Shutter Priority mode because it frees me to concentrate on the image in the viewfinder and not on a lot of camera settings. I also like that my camera shows me the aperture/shutter speed combination inside my camera's viewfinder so I can quickly change it if I need to. I never have to take my eye away from the action to change camera settings and run the risk of missing a shot.
Being able to see the aperture/shutter speed combination in the viewfinder is also important when shooting in Manual mode because all the settings are left up to you. Similar to the old match-needle metering system in film cameras, today's dSLR models show a small cursor that moves from plus exposure to minus exposure as you change settings. This is the camera's way of telling you exactly where it thinks you are exposure wise from a normal proper exposure. Manual mode gives you total control over the exposure settings but still provides a reference point or benchmark for what the camera considers the right exposure.
When shooting in Manual mode, pay close attention to the camera's exposure settings and histograms of the images. It is very easy to overexpose or underexpose images in this mode because the camera does not prevent you from doing so. Purposely adding or subtracting exposure in Manual mode is the same as dialing it in by exposure compensation when shooting in your camera's Auto modes. Exposure compensation has no effect on exposure however when shooting in Manual mode.
I usually go through a quick mental Q&A when determining shutter speed. Take a second or two to run through this list to see if it can be helpful to you for your type of shooting:
Is the subject moving? This sounds like a no-brainer, but I'm not kidding when I tell you that I've had workshop participants so intent on photographing grasshoppers and butterflies that they never considered the fact that the subjects were slightly bouncing on a branch or leaf. Poor shutter speed choice was responsible for their blurry photos, not a focus or lens problem. I always err on the side of caution if I think there is a chance of the slightest movement by choosing a faster shutter speed than the subject requires.
How fast is the subject moving? If it's moving very fast I'm going to need a very fast shutter speed to keep up with the action and yield crisp, sharp images. I might even go all the way up to 1/4000 or even 1/8000 second if my camera is capable of it. If the subject is moving moderately slowly, as the aforementioned grasshopper bobbing merrily on a leaf, I choose a moderate shutter speed somewhere in the 1/125-1/500 second range.
How far away is the subject? Subjects that are very far away are going to appear smaller in your viewfinder and in the final image. The speed of a moving subject is dramatically increased the closer it is to the camera, so you need a fast shutter speed for closer subjects. Subjects farther away yet still moving quickly may not cover as much ground visually in your frame and afford a slower shutter speed.
What's the lowest ISO setting I can use and still maintain my preferred shutter speed? You want to always use the lowest ISO setting you can to avoid digital noise in your images while still allowing you enough flexibility to shoot using a wide range of shutter speeds. I would rather accept some noise in the image as long as it is optically sharp. When shooting handheld, I want to stay at 1/60 second or faster for wide-angle lenses to medium telephotos, so I make sure to choose an ISO setting that allows me to do this.
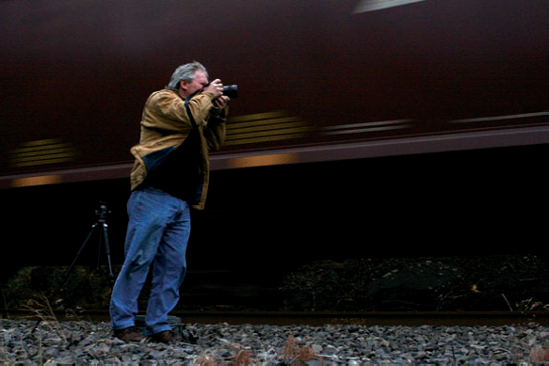
Figure 3.4. Soft overcast light illuminates photographer Dave Lutz as he photographs a passing freight train. Handholding the camera at the slowest shutter speed I could use while retaining my preferred aperture, I had to boost the ISO to get a usable image. Exposure: ISO 1600, f/6.3, 1/60 second.
Keep in mind how important shutter speed is to obtaining sharp photos — don't get so locked into looking at the subject and how cool it is that you fail to notice that it is moving ever so slightly. Even people standing still are actually moving very slightly by breathing and blinking their eyes. It is not enough to just keep the camera steady; you need to select the proper shutter speed relative to the subject or scene you want to photograph. Even a tripod and remote switch setup is of little help if the shutter speed is set incorrectly.
Freezing the action means selecting the proper shutter speed for the subject at hand, whether it's a pro football player catching a pass or a small child riding a bike, to produce a sharp image. When contemplating the action before you, consider the subject's speed, direction of movement, and size.
Developing a feel for the movement of the scene gives you a good idea of the right shutter speed to start out with. I have found that it is almost always a tick or two faster than what I originally thought. Many photographers share the heartbreak of coming home and pulling up some hot images they just shot only to find they are soft and not entirely tack sharp. Learning to pick the best shutter speed to capture a split second at the peak of the action takes practice. If it were that easy to shoot Sports Illustrated covers, wouldn't everyone be doing it?
First, you need to determine how fast the camera or subject is moving. Shooting racing cars requires a faster shutter speed than photographing a dog running on the beach. Children at play and sporting events require faster shutter speeds. Photographing water skiers from a towboat means both of you are moving, so an even faster speed must be chosen to freeze the motion. The more you shoot objects in motion, the better you can judge the proper shutter speed.
Second, you need to figure out which way the subject is moving. Front-to-back movement, where the subject is heading toward or away from you, needs less of a shutter speed boost than objects moving from side to side. Early autofocus cameras had a problem with accurately focusing on front-to-back moving subjects, so Servo or Predictive focus modes were developed to solve the problem of the subject moving after the camera had autofocused. The speed of the subject and the direction it's moving plays a major part in shutter speed selection.
The last consideration before pressing the Shutter Release button is subject size. Most of the time, you want to fill the frame with your subject, visually cropping out the elements in the scene that don't support the subject or main idea for your photo. The larger the subject is in the frame, the more distance it covers visually in a certain amount of time. Shoot that subject at a greater distance or with a wide-angle lens and it takes longer to cross the frame and can tolerate a much slower shutter speed.
I have discussed several considerations for using shutter speed to freeze the motion of the subject, but there is another motion to be aware of when shooting and that's the movement of the photographer and thus, the camera. Camera movement during the time the shutter is open results in blurred photos from camera shake. Camera shake used to be a very common problem when shooting in Programmed Auto mode in low-light situations. Some digital cameras can pick a shutter speed you cannot safely handhold in low-light scenes and the resulting images can be blurry. However, most cameras today have a warning light or sound when this is the case. At those times, I increase my ISO setting, open my aperture, or do both to reach an acceptable shutter speed I can safely handhold.
Camera shake is especially a problem when shooting with telephoto lenses. The longer the focal length of the lens, the faster the shutter speed needs to be because the telephoto lens captures less of the scene by narrowing the field of view. The general rule to follow has always been to select a shutter speed that equals 1 over the focal length of the lens you're using when shooting handheld. To apply this to a standard 100mm lens, your shutter speed should be at least 1/100 second; a 200mm lens needs a shutter speed of at least 1/200 second. However, there is popular lens technology that helps you get around this longtime rule and allows you to shoot between 1 to 4 stops slower than you normally would.
Image Stabilization (IS) mode by Canon and Vibration Reduction (VR) by Nikon are two of the most popular lens technologies for shooting sharp images at slower shutter speeds. If the handholding limit is pushed, then camera shake bends the light rays coming from the subject into the lens relative to the optical axis, and the result is a blurry image.
Image stabilization technology is employed in optical systems such as binoculars, telescopes, and video cameras. It is commonly used in cameras to reduce blurred images due to camera shake, and is particularly useful at slower shutter speeds and with telephoto lenses. Different manufacturers use various methods to produce this advantage but the overall effect is the same. The stabilization systems attempt to compensate for the pan, tilt, or angular movement (pitch and yaw) of the camera.
Stabilization is particularly important with longer lenses where the effect of shake is more pronounced as the focal length increases. And, as a result, the correction needed to cancel camera shake increases proportionately. Some manufacturers place the stabilizing system in the camera body while others opt to place it in the lens, making it available for that lens only. Lenses that include image stabilization built-in are generally more expensive than ones that do not. The in-camera models use a system that involves moving the image sensor to counteract for the camera's movement.
But how do image-stabilized lenses respond when you want to pan or move the camera with the motion of a subject? The lens detects the movement and responds accordingly to produce a sharp image. Some cameras automatically sense this movement while others include switches to tailor the stabilization to adjust for whichever way the camera is moving such as panning, which is discussed in greater detail later on in this chapter. Image stabilization needs to be turned off when using a tripod-mounted camera because the stabilizing system looks for camera movement which the tripod has effectively neutralized.
Regardless of the method of image stabilization utilized, the end goal is producing sharp images at slower shutter speeds or when shooting longer telephoto lenses handheld, and this technology is very beneficial in that regard and worth exploring.
The question is whether this technology is worth the premium prices for these lenses and, of course, how much you hate schlepping around a tripod. Comparing the cost of similar lenses, the price is usually a few hundred (U.S.) dollars more for an image-stabilized lens than for a similar non-image-stabilized lens. Only you can decide, but for my photography, this technology is worth the price, particularly in low-light situations such as weddings and music concerts where tripods or monopods are impractical.
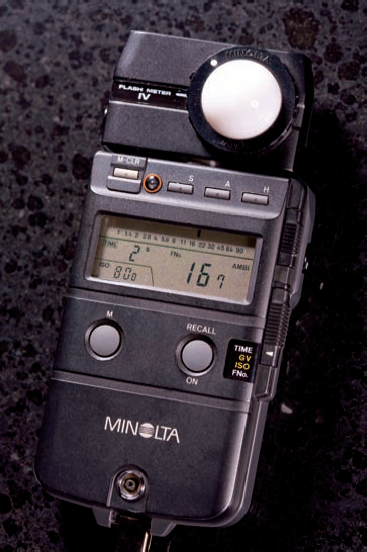
Figure 3.5. External light meters usually include several modes for measuring light and come with a dome diffuser for incident light measuring. To take reflected light readings, simply remove the dome. Light meters can be a big help when taking long time exposures.
Another method of freezing the action involves firing your built-in flash or adding an external flash unit to the exposure mix or shooting in High-speed Sync mode. High-speed Sync mode allows you to use virtually all your shutter speeds while working with flash and only works in dedicated TTL systems. With many of today's dSLR cameras including high-speed flash sync to their list of features, you can use virtually any shutter speed you want.
The wonderful thing about shutter speed control is that there are so many creative possibilities involved and it's not just a utilitarian device to get tack-sharp pictures of moving subjects. Time exposures, where the shutter is fully open for longer periods of time, are one of the more enjoyable activities to discover the power of the shutter speed.
Time exposures can usually be broken down into three distinct types: short, medium, and long. There are certain qualities to each type and understanding the effect each shutter speed provides and how it renders the subjects in your images will give you the confidence to handle any subject. This section takes a look at each type and the benefits it provides.
Shorter time exposures in the 1/15 to just under 1 second range are considered shutter speeds you have chosen to depict some form of motion of an object or action in the shot. You may be shooting from a moving position such as a speedboat, bicycle, or car or you may be in a stationary position shooting a moving subject or action. Assuming you are capturing these images during the day, you probably have loads of light in which to shoot, which may present exposure problems when you try to choose a slower shutter speed.
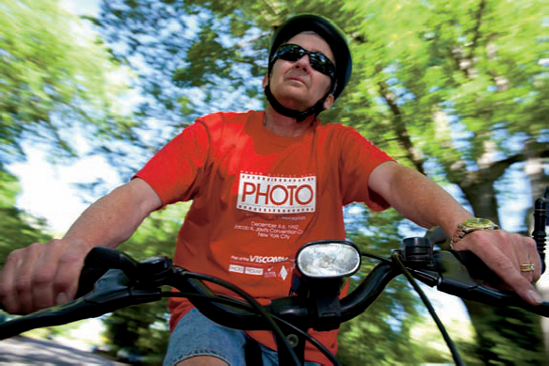
Figure 3.6. With my camera mounted securely to my mountain bike, I chose a slower shutter speed of 1/30 second to add motion blur to the background yet still keep me sharp. Exposure: ISO 100, f/5.6, 1/30 second.
The easiest technique to slow down your shutter speed to achieve motion blur and still yield accurate exposures is to drop your ISO as low as it can go. On most cameras this is ISO 100-200, but some digital cameras can go as low as ISO 50. By de-amplifying the sensor, you make it less sensitive to light thereby requiring more light to make a usable image. You can also shoot with smaller apertures that require more light as well.
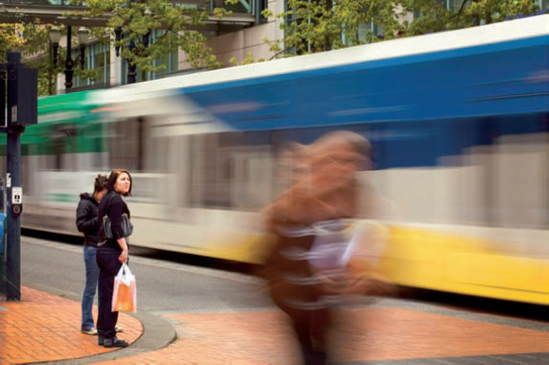
Figure 3.7. A short time exposure blurred the light rail train and a pedestrian walking toward me but kept the woman waiting to cross the street sharp. To create this effect, I used the lowest ISO and smallest aperture my camera was capable of to facilitate the use of a slower shutter speed. Exposure: ISO 50, f/32, 1/2 second.
In really bright situations where you have already stopped down the aperture and selected the lowest ISO, you could add a polarizing or neutral density (ND) filter to further reduce the amount of light coming into the camera by a few stops.
Medium time exposures are those that fall into the 1- to 60-second range and are great for showing action and motion such as water, fireworks, and clouds. These are arguably the most widely used times for time exposures. They require a sturdy tripod, a cable release, and a stable place from which to shoot. Nightscapes and cityscapes are especially fun subjects to shoot in this range along with streams of traffic with headlights and taillights becoming long strings of color on the roads. Water especially takes on a beautiful soft glow if there is any man-made illumination falling on it, and by extending the time, most surface detail disappears.
Another great use of medium time exposures happens when shooting interiors. I am fortunate to work with a number of interior designers, architects, and building contractors photographing completed projects for their Web sites and marketing materials. When setting up the shoot, I always suggest we can plan the shoot for late afternoon/early evening when the outside light is fading and less intense to better blend the interior and exterior illumination values, as the golden time makes the shot look more natural and inviting.
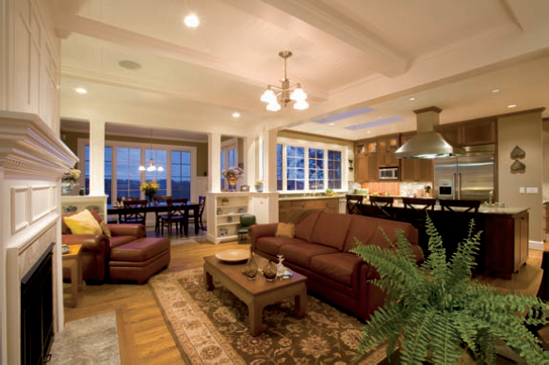
Figure 3.8. The perfect time of the day for shooting interiors is when the outside intensity of light matches the inside, in this case 6 p.m. in February. A medium time exposure of 15 seconds yields warm tones of the interior tungsten lighting that contrast nicely with the cool blues of the outside sky. Exposure: ISO 100, f/22, 15 seconds.
Medium time exposures of several seconds allow me to keep the window shades open when shooting interiors, letting the light in for a more natural look. Clients do not want me to bring in extra lighting gear to shoot the images because they want the rooms to appear natural and lit they way they were designed. To gain depth of field I use smaller apertures that let in less light, so I need to use medium time exposures that keep the shutter open to compensate for the lower light level. I have hidden some small flashes to open up some darker problem areas, but overall the scene is photographed as it appears. Because I want good detail throughout the scene, I use a cable release or remote switch, a tripod, and a 16-35mm lens set to its widest setting and positioned to minimize distortion.
Longer time exposures of a minute and beyond are used for many creative purposes, such as star trails and light painting. For this you again need a tripod and cable release or remote switch, but the trigger needs to be able to lock in the open position because any camera handling during this long of a time degrades image sharpness.
Many photographers who shoot star trails find the North Star by locating the leading edge of the Big Dipper's cup and following an imaginary line up from the two stars. By placing the North Star somewhere in the frame, all the other stars appear to rotate around it. Use the Bulb exposure on your camera to keep the shutter open longer than the 30-second default time most cameras include as their longest and lock the shutter open with the switch. Keeping the camera in an active state for this long really takes its toll on batteries, so always be sure to have spares available for this type of work.
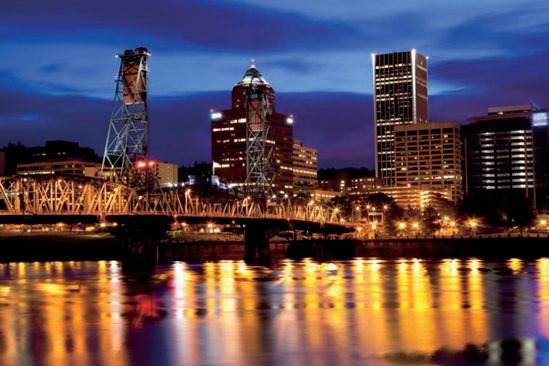
Figure 3.9. The Morrison Bridge, Willamette River, and Portland skyline are captured with a medium time exposure. Notice the sheen of the reflections on the river surface caused by the lengthy amount of time the shutter was open. As a bonus, using a small aperture creates star points on the spectral highlights. Exposure: ISO 100, f/13, 30 seconds.
Zoom Blur
Another technique of creating motion blur is the zoom blur. This works with both stationary and moving subjects with equal success. The secret is to place your subject in the center of the frame and zoom the lens while you make the exposure. A tripod is helpful but not always necessary because much in the scene ends up blurry from the motion, which is the effect you are going for. Shutter speeds longer than 1/4 second work well for this technique and allow enough time for you to zoom through the range of your lens.
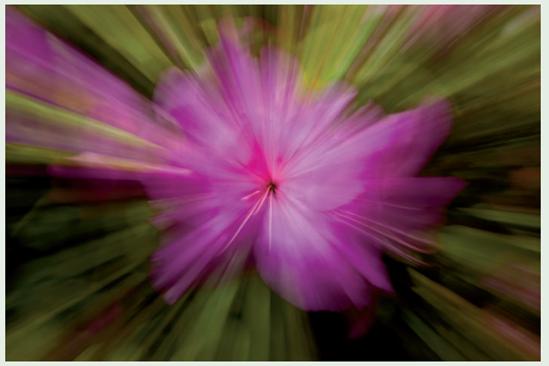
The following image is a small pink flower I found in subdued light. I set up my tripod without a remote switch, composed the shot so that the flower was centered, and set my zoom lens to its longest focal length. Zooming from long to short focal lengths allows you to pick up depth of field and sharpness as you zoom. Starting the zooming before opening the shutter provides a more fluid look to the zoom.
Panning the camera is another way to convey speed, motion, and color to create compelling images. Most panning involves moving the camera from side to side while tracking a moving object through the viewfinder. There are a number of techniques to use for successful panning that yields sharp subjects.
I try to plan the pan by standing with my feet slightly apart in an A-frame position and keep my weight evenly distributed on both feet. I search out a pleasing background to use for the pan, not worrying about the details because they will be blurred but also trying to avoid large discrepancies in tonality or color. This is a great technique to use for parades or sporting events where there are people everywhere and no good backgrounds.
I focus on a spot where I want to take the picture and shut the autofocus system off or set my camera to Continuous focus mode. Then I pick up the moving subject through the viewfinder by twisting my waist slightly and track it as it moves into position. When I feel my body center itself, I press the Shutter Release button knowing I'm in the right spot because that's how I set it up, and follow through in a smooth fluid motion as the object passes.
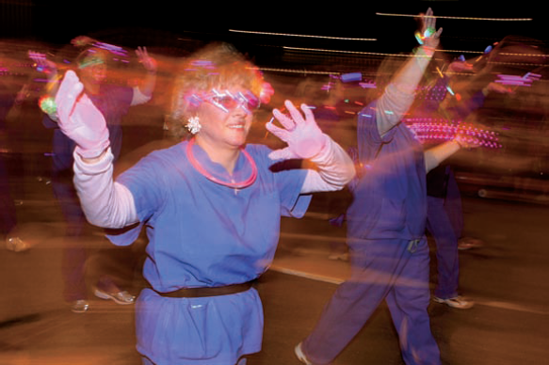
Figure 3.10. Panning the camera and using an external flash set to Rear-Curtain sync creates unique one-of-a-kind light trails and other interesting lighting effects. Exposure: ISO 800, f/5.6, 1/3 second.
As you can see from this chapter's examples, there is a world of creativity waiting for you in the land of shutter speeds. If you spend a week concentrating on controlling light with only shutter speed and let the camera pick the other settings, you can develop the confidence to know that with shutter speed and enough light you can handle any subject.