
If you're anything like most of the professionals I work with, Outlook is one of the programs you use the most often, and at the same time, it's possibly the most underutilized application installed on your work computer. This is because, for many, many knowledge workers, Outlook is merely the program that enables them to "do" their e-mail and, at times, look up vital contact information.
More than a few Outlook users aren't even aware that the program is capable of doing anything useful besides sending and receiving e-mail and storing contact information. Because Outlook always starts up with the display of the Inbox, users naturally spend almost all their time in its Mail module, blissfully unaware of its other capabilities. This rather sad situation is about to change, for in this chapter, I expose you to, as they say, the "full Monty" when it comes to Outlook's functionality and interface (look and feel).
The goal of this chapter is for you to see Outlook as a full-featured personal information management program equipped with all the capabilities you need in order to organize, manage, and track electronic personal information on your computer. Note that to meet this goal, you don't need to become fully familiar with all of Outlook's bells and whistles. You simply need to become familiar with the productivity features that each of its modules offers and know how to work with these modules and blend their features so that your focus remains first and foremost on the task at hand and only secondarily on Outlook itself.
In Part I, I have a lot to say about your attitudes and how they affect personal productivity both for better and for worse. Attitude is important here because the first thing you need to do to use Outlook as your Personal Information Manager is to see it and approach it as such. This means that you have to be able to approach Outlook as so much more than an e-mail client with address book functions (even though they're included).
If you're anything like me, making this kind of attitude adjustment is a process that takes some time and comes about only with some experience using the other Outlook modules besides Mail and Contacts on a somewhat regular basis (the kind of experience that you definitely get as a result of following the productivity techniques laid out in this book).
You can start this process of viewing Outlook as a full-fledged Personal Information Manager by taking a quick tour of Outlook's modules. This module tour is designed to get you out of the Mail module and familiar with the others, which I hope you'll soon be using almost as much as Mail.
To take this tour, all you have to do is to follow these easy steps:
Launch Outlook as you normally do.
Remember that you can launch Outlook by clicking the Microsoft Office Outlook button in the Quick Launch toolbar on the Windows task bar, or by double-clicking its program icon on the Windows desktop, or by clicking the Windows Start button and then choosing Microsoft Office Outlook at the top of the Start menu.
When you first launch Outlook, the program automatically opens the Mail module, selecting the Inbox folder and displaying the folder's contents in the Information Viewer and the contents of the currently selected message in the Reading Pane.
In the Navigation Pane on the left, click the Personal Folders icon at the very top of the All Mail Folders section.
Doing this displays the Outlook Today view. This is Outlook's snapshot view that lets you see at a glance upcoming appointments on your calendar, tasks on your to-do lists, and unopened messages in your Inbox.
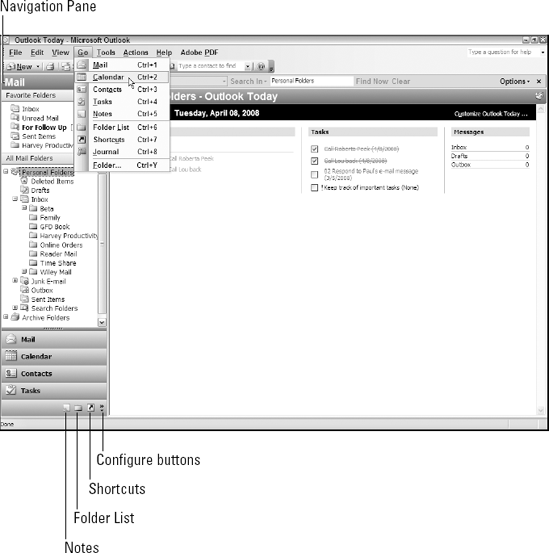
Choose the Go menu from the Outlook menu bar or press Alt+G.
Outlook displays Go menu items for selecting the other Outlook modules, as shown in Figure 5-1. Note the shortcut keys associated with each menu option (as I really want you to know these shortcuts by heart).
Choose Calendar from the Go menu.
Outlook displays the Calendar module. Note that the Calendar button in the bottom section of the Navigation Pane is now highlighted. (The Mail button was automatically highlighted in the Navigation Pane when the Mail was displayed, in case you didn't notice.)
Click the Contacts button in the Navigation Pane.
Outlook opens the Contacts module. Note that the Contacts button is now highlighted in the Navigation Pane.
Click the Tasks button in the Navigation Pane.
Outlook opens the Tasks module. Note that Tasks button is now highlighted in the Navigation Pane.
7. Press Ctrl+Shift+I.
Outlook now opens the Mail module and selects the Inbox folder in the Navigation Pane. Note that if you had just clicked the Mail navigation button or pressed the Ctrl+1 shortcut to return to the Mail module, Outlook would have automatically selected Personal Folders in the Navigation Pane and displayed Outlook Today because this view was the last one you had selected.
That concludes your initial tour of the main modules. As you can see, the Microsoft software engineers include plenty of ways to easily move between these modules. Awareness of this should go a long way towards making you less Inbox dependent and opening you up to the other features that can also make Outlook a first-class Personal Information Manager.
An integral part of my third stress-free productivity strategy, mastering your productivity tools (see Chapter 4), is being able to readily identify the components of each productivity tool in your arsenal. This includes understanding the function of each component as well as its prescribed use.
When applying this specifically to Outlook (the major electronic tool in your productivity arsenal), this translates into being familiar with each of the major command components in the Outlook window as well as its setup of panes, depending upon which of the various modules you select.
The most basic command component in Outlook is its menu bar — the second bar at the top of the program window immediately beneath the title bar.
The Outlook menu bar contains seven standard menus: File, Edit, View, Go, Tools, Actions, and Help. (Standard here means that these same seven menus are available no matter which of the Outlook modules you happen to be in.) As you're undoubtedly aware, you can open a menu by clicking the menu name. You may also know that you can press and release the Alt key and then use an arrow key to highlight the menu name and press Enter, or you can press and hold Alt and type the menu's underlined hotkey. (For example, Alt+T opens the Tools menu because the T in Tools is underlined.)
Note
Keep in mind that even though the menus themselves don't change, depending upon which Outlook module you're in, the menu items they offer you do (with the exception of File and Help). This is the case simply because Outlook performs so many diverse productivity-related tasks that the majority of its menus have to be highly context-sensitive in order to offer you all the options you need.
You can experience the highly context-sensitive nature of Outlook's menus for yourself by following this simple sequence of steps:
With the Mail module displayed in Outlook, press Alt+V to open the View menu.
Note the various items on this menu.
Press Alt and then release it without pressing any other key.
Doing this closes the View menu, allowing you to switch to the Calendar module in Outlook.
Press Ctrl+2 to switch to the Calendar module and then press Alt+V to open the View menu.
Note the appearance of the Day, Work Week, Week, and Month items on the View menu when the Calendar module is selected. Such items are missing from the View menu when the Mail module is current.
Move your mouse pointer over the Actions menu.
Doing this closes the View menu while at the same time opening the Actions menu. Note the type of action items available to you with the Calendar module selected.
Press Alt to deselect the menu bar and then press Ctrl+3 to switch to the Contacts module and Alt+A to open the Actions menu.
Note the many action items available to you when the Contacts module is current. Also, observe the difference between actions presented here and those presented with the Calendar module selected.
Repeat Step 5, this time pressing Ctrl+4 instead of Ctrl+3.
Doing this opens the Actions menu again, this time when the Tasks module is current. Note the rather short list of action items attached to the menu in this module and how they differ from those presented with the Contacts module selected.
Repeat Step 5, this time pressing Ctrl+1 instead of Ctrl+3.
Doing this opens the Actions menu when the Mail module is current. Note the completely mail-oriented action items that populate this menu with the Mail module selected.
Press the Alt key one last time to close the open menu.
I hope this little exercise gives you a taste of how chameleon-like Outlook can be, changing key menu options to suit the particular module you're using at the time. I think this helps reinforce the notion that, as a Personal Information Manager, Outlook really presents you with a collection of various environments. And as you become more and more comfortable moving between modules, you begin to see that each Outlook environment is uniquely designed to help perform a particular group of productivity activities.
When compared with other Microsoft programs such as Word 2003 and Excel 2003, Outlook appears positively toolbar-challenged. However, don't let the meager number of toolbars fool you, for as with the Outlook menu items the particular buttons on two out of three of the toolbars (the Standard and Advanced) change depending upon which Outlook module you're using at the time (that old context-sensitive thing again).
The three Outlook three toolbars are
Standard: Contains buttons for creating new entities (messages, appointments, tasks, and so on), printing them, and changing the view, depending upon the current Outlook module.
Advanced: Contains a specific set of navigation buttons and a limited number of view buttons pertaining to the current Outlook module.
Web: Contains buttons for navigating Web pages from within Outlook.
Note
Remember that you can always display or hide a particular toolbar in Outlook by choosing View
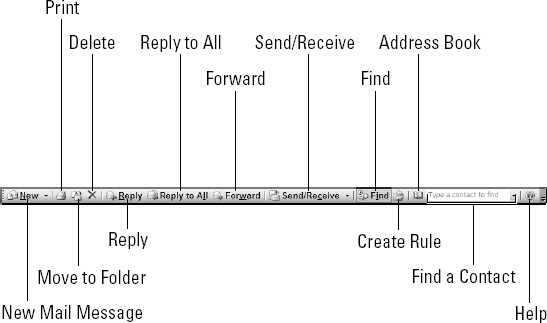
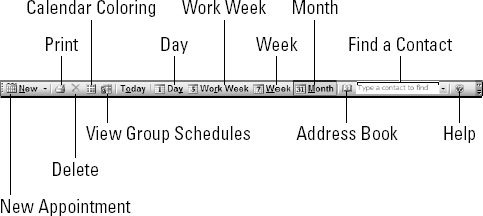
The Standard toolbar is the most chameleon-like of the bunch. You can see this clearly by comparing the buttons on the Standard toolbar in Figure 5-2 when the Mail module in Outlook 2003 is selected with those shown in Figure 5-3 when the Calendar module is selected.
Note
Note that if you're running Outlook 2007 on your computer, the Standard toolbar in the Mail and Contacts modules is slightly different. Particularly, the toolbar contains Categorize and Follow Up buttons when you're in the Mail or Contacts module — buttons that don't appear in earlier versions of Outlook. The Categorize button enables you to assign a category to the currently selected e-mail messages or contacts. The Follow Up button enables you to flag currently selected messages or contacts or add reminders so that you'll remember to follow up on them in the near future.
Note
The two buttons on the Standard toolbar that can save you the most time — and therefore are the ones I want you to pay particular attention to — are the New button at the beginning of the toolbar and the Find a Contact button near the end. You can use the New button to create new entities for all the types of information you track, including new e-mail messages, appointments, contacts, tasks, and notes (especially helpful when you forget the shortcut keys associated with creating them in any module). You can use the text box in the Find a Contact button to locate and open the record for any contact in your address book from any module in Outlook. For example, you can use this button to look up the telephone number for a client with whom you have a telephone appointment right from within the Calendar module.
The Advanced toolbar is a bit more stable than the Standard toolbar. That being said, as you can see by comparing Figure 5-4 with Figure 5-5, you do find considerable difference in the buttons on the Advanced toolbar when you're in the Calendar module as opposed to the Contacts module.
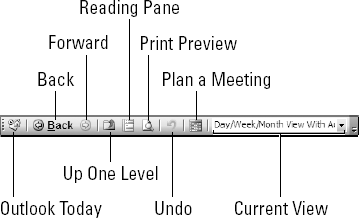
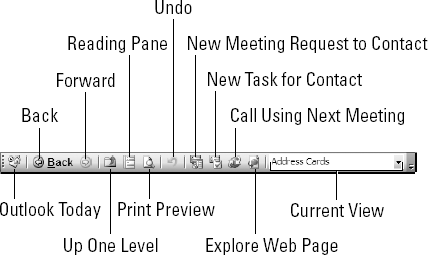
The first seven buttons (Outlook Today through Undo) on the Advanced toolbar, however, are the same regardless of which main modules you're in. As such, they're well worth being familiar with:
Outlook Today: Click this button to switch to the Outlook Today view that gives you an overview of your day's appointments, tasks, and unread messages from the current module.
Back: Click this button to return to the view that you previously selected in the current or different module.
Forward: Click this button to go back to the view that was displayed in the module before you clicked the Back button.
Up One Level: Click this button in the Mail module to display the contents of a Mail folder in the level immediately above the current one. (In the Calendar, Contacts, and Tasks modules, clicking this button has the same effect as clicking the Back button.)
Reading Pane: Click this button to display or hide the Reading Pane, which shows the detailed contents of the selected message, appointment, contact, or task when the Mail, Calendar, Contacts, or Tasks module is current. (See "Putting the Reading Pane to best use" later in this chapter.)
Print Preview: Click this button to open a Print Preview window that shows how the selected e-mail message or the selected Calendar, Contacts, and Tasks view will appear when printed when the Mail, Calendar, Contacts, or Tasks module is current.
Undo: Click this button to undo any action you just completed. It will be as if you had never done it.
In addition to these useful buttons common to all the Outlook modules, you can find some valuable buttons specific to particular modules. For example, when you're in the Calendar module, Outlook adds a Plan a Meeting button to the Advanced toolbar that you can click to open the Plan a Meeting dialog box, where you can set up a meeting and invite others to participate. (See Chapter 10 for details on planning meetings and sending out requests.)
Likewise, when you're in the Contacts module, the Advanced toolbar acquires the following three buttons, which can be very useful and save you time when you need to do something:
New Meeting Request to Contact: Opens the Meeting dialog box using the current contact's e-mail address so that you can invite him or her to an upcoming meeting.
New Task for Contact: Opens the Task dialog box, where you can assign a new task associated with the current contact.
Explore Web Page: Opens the Web page associated with the current contact using your Web browser in a separate program window.
The Web toolbar is the most static of the three Outlook toolbars. This toolbar is extremely useful when you need to research online or otherwise refer to some information on the Web and don't want to have to leave Outlook and switch to your Web browser in order to do it.
Figure 5-6 shows how this can work. Here, I've opened the Start page of my productivity Web site from the Mail module in Outlook. To open a page, you simply type in main part of the URL (I used harveyproducivity.com in this case) in the Address text box on the Web toolbar.
When you press the Enter key, Outlook opens the Start page of my productivity Web site in a single pane to the right of the Navigation Pane (and automatically adds the rest of the main page address, including the http:// prefix and the default.aspx suffix to the URL in the Address text box).
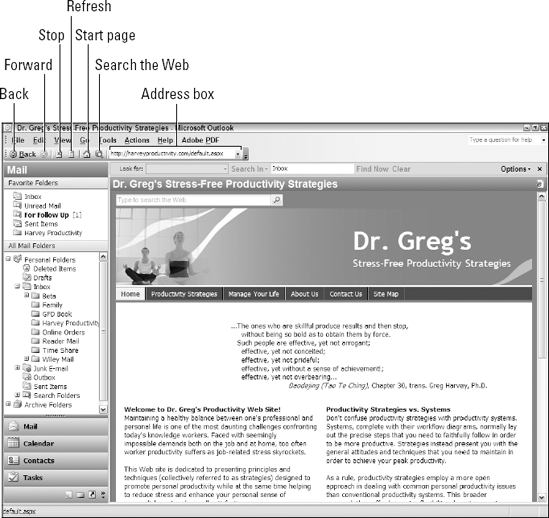
Figure 5-6. The Outlook 2003 Web toolbar as it appears when visiting my productivity Web site from the Mail module.
You can then surf the pages of this Web site using the site's internal navigation buttons. Note that you can return to a previously viewed Web page on the site by clicking the Back button on the Outlook Web toolbar and then go back to the currently displayed page from which you made that jump by clicking the toolbar's Forward button. You can also display your Web browser's Home page in the Outlook window by clicking the Web toolbar's Start Page button, or you can use Microsoft's Live Search engine to search the Web by clicking the toolbar's Search the Web button.
Note
If any Web sites contain information to which you regularly need to refer when using a particular Outlook module, don't waste your precious time typing their URLs in the Address text box of the Web toolbar each time you want to open them. Instead, create a new Outlook folder for each Web site you regularly visit and then associate the folder with the Web address before you add it to the Favorite Folders section in Navigation Pane in the Mail module as well as the Shortcuts Navigation mini-pane. (See "Making short work of the Folder List and Shortcuts buttons," later in this chapter, for precise instructions on how you do this.)
It isn't bad enough that Outlook splits up its considerable functions between so many different modules. Outlook also has to go and split up its program window into a bunch of different window panes as well.
And it'll probably come as no surprise to discover that the usage and arrangement of these panes varies from module to module. (Outlook's nothing if not context-sensitive.) The one constant in all the modules is the Navigation Pane. But even here, the groups of links and icons that appear above the standard navigation buttons that switch you between Outlook modules varies according to which module is current.
However, when considering the panes in all four main Outlook modules (Mail, Calendar, Contacts, and Tasks), you can relax by concentrating mainly on the functioning of the Navigation and Reading Panes. In addition, you also need to make yourself familiar with the functioning of the TaskPad in the Calendar module of Outlook 2003 and the To Do Bar (that replaces the TaskPad and appears in all modules) in Outlook 2007.
Putting the Navigation Pane to best use
As its name implies, the primary function of the Navigation Pane is to enable you to switch between Outlook modules as well as between different views in the same module.
You can click the Navigation buttons that appear in the bottom portion of the Navigation Pane in every module to switch to a new module (although I prefer you to use the shortcut keys most of the time — see "The Outlook Shortcut Keys You Need to Know and Use," later in this chapter, for details).
The actual buttons and options that appear in the area above these navigation buttons vary depending upon which Outlook module is active. Each Outlook module divides the area above these buttons into two sections: the top section includes icons that enable you to select the particular module entity you want to work with (be it a favorite folder, calendar, contacts list, to-do list, group of notes, or journal), and the middle section contains options or links for selecting the view to apply in displaying the items that the selected entity contains.
Take the time to become familiar with your choices in the My section — My Calendars, for example, or My Tasks or My Contracts — at the top of the Navigation Pane in each of the Outlook modules you regularly use. As you begin to really use Outlook as your Personal Information Manager, you'll undoubtedly create new entities for particular groups of information whose icons will appear here, and clicking their icons is the fastest way to select and display them in Outlook.
Also, keep in mind that clicking the View Options buttons that appear in the Views section in the middle of the Navigation Pane is by far the fastest way to switch to a new view in the current module. Selecting a view from the Current View drop-down list on the Advanced toolbar is also fine, provided that this toolbar is already displayed in Outlook. (Don't ever waste time redisplaying this toolbar when it's hidden just to use this button.) However, if you're using Outlook 2003, please stay away from selecting a new view using the View menu, as this involves navigating multiple levels of submenus. They shortened the submenus path for selecting a new view considerably in Outlook 2007.
Note
When you know the essential shortcut keys for navigating the Outlook interface (see "The Outlook Shortcut Keys You Need to Know and Use" later in this chapter), you can increase your screen real estate and make working with the individual items in each Outlook module much easier to deal with by routinely hiding the Navigation Pane as you work, redisplaying it only when you need to use its options. Of course, if you keep the Advanced toolbar displayed in Outlook, you'll have to redisplay the Navigation Pane a lot less because you can use the menu attached to its Current View button to change views in the current module.
Putting the Reading Pane to best use
The Reading Pane takes its name from its primary application in the Mail module. Here, where it customarily appears on the right side of the Outlook screen, the Reading Pane displays the contents of the currently selected e-mail message. The value of this pane in enabling you to easily scan and read your e-mail messages in the Mail module goes without question.
However, the Mail module's not the only place in Outlook where the Reading Pane comes in really handy. In other main modules — including the Calendar, Contacts, and Tasks — the Reading Pane displays the details of whatever appointment, contact, or task you select in that module.
You can then use the Reading Pane to get more detailed information about the current item (although you have to open its Appointment dialog box by double-clicking the appointment if you want to change any information). For example, say you're in the Calendar module and your daily calendar has an upcoming telephone appointment with a client. Imagine as well that you've added to the Calendar entry the client's telephone number along with a bunch of notes to remind yourself of the questions you want to ask and get answered, and all that added info doesn't fit in the appointment's AutoPreview. Instead of having to double-click the appointment on the calendar to open its Appointment dialog box to review all this information before making the call, you can simply select the appointment and then turn on the Reading Pane at the bottom of the Information Viewer (Alt+VNB in Outlook 2003 or Alt+VRB in Outlook 2007). This shows you all your notes covering the questions you want answered during the conversation in the Reading Pane that now appears beneath the calendar in the Information Viewer (see Figure 5-7).
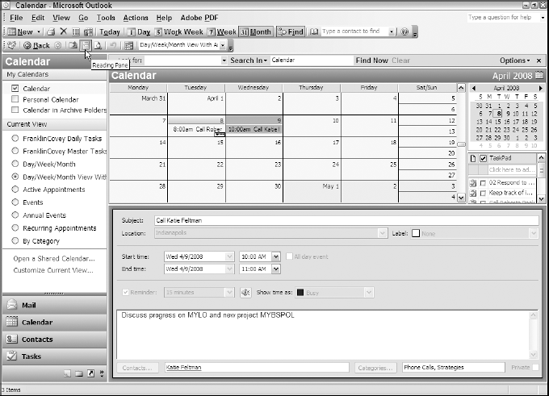
Figure 5-7. The Reading Pane displayed at the bottom of the Calendar module showing notes attached to the appointment currently selected.
After you've concluded the conversation with your client, you can then once again hide the Reading Pane in the Calendar module (Alt+VNO in Outlook 2003 or Alt+VRO in Outlook 2007), assuming that you want more of your calendar information displayed in the Outlook screen.
The TaskPad versus the To-Do Bar
There's one more pane with which you need to be on really good terms in Outlook. In versions of the program prior to Outlook 2007, this pane is referred to as the TaskPad, and it appears on the right side of the program window only in the Calendar module. In Outlook 2007, this pane has morphed into the To-Do Bar, which appears on the right side of the program window in each and every Outlook module.
The TaskPad in earlier versions of Outlook displays the Date Navigator (showing a small calendar with the current month and navigation buttons for displaying earlier and later months) above a section displaying the tasks on your to-do list that either have no due dates or have a due date on or before the current date. Note that you can customize the TaskPad from the View
Note
The To-Do Bar in Outlook 2007 not only displays the Date Navigator and the most recent tasks on your to-do list, but also a brief list with your three most recent upcoming appointments.
You can also customize the To-Do Bar from the View
In this section, I give you a brief overview of the basic functions of each of the eight Outlook modules in terms of how they relate to personal productivity. This survey's intended only to whet your curiosity about how you may be able to fit each module into your quest for greater work/life balance and use its key features to be more productive. You can find loads more detailed information devoted to the personal productivity usage of features in specific modules in later chapters.
The only exception to this "later chapters" strategy of mine is the Folder List and Shortcuts, which, technically speaking, aren't even Outlook modules because they restrict their appearance to the Navigation Pane (although they do rate their own navigation buttons at the bottom of the Navigation Pane and keyboard shortcuts just like the honest-to-goodness Outlook modules do). For detailed information on how to make efficient use of the Folder List and Shortcuts, consult "Making short work of the Folder List and Shortcuts in the Navigation Pane" later in this chapter.
I presume that, as a somewhat seasoned Outlook user, you're most familiar with the functioning of the Mail module, specifically its Inbox Mail folder. After all, this is the module and folder in which Outlook automatically opens each and every time you launch the program. And dollars to donuts, you spend most, if not all, of your time in this Mail folder, creating new e-mail to send and reading and answering the messages you receive (when you can get to it and it's not too overwhelming, that is).
And while processing your e-mail is certainly the Mail module's specialty, using it efficiently is obviously not every worker's forte, for how else can you explain the almost universal aversion to e-mail and inability to deal with it effectively? (Jump ahead to Chapters 7 and 8, if this is your main personal productivity bugaboo and you need strategies for getting it under control right away.)
In addition to its considerable role in processing your e-mail correspondence (see Chapter 9), the Mail module also gives you considerable power over organizing it (and this is often the key to getting a handle on your e-mail).
The Mail modules offer you this power through the use of the following special features:
Categories: Categories enable you to organize the e-mail messages that appear in the Information Viewer by the groups to which they're assigned. Viewing the contents of your Inbox by Categories gives you control over which messages are displayed and which are hidden, thus making the contents of your Inbox a whole lot easier to deal with.
Folders: Folders in the All Mail Folders section in the middle of the Mail module's Navigation Pane enable you to store e-mail messages in different custom folders you set up so that you can not only easily find the top priority messages to which you must respond but also those messages that contain particular information to which you need to refer later on. The best thing about using folders to stay on top of incoming messages is that you can often have Outlook automatically move many of these messages out of the general Inbox folder and into the appropriate custom folder through the creation of an e-mail rule. (See Chapter 8 for details.)
Favorite Folders: Favorite folders in the section by the same name at the very top of the Mail module's Navigation Pane enable you to quickly switch between the Mail folders that you maintain. In addition, you can also associate custom folders with particular Web addresses and then use the folders to open their pages in Outlook. (See the "Making short work of the Folder List and Shortcuts in the Navigation Pane" section, later in this chapter, for details.)
The Calendar module enables you to keep track all your appointments in a visual manner. The Information Viewer of the Calendar module therefore takes on the appearance of a printed day planner, with a graphic representation of either your daily, weekly, or monthly schedule. Because it's electronic and not paper, you can switch the Calendar view to the current day, five-day work week, entire seven-day week, and month in the blink of an eye.
The keystrokes for switching to these views in Outlook 2003 are
Day: Alt+1
Work Week: Alt+5
Week: Alt+7
Month: Alt+= (equal sign)
In Outlook 2007, you switch to these views with the following shortcut keys:
Day: Ctrl+Alt+1
Work Week: Ctrl+Alt+2
Week: Ctrl+Alt+3
Month: Ctrl+Alt+4
In versions prior to Outlook 2007, the Calendar module is the only one that can also display tasks on your to-do list alongside your schedule in its TaskPad pane. (In Outlook 2007, your upcoming tasks can appear on the To-Do Bar not only in the Calendar but also in all the other Outlook modules.)
Because the Calendar module enables you combine different views of your appointment calendar with a partial view of your to-do list, it often offers the ideal environment from which to plan your day by enabling you to effectively prioritize your tasks and harmonize them with your standing appointments.
Note
Consider making the Calendar module the heart of your Outlook Personal Information Manager instead of your Inbox in the Mail module. That way, you bring both your current schedule and to-do list (in the To-Do Bar in Outlook 2007 and the TaskPad in earlier versions) into the forefront of your personal productivity while at the same time putting your e-mail in the background (where it clearly belongs). To do this, you simply customize Outlook so that it automatically starts up in the Calendar module when you launch the program instead of the Inbox of the Mail module. (See Chapter 6 for details on how you do this.) Then, you memorize the shortcut keys that I outline later in this chapter in the section entitled, "The Outlook Shortcut Keys You Need to Know and Use" so that you can easily switch over to the Mail module (or any other one you need to access) and deftly return to the Calendar without so much as breaking a sweat.
The primary function of the Contacts module is to make it easy for you to keep track of the people that you need to stay in touch with. Although most people track only essential contact information such as name, address, e-mail, and telephone numbers, Contacts enables you to store all sorts of additional, less vital pieces of information about a contact, such as the name of his or her department, manager, assistant, and spouse, as well as his or her title, suffix, nickname, birthday, and anniversary.
And if these additional bits of information in these preset detail fields aren't sufficient, the module enables you add your own custom fields as well as notes about the contact that you can review simply by opening his or her Contact record.
Tip
If you're involved in some sort of service profession that relies heavily on good client relations (such as sales, insurance, medicine, and the like), consider adding personal details such as birthday, nickname, and spouse's name for your important clients, along with any other noteworthy items (such as the names of pets, favorite sports, hobbies, and pastimes) on contact records. That way, you can review this information prior to an encounter and use it when appropriate to add a special personal touch that can only enhance and deepen your professional relationship.
Note
In addition to making it possible for you to store information about the notable people in your work and life at large, the Contacts module can facilitate your personal productivity by enabling you to easily review all your activities with them. This feature makes it a breeze to look up an upcoming meeting, an e-mail, or a log of a telephone conversation (provided you note the call as a scheduled appointment or task on your to-do list), saving you loads of precious time that might be lost if you were to blindly shuffle through your Inbox, calendars, or to-do list to find it. All you have to do is double-click the contact's name to open his record and then click the Activities tab (in Outlook 2003) or the Activities button in the Show group of the Contact tab (in Outlook 2007). Outlook then generates a list of all the Outlook activities associated with that person. These include e-mails you've received and sent to this person as well as appointments and tasks involving him. You can then review any of these listed messages, appointments, or tasks in detail simply by double-clicking them.
The function of the Tasks module is fairly self-evident: Tasks keeps track of all the things you have to do; in other words, your obligations, both professional and personal. These can run the gamut from simple tasks such as "Pick up dry cleaning" all the way to complex projects such as "Complete New Product Proposal."
Therefore, it's in the Tasks module that you'll end up doing a lot of your planning work. This is because to be able to accurately record tasks in your to-do list, you just naturally have to determine the following things about them:
Exact nature of the task: Is this a simple one-step task or is it a more complex one that would be better split up into lots of smaller, easier-to-accomplish tasks?
Due date: Ideally, when should this task be completed, and is it a task that has a drop-dead date attached to it that you can't alter in any way?
Whether or not it should be delegated: Are you the best person to perform this task, or is there somebody else on the team better qualified to handle it? And, if you are the one, can you handle the task all by yourself or do you need somebody else's help completing it?
Note
The built-in views that the Outlook Tasks module offers are really valuable in helping evaluate how well you're doing in getting your work load under control and reaching your goal of better work/life balance. You can use the views to quickly filter your to-do list so that only certain tasks appear on the list. This can include just the tasks that are currently active, have due dates coming up in the next week, are currently overdue or assigned to others on the team, or are even now completed. In addition, Outlook supports a Timeline view that shows the tasks on your to-do list on a timeline where you tell at a glance which tasks overlap each other and share the same deadline.
The Notes module gives you the perfect place to jot down and store all the little bits of information that just don't belong anywhere else in Outlook. These can include notes to jog your memory (the electronic equivalent of tying a string around your finger), suggestions for things to work on and ways to improve yourself and your job, and even those wonderful inspirations that come to out of the blue.
The funny thing is that the Notes module is definitely underutilized even by many of those Outlook users who have all kinds of sticky notes plastered all over their computer monitors. This is probably because most users are completely unaware of the benefits of keeping electronic notes (and some aren't even aware that Outlook takes notes), and the program does a good job of hiding this module by reducing its navigation button to a fairly nondescript sticky-note icon in the Navigation Pane. It's also most likely due to the fact that everybody's just in the habit of using physical sticky notes to jot down their stray thoughts.
Note
If you're serious about improving your personal productivity and enhancing your work/life balance with Outlook, I really want you to develop the habit of recording those bits of information that you'd normally jot down on a sticky note as an electronic note in the Outlook Notes module. That way, you not only don't have to worry about losing a note, but you also can quickly search your notes and copy pertinent information to other parts of Outlook and other applications you use.
The Journal module is probably the least understood module in Outlook, and therefore it ends up being woefully underutilized like the Notes module. This may be because most people think of journaling as something that involves lots of writing. And they don't realize the Outlook Journal can automatically create a log of certain activities that you initiate both within and outside of Outlook. These can include such things as the Microsoft Office documents (including Word documents, Excel worksheets, and PowerPoint presentations) that you create or edit, e-mail you send to or receive from a particular co-worker or client, as well as meeting and task requests that you make and the responses you get back.
Note
Correctly used, the Outlook Journal can not only help you document the dates when certain activities occurred, but it can also help you understand how efficiently you're making use of the bulk of your work time. Because Outlook can do so much of the logging automatically, you have little excuse for not activating the Journal module and using it to be more productive. You certainly can't use the excuse that you don't have the time, because I can help you activate the Journal module and set up the activities you want it to automatically log in literally a matter of a few minutes. (See Chapter 14 for details.)
The Folder List and Shortcuts aren't really Outlook modules as much as mini-panes that appear in the Navigation Pane. These mini-panes appear in the Navigation Pane no matter what module is open as soon as you click their navigation buttons located at the bottom of Navigation Pane (identified respectively by a standard folder icon and an icon with a return arrow pointing to up to the right), or choose their menu items from the Go menu, or press their shortcut keys (Ctrl+6 for Folder List and Ctrl+7 for Shortcuts).
After the Folder List is open in the Navigation Pane, you can open one of its folders and display its contents simply by clicking its folder icon. If the folder is one that contains e-mail, the messages appear in the Information Viewer, and the contents of the selected message show up in the Reading Pane. If the folder is associated with a Web page, Outlook displays that page in the window to the right of the Navigation Pane used by the Information Viewer and Reading Pane when an e-mail folder is selected.
Note
Remember that you can add a custom mail folder to the Folder List by clicking any folder icon in the Navigation Pane and then pressing Ctrl+Shift+E to open the Create New Folder dialog box. Enter the name of the folder in the Name text box and then click the name of the folder in which the new folder is to appear in the Select Where to Place the Folder list box before you click OK.
After the Shortcuts list is open at the top of the Navigation Pane, you can open any of its folders, modules, views, or Web pages simply by clicking the icons.
Tip
If your display screen isn't large enough to accommodate more than the four standard navigation buttons (Mail, Calendar, Contacts, and Tasks) but you still want quick-click access to lesser-used modules like Notes and Journal as alternative to using their keyboard shortcuts, be sure to add their folders to your Shortcuts.
Adding and grouping folders in Shortcuts
You can add shortcuts to any folder that appears in your Folder List. This includes both built-in folders that Outlook automatically creates (such as Drafts, Sent Items, Junk E-Mail, and the like) and all the custom folders that you add to your Folder List.
To add an existing folder to Shortcuts, follow these few steps:
Launch Outlook and press Ctrl+7.
Outlook displays the Shortcuts list in the Navigation Pane.
Click the Add New Shortcut link in the Navigation Pane.
Outlook opens the Add to Navigation Pane dialog box.
Click the name of the folder you want to add to Shortcuts in the list box and then press Enter or click OK.
Remember to click the Expand button with a plus sign (+) if the folder you want to add is within another folder in the list.
Outlook adds the name of the folder to the bottom of the Shortcuts list in the Navigation Pane.
If you end up adding lots of folders to your Outlook Shortcuts, you can help organize them by adding groups to the Shortcuts and then moving the appropriate folders to any of these groups. To do this, you follow these steps:
Launch Outlook and press Ctrl+7.
Outlook displays the Shortcuts list in the Navigation Pane.
Click the Add New Group link in the Navigation Pane.
Outlook adds a group — provisionally named New Group — to the bottom of the Shortcuts.
Replace the New Group name by typing the name you want to give your group and then press Enter.
The name of the new group now appears in bold.
To move folders in the general Shortcuts area to the new group, drag and drop their folder icons on the name of the new group.
To move the new group up in the list of groups in Shortcuts, right-click the group name and choose Move Up from the context menu that appears.
Repeat Step 5 as needed until the new group is positioned exactly where you want it in Shortcuts.
Adding folders with Web page links to your Favorite Folders and Shortcuts
Having access to a favorite Web site from within Outlook at the click of an icon comes in real handy. For example, I suggest that you create a folder associated with my productivity Web site that you can then add to your Favorite Folders in the Mail module as well as to your Shortcuts. That way, you can visit the site and get additional information and inspiration on using Outlook as your Personal Information Manager right as you're using the program!
To do this, you follow these simple steps:
Launch Outlook as you normally do.
Make sure that you're in the Inbox of the Mail module. If you don't see Mail at the top of the Navigation Pane and the Inbox folder isn't highlighted in this pane, you then need to press Ctrl+Shift+I.
Press Ctrl+Shift+E to open the Create New Folder dialog box and then type Harvey Productivity as the new folder name in the Name text box. (See Figure 5-8.)
Click the Inbox icon in the Select Where to Place the Folder list box and then press Enter or click OK.
The Harvey Productivity folder now appears a subfolder of Inbox in the All Mail Folders area of the Navigation Pane.
Right-click the Harvey Productivity folder and then choose Properties from its context menu.
Outlook opens the Harvey Productivity Properties dialog box.
Click the Home Page tab and then type
http://www.harveyproductivity.comin the Address text box.Select the Show Home Page by Default for This Folder check box (see Figure 5-9) and then press Enter or click OK.
Outlook closes the Harvey Productivity Properties dialog box.
Click the Harvey Productivity folder in the Navigation Pane.
Outlook should display the Home page of my productivity Web site, and you should start to feel the stress just melting away.
Drag the Harvey Productivity icon up to the Favorite Folders area in the Navigation Pane and drop it wherever you want it to appear. (See Figure 5-10.)
Now, you're ready to add this folder to your Shortcuts.
Press Ctrl+7 to open your Shortcuts in the Navigation Pane and then click the Add New Shortcut link found there.
Outlook opens the Add to Navigation Pane dialog box.
Click the Harvey Productivity folder in the Add to Navigation Pane dialog box (see Figure 5-11) and then press Enter or click OK.
Outlook closes the Add to Navigation Pane dialog box and adds a folder named Harvey Productivity to your Shortcuts.

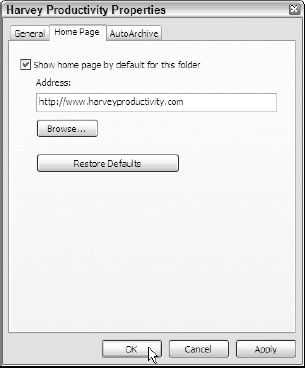
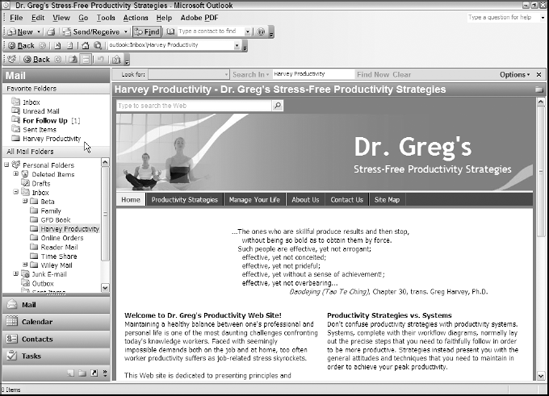
Figure 5-10. Adding the Harvey Productivity folder to the Favorite Folders after opening the Harvey Productivity Web site in Outlook.
That's all there is to it — pretty simple once you know the secret. And now that you know the secret, you can go ahead and create custom folders associated with your preferred Web sites and add them to your Favorite Folders and/or Shortcuts.

In most books on Outlook, the authors present you with a smorgasbord of ways to accomplish a certain task, using either the menus or toolbar buttons or keyboard shortcuts. Such books then leave it to you to decide which of the methods you like best and want to use to get the job done.
However, because the primary focus of this book is work/life balance through personal productivity and not using Outlook, I not going to give you that luxury of user's choice. To save as much time as possible and to put Outlook as far into the background as possible so you can stay focused on being productive, I want you to memorize the following keyboard shortcuts and use them consistently. By the way, this doesn't mean that you can never click a Navigation button or use a pull-down menu: It simply means that you need to make using these keyboard shortcuts habitual so that they become your primary means of doing these tasks; the idea here is that you resort to the use of alternative buttons and menus only occasionally when it makes sense in the context of your screen use.
So that you can quickly navigate between Outlook modules and open and close important panes, I want you to memorize the following 12 keyboard shortcuts and then rely on them conscientiously as you use Outlook:
Ctrl+1: Switches to the Mail module.
Ctrl+2: Switches to the Calendar module.
Ctrl+3: Switches to the Contacts module.
Ctrl+4: Switches to the Tasks module.
Ctrl+5: Switches to the Notes module.
Ctrl+6: Displays the Folder List in the Navigation Pane in any module.
Ctrl+7: Displays Shortcuts in the Navigation Pane in any module.
Ctrl+8: Switches to the Journal module.
Ctrl+Shift+I: Switches to the Inbox folder in the Mail module.
Ctrl+Y: Opens the Go to Folder dialog box, where you can select the Mail folder to display in the Mail module.
Alt+F1: Hides and redisplays the Navigation Pane.
Alt+F2: Hides and redisplays the To-Do Bar (Outlook 2007 only).
Note
Try to approach these navigation keystroke shortcuts not simply as timesavers but as an integral part of the process of making Outlook your complete Personal Information Manager. And because these shortcuts make the Outlook work environment feel more fluid, they aid you in becoming more flexible. Therefore, it's not likely that you feel as trapped in the Inbox of your Mail module when you're comfortable switching back and forth between modules simply by holding down the Ctrl key and pressing the appropriate number between 1 and 8. Also, note that Outlook never varies the sequence used in the shortcut keys — Mail first, Calendar second, Contacts third, Tasks fourth, Notes fifth, Folder List sixth, Shortcuts seventh, and Journal eighth — either on its Go menu or in the ordering of its navigation buttons in the Navigation Pane.
To be able to create a new item you need (such as an e-mail message, appointment, contact, task, and so forth) no matter which Outlook module is current, I want you to memorize these six keyboard shortcuts and then rely on them faithfully as you use Outlook:
Ctrl+Shift+M: Opens the Untitled Message window so that you can create a new e-mail in any module other than Mail. (Press Ctrl+N to do this when the Mail module is current.)
Ctrl+Shift+A: Opens the Appointment dialog box so that you can put a new appointment on your calendar in any module other than Calendar. (Press Ctrl+N to do this when the Calendar module is current.)
Ctrl+Shift+C: Opens the Contact dialog box so that you can add a new contact to your address book in any module other than Contacts. (Press Ctrl+N to do this when the Contacts module is current.)
Ctrl+Shift+K: Opens the Task dialog box so that you can add a new task to your to-do list in any module other than Tasks. (Press Ctrl+N to do this when the Tasks module is current.)
Ctrl+Shift+N: Opens a new sticky note dialog box so that you can add a new note in any other module than Notes. (Press Ctrl+N to do this when the Notes module is current.)
Ctrl+Shift+J: Opens the Journal Entry dialog box so that you can add a new entry to your journal in any module other than Journal. (Press Ctrl+N to do this when the Journal module is current.)
Note
To help learn these keystroke shortcuts, remember you press Ctrl+N (for New item) to create a new item for the current module (e-mail message in Mail, appointment in Calendar, contact in Contacts, and task in Tasks). However, when you're not in the Outlook module that automatically generates the item you need to create, keep in mind that you don't have to waste time switching to that module and pressing Ctrl+N. Instead, simply hold down the Ctrl and Shift keys as you press the mnemonic letter key assigned to that item (M for Message, A for Appointment, C for Contact, K for tasK, and J for Journal).
Note
Knowing you can be in any Outlook module and still create any Outlook item you need right then and there — and knowing that you can jump instantly to any other module you need to consult — has a freeing effect that's not to be underestimated. Having this ability encourages you to go beyond the confines of the Mail module as it breaks down the psychological walls that somehow tend to grow up between it and the other modules. As such, it represents a big step in truly making Outlook your Personal Information Manager and not simply your e-mail with address book program.
I suggest that you perform the following exercise to get a feel for these shortcut keys and how they can help you be more comfortable and productive in Outlook as well as to begin training your mind and your fingers in their usage:
Launch Outlook as you normally do.
Outlook opens in the Inbox in its Mail module.
Press Ctrl+2.
Outlook opens the Calendar module, the second of the main four modules. The Information Viewer depicts the days and weeks in the current monthly calendar.
Press Alt+F1.
Outlook hides the Navigation Pane, giving you a better view of the monthly calendar.
Press Ctrl+Shift+M.
Outlook opens an Untitled Message dialog box, where you can create a new e-mail and send it right from within the Calendar module.
Press Esc to close the Untitled Message dialog box and then press Ctrl+Shift+C.
Outlook opens an Untitled Contact dialog box, where you can enter the information for a new contact to add to your address book.
Press Esc to close the Untitled Contact dialog box and then press Ctrl+Shift+K.
Outlook opens an Untitled Task dialog box, where you can enter the information for a new task to add to your to-do list.
Press Esc to close the Untitled Task dialog box and then press Ctrl+Shift+N.
Outlook opens a blank sticky note dialog box with today's date and time where you can jot down a note to yourself.
Type Don't forget to practice using Outlook's shortcut keys as the text of the note and click the note's Close box.
Press Ctrl+5.
Outlook opens the Notes module, where you see the text of your reminder to practice using these invaluable keystroke shortcuts.
Press Ctrl+6.
Outlook opens the Folder List in the Navigation Pane. Note, however, that you're still in the Notes module (no pun intended).
Press Ctrl+7.
Outlook replaces the Folder List in the Navigation Pane with Shortcuts.
Click Outlook Today at the top of your Shortcuts list in the Navigation Pane.
Outlook opens the Outlook Today. Note, however, that Shortcuts still appears in the Navigation Pane.
Press Ctrl+Shift+I.
Outlook opens the Inbox in the Mail module (right back where you started from). Note that your Favorite Folders and All Mail Folders mini-panes have replaced Shortcuts in the Navigation Pane.
Now that you've completed this exercise, you should have a much better idea of how easily you can move from one Outlook module to the next. You should also have a feel for how easy it is to create new Outlook items without having to first move to the particular module known for using the item.