
Chapter 2. Discovering What You Need to Work with ActionScript 3.0
Working with ActionScript 3.0 is an equation composed of two parts: you need something to compile a program written in the language, and you need something to display the results of that programming. In compiler territory, you have quite a few development choices. In the most basic approach, Adobe makes the Flex Software Development Kit (SDK) available to the public free of charge (http://www.adobe.com/go/flex_trial/). This SDK includes the full ActionScript 3.0 application programming interface (API), which is the full list of core and Flash Player API classes described in the ActionScript 3.0 Language and Components Reference, published on the Adobe LiveDocs website (http://help.adobe.com/en_US/AS3LCR/Flash_10.0/). In addition, the SDK includes the Flex framework (component class library) and Flex command line compiler, letting programmers freely develop and deploy Flex applications using any scripting integrated development environment (IDE). Because the Flex framework is, itself, written in ActionScript 3.0, you don’t necessarily have to learn a new language to use Flex. Without spending a dime, interested programmers can build anything from basic ActionScript 3.0 class files—which you can also write in the Script window of Flash CS4 Professional—to full-scale Flex applications that you can write with Flex Builder 3.
Displaying the results of your work requires Flash Player 9 or higher (Flash CS4 publishes to Flash Player 10 by default). That may seem like the easy half the equation, but there are actually several versions of Flash Player 9 and will likely be several versions of Flash Player 10. The following sections give a brief overview of the tools necessary to work with ActionScript 3.0. Later in the chapter, you’ll learn about alternative scripting IDEs that you can use in cooperation with the Flash authoring tool.
Flash CS4 Professional/Flex Builder 3
The Flash CS4 Professional authoring tool is the latest in a running line of the production tool that originally began life as a vector animation program. When designers and developers hear the word “Flash,” they probably think first of the Flash authoring tool, rather than Flex Builder, even though both applications are Adobe products that publish SWF files for the same Flash Player runtime. In a few words, Flash CS4 can be summed up as the most appropriate tool for traditional Flash designers and developers. This authoring tool features numerous panels aimed at drawing and animation—consider the Timeline, Color, Align, Transform, and Tools panels.
Flash authoring techniques often take advantage of a
timeline metaphor, in which the goings-on of a SWF file are thought of in terms
of a playhead moving along a timeline: navigation from one display state
to another is the result of “going to” and “playing” desired keyframes. In
contrast, Flex Builder can be summed up as the most appropriate tool for
traditional programmers, especially those familiar with tools like Borland
JBuilder for Java and Microsoft Visual Studio for Visual Basic or C#. In
fact, Flex Builder is built on the popular open source Eclipse platform
(http://www.eclipse.org/), and you can even buy it
as an Eclipse plug-in. Flex Builder is a coder’s environment and, as such,
provides no drawing tools or timelines, and only the most basic of color
palettes. Even though ActionScript’s MovieClip class features methods such as
play(), stop(), and gotoAndPlay(), a Flex Builder developer is more
likely to think of movie clips—that is, timelines—in an abstract way, in
terms of an object-oriented programming (OOP) point
of view.
To program and deploy ActionScript 3.0, you need only an ActionScript 3.0 compiler. Flash CS4 provides one, which is used when a FLA file’s publish settings are configured for ActionScript 3.0. The Flex SDK also provides one, which you can use with a command line interface (no graphical user interface, just typing) or Flex Builder 3, which does the command line typing for you. If Flash CS4 (or CS3) isn’t used, then you don’t need (indeed, you can’t create) the FLA file familiar to traditional Flash developers. In either case, you may use any simple text editor at a bare minimum, such as Notepad on Windows or TextEdit on Mac, though most developers type their code into the Actions panel or a Script window of Flash CS4, an edit window in Flex Builder, or one of the external script editors discussed later in this chapter.
Flash Player 9 or Higher
Once a SWF file is compiled, it must be viewed in some version of Flash Player; specifically, Flash Player 9 or higher, if the SWF file contains ActionScript 3.0. Generally speaking, this tends to be a straightforward enterprise. As a reader of this book, you’re presumably a Flash professional, which means you build your content in the Flash authoring tool, and publish using either File→Publish or Control→Test Movie. You already have Flash Player installed, of course, so when you launch the SWF file, or view it in an HTML document, you see the content, and then decide whether or not to upload it to a web server. For simple projects, this process is often all it takes.
You might, however, find yourself in need of a particular minor point release of Flash Player 9 or 10, like those listed in Table 1-1 of Chapter 1. If you want to display your SWF file in full screen mode, for example, you need to test in Flash Player 9.0.28.0 or higher. If you want to display H.264-encoded high definition video, you need to test in Flash Player 9.0.115.0 or higher. Further, you need to ensure that people visiting your website also have the same minor point release. The Flash authoring tool gives you more than one version of Flash Player for testing during development: debug and release players.
Debug Vs. Release Players
The application folder of Flash CS4 Professional includes installation files for two distinct versions of Flash Player. These versions are located in Debug and Release subfolders of the following locations:
Windows: C:Program FilesAdobeAdobe Flash CS4Players
Mac: /Applications/Adobe Flash CS4/Players/
These installation files include:
Debug:
Install Flash Player 10 ActiveX.exe: Debug installer for the ActiveX version of Flash Player used by Internet Explorer on Windows.
Install Flash Player 10 Plugin.exe: Debug installer for the plug-in version of Flash Player used by Mozilla compatible browsers.
Install Flash Player 10 UB.dmg: Debug installer for Flash Player on Mac.
Release:
Install Flash Player 10 ActiveX.exe: Release installer for the ActiveX version of Flash Player used by Internet Explorer on Windows.
Install Flash Player 10 Plugin.exe: Release installer for the plug-in version of Flash Player used by Mozilla compatible browsers.
Install Flash Player 10 UB.dmg: Release installer for Mac Flash Player.
Note
Both folders, Debug and Release, contain identically named files. Don’t let that confuse you!
These installation files let you install debug versions of Flash Player for testing locally inside a browser—then to switch back to release versions any time you please. Debug versions are identical to the non-debug-enabled (release) versions, except that the debug versions contain additional code to communicate with Flash CS4. While convenient, because they avoid the delay of a download from http://adobe.com, these files are limited to whatever minor point release they represent. If the Adobe update utility hasn’t yet updated Flash CS4 on your computer, these installation files might not let you test everything you’d like to from within the authoring tool.
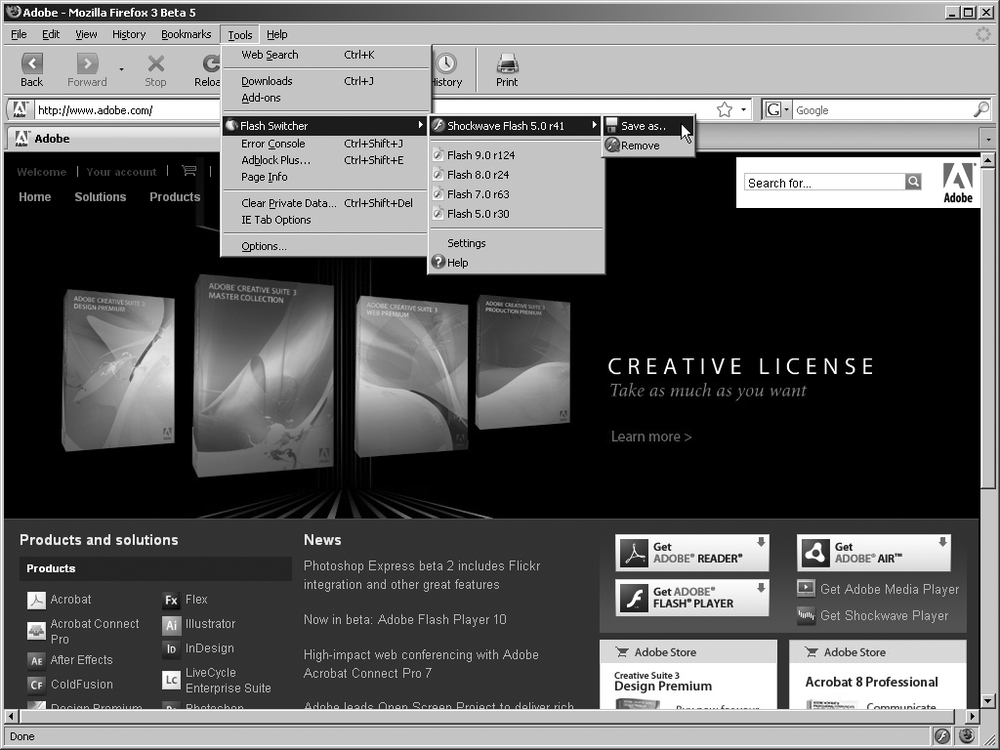
The latest installation files are available at http://www.adobe.com/support/flashplayer/downloads.html. Older versions are archived at http://www.adobe.com/go/tn_14266/ for testing purposes. To ensure that installations succeed, Adobe recommends that you uninstall existing ActiveX controls and/or plug-ins before re-installing different versions. This can become tedious, so you may want to consider downloading Flash Switcher, a third party Firefox extension to do the work for you. Flash Switcher was written by Alessandro Crugnola and is freely available on his website for Firefox 3 on Windows, Mac, and Linux:
| http://www.sephiroth.it/weblog/archives/2008/04/flash_switcher_for_windows_osx_and_li.php |
Note
Flash Switcher includes the files necessary to test many, but not all, versions of Flash Player. To make additional versions available to the extension, install the desired version by hand from http://www.adobe.com/go/tn_14266/, then select the extension’s icon from within Firefox and select Save As, as shown in Figure 2-1.
In addition to installation files, the Release and Debug folders contain a standalone executable: FlashPlayer.exe on Windows and Flash Player.app on Mac. Flash CS4 uses this executable to create Projectors or view standalone content. When you select Control→Test Movie, for example, the executable inside the Release folder displays your SWF file in the authoring tool. When you select Debug→Debug Movie, the executable inside the Debug folder is used instead.
The parent folder, Players, contains a copy of this executable. This copy is the one used when you launch a local SWF file outside of the authoring tool, for example by double-clicking a SWF file from the desktop. You can control which version is used—debug or release—by copying (not moving!) the desired executable from its respective Debug or Release folder into the Players folder.
Debug versions of Flash Player are capable of logging trace() statement output to a text file. For
more information on this topic, see Chapter 11.
Making Sure Users Have the Necessary Version of Flash Player
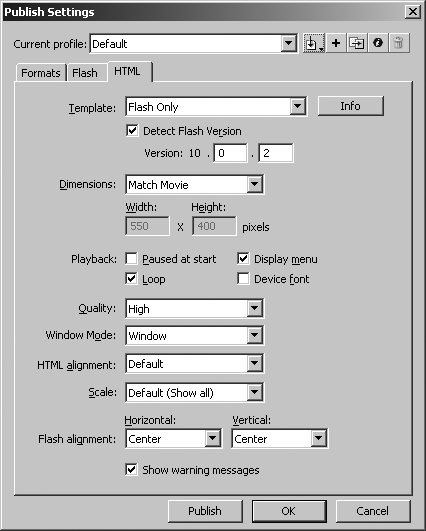
Flash CS4 provides a convenient mechanism for ensuring that website visitors have the version of Flash Player they need in order to view your content. It’s a simple configuration under File→Publish Settings→HTML, as seen in Figure 2-2. Select “Detect Flash Version” as shown, and specify the desired version numbers—here, 10, 0, and 2—which indicate the minimum version of Flash Player your content requires. The fourth number, seen in the series 10.0.2.0, identifies the internal build number, which may run a wide range during private Adobe beta testing but is typically 0 for public releases; in any event, the fourth number is irrelevant for ensuring compatibility in this context.
The first number isn’t editable from the HTML tab of this dialog box, and, in any case, needs to be 9 or higher to support ActionScript 3.0. If you choose to publish to older versions of Flash Player, you may change the first number in the version series by selecting this dialog box’s Flash tab, and then changing the Version listbox selection to a previous version of Flash Player. Anything lower than Flash Player 9 will force the Script listbox to change to ActionScript 2.0 or lower.
Warning
Version detection requires publishing for Flash Player 4 or greater.
Employing version detection changes the way the authoring tool writes the HTML it uses to embed a published SWF file. For that reason, it’s useful to understand how the HTML is written by default. At the time this book was being written (before the public release of Flash CS4), the default HTML template—that is, no Flash Player version detection—generated an HTML document with inline JavaScript (not an external .js file). This JavaScript embedded the SWF file dynamically, a feature that was necessary for the Internet Explorer browser between February of 2006 and April of 2008. Without such JavaScript, Internet Explorer users had to signify their intention to interact with Active Content—that is, Flash, QuickTime, Java applets, and so on—by first clicking the Active Content in their browser.
It may be that the commercial release of Flash CS4 no longer includes JavaScript with its default HTML template, in which case the parameters in the HTML tab of the Publish Settings dialog box will only affect the HTML itself.
Note
As of November 2007, Microsoft announced its intention to remove the “click to activate” behavior from Internet Explorer in April 2008. Regardless, JavaScript embedding remains useful because it allows for version detection and progressive enhancement, as discussed later in this chapter. For more information, see Adobe’s Active Content Development Center (http://www.adobe.com/devnet/activecontent/).
The configuration parameters shown in Figure 2-2 affect the HTML
<param> tags that appear as
children of the <object> tag
used by Internet Explorer. These, in turn, correspond almost point for
point with attributes of the companion <embed> tag used by Mozilla compatible
browsers.
One of these settings—codebase,
which only appears in the HTML, not the dialog box—is used only by
Internet Explorer. If a user has an older version of Flash Player
installed, Internet Explorer compares the version number of the
installed ActiveX control against the codebase attribute to determine if an upgrade
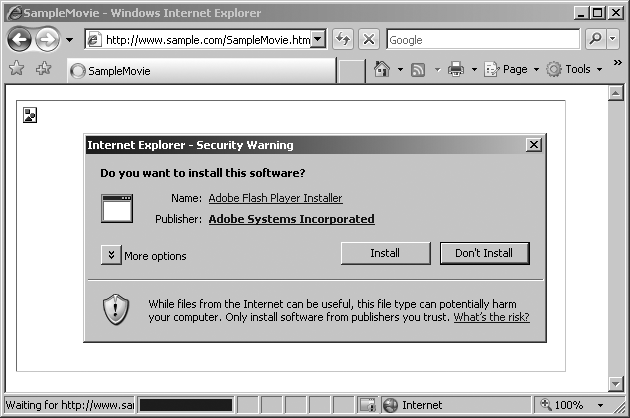
is merited, in which case the user is prompted as shown in Figure 2-3. If Flash Player is
absent altogether, the same installation prompt occurs. For an example
of the former case, consider that, as of the time this chapter was
written, the default codebase value
was 10.0.2.0. In Flash CS3, this value was 9.0.0.0, a “perfect” initial
release number that has no real-life Flash Player counterpart. If you
needed to use, say, the Event.ADDED_TO_STAGE event constant introduced
in minor point release 9.0.28.0, then you could change the codebase value by hand after Flash CS3
generated the HTML. You can do the same with Flash CS4, if a higher
minor point release is required. Just make sure, if JavaScript is
included, to update any mention of codebase both in the JavaScript and the
HTML.
In a sense, this is a rudimentary approximation of version
detection, but it’s essentially flawed. Why? From an aesthetic and
usability standpoint, you want to avoid an interruption of the user’s
experience. In addition, Mozilla compatible browsers ignore codebase in favor of the roughly analogous
pluginspage attribute to
determine whether to present a similar prompt. The difference is that
pluginspage makes no distinction
among Flash Player versions:
Mozilla browsers always install the latest version, even if you don’t
need the latest.
By and large, encouraging the latest version of Flash Player seems to make sense. Generally speaking, installation is a relatively trivial affair, even if it is an interruption. If your website visitor has the latest version installed, it doesn’t matter if your content requires only, say, 9.0.16.0. Modern browsers make installation or upgrades practically effortless for most home users, but not every user scenario occurs at home.
In most corporate, government, and educational settings (think
libraries!), individual users are rarely given administrative rights to
the computers they use. These content viewers can’t agree to an upgrade
when prompted by the browser—in fact, the prompt may not even happen—so
at best, such viewers may be faced with an upgrade proposition they
can’t act on and at worst, a webpage with obviously missing content. By
leaving the codebase attribute at the
lowest required value, you might steer clear of a few unnecessary
interruptions for Internet Explorer users, but your best bet is version
detection.
When “Detect Flash Version” is selected on in the HTML tab of the Publish Settings dialog box, the JavaScript code is slightly altered, which comes as no surprise. (Remember, if the HTML templates change in the commercial release of Flash CS4, then it won’t be that the JavaScript is altered, but rather, that it is introduced into the publish process.)
The detection-specific JavaScript provides a mechanism more
reliable than the codebase or
pluginspage HTML tag attributes. With
detection engaged, the user’s installed Flash Player can be checked
against major, minor, and revision values, as specified below the
“Detect Flash Version” checkbox in the dialog box.
In addition, a notable change happens to the HTML. In this case,
content inside the <noscript>
tag no longer contains the backup <object> and <embed> tags. Instead, you’re expected
to provide your own alternate content. This might be an explanatory line
of text, as suggested by the generated markup, but could just as easily
be an image or any other valid HTML, including, if you want to risk it,
an alternate SWF file published for an older version of Flash
Player.
<noscript>
    // Provide alternate content for browsers that do not
        support scripting
    // or for those that have scripting disabled.
    Alternate HTML content should be placed here. This content
        requires the Adobe Flash Player.
    <a href="http://www.macromedia.com/go/getflash/">Get Flash</a>
</noscript>
This markup is mirrored in an else clause just a few lines prior:
} else {  // flash is too old or we can't detect the plugin
        var alternateContent = 'Alternate HTML content should ¬
             be placed here.'
            + 'This content requires the Adobe Flash Player.'
            + '<a href=http://www.macromedia.com/go/getflash/>
                Get Flash</a>';
        document.write(alternateContent);  // insert non-flash content
    }
This code is what gets displayed if the user has JavaScript enabled, but not the minimum required version of Flash Player. Here too, the HTML written out by JavaScript can be replaced with more appropriate or targeted content of your own choosing. In this way, you can provide an experience of progressive enhancement, in which essential content is presented to the user in all cases, and augmented for the user who has Flash Player installed.
Using SWFObject
Be aware that the authoring tool’s built-in code templates aren’t your only option for embedding a SWF file with JavaScript. SWFObject, a popular third-party solution, provides an alternative approach that many consider even easier to use. The required swfobject.js JavaScript file, as well as additional sample files, are freely available from a Google Code project maintained by Geoff Stearns, who wrote the original script.
Download the swfobject_2_0.zip archive from http://code.google.com/p/swfobject/. At a minimum, you need to extract the swfobject.js file into the folder that contains your HTML document. This JavaScript file replaces the AC_RunActiveContent.js file that ships with Flash CS4, so you don’t need the HTML document generated by the authoring tool when you use SWFObject. Instead, create a new HTML document of your own. Use the SWFObject generator tool (an interactive form) at http://www.swffix.org/swfobject/generator/ to create the necessary HTML and JavaScript code. Paste this code into your HTML document and upload the HTML, JavaScript and SWF files to your server.
Using Other Code Editors with Flash
With an ActionScript 3.0 compiler in hand and Flash Player 9 or 10 to display compiled content, you’re ready to start producing. If your projects involve mainly timeline code, especially nested movie clip techniques, you’ll likely find that the Actions panel is the most convenient place to compose ActionScript. For more complex projects, where custom classes are in order, you also—or exclusively—have to use a Script window. Script windows in Flash CS4 are not true panels, so they don’t appear in the file menu like the Actions panel does, under Window→Actions. To use a Script window, simply select File→New→ActionScript file, or open an existing AS file. Although the Actions panel and Script windows share some features, only Script windows deal with the external text files necessary for custom classes.
Note
For a detailed overview of changes to the Actions panel and Script windows, see Chapter 5.
Of course, you have alternatives to coding in the Flash authoring tool, even if you use the authoring tool’s compiler for deployment. The remainder of this chapter focuses on a simple drag-and-drop application to demonstrate workflows in which a designer is responsible for FLA file maintenance while a developer writes ActionScript in an external script editor. The same person could very well play both designer and developer roles. In such a case, the designer/developer multitasks between the Flash authoring tool and an external script editor, which becomes a sort of “superhero Actions panel.” Coding is done externally, but SWF files are generally compiled in Flash CS4.
In team environments, this scenario may or may not be suitable. In cases where virtually all content is generated by code, or where assets are loaded at runtime, designers and developers may indeed comfortably work in isolation. The only purpose of FLA files in this case might be to store artwork, audio, fonts, and the like for export as SWC files, which can be used as components in Flex Builder 3. These assets might also be dynamically loaded as SWF files, if not in their native formats. Under these circumstances, a project would almost certainly be positioned as a Flex endeavor, and deployed with the Flex SDK compiler.
In general terms, then, when ActionScript classes depend on library assets, the Flash authoring tool should perform the compiling. For this reason, the following example specifically relies on library assets to demonstrate both the benefits and considerations involved in separating code from content, especially when coding occurs outside of Flash.
Creating DragParrot, a Sample Class File
Although you can reproduce the functionality of the following
class with timeline code, doing so would largely defeat the purpose of
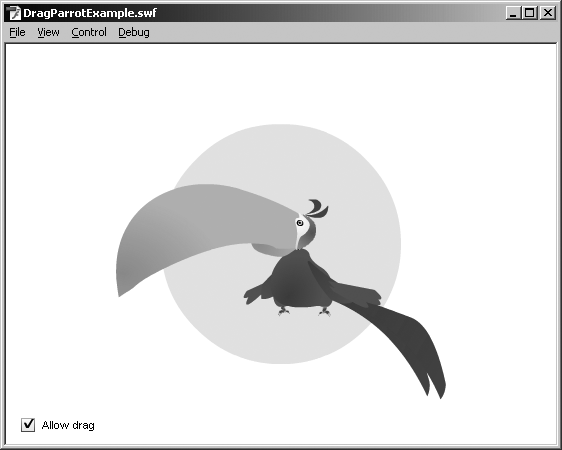
using an external code editor. This code defines a custom DragParrot class that, when configured as the
document class of a specific FLA file, results in a
pre-drawn parrot in a circle that you can drag only when a checkbox is
selected (Figure 2-4). The
ActionScript is stored in an external text file, DragParrot.as, saved in the same folder as
its companion, DragParrotExample.fla. You can use the exact
same code in each of the script editors discussed in the following
sections.
Note
For more information on the new document class concept, see Chapter 6.
It’s important to keep in mind that some of the assets required by
DragParrot are stored in a
separate FLA file, included with the samples that accompany this book.
These assets are configured to be exported for ActionScript in the
Linkage area of the Symbol Properties dialog box accessible from the
Library panel. They don’t appear anywhere on the FLA file’s stage. Prior
to ActionScript 3.0, these assets would have been assigned a linkage
identifier, but the attaching mechanism has changed in the new language.
Attachable assets are now assigned a linkage class,
which defines the asset in terms of an appropriate base class, such as
MovieClip or Sprite. This linkage class can be composed of
custom ActionScript, but it doesn’t have to be. In fact, by default, the
Flash authoring tool automatically writes this class for you, in which
case the class isn’t saved as a separate AS file, but included virtually
into the SWF file. If you’re coding in an external script editor and
compiling in Flash CS4, you can trust that linkage classes are
“magically” available at compile time.
Note
For more information on the new linkage paradigm, see Chapter 8.
The DragParrot class, shown in
the following code, begins by importing a set of external classes it
needs to perform its tasks. The first of these, Parrot, obviously stands out as a custom
class. This is the linkage class handled by the Flash authoring
tool. As it happens, CheckBox is also
a library asset (an instance of the CheckBox component) and must be
present in the library. After class properties are declared, the
constructor function, DragParrot(),
calls on a handful of descriptively named methods.
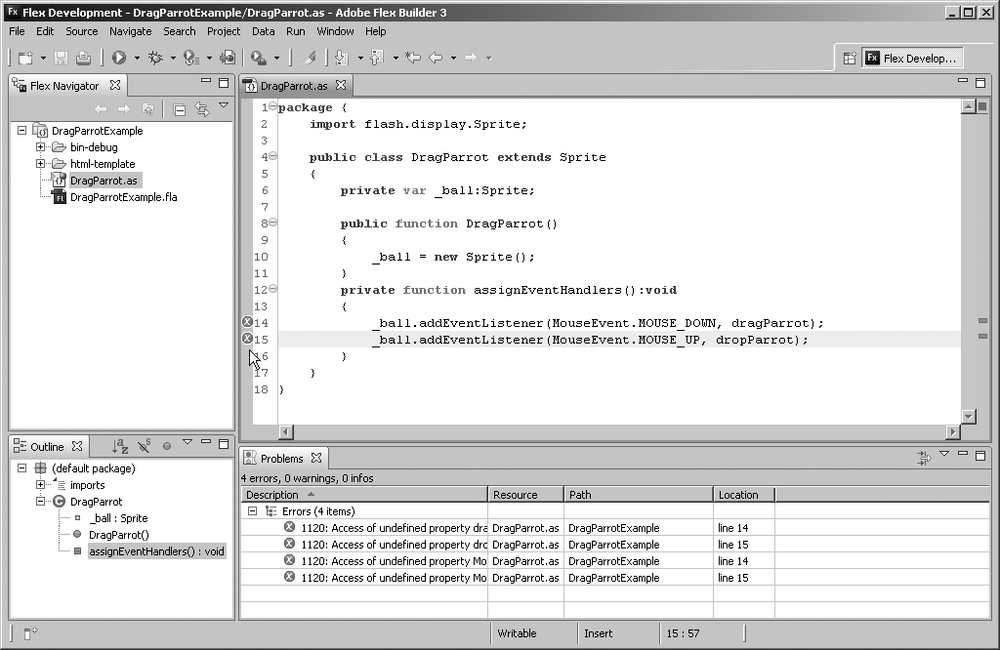
package {

    import Parrot;
    import fl.controls.CheckBox;
    import flash.display.Sprite;
    import flash.events.MouseEvent;

    public class DragParrot extends Sprite {

        private var _ball:Sprite;
        private var _parrot:Sprite;
        private var _checkbox:CheckBox;

        public function DragParrot() {
            drawBall();
            addParrot();
            makeCheckBox();
            assignEventHandlers();
        }
These methods are fairly basic. The first, drawBall(), calls on a special set of
functionality from the Graphics
class, collectively known as the Drawing API, to draw a light blue
circle into a Sprite instance, and
then adds this object to the display list, so that it can be
seen.
        private function drawBall():void {
            _ball = new Sprite();
            _ball.graphics.lineStyle();
            _ball.graphics.beginFill(0xB9D5FF);
            _ball.graphics.drawCircle(0, 0, 60);
            _ball.graphics.endFill();
            _ball.x = stage.stageWidth / 2;
            _ball.y = stage.stageHeight / 2;
            _ball.buttonMode = true;
            addChild(_ball);
        }
The addParrot() method attaches
pre-drawn artwork from the companion FLA file’s library by instantiating
the linkage class Parrot. This object
is added to the display list of _ball
(created in the previous method), which makes the artwork a child of
that object.
        private function addParrot():void {
            _parrot = new Parrot();
            _ball.addChild(_parrot);
            _parrot.x = _parrot.width / −2;
            _parrot.y = _parrot.height / 2 − ¬
                _ball.height / 2;
        }
Note
There’s a reason why the _ball, _parrot, and _checkbox variables are preceded by an
underscore. By popular convention, many developers set private
variables apart by using this punctuation. This was a source of
potential conflict in ActionScript 2.0, because many built-in
properties formerly featured underscores for unrelated reasons. Their
removal in ActionScript 3.0 eliminates this confusion.
The makeCheckBox() method
attaches a component from the companion FLA file’s library by
instantiating the linkage class CheckBox. The checkbox is positioned in the
lower left corner of the stage, given a label “Allow drag”, and then
added to the display list.
    private function makeCheckBox():void {
            _checkbox = new CheckBox();
            _checkbox.x = 10;
            _checkbox.y = stage.stageHeight - 30;
            _checkbox.label = "Allow drag";
            _checkbox.selected = true;
            addChild(_checkbox);
        }
Finally, assignEventHandlers()
associates _ball with two event
handler methods. Thanks to an if
statement, the dragParrot() handler
responds only when the checkbox is turned on.
private function assignEventHandlers():void {
            _ball.addEventListener(MouseEvent.MOUSE_DOWN, ¬
                dragParrot);
            _ball.addEventListener(MouseEvent.MOUSE_UP, ¬
                dropParrot);
        }
        private function dragParrot(evt:MouseEvent):void {
            if (_checkbox.selected) {
                _ball.startDrag();
            }
        }
        private function dropParrot(evt:MouseEvent):void {
            _ball.stopDrag();
        }
    }
}
This class could have been written in a Script window of the Flash authoring tool or in any simple text editor. The remaining sections touch on four popular alternative ActionScript editors. Bear in mind, none of these applications exclude the use of one another. If you like, sample each one to get a feel for their nuances. You might just decide you like them all!
Coding with Flex Builder 3
As mentioned earlier in this chapter, Flex Builder 3 is Adobe’s answer to traditional programmers interested in developing for the Flash Platform. To be sure, Flex Builder is hardly just a script editor. Its full benefit becomes clear when you use it to leverage the Flex framework, which includes dozens of user interface (UI) components and data classes not available in the Flash authoring tool (though freely available with the Flex SDK). These elements are geared toward the development of Rich Internet Applications (RIAs), which are Flex’s specific focus. In addition to ActionScript 3.0, Flex Builder can create and edit MXML, an XML-based markup language used to declaratively lay out interface elements and, in conjunction with ActionScript 3.0, implement business logic and facilitate remote procedure calls (RPCs). Built on the Eclipse platform, Flex Builder benefits from hundreds of third-party plug-ins, which extend basic functionality across a wide range of topics. Many of these plug-ins are free (see http://www.eclipseplugincentral.com/) and work with both the stand alone version of Flex Builder and the version that is, itself, a plug-in for Eclipse.
Note
For some comprehensive guides to Flex, including Flex Builder 3, read Learning Flex 3 (O’Reilly), by Alaric Cole; Programming Flex 3 (O’Reilly), by Joey Lott and Chafic Kazoun; and Flex 3 Cookbook (O’Reilly), by Joshua Noble and Todd Anderson.
Muscle notwithstanding, Flex Builder 3 is perfectly capable of creating and editing straightforward ActionScript 3.0 classes. Although the Flash authoring tool’s Actions panel and Script windows get the job done, the powerful editing capabilities of Flex Builder raise the bar considerably.
If you don’t already have Flex Builder 3 installed, you can download a 60-day trial version from http://www.adobe.com/products/flex/. Once the application is installed, launch Flex Builder.
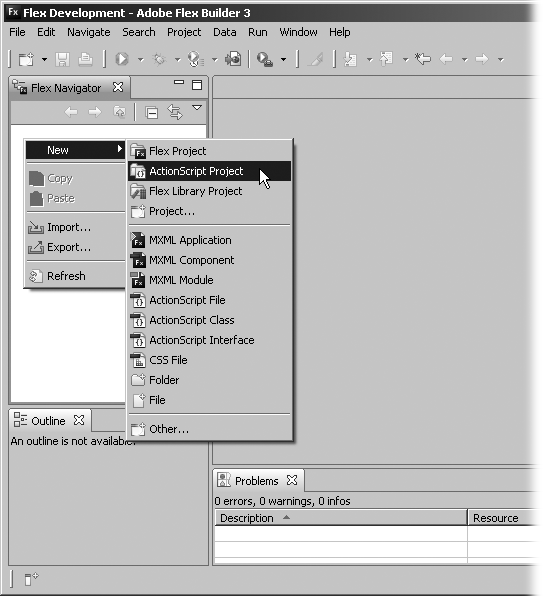
Select File→New→ActionScript Project from the File menu or right-click (Command-click) in the Navigator view, as shown in Figure 2-5.
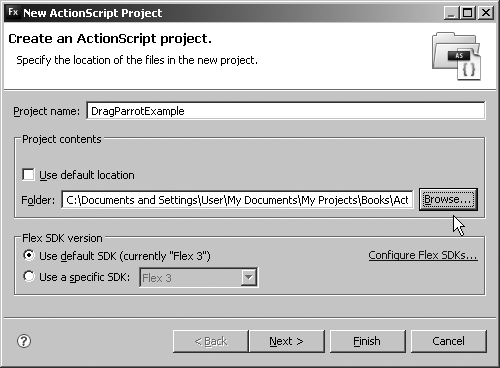
In the New ActionScript Project dialog box, name the project
DragParrotExample. Turn off “Use default location”, as shown in Figure 2-6, and then browse to the folder on your hard drive that contains DragParrotExample.fla.Click Next to continue.
In the Create an ActionScript Project dialog box (Figure 2-7), you have the option of including additional source folders and assets with the Source path and Library path tabs. Although they sound otherwise, these tabs aren’t related to the Library panel in Flash. Ignore them, and change the Main application file from the default DragParrotExample.as (automatically named after the project) to DragParrot.as. By doing this, you’re creating a brand new AS file, rather than reusing the class file you wrote in Flash CS4.
Click Finish to conclude.
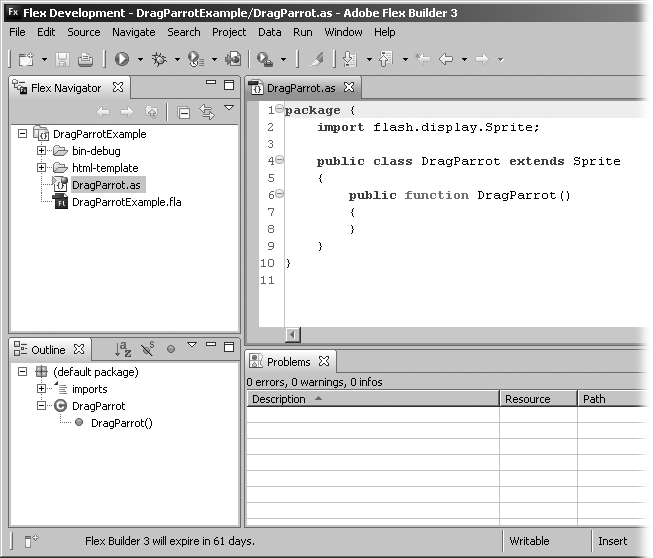
At this point, you’re ready to code. As Figure 2-8 shows, Flex Builder has already created a basic outline for you. A package and class have already been declared;
DragParrotextendsSprite, which is already imported; and the constructor function,DragParrot(), is already written.Add code to the existing ActionScript so that it looks like the code that follows (new code in bold).
package {
    import flash.display.Sprite;

    public class DragParrot extends Sprite
    {
        private var _ball:Sprite;

        public function DragParrot()
        {
            _ball = new Sprite();
        }
        private function assignEventHandlers():void
        {

        }
    }
}
Note
Flex Builder places open curly braces (
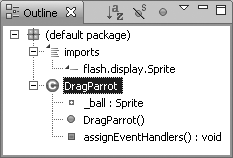
{) on a new line. This is a stylistic preference that has no effect on code execution.This detours slightly from the code shown earlier, but it’s enough to showcase a number of Flex Builder enhancements. Like the Flash authoring tool, Flex Builder features code coloring and code hinting. In addition, note that the Outline view (Figure 2-9) maintains a running catalog of class members, including
importstatements, properties, and methods. Each kind displays its own icon to distinguish it from the others, and even the constructor function is set apart from other methods by a green dot. If you select any of the items in the Outline view, then the corresponding section of code is highlighted. Likewise, as you click various elements in the code editor, such as property and method declarations, the Outline view changes to reflect your selection.Complete the
assignEventHandlers()method so that it looks like this:private function assignEventHandlers():void { _ball.addEventListener(MouseEvent.MOUSE_DOWN, ¬ dragParrot); _ball.addEventListener(MouseEvent.MOUSE_UP, ¬ dropParrot); }Ensure that Project→Build Automatically is turned on. Save the file. When you do, you see a powerful troubleshooting tool as shown in Figure 2-10. Circular red
Xicons appear next to lines with errors. In the Problems view (bottom center), errors are conveniently summarized in a group. Clicking any of these rows highlights the relevant line of ActionScript. As you correct issues, they automatically remove themselves from the Problems view, and the redXicons disappear.In this case, one of the errors is that the
MouseEventevent hasn’t been defined. Scroll to the existingimportstatement, and then add the following new line beneath it:import flash.events.MouseEvent;
Save the file, and two of the four error messages go away. The remaining errors show that the event handler methods,
dragParrot()anddropParrot(), haven’t yet been written.

Revise the ActionScript so that it looks like this:
package {

    import flash.display.Sprite;
    import flash.events.MouseEvent;

    public class DragParrot extends Sprite {

        private var _ball:Sprite;

        public function DragParrot()
        {
            drawBall();
            assignEventHandlers();
        }
        private function drawBall():void
        {
            _ball = new Sprite();
            _ball.graphics.lineStyle();
            _ball.graphics.beginFill(0xB9D5FF);
            _ball.graphics.drawCircle(0, 0, 120);
            _ball.graphics.endFill();
            _ball.x = stage.stageWidth / 2;
            _ball.y = stage.stageHeight / 2;
            _ball.buttonMode = true;
            addChild(_ball);
        }
        private function assignEventHandlers():void
        {
            _ball.addEventListener(MouseEvent.MOUSE_DOWN, ¬
                dragParrot);
            _ball.addEventListener(MouseEvent.MOUSE_UP, ¬
                dropParrot);
        }
        private function dragParrot(evt:MouseEvent):void
        {
             _ball.startDrag();
        }
        private function dropParrot(evt:MouseEvent):void
        {
            _ball.stopDrag();
        }
    }
}
At this point, nothing in the class file yet relies on the FLA file with which it shares a folder. To prove it, select Run→Debug DragParrot, and then wait a few moments while Flex Builder 3 compiles the class. Before long, a browser opens, as shown in Figure 2-11, and a draggable circle appears. The teal background color is a result of Flex’s default preference settings.
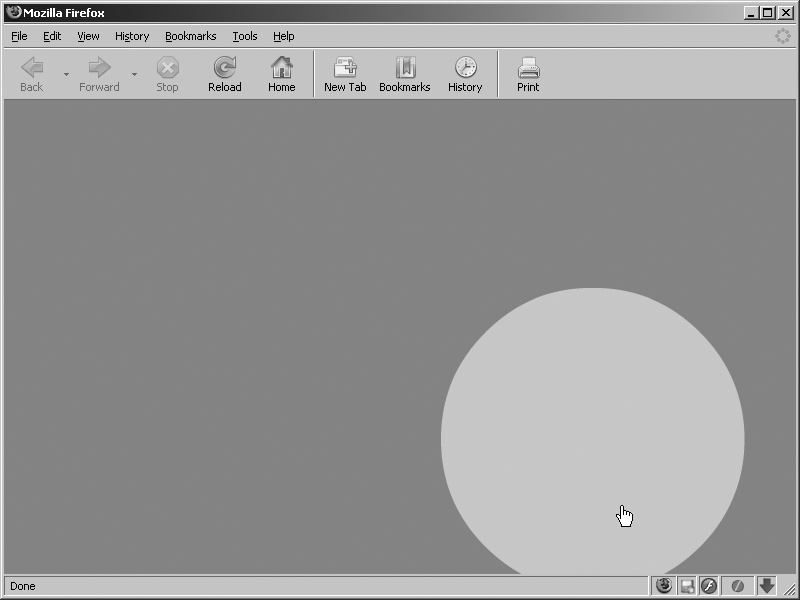
Warning
Because of the default scale mode used by Flex Builder 3, the
blue circle may not appear centered when the browser opens. Don’t be
surprised if you have to resize the browser repeatedly and look in the
corners. You could address this in the DragParrot class, but remember, this SWF
file is ultimately going to be compiled in Flash CS4.
Close the browser, and return to Flex Builder 3. Locate the
drawBall()method by selecting it in the Outline view. Hover over the term_ballin the final line,addChild(_ball);. When you do, a tooltip appears (Figure 2-12) that tells you the data type of_ball, which isSprite, and that thisSpriteinstance belongs to theDragParrotclass.Hold down the Ctrl (Command) key, and then move the mouse over various lines of code. The Ctrl (Command) key adds a temporary underline to properties and methods. With the key still pressed, click
_ballonce again. The ActionScript editor jumps to the definition of this term near the top of the class. These hover and click techniques assist considerably in code navigation.

Time to wrap things up. Update the ActionScript one last time to look like the code that follows.
package {

    import Parrot;
    import fl.controls.CheckBox;
    import flash.display.Sprite;
    import flash.events.MouseEvent;

    public class DragParrot extends Sprite {

        private var _ball:Sprite;
        private var _parrot:Sprite;
        private var _checkbox:CheckBox;

        public function DragParrot()
        {
            drawBall();
            addParrot();
            makeCheckBox();
            assignEventHandlers();
        }
        private function drawBall():void
        {
            _ball = new Sprite();
            _ball.graphics.lineStyle();
            _ball.graphics.beginFill(0xB9D5FF);
            _ball.graphics.drawCircle(0, 0, 120);
            _ball.graphics.endFill();
            _ball.x = stage.stageWidth / 2;
            _ball.y = stage.stageHeight / 2;
            _ball.buttonMode = true;
            addChild(_ball);
        }
        private function addParrot():void
        {
            _parrot = new Parrot();
            _ball.addChild(_parrot);
            _parrot.x = _parrot.width / −2;
            _parrot.y = _parrot.height / 2 -
                _ball.height / 2;
        }
        private function makeCheckBox():void
        {
            _checkbox = new CheckBox();
            _checkbox.x = 10;
            _checkbox.y = stage.stageHeight - 30;
            _checkbox.label = "Allow drag";
            _checkbox.selected = true;
            addChild(_checkbox);
        }
        private function assignEventHandlers():void
        {
            _ball.addEventListener(MouseEvent.MOUSE_DOWN, ¬
                dragParrot);
            _ball.addEventListener(MouseEvent.MOUSE_UP, ¬
                dropParrot);
        }
        private function dragParrot(evt:MouseEvent):void
        {
            if (_checkbox.selected) {
                _ball.startDrag();
            }
        }
        private function dropParrot(evt:MouseEvent):void
        {
            _ball.stopDrag();
        }
    }
}
Warning
Error notices occur because of the references to
ParrotandCheckBox, which the Flex SDK compiler can’t locate. For a detailed look at collaboration between Flash CS4 Professional and Flex Builder 3, read about the Flex Component Kit for Flash CS3 extension on the Adobe Exchange website http://www.adobe.com/cfusion/exchange/index.cfm?event=extensionDetail&extid=1273018.Open DragParrotExample.fla in Flash CS4. Ensure that the Property inspector indicates
DragParrotas the document class, and then select Control→Test Movie to compile the FLA file (and class) in the Flash compiler.
Coding with SE|PY
SE|PY is a free ActionScript editor for Windows and Mac written in Python by Alessandro Crugnola. It was originally developed for ActionScript 2.0, yet continues to be very popular and works quite well with ActionScript 3.0 and even JavaScript. Information on SE|PY and downloads are available at http://www.sephiroth.it/python/sepy.php. Helpful tips are occasionally posted at http://www.sepy.it/. If you like what you see, consider making a PayPal donation.
Compared with Flex Builder 3, SE|PY (Figure 2-13) is a svelte application, and purposefully so. It offers a quick-loading interface with a Swiss Army knife assortment of practical minitools. When working with ActionScript 3.0, you’ll use SE|PY to write your ActionScript, and then switch over to Flash to compile. Here are a handful of the goodies that await you.
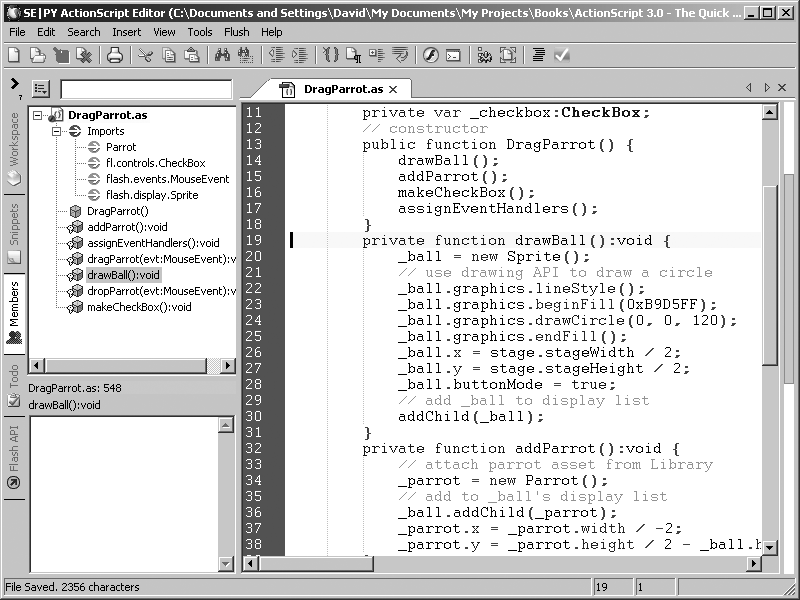
A number of tabs run down SE|PY interface’s left edge. The tab
selected in Figure 2-14,
Members, is similar to the functionality of Flex Builder’s Outline view.
Class members are indicated by icons and, when double-clicked, highlight
the corresponding section of code. In this implementation, members are
displayed alphabetically, regardless of their order in the ActionScript,
which eases navigation. The input field at the top filters members as
you type (Figure 2-14), so you
can easily locate methods in complex class files. Notice that the
letters “dr” have highlighted methods whose names start with those
characters. Adding “a” (“dra”) omits dropParrot() from the list, and so on. To
clear filtering, delete the contents of the input field.

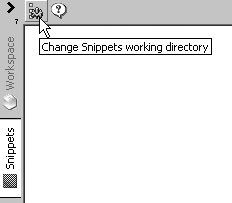
The Snippets tab gives you a handy way to reduce the tedium of typing common blocks of code, fittingly known as snippets. The green cogwheel icon (Figure 2-15) lets you categorize snippets by folder on your hard drive. You might create folders for ActionScript 3.0, 2.0, JavaScript, and XML.
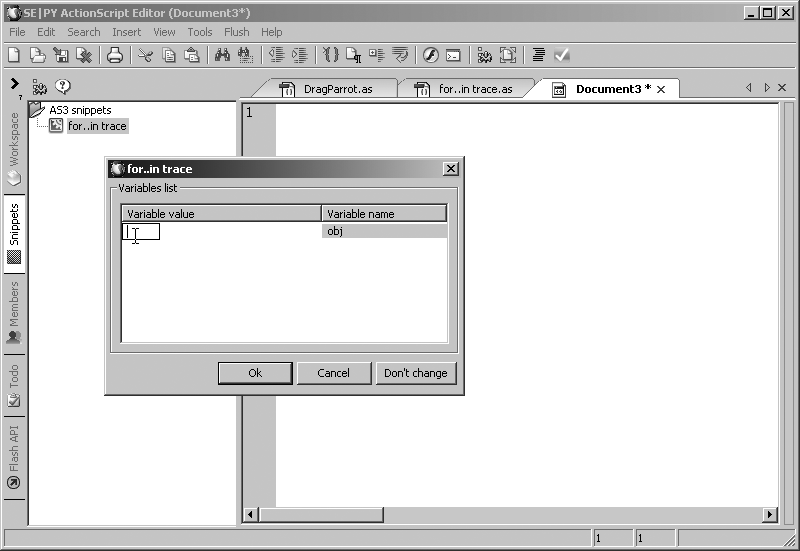
The next few steps walk you through the creation of a SE|PY snippet.
Download and install SE|PY, and then launch the application. Select the Snippets tab, and then click the green cogwheel icon to locate or create a folder for snippets.
Once a folder is created, right-click (Command-click) on the folder’s name, and then select “Create new snippet”.
In the New Snippet dialog box, enter the name
for..in trace, which you’ll supply with a bit of templated code in a moment. Click OK to continue. This action opens a new document tab.In the new document tab, type the following ActionScript (and save):
trace("for..in obj trace");
for (var prop:String in obj) {
    trace(prop + ": " + obj[prop]);
}
Select File→New to open a new document. Double-click your newly created snippet in the Snippets tab to see it appear in the new document. So far, this is only slightly better than pasting from the Clipboard. Here’s where it gets interesting.
Right-click (Command-click) the snippet, and then select Edit. Update the existing code to look like this:
trace("for..in @@obj@@ trace");
for (var prop:String in @@obj@@) {
    trace(prop + ": " + @@obj@@[prop]);
}
The addition of the
@@characters establishesobjas a kind of snippet-specific variable. Save and switch to the new document. Double-click the snippet again. This time, a dialog box opens, as shown in Figure 2-16.This dialog box shows the
objvariable on the right, and lets you provide a custom value on the left. Enter the termthis, click OK, and see the custom snippet appear in the new document:trace("for..in this trace"); for (var prop:String in this) { trace(prop + ": " + this[prop]); }You may add numerous variables to each snippet in this manner, which gives you shortcuts to tailor-made blocks of code. If you wish, you can even provide default (but changeable) values for these variables by using the following syntax inside the snippet:
trace("for..in @@obj=[defaultValueHere]@@ trace");
for (var prop:String in @@obj@@) {
    trace(prop + ": " + @@obj@@[prop]);
}
You have nearly a dozen additional tabs and tools, including:
Todo: Keeps track of commented reminders (for example,
// TODO optimize this
          loop!
). Reminders are displayed in a clickable tree view, like the Members tab, sorted by line number and script file.Variables: Displays declared variables in a clickable table, similar to the Members tab.
Unicode chars: Displays Unicode and ANSI character codes for basic and extended character sets.
Clipboard: Displays text content of the current Clipboard contents.
XML Reader: Displays XML files in a collapsible tree view. Supports XPath expressions for quick navigation.
Class Explorer: Displays packages and classes like the Members tab, even if those classes aren’t open as documents. Double-clicking a member opens the relevant class file, and highlights the corresponding section of code.
Stickies: Maintains virtual “paper” sticky notes, configurable by color.
SharedObject Reader: Displays the content of SharedObject files, the Flash equivalent of a browser cookie. (This item and the remaining ones are found in the file menu under Tools.)
Regular Expression Toolkit: Provides an interface for testing regular expressions patterns.
Compare Files: Compares text files, which is great for locating changes among multiple revisions, and compares file directories.
Coding with FlashDevelop
FlashDevelop is a compelling open source script editor for Windows designed for ActionScript 3.0 and 2.0 development. Built on the Microsoft .NET Framework, this application functions comfortably as a standalone IDE or in conjunction the Flash authoring tool. FlashDevelop is produced by Mika Palmu, Philippe Elsass, Nick Farina, and contributors. Information and downloads are available at http://www.flashdevelop.org/ or http://osflash.org/flashdevelop/.
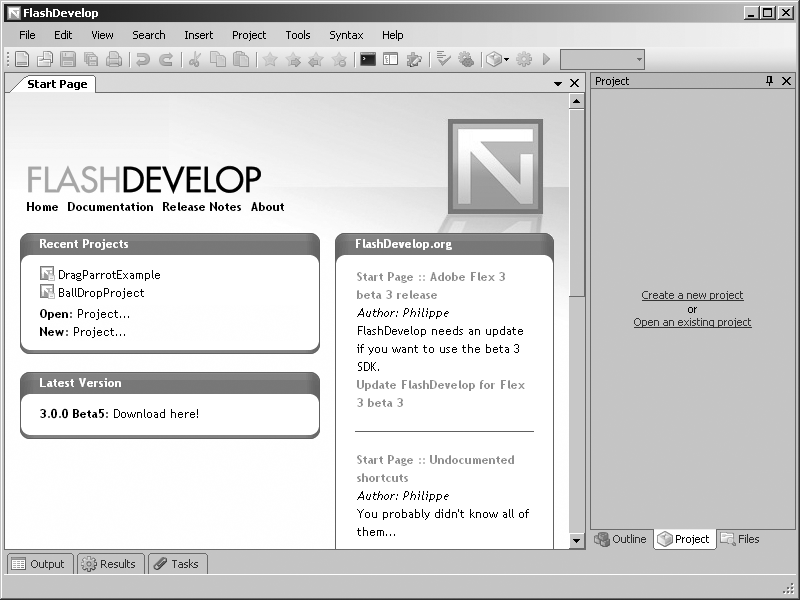
Once FlashDevelop is installed, launch the application and note the Start Page (Figure 2-17), which is similar to the Welcome Screen in Flash CS4. The first time you run FlashDevelop, you may have to let it know where your Flex SDK compiler is, if you plan to optionally compile ActionScript 3.0 SWF files without Flash.
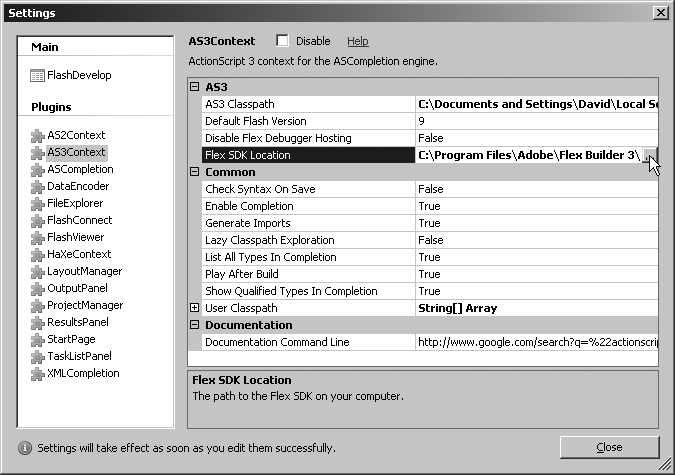
Select Tools→Program Settings. This action opens the Settings dialog box. Select AS3Context, locate the Flex SDK Location selection (Figure 2-18), and then, on your hard drive, browse to the SDK. If you have Flex Builder 3 installed, you’ll find the SDK located within the application folder for Flex Builder (for example, C:Program FilesAdobeFlex Builder 3sdks3.0.0); otherwise, download and install the free Flex SDK, and then navigate to that folder.
Click Close to continue.
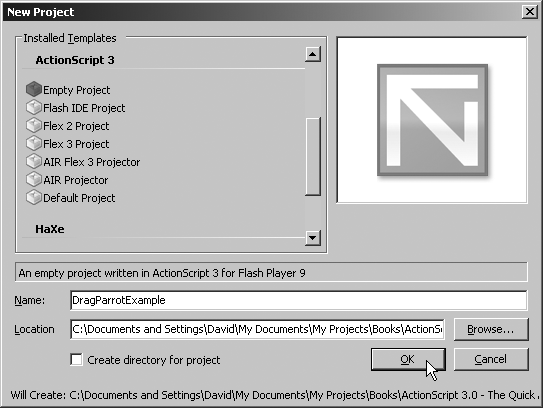
Close the Start Page, and then select Project→New Project. This action opens the New Project dialog box. Scroll to the ActionScript 3 section, and then select Empty Project. Name this project
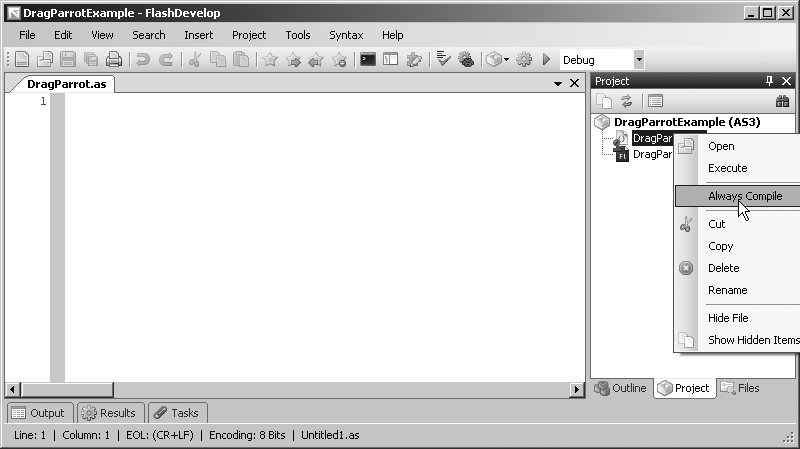
DragParrotExample, and then set its location to a folder that contains DragParrotExample.fla, as shown in Figure 2-19. Click OK.FlashDevelop creates a new document for you named Untitled1.as. Select File→Save to save this file into the project folder as DragParrot.as. In the Project tab (Figure 2-20), right-click DragParrot.as, and then select Always Compile. Doing so configures this class as the project’s main file.
At this point, you’re ready to start coding. Type the following ActionScript into the DragParrot.as document (note, this is everything in the class that doesn’t rely on library assets in the FLA file):
package {

    import flash.display.Sprite;
    import flash.events.MouseEvent;

    public class DragParrot extends Sprite {

        private var _ball:Sprite;

        public function DragParrot(){
            drawBall();
            assignEventHandlers();
        }
        private function drawBall():void {
            _ball = new Sprite();
            _ball.graphics.lineStyle();
            _ball.graphics.beginFill(0xB9D5FF);
            _ball.graphics.drawCircle(0, 0, 120);
            _ball.graphics.endFill();
            _ball.x = stage.stageWidth / 2;
            _ball.y = stage.stageHeight / 2;
            _ball.buttonMode = true;
            addChild(_ball);
        }
        private function assignEventHandlers():void {
            _ball.addEventListener(MouseEvent.MOUSE_DOWN, ¬
              dragParrot);
            _ball.addEventListener(MouseEvent.MOUSE_UP, ¬
              dropParrot);
        }
        private function dragParrot(evt:MouseEvent):void {
             _ball.startDrag();
        }
        private function dropParrot(evt:MouseEvent):void {
            _ball.stopDrag();
        }
    }
}
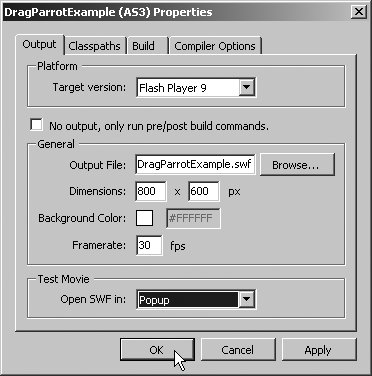
Select Project→Properties, which opens a dialog box that configures the settings for the DragParrotExample project. This project requires the name of an output file—this is the SWF file that the Flex SDK compiler will generate—so type
DragParrotExample.swfin the Output File field, as shown in Figure 2-21. Experiment with the Dimensions, Background Color, and Framerate settings, if you like. The Test Movie area lets you specify how the SWF file should be opened. Choose Popup for now, and then click OK to close the dialog box.Select Project→Test Movie to compile the SWF file. For now, the compile succeeds, because
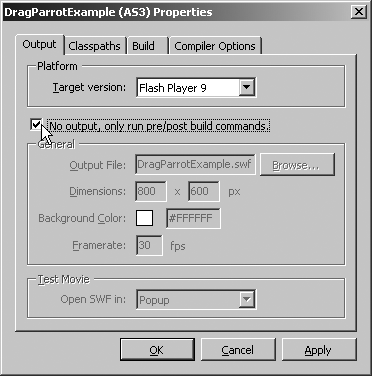
DragParrotdoesn’t rely on the FLA file’s library assets. As soon as you update your code to include theParrotandCheckBoxclasses—along with the ActionScript that references them—you’ have to compile in the Flash authoring tool, because the Flex SDK compiler can’t locate the necessary assets. As with Flex Builder 3, you have workarounds for dealing with this situation in FlashDevelop. Forums on the FlashDevelop website offer a handful of tutorials on the subject.Double-click DragParrotExample.fla in the Project tab to launch Flash CS4. Return to Project→Properties, and then select the checkbox next to “No output, only run pre/post build commands” (Figure 2-22).
Select Project→Test Movie, and note that FlashDevelop automatically brings the Flash authoring tool to the forefront. In this way, FLA file library assets are properly located by
DragParrot, so that when your class is revised to reference them, the compile succeeds.
FlashDevelop supports a remarkable number of the tools featured in the other script editors discussed in this chapter. Naturally, individual nuances differ from application to application, but FlashDevelop includes its own version of the following:
Outline tab similar to the Outline view in Flex Builder 3
Code folding and code bookmarks
Syntax checking and error warnings, by way of the Flex SDK
Tasks interface for commented TODO reminders
Introspective tooltips that display class member details
Snippets
SharedObject reader
File comparison interface
Built-in web browser
Coding with PrimalScript
PrimalScript, by SAPIEN Technologies, is a powerhouse script editor for Windows. This application is conversant in ActionScript 2.0 and also 3.0—provided you help it out, which is discussed in the following steps. PrimalScript gives you much of the expected code coloring, autoformatting, and code completion seen in the Flash authoring tool and Flex Builder. If you want to explore other languages, you’re in luck, because PrimalScript supports over 40 more, including HTML, CSS, JavaScript, Java, C#, PHP, Python, Ruby, Perl, Tcl, and the list goes on. Application information and downloads are available at http://www.primalscript.com/, with three editions to choose from: Standard, Professional, and Enterprise. Fully functioning 45-day trials are available for all editions.
Longtime users of PrimalScript may notice that the application manages just fine in ActionScript 2.0 but offers minimal support in ActionScript 3.0 out the box. To work around this limitation, you have to give the application access to a set of specially formatted class definitions for ActionScript 3.0 called intrinsic classes. Fortunately, FlashDevelop (discussed in the previous section) includes an unofficial set of intrinsics, which you can re-use with PrimalScript:
Download and install PrimalScript, and then launch the application. Select Tools→Options.
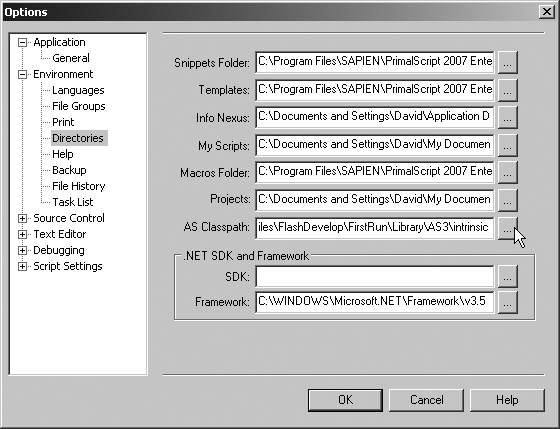
In the Options dialog box, select Environment→Directories. Use the ellipsis (...) button next to the AS Classpath field to browse for the intrinsic classes, as shown in Figure 2-23. Select the C:Program FilesFlashDevelopFirstRunLibraryAS3intrinsic path from your FlashDevelop installation.
Restart PrimalScript.
To verity that ActionScript 3.0 code hinting is now supported, select File→New File→Script Files→ActionScript Class. Create a
Spriteinstance—or some other ActionScript 3.0 class instance—such as this:var s:Sprite = new Sprite();
Add a new line to your code and repeat the variable name (here,
s), then type dot (.) to bring up the PrimalSense menu, as shown in Figure 2-24.
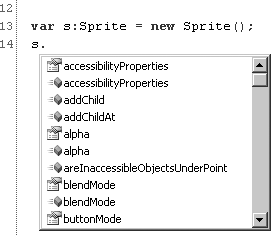
Like the other scripting IDEs mentioned in this chapter, PrimalScript features numerous additional amenities, all of which can boost your workflow productivity:
Code folding and code bookmarks
Advanced snippets
Clipboard viewer
Code browser, similar to Outline view in Flex Builder 3
Integration with source control software
File comparison interface
Visual query builder and XML editor
Built-in web browser and FTP client
Configurable tools browser to launch related applications, such as Dreamweaver