Chapter 13. User Authentication
13.0. Introduction
Today’s primary method for permitting access to host computers and other networked or networking devices is the username and password combination. This method, which provides the simplest form of verifying the authenticity of a user trying to access the resource, is known as user authentication. Grand schemes are sometimes developed to authenticate users, but most can be broken down into three primary authentication factors:
- Something you know
This is the simplest and most common form of user authentication. It might be a password, PIN, or secret phrase that only “trusted” users would know.
- Something you have
This would be something a trusted user possesses, such as a secret decoder ring, or a token-generator such as RSA Security’s SecurID product.
- Something you are
Lots of new development is occurring here in a field known as biometrics. This involves offering your fingerprint or a scan of your retinas, or looking into a camera, so that your facial features can be scanned and matched against a trusted user facial profile.
Many systems implement two or more of these authentication factors—for instance, the user must know a PIN and possess a security token before access is permitted. This is known as two-factor authentication. ScreenOS provides native username and password authentication, and you can configure it to integrate with external authentication systems running within the network that provide authentication and authorization services such as the Remote Access Dial-In User Service (RADIUS), Lightweight Directory Access Protocol (LDAP), or SecurID.
This chapter introduces user authentication in ScreenOS and presents the two locations for storing user profiles: the local database and an external authentication server.
It provides several recipes for configuring different types of users and user groups. It also covers some other aspects of user authentication, such as changing login banners, configuring users for multiple types of authentication such as Internet Key Exchange (IKE)/Xauth, and using group expressions in policies for user authentication.
Authentication and Authorization
In computer security, authentication is the process of verifying (or not) the digital identity of the sender of a digital communication, such as a login attempt. The sender may be a person, computer, or computer program. In computer terms, authentication is distinct from authorization. Authentication is the verification of user credentials, as opposed to authorization, which is the privilege granted upon successful authentication.
ScreenOS provides a portion of all three services in AAA (Authentication, Authorization, and Accounting) security schemes, but it is not designed to offer fully featured capabilities beyond simple password authentication and simple authorization which is provided with RADIUS, or other types of external AAA systems.
User Profiles
Profiles are created to provide username and password matches as well as to grant access rights for a login attempt. You can store profiles locally within the ScreenOS internal database. In addition to the internal database, ScreenOS supports the following external authentication server types:
External Authentication Servers
You can use external servers with ScreenOS; the most widely used external authentication server in use is RADIUS. ScreenOS also has native support for LDAP and RSA Security’s SecurID. The default authentication server for all user types is the local database. However, you can specify that an external auth server be used for any of the user types except IKE users. For example, you can specify that administrators be authenticated via RADIUS, while policy authentication uses SecurID.
RADIUS
RADIUS is a protocol for a type of authentication server that can support thousands of users. ScreenOS can act as a RADIUS client that authenticates users based on a series of messages between the RADIUS client and the RADIUS server. At a high level, the RADIUS client prompts the user for login credentials. The client then sends the credentials to the RADIUS server to be compared against the list of users in the database. The RADIUS server will respond with a success message or a failure message. ScreenOS will then either grant or deny the login based on the server’s response.
In addition, you can configure RADIUS to return certain attributes that you can use to assign privilege level, IP address, or other information that may be used for the connection. ScreenOS accepts these vendor-specific attributes (VSAs) for a variety of functions. For admin users, these VSAs can set the privilege level—read/write or read-only—for individual administrators of the firewall. For Xauth or the Layer 2 Tunneling Protocol (L2TP), you can use these attributes only to assign IP address and name resolution servers.
VSAs are defined in a dictionary file and can be very different among vendors. Juniper provides a dictionary file for the ScreenOS devices at:
| http://www.juniper.net/customers/csc/research/netscreen_kb/downloads/dictionary/funk_radius.zip |
You should load the RADIUS dictionary file onto the RADIUS server; if you don’t, you can use the RADIUS server for authentication only.
External RADIUS servers have generic auth-server properties, and they have three distinct configuration properties associated with them:
- Shared secret
This is a password that is shared between the client and the server, and is used to encrypt the user’s password that is sent for verification.
- RADIUS port
This is the port the RADIUS server is listening on for incoming client requests. The default port is 1645.
- RADIUS retry timeout
This is the time in seconds that the client will wait before sending another request if a response from a previous request is not received. The default is three seconds.
RADIUS supports all user types that the local database supports, except IKE users. Of the three types of external authentication servers supported by ScreenOS, only RADIUS provides the broad support for authentication, admin privilege assignment, and Xauth/L2TP remote settings assignment.
You can find examples for configuring RADIUS external authentication servers in Recipe 13.7.
LDAP
LDAP is a protocol used for conducting searches through a directory. LDAP is based on the X.500 specifications, but it is significantly simpler. It allows users to query directories of information such as email addresses or public keys. Because LDAP is an open standard and it supports the Transmission Control Protocol/Internet Protocol (TCP/IP), it is well suited for centralized storage of information that a variety of host computers or applications may access. Microsoft uses a very common LDAP system, called Active Directory. Active Directory stores information about organizations, groups, and users within a Windows domain structure, including the user logon credentials for the domain. You can find more information on LDAP in RFC 1777, at http://www.ietf.org/rfc/rfc1777.txt.
LDAP directories are designed in a hierarchical fashion and you can think of them as branches of a tree, starting at the root. In its basic form, LDAP branches from country to organization to organizational units to individuals (where individuals can be people, files, devices, etc.). Figure 13-1 illustrates a typical LDAP structure.

ScreenOS can use the LDAP protocol for authentication of user passwords for any user type except IKE users.
Warning
You can use LDAP for authentication only; it does not support admin privilege assignment, remote settings for L2TP users or user groups, or remote settings for Xauth users or user groups.
Support is available for the various user types within ScreenOS:
- Auth user
- L2TP user
Authentication only. User will receive the default remote settings from the security device.
- Xauth user
Authentication only. User will receive the remote settings from the Xauth server configured within the security device.
- Admin user
Authentication only. User will receive the default read-only privilege level.
- User groups
In addition to the generic auth-server properties, LDAP configuration requires the default setting for the LDAP server port to be 389. You can find examples of configuring LDAP external authentication servers in Recipe 13.8.
SecurID
Instead of relying on a fixed password, SecurID provides two-factor authentication. The two factors are “something you know” in the form of a PIN, and “something you have” in the form of a one-time token generated by an RSA SecurID authenticator. An authenticator is available in several formats, from a credit-card-size device with an LCD window, to keychain fobs, to software that runs on your computer. The authenticator displays a new pseudorandom number every 60 seconds and is synchronized to the RSA Ace server. When a user attempts a logon using SecurID, he enters his username followed by his PIN and the pseudorandom number currently displayed by the authenticator, as shown in Figure 13-2. In essence, it is a password that is valid for only 60 seconds.

If that isn’t enough, a duress mode will send an alarm if the user enters a predetermined PIN code that signifies that the user is being forced to enter her login credentials, perhaps with a gun to her head. The login will succeed for that one time only and will trigger an event on the Ace server. All future login attempts will fail until the user contacts the Ace server administrator. This feature is available only on Ace servers that support this feature.
The ScreenOS security device performs the same basic function when communicating with an RSA Ace server as it does with a RADIUS server. That is, the security device acts as a proxy between the user and the authentication server, prompting the user for the login credentials and then forwarding them for verification to the Ace server. The Ace server will respond with a success or failure message allowing ScreenOS to accept or deny the login attempt.
Warning
You can use SecurID for authentication only; it does not support admin privilege assignment, remote settings for L2TP users or user groups, or remote settings for Xauth users or user groups.
You can use SecurID with any user type except IKE users. Support for the individual user types is the same as for LDAP:
- Auth user
Full support for auth users.
- L2TP user
Authentication only. User will receive the default remote settings from the security device.
- Xauth user
Authentication only. User will receive the remote settings from the Xauth server configured within the security device.
- Admin user
Authentication only. User will receive the default read-only privilege level.
- User groups
Not supported with the LDAP external authentication server.
In addition to the generic authentication properties, you can configure SecurID external servers with the following options:
- Authentication port
The port number on the SecurID Ace server to which the security device sends authentication requests. The default port number is 5500.
- Encryption type
The algorithm used for encrypting communication between the security device and the SecurID Ace server—either SDI or Data Encryption Standard (DES).
- Client retries
The number of times the SecurID client (i.e., the security device) tries to establish communication with the SecurID Ace server before aborting the attempt.
- Client timeout
The length of time in seconds that the security device waits between authentication retry attempts.
You can find examples of configuring SecurID external authentication servers in Recipe 13.9.
ScreenOS User Types
You can create multiple types of user accounts on the ScreenOS device. Each has a different purpose. Table 13-1 compares user types with the server type.

- Administrative users
This type of user has access to the firewall configuration and monitoring interfaces.
- Auth user
This type of user is referenced within a firewall policy to authenticate a user before taking an action such as “permit”.
- L2TP user
This type of user is referenced in the configuration of an L2TP tunnel.
- IKE user
This type of user is for authenticating virtual private network (VPN) tunnels (Phase 1).
- Xauth user
This type of user is referenced by the client/server configuration for VPN authentication.
Administrative Users
You can assign only a few types of administrative privileges to an administrative user:
- Root admin
This account has complete control over the entire firewall. It is the only account that can create additional “root-level” administrative accounts and is always stored locally on the device.
- Root-level “fully privileged” admin
This account has full privileges over the root level of the device, with a few exceptions for commands kept strictly for the “root” user. This type of account can create Virtual Systems (VSYS) and VSYS admin accounts within those VSYS.
- Root-level “read-only” admin
This type of account can view the configuration, but cannot change any configuration values.
- VSYS “fully privileged” admin
This type of account has full control over the VSYS device. This type of account cannot view configurations for the root level of the firewall or other VSYS residing on the same platform.
- VSYS “read-only” admin
This account type can view configurations within the VSYS only and cannot alter any configuration values.
Figure 13-3 shows the process for authenticating administrative users.
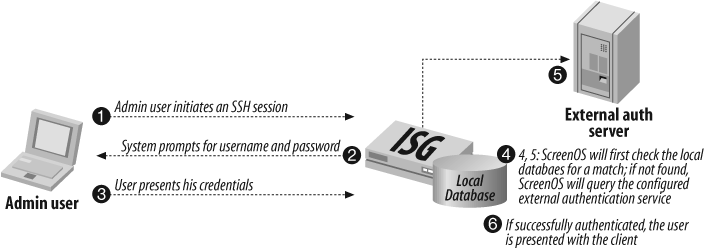
You must store the root admin account locally on the firewall. You can store all other admin accounts for the root level, or VSYS level, on an external authentication server. If you’re using RADIUS, you can load the NetScreen dictionary file to provide VSAs that can be returned to the ScreenOS device assigning a privilege level. Optionally, you can assign a global privilege level of read/write or read-only for all admin users. If you’re using SecurID, LDAP, or RADIUS without the dictionary file, you must configure the privilege level for the user in the local database.
Here is an excerpt from the NetScreen dictionary file:
	# For Admin Privileges
	# READ_WRITE (ALL): 2, VSYS_ADMIN: 3, READ_ONLY: 4, VSYS_READ_ONLY: 5
	ATTRIBUTE NS-Admin-Privilege 26 [vid=3224 type1=1 len1=+2 data=int4] r
	VALUE NS-Admin-Privilege        READ_WRITE      2
	VALUE NS-Admin-Privilege        VSYS_ADMIN      3
	VALUE NS-Admin-Privilege        READ_ONLY       4
	VALUE NS-Admin-Privilege        VSYS_READ_ONLY  5

	ATTRIBUTE NS-Admin-Vsys-Name 26 [vid=3224 type1=2 len1=+2 data=string] r
You can find examples of creating both local and external administrative user accounts in Recipe 13.1, Recipe 13.2, and Recipe 13.7.
Auth Users
You create auth users to be used in firewall policies. You can use one of two schemes.
In the first scheme, as shown in Figure 13-4, you use a standard auth policy to authenticate users attempting an HTTP, FTP, or Telnet connection across the firewall. In this form, ScreenOS intercepts the connection request and prompts the user for his username and password, meanwhile buffering the packets associated with the connection attempt. If successfully authenticated, the packets are forwarded to the target host and the connection proceeds.
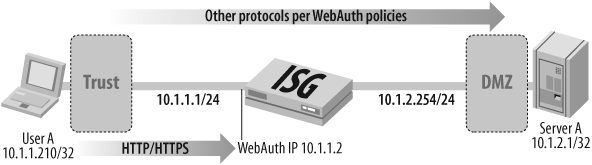
In the optional scheme, the user authenticates to the firewall first, before attempting any connections through the firewall. This is known as WebAuth. Using WebAuth, users are authenticated and then can forward any type of traffic (not just Telnet, FTP, or HTTP) that may be permitted by the policy.
You can create authentication users within the local database on the firewall or on external authentication servers. Figure 13-5 shows the authentication process. You can find examples for configuring authentication policies in Recipe 13.4, Recipe 13.5, and Recipe 13.8.
For the second scheme that uses WebAuth, ScreenOS is configured with an additional IP address that will be bound to an internal web server process. This IP address should be in the same subnet as one of the interface IP addresses of the fire-wall. In this scheme, the authentication user will initially connect to the firewall WebAuth IP address where she will be prompted for her username and password prior to any firewall policy checks. Once authenticated to the firewall, the user will be added to the authentication table within ScreenOS and all traffic permitted by an authentication policy for that user or group will be forwarded. You can find examples for configuring WebAuth in Recipe 13.5.


IKE, Xauth, and L2TP Users
ScreenOS supports both IP Security (IPSec) and L2TP. You can configure IKE, Xauth, and L2TP users and user groups for establishing these tunneled connections:
You can create IKE users to link an IKE ID to a username for establishing an IPSec tunnel in aggressive mode. IKE users can only be stored on the local database.
Xauth users are created for authentication and further assignment of networking information such as IP address, DNS server(s), and Windows Internet Naming Service (WINS) servers. Xauth users can reside locally or externally.
L2TP users are created for establishing a Layer 2 tunnel and providing an IP address, DNS server(s), and WINS server information to the end system. L2TP users can reside locally or on external authentication servers.
For Xauth and L2TP, only the local security device or a RADIUS server can assign the IP, DNS, and WINS. LDAP and SecurID do not support this functionality; however, you can use a combination of servers for this purpose. For example, you could authenticate your Xauth users, via SecurID, and then assign the additional information from the local security device.
You can find examples of IKE users in Recipe 13.6.
Multiple-Type Users
You can combine IKE, Auth, L2TP, and Xauth users in the following combinations to store within the local database:
Auth/IKE user
Auth/IKE/Xauth user
Auth/L2TP user
IKE/Xauth user
Auth/IKE/L2TP user
L2TP/Xauth user
IKE/L2TP user
IKE/L2TP/Xauth user
Auth/Xauth user
Auth/IKE/L2TP/Xauth user
You should consider the following points when creating accounts with multiple types of use:
Combining an IKE user type with any other user type limits the potential to scale. You must store an IKE user account on the local database. If you create auth/IKE, IKE/L2TP, and IKE/Xauth user accounts and the number of users grows beyond the capacity of the local database, you will not be able to relocate these accounts to an external auth server. If you separate IKE user accounts from other types of accounts, you have the flexibility to move the non-IKE user accounts to an external auth server should the need arise.
L2TP and Xauth provide the same services: remote user authentication and IP, DNS server, and WINS server address assignments. It is not recommended to use L2TP and Xauth together for an L2TP-over-IPSec tunnel. Not only do the two protocols accomplish the same goal, but also the L2TP address assignments overwrite the Xauth address assignments after Phase-2 IKE negotiations are complete and L2TP negotiations take place.
If you create a multiple-type user account on the local database combining auth/L2TP or auth/Xauth, the same username and password must be used for both logins.
Although it is more convenient to create a single multiple-type user account, separating the user types into two single accounts allows you to increase security. For example, you can store an auth user account on an external auth server and an Xauth user account on the local database. You can then assign different login usernames and passwords to each account and reference the Xauth user in the IKE gateway configuration and the auth user in the policy configuration. The dial-up VPN user must authenticate twice, potentially with two completely different usernames and passwords.
Group Expressions
You use a group expression within a policy to set conditions for authentication. Group expressions allow you to use users, groups, or other group expressions to create alternatives for authentication, such as matching a or b. In addition, you can use group expressions as requirements for authentication, such as a and b. You also can use group expressions to exclude users, user groups, or other group expressions such as not a.
Tip
Although you configure group expressions on the firewall the groups that the expressions reference must reside on a RADIUS server. RADIUS allows a user to be a member of multiple groups, whereas the local database does not.
Group expressions use three different operators: AND, OR, and NOT. The operators can relate to an auth user, auth user group, or previously defined group expression, as detailed in Table 13-2.
|
Object |
Expression |
Usage |
|
|
A policy specifies that a user match “a” or “b” so that the user is authenticated if he matches either condition. | |
|
|
The group expression “AND” requires that at least one of the two expression objects be a user group or a group expression. For example, it is illogical to require a user to be both “user a” and “user b”. A proper usage would be to require that the user be “user a” and be a member of “user group b”, for example. Authentication succeeds only if both conditions are met. | |
|
|
A policy can specify that the user be anyone except “c”, for example (NOT c). | |
|
User groups |
|
A policy specifies that the user be a member of “group a” or “group b”, and authentication succeeds if the user is a member of either group. |
|
|
A policy specifies that the user be a member of “group a” and “group c”, and authentication succeeds only if the user is a member of both groups. | |
|
|
A policy specifies that the user not be a member of “group a”, and authentication succeeds only if the user is not a member of “group a”. | |
|
Group expressions |
|
A policy specifies that the user meets the criteria of “group expression a” or “group expression b”, and authentication succeeds if the user meets either criterion. |
|
|
A policy specifies that the user fits the description of both “group expression c” and “group expression d”. Authentication succeeds only if the user meets both criteria. | |
|
|
A policy specifies that the user does not meet the description of “group expression a”, and authentication succeeds only if the user does not fit the description of “group expression a”. |
Login Banners
You use login banners to display the terms of use for the security device or protected resources behind the security device. Default messages are present for most banners, but you can customize them to meet the needs of the organization.
Here is an example banner that may be displayed upon login to a host system to inform the user of the terms of use:
NOTICE TO USERS
This is a Private computer (and/or it is directly connected to a private network system) that is the property of MyCompany, Inc. It is for authorized use only. Users (authorized or unauthorized) have no explicit or implicit expectation of privacy.
Any or all uses of this system and all files on this system may be intercepted, monitored, recorded, copied, audited, inspected, and disclosed to law enforcement personnel, as well as authorized officials of other agencies, both domestic and foreign. By using this system, the user consents to such interception, monitoring, recording, copying, auditing, inspection, and disclosure at the discretion of MyCompany Inc. personnel.
Unauthorized or improper use of this system may result in administrative disciplinary action and civil and criminal penalties. By continuing to use this system, you indicate your awareness of and consent to these terms and conditions of use. LOG OFF IMMEDIATELY if you do not agree to the conditions stated in this warning.
ScreenOS supports multiple banners. Telnet, FTP, and HTTP protocols have three banners presented when used in authentication policies. A login banner is displayed with the login prompt and additional banners for successful and failed login attempts. WebAuth allows for a single banner for successful authentications.
One additional banner is available for administrative login. You can configure this login banner via the CLI or load it onto the security device as a file via the Secure Copy (SCP) protocol. You can find examples of creating an administrative login banner in Recipe 13.1. You can find examples of other authentication banners in Recipe 13.4 and Recipe 13.5.
The remainder of this chapter provides configuration recipes for various combinations of users, types, and authentication services.
13.1. Create Local Administrative Users
Solution
Use the set admin context for this operation:
mydevice->set admin name fwadminmydevice->set admin password !secret$PWmydevice->set admin user "super" password "super$pw1" privilege allmydevice->set admin user "ro-admin" password "pwF0rRO" privilege "read-only"mydevice->set admin auth server local
Set a login banner for administrative access if desired:
	mydevice-> set admin auth banner telnet login
	"This security device may only be accessed by authorized firewall
	administrators of my-company. All access is logged."
Discussion
A critical security task is to secure your firewall from unauthorized access to the configuration interfaces as well as add any additional user accounts for managing the firewall. ScreenOS devices ship with the default username netscreen and the default password netscreen for the “root” level account. You should change this immediately using this recipe’s solution. Here, we have changed the existing root user account name to fwadmin, and set the password for that account to !secret$PW.
We have also created two additional users. One user, super, has full privileges, and another user, ro-admin, has read-only privileges. Lastly, we have specified that ScreenOS uses the local authentication server for firewall admins.
To show the configuration of users that have been created on the firewall, use the get admin user command:
	mydevice-> get admin user
	Name                             Privilege
	-------------------------------- ---------------
	fwadmin                          Root
	super                            Read-Write
	ro-admin                         Read-Only
Set a login banner for administrative access if desired:
	mydevice-> set admin auth banner telnet login "This security device
	may only be accessed by authorized firewall administrators of my-company.
	All access is logged."
You can find additional information about preparing your device for initial operation in Chapter 2.
13.2. Create VSYS-Level Administrator Accounts
Solution
To create VSYS-level accounts, you must “enter” the vsys. Here we will enter vsys1:
mydevice->enter vsys vsys1mydevice(vsys1)->set admin vsys name vadminmydevice(vsys1)->set admin vsys password !secret$PWmydevice(vsys1)->set admin vsys user "vadminr-o" password "St1ng3r" privilege"read-only"
Discussion
ScreenOS supports VSYS on the higher-end devices. You can create user accounts to authenticate administrators of specific VSYS. A VSYS administrator will have read-only or read/write access only, within the VSYS in which the user account resides. A VSYS administrator cannot see any configuration information within the root level of the firewall or any other VSYS devices that have been created.
Here, vsys1 was created previously. By using the enter vsys command, we can access the VSYS named vsys1. A simple variation on the preceding recipe provides the ability to create our VSYS admin accounts. From the following output, you can see the two accounts within the virtual system:
	mydevice(vsys1)-> get admin user
	Name                             Privilege
	-------------------------------- ---------------
	vadmin                           VSYS Read-Write
	vadminr-o                        VSYS Read-Only
You can find more information on VSYS in Chapter 21.
13.3. Create User Groups for Authentication Policies
Solution
Rather than manage each user individually, you can gather users into a group so that any changes made to the group propagate to each group member:
mydevice->set user jim password mypass06mydevice->set user kim password mypass07mydevice->set user bill password mypass08mydevice->set user bill type ike xauthmydevice->set user pearl password mypass09mydevice->set user pearl type ike xauthmydevice->set admin user bill password billpass99 type ikemydevice->set user-group auth_grp1 location localmydevice->set user-group auth_grp1 user jimmydevice->set user-group auth_grp1 user kimmydevice->set user-group vpn location localmydevice->set user-group vpn user billmydevice->set user-group vpn user pearl
Discussion
By default, creating a user with a password creates a user account type of “auth”. When you create a user group in ScreenOS, the type remains undefined until you add a user to the group, at which point the group inherits the type(s) of accounts from the user definitions. You can create groups with multiple types by adding such users as Xauth, IKE, and L2TP to the group. However, you cannot combine the admin user with any other type of account. Any user account can be a member of up to four user groups.
In the solution to this recipe, four users and two user groups are defined. Users jim and kim are members of the auth_grp1 user group and users bill and pearl are members of the vpn group. User jim is also a member of the local group. We can view the group memberships with the get user-group command:
mydevice->get user-group auth_grp1GroupId: 3 Group Name : auth_grp1 Type : auth Total members : 2 Location : local Use cnt: Gateway 0, Firewall 0, L2TP 0, XAuth 0 Users: Id User name Enable Type ID-type Identity Belongs to groups ----- ----------- ------ ------- ------- ---------- ----------------- 101 jim Yes auth local auth_gr. 6 kim Yes auth auth_grp1 mydevice->get user-group vpnGroupId: 2 Group Name : vpn Type : ike xauth Total members : 2 Location : local Use cnt: Gateway 0, Firewall 0, L2TP 0, XAuth 0 Users: Id User name Enable Type ID-type Identity Belongs to groups ----- ---------- ------ ------- ------- ---------- ----------------- 4 bill Yes ike xauth NONE vpn 5 pearl Yes ike xauth NONE vpn
You can also view individual users and group memberships with the get user command:
	mydevice-> get user all
	Total users: 6
	Id    User name  Enable      Type ID-type Identity Belongs to groups
	----- ---------- ------- --------- ------- -------- -----------------
	    4 bill      Yes     ike xauth NONE             vpn
	  100 dude      Yes     auth                       local
	  101 jim       Yes     auth                       local auth_gr..
	    6 kim       Yes     auth                       auth_grp1
	    3 louis     Yes     auth
	    5 pearl     Yes     ike xauth NONE             vpn
	user with ASN1_DN type ID sort list:
User groups can now be used in VPN or authentication policies, as shown in the following recipes.
You can find more information on setting up VPN scenarios in Chapter 10.
13.4. Use Authentication Policies
Problem
You want to require user authentication before permitting an FTP connection across the firewall.
Solution
This solution touches on a few areas of ScreenOS configuration, users, objects, policies, and banners.
User and group:
mydevice->set user "jim" uid 100mydevice->set user "jim" type authmydevice->set user "jim" password $somePw671mydevice->set user "jim" "enable"mydevice->set user-group "local" id 100mydevice->set user-group "local" user "jim"
Objects:
mydevice->set address trust user-a 10.1.1.1/32mydevice->set address dmz server-a 10.2.2.2/32
Policy:
	mydevice->set policy id 11 top from trust to dmz user-a server-a ftp
	permit auth user-group local log
Banners:
mydevice->set auth banner ftp login "Please enter your username and password to be authenticated by this security device"mydevice->set auth banner ftp success "You are now authenticated. You may proceed with your ftp session"mydevice->set auth banner ftp fail "The username and password presented is not authorized for this ftp session"
Discussion
In this section, we will provide an example of simple user authentication within a firewall policy for FTP. ScreenOS permits this type of authentication for FTP and Telnet. These protocols can support an interactive style of communication that allows for prompting of user credentials.
ScreenOS will cache these credentials and offer them to the FTP server. This means that if the user credentials configured on the firewall match the FTP login credentials, the user will be automatically logged into the FTP server, having to provide credentials only once. If the username and password do not match the FTP server login process, the user will have to log in to the FTP server again and provide the correct credentials.
Upon successfully authenticating to the firewall, ScreenOS will create an entry in the authentication table for the user’s IP address. You can view this authentication table with the get auth table command:
	mydevice-> get auth table
	Total users in table:     1
	  Successful:     1, Failed:     0
	  Pending   :     0, Others:     0
	  Infranet users :     0
	Col T: D = Default, W= WebAuth, I= Infranet, A= Auth server in policy
	id src          user  group    age status   server T srczone  dstzone
	 1 10.1.1.1     jim   local      0 Success  Local  D Untrust  Trust
Additional commands are available for the get auth context. An example is the get auth statistics command:
	mydevice-> get auth statistics
	Values of the following:
	  Current entries in Auth Queue: 0
	  Maximum entries ever in Auth Queue: 0

	Number of times the following have happened:
	  Auth Queue was full: 0
	  LDAP connect failed: 0
	  Out of Auth Msg Bufs: 0
	  Auth table entry unavailable: 0
	  Could not send mail to Auth task: 0
	  Auth callback func called: 0 times
	  Select() has data: 0 times
	  Select() has data on socket: 0 times
	  Authq entry allocated: 0, freed: 0
	Radius counters:
	  Authentication:
	    L2TP/XAuth Access Requests sent: 0
	    Admin/FW Access Requests sent: 0
	    Total Access Accepts Received 0
	    Total Access Rejects Received 0
	    Total Access Challenges Received 0
	    Authenticator in Accept/Reject/Challenge: Valid: 0, Invalid: 0

	  Accounting:
	    Accounting Start Requests sent: 0
	    Accounting Start Response recd: 0 (Valid: 0, Invalid: 0)

	    Accounting Stop Requests sent: 0
	    Accounting Stop Response recd: 0 (Valid: 0, Invalid: 0)
	    Accounting Stop Retry attempts: 0

	    Total Accounting Responses recd: 0
	    Authenticator in Accounting Response: Valid: 0, Invalid: 0

	  Total Radius Packets sent: 0
	  Total Radius Packets recd: 0
	  Total Radius Retry attempts: 0
Entries within the auth table have a timeout to remove entries with idle connections. This inactivity timer is set to 10 minutes by default, but you can change it to any value between 0 and 255 minutes:
	mydevice-> set auth-server Local timeout ?
	<number> timeout in minutes. Valid range 0 - 255 (1000 for
	admin timeout)
You can find additional information on policy configuration in Chapter 7.
13.5. Use WebAuth with the Local Database
Problem
You want to use WebAuth to authenticate a user prior to policy-checking other traffic, similar to the scenario shown in Figure 13-6.
Solution
WebAuth authenticates the user credentials and then creates an entry in the auth table for the IP address of the user host machine.
User and group:
mydevice->set user "jim" uid 100mydevice->set user "jim" type authmydevice->set user "jim" password $somePw671mydevice->set user "jim" "enable"mydevice->set user-group "local" id 100mydevice->set user-group "local" user "jim"
WebAuth:
mydevice->set webauth server Localmydevice->set interf e0/0 webauth-ip 10.1.1.2mydevice->set interf e0/0 webauthmydevice->set auth-server Local timeout 30
Policy:
mydevice->set pol id 12 from trust to dmz user-a server-a ftp permit webauth user-group local logmydevice->set pol move 12 after 11
Banner:
	mydevice-> set webauth banner success "You have successfully
	authenticated to the firewall. You may now use your other applications."
Discussion
WebAuth allows user authentication prior to policy checking. Upon successful authentication, an entry is created within the auth table for the IP address of the user’s workstation. This entry in the auth table is checked for each session that matches a rule with the WebAuth option enabled. You can choose whether to use clear text HTTP or HTTPS (SSL) for this authentication. For example:
mydevice-> set interf e0/0 webauth ssl-only
You can use WebAuth with the local database or an external authentication server. The main requirement is that WebAuth be used with the user account type of “auth”.
You can configure the WebAuth server on any physical interface, subinterface, or Virtual Security Interface (VSI), but it must be an address in the same subnet as the chosen interface. You also can configure WebAuth on multiple interfaces. If you have multiple interfaces bound to the same security zone, you can put a WebAuth IP address on one interface, and traffic from other interfaces within the same zone can still reach it.
You also can use WebAuth in transparent mode with a WebAuth IP address chosen in the same subnet as the vlan1 interface.
Warning
Be aware that after a security device authenticates a user at a particular source IP address, it subsequently permits traffic—as specified in the policy requiring authentication via WebAuth—from any other user at that same address. This might be the case if the users originate traffic from behind a Network Address Translation (NAT) device that changes all original source addresses to a single translated address.
You can view entries within the auth table with the get auth table command:
	mydevice-> get auth table
	Total users in table:     1
	  Successful:     1, Failed:     0
	  Pending   :     0, Others:     0
	  Infranet users :     0
	Col T: D= Default, W= WebAuth, I= Infranet, A= Auth server in policy
	  id src       user  group    age status   server T srczone  dstzone
	   1 10.1.1.1  jim   local      0 Success  Local  D Untrust  Trust
The ScreenOS event log also has entries associated with WebAuth authentication events. Event type 518 displays authentication failures for WebAuth, and type 519 displays successful WebAuth authentications:
mydevice->get event type 518Date Time Module Level Type Description 2006-03-14 12:27:51 system warn 00518 Local authentication for WebAuth user jeff at 10.1.1.210 was denied 2006-03-14 12:27:42 system warn 00518 Local authentication for WebAuth user jeff at 10.1.1.210 was denied 2006-03-14 12:27:31 system warn 00518 Local authentication for WebAuth user jeff at 10.1.1.210 was denied 2006-03-11 16:13:19 system warn 00518 ADM: Local admin authentication failed for login name 'fwadmin': invalid password 2006-03-11 16:10:28 system warn 00518 Local authentication for WebAuth user joe at 10.1.1.210 was denied Total entries matched = 5 mydevice->get event type 519Date Time Module Level Type Description 2006-03-14 12:25:19 system warn 00519 Local authentication for WebAuth user kim at 10.1.1.210 was successful 2006-03-14 12:24:38 system warn 00519 Local authentication for WebAuth user jim at 10.1.1.210 was successful 2006-03-14 12:23:06 system warn 00519 Local authentication for WebAuth user dude at 10.1.1.210 was successful 2006-03-11 16:20:32 system warn 00519 Local authentication for user dude at 10.1.1.210 was successful 2006-03-11 16:19:27 system warn 00519 Local authentication for user dude at 10.1.1.210 was successful 2006-03-11 16:17:42 system warn 00519 Local authentication for WebAuth user dude at 10.1.1.210 was successful 2006-03-11 16:12:09 system warn 00519 Local authentication for WebAuth user dude at 10.1.1.210 was successful Total entries matched = 7
You can find additional information on policy configuration in Chapter 7.
13.6. Create VPN Users with the Local Database
Solution
For this recipe, you’ll need to create both IKE and Xauth user types. Passwords are assigned for Xauth authentication, and you must configure remote networking settings for the Xauth users. Note that you can store only IKE users and user groups on the local database.
mydevice->set user alex ike-id u-fqdn [email protected]mydevice->set user ben ike-id ip 24.1.1.1mydevice->set user cal ike-id fqdn www.juniper.netmydevice->set used dan ike-id asn1-dn wildcard CN=clark,OU=dan,O=mycompany,L=dallas,ST=tx,C=us,[email protected]
Then, set the account types for the users:
mydevice->set user alex type ike xauthmydevice->set user ben type ike xauthmydevice->set user cal type ike xauthmydevice->set user dan type ike xauth
Set passwords for each user:
mydevice->set user alex password pass1mydevice->set user ben password pass2mydevice->set user cal password pass3mydevice->set user dan password pass4
Create the IP address pool:
mydevice-> set ippool vpn1pool 10.60.1.1 10.60.1.100Assign remote networking settings for each user:
mydevice->set user alex remote ippool vpn1poolmydevice->set user alex remote dns1 10.10.10.30mydevice->set user alex remote wins1 10.10.10.30mydevice->set user ben remote ippool vpn1poolmydevice->set user ben remote dns1 10.10.10.30mydevice->set user ben remote wins1 10.10.10.30mydevice->set user cal remote ippool vpn1poolmydevice->set user cal remote dns1 10.10.10.30mydevice->set user cal remote wins1 10.10.10.30mydevice->set user dan remote ippool vpn1poolmydevice->set user dan remote dns1 10.10.10.30mydevice->set user dan remote wins1 10.10.10.30
And finally, create the group and add its users:
mydevice->set user-group vpnauth location localmydevice->set user-group vpnauth user alexmydevice->set user-group vpnauth user benmydevice->set user-group vpnauth user calmydevice->set user-group vpnauth user dan
Discussion
In ScreenOS, an IKE user is for VPN tunnel establishment typically when the end system will have a dynamically assigned IP address. In this case, you must use an IKE ID to establish the Phase-1 Security Association (SA). The IKE ID can be one of four types. In this example, there are four users, each with a different type of IKE ID, and they are placed in a group called vpnauth.
Each user is configured to be of type IKE and Xauth. You can view users and group configurations with the get user commands:
	mydevice-> get user all
	Total users: 11
	Id    User name Enable    Type    ID-type Identity   Belongs to groups
	----- --------- ----------------- ------- ---------- -----------------
	    7 alex      Yes   ike xauth   USER-DN [email protected] vpnauth
	    8 ben       Yes   ike xauth   IPV4    24.1.1.1   vpnauth
	    4 bill      Yes   ike xauth   NONE               vpn
	    9 cal       Yes   ike xauth   FQDN    www.juniper.net vpnauth
	   10 dan       Yes   ike xauth   ASN1-DN
	CN=clark,OU=dan,O=mycompany,L=dallas,ST=tx,C=us,Email=cal@mycompan
	.com,DC=, vpnauth
	  100 dude       Yes     auth                         local
	   11 eve        Yes     l2tp xauth
	  101 jim        Yes     auth                         local admin_gr..
	    6 kim        Yes     auth                            admin_grp1
	    3 louis      Yes     auth
	    5 pearl       Yes     ike xauth      NONE               vpn
	user with ASN1_DN type ID sort list:
	[0]=10u
Here, our users are created as IDs 7–10, are enabled, are of type IKE and Xauth, with the IKE ID type and identity, and are members of the vpnauth group.
A more detailed look at user alex will show the remote settings assigned to this user:
	mydevice-> get user alex
	Id  User name  Enable     Type  ID-type Identity   Belongs to groups
	--- ---------- ------ --------- ------- ---------- ------------------
	  7 alex       Yes    ike xauth USER-DN [email protected] vpnauth
	user type<00000034>.
	Number login with this user id is 1. gw_use_cnt<0>
	identity type<3>.
	identity <[email protected]>.
	Remote IP          : 0.0.0.0           IP Pool Name :vpn1pool
	Remote Primary DNS : 10.10.10.30       Remote Secondary DNS : 0.0.0.0
	Remote Primary WINS: 10.10.10.30       Remote Secondary WINS: 0.0.0.0
	Static IP          : 0.0.0.0
	User belongs to group(s): vpnauth
Warning
You must remove a user from any groups or policies before making changes to the user. For example:
	mydevice-> set user alex type ike
	User alex is in use
The user alex is a member of a user group. You would see the same message if the user was configured within a policy.
In the preceding example, each user was assigned remote networking settings. A variation on this is to use the Xauth server to assign these values. Using the Xauth server to assign these values is recommended when a large number of users will be connecting to the security device. More detailed information on using Xauth, IKE, and VPN tunnels is available in Chapter 10.
13.7. Use RADIUS for Admin Authentication
Problem
You want to use Windows Active Directory accounts with the Microsoft Internet Authentication Service (IAS) as the RADIUS server for administrator authentication.
Solution
You can configure any user, other than the “root” user, for RADIUS authentication and privilege assignment from the RADIUS server.
First, define the auth-server properties:
mydevice->set auth-server "IAS" id 1mydevice->set auth-server "IAS" server-name "10.1.1.66"mydevice->set auth-server "IAS" account-type adminmydevice->set auth-server "IAS" radius secret "netscreen"mydevice->set auth-server "IAS" radius retries 3mydevice->set auth-server "IAS" radius timeout 5mydevice->set auth-server "IAS" account-type admin
Then, specify what privilege should be assigned by the remote authentication server:
mydevice-> set admin privilege get-externalAnd finally, choose the external server as the default for admin authentication:
mydevice-> set admin auth server "IAS"Discussion
In this section, we will provide a ScreenOS configuration example for using Microsoft IAS, which is included with Windows 2003 Server. It is common to want to leverage the existing credentials present in the Active Directory of the domain controller. Therefore, here we have used a combination of RADIUS and LDAP to authenticate administrators of the security device, even though ScreenOS is only aware of the RADIUS server.
The first part of the configuration defines the external authentication server properties to be used. Next, ScreenOS is instructed to get the privilege, either read/write or read-only, from the external server. Finally, the new authentication server is set as the default for admin authentication.
You can view the configuration of this newly created authentication server with the get auth-server command:
	mydevice-> get auth-server IAS
	Id     :   1                 Auth Server   : IAS
	Type   : Radius              Server Name/IP: 10.1.1.66
	Backup1:                     Backup2       :
	Idle Timeout:   10           Account Type  : admin
	Forced Timeout: 0 (Disabled)
	Fail-over revert interval: Disabled
	Radius shared secret: 7VV93tUaNXoxWnsEeACurDXZWHndDAe4AQ==
	Radius server port : 1645
	Radius retry timeout: 5 second(s), Number of retries: 3
The root user account of the security device can only reside locally. It cannot reside on an external authentication server, and ScreenOS will always search for the user account within the local database first. If it cannot find the user account, it will consult the external server configured to serve the admin account type.
RADIUS is the preferred external authentication server type, as it supports the ability to assign the privilege level, whereas LDAP and SecurID do not have this ability. As shown in this example, you can combine RADIUS with LDAP.
You also can combine it with SecurID in the same fashion. Therefore, it is recommended that you use this approach for authenticating external administrator accounts.
For the Microsoft part of the configuration, you should consult the appropriate documentation for assistance, but here is a quick tutorial:
Create a Windows group such as “firewall admins” and make each admin a member of the group.
When creating the client profile, match on the NAS IP address (which will be the ScreenOS interface IP), and enter the same shared secret as that which was entered on the ScreenOS auth server configuration.
Create an access policy and match on the NAS IP address and the Windows group created in step 1.
Click Edit Profile, and use PAP in the Authentication tab.
In the Advanced tab, add a vendor-specific attribute with vendor code 3224 and click “Yes it conforms”.
Click the “Edit attribute” button, and in the first field type
1, the second field will be “decimal”, and the last field will be “2” for read/write, or “4” for read-only.
Tip
If you do not configure a VSA to be returned to ScreenOS, the default permissions will be chosen. The default is read-only, but you can change this to read/write with the command set admin privilege read-write.
You can find additional information on setting up administrators or setting service options on the interface in Chapter 2.
13.8. Use LDAP for Policy-Based Authentication
Problem
You want to use an LDAP database for authentication within auth or WebAuth policies.
Solution
Configure an auth server with the LDAP properties that match your environment by first defining the auth-server properties:
mydevice->set auth-server "my-ldap" type ldapmydevice->set auth-server "my-ldap" account-type authmydevice->set auth-server "my-ldap" server-name 10.1.1.66mydevice->set auth-server "my-ldap" backup1 10.1.1.67mydevice->set auth-server "my-ldap" backup2 10.1.1.68mydevice->set auth-server "my-ldap" timeout 30mydevice->set auth-server "my-ldap" ldap port 389mydevice->set auth-server "my-ldap" ldap cn cn
Then, set the base dn:
mydevice-> set auth-server "my-ldap" ldap dn c=us;o=mycompany;ou=salesSet the server as the default for the account-type auth:
mydevice-> set auth default auth server my-ldapAnd, use it within a policy:
	mydevice-> set pol top from untrust to dmz any server-a svc-grp1
	permit auth log
Discussion
Sometimes you do not know the IP address from which authorized users may be accessing protected resources. Because of this, administrators have been known to use the any object in the source address field of the rule permitting such access. This is an example of why it is difficult to secure networks.
ScreenOS offers the auth and WebAuth features to help with security. With these authentication features, you can use the any identifier in the rule and still be assured that only authorized users can gain access to protected resources.
Here, we have defined the authentication server to use with policy authentication to be an LDAP server by defining a group of servers with a logical name of my-ldap and a server type of ldap, and we set these servers to serve the authentication requests for the auth account type. The server name could be a name resolvable via DNS, or as defined here, simply an IP address. The default timeout of 10 minutes was changed to 30 minutes, so after an idle time of 30 minutes on any given session, the authentication status will be removed, and the user will have to reauthenticate.
The server at 10.1.1.66 will be the primary LDAP server. If this server does not respond, the security device will try the backup1 server at 10.1.1.67. If neither responds, the backup2 server will be tried.
You can view the configuration of the newly defined authentication server with the get auth-server command:
	mydevice-> get auth-server my-ldap
	Id     :   2                 Auth Server   : my-ldap
	Type   : LDAP                Server Name/IP: 10.1.1.66
	Backup1: 10.1.1.67           Backup2       : 10.1.1.68
	Idle Timeout:   30           Account Type  : auth
	Forced Timeout: 0 (Disabled)
	Fail-over revert interval: Disabled
	LDAP server port            : 389
	LDAP distinguished name (dn): c=us;o=mycompany;ou=sales
	LDAP common name identifier : cn
The server was set to be the default server for account type “auth”; you can verify this by issuing the get auth settings command:
	mydevice-> get auth settings
	Id     :   2                 Auth Server   : my-ldap
	Type   : LDAP                Server Name/IP: 10.1.1.66
	Backup1: 10.1.1.67           Backup2       : 10.1.1.68
	Idle Timeout:   30           Account Type  : auth
	Forced Timeout: 0 (Disabled)
	Fail-over revert interval: Disabled
	LDAP server port            : 389
	LDAP distinguished name (dn): c=us;o=mycompany;ou=sales
	LDAP common name identifier : cn
The output of the get auth settings command shows that our newly defined server will be the default for policy-based authentication.
This authentication server is now ready to use with any auth or WebAuth rules within the security device. Recipe 13.4 and Recipe 13.5 are applicable here, as once you have defined the external authentication server, you can use it in the other user authentication schemes in this chapter.
For more information on using policies, please refer to Chapter 7.
13.9. Use SecurID for Policy-Based Authentication
Problem
You want to use your SecurID authentication server for authentication within auth or WebAuth policies.
Solution
Configure an authentication server with properties to match your environment.
First, define the auth-server properties:
mydevice->set auth-server "ace1" type securidmydevice->set auth-server "ace1" server-name 10.1.1.88mydevice->set auth-server "ace1" backup1 10.1.1.188mydevice->set auth-server "ace1" timeout 40mydevice->set auth-server "ace1" account-type authmydevice->set auth-server "ace1" securid retries 3mydevice->set auth-server "ace1" securid timeout 10mydevice->set auth-server "ace1" securid auth-port 5000mydevice->set auth-server "ace1" securid encr 1mydevice->set auth-server "ace1" securid duress 0
Set this server as the default for account type “auth”:
mydevice-> set auth default auth server ace1Then, use it within a policy:
	mydevice-> set pol top from untrust to dmz any server-a svc-grp1
	permit auth log
Discussion
SecurID is a product available from RSA that provides for strong, two-factor authentication. The product consists of server software and individual authenticators. The authenticators are available in a variety of forms, but the most common are keychain-style fobs that produce pseudorandom numbers as one-time passwords. A typical user would enter her username, followed by her PIN, and then enter the numbers currently displayed on her authenticator device. The server upon which the software is installed is referred to as the “Ace” server.
You can use SecurID authentication servers for policy-based authentication, admin authentication, and Xauth/L2TP authentication. However, because the SecurID server cannot send any configuration data back to the ScreenOS device, SecurID is best suited for policy-based authentication. The SecurID server is natively supported within ScreenOS.
In the following example, we will create the authentication server and accept the default ID assigned by ScreenOS. We set the primary server to be at address 10.1.1.88 and to have a backup server at 10.1.1.188. We set the timeout for inactivity within an authenticated session to 40. Lastly, we set specific SecurID properties for the number of retries for reaching the Ace server. We set a timeout of 10 seconds for awaiting a response from the Ace server; we set the port the server is listening on to 5,000; we set encryption to 1, which is DES; and we set the duress mode to disabled.
Use the get auth-server command to view the properties of the newly configured SecurID server object:
	mydevice-> get auth-server ace1
	Id     :   3                 Auth Server   : ace1
	Type   : SecurID             Server Name/IP: 10.1.1.88
	Backup1: 10.1.1.188          Backup2 :
	Idle Timeout:   40           Account Type : auth
	Forced Timeout: 0 (Disabled)
	Fail-over revert interval: Disabled
	SecurID Authentication Port: 5000
	SecurID Use Duress         : NO
	SecurID Encryption Type    : DES
	SecurID Timeout            : 10
	SecurID Max Number Retries : 3
Set the server to be the default for account type “auth”, which you can verify with the get auth settings command:
	mydevice-> get auth settings
	Id     :   3                 Auth Server   : ace1
	Type   : SecurID             Server Name/IP: 10.1.1.88
	Backup1: 10.1.1.188          Backup2 :
	Idle Timeout:   40           Account Type : auth
	Forced Timeout: 0 (Disabled)
	Fail-over revert interval: Disabled
	SecurID Authentication Port: 5000
	SecurID Use Duress         : NO
	SecurID Encryption Type    : DES
	SecurID Timeout            : 10
	SecurID Max Number Retries : 3
This authentication server is now ready to use with any auth or WebAuth rules within the security device. Recipe 13.4 and Recipe 13.5 are applicable here, as once you have defined the external authentication server, you can use it with other user authentication recipes in this chapter.