Chapter 11. Producing Statements
Statements are the perfect solution for businesses that charge for time and other services in bits and pieces, such as law offices, wireless telephone services, or astrology advisors. Statements summarize the statement charges racked up during the statement period (usually a month). This type of sales form is also great for showing payments and outstanding balances, the way your cable bill shows the charges for your monthly service, the Pay-Per-View movies you ordered, your last payment, and your current balance. So even if you invoice your customers, you can send statements to show them their previous balances, payments received, new charges, and overdue invoices. (To learn about the limitations of statements, see Statements.)
In this chapter, you’ll learn how to produce statements, whether you accumulate charges over time or simply summarize your customers’ account status.
Producing Statements
You don’t fill in a QuickBooks statement in one fell swoop the way you do invoices and sales receipts. Think of a statement as a report of all the charges and payments during the statement period that you then send to your customer. A statement’s previous balance, charges, and customer payments all depend on the dates you choose for the statement. Businesses typically send statements out once a month, but you can generate statements for any time period you want.
In QuickBooks, creating statements is a two-step process:
Creating Statement Charges
Statement charges look like the line items you see in an invoice, except for a few small but important omissions. When you select an item for a statement charge, you won’t see any sales tax items, percentage discounts, subtotals, or groups in your item list, because QuickBooks doesn’t let you use those features in statements. You don’t see payment items either, because QuickBooks automatically grabs any payments that have been made when you generate the statement.
Here are the types of items in your Item List that you can use to create statement charges:
Service items
Inventory Part items
Non-inventory Part items
Other Charge items
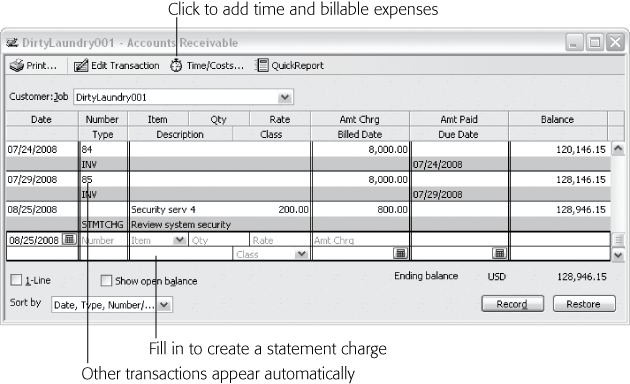
Unlike invoice line items, you create statement charges directly in the Accounts Receivable register for the customer or job that has racked up charges, as shown in Figure 11-1. A statement charge has fields much like those for a line item in an invoice, although they’re scrunched into two lines in the Accounts Receivable register.
Entering statement charges is the first step in preparing billing statements to send to customers. The charges land in the customer’s Accounts Receivable register, just as the total for a customer’s invoice does. Here’s how to create a statement charge:
Choose Customers → Enter Statement Charges or on the Home page, click Statement Charges.
The Accounts Receivable window opens. (Or you can press Ctrl+A to open the Chart of Accounts window and then double-click the Accounts Receivable account.)
In the Customer:Job drop-down list, choose the customer to whom you want to assign the statement charge.
The Accounts Receivable window filters the transactions to show only accounts receivable for the customer or job you choose.
Note
If you set up the customer or job to use a foreign currency, you can’t record statement charges directly in the Accounts Receivable register. Instead, in the Accounts Receivable window’s toolbar, click Edit Transaction. The Make General Journal Entries window opens so you can record the charge there.
In a blank line in the Accounts Receivable register, in the Item drop-down list, choose the item you want to charge for.
When you choose an item, QuickBooks fills in the Rate and Description fields with the rate and description from the item record (Service Items). QuickBooks sets the Type to STMTCHG to denote a charge that appears on a statement rather than an invoice. The program initially copies the value in the Rate field to the Amt Chrg field (the total amount for the charge).
Figure 11-1. Because invoices and payments post to your accounts receivable account, statements can pull those transactions automatically from your accounts receivable account register. To create statement charges for billable time, costs, or mileage, in the Accounts Receivable window’s toolbar, click Time/Costs to add statement charges for those items.Note
If you track billable time, costs, or mileage, you can create statement charges for those items in one fell swoop. In the Accounts Receivable window’s toolbar, click Time/Costs to add statement charges for those items. The “Choose Billable Time and Costs” dialog box that opens is the same one you see when you add billable time and costs to an invoice (Adding Billable Time and Costs to Invoices).
Press Tab to move to the Qty field, and then type the quantity for the item. (If you don’t use a quantity and rate, type the amount charged directly in the Amt Chrg field.)
Just as you do for invoice line items, enter the quantity based on the units for the item (Entering Invoice Line Items). When you move to another field (by pressing Tab or clicking the field), QuickBooks updates the total amount charged (in the Amt Chrg field) to the rate multiplied by the quantity.
If you want to change the rate, press Tab to move to the Rate field, and type the value you want.
When you change the value in the Rate field, QuickBooks recalculates the amount in the Amt Chrg field.
If you want to revise the description for the charge (which appears on the statement you create later), edit the text in the Description field.
QuickBooks automatically fills in the Description field with the first paragraph of the Sales description from the item record, but you can see only a smidgeon of it. To see the whole thing, click the Description field and then keep the pointer over the field. QuickBooks displays the full contents of the field in a pop-up tooltip just below the field.
If you use classes (Filling in Expense Accounts Automatically), in the Class field, choose the one you want.
You can skip the Class field, but when you try to save the statement charge, QuickBooks asks if you want to save it without a class. Click Save Anyway to omit the class, or click Cancel to return to the transactions so you can add the class.
To control which statement the charge appears on, in the Billed Date field, choose the date for the charge.
If you don’t choose a Billed Date, QuickBooks uses the date in the Date field to gather the charge onto a statement.
When you add a statement charge that you want to save for a future statement, be sure to choose a Billed Date within the correct time period. For example, if a membership fee comes due in April, choose a Billed date during the month of April. The statement charge won’t show up until you generate the customer’s April statement. On the other hand, if you forgot a charge from the previous month, set its Billed date to a day in the current month so the charge appears on this month’s statement.
If you plan to assess finance charges for late payments, in the Due Date field, choose the date when payment is due.
QuickBooks uses the date in the Due Date field along with your preferences for finance charges (Finance Charge) to calculate any late charges due. (The due date is based on the terms you apply to the customer [Specifying additional customer information].) But late charge calculations don’t happen until you generate statements.
To save the statement charge, click Record.
Tip
If you charge the same amount every month, memorize (Ctrl+M) the first statement charge and set its recurrence schedule to the same time each month (Using a Memorized Transaction). QuickBooks then takes care of entering your statement charges for you, so all you have to do is generate customer statements once a month.
Generating Customer Statements
QuickBooks is a smart program, but it can’t read your mind. The statements you generate include only the statement charges and other transactions you’ve entered. Before you produce your monthly statements, double-check that you’ve entered all customer payments, credits, or refunds that your customers are due, and all new statement charges for the period.
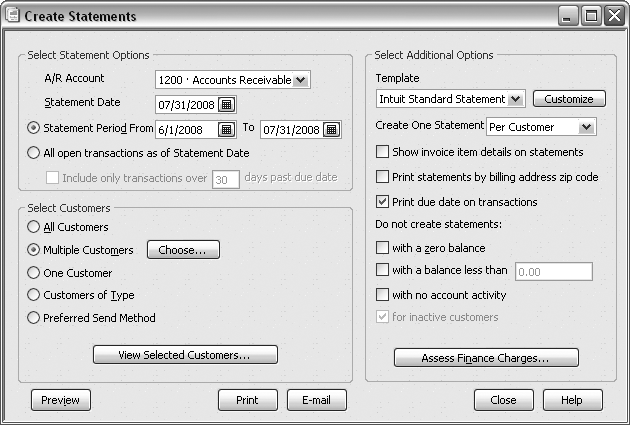
As Figure 11-2 shows, everything about the statements you generate appears in the Create Statements window, including the date range for the statements, the customers you want to send statements to, the template you use, printing options, and finance charges. To begin creating statements, on the Home page, click Statements (or choose Customers → Create Statements). The sections that follow explain the choices you can make and the best way to apply them.
Choosing the date range
Statements typically cover a set period of time, like a month. But the date of the statement doesn’t have to be during that period. For example, you might wait until the day after the period ends so you’re sure to capture every transaction. In the Select Statement Options section, you can choose the statement date and the date range for the statement charges:
A/R Account. If you’ve turned on the multiple currency preference (Multiple Currencies), your company file has an Accounts Receivable account for each currency that you use. Before you generate statements, in the A/R Account drop-down menu, choose the correct currency Accounts Receivable account for the statements you want to create. (That’s right—you have to repeat the statement generation steps for each currency you use.)
Statement Date. Type the date that you want to appear on the statement. In Figure 11-2, the statement date is the last day of the statement period.
Statement Period From _ To _. This is the option you choose to create statements for a period of time. For example, if you produce monthly statements, in the From box, choose the first day of the month, and in the To box, choose the last day of the month.
All open transactions as of Statement Date. Choosing this option adds every unpaid statement charge to the statement, regardless of when the original charges happened. This option is particularly helpful when you want to generate a list of all overdue charges so you can send a gentle reminder to woefully tardy customers. To filter the list of open transactions to only those overdue by a certain number of days, turn on the “Include only transactions over _ days past due date” checkbox, and type the number of days late.
Selecting customers
QuickBooks automatically selects the All Customers option because most companies send statements to every customer. But you can choose other options to limit the list of recipients. (The program remembers the option you chose the last time you opened the Create Statements window and selects it automatically.) Here are your customer options and reasons you might choose each one:
Multiple Customers. To specify the exact set of customers to whom you want to send statements, choose the Multiple Customers option. For example, if most of your customers pay by check, you can choose this option to select the handful of customers that have charge accounts with you. This option also works for selecting customers that use the currency that goes with the Accounts Receivable account you selected.
When you choose this option, a Choose button appears to the right of the Multiple Customers label. Click the Choose button. In the Print Statements dialog box that opens, QuickBooks automatically selects the Manual option. With this option selected, you can select each customer or job that you want to send a statement to by clicking individual customers or jobs or by dragging over several adjacent customers to turn on their checkmarks.
The Automatic option isn’t all that helpful—you must type a customer’s name exactly as it appears in the Customer Name field in the customer’s record to select that single customer. Unless you have gazillions of customers, scrolling through the list and clicking the name is probably faster.
One Customer. To create a corrected statement for only one customer, choose this option. In the drop-down list that appears, click the down arrow, and then choose the customer or job.
Customers of Type. If you categorize your customers by type and process their statements differently, choose this option. For example, you might spread your billing work out by sending statements to your corporate customers at the end of the month and to individuals on the 15th. In the drop-down list that appears, choose the customer type.
Preferred Send Method. If you print some statements and email others, you’ll have to create your statements in two runs. Choose this option and, in the drop-down list that appears, choose one of the send methods. For example, click the E-mail button to send statements to the customers who prefer to receive bills via email. (See Choosing a Send Method for how to email documents.) Before you click Print or E-mail to produce statements, click View Selected Customers to make sure you’ve chosen the customers you want.
Setting printing options
In the Template box, QuickBooks automatically chooses the Intuit Standard Statement template, but you can choose your own customized template instead. In addition, you can control what QuickBooks adds to statements and which statements to skip:
Create One Statement. In the Create One Statement drop-down list, choosing Per Customer can save some trees. QuickBooks generates one statement for each customer, no matter how many jobs you do for them. Charges are grouped by job. If you want to create separate statements for each job, choose Per Job.
Show invoice item details on statements. Turning this checkbox on is usually unnecessary because your customers already have copies of the invoices you’ve sent, and extra details merely clutter your statement. Besides, if customers lose invoices or have questions, they’re usually not shy about calling you.
Print statements by billing address zip code. You’ll want to turn on this checkbox if you have a bulk mail permit, which requires that you mail by Zip code.
Print due date on transactions. QuickBooks turns on this checkbox because you’ll typically want to show the due date for each entry on the statement.
Do not create statements. Printing statements that you don’t need is a waste of time and paper. QuickBooks includes several settings that you can choose to skip certain statements. For example, you can turn on the “with a zero balance” checkbox to skip statements for customers who don’t owe you anything. If you want to send a statement to show that the last payment arrived and cleared the balance due, turn off this checkbox.
You might decide to skip customers unless their balance exceeds your typical cost of processing a statement. With a first-class stamp costing 44 cents and the added expense of letterhead, envelopes, and a label, you can skip statements unless the balance is at least $5 or so. Turn on the “with a balance less than” checkbox and, in the box to the right of the label, type the dollar value.
You can also skip customers with no activity during the period, which means nothing happened—no charges, no payments, no transactions whatsoever. QuickBooks automatically turns on the “for inactive customers” checkbox because there’s no reason to send statements to customers who aren’t actively doing business with you.
Assess Finance Charges. If you haven’t assessed finance charges already, click Assess Finance Charges to add finance charges due. (You can also assess finance charges before you start the statement process by clicking the Finance Charges icon on the Home page.) In the Assess Finance Charges dialog box, you still have an opportunity to turn off the checkmark for individual customers. For example, if a squirrel ate your customer’s last statement, you can turn off the checkmark in that customer’s entry to tell Quick-Books not to penalize them with a finance charge.
Previewing Statements
Before you print statements on expensive letterhead or send the statements to your customers, it’s a good idea to preview them to make sure you’ve chosen the right customers and that the statements are correct. In the Create Statements window, click Preview. QuickBooks opens the Print Preview window (Figure 11-3), which works like its counterparts in other programs.
Here’s how to preview statements before printing:
Click “Prev page” or “Next page” to view statements.
If you left your reading glasses at home, click Zoom In to get a closer look. The Zoom In button switches to Zoom Out so you can return to a bird’s-eye view.
To return to the Create Statements window to print or email your statements, click Close.
The Print Preview window includes a Print button, but it’s not the best way to print your statements. Clicking it begins printing your statements immediately so you have no chance to set your printer options like which printer to use or the number of copies. To set those print settings, as described on Setting Print Options, click Close, and then click Print in the Create Statements window.
Generating Statements
When you’re absolutely sure the statements are correct, in the Create Statements window, click Print or E-mail to generate your statements. This section describes how to do both.

To print your statements, do the following:
In the Create Statements window, click Print.
QuickBooks opens the Print Statement(s) dialog box.
Choose the printer you want to use.
For example, if you have one printer loaded with preprinted forms, select that printer in the “Printer name” drop-down list. See Setting Print Options to learn how to designate a printer to use every time you print statements.
Select one of the “Print on” options.
If you select the “Intuit Preprinted forms” option, QuickBooks doesn’t print the name of the form or the lines around fields, because they’re already on the preprinted page. The “Blank paper” option tells the program to print the statement exactly the way you see it in print preview. The Letterhead option shrinks the form to leave a two-inch band at the top of the page for your company logo. If your letterhead is laid out in an unusual way (your logo down the left side of the page, for instance), create a custom statement template that leaves room for your letterhead elements, and then choose the “Blank paper” option.
In the “Number of copies” box, type the number of copies you want to print.
For example, if you want one copy for the customer and a second one for your files, type 2.
Click Print.
To email your statement directly from QuickBooks, in the Create Statements window, click E-mail. If you use Microsoft Outlook, an Outlook window opens with the customer’s email address filled in. The message contains the standard message you’ve set up for statements (Sales Tax).
If you use QuickBooks email, the Select Forms To Send dialog box opens, showing the statements you’re about to email. Click a statement to preview its content. Click Send Now to dispatch them to your customers.