Chapter 6. Setting Up Other QuickBooks Lists
Open any QuickBooks window, dialog box, or form, and you’re bound to bump into at least one QuickBooks list. These drop-down lists make it easy to fill in transactions and forms. Creating an invoice? If you pick the customer and job from the Customer:Job List, QuickBooks fills in the customer’s address, payment terms, and other fields for you. Selecting the payment terms from the Terms List tells QuickBooks how to calculate the due date for the invoice. If you choose an entry in the Price Level List, QuickBooks calculates the discount you extend to your customers for the goods they buy. Even the products and services you sell to your customers come from the Item List, which you already learned about in Chapter 5.
In this chapter, you’ll discover what the different lists actually do for you and whether you should bother setting them up for your business. Because some lists have their own unique fields (such as the Price Level Type for a Price Level entry), you’ll also learn what the various fields do and how to fill them in. If you already know which lists and list entries you want, you can skip to Creating and Editing List Entries on Creating and Editing List Entries to master the techniques that work for most lists in QuickBooks, such as creating and editing entries, hiding entries, and so on. Once you learn how to work with one QuickBooks list, the doors to almost every other list open as well.
Note
The Customer, Vendor, and Employee lists are the exceptions. Although you’ll learn about the Vendor List in this chapter, here are the other chapters that provide instructions for working with a few of the QuickBooks lists:
The Chart of Accounts, which is a list of your bookkeeping accounts, is covered in Chapter 3.
The Customer:Job List, which includes entries for both customers and their jobs, is the topic for Chapter 4.
The Item List helps you fill in invoices and other sales forms with services and products you sell and is described in Chapter 5. (Although the Sales Tax Code List appears on the Lists menu, sales tax codes are inextricably linked to how you handle sales tax. Details for setting up the Sales Tax Code List are described in Chapter 5, on Assigning tax codes to items.)
Chapter 12 shows you how to have QuickBooks memorize transactions to reuse in the future.
If you turn on the payroll feature (Payroll & Employees), the Lists menu shows the Payroll Item List command, which covers the deposits and deductions on your payroll. Payroll Items are quite specialized, and QuickBooks has tools to help you set them up, which are explained in detail in Chapter 14 on Setting Up Compensation and Benefits.
Chapter 24 describes how to create or modify templates for your QuickBooks business forms.
The Vendor List
There’s no way around it: You’re going to work with vendors and pay them for their services and products. The telephone company, your accountant, and the subcontractor who installs Venetian plaster in your spec houses are all vendors. You can create vendors in QuickBooks one at a time, whenever you get the first bill from a new vendor. But if you already know who most of your vendors are, it’s easier to create those entries all at once so that you can write checks or enter bills without interruptions.
The Add/Edit Multiple List Entries feature, new in QuickBooks 2010, lets you paste data from Microsoft Excel or copy values from vendor to vendor. It works the same way for customer, vendor, and item lists, and you can read how to use it on Selecting the list to work with.
Importing vendor information into QuickBooks is the fastest way to create oodles of vendor records. After you create a map between QuickBooks fields and fields in another program, you can transfer all your vendor information with one command. In this section, you’ll see what fields QuickBooks uses for vendor information. Use the instructions on Importing Customer Information in conjunction with the vendor fields in Table 6-1 to import vendor records into QuickBooks.
Creating, editing, and reviewing your vendors in QuickBooks is a breeze with the Vendor Center. Like the Customer Center (Customers), the Vendor Center lists the details of your vendors and their transactions in one easy-to-use dashboard. To open the Vendor Center window, use any of the following methods:
Choose Vendors → Vendor Center.
On the left side of the QuickBooks Home page, click Vendors.
In the icon bar, click Vendor Center.
Create a new vendor from the Vendor Center window by pressing Ctrl+N (or, in the Vendor Center menu bar, clicking New Vendor). The New Vendor dialog box opens.
Many of the fields that you see should be familiar from creating customers in QuickBooks. For example, the Vendor Name field corresponds to the Customer Name field, which you might remember is actually more of a code than a name. Use the same sort of naming convention for vendors that you use for customers (see the box on Creating Customers in QuickBooks). As with customer records, you’re better off leaving the Opening Balance field empty and building your current vendor balance by entering the invoices or bills they send.
Entering Address Information
If you print checks and envelopes to pay your bills, you’ll need address and contact information for your vendors. The Address Info tab in the New Vendor dialog box (which you opened in the previous section) has fields for the vendor’s address and contact information, which are almost identical to customer address and contact fields, so see Entering address information if you need help filling them in. The one additional vendor field on the Address Info tab is “Print on Check as”, which QuickBooks automatically fills in with the name you enter in the vendor’s Company Name field. When you print checks, QuickBooks fills in the payee with the name in the “Print on Check as” field, so to use a different name, simply edit the name in this box.
Additional Info
The Additional Info tab, shown in Figure 6-1 has fields that are a bit different than the ones you see for customers. The following list describes what they are and what you can do with them.

Account No. When you create customers, you can assign an account number to them. When it’s your turn to be a customer, your vendors return the favor and assign an account number to your company. If you fill in this box with the account number that the vendor gave you, QuickBooks prints it in the memo field of the checks you print. Even if you don’t print checks, keeping your account number in QuickBooks is handy if a question arises about one of your payments.
Type. If you want to classify vendors or generate reports based on types of vendors, choose a type in the Type drop-down list or create a new type in the Vendor Type List (Job Type List) by choosing <Add New>. For example, if you assign a Tax type to all the tax agencies you remit taxes to, you can easily prepare a report of your tax liabilities and payments.
Terms. Choose the payment terms that the vendor extended to your company. The entries in the Terms drop-down list (Job Type List) apply to both vendors and customers.
Credit Limit. If the vendor has set a credit limit for your company (like $45,500 for your credit card), type that value in this box. That way, QuickBooks warns you when you create a purchase order that pushes your credit balance above your credit limit.
Tax ID. You have to fill in this field with the vendor’s Employer Identification Number (EIN) or Social Security number only if you’re going to create a 1099 for the vendor.
Note
When you hire subcontractors to do work for you, you first ask them to fill out a W-9 form, which tells you the subcontractor’s taxpayer identification number (Social Security number or Federal Employer Information Number, for example). Then, at the end of the year, you fill out a 1099 tax form telling them how much you paid them.
Vendor eligible for 1099. Turn on this checkbox if you’re going to create a 1099 for the vendor.
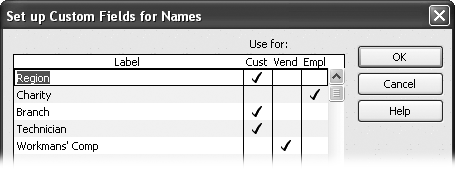
Custom fields. If you want to track vendor information that isn’t handled by the fields that QuickBooks provides, you can include several custom fields (see the box on Hiding Entries). Say your subcontractors are supposed to have current certificates for workers’ comp insurance, and you could be in big trouble if you hire a subcontractor whose certificate is expired. If you create a custom field to hold the expiration date for each subcontractor’s workers’ comp certificate, you can generate a report of workers’ comp expiration dates.
Importing Vendor Information
To import vendor data into QuickBooks, you first have to export a delimited text file or a spreadsheet from the other program (Importing Data from Other Programs). Each piece of information is separated with commas or tabs, or into columns and rows in a spreadsheet file.
QuickBooks looks for keywords in the import file to tell it what to do, so you usually have to rename some headings to transform an export file produced by another program into an import file that QuickBooks can read. QuickBooks’ vendor keywords and the fields they represent appear in Table 6-1. Fortunately, Excel and other spreadsheet programs make it easy to edit the headings in cells.
Tip
To see how QuickBooks wants a delimited file to look, export your current QuickBooks vendor list to an .iif file (Exporting lists to a text file) and then open it in Excel.
Keyword | Field contents |
NAME | (Required) The Vendor Name field, which specifies the name or code that you use to identify the vendor. |
PRINTAS | The name you want to appear as the payee when you print a check to the vendor. |
ADDR1 – ADDR5 | Up to five lines of the vendor’s billing address. |
VTYPE | The vendor type category. If you import a vendor type that doesn’t exist in your Vendor Type List, QuickBooks adds the new type to the list. |
CONT1 | The name of the primary contact for the vendor. |
CONT2 | The name of an alternate contact for the vendor. |
PHONE1 | The number stored in the Phone Number field. |
PHONE2 | The vendor’s alternate phone number. |
FAXNUM | The vendor’s fax number. |
The vendor’s email address. | |
NOTE | Despite the keyword, this field is the name or number of the account, stored in the Account No. field. To set up a vendor as an online payee, you have to assign an account number. |
TAXID | The vendor’s tax ID, which you will need to produce a 1099 for the vendor at the end of the year. |
LIMIT | The dollar amount of your credit limit with the vendor. |
TERMS | The payment terms the vendor requires. |
NOTEPAD | This field is your opportunity to document details you want to remember. |
SALUTATION | The title that goes before the contact’s name, such as Mr., Ms., or Dr. |
COMPANYNAME | The name of the vendor’s company as you want it to appear on documents and transactions. |
FIRSTNAME | The primary contact’s first name. |
MIDINIT | The primary contact’s middle initial. |
LASTNAME | The primary contact’s last name. |
CUSTFLD1-CUSTFLD15 | Custom field entries for the vendor, if you’ve defined any. To learn how to create custom fields, see Hiding Entries. |
1099 | Y or N to indicate whether you produce a 1099 for the vendor at the end of the year. |
HIDDEN | This field is set to N if the vendor is active in your QuickBooks file. Inactive vendors are set to Y. |
Filling in Expense Accounts Automatically
When you write checks, record credit card charges, or enter bills for a vendor, you have to fill in the expense account to which you want to assign the payment.
QuickBooks is happy to fill in expense account names for you if you tell it which ones you typically use. Then all you do is type the amounts that go with each account. Here are the steps:
In the New Vendor dialog box, click the Account Prefill tab.
The Account Prefill tab includes three drop-down lists, so you can assign up to three expense accounts for each vendor. (Each drop-down list shows all the accounts in your chart of accounts, not just expense accounts.)
In each drop-down list, choose the expense account you want.
For example, if you get office equipment and supplies from one vendor, choose Office Equipment in the first drop-down list and Office Supplies in the second.
Click OK to save the vendor record.
When you choose the vendor name in the Write Checks, Enter Credit Card Charges, or Enter Bills dialog box, QuickBooks fills in the Expenses tab with any prefill expense accounts you assigned. If you record a transaction directly in the register, the expense accounts appear automatically in the split transaction Account fields (if you assign more than one expense account) as soon as you choose the vendor’s name.
You don’t have to use the prefill accounts. Instead, you can simply click an Account field and choose a different account or leave the amounts blank and add new accounts below the prefilled entries.
Categorizing with Classes
Classes are the only solution if you want to classify income and expenses by business unit, department, location, partner, consultant, or other categories that span multiple accounts in your chart of accounts or multiple types of customers, jobs, and vendors. They also come in handy for tracking the Allocation of Functional Expenses that nonprofit organizations have to show on financial statements. Not everyone needs classes, so don’t feel that you have to use them. The box below can help you decide.
Tip
Before you decide to turn on classes, use QuickBooks without them for a few weeks or months. If you can generate all the reports you need without classes, don’t burden yourself with another field to fill in. For example, if you run restaurants in a couple of locations, you don’t necessarily need classes to track your business for each restaurant. You could create income accounts for each location instead. However, to separately track expenses for each restaurant, classes for each location are a lot easier than creating multiple sets of expense accounts. If you work without classes and then decide to use them after all, you’ll have to go back and edit past transactions to assign classes to them. Or, you can start using classes at the beginning of a new fiscal period (and not run class-based reports prior to that date).
If you choose to work with classes, be sure to follow these guidelines to get the most out of them:
Pick one use for your classes. QuickBooks has only one list of classes, and every class should represent the same type of classification. Moreover, you can assign just one class to a transaction, so classes add only one additional way to categorize your transactions. For example, once you assign a class for a business unit to a transaction, there’s no way to assign another class—to identify the office branch, say—to the same transaction.
Use classes consistently. Make sure to use classes on every transaction. Otherwise, your class-based reports won’t be accurate.
Tip
QuickBooks can remind you to enter a class for a transaction if you forget. Choose Edit → Preferences, click the Accounting icon, click the Company Preferences tab, and then turn on the “Prompt to assign classes” checkbox. If you try to save a transaction without an entry in the Class field, QuickBooks gives you a chance to add the class or save the transaction without one.
Create a catch-all class. Set up a class like Other so that you can still classify transactions even if they don’t fit into any of the specific classes you’ve defined.
Here’s how to set up classes:
Turn on the class-tracking feature (Accounting).
If class tracking is turned off, the Lists menu won’t display the Class List command. To turn on class tracking, you need to be a QuickBooks administrator, because classes affect everyone in your organization who uses the program. If you aren’t a QuickBooks administrator, you’ll have to convince someone who is to turn on classes. To do so, choose Edit → Preferences, click the Accounting icon, click the Company Preferences tab, and then turn on the “Use class tracking” checkbox. QuickBooks automatically turns on the “Prompt to assign classes” checkbox. Click OK to close the dialog box.
Choose Lists → Class List.
The Class List window opens.
In the Class List window, press Ctrl+N (or click Class and then choose New on the drop-down menu).
The New Class dialog box opens. You can create all of your classes at once by filling in the fields for one class and then clicking Next to create another one.
In the Class Name box, type the name of the class.
If you want to create classes that are subclasses to a parent (say to set up subclasses for each region within a business unit), turn on the “Subclass of” checkbox. Then, in the drop-down list, choose the parent class you want.
Click Next to create another class, or click OK to close the New Class dialog box.
If you realize you need another class while working on a transaction, you can create an entry by choosing <Add New> in the Class drop-down list, as you can see in Figure 6-2.

Price Levels
Whether you give your favorite customers price breaks or increase other customers’ charges because they keep asking for “just one more thing,” you can apply discounts or markups when you create invoices. Remembering who gets discounts and what percentage you apply is tough when you have a lot of customers, and it’s bad form to mark up a favorite customer’s prices by mistake. Say hello to QuickBooks’ Price Level list. When you define price levels and assign them to customers, QuickBooks takes care of adjusting the prices on every invoice you create. You can also apply a price level to invoice lines to mark up or discount individual items.
Creating a Price Level
To create a price level, do the following:
If the Price Level preference isn’t turned on already, do that now.
Choose Edit → Preferences, click the Sales & Customers icon, and then click the Company Preferences tab. Turn on the “Use price levels” checkbox, and then click OK. (If you don’t turn on the Price Level preference, the Price Level List command doesn’t appear on the Lists menu.)
Choose Lists → Price Level List.
The Price Level List window opens.
In the Price Level List window, press Ctrl+N (or click Price Level, and then choose New on the drop-down menu).
The New Price Level dialog box opens.
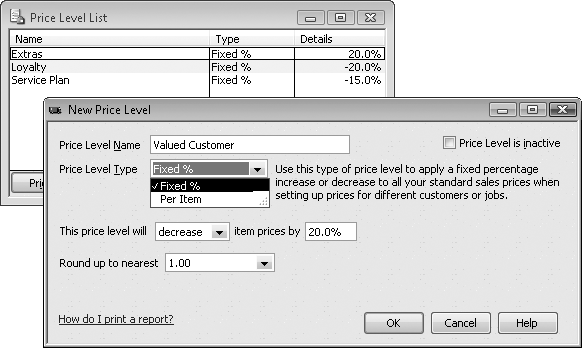
In the Price Level Name box, type a name for the price level.
If you have a fixed set of discounts, you might name the price levels by the percentage, like Discount 10 and Discount 20, for example. An alternative is to name price levels by their purpose, like Customer Loyalty or User Group Discount.
In the “This price level will” box, choose “increase” or “decrease” based on whether you want the price level to mark up or discount prices.
In QuickBooks Pro, the Price Level Type box is automatically set to Fixed % because you can create price levels only with fixed percentage increases or decreases, as shown in Figure 6-3. A fixed percentage price level does one thing: increases or decreases a price by a fixed percentage.
Figure 6-3. Think of fixed percentage price levels as standard discounts or markups. For example, you can create a price level called Extras to boost prices by 20 percent. Then, assign that price level in the customer record (Designating payment information) for every nitpicker you work for. (Although price level names don’t appear on your customer invoices, it’s still a good idea to choose names that are meaningful without being rude.)In QuickBooks Premier and Enterprise, you can create price levels that apply to individual items in your Item List. In the Price Level Type drop-down list, choose Per Item. The New Price Level dialog box immediately displays a table containing all your items. In the Custom Price column, type the price for an item at that price level. Suppose you sell calendars to retail stores for $5 each. The Standard Price column would show 5.00 for the calendar item. If you’re creating a price level for nonprofit organizations, you could type 3.50 in the item’s Custom Price cell so that a nonprofit would pay only $3.50 for a calendar.
If you want to apply percentages to several items in the list, there’s a shortcut for calculating custom prices. Turn on the checkboxes for the items that use the same percentage increase or decrease. Then, in the “Adjust price of marked items to be” box, type the percentage. In the drop-down list, choose “lower” or “higher”. You can set the price level to calculate based on the standard price, the cost, or the current custom price. When you click Adjust, QuickBooks fills in the Custom Price cells for the marked items with the new custom prices. To apply different percentages to another set of items, clear any checkmarks and then select the next set of items. Repeat the steps to define the percentage adjustment.
Note
If you work with more than one currency and use QuickBooks Premier or Enterprise, you can set up price levels for individual items to set their prices in a different currency. In the New Price Level dialog box, choose the currency in the Currency drop-down list. Then, in the Custom Price cell, type the price for the item in the foreign currency. When you add the item to an invoice, choose the currency price level in the Rate drop-down list.
For percentage price levels, in the “Round up to nearest” drop-down list, choose the type of rounding you want to apply.
The “Round up to nearest” feature is handy if the percentages you apply result in fractions of pennies or amounts too small to bother with. This setting lets you round discounts to pennies, nickels, dimes, quarters, 50 cents, and even whole dollars (if you really hate making change). The box on Customer and Vendor Profile Lists explains fancier rounding you can apply.
Click OK to close the New Price Level dialog box.
To create another price level, repeat steps 3–7.
Applying a Price Level
You can apply price levels to invoices in two ways:
Applying a price level to a customer record (Designating payment information) tells QuickBooks to automatically adjust all the prices on a new invoice for that customer by the price level percentage (Creating a Price Level).
You can apply a price level to line items in an invoice whether or not a customer has a standard price level. In the Create Invoices dialog box, click an item’s Rate cell, click the down arrow that appears, and then choose the price level you want from the drop-down list.
Note
If you use the Contractor, Professional Services, or Accountant edition of QuickBooks, the Billing Rate Level is another list that lets you set up custom billing rates for employees and vendors. The Billing Rate Level helps you price the services you sell the same way a Price Level helps you adjust the prices on products you sell. Say you have three carpenters: a newbie, an old timer, and a finish carpenter. You can set up Billing Rate Levels for each level of carpentry experience. Then, when you create an invoice based on your carpenters’ billable time, QuickBooks automatically applies the correct rate to each carpenter’s hours.
Customer and Vendor Profile Lists
Filling in fields goes much faster when you can choose info from drop-down lists instead of typing values. The lists that appear on the Customer & Vendor Profile Lists menu pop up regularly, whether you’re creating an invoice, paying a bill, or generating reports. For example, when you create an invoice, QuickBooks fills in the Payment Terms field with the payment terms you assigned to the customer’s record (Specifying additional customer information), but you can choose different payment terms from the drop-down list to urge your customer to pay more quickly.
For many of these lists, creating entries requires no more than typing an entry name and specifying whether the entry is a subentry to another. This section describes the information you add to entries in each list and how to put these lists to work for you.
Sales Rep List
If you pay sales reps on commission or want to assign employees as points of contact for your customers, you can assign people as sales reps to your customers (Specifying additional customer information) and then generate reports by sales rep (Subtotals). But first you have to add the names of your sales reps and contacts to the Sales Rep List.
Note
QuickBooks can’t help you calculate sales commissions, even if you assign sales reps to your customers. To find a third-party program that does, go to http://marketplace.intuit.com. In the Find Apps box, type “sales commission” and press Enter.
To add a name to the Sales Rep List:
Choose Lists → Customer & Vendor Profile Lists → Sales Rep List. In the Sales Rep List window that opens, press Ctrl+N (or click Sales Rep and choose New from the drop-down menu).
The New Sales Rep List dialog box opens.
In the Sales Rep Name drop-down list, choose a name. In the Sales Rep Initials box, type the person’s initials.
When you create a sales rep entry, you can choose only names that are on the Employee List (Creating employee records), the Vendor List (The Vendor List), or the Other Names List (Vendor Type List). If the name you want doesn’t exist, choose <Add New> at the top of the drop-down list.
QuickBooks automatically fills in the Sales Rep Type with Employee, Vendor, or Other Name, depending on which list the name came from. The box on Vendor Type List gives hints about when to use the Other Names List.
Click Next to add another sales rep, or click OK to close the New Sales Rep dialog box.
If you select a name and realize that it’s misspelled, you can edit the name from the New Sales Rep dialog box. Click Edit Name, and QuickBooks opens the Edit Employee, Edit Vendor, or Edit Name dialog box so you can change the name.
Customer Type List
Customer types help you analyze your income and expenses by customer category (Understanding customer types). For example, a healthcare provider might create Govt and Private customer types to see how much a change in government reimbursement might hurt revenue. You first create customer types in the Customer Type List and then assign one of those types in each customer’s record.
Creating all your customer types up front is fast—as long as you already know what your entries are:
Choose Lists → Customer & Vendor Profile Lists → Customer Type List. In the Customer Type List dialog box that opens, press Ctrl+N.
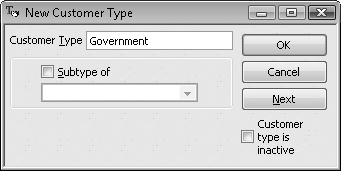
The New Customer Type dialog box (Figure 6-4) opens.
Create the customer type.
A Customer Type entry includes a name (in the Customer Type field) and whether the customer type is a subtype of another.
After you create one type, click Next to create another or click OK if you’re done.
You can also create entries as you work. If you’re creating or modifying a customer in the New Customer or Edit Customer dialog boxes, click the Additional Info tab. In the Type drop-down list, choose <Add New>, which opens the New Customer Type dialog box. Then, you can create a new customer type, as shown in Figure 6-4.
Vendor Type List
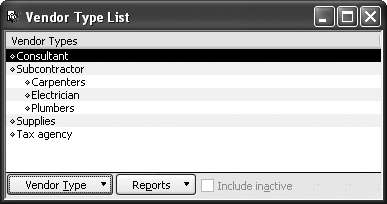
Vendor types work similarly to customer types—you can filter reports or subtotal your expenses by different types of vendors. For example, if you create a Communications vendor type, you could generate a report of the expenses you’ve paid to your telephone, Internet, and satellite communications providers.
You create Vendor Type entries the way you create Customer Type entries. Choose Lists → Customer & Vendor Profile Lists → Vendor Type List. With the Vendor Type List window open, press Ctrl+N to open the New Vendor Type dialog box.
Job Type List
Job types also follow the customer type lead. For instance, you can filter a Profit & Loss report to show how profitable your spec house projects are compared to your remodeling contracts. You create Job Type entries the way you create Customer Type entries (Customer Type List). Open the Job Type List window by choosing Lists → Customer & Vendor Profile Lists → Job Type List.
Terms List
The Terms List (Lists → Customer & Vendor Profile Lists → Terms List) holds both the payment terms you require of your customers and the payment terms your vendors ask of you. When you assign terms in a customer record, QuickBooks automatically fills in the Terms box on the invoices you create for that customer. Likewise, filling in terms in a vendor record means that QuickBooks fills in the Terms box on bills you create.
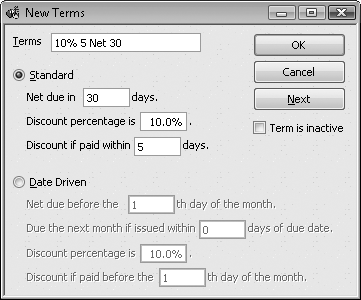
The fields that you fill in to create Terms (Figure 6-5) are different from those in other Customer & Vendor Profile lists.
Setting up terms using elapsed time
The Standard option is ideal when the due date is a specific number of days after the invoice date (or the date you receive a bill, if you’re the customer). If you send invoices whenever you complete a sale, choose the Standard option so that payment is due within a number of days of the invoice date. Here’s an explanation of what the Standard option fields do:
Net due in _ days. Type the maximum number of days after the invoice date that you or a customer can pay. For example, if you type 30, customers have up to 30 days to pay an invoice or you have up to 30 days to pay a bill. If you charge penalties for late payments, QuickBooks can figure out whose payments are late, so you can assess finance charges (Assessing Finance Charges on Overdue Balances).
Discount percentage is. If you offer a discount for early payments, type the percentage discount in this box.
Discount if paid within _ days. Type the number of days after the invoice date within which a customer has to pay to receive the early payment discount.
Note
When you use terms that reduce a customer’s bill for early payments, QuickBooks deducts these discounts in the Receive Payments window (Receiving Payments for Invoiced Income), which is when the program can tell if the customer paid early.
Setting up date-driven terms
The Date Driven option sets up terms for payments that are due on a specific date, regardless of the date on the invoice. This option is handy if you send invoices on a schedule—say, on the last day of the month. For example, your home mortgage might assess a late fee if your payment arrives after the 15th of the month.
Here’s what the Date Driven option fields do:
Net due before the _ th day of the month. Type the day of the month that the payment is due. For example, if a payment is due before the 15th of the month, no matter what date appears on your statement, type 15 in the box.
Due the next month if issued within _ days of due date. Your customers might get annoyed if you require payment by the 15th of the month and send out your invoices on the 14th. They would have no way of paying on time, unless they camped out in your billing department.
You can type a number of days in this box to automatically push the due date to the following month when you issue invoices too close to the due date. Suppose payments are due on the 15th of each month and you type 5 in this box. For invoices you create between August 10th and August 15th, the program changes the due date to September 15th.
Discount percentage is. If you extend a discount for early payments, type the percentage discount in this box.
Discount if paid before the _ th day of the month. Type the day of the month before which a customer receives the early payment discount.
Customer Message
When you create an invoice, you can add a short message to the form, such as “If you like the service we deliver, tell your friends. If you don’t like our service, tell us.” Save time and prevent embarrassing typos by adding your stock messages to the Customer Message List. The New Customer Message dialog box has only one field—the Customer Message field—which can hold up to 101 characters (including spaces).
Don’t use the Customer Message List for messages that change with every invoice, like one that specifies the calendar period that an invoice covers. You’ll fill your Customer Message List with unique messages and won’t be able to add any more. If you want to include unique information, do so in the cover letter (or email) that accompanies your invoice.
Payment Method List
You can choose to process all the payments you’ve received via a specific payment method when you select Banking → Make Deposits. For example, you can deposit all the checks and cash you received into your checking account, but you might deposit the payments you receive via credit cards to a dedicated merchant checking account. QuickBooks starts the Payment Method List for you with entries for cash, check, and credit cards (such as American Express and Visa).
If you want another payment method—for payments through PayPal, for example—you can create a new Payment Method entry. Choose Lists → Customer & Vendor Profile Lists → Payment Method List, and then press Ctrl+N. In the New Payment Method dialog box, type a name for the payment method, and then choose a payment type. For instance, if you use two Visa credit cards, you can create two entries with a Visa payment type. Other payment types include Discover, Debit Card, Gift Card, and E-Check.
Ship Via List
When you include the shipping method that you use on your invoices, your customers know whether to watch for the mailman or the UPS truck. QuickBooks creates several shipping methods for you, including DHL, Federal Express, UPS, and U.S. Mail. If you use another shipping method, like a bike messenger in New York City or your own delivery truck, simply create additional entries in the Ship Via List. In the Shipping Method field (the only field in the New Ship Method dialog box), type the name of the method you want to add.
Tip
If you use one method of shipping most of the time, you can have QuickBooks fill in the Shipping Method with that entry automatically. See Sales & Customers to learn about this and other shipping preferences, such as the “Usual Free on Board” location.
Vehicle List
If you want to track mileage (Tracking Mileage) on the vehicles you use for your business, create entries for your cars and trucks in the Vehicle List (Lists → Customer & Vendor Profile Lists → Vehicle List). Use the Vehicle box to name the vehicle: Ford Prefect 1982 Red, for example. The Description field holds up to 256 characters, so you can use it to store the VIN, license plate, and even the insurance policy number. If you want to charge your customers for your mileage, see Invoicing for Billable Time and Costs.
Fixed Asset Items
Assets that you can’t convert to cash quickly—such as backhoes, buildings, or supercomputers—are called fixed assets. If you track information about your fixed assets in another program or have only a few fixed assets, there’s no reason to bother with the Fixed Asset Item List. As you can see in Figure 6-6 Fixed Asset items track information such as when you bought the asset and how much you paid. But in QuickBooks, you have to calculate depreciation (see the box on Fixed Asset Items) for each asset at the end of the year and create journal entries to adjust the values in your asset accounts.
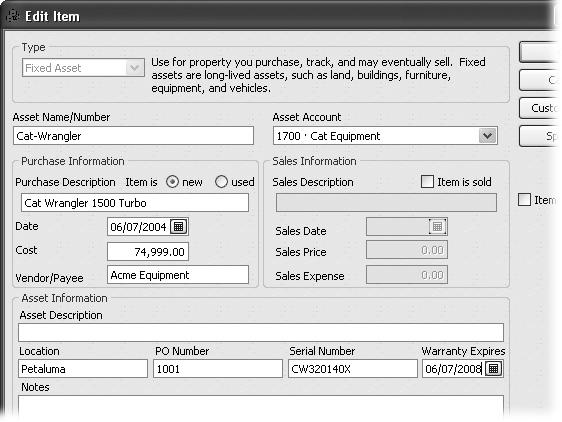
When you sell an asset, open the Edit Item dialog box (with the Fixed Asset Item List window open, select the item and press Ctrl+E), and then turn on the “Item is sold” checkbox. When you do so, the sales fields come to life so that you can specify when you sold the asset, how much you sold it for, and any costs associated with the sale.
Note
QuickBooks Premier Accountant Edition and QuickBooks Enterprise Edition include the Fixed Asset Manager, which not only figures out the depreciation on your assets, but posts depreciation to QuickBooks with a click of the mouse.
If you decide to track the details about your fixed assets outside QuickBooks, you still need the value of your fixed assets in your financial reports. Simply create Fixed Asset accounts (Creating an Account) to hold the value of your assets. Each year, you’ll add a general journal entry to each Fixed Asset account (Recording Owners’ Contributions) to reduce the asset’s value by the amount of depreciation.
Creating and Editing List Entries
Every list in QuickBooks responds to the same set of commands. As your business changes, you can add new entries, edit existing ones, hide entries that you no longer use, and, in some lists, merge two entries into one. If you make a mistake creating an entry, you can delete it. You can also print your QuickBooks lists to produce a price list of the products you sell, for example. With the following techniques, you’ll be able to do what you want with any list or entry you might need.
Creating Entries
If you’re setting up QuickBooks, creating all the entries for a list at the same time is fast and efficient. Open the New dialog box for the type of list entry you want (New Vendor, for example), and you’ll soon get into a rhythm creating one entry after another.
You can also add new list entries in the middle of bookkeeping tasks without too much of an interruption. If you launch a new line of business selling moose repellent, you can add a customer type for burly men in the middle of creating an invoice. But don’t rely on this approach to add every entry to every list—you’ll spend so much time jumping from dialog box to dialog box that you’ll never get to your bookkeeping.
Each list has its own collection of fields, but the overall procedure for creating entries in lists is the same:
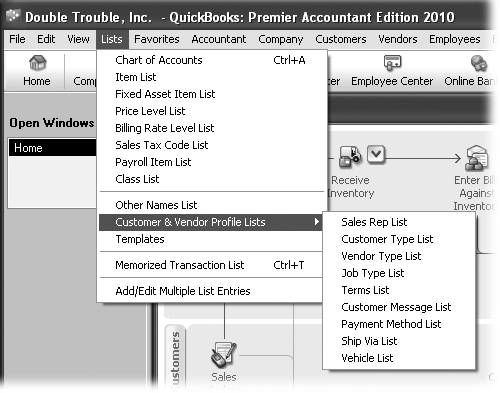
Open the window for the list you want to work on by choosing Lists and then selecting the list you want on the submenu.
For example, to open the Class List window, choose Lists → Class List. Several lists are tucked away one level deeper on the Lists menu. For lists that include characteristics for your customers or vendors, such as Vendor Type or Terms, choose Lists → Customer & Vendor Profile Lists, and then choose the list you want, as shown in Figure 6-7.
To create a new entry, press Ctrl+N or, at the bottom of the list window, click the list name, and then choose New.
For instance, to create an entry in the Class List, make sure that the Class List is the active window and then press Ctrl+N. Or, at the bottom of the Class List window, click Class and then choose New. QuickBooks opens the New Class dialog box.
Figure 6-7. Many of the QuickBooks lists appear directly on the Lists menu, but some lists are one level lower on the Customer & Vendor Profile Lists submenu. To boost your productivity, take note of the keyboard shortcuts for lists you’re likely to access most often. Ctrl+A opens the Chart of Accounts window. To see customer, vendor, or employee lists, in the QuickBooks Home page, click Customers, Vendors, or Employees to open the corresponding center.After you’ve completed one entry, simply click Next to save the current entry and begin another. To save the entry you just created and close the dialog box, click OK.
Note
Unlike all the other New dialog boxes for lists, the New Price Level dialog box doesn’t include a Next button.
To toss an entry that you botched, click Cancel to throw it away and close the dialog box. A few of the lists on the Customer & Vendor Profile Lists menu can include subentries, as shown in Figure 6-8.
Merging List Entries
Over time, your lists collect detritus. For example, two of your suppliers for copper pipes merge, and you want to merge their vendor records as well. You can merge entries on only two of the lists discussed in this chapter: the Vendor List and the Other Names List. (You can’t undo merging entries, so make sure merging is what you want to do. The alternative is to change one of the two entries to inactive, as described on Hiding and Deleting List Entries, and then use the other entry for all future transactions.)
Note
Merging accounts on your chart of accounts is described on Merging Accounts. Merging customers is covered on Merging Customer Records.
When you merge entries, QuickBooks puts all the transactions from both entries into the one that you keep. For example, if you merge Financial Finesse into Fuggedaboudit Financial, all your payments to Financial Finesse become payments to Fuggedaboudit Financial.
Here’s how you can merge two entries, using the Vendor List as an example:
Switch to single-user mode.
If you work in multi-user mode, choose File → “Switch to Single-user Mode”. (When you’re done, be sure to switch back to multi-user mode and tell your colleagues they can work in QuickBooks again.)
Open the Vendor Center.
On the QuickBooks Home page, click Vendors, or choose Vendors → Vendor Center. (If you want to merge names on the Other Names List, choose Lists → Other Names List.)
In the Vendors tab, right-click the name of the vendor you’re going to merge and, on the shortcut menu, choose Edit Vendor.
The Edit Vendor dialog box opens.
In the Edit Vendor dialog box, change the name in the Vendor Name field to match the name of the vendor you intend to keep. Click OK.
QuickBooks displays a message warning you that the name is in use and asks if you want to merge the vendors.
Click Yes to merge the vendors.
In the Vendor Center, the vendor you renamed disappears and any balances now belong to the remaining vendor.
Don’t forget to switch back to multi-user mode so your coworkers can use QuickBooks again.
Hiding and Deleting List Entries
Deleting entries is only for discarding entries that you create by mistake. If you’ve already used list entries in transactions, hide the entries you don’t use anymore so your historical records are complete. For example, you wouldn’t delete the “Net 30” payment term just because you’re lucky enough to have only Net 15 clients right now; you may still extend Net 30 terms to some clients in the future.
Hiding Entries
Hiding list entries that you no longer use does two things:
Your previous transactions still use the entries you’ve hidden, so your historical records don’t change.
When you create new transactions, the hidden entries don’t appear in dropdown lists, so you can’t choose an old entry by mistake.
The methods for hiding and reactivating list entries are exactly the same regardless of which list you’re working on:
Hide an entry. In the list window (or the list in Vendor Center), right-click the entry and choose “Make <list name> Inactive” from the shortcut menu, where <list name> is the list that you’re editing. The entry disappears from the list.
View all the entries in a list. At the bottom of the window, turn on the “Include inactive” checkbox to show both active and hidden entries. In the Vendor Center, in the View drop-down list, choose All Vendors. QuickBooks adds a column with an X as its heading and displays an X in that column for every inactive entry in the list.
Reactivate an entry. First, view all the entries, and then click the X next to the entry that you want to reactivate. If the entry has subentries, in the Activate Group dialog box, click Yes to reactivate the entry and all its subentries.
Deleting Entries
You can delete an entry only if nothing in QuickBooks references it in any way. If you create a list entry by mistake, your only hope is to catch it quickly. To delete a list entry, open the appropriate list window and select the entry you want to delete. Press Ctrl+D or choose Edit → Delete <list name>. If you haven’t used the entry in any records or transactions, QuickBooks asks you to confirm that you want to delete the entry. Click Yes.
Finding List Entries in Transactions
If QuickBooks won’t let you delete a list entry because a transaction is still using it, don’t worry. It’s easy to find transactions that use a specific list entry. Here’s how:
Open the list that contains the entry you want to find. In the list window, select the entry.
At the bottom of the list window, click the list name, and then choose “Find in Transactions”.
The Find dialog box opens already set up to find transactions that use the list entry you selected.
Click Find.
The table at the bottom of the Find dialog box displays all the transactions using that entry.
To modify the list entry a transaction uses, select the entry in the table, and then click Go To.
QuickBooks opens the window or dialog box that corresponds to the type of transaction. If you’re trying to eliminate references to a list entry so you can delete it, choose a different list entry and then save the transaction.
Sorting Lists
QuickBooks sorts lists alphabetically by name, which is usually what you want. The only reason to sort a list another way is if you’re having trouble finding the entry you want to edit. For example, if you want to find equipment you bought within the last few years, you could sort the Fixed Asset List by purchase date to find the machines that you’re still depreciating. Sorting in the list window doesn’t change the order that entries appear in drop-down lists.
Figure 6-10 shows you how to change the sort order—and how to change it back.

Note
If you use a different column to sort a list, QuickBooks displays a gray diamond to the left of the column heading that it uses to sort the list initially. For example, the Fixed Asset Item List shows items in alphabetical order by Name. If you sort the list by Purchase Date instead, a gray diamond appears to the left of the Name heading. To return the list to the order that QuickBooks uses, click the diamond.
Printing Lists
After you spend all that time building lists in QuickBooks, you’ll be happy to know that it’s much easier to get those lists back out of the program. For instance, suppose you want to print a price list of all the items you sell. Or, you want a text file of your customer information to import into your email program. QuickBooks makes short work of printing your lists or turning them into files that you can use in other programs.
Blasting Out a Quick List
Here’s the fastest way to produce a list, albeit one that doesn’t give you any control over report appearance:
At the bottom of the list window, click the button containing the list name—Price Level, for example—and then, in the drop-down menu, choose Print List.
QuickBooks might display a message box telling you to try list reports if you want to customize or format your reports. That method is covered in the next section. For now, in the message box, click OK. The Print Lists dialog box opens.
To print the list, select the “Printer” option and choose the printer in the drop-down list. If you want to output the list to a file, choose the File option and then select the file format you want.
You can create ASCII text files, comma-delimited files, or tab-delimited files (Exporting lists to a text file). You can also specify printer settings, as you can in many other programs. Choose landscape or portrait orientation, the pages to print, and the number of copies.
Click Print.
QuickBooks prints the report.
Customizing a Printed List
If the Print List command described in the previous section scatters fields over the page or produces a comma-delimited file that doesn’t play well with your email program, QuickBooks might provide a report closer to what you have in mind. For example, a vendor phone list and employee contact list are only two menu clicks away. To access the reports that come with QuickBooks, choose Reports → List and then choose the report you want. If these reports fall short, you can modify them to change the fields and records they include, or you can format them in a variety of ways.
Chapter 21 explains how to customize reports, but if you click Modify Report in the report window toolbar, you can make the following changes to a list report before you print your list or create a file of your list information:
Choose fields. The Columns box (on the Display tab) includes every field for a list entry. When you click a field, QuickBooks adds a checkmark before its name and adds that field to the report.
Sort records. Choose the field you want to sort by (on the Display tab) and whether you want the report sorted in ascending or descending order.
Filter the report. Filters (on the Filters tab) limit the records in a report. For example, you can produce an employee report for active employees, which refers to their employment status—not the level of effort they devote to their jobs. You can also filter by employee name or values in other fields.
Set up the report header and footer. On the Header/Footer tab, you can choose the information that you want to show in the report’s title and the footer at the bottom of each page. A report’s title identifies the information in the report, and the footer can include the date the report was prepared so you know whether the list is current.
Format text and numbers. On the Fonts & Numbers tab, choose the font that QuickBooks uses for different parts of the report. For instance, labels should be larger than the lines in the report. You can also choose how to display negative numbers: The In Bright Red checkbox controls whether red ink truly applies to your financial reports. You can also divide numbers by 1,000 before displaying them in a report so that it’s easier to differentiate thousands from millions.