Chapter 5. Setting Up Invoice Items
Whether you build houses, sell gardening tools, or tell fortunes on the Internet, you’ll probably use items in QuickBooks to represent the products and services you sell. But to QuickBooks, things like subtotals, discounts, and sales tax are items, too. In fact, nothing appears in the body of a QuickBooks sales form (such as an invoice) unless it’s an item.
Put another way, when you want to create invoices in QuickBooks (Chapter 10), you need customers and items to do so. So, now that you’ve got your chart of accounts and your customers set up, it’s time to dive into items.
This chapter begins by helping you decide whether your business is one of the few that doesn’t need items at all. But if your organization is like most and uses business forms like invoices, sales receipts, and so on, the rest of the chapter will teach you how to create, name, edit, and manage the items you add to forms. You’ll learn how to use items in invoices and other forms in the remaining chapters of this book.
What Items Do
For your day-to-day work with QuickBooks, items save time and increase consistency on your sales forms. Here’s the deal: Items form the link between what you sell (and buy) and the income, expense, and other types of accounts in your chart of accounts. When you create an item, you specify what the item is, how much you pay for it, how much you sell it for, and the accounts to which you post the corresponding income, expense, cost of goods sold, and asset value. For example, you might charge $75 an hour for the bookkeeping service you provide, and you want the income to show up in your Financial Services income account. When you add that bookkeeping item to a sales form, QuickBooks multiplies the price per hour by the number of hours to calculate the full charge, and posts the income to your Financial Services account.
You can work out which accounts to assign items to on your own or with your accountant (a good idea if you’re new to bookkeeping), and then specify the accounts in your items, as shown in Figure 5-1. QuickBooks remembers these assignments from then on.

When it’s time to analyze how your business is doing, items shine. QuickBooks has built-in reports based on items, which show the dollar value of sales or the number of units of inventory you’ve sold. To learn how to use inventory reports, see Inventory Valuation: How Much Is Inventory Worth?. Other item-based reports are described in chapters throughout this book.
When You Don’t Need Items
Bottom line: Without items, you can’t create any type of sales form in QuickBooks, which includes invoices, statements, sales receipts, credit memos, and estimates. Conversely, if you don’t use sales forms, you don’t need items. Not many organizations operate without sales forms, but here are a few examples:
Old Stuff Antiques sells junk—er, antiques—on consignment. Kate, the owner, doesn’t pay for the pieces; she just displays them in her store. When she sells a consignment item, she writes paper sales receipts. When she receives her cut from the seller, she deposits the money in her checking account.
Tony owns a tattoo parlor specializing in gang insignias. He doesn’t care how many tattoos he creates and—for safety’s sake—he doesn’t want to know his customers’ names. All Tony does is deposit the cash he receives upon completing each masterpiece.
Dominic keeps the books for his charity for icebergless penguins. The charity accepts donations of money and fish, and it doesn’t sell any products or perform services to earn additional income. He deposits the monetary donations into the charity’s checking account and enters the checking account deposit in QuickBooks. Dominic does keep track of the donors’ contributions and fish inventory in a spreadsheet.
Should You Track Inventory with Items?
If your business is based solely on selling services, you can skip this section entirely. But if you sell products, you can handle them in two ways: by stocking and tracking inventory or by buying products only when work for your customers requires them. The system you use affects the types of items you create in QuickBooks. When you use QuickBooks’ inventory feature, the program keeps track of how many products you have on hand, increasing the number as you purchase them and decreasing the number when you sell them to customers. When you buy products specifically for customers, you still need items, but there’s no need to track the quantity on hand. In this case, you can create Non-inventory Part items, which you’ll learn about shortly.
For example, general contractors rarely work on the same type of project twice, so they usually purchase the materials they need for a job and charge the customer for those materials. Because general contractors don’t keep materials in stock, they don’t have to track inventory and can use Non-inventory Part items. On the other hand, specialized contractors like plumbers install the same kinds of pipes and fittings over and over. These contractors often purchase parts and store them in a warehouse, selling them to their customers as they perform jobs. These ware-housed parts should be set up as Inventory Part items in QuickBooks.
Tracking inventory requires more effort than buying only the materials you need. Use the following questions to determine whether your business should track inventory:
Do you keep products in stock to resell to customers? If your company stocks faux pony bar stools to resell to customers, those bar stools are inventory. By tracking inventory, you know how many units you have on hand, how much they’re worth, and how much money you made on the bar stools you’ve sold.
On the other hand, the faux pony mouse pads you keep in the storage closet for your employees are business supplies. Most companies don’t want the overhead of tracking inventory for supplies they consume in the course of their business.
Do you want to know when to reorder products so you don’t run out? If you sell the same items over and over, keeping your shelves stocked means more sales (because the products are ready to ship out as soon as an order comes in). QuickBooks can remind you when it’s time to reorder a product.
Do you purchase products specifically for jobs or customers? If you special order products for customers or buy products for specific jobs, you don’t need to track inventory. After you deliver the special order or complete the job, your customer has taken and paid for products, and you only have to account for the income and expenses you incurred.
Do you rent equipment to customers? If you rent or lease equipment, you receive income for the rental or lease of assets you own. In this case, you can show the value of the for-rent products as an asset in QuickBooks and the rental income with a Service item, so you don’t need Inventory items.
Your business model might dictate that you track inventory. However, QuickBooks’ inventory-tracking feature has some limitations. For example, it lets you store up to 14,500 items, and then you’re stuck. If you answer yes to any of the following questions, QuickBooks isn’t the program to use to handle the products you sell:
Do you sell products that are unique? In the business world, tracking inventory is meant for businesses that sell commodity products, such as electronic equipment, and stock numerous units of each product. If you sell unique items, such as fine art or compromising Polaroid photos, you’d eventually use up the 14,500 items that QuickBooks can store. For such items, consider using a spreadsheet to track the products you have on hand. When you sell your unique handicrafts, you can record your sales in QuickBooks using more generic items. For example, use an item called Oil Painting on the sales receipts for the artwork you sell and fill in more specific information about the painting in the sales receipt Description field.
Do you manufacture the products you sell out of raw materials? QuickBooks inventory can’t follow materials as they wend through a manufacturing process or track inventory in various stages of completion.
Note
QuickBooks Premier and Enterprise editions can track inventory for products that require light assembly. For instance, if you create Wines from Around the World gift baskets using the wine bottles in your store, you can build an Inventory Assembly item out of wine and basket Inventory items. The box on Inventory Part Fields explains another way to track assembled inventory.
Do you value your inventory by a method other than average cost? QuickBooks calculates inventory value by average cost. If you want to use other methods, like last in, first out (LIFO) or first in, first out (FIFO), you can export inventory data to a spreadsheet and calculate inventory cost outside of QuickBooks (Adjusting Quantities and Values).
Do you use a point-of-sale system to track inventory? Point-of-sale inventory systems often blow QuickBooks inventory tracking out of the water. If you forego QuickBooks’ inventory feature, you can periodically update your QuickBooks file with the value of your inventory from the point-of-sale system.
Note
If you like the point-of-sale idea but don’t have a system yet, Intuit offers QuickBooks Point of Sale, an integrated, add-on product for retail operations that tracks store sales, customer information, and inventory.
You don’t have to use QuickBooks’ inventory feature at all if you don’t want to. For example, if you perform light manufacturing, you can track the value of your manufactured inventory in a database or other program. Periodically, you can then add journal entries (Creating General Journal Entries) to QuickBooks to show the value of in-progress and completed inventory.
Note
The answer to your inventory dilemma could be an add-on program that tracks inventory and keeps QuickBooks informed. One of the best is FishBowl Inventory (www.fishbowlinventory.com).
Planning Your Items
Setting up items in QuickBooks is a lot like shopping at a grocery store. If you need only a few things, you can shop without a list. Similarly, if you use just a few QuickBooks items, you don’t need to write the list out before you start creating items. But if you use dozens or even hundreds of items, planning your item list can save you from experiencing all sorts of unpleasant emotions.
If you jumped feet first into this section, now’s the time to read “Should You Track Inventory with Items?” on Should You Track Inventory with Items?. Those sections help you with your first decision: whether to use items that represent services, inventory, or non-inventory products.
By deciding how to name and organize your items before you create individual items, you won’t waste time editing and reworking existing items to fit your new naming scheme. Read on to learn what you should consider before creating your items in QuickBooks.
Generic or Specific?
Conservation can be as important with QuickBooks’ items as it is for the environment. QuickBooks Pro and Premier can hold no more than 14,500 items, which is a problem if you sell unique products, such as antiques, or products that change frequently, such as the current clothing styles for teenagers. Once you use an item in a transaction, you can’t delete that item, so your item list could fill up with items you no longer use (see Deleting Items).
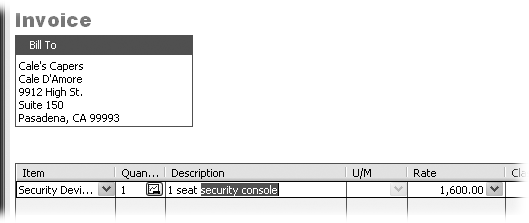
By planning how specific your items will be, you can keep your QuickBooks list lean with generic items. For instance, a generic item such as Top can represent a girl’s black Goth t-shirt one winter and a white poplin button-down shirt the next summer.
Generic items have their limitations, though, so use them only if necessary. You can’t track inventory properly when you use generic items. QuickBooks might show that you have 100 tops in stock, but that doesn’t help when your customers are clamoring for white button-downs and you have 97 black Goth t-shirts. In addition, the information you store with a generic item won’t match the specifics of each product you sell. So, when you add generic items to an invoice or sales form, you’ll have to edit a few fields, such as description or price, as you can see in Figure 5-2.
Naming Items
Brevity and recognizability are equally desirable characteristics when naming items. On the one hand, short names are easier to type and manage, but they can be unintelligible. Longer names take more effort to type and manage, but are easier to read. Decide ahead of time which type of naming you prefer and stick with it as you create items.
QuickBooks encourages brevity by allowing no more than 31 characters in an item’s name. If you sell only a handful of services, you can name your items as you would when you’re talking. For a tree service company, names like Cut, Limb, Trim, Chip, and Haul work just fine. If your item list runs in the hundreds or thousands, some planning is in order. Here are some factors to consider when naming your items:
Abbreviation. If you have to compress a great deal of information into an item name, you’ll have to abbreviate. For example, suppose you want to convey all the things you do when you install a carpet, including installing tack strips, padding, and carpet; trimming carpet; vacuuming; and hauling waste. That’s more than the 31 characters you have to work with. Poetic won’t describe it, but something like “inst tkst, pad, cpt, trim, vac, haul” says it all in very few characters. The box on the next page describes two other ways to identify items.
Aliases. Create a pseudonym to represent the item. For the carpet job, “Standard install” can represent the installation with vacuuming and hauling waste, while “Deluxe install” includes the standard installation plus moving and replacing furniture. You can include the details in the item description.
Sort order. In the Item List, QuickBooks lists items first by item type and then in alphabetical order. If you want your items to appear in some logical order on drop-down lists (like an invoice item table, for instance), pay attention to the order of characteristics in your item names. Other service items beginning with the intervening letters of the alphabet would separate “Deluxe install” and “Standard install.” If you name your installation items “Install deluxe” and “Install standard,” they’ll show up one after the other in your item list.
Note
Construction companies in particular can forego long hours of item data entry using third-party estimating programs. Construction estimating programs usually include thousands of entries for standard construction services and products. If you build an estimate with a program that integrates with QuickBooks, you can import that estimate into QuickBooks and then sit back and watch as it automatically adds all the items in the estimate to your item list. To find such programs that integrate with QuickBooks, go to http://marketplace.intuit.com. On the menu bar, click Find Software and then choose Find Solutions by Industry on the drop-down menu. In the By Industry tab’s drop-down menu, choose Construction/Contractors.
Subitems
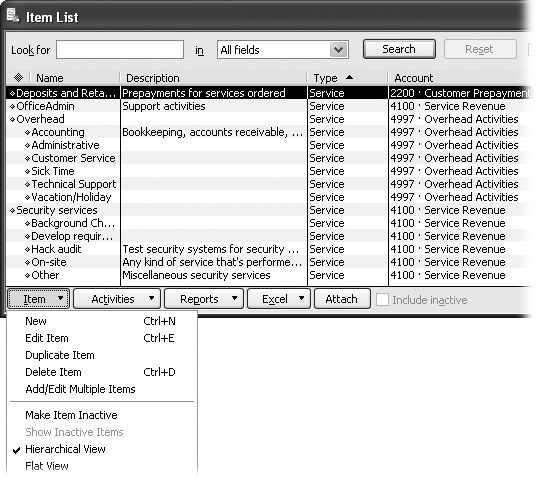
If you keep all your personal papers in one big stack, you probably have a hard time finding everything from birth certificates to tax forms to bills and receipts. If you’ve got one big list of items in QuickBooks, you’re in no better shape. To locate items more easily, consider designing a hierarchy of higher-level items (parents) and one or more levels of subitems, as shown in Figure 5-3. The box on Creating Items explains how to make sure you have items for every purpose.
For example, a landscaping business might create top-level items for trees, shrubbery, cacti, and flower bulbs. Within the tree top-level item, the landscaper might create items for several species: maple, oak, elm, sycamore, and dogwood. Additional levels of subitems can represent categories such as size (seedling, established, and mature, for example).
Creating Items
The best time to create items is after you’ve created your accounts but before you start billing customers. Each item links to an account in your chart of accounts, so creating items goes quicker if you don’t have to stop to create an account as well.
Similarly, you can create items while you’re in the midst of creating an invoice, but you’ll find creating items goes much faster when you create one item after the other. How long it takes to create items depends on how many items you need. If you sell only a few services, a few minutes should be sufficient. On the other hand, construction companies that need thousands of items often forego hours of data entry by importing items from third-party programs (Setting Up an Integrated Application). In QuickBooks 2010, the Add/Edit Multiple List Entries feature is another time-saving method for adding several items to the Item List. The feature lets you paste data from Excel or copy values between entries to populate entries. It works the same way for customer, vendor, and item lists, so Selecting the list to work with in Chapter 4 describes how to use it.
Each type of item has its own assortment of fields, but the overall process for creating an item is the same for every type. With the following procedure under your belt, you’ll find that you can create many of your items without further instruction.
If you do need help with fields for a specific type of item, read the sections that follow to learn what each field does.
In the QuickBooks Home window, click Items & Services to open the Item List window. Or, choose Lists → Item List.
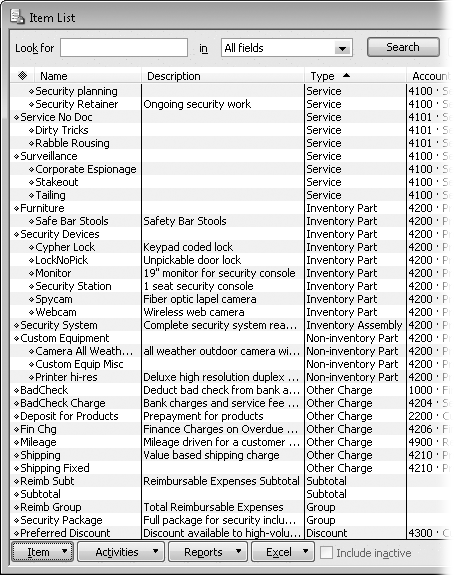
When you first display the Item List, QuickBooks sorts entries by item type. The sort order for the item types isn’t alphabetical—it’s the order that item types appear in the Type drop-down list, as shown in Figure 5-4. You can change the sort order of the list by clicking a column header.
Open the New Item dialog box by pressing Ctrl+N. Alternatively, on the menu bar at the bottom of the window, click Item, and then choose New.
QuickBooks opens the New Item dialog box and highlights the Service item type (Service Items) in the Type drop-down list.
To create a Service item, just press Tab to proceed to naming the item. If you want to create any other type of item, choose the type in the Type drop-down list.
Some item types won’t appear in the list if you haven’t turned on the corresponding feature. For example, the Inventory Item type doesn’t appear if you haven’t turned on inventory tracking, as described on Items & Inventory.
In the Item Name/Number box, type a unique identifier for the item.
For example, if you opt for long and meaningful names, you might type Install carpet and vacuum. For a short name, you might type Inst Carpt.
To make this item a subitem of another item, turn on the “Subitem of” checkbox and choose the item that you want to act as the parent.
You can create the parent item in the midst of creating a subitem, but creating the parent first puts much less strain on your brain. When the parent item already exists, simply choose it from the “Subitem of” drop-down list. To create the parent while creating the subitem, choose <Add New> on the “Subitem of” drop-down list, and jump to step 3 to begin the parent creation process. Subitems and parents have to be the same type. (You can’t create subitems for Subtotal, Group, or Payment items.)
You have to assign an account to every item, whether it’s a parent or not. However, you need Rate or Price values only if you plan to use items on invoices or other sales forms.
Figure 5-4. QuickBooks lists items in alphabetical order within each item type. You can change the sort order of the Item List by clicking a column heading. If you click it again, QuickBooks toggles the list order between ascending and descending order. To return the list to sort by item type, click the diamond to the left of the column headings (which appears any time the list is sorted by a column other than Type).Complete the other fields as described in the following sections (Service Items, Product Items, and so on) for the type of item that you’re creating.
You can enter information that QuickBooks uses later to fill in fields on sales forms. For example, you can type in the sales price, and QuickBooks uses that price on an invoice when you sell some units. If the sales price changes each time, simply leave the item’s Sales Price field at zero. In this case, QuickBooks doesn’t fill in the price, so you can type the price each time you sell the item. Even if you set up a value for an item, you can overwrite it whenever you use the item on a sales form.
When you have additional items to create, simply click Next to save the current item and begin another. If you want to save the item you just created and close the New Item dialog box, click OK.
If you’ve made mistakes in almost every field or need more information before you can complete an item, click Cancel to throw away the current item and close the New Item dialog box.
Service Items
Services are less tangible things that you sell, like time or the output of your brain. For example, you might sell consulting services, Internet connection time, magazine articles, or Tarot card readings. In construction, services represent phases of construction, which makes it easy to bill customers based on progress and to compare actual values to estimates.
Suppose you provide a telephone answering service. You earn income when your customers pay you for the service. You pay salaries to the people who answer the phones, regardless of whether you have 2 service contracts or 20. For this business, you earn income with your service, but your costs don’t link to the income from specific customers or jobs.
In some companies, such as law practices, the partners get paid based on the hours they bill, so the partners’ compensation is an expense associated directly with the firm’s income. Services that you farm out to a subcontractor work similarly. If you offer a 900 number for gardening advice, you might have a group of freelancers who field the calls and whom you pay only for their time on the phone. You still earn income for the service you sell, but you also have to pay the subcontractors to do the work. The subcontractors’ cost relates to the income for that service. QuickBooks displays different fields depending on whether a service has costs associated with income.
The mighty Service item single-handedly manages all types of services, whether you charge by the hour or by the service, with associated expenses or without. This section describes the fields you fill in when you create service items.
The “This service is used in assemblies or is performed by a subcontractor or partner” checkbox, as shown in Figure 5-5 is the key to displaying the fields you need when you purchase services from someone else.
Here’s how the service fields work when you don’t purchase services from someone else (that is, when you turn off the “This service is used in assemblies or is performed by a subcontractor or partner” checkbox):
Description. Type a detailed description for the service in this box. This description appears on invoices and sales forms, so use terms your customers can understand.
Rate. Type how much you charge your customers for the service. You can enter a flat fee or a charge per unit of time. For example, you might charge $9.95 for unlimited gardening advice per call, but Intuit telephone support charges by the minute.

When you add the item to an invoice, QuickBooks multiplies the quantity by the sales price to calculate the total charge. If the cost varies, type 0 in the Rate or Sales Price field. You can then enter the price when you create an invoice or other sales form. If the rate or price is often the same, you can also type the most common rate. Then, when you add the item to an invoice, you can modify the rate if you want to use a different amount. For services that carry a flat fee, use a quantity of 1 on your invoices.
Note
QuickBooks multiplies the cost and sales prices by the quantities you add to sales forms. Be sure to define the cost and sales price in the same units so that QuickBooks calculates your income and expenses correctly.
Tax Code. Most service items are nontaxable, so you’ll choose Non more often than not. (This field appears only if you’ve turned on the sales tax feature, as described on Sales Tax.)
Account. Choose the income account to which you want to post the income for this service, whether it’s a catch-all income account for all services or one you create specifically for the service.
If you purchase services from someone else and have associated costs, you have to provide information about your purchase from the other party and your sales transaction to your customer. Here are the service fields you fill in when you do have associated costs for an item:
Description on Purchase Transactions. Type the description that you want to appear on the purchase orders you issue to subcontractors.
Cost. Enter what you pay for the service, which can be an hourly rate or a flat fee. For example, if a subcontractor performs the service and receives $100 for each hour of work, type 100 in this field. If the cost varies, type 0 in the Cost field. You can then enter the actual cost when you create a purchase order.
Expense Account. Choose the account to which you want to post what you pay for the service. If a subcontractor does the work, choose an expense account for subcontractor or outside consultants’ fees. If a partner or owner performs the work, choose an expense account for job-related costs.
Preferred Vendor. If you choose a vendor in this drop-down list, QuickBooks selects the preferred vendor for a purchase order when you add this Service item. This behavior is helpful only if you almost always use the same vendor for this service and you add the service item to a purchase order before you choose the vendor.
Description on Sales Transactions. QuickBooks copies the text from the “Description on Purchase Transactions” box to the “Description on Sales Transactions” box. However, if your vendors use technical jargon that your customers wouldn’t recognize, you can change the text in the “Description on Sales Transactions” box to something more meaningful.
Sales Price. Type how much you charge your customers for the service, as you would in the Rate field for a service item that you don’t purchase from someone else.
Tax Code. Most service items are nontaxable, so you’ll choose Non more often than not. (This field appears only if you’ve turned on the sales tax feature, as described on Sales Tax.)
Income Account. Choose the income account to which you want to post the income for this service, whether it’s a catch-all income account for all services or one you create specifically for the service.
Product Items
Products you sell to customers fall into three categories: products you keep in inventory, products you special order, and products you assemble. QuickBooks can handle inventory as long as your company passes the tests on Should You Track Inventory with Items?. Likewise, products purchased specifically for customers or jobs are no problem. As explained on Product Items, QuickBooks can handle lightly assembled products like gift baskets or gizmos made from widgets—but you’ll need QuickBooks Premier Edition to do even that.
In QuickBooks, choose one of these three item types for the products you sell:
Inventory Part. Use this type for products you purchase and keep in stock for resale. Retailers and wholesalers are the obvious examples of inventory-based businesses, but other types of businesses like building contractors may track inventory, too. You can create Inventory Part items only if you turn on the inventory feature as described on Items & Inventory. With inventory parts, you can track how many you have, how much they’re worth, and when you should reorder. The box on Product Items explains how you account for all these details.
Non-inventory Part. If you purchase products specifically for a job or a customer and you don’t track how many products you have on hand, use Non-inventory Part items. Unlike an Inventory Part item, the Non-inventory Part item has at most two account fields: one for income you receive when you sell the part, and the other for the expense of purchasing the part in the first place.
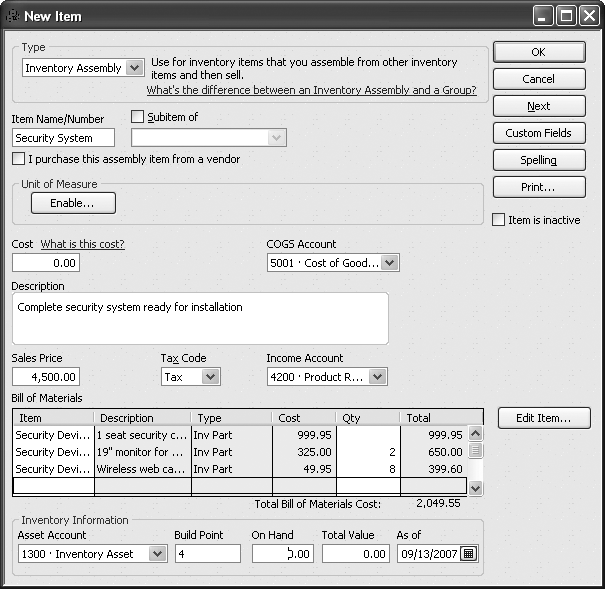
Inventory Assembly. This item type (available only in QuickBooks Premier and Enterprise editions) is perfect when you sell products built from your inventory items. For example, you stock wine bottles and related products like corkscrews and glasses, and you assemble them into gift baskets. With an Inventory Assembly item, you can track the number of gift baskets you have on hand as well as the individual inventory items. You can assign a different price for the gift basket than the total of the individual products, as described in the box on Product Items.
The box on Inventory Part Fields describes an easier approach to tracking products you build from other items.
|
Transaction |
Account |
Debit |
Credit |
|
Buy inventory |
Checking Account |
$500 | |
|
Buy inventory |
Inventory Asset |
$500 | |
|
Sell inventory |
Product Income |
$1,000 | |
|
Sell inventory |
Accounts Receivable |
$1,000 | |
|
Sell inventory |
Inventory Asset |
$500 | |
|
Sell inventory |
Cost of Goods Sold |
$500 |
Tip
Many companies don’t bother with purchase orders—forms that record what you order from a vendor—to buy office supplies. But if you want to track whether you receive the supplies you bought, you can create purchase orders for them (Creating Purchase Orders). Then use Non-inventory Part items for supplies you add to purchase orders but don’t track as inventory.
Inventory Part Fields
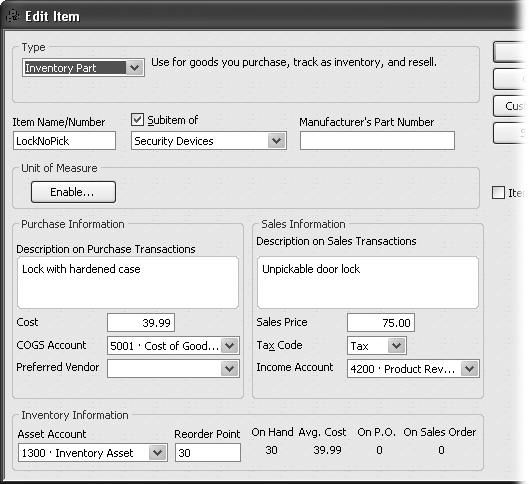
As described in the box on Product Items, dollars move between accounts as you buy and sell inventory. Here’s how you can use the fields for an Inventory Part item (shown in Figure 5-7) to define your company’s inventory money trail and, at the same time, keep track of how much inventory you have:
Manufacturer’s Part Number. If you want your purchase orders to include the manufacturer’s part number or unique identifier for the product, add it here.
Description on Purchase Transactions. Any description you type here appears on the purchase orders you issue to purchase inventory items. Describe the product in terms that the vendor or manufacturer understands, because you can use a different and more customer-friendly description for the invoices that customers see.
Cost. Enter what you pay for one unit of the product. QuickBooks assumes you sell products in the same units that you buy them. For example, if you purchase four cases of merlot but sell wine by the bottle, enter the price you pay per bottle in this field.
COGS Account. Choose the account to which you want to post the costs when you sell the product. (COGS stands for “cost of goods sold,” which is an account for tracking the underlying costs of the things you sell in order to calculate your gross profit.)
Preferred Vendor. If you choose a vendor in this drop-down list, QuickBooks selects the preferred vendor when you add this Inventory Part item to a purchase order.
Figure 5-7. When you create a new Inventory Part item, QuickBooks includes fields for purchasing and selling the item. The fields in the Purchase Information section show up on purchase orders. The Sales Information section sets the values you see on sales forms, such as invoices and sales receipts. The program simplifies building your initial inventory by letting you type the quantity you have on hand and their value.Description on Sales Transactions. When you type a description in the “Description on Purchase Transactions” box, QuickBooks copies that description into the “Description on Sales Transactions” box. If your customers wouldn’t recognize the description you use to buy the product, type a more customer-friendly description in this field.
Sales Price. In this field, type how much you charge for the product. Make sure that the Cost field uses the same units. For example, if you sell a bottle of merlot for $15, type 15 in this field and type the price you pay per bottle in the Cost field.
Tax Code. When you add an item to an invoice, QuickBooks checks this code to see whether the item is taxable. (QuickBooks comes with two tax codes: Non for nontaxable items and Tax for taxable items.) Most products are taxable, although groceries are the most familiar exception.
Income Account. This drop-down list includes all the accounts in your chart of accounts. Choose the income account for the money you receive when you sell one of these products.
Asset Account. Choose the asset account for the value of the inventory you buy. Suppose you buy 100 bottles of merlot, which are worth the $8-a-bottle you paid. QuickBooks posts $800 into your inventory asset account. When you sell a bottle, QuickBooks deducts $8 from the inventory asset account and adds that $8 to the COGS Account.
Reorder Point. Type the quantity on hand that would prompt you to order more. When your inventory hits that number, QuickBooks notifies you to reorder the product on the Reminders List (Reminders).
Tip
If you can receive products quickly, use a lower reorder point to reduce the money tied up in inventory and prevent write-offs due to obsolete inventory. When products take some time to arrive, set the reorder point higher. Start with your best guess and edit this field as business conditions change.
On Hand. If you already have some of the product in inventory, type the quantity in this field. From then on, if you use QuickBooks’ inventory feature (Chapter 19) to record inventory you receive, you can rely on it to accurately post inventory values in your accounts.
Total Value. If you filled in the On Hand field, fill in this field with the total value of the number of the products on hand. QuickBooks increases the value of your inventory asset account accordingly.
As of. The program uses this date for the transaction it creates in the inventory asset account.
Non-Inventory Part Fields
You’ll need Non-inventory Part items if you use purchase orders to buy supplies or other products that you don’t track as inventory. For example, suppose you’re a general contractor and you purchase materials for a job. When you use Non-inventory Part items, QuickBooks posts the cost of the products to an expense account and the income from selling the products to an income account. You don’t have to bother with the inventory asset account because you transfer ownership of these products to the customer almost immediately. See Paying Your Bills to learn how to charge your customer for these reimbursable expenses.
The good news about Non-inventory Part items is that they use all the same fields as Service items. The bad news is the few subtle differences you need to know. Take the following disparities into account when you create Non-inventory Part items:
“This item is used in assemblies or is purchased for a specific customer:job” checkbox. The checkbox goes by a different name than the one in Service items, but its behavior is the same. Turn on this checkbox when you want to use different values on purchase and sales transactions, that is, for items you resell. If the Non-inventory Part item is for office supplies you want to place on a purchase order, turn this checkbox off because you won’t have sales values.
When you turn this checkbox on, QuickBooks displays an Income Account field and an Expense Account field, like the fields you saw in Figure 5-5 (bottom). For Non-inventory Part items, the accounts that you choose are income and expense accounts specifically for products. Read the next bullet point to find out what happens when you turn this checkbox off.
Account. If you don’t resell this product and you thus turn off the “This item is used in assemblies or is purchased for a specific customer:job” checkbox, you see only one Account field. QuickBooks considers the account in this field an expense account for the purchase.
Tax Code. The Tax Code field works exactly the same way as the Tax Code field for a Service item. Choose Non if the products are nontaxable (like groceries), and Tax if the products are taxable.
Other Types of Items
If a line on a sales form isn’t a service or a product, read through this section to find the type of item you need.
Other Charge
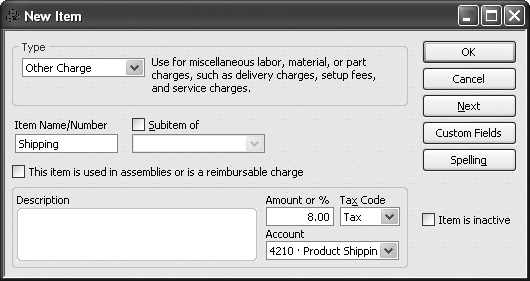
The Other Charge item is aptly named because you use it for any charge that isn’t quite a service or a product—for instance, shipping charges, finance charges, or bounced check charges. Other Charge items can be percentages or fixed amounts. For example, you can set up shipping charges as the actual cost of shipping, or estimate shipping as a percentage of the product cost.
If a customer holds back a percentage of your charges until you complete the job satisfactorily, create an Other Charge item for the retainer (that is, the portion of your invoice that the customer doesn’t pay initially). In this case, when you create the invoice, enter a negative percentage so QuickBooks deducts the retainer from the invoice total. When your customer approves the job, create another invoice, this time using another Other Charge item, called Retention, to charge the customer for the amount she withheld.
Tip
Progress invoices (Creating Progress Invoices) are another way to invoice customers for a portion of a job. They’re ideal if you invoice the customer based on the percentage of the job you’ve completed or on the parts of the job that are complete.
For Other Charge items, the checkbox for hiding or showing cost fields comes with the label “This item is used in assemblies or is a reimbursable charge”. For example, turn on this checkbox when you want to set the Cost field to what you pay and set the Sales Price field to what you charge your customers. You’ll see the same sets of fields for purchases and sales as you do for Service and Non-inventory Part items.
Alternatively, you can create charges that don’t link directly to expenses by turning off this checkbox. You can create a percentage, which is useful for calculating shipping based on the value of the products being shipped, as shown in Figure 5-8. When you turn off the “This is used in assemblies or is a reimbursable charge” checkbox, the Cost and Sales Price fields disappear, and the “Amount or %” field takes their place. If you want to create a dollar charge (like the dollar value charge for a country club’s one-time initiation fee), type a whole or decimal number in this field.
Subtotal
You’ll need Subtotal items if you charge sales tax on the products you sell, or if you discount only some of the items on a sales form. You need only one Subtotal item, because a Subtotal item does only one thing—it totals all the amounts for the preceding lines up to the last subtotal. That means you can have more than one subtotal on an invoice. For example, you can use one Subtotal item to add up the services you sell before applying a preferred customer product discount and a second Subtotal for product sales when you have to calculate sales tax. Because you can’t change a Subtotal item’s behavior in any way, a Subtotal item has just two fields: Item Name/Number and Description. You can type any name and description you wish in these fields, but in practically every case, Subtotal says it all.
Group
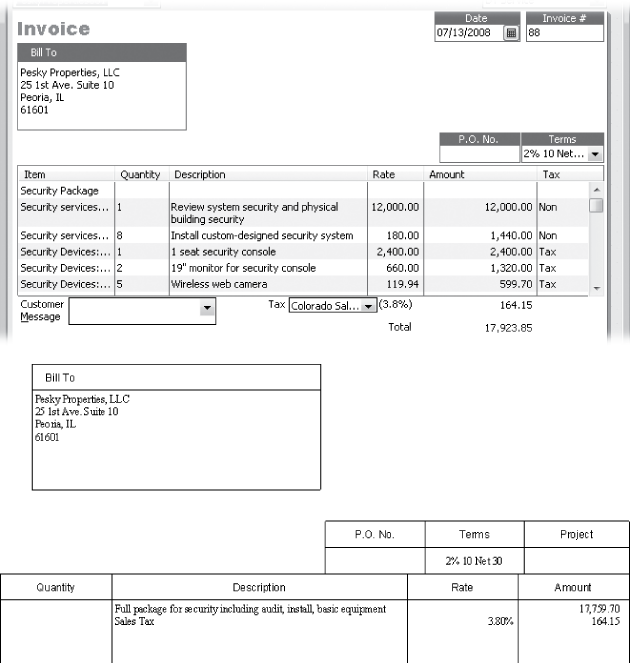
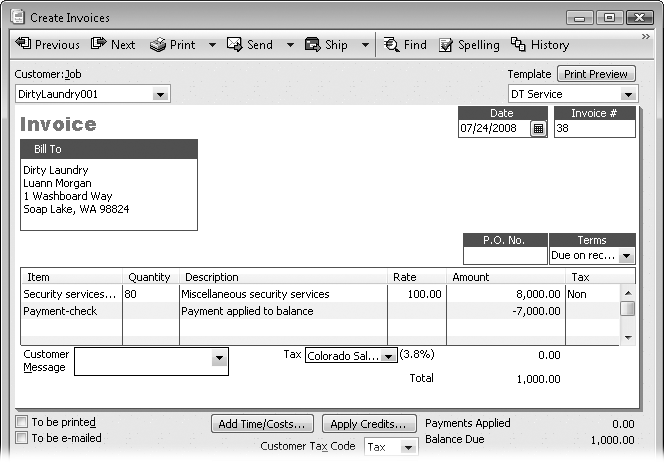
The Group item is a great timesaver, and it’s indispensable if you have a tendency to forget things. Create a Group item that contains items that always appear together, such as each service you provide for a landscaping job. As shown in Figure 5-9 you can show or suppress the individual items that a Group item contains. When you add this Landscaping Group item to an invoice, QuickBooks automatically adds the Service items for phases, such as Excavation, Grading, Planting, and Cleanup.
You can also use a Group item to hide the underlying items, which is useful mainly when you create fixed-price invoices (Applying Subtotals, Discounts, and Percentage Charges) and you don’t want the customer to know how much profit you’re making. Here’s how you set up a Group item to do these things:
Group Name/Number. Type a name for the group that gives a sense of the individual items within it, such as Landscaping Project.
Print items in group. To show all the underlying items on your invoice, turn on the “Print items in group” checkbox. Figure 5-9 shows examples of both showing and hiding the items within a group.
Item. To add an item to a group, click a blank cell in the Item column, as shown in Figure 5-10, and choose the item you want.
Figure 5-9. Top: When you add a Group item to an invoice (Security Package in this example), QuickBooks replaces that one item with all of the individual items, along with their prices, descriptions, and whatever else you’ve defined. To show these items on the invoice you send to your customer, turn on the “Print items in group” checkbox when you create the Group item. Bottom: For fixed-price invoices, which you use when you charge the customer a fixed amount—regardless of how much or little it costs you to deliver—you don’t want to show the underlying prices for each item you deliver. If you turn off the “Print items in group” checkbox when you create the Group item, you still see the individual items in the Create Invoices window, but the invoice you print to send to the customer shows only the Group item itself, along with the total price for all of the items in the Group.Qty. When you create a Group item, you can include different quantities of items, just like a box of note cards usually includes a few more envelopes than cards. For each item, type how many you typically sell as a group. If the quantity of each item varies, type 0 in the Qty cells. You can then specify the quantities on your invoices after you’ve added a Group item.
Discount
As a bookkeeper, you know that a discount is an amount you deduct from the standard price you charge. Volume discounts, customer loyalty discounts, and sale discounts are examples, and QuickBooks’ Discount item calculates deductions like these. By using both Subtotal and Discount items, you can apply discounts to some or all of the charges on a sales form.

The Discount item deducts either a dollar amount or a percentage for discounts you apply at the time of sale, such as volume discounts, damaged goods discounts, or the discount you apply because your customer has incriminating pictures of you.
Note
Early payment discounts don’t appear on sales forms because you won’t know that a customer pays early until long after the sales form is complete. You apply early payment discounts in the Receive Payments window, described on Discounting for Early Payment.
The fields for a Discount item are similar to those of an Other Charge item with a few small differences:
Amount or %. This field is always visible for a Discount item. To deduct a dollar amount, type a positive number (whole or decimal) in this field. To deduct a percentage, type a whole or decimal number followed by %, like 5.5%.
Account. Choose the account to which you want to post the discounts you apply. You can post discounts to either income accounts or expense accounts.
When you post discounts to an income account, they appear as negative income, so your gross profit reflects what you actually earned after deducting discounts. Posting discounts to expense accounts, on the other hand, makes your income look better than it actually is. The discounts increase the amounts in your expense accounts, so your net profit is the same no matter which approach you use.
Tax Code. When you choose a taxable code in the Tax Code field, QuickBooks applies the discount before it calculates sales tax. For instance, if customers buy products on sale, they pay sales tax on the sale price, not the original price.
When you choose a nontaxable code in the Tax Code field, QuickBooks applies the discount after it calculates sales tax. You’ll rarely want to do this because you’ll collect less sales tax from your customers than you have to send to the tax agencies.
Payment
When your customers send you payments, you can record them in your QuickBooks file using the Receive Payments command. If you’re in the middle of creating invoices when the checks arrive, it’s easier to record those payments by adding a Payment item to the customers’ sales forms. A Payment item does more than reduce the amount owed on the invoice (see Figure 5-11).
Beyond the Type, Item Name/Number, and Descriptions fields, the Payment item boasts fields unlike those for other items. The fields for a Payment item designate the method of payment that a customer uses and whether you deposit the funds to a specific bank account or group them with other undeposited funds. For example, if your customers send checks, you save up the checks you receive each week and make one trip to deposit them in your bank. Banks sometimes transfer credit card payments into a bank account individually and sometimes group all the charges for the same day.
Here’s what the payment fields do:
Payment Method. Choose the payment method, such as cash, check, or brand of credit card. In the Make Deposits window (Recording Deposits), you can filter pending deposits by the payment method.
Group with other undeposited funds. Choose this option if you want to add the payment to other payments you received. When you add the Payment item to a sales form, QuickBooks adds the payment to the list of undeposited funds. To actually complete the deposit of all your payments, choose Banking → Make Deposits (Recording Deposits).
Deposit To. If payments flow into an account without any action on your part, such as credit card or electronic payments, choose this option and then choose the bank account in the drop-down list.
Setting Up Sales Tax
If you don’t have to collect and remit sales tax, skip this section and give thanks. Sales taxes aren’t much more fun in QuickBooks than they are in real life. Confusingly, QuickBooks has two features for dealing with sales tax: codes and items. If you sell taxable and nontaxable products or services, Sales Tax codes specify whether or not an invoice item is taxable. Sales Tax items let you calculate and organize sales taxes charged by state and local authorities for the items on your invoices or other sales forms. This section describes both features and how to use each. If you sell products in a location burdened with multiple sales taxes (state, city, and local, say), you can use a Sales Tax Group item to calculate the total sales tax you have to charge. Your sales form shows the total, but QuickBooks keeps track of the tax you owe to each agency.
Note
Before you can dive into the details of setting up sales tax, you need to turn the sales tax feature on. Sales Tax explains how.
For most product sales in most areas, you have to keep track of the sales taxes you collect and then send them to the appropriate tax agencies. Labor usually isn’t taxable, whereas products usually are. Creating separate items for labor and materials makes it easy to apply sales tax to the right items or subtotals on your invoices. Separating the items you’ve identified as taxable or nontaxable can help you decide whether you need one or more items for a particular service or product. You can assign a sales tax code to the items you create for services and products. As you’ll learn in the next section, QuickBooks has two built-in tax codes: Tax and Non.
Sales Tax Codes
Sales tax codes are QuickBooks’ way of letting you specify whether to apply sales tax. Out of the box, the Sales Tax Code List comes with two self-explanatory options: Tax and Non. If you’d like to further refine taxable status, for example, to specify why a sale isn’t taxable, you can add more choices.
You can apply tax codes in two places: to customers or to individual sales items. For example, nonprofit organizations and government agencies are usually tax-exempt (Non). In many states, food and services aren’t taxable, although some states tax almost everything.
Assigning tax codes to customers
To tell QuickBooks whether a customer pays sales tax, open the Edit Customer dialog box (Adding Notes About Customers) and click the Additional Info tab. Here’s how QuickBooks interprets a customer’s tax-exempt status:
Nontaxable customer. When you assign Non or another nontaxable sales tax code to customers (Designating payment information), QuickBooks doesn’t calculate sales tax on any items you sell to them.
Taxable customer. When you assign Tax or any taxable sales tax code to a customer, the program calculates sales tax only on the taxable items on their invoices.
Assigning tax codes to items
Some items aren’t taxable whether or not a customer pays sales tax. As mentioned earlier, most services and non-luxury goods like food don’t get taxed in most states. If you look carefully at the top invoice in Figure 5-9 you’ll notice Non or Tax to the right of some of the amounts, which indicates nontaxable and taxable items, respectively. QuickBooks applies the sales tax only to taxable items to calculate the sales taxes on the invoice.
Items include a Tax Code field, so you can designate each item as taxable or nontaxable. In the Create Item or Edit Item dialog box (Creating Items), choose the code in the Tax Code drop-down list. (Taxable and nontaxable items can live together peacefully assigned to the same income account. QuickBooks figures out what to do with sales taxes based on tax codes, tax items, and whether a customer has to pay sales tax.)
Creating additional sales tax codes
Built-in tax codes aren’t QuickBooks’ most powerful feature: They let you mark customers and items as either taxable or nontaxable, and that’s it. So, the two built-in options, Tax and Non, pretty much cover all possibilities. The only reason you may want to create additional sales tax codes is to classify nontaxable customers by their reason for exemption (nonprofit, government, wholesaler, out-of-state, and so on).
With that caveat in mind, here are the steps for creating additional sales tax codes in QuickBooks:
Choose Lists → Sales Tax Code List.
The Sales Tax Code List window opens.
To create a new code, press Ctrl+N. Or, at the bottom of the list window, click the Sales Tax Code drop-down menu and choose New.
The New Sales Tax Code dialog box opens.
In the Sales Tax Code box, type a one- to three-character code.
For example, type Gov for a nontaxable sales tax code for government agencies, Whl for wholesalers who resell your products, or Oos for out-of-state customers, and so on.
In the Description box, add some helpful details about the code.
For example, type a description that explains the purpose for the code, like Government for Gov.
Choose the Taxable or Non-taxable option.
Sales tax codes are limited to taxable or nontaxable status.
Click Next to add another code.
The code you created appears in the Sales Tax Code List window.
When you’ve added all the codes you want, click OK to close the New Sales Tax Code dialog box.
As you can see, QuickBooks’ sales tax codes sport only a three-code ID, a description, and a taxable or nontaxable setting. They don’t let you specify a sales tax percentage or note which tax office to send the collected sales taxes. That’s where Sales Tax items (described next) come to the rescue.
Sales Tax Items
QuickBooks’ built-in sales tax codes are fine for turning taxable status on and off at will, but you also have to tell QuickBooks the sales tax rate and which tax authority levies the tax. If you sell products in more than one state, Sales Tax items are the way to deal with varying tax regulations. Like the IRS, each tax agency wants to receive the taxes it’s due. To track the taxes you owe to each agency, create a Sales Tax item for each agency. Also, if you sell products through direct mail, you’ll need a Sales Tax item for each state you ship to, as described on Sales Tax Items.
For example, suppose both local and state taxes apply to products you sell in your store. And, for customers to whom you ship goods in other states, sales taxes for those other states apply as well. You can create separate Sales Tax items for your local tax and the state sales taxes for each state in which you do business. Or, if one tax authority collects several sales taxes, QuickBooks has its Sales Tax Group feature (Modifying Items) to help you collect them all in one shot.
Unlike sales tax codes, which can apply to both customers and products, Sales Tax items apply only to customers, which makes sense when you think about it, since sales tax rates usually depend on the customer’s location. If the customer is in the boonies, you might assign the state Sales Tax item because the customer pays only that one tax. Alternatively, a customer smack in the middle of downtown might have to pay state tax, city tax, and a special district tax. If you assign Sales Tax items to customers (Hiding and Deleting Items), QuickBooks automatically fills in the Sales Tax item on your invoices to show the customer the sales taxes they pay.
To create a Sales Tax item, in the New Item dialog box, from the Type drop-down list, choose Sales Tax Item. Then fill in the fields (see Figure 5-12) as follows:
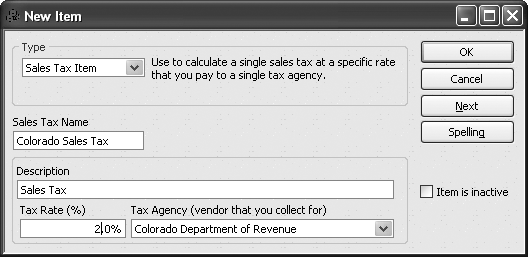
Sales Tax Name. Fill in this box with a name for the sales tax. You can use the identifiers that the tax authority uses, or a more meaningful name like Denver City Tax.
Description. If you want QuickBooks to display a description of the sales tax on your invoices or sales forms, type the description that you want to appear.
Tax Rate (%). In this box, type the percentage rate for the sales tax. QuickBooks automatically adds the percent sign (%), so simply type the decimal number—for example, 4.3 for a 4.3% tax rate.
Tax Agency. In this drop-down list, choose the tax authority that collects the sales tax. If you haven’t created the vendor for the tax authority, choose <Add New>.
Modifying Items
You can change information about an item even if you’ve already used the item in transactions. The changes you make don’t affect existing transactions. When you create new transactions using the item, QuickBooks grabs the updated information to fill in fields.
In the Item List window (click Items & Services in the QuickBooks Home page), double-click the item you want to edit. QuickBooks opens the Edit Item dialog box. Make the changes you want and then click OK. Or if you want to modify several items at once, use the new Add/Edit Multiple List Entries feature (see Selecting the list to work with).

Note
If you change an account associated with an item (like the income account to which sales post), the Account Change dialog box appears when you save the edited item. This dialog box tells you that all future transactions for that item will use the new account. If you also want to change the account on all existing transactions using the item, click Yes. Click No to keep the old account on existing transactions using the item.
Be particularly attentive if you decide to change the Type field. You can change only Non-inventory Part or Other Charge items to other item types, and they can morph into only certain item types: Service, Non-inventory Part, Other Charge, Inventory Part, or Inventory Assembly (this last type is available only in QuickBooks Premier and Enterprise). If you conclude from this that you can’t change a Non-inventory Part item back once you change it to an Inventory part, you’re absolutely correct. To prevent type change disasters, back up your QuickBooks file before switching item types (see Backing Up Files).
Tip
Parts that you keep in inventory have value that shows up as an asset of your company, but non-inventory parts show up simply as expenses. If you change an item from a Non-inventory Part to an Inventory Part, be sure to choose a date in the “As of” field that’s after the date of the last transaction using the item in its Non-inventory Part guise.
Hiding and Deleting Items
Deleting items and hiding them are two totally different actions, although the visible result is the same—QuickBooks doesn’t display the items in the Item List window. The only time you’ll delete an item is when you create it by mistake and want to eliminate it permanently from the Item List. As you might discover when you attempt to delete an item, deleting an item is possible only if you’ve never used it in a transaction.
Hiding items doesn’t have the same restrictions as deleting them, and offers a couple of advantages to boot. First, when you hide items, they don’t appear in your Item List, which prevents you from selecting the wrong item as you create an invoice or other sales form. And unlike deleting, hiding is reversible: You can switch items to active status if you start selling them again. Suppose you hid the item for bell-bottom hip-huggers in 1974. Decades later, when ’70s retro becomes cool again, you can reactivate the item and use it on sales forms. (Of course, you’ll probably want to edit the cost and sales price to reflect today’s higher prices.)
Hiding Items
If you’ve sold an item in the past, then the only way to remove it from the Item List is to hide it. Hiding items means that your Item List shows only the items you currently use. You’ll scroll less to find the items you want and you’re less likely to pick the wrong item by mistake. If you start selling an item again, you can reactivate it so that it appears on the Item List once more. If you’re wondering how you make an item reappear if it isn’t visible, here’s a guide to hiding and reactivating items in your Item List:
Hide an item. In the Item List, right-click the item and choose Make Item Inactive from the shortcut menu. The item disappears from the Item List.
View all items, active or inactive. At the bottom of the Item List window, turn on the “Include inactive” checkbox. QuickBooks displays a column with an X as its heading and shows an X in that column for every inactive item in the list. The “Include inactive” checkbox is grayed out when all the items are active.
Reactivate an item. First, turn on the “Include inactive” checkbox to display all items. To reactivate the item, click the X next to its name. When you click the X next to a parent item, QuickBooks opens the Activate Group dialog box. If you want to reactivate all the subitems as well as the parent, click Yes.
If you find that you’re constantly hiding items that you no longer sell, your item list might be too specific for your constantly changing product list. For example, if you create 100 items for the clothes that are fashionable for teenagers in May, those items will be obsolete by June. Consider creating more generic items, such as pants, shorts, t-shirts, and bathing suits. You can reuse these items season after season, year after year, without worrying about running out of room on the Item List, which is limited to 14,500 items.
Deleting Items
If you improperly create an item and catch your mistake immediately, deleting the offender is no sweat. Use any one of these methods to delete an item:
In the Item List window, select the item you want to delete and press Ctrl+D.
In the Item List window, select the item, and then choose Edit → Delete Item (if commands on menus are more to your liking).
In the menu at the bottom of the window, click Item and then choose Delete Item.
If you try to delete an item that’s used in even one transaction, QuickBooks warns you that you can’t delete it. Say you created an item by mistake and then compounded the problem by inadvertently adding the item to an invoice. When you realize your error and try to delete the item, QuickBooks refuses to oblige. If you used the item in one or two recent transactions, you can probably find those transactions and replace the item without thinking too hard. (Open the Item List by choosing Lists → Item List. Right-click the item and choose QuickReport on the shortcut menu. QuickBooks displays a report with all the transactions using that item.) When you’ve removed the item from all transactions, use one of the methods above to delete it.
If you blasted out a bunch of transactions, it’s easier to find the transactions with the “Sales by Item Detail” report, which includes a heading for each item you sell, and groups transactions underneath each heading. If you sell lots of items, you probably want the report to show the transactions only for the item you want to delete. Here’s how you modify the “Sales by Item Detail” report and then edit the transactions:
To create a “Sales by Item Detail” report, choose Reports → Sales → “Sales by Item Detail”.
QuickBooks opens the “Sales by Item Detail” report in its own window.
To modify the report, in the report window tool bar, click Modify Report.
QuickBooks opens the “Modify Report: Sales by Item Detail” dialog box. To produce a report with transactions for one item, modify the date range and filter the report based on the item’s name, as shown in Figure 5-14.
If you know when you first used the item in a transaction, type or click that date in the From box. QuickBooks sets the date in the To box to the current date, which is perfect for this situation. Alternatively, in the Dates drop-down list, choose a predefined date range, such as “This Fiscal Year-to-date”.
To edit a transaction to remove an item, in the “Sales by Item Detail” window, double-click the transaction.
Based on the type of transaction you double-click, QuickBooks opens the corresponding dialog box or window. For example, if you double-click an invoice, QuickBooks opens the Create Invoices window and displays the invoice you chose.
In the Item Code column, click the cell containing the item you want to delete, click the downward-pointing arrow in the cell, and then choose the correct item from the Item drop-down list.
To save the transaction with the revised item, click Save & Close.
You’ll know that you’ve successfully eliminated the item from all sales transactions when the report in the “Sales by Item Detail” window shows no transactions.
Figure 5-14. To filter the report by an item’s name, click the Filters tab. On the Filters tab, in the Filter list, choose Item. In the Item drop-down list, click the downward-pointing arrow and then select the item you want to delete. QuickBooks displays the changes to the report in the Current Filter Choices section. Give these settings the once-over, and if they look correct, click OK to revise the report.Finally, back in the Item List window, select the item you want to delete and press Ctrl+D. In the Delete Item message box, click Yes to confirm the deletion of the item.
The item disappears from your Item List for good.
To close the report window, click the Close box at the upper-right.
