
There is nothing like dream to create the future.
It was only in the very early days of the Web that a Web site could be assembled by simply grouping distinct pages under the same host. Today, it is necessary for all pages in a Web site to define a common structure and share a common set of interface elements such as header, footer, navigation bar, ad rotators, and search and login box.
Beyond having a similar-looking and consistent layout, Web pages in a site must be easy to retrieve, understand, and navigate for users. In one word, Web pages must be enjoyable by their target audience. Most Web sites exist for strong business reasons; failing on the composition or usability aspects of site planning and development is a mistake that can cost your company much more than you might expect.
The challenge for a Web development platform is providing a technology that makes composing rich and usable pages effective in the first place, but also quick and at least relatively easy. This chapter is split into two parts, each providing a sort of checklist for the two aspects I’ve emphasized so far: composition and usability.
In the composition section, I’ll discuss master pages, cascading style sheets (CSS), and ASP.NET themes. In the usability section, I’ll touch on cross-browser rendering, site navigation, and search-engine optimization.
A successful Web site results from the combined effect of well-organized content and HTML appeal. You can’t do without a strong visual idea of the site that contributes to spreading the brand and making the site recognizable and, in some way, giving the site its own character. Elaborating on a successful visual idea for a site is (fortunately?) beyond the reach of most developers and definitely is a different job that requires a different set of skills.
Some point of contact between the design and development teams, however, has to be found. When the underlying platform is going to be ASP.NET Web Forms, this point of contact comes in the form of a master page template and one or more cascading style sheets. Sometimes, the style of the site is represented through one or more ASP.NET themes. A theme is a superset of a CSS and includes multiple cascading style sheets plus additional files.
Let’s begin our exploration of site composition with an in-depth look at master pages.
In ASP.NET, master pages provide the ability to define a common layout and have it reused and shared across as many pages as you want throughout the site. Master pages improve the maintainability of the site while reducing code duplication. ASP.NET master pages basically benefits from the ASP.NET framework’s ability to merge a super-template with user-defined content replacements.
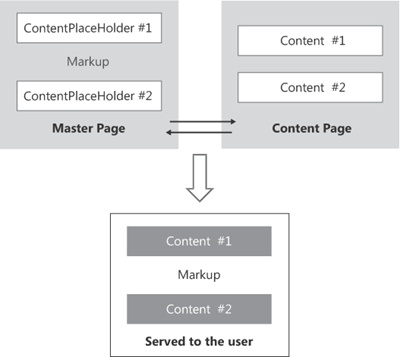
A master page is a distinct file referenced at the application level, as well as at the page level, that contains the static layout of the page. The page layout consists of regions that each “derived” page can customize. Such regions are referenced in the master page with a special placeholder control. A derived page, also known as a content page, is simply a collection of blocks the run time will use to fill the regions in the master.
The contents of a master page are merged into the content page, and they dynamically produce a new page class that is served to the user upon request. The merge process takes place at compile time and only once.
It might seem that the idea of master and content pages revolves around some sort of visual inheritance such as the form inheritance feature you might experience in Windows Forms. Abstractly speaking, the content page really looks like an inherited page that overrides some virtual regions in the master. Although this is a possible high-level way of looking at things, it is not how master and content pages work in practice.
Note
In ASP.NET, a master page is not necessary for any page you add to the project. You can certainly create plain Web pages that don’t import any layout information from the outside. In Microsoft Visual Studio, you are in fact given two options when you choose to add a new Web page to the project—you can add it with or without a master page. In the economy of a real-world site, though, using a master page (or even multiple master pages) is a necessity.
A master page is similar to an ordinary ASP.NET page except for the top @Master directive and the presence of one or more ContentPlaceHolder server controls. In addition, a master page doesn’t derive from Page but has UserControl as its parent class. A ContentPlaceHolder control defines a region in the master page that can be customized in a derived page.
A master page without content placeholders is technically correct and will be processed correctly by the ASP.NET runtime. However, a placeholder-less master fails in its primary goal—to be the super-template of multiple pages that look alike. A master page devoid of placeholders works like an ordinary Web page but with the extra burden required to process master pages.
Here is a simple master page adapted from the master page of the Visual Studio 2010 sample ASP.NET project:
<%@ Master Codebehind=.Site.master.cs. Inherits=.YourApp.SiteMaster. %>
<html>
<head runat="server">
    <title></title>
    <link href="~/Styles/Site.css" rel="stylesheet" type="text/css" />
    <asp:ContentPlaceHolder ID="HeadContent" runat="server">
    </asp:ContentPlaceHolder>
</head>
<body>
    <form runat="server">
       <div class="page">
           <div class="header">
              <div class="title"><h1> Programming ASP.NET 4 </h1></div>
              <div class="loginDisplay">
                 ...
              </div>
              <div class="clear menu">
                 ...
              </div>
           </div>
           <div class="main">
             <asp:ContentPlaceHolder ID="MainContent" runat="server"/>
           </div>
           <div class="clear"></div>
       </div>
       <div class="footer">
          ...
       </div>
    </form>
</body>
</html>
As you can see, the master page looks like a standard ASP.NET page. Aside from the identifying @Master directive, the only key differences are ContentPlaceHolder controls. A page bound to this master automatically picks up the layout and contents of the master and can attach custom markup and server controls to each defined placeholder. The content placeholder element is fully identified by its ID property and normally doesn’t require other attributes.
This is important to note because a content page is not allowed to include any content other than the markup strictly required to fill up a specific content placeholder. I’ll return to this point in a moment.
The @Master directive distinguishes master pages from content pages and allows the ASP.NET runtime to properly handle each. A master page file is compiled to a class that derives from the MasterPage class. The MasterPage class, in turn, inherits UserControl. So, at the end of the day, a master page is treated as a special kind of ASP.NET user control.
The @Master directive supports quite a few attributes. For the most part, though, they are the same attributes that we reviewed in Chapter 5, for the @Page directive. Table 8-1 details the attributes that have a special meaning to master pages.
Table 8-1. Attributes of the @Master Directive
Description | |
|---|---|
ClassName | Specifies the name for the class that will be created to render the master page. This value can be any valid class name but should not include a namespace. By default, the class name for a simple.master is ASP.simple_master. |
CodeBehind | Indicates the file that contains any source code associated with the master page, and is used for a Web Application Project (WAP). Note that the CodeBehind attribute is ignored by ASP.NET and simply exists to help Visual Studio edit the file. You can remove it in production without losing functionality. |
CodeFile | Indicates the file that contains any source code associated with the master page, and is used for a Web site project. |
Inherits | Specifies a code-behind class for the master page to inherit. This can be any class derived from MasterPage. |
MasterPageFile | Specifies the name of the master page file that this master refers to. A master can refer to another master through the same mechanisms a page uses to attach to a master. If this attribute is set, you will have nested masters. |
The master page is associated with a code file that looks like the following:
public partial class SiteMaster: System.Web.UI.MasterPage
{
    protected void Page_Load(Object sender, EventArgs e)
    {
        ...
    }
    ...
}
The @Master directive doesn’t override attributes set at the @Page directive level. For example, you can have the master set the language to Visual Basic and one of the content pages can instead use C#. The language set at the master page level never influences the choice of the language at the content page level.
Likewise, you can use other ASP.NET directives in a master page—for example, @Import. However, the scope of these directives is limited to the master file and does not extend to child pages generated from the master.
The ContentPlaceHolder control acts as a container placed in a master page. It marks places in the master where related pages can insert custom content. A content placeholder is uniquely identified by an ID. Here’s an example:
<asp:ContentPlaceHolder runat="server" ID="MainContent" />
A content page is an ASP.NET page that contains only <asp:Content> server tags. This element corresponds to an instance of the Content class that provides the actual content for a particular placeholder in the master. The link between placeholders and content is established through the ID of the placeholder. The content of a particular instance of the Content server control is written to the placeholder whose ID matches the value of the ContentPlaceHolderID property, as shown here:
<asp:Content runat="server" contentplaceholderID="MainContent">
    ...
</asp:Content>
In a master page, you define as many content placeholders as there are customizable regions in the page. A content page doesn’t have to fill all the placeholders defined in the bound master. However, a content page can’t do more than just fill placeholders defined in the master.
A content placeholder can be assigned default content that will show up if the content page fails to provide a replacement. Each ContentPlaceHolder control in the master page can contain default content. If a content page does not reference a given placeholder in the master, the default content will be used. The following code snippet shows how to define default content:
<asp:ContentPlaceHolder runat="server" ID="MainContent">
    <!-- Use the following markup if no custom
        content is provided by the content page -->
    ...
</asp:ContentPlaceHolder>
The default content is completely ignored if the content page populates the placeholder. The default content is never merged with the custom markup provided by the content page.
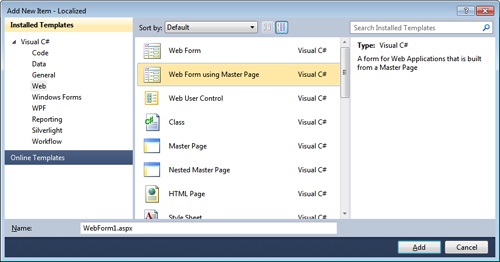
Once you have a master page, you think of your actual site pages in terms of a delta from the master. The master defines the common parts of a certain group of pages and leaves placeholders for customizable regions. Each content page, in turn, defines what the content of each region has to be for a particular ASP.NET page. Figure 8-1 shows the first step you take on the way to adding a content page to a Visual Studio project.
The next step entails choosing a particular master page from within the folders of the current project. Normally, master pages are located in the root folder that defines their scope. If you have only one master page, it is usually located in the root of the site.
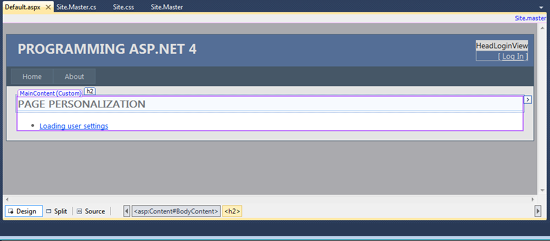
The key part of a content page is the Content control—a mere container for other controls. The Content control is used only in conjunction with a corresponding ContentPlaceHolder and is not a standalone control. The master file that we considered earlier defines a single placeholder named PageBody. This placeholder represents the body of the page and is placed right below an HTML table that provides the page’s header. Figure 8-2 shows a sample content page based on the aforementioned master page.
Let’s take a look at the source code of the content page:
<%@ Page Title="Home Page"
Language="C#"
AutoEventWireup="true"
MasterPageFile="~/Site.master"
CodeBehind="Default.aspx.cs"
Inherits="UserProfileDemo._Default" %>
<asp:Content ID="HeaderContent" runat="server" ContentPlaceHolderID="HeadContent">
</asp:Content>
<asp:Content ID="BodyContent" runat="server" ContentPlaceHolderID="MainContent">
<h2>
Page personalization
</h2>
<div>
<ul>
<li><a href="/profile.aspx">Loading user settings</a></li>
</ul>
</div>
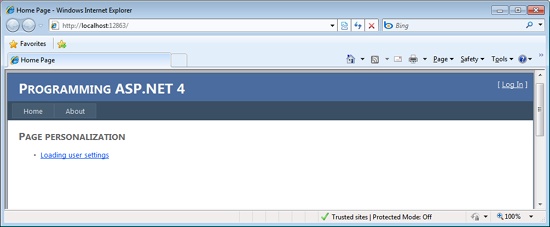
</asp:Content>The content page is the resource that users invoke through the browser. When the user points her or his browser to this page, the output in Figure 8-3 is shown.
The replaceable part of the master is filled with the corresponding content section defined in the derived pages.
A content page—that is, a page bound to a master—is a special breed of page in that it can only contain <asp:Content> controls. A content page is not permitted to host server controls outside of an <asp:Content> tag.
As a collection of <asp:Content> tags, a content page is not even allowed to include any markup that specifies general information such as the title of the page, inline styles, and even scripts.
You can declaratively set the title of a content page using the Title attribute of the @Page directive as shown here:
<@Page MasterPageFile="site.master" Title="Hello, world" %>
However, there’s not much you can do to add styles and scripts in a content page unless the master page provides for specific placeholders. You can add styles and scripts to a placeholder if the placeholder’s position in the layout allows you to include them. Most of the time, you create a placeholder within the <head> section and perhaps another at the bottom of the page to allow for styles and scripts. The default master you get in sample Visual Studio 2010 projects has the following:
<html>
<head runat="server">
    <title></title>
    <link href="~/Styles/Site.css" rel="stylesheet" type="text/css" />
    <asp:ContentPlaceHolder ID="HeadContent" runat="server">
    </asp:ContentPlaceHolder>
</head>
<body>
   ...
</body>
</html>
The HeadContent placeholder just exists so that content pages can fill it with any page head–specific content such as script or styles. Likewise, you can create a script-only placeholder and place it at the bottom of the page to improve the page’s rendering speed, as discussed in Chapter 7.
Note, though, that a placeholder is just a container you can fill with whatever ends up producing valid HTML markup. You have no way to restrict a placeholder to contain only certain controls or certain fragments of HTML markup. Later in the chapter, I’ll return to this point, contrasting placeholders with master page properties.
For now let’s explore in a bit more detail the techniques to attach pages to masters.
So far, we have bound any content page to its master by using the MasterPageFile attribute in the @Page directive. The MasterPageFile attribute indicates the path to the master page. Page-level binding, however, is just one possibility—although it is the most common one.
You can also set the binding between the master and the content at the application or folder level. Application-level binding means that you link all the pages of an application to the same master. You configure this behavior by setting the Master attribute in the <pages> element of the principal web.config file:
<configuration>
    <system.web>
        <pages master="Site.master" />
    </system.web>
</configuration>
If the same setting is expressed in a child web.config file—a web.config file stored in a site subdirectory—all ASP.NET pages in the folder are bound to a specified master page.
Note that if you define binding at the application or folder level, all the Web pages in the application (or the folder) must have Content controls mapped to one or more placeholders in the master page. In other words, application-level binding prevents you from having (or later adding) a page to the site that is not configured as a content page. Any classic ASP.NET page in the application (or folder) that contains server controls will throw an exception.
Like all ASP.NET pages and controls, master pages can detect the capabilities of the underlying browser and adapt their output to the specific device in use. ASP.NET makes choosing a device-specific master easier than ever. If you want to control how certain pages of your site appear on a particular browser, you can build them from a common master and design the master to address the specific features of the browser. In other words, you can create multiple versions of the same master, each targeting a different type of browser.
How do you associate a particular version of the master and a particular browser? In the content page, you define multiple bindings using the same MasterPageFile attribute, but you prefix it with the identifier of the device. For example, suppose you want to provide ad hoc support for Microsoft Internet Explorer and Firefox browsers and use a generic master for any other browsers that users employ to visit the site. You use the following syntax:
<%@ Page masterpagefile="Site.master"
ie:masterpagefile="ieSite.master"
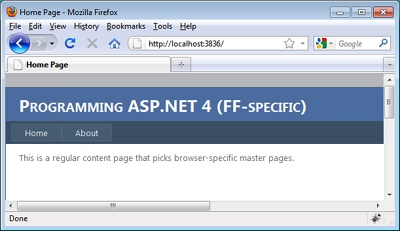
firefox:masterpagefile="ffSite.master" %>The ieSite.master file will be used for Internet Explorer; the ffSite.master, on the other hand, will be used if the browser is Firefox. In any other case, a device-independent master (site.master) will be used. When the page runs, the ASP.NET runtime automatically determines which browser or device the user is using and selects the corresponding master page, as shown in Figure 8-4.
The prefixes you can use to indicate a particular type of browser are those defined in the ASP.NET configuration files for browsers. Table 8-2 lists the most commonly used IDs.
Table 8-2. ID of Most Common Browsers
Browser ID | Browser Name |
|---|---|
IE | Any version of Internet Explorer |
Netscape3 | Netscape Navigator 3.x |
Netscape4 | Netscape Communicator 4.x |
Netscape6to9 | Any version of Netscape higher than 6.0 |
Firefox | Firefox |
Opera | Opera |
Up | Openwave-powered devices |
Blackberry | BlackBerry browser |
iPhone | iPhone browser |
Chrome | Google Chrome |
ieMobile | Internet Explorer for mobile devices |
Obviously, you can distinguish not just between up-level and down-level browsers, but you can also distinguish between browsers and other devices, such as cellular phones and personal digital assistants (PDAs). If you use device-specific masters, you must also indicate a device-independent master.
The use of master pages slightly changes how pages are processed and compiled. For one thing, a page based on a master has a double dependency—on the .aspx source file (the content page) and on the .master file (the master page). If either of these pages changes, the dynamic page assembly will be re-created. Although the URL that users need is the URL of the content page, the page served to the browser results from the master page being fleshed out with any replacement information provided by the content page.
When the user requests an .aspx resource mapped to a content page—that is, a page that references a master—the ASP.NET runtime begins its job by tracking the dependency between the source .aspx file and its master. This information is persisted in a local file created in the ASP.NET temporary files folder. Next, the runtime parses the master page source code and creates a Visual Basic or C# class, depending on the language set in the master page. The class inherits MasterPage, or the master’s code file, and is then compiled to an assembly.
If multiple .master files are found in the same directory, they are all processed at the same time. Thus a dynamic assembly is generated for any master files found, even if only one of them is used by the ASP.NET page whose request triggered the compilation process. Therefore, don’t leave unused master files in your Web space—they will be compiled anyway. Also note that the compilation tax is paid only the first time a content page is accessed within the application. When a user accesses another page that requires the second master, the response is faster because the previously compiled master is cached.
As mentioned, any ASP.NET page bound to a master page must have a certain structure—no server controls or literal text are allowed outside the <asp:Content> tag. As a result, the layout of the page looks like a plain collection of content elements, each bound to a particular placeholder in the master. The connection is established through the ID property. The <asp:Content> element works like a control container, much like the Panel control of ASP.NET or the HTML <div> tag. All the markup text is compiled to a template and associated with the corresponding placeholder property on the master class.
The master page is a special kind of user control with some templated regions. It’s not coincidental, in fact, that the MasterPage class inherits from the UserControl class. After it is instantiated as a user control, the master page is completed with templates generated from the markup defined in the content page. Next, the resulting control is added to the control tree of the current page. No other controls are present in the final page except those brought in by the master. Figure 8-5 shows the skeleton of the final page served to the user.
So far, we’ve seen a pretty simple relationship between a master page and a collection of content pages. However, the topology of the relationship can be made as complex and sophisticated as needed. A master can, in fact, be associated with another master and form a hierarchical, nested structure. When nested masters are used, any child master is seen and implemented as a plain content page in which extra ContentPlaceHolder controls are defined for an extra level of content pages. Put another way, a child master is a kind of content page that contains a combination of <asp:Content> and <asp:ContentPlaceHolder> elements. Like any other content page, a child master points to a master page and provides content blocks for its parent’s placeholders. At the same time, it makes available new placeholders for its child pages.
Note
There’s no architectural limitation on the number of nesting levels you can implement in your Web sites. Performance-wise, the depth of the nesting has a negligible impact on the overall functionality and scalability of the solution. The final page served to the user is always compiled on demand and never modified as long as dependent files are not touched.
Let’s expand on the previous example to add an intermediate master page. The root master page is the Site.master file we met earlier. The root master defines the header, the footer, and replaceable regions for the head and main content. Let’s add an intermediate master page to further structure the main content. The intermediate master page is named MainContent.master.
<%@ Master Language="C#"
           AutoEventWireup="true"
           MasterPageFile="~/Site.Master"
           CodeBehind="MainContent.Master.cs"
           Inherits="Masters.MainContentMaster" %>

<asp:Content ID="Content1" ContentPlaceHolderID="HeadContent" runat="server">
    <!-- Won't be accessible from the final content page, anyway -->
</asp:Content>

<asp:Content ID="Content2" ContentPlaceHolderID="MainContent" runat="server">
  <fieldset>
    <legend>How <b>MainContent.Master</b> replaces MainContent</legend>
    <h2>
          <asp:Label runat="server" ID="MainContentTitle_Label">
             What is this page for?
          </asp:Label>
    </h2>

    <asp:ContentPlaceHolder ID="PageBody" runat="server" />
    <asp:ContentPlaceHolder ID="ScriptContentBottom" runat="server" />
  </fieldset>
</asp:Content>
As you can see, the master contains both a collection of <asp:Content> and <asp:ContentPlaceHolder> tags. The top directive is that of a master, but it contains the MasterPageFile attribute, which typically characterizes a content page.
An intermediate master page is essentially a content page and must fulfill the rules of content pages such as not having markup outside <asp:Content> controls. At the same time, it is allowed to specify the @Master directive and host some additional (well, nested) content placeholders.
Note that the final content page has access only to the placeholders of its immediate master. The HeadContent placeholder defined on the root master can be filled up by the intermediate master, but not by the final content page.
The following code illustrates nesteddemo.aspx—a content page that builds on two masters:
<%@ Page Title="Nested master pages"
         Language="C#"
         AutoEventWireup="true"
         CodeBehind="NestedDemo.aspx.cs"
         MasterPageFile="~/MainContent.Master"
         Inherits="Masters.NestedDemo" %>

<asp:Content ID="Content1" ContentPlaceHolderID="PageBody" runat="server">
  <fieldset>
    <legend>How <b>NestedDemo.aspx</b> replaces PageBody</legend>
    <h2>[Your custom markup here]</h2>
  </fieldset>
</asp:Content>
Figure 8-6 shows the results.
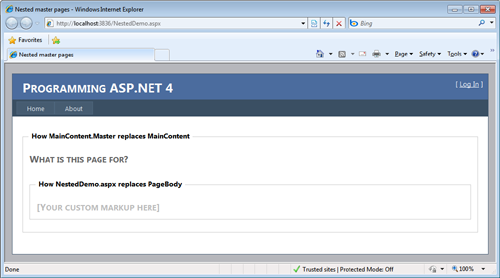
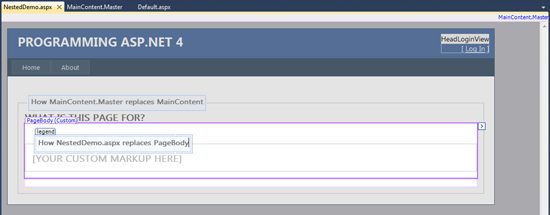
At this point, if you create a new page from MainContent.Master you’ll be able to add custom content only below the label that says “What is this page for?”. Everything else is fixed and can’t be changed from the content page. Nested masters are fully supported by Visual Studio 2010, which provides you with a visual experience, as shown in Figure 8-7.
What’s the purpose of having nested master pages?
Whereas a master page helps share a common layout through multiple pages, nested master pages simply give you more control over the structure of the final pages. Especially in sites with hundreds of pages, a single layout is not realistic. More likely, you need a super-template in which different areas are filled in a way for a bunch of pages and in another way for another bunch of pages. Each group of pages might be derived from an intermediate master.
When you create a content placeholder in a master page, you are leaving to the content page author full freedom to put in the placeholder wherever she wishes. Sometimes, instead, you want pages to customize the content of certain areas but without altering the layout. In Figure 8-6, the MainContent placeholder defined on the root master has been filled up as follows. (I omitted the fieldset you see in Figure 8-6 for clarity.)
<asp:Content ID="Content2" ContentPlaceHolderID="MainContent" runat="server">
    <h2>
          <asp:Label runat="server" ID="MainContentTitle_Label">
             What is this page for?
          </asp:Label>
    </h2>

    <asp:ContentPlaceHolder ID="PageBody" runat="server" />
    <asp:ContentPlaceHolder ID="ScriptContentBottom" runat="server" />
</asp:Content>
The markup consists of an H2 element plus a couple of placeholders. This means that as the author of the master page, you always want a title string followed by the real content. However, the title string (the Label control in the code) is static. How can you make it dynamically settable from content pages? Here’s where master page properties fit in.
You can use code in content pages to reference properties, methods, and controls in the master page, with some restrictions. The rule for properties and methods is that you can reference them if they are declared as public members of the master page. This includes public page-scope variables, public properties, and public methods.
To give an identity to a control in the master, you simply set the runat attribute and give the control an ID. Can you then access the control from within a content page? Not directly. The only way to access the master page object model is through the Master property. Note, though, that the Master property of the Page class references the master page object for the content page. This means that only public properties and methods defined on the master page class are accessible.
The following code enhances the previous master page to make it expose the text of the label as a public property:
public partial class MainContentMaster : MasterPage
{
   protected void Page_Load(object sender, EventArgs e)
   {
   }

   public String MainContentTitle
   {
       get { return MainContentTitle_Label.Text; }
       set { MainContentTitle_Label.Text = value; }
   }
}
The control’s protection level makes it inaccessible from the outside world, but the public property MainContentTitle defined in the preceding code represents a public wrapper around the Label’s Text property. In the end, the master page has an extra public property through which programmers can set the page description.
The Master property is the only point of contact between the content page and its master. The bad news is that the Master property is defined to be of type MasterPage; as such, it doesn’t know anything about any property or method definition specific to the master you’re really working with. In other words, the following code wouldn’t compile because no MainContentTitle property is defined on the MasterPage class:
public partial class NestedDemo : System.Web.UI.Page
{
    protected void Page_Load(object sender, EventArgs e)
    {
        Master.MainContentTitle = "Nested demo";
    }
}
What’s the real type behind the Master property?
The Master property represents the master page object as compiled by the ASP.NET runtime engine. This class follows the same naming convention as regular pages—ASP.XXX_master, where XXX is the name of the master file. Developers can override the default class name by setting the ClassName attribute on the @Master directive. The attribute lets you assign a user-defined name to the master page class:
<%@ Master ... Classname="ContentMaster" %>
In light of this, you would need code like that shown here:
((ASP.ContentMaster)Master).MainContentTitle = "Nested demo";
However, there are a couple of simpler alternatives—one for .NET 4 applications and one that works regardless of the .NET Framework version you’re using. If you compile your code for the .NET Framework 4, you can take advantage of the dynamic keyword in C#.
public partial class NestedDemo : Page
{
    protected void Page_Load(Object sender, EventArgs e)
    {
        dynamic master = this.Master;
        master.MainContentTitle = "Nested demo";
    }
}
The dynamic keyword tells the compiler to suspend any further processing on the expression and just assume the syntax is fine. The compiler understands that the variable master is of type dynamic, and that’s enough. For this type, then, the compiler actually emits some code that at run time will try to resolve the expression through the services of the Dynamic Language Runtime (DLR) component of the .NET Framework 4. The net effect is that if at run time the actual object behind the master variable can successfully resolve a call to the specified property, the code works as expected; otherwise, an exception would be raised.
If you’re not using .NET 4, however, you have another choice.
By adding the @MasterType directive in the content page, you can avoid all the casting just shown. The @MasterType informs the compiler about the real type of the Master property. The Master property is declared as the right type in the dynamically created page class, and this allows you to write strongly typed code, as follows:
<%@ Page Title="Nested master pages"
         MasterPageFile="~/MainContent.Master"
         AutoEventWireup="true"
         CodeBehind="NestedDemo.aspx.cs"
         Inherits="Masters.NestedDemo" %>
<%@ MasterType VirtualPath="~/MainContent.Master" %>
In the code file, you can have the following statements:
protected void Page_Load(object sender, EventArgs e)
{
Master.MainContentTitle = "Nested demo";
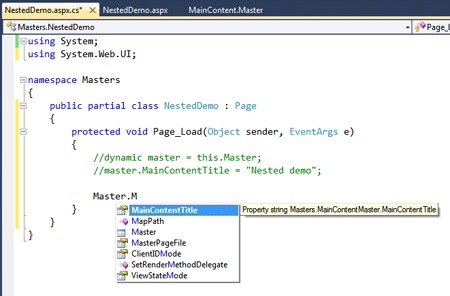
}The @MasterType directive supports two mutually exclusive attributes: VirtualPath and TypeName. Both serve to identify the master class to use. The former does it by URL; the latter by type name. Figure 8-8 shows the effect of the directive on the code being created and the nice work Visual Studio IntelliSense does around it.
To associate an ASP.NET content page with a master page—keeping in mind that in no case can you associate a classic ASP.NET page with a master—you use the MasterPageFile attribute of the @Page directive. MasterPageFile, though, is also a read-write property on the Page class that points to the name of the master page file. Can you dynamically select the master page via code and based on run-time conditions?
Using a dynamically changing master page is definitely possible in ASP.NET and is suitable, for example, for applications that can present themselves to users through different skins. However, programmatically selecting the master page is not a task that you can accomplish at any time. To be precise, you can set the MasterPageFile property only during the PreInit page event—that is, before the run time begins working on the request.
protected void Page_PreInit(object sender, EventArgs e)
{
    MasterPageFile = "another.master";
}
If you try to set the MasterPageFile property in Init or Load event handlers, an exception is raised.
ASP.NET pages are mostly made of server controls, and server controls ultimately serve up HTML markup. The client browser builds and displays HTML elements whose appearance depends on the information stored in their style containers.
It turns out that there are several places for you to add style information to control the look and feel of the page. If you feel comfortable with server controls, you use ASP.NET themes. If you need to exercise more control over the content actually sent to (and displayed by) the browser, you can configure controls to emit CSS-friendly markup that can be styled effectively from the client or through HTML literals right in the ASPX markup.
ASP.NET themes have been introduced with the intent of facilitating the task of styling server controls with the same approach used by cascading style sheets at the HTML element level. Themes were originally aimed at doing the same job of CSS but through a more specific interface tailor-made for server controls. Through themes, you just declaratively define some code to be run to dress the control in a given way. Basically, themes are a way to adapt the CSS syntax to the syntax of server controls.
Boldly introduced as a way to supersede CSS styles, today ASP.NET themes are in a downturn, if not explicitly deprecated. Why is this so? As I see things, the problem is not with themes but with the overall perception of server controls in ASP.NET development. Themes are just perfect—and more effective than CSS—if your language for expressing Web pages is largely based on server controls. If you don’t really feel the need to worry about what a server control emits, themes are just the perfect tool for the job.
At the height of ASP.NET’s success, the advent of AJAX silently started changing people’s perspective of things and led to a complete turnaround in only a couple of years. In a way, AJAX was the straw that broke the ASP.NET Web Forms abstraction model. With AJAX, you need much more control over the markup—HTML elements and CSS styles. Subsequently, many more developers are using server controls not as building blocks but rather as HTML helper factories. In this context, themes are simply a cumbersome technology compared to the flexibility and dynamism of CSS.
In any case, in this chapter you’ll find a section dedicated to the syntax and semantics of themes. CSS is a too large of a topic to be covered here. You can pick up one of the several books available on CSS. If you’re looking for an online reference, I recommend http://www.w3schools.com/CSS/CSS_reference.asp.
Note
Although themes are fully supported in ASP.NET 4, I currently see them mostly as a feature for a suite of controls rather than pages and sites. And I’m probably not the only one thinking this way. In the past couple of years, in fact, we’ve witnessed a significant technology shift that resulted in server controls becoming more and more HTML and CSS friendly. This trend is clearly visible in ASP.NET 4 (and future extensions are being currently planned). The perception is different—server controls must adapt their internal organization so that the output can be styled via CSS. If you take this route, of course, you just don’t need themes.
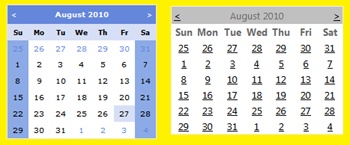
A theme is a set of visual settings that can be applied to style the markup produced by ASP.NET server controls. A theme is ultimately a collection of files—ASP.NET visual settings (known as skins), CSS, plus any auxiliary images. Once enabled, the theme determines the appearance of all controls under its jurisdiction. Consider the following simple markup:
<asp:Calendar ID="Calendar1" runat="server" />
Without themes, the calendar will look gray, spare, and spartan. With a theme added, the same markup renders a more colorful and appealing calendar. As you can see, a neat separation exists between the page contents and formatting rules. Look at Figure 8-9. Which do you think is the unthemed calendar?
To fully understand ASP.NET themes, you must be familiar with a few terms, which are detailed in Table 8-3.
Table 8-3. ASP.NET Themes Terminology
Imagine you are creating a new Web site and would like it to be visually appealing from the start. Instead of having to learn all the available style properties of each employed control, you just use ASP.NET themes. Using a built-in theme in a page is as easy as setting a property, as you’ll see in a moment. With this change, pages automatically inherit a new, and hopefully attractive, appearance. For example, if you add a Calendar control to a page, it automatically renders with the default appearance defined in the theme.
Selecting a theme for one or more pages doesn’t necessarily bind you to the settings of that theme. Through the Visual Studio designer, you can review the pages and manually adjust some styles in a control if you want to.
Note
The following convention holds true in this book and, in general, in related literature. Unless otherwise suggested by the context, the word “theme” indicates a customization theme. Customization themes and style sheet themes use the same source files. They differ only in how the ASP.NET runtime applies them to a page. The same theme can be applied as a customization theme or a style sheet theme at different times.
Themes are expressed as the union of various files and folders living under a common root directory. Themes can be global or local. Global themes are visible to all Web applications installed on a server machine. Local themes are visible only to the application that defines them. Global themes are contained in child directories located under the following path. The name of the directory is the name of the theme.
%WINDOWS%Microsoft.NETFramework[version]ASP.NETClientFilesThemes
Local themes are specialized folders that live under the App_Themes folder at the root of the application. Figure 8-10 shows the content of a couple of themes in a Web application.
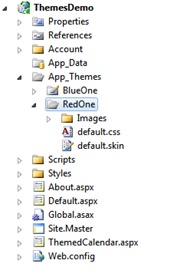
As you can see, the theme in the figure consists of a .css file and a .skin file, plus a subdirectory of images. Generally, themes can contain a mix of the following resources:
CSS files Also known as style sheets, CSS files contain style definitions to be applied to elements in an HTML document. Written according to a tailor-made syntax, CSS styles define how elements are displayed and where they are positioned on your page. The World Wide Web Consortium (W3C) maintains and constantly evolves CSS standards. Visit http://www.w3.org for details on current CSS specifications. CSS files are located in the root of the theme folder.
Skin files A skin file contains the theme-specific markup for a given set of controls. A skin file is made of a sequence of control definitions that include predefined values for most visual properties and supported templates. Each skin is control-specific and has a unique name. You can define multiple skins for a given control. A skinned control has the original markup written in the .aspx source file modified by the content of the skin. The way the modification occurs depends on whether a customization theme or a style sheet theme is used. Skin files are located in the root of the theme folder.
Image files Feature-rich ASP.NET controls might require images. For example, a pageable DataGrid control might want to use bitmaps for first or last pages that are graphically compliant to the skin. Images that are part of a skin are typically located in an Images directory under the theme folder. (You can change the name of the folder as long as the name is correctly reflected by the skin’s attributes.)
Templates A control skin is not limited to graphical properties but extends to define the layout of the control—for templated controls that support this capability. By stuffing template definitions in a theme, you can alter the internal structure of a control while leaving the programming interface and behavior intact. Templates are defined as part of the control skin and persisted to skin files.
The content types just listed are not exhaustive, but they do cover the most commonly used data you might want to store in a theme. You can have additional subdirectories filled with any sort of data that makes sense to skinned controls. For example, imagine you have a custom control that displays its own user interface through the services of an external ASP.NET user control (.ascx). Skinning this control entails, among other things, indicating the URL to the user control. The user control becomes an effective part of the theme and must be stored under the theme folder. Where exactly? That is up to you, but opting for a Controls subdirectory doesn’t seem to be a bad idea.
You can apply themes at various levels—application, folder, and individual pages. In addition, within the same theme you can select different skins for the same type of control.
Setting a theme at the application level affects all the pages and controls in the application. It’s a feature you configure in the application’s web.config file:
<system.web>
    <pages theme="BlueOne" />
</system.web>
The theme attribute sets a customization theme, while the styleSheetTheme attribute sets a style sheet theme. Note that the case is important in the web.config’s schema. Likewise, a theme can be applied to all the pages found in a given folder and below that folder. To do so, you create a new web.config file in an application’s directory and add the section just shown to it. All the pages in that directory and below it will be themed accordingly. Finally, you can select the theme at the page level and have styles and skins applied only to that page and all its controls.
To associate a theme with a page, you set the Theme or StyleSheetTheme attribute on the @Page directive, and you’re all set:
<% @Page Language="C#" Theme="BlueOne" %>
<% @Page Language="C#" StyleSheetTheme="BlueOne" %>
Also in this case, Theme sets a customization theme, whereas StyleSheetTheme indicates a style sheet theme.
Bear in mind that the name of the selected theme must match the name of a subdirectory under the App_Themes path or the name of a global theme. If a theme with a given name exists both locally to the application and globally to the site, the local theme takes precedence.
While we’re speaking of precedence, note that themes have a hierarchical nature: directory-level themes take precedence over application-level themes, and page-level themes override any other themes defined around the application. This hierarchy is independent of which attributes are used—Theme or StyleSheetTheme—to enable theming.
Note
Setting both the Theme and StyleSheetTheme attributes is not prohibited, even though it is not a recommended practice. There’s a behavioral gap between the two forms of themes that should make clear which one you need in any situation. However, if you set both attributes, consider that both themes will be applied—first the style sheet theme and then the customization theme. The results depend on the CSS cascading mechanism and, ultimately, are determined by the CSS settings of each theme.
A skin file looks like a regular ASP.NET page because it is populated by control declarations and import directives. Each control declaration defines the default appearance of a particular control. Consider the following excerpt from a skin file:
<!-- This is a possible skin for a Button control -->
<asp:Button runat="server"
    BorderColor="darkgray"
    Font-Bold="true"
    BorderWidth="1px"
    BorderStyle="outset"
    ForeColor="DarkSlateGray"
    BackColor="gainsboro" />
The net effect of the skin is that every Button control in a themed page will be rendered as defined by the preceding markup. If the theme is applied as a style sheet, the settings just shown will be overridable by the developer; if the theme is a customization theme, those settings determine the final look and feel of the control. Properties that the theme leaves blank are set according to the control’s defaults or the .aspx source.
Important
Whatever theme you apply—customization or style sheet—control properties can always be modified through code in page events such as Init and Load.
A theme can contain multiple skins for a given control, each identified with a unique name—the SkinID attribute. When the SkinID attribute is set, the skin is said to be a named skin. A theme can contain any number of named skins per control, but just one unnamed (default) skin. You select the skin for a control in an ASP.NET themed page by setting the control’s SkinID property. The value of the control’s SkinID property should match an existing skin in the current theme. If the page theme doesn’t include a skin that matches the SkinID property, the default skin for that control type is used. The following code shows two named skins for a button within the same theme:
<!-- Place these two definitions in the same .skin file -->
<asp:button skinid="skinClassic" BackColor="gray" />
<asp:button skinid="skinTrendy" BackColor="lightcyan" />
When you enable theming on a page, by default all controls in that page will be themed except controls and individual control properties that explicitly disable theming.
The ASP.NET theming infrastructure provides the EnableTheming Boolean property to disable skins for a control and all its children. You can configure a page or control to ignore themes by setting the EnableTheming property to false. The default value of the property is true. EnableTheming is defined on the Control class and inherited by all server controls and pages. If you want to disable theme support for all controls in a page, you can set the EnableTheming attribute on the @Page directive.
Important
Note that the EnableTheming property can be set only in the Page_PreInit event for static controls—that is, controls defined in the .aspx source. For dynamic controls—that is, controls created programmatically—you must have set the property before adding the control to the page’s control tree. A control is added to the page’s control tree when you add to the Controls collection of the parent control—typically, the form or another control in the form.
When is disabling themes useful? Themes are great at ensuring that all page controls have a consistent look and feel, but at the same time themes override the visual attributes of any control for which a skin is defined. You can control the overriding mechanism a bit by switching style sheet and customization themes. However, when you want a control or page to maintain its predefined look, you just disable themes for that page or control.
Note that disabling themes affects only skins, not CSS styles. When a theme includes one or more CSS style-sheet files, they are linked to the <head> tag of the resulting HTML document and, after that, are handled entirely by the browser. As you can easily guess, there’s not much a Web browser can know about ASP.NET themes!
You can apply themes dynamically, but this requires a bit of care. The ASP.NET runtime loads theme information immediately after the PreInit event fires. When the PreInit event fires, the name of any theme referenced in the @Page directive is already known and will be used unless it is overridden during the event. If you want to enable your users to change themes on the fly, you create a Page_PreInit event handler. The following code shows the code file of a sample page that changes themes dynamically:
public partial class TestThemes : System.Web.UI.Page
{
    protected void Page_Load(object sender, EventArgs e)
    {
        if (!IsPostBack) {
            // Populate the list of available themes
            ThemeList.DataSource = GetAvailableThemes();
            ThemeList.DataBind();
        }
    }

    void Page_PreInit(object sender, EventArgs e)
    {
        string theme = "";
        if (Page.Request.Form.Count > 0)
            theme = Page.Request["ThemeList"].ToString();
        if (theme == "None")
            theme = "";
        this.Theme = theme;
    }

    protected StringCollection GetAvailableThemes()
    {
        var path = Request.PhysicalApplicationPath + @"App_Themes";
        var dir = new DirectoryInfo(path);
        var themes = new StringCollection();
        foreach (var di in dir.GetDirectories())
            themes.Add(di.Name);

        return themes;
    }
}
The drop-down list control named ThemeList enumerates the installed application themes and lets you choose the one to apply. The selected theme is then applied in the PreInit event and immediately reflected. In the PreInit event, no view state has been restored yet; so Request.Form is the only safe way to access a posted value like the selected theme.
Mastering the technology for building a Web site is necessary, but often it’s not sufficient. Your site must be able to attract people and make them return on a regular basis. A site must surely provide valuable content and services, but that might not be good enough if that content and those great services are hard to find, understand, and consume.
There are three fundamental items that any developers of any Web sites must tick off their to-do list as soon and as as possible: consistent cross-browser display, Search Engine Optimization (SEO), and site navigation. Cross-browser display ensures that your pages will look and work the same regardless of the device being used to reach it. SEO best practices ensure that your site is ranked high by search engines and possibly appear as one of the first links when a user searches for a related keyword. Finally, once users arrive, they must be able to work with the site seamlessly and have an enjoyable experience. Site navigation facilities are fundamental.
In the rest of this chapter, I’ll address some of the best practices and ASP.NET techniques and technologies to provide users with a consistent and comfortable experience while interacting with the site.
Although all client browsers these days share a common set of capabilities large enough to implement nice Web features, the old motto of “Write once, browse everywhere” is a fairy tale. That a page works the same across different browsers is not a foregone conclusion; rather, it’s something you have to test carefully and that might require a bit of extra work to achieve. Especially with extremely dynamic pages full of script and HTML manipulation code, the risk of having some markup misinterpreted is real.
Cross-browser rendering refers to the set of techniques and technologies you can use to ensure that your pages work and look the same regardless of the browser in use. The key idea behind cross-browser rendering is that the code within the page is able to detect the browser ID and its known set of capabilities. Based on that, the code within the page will then work out a solution to get the best possible markup for the device.
ASP.NET provides a specific API to detect browser capabilities programmatically and also to keep the set of capabilities updated over time.
In ASP.NET, the central repository for browser information is the Browser property on the HttpRequest object. Here’s how it is defined:
public HttpBrowserCapabilities Browser
{
    get { ... }
    set { ... }
}
When the getter method is invoked for the first time, the HttpRequest object gets and caches any available browser information. The user agent information carried by the request is used to identify the requesting browser. Any gathered browser information is published through an instance of the HttpBrowserCapabilities class. The HttpBrowserCapabilities class groups, in a single place, values that identify a fair number of browser capabilities, including support for ActiveX controls, scripting languages, frames, cookies, and much more. Note that no information is in any way dynamically set by the browser; instead, it is retrieved from an offline server-side repository.
As mentioned, ASP.NET identifies the connected browser by reading the user-agent information that is passed during a request. ASP.NET compares the user-agent string that is received from the browser to user-agent strings that are stored in server-side browser definition files. These files contain information about the known capabilities of various user agents. When ASP.NET finds a match between the current user-agent string and a user-agent string in a browser definition file, it loads the corresponding browser capabilities into the HttpBrowserCapabilities object. The following code shows how to identify and output the name of the calling browser:
var browserCaps = Request.Browser;
Label1.Text = browserCaps.Browser;
The properties of the HttpBrowserCapabilities object can then be used to determine whether the browser type that is represented by the user agent supports scripting, styles, frames, and so on. Based on these capabilities, the controls on the page render Web controls using appropriate markup.
The class HttpBrowserCapabilities inherits from HttpBrowserCapabilitiesBase, which represents the list of information that is possible to know about a browser. The base class includes dozens of properties, including IsMobileDevice, SupportsXmlHttp, JScriptVersion, and HasBackButton. As an example, IsMobileDevice returns a Boolean value denoting whether or not the current browser is a mobile device. Likewise, JScriptVersion returns the version of JavaScript currently being supported by the browser, and SupportsXmlHttp indicates whether the browser has AJAX capabilities.
Browser information is read from server-side browser definition files installed with ASP.NET. In ASP.NET 4, you find the following definition files—one for each recognized browser device:
Browser definition files are plain XML files located under the following folder:
%Windows%Microsoft.NETFrameworkv4.0.30319ConfigBrowsers
Browser files in the specified folder contain global definitions valid for all applications on the server. If you want to employ application-specific settings, you create an App_Browsers folder in your project and drop into it any .browser file you might need.
At any time, you can add new .browser files or edit any stored information. The syntax of .browser files is a bit quirky, and any edit needs to be conducted by hand, with the risk of breaking things. To make this scenario more seamless, in ASP.NET 4 Microsoft introduced the concept of a browser-capabilities provider.
Note
If you make any edits to any of the .browser files, make sure you re-create the browser assembly in the global assembly cache (GAC). For this to happen, you have to run the following command:
aspnet_regbrowsers.exe -I c
Needless to say, this action will inevitably restart your entire Web application.
In ASP.NET, a provider is a component that implements a contracted interface and interacts with specific ASP.NET subsystems only through that interface. Each ASP.NET subsystem that supports the provider model must have a default provider configured. As a developer, you can make your application switch from one provider to the next declaratively, when not doing it programmatically. Through the provider model, a piece of functionality represented by a “contract” (in this context, it is usually a base class) is injected into a particular subsystem of ASP.NET. Providers exist for membership, role management, user profiles and, in ASP.NET 4, also for managing browser capabilities.
Browser-capabilities providers enforce the following contract:
public abstract class HttpCapabilitiesProvider
{
    public abstract HttpBrowserCapabilities GetBrowserCapabilities(HttpRequest request);
}
The default browser-capabilities provider is the class HttpCapabilitiesDefaultProvider you find in the System.Web.Configuration namespace. This class is designed to read browser information from .browser files. Internally, the implementation of the Browser property on the HttpRequest object ends up calling the configured provider and gets to the actual information through the interface of the HttpCapabilitiesProvider class.
If you need to read browser information from other sources, you can replace or extend the default provider. You create a new provider class that derives from HttpCapabilitiesProvider and overrides the GetBrowserCapabilities method:
public class CustomProvider : HttpCapabilitiesProvider
{
   public override HttpBrowserCapabilities GetBrowserCapabilities(HttpRequest request)
   {
       // Detect the browser
       var userAgent = request.UserAgent;

       // Retrieve information
       var values = GetBrowserInfoAsHashTable(userAgent);

       // Pack information in a consumable format
       var browserCaps = new HttpBrowserCapabilities();
       browserCaps.Capabilities = values;

       return browserCaps;
   }

   private HashTable GetBrowserInfoAsHashTable(String userAgent)
   {
        var values = new HashTable(180);
        ...
        return values;
   }
}
The final step consists of registering the new provider. You can do that declaratively through the <browserCaps> section of the configuration file:
<system.web>
   <browserCaps provider="YourApp.CustomProvider, Extensions" />
</system.web>
Alternatively, you can use the following code from global.asax:
void Application_Start(Object sender, EventArgs e)
{
   HttpCapabilitiesBase.BrowserCapabilitiesProvider = new YourApp.CustomProvider();
}
When you write a provider, you should also consider caching the information because although it is static information, it might be requested several times. Setting up forms of data caching is entirely up to you.
The primary reason for writing a custom browser capabilities provider is to let developers store browser capabilities in an alternate repository (for example, a database) and use that instead of the built in one.
Spreading the word around about a Web site is a key step to getting a good site its deserved success. People visit a Web site because they are told about it, because they receive a direct link to it or, more likely, because they were searching for some topics related to the content of the site and engines such as Bing, Google, and Yahoo suggested they could find good information there.
If a Web site is quite high in the list of search results, the site is going to experience plenty of visits. How can you manage to make links from your site look attractive to search engines? That’s precisely a whole new field that goes side by side with Web development—search engine optimization or SEO.
SEO is critical for any Web sites that need to have high volumes of traffic to survive. More traffic will likely generate more advertising and increase the revenue the site generates.
Search engines won’t tell you exactly which parameters they’re using to rank pages. Algorithms, however, are continually updated to stay in sync with user expectations and to fix any possible drawbacks that could cause inconsistent or unreliable results. Even though the indexing algorithm used by search engines remains a well-kept trade secret, it is widely known that pages with certain characteristics are ranked higher than others. Let’s review some of these SEO techniques.
The first aspect to consider is that the title of the Web page does matter. The title has to be unique for every page, kept short (about 50 characters maximum), and be meaningful enough to please both end users and search engines. To please search engines, the title string should include page keywords, preferably in the beginning of the string. In addition, the content of the title (or a similar string) should also be displayed through an <H1> tag. This increases the relevance of the content to the search engine’s eyes.
Search engines work by searching references to Web pages that can be associated with the input keywords. In other words, a search engine works by mapping its own keywords to the content exposed by pages. HTML pages can include a couple of interesting meta tags in their <head> section. These meta tags are keywords and description:
<head>
  <meta name="keywords" content="ASP.NET Web Forms, Book, Training" />
  <meta name="description" content="This book explains how ASP.NET works so that you
              find out yourself how to do things." />
  ...
</head>
In ASP.NET 4, you can set the keywords and description attributes easily through a pair of new properties added to the Page class. (See Chapter 5.) Today, however, the importance of the keywords meta tag is diminished. Bing and Google, for example, have both stated explicitly that they don’t use keywords declared in the <head> of the page but actually extract real keywords from the content. In light of this, using the keywords meta tag to list your page keywords is hardly a bad thing, but it is not a decisive factor in determining the final ranking. A common use of the keywords meta tag today is also to associate your page with misspelled keywords. For example, if your page is about tennis, the engine will easily figure that out from the content and rank it accordingly. However, if you list words like tenis in the keywords, you have a better chance of your page being picked up when the user mistypes words.
The description meta tag, instead, is more relevant, even though it’s not specifically for raising the rank. If a description meta tag is found, search engines embed that content in the result page instead of creating their own description. If the description is attractive enough, your page has more chances to be clicked. A description is ideally around 200 characters and should read well and be informative.
Search engines don’t like many things that often populate Web pages. They don’t like duplicated URLs, for example. If there are two or more URLs used to get the same content, search engines tend to lower the page ranking. This happens even if you have subdomains, such as www.yourserver.com and yourserver.com. Without a permanent redirect being configured at the Internet Information Services (IIS) level, your home page will suffer.
Search engines don’t like query strings, hidden fields, Flash/Silverlight components, or rich JavaScript content. All these things make the page harder to analyze. Search engines, instead, love plain anchor tags, title attributes, and alt attributes—plain HTML.
If not properly handled, redirects are also problematic because they can lead to duplicated URLs. Classic redirects you perform through Response.Redirect result in an HTTP 302 status code. As developers, we tend to forget that HTTP 302 indicates a temporary redirect. A temporary redirect therefore tells engines that eventually the page being moved will return to its original location. If this doesn’t happen, engines keep on storing two locations for the same content. A permanent redirect is HTTP 301, which in ASP.NET 4 is enforced by a new method—Response.PermanentRedirect.
Query strings should be avoided too. Ideally, URLs should be extensionless and represent a meaningful path within the content of the page. URL rewriting is an ASP.NET technique that can help in this regard. In ASP.NET 4, however, routing is a type of URL rewriting that offers a richer programming model and the same (if not higher) degree of effectiveness. (See Chapter 4.)
Although ASP.NET 4 put some effort into making it easier for you to improve SEO, there are a few structural aspects of ASP.NET that are not specifically optimized for search engines. I don’t mean this to be necessarily a bad statement about ASP.NET Web Forms as a platform. On the other hand, ASP.NET Web Forms was designed a decade ago when we all were living in a totally different world and were chasing different priorities than today. In this regard, ASP.NET MVC is a better (because it’s newer) platform that is natively optimized for search engines.
So my point here is don’t be fooled if you read that ASP.NET improves SEO. It simply gives you some new tools for implementing features (permanent redirection, meta description, routing) that were only harder, but not impossible, to achieve before.
Let’s briefly review some structural SEO-related issues of ASP.NET.
The postback mechanism carried via JavaScript code is like smoke in the eyes of search engines. Every time you use link buttons or built-in paging/sorting capabilities of data-bound controls, you put your page at risk of not being ranked properly. Search engines don’t follow JavaScript and ignore cookies. Because the session ID is stored in a cookie and engines ignore cookies, some of the page content might remain undiscovered. What about a cookieless approach for sessions, then? (We’ll discover this feature in Chapter 17.) It would be even worse because it would produce a lot of duplicated URLs, confusing engines even more.
Finally, the ASP.NET view state. The view state is a potentially large hidden field usually stored at the beginning of the page, right after the opening <form> tag. For a while, it was assumed that to make the process quicker, search engines could read only the first chunk of the page (maybe 100 KB). In this way, because the view state is at the top and much of the real content would be out of reach. This is conjecture, however, as there’s currently no evidence that search engines do this.
In the end, moving the view state to the bottom of the page to get some alleged SEO benefits can actually be dangerous because the user, in cases where there’s a very large view state, will likely get the opportunity to post back before the entire content is loaded. This situation, as you can guess, could cause errors.
For completeness, you can move the view state to the bottom of the page using a little-known attribute in the configuration:
<pages RenderAllHiddenFieldsAtTopOfForm="false" />
Note that regardless of what the attribute name suggests, the attribute has an effect only on system hidden fields. Custom hidden fields defined programmatically will always be emitted in their natural position.
Note
If search engines don’t like JavaScript very much, what about AJAX pages and SEO? AJAX is inherently JavaScript-based, and if your page is built using JavaScript only, well, it will likely not be indexed by engines. A simple test is to try to load the page in the browser with JavaScript disabled. What you see in this test is what a search engine will be able to index. To partially remedy this, you can add static site maps that offer plain HTML links and load at least the initial content of the page statically through the browser and not without JavaScript code. A recommended practice is using tools such as HTMLUnit to automate grabbing a static, scriptless version of your pages. For more information, see http://blog.stevensanderson.com/2010/03/30/using-htmlunit-on-net-for-headless-browser-automation.
Wouldn’t it be great if you could run a tool against a public site and get a report about some of the SEO issues it could spot? SEO correctness depends on whether or not (and in which measure) you do the few things listed in the previous section. A tool can easily automate the process of validation and come up with a list of things to fix. From Microsoft, you get the IIS SEO Toolkit: http://www.iis.net/download/seotoolkit. The toolkit includes various modules—Site Analysis, Robots Exclusion, and Sitemaps and Site Indexes.
The Site Analysis module analyzes the content of a Web site and reports suggestions on how to optimize content, structure, and URLs for search engines.
The Robots Exclusion module enables Web site administrators to manage the content of the robots.txt file right from the IIS Manager interface. Created by a site administrator, the file robots.txt contains instructions for search engines regarding which directories and files in the site should not be touched and indexed.
Finally, the Sitemaps and Site Indexes module manages the sitemap files (and indexes) at the site, application, and folder level. This ensures that the sitemap file doesn’t contain broken links and search engines always access fresh and up-to-date navigation information.
A good navigation system is a fundamental asset for any Web site—for both its human users and search engines. A good navigation system enables any user at any time to know where she is, where she has come from, and where she can go.
A navigation system always appears in the same position within all pages; this makes it a good fit for a master page. It is made of well-described links in which the text inside the anchor is quite clear about the final destination. Links are preferably emphasized using some CSS style and are a static part of the page. The more you use JavaScript, the more you can create appealing menus. However, the more you require from the equipment of your users, the more likely you will be to raise SEO issues and screen-reader issues for users with disabilities. These are the possible drawbacks of excessive use of JavaScript in the navigation system of a page. Finally, a navigation system should always provide an easy-to-reach link to the home page. A visitor might not land at your site from the main door, so once the user is there, you might want to show him the way to the home page.
In ASP.NET, the site navigation API allows you to define the map of the site and provide a declarative description of how it is laid out. By using the site navigation API, you define the hierarchy of pages you have and group them to form sections and subsections of the site. ASP.NET caches this information and makes it programmatically accessible at run time. With site navigation, you store links to pages in a central location and can optionally bind those links to navigation controls, such as the TreeView and Menu controls. In addition, as mentioned, a link-based map of the site helps search engines considerably.
ASP.NET site navigation offers a number of features, including site maps to describe the logical structure of the site, site map providers to physically store the contents of a map and optional security access rules, and a bunch of controls to display site map information through navigation components. In this section, we discuss how to define, configure, and consume site map information.
You start by defining the list of constituent pages and relationships between them. Exposed in a standard way, this information then will be easily consumed by site navigation controls and reflected by page output. By default, the site map is expressed through an XML file, usually named web.sitemap. (Thanks to the provider model, however, alternative data sources are possible.)
Site map information is retrieved via the currently selected site map provider. The default site map provider is registered in the root configuration file as an instance of the XmlSiteMapProvider class:
<siteMap>
   <providers>
      <add name="AspNetXmlSiteMapProvider"
           siteMapFile="web.sitemap"
           type="System.Web.XmlSiteMapProvider, System.Web, ... " />
   </providers>
</siteMap>
As you can see, the schema contains a siteMapFile attribute through which you indicate the name of the source file where site map information can be read from. In spite of the extension, the file must be an XML file validated against a given schema. Note that the XmlSiteMapProvider class doesn’t handle files with an extension other than .sitemap. Finally, note that the XmlSiteMapProvider class detects changes to the site map file and dynamically updates the site map to reflect changes.
Located in the application’s root directory, the web.sitemap file organizes the pages in the site hierarchically. It can reference other site map providers or other site map files in other directories in the same application. Here’s a sample site map file that attempts to describe a Web site to navigate through the contents of the book:
<siteMap>
   <siteMapNode title="My Book" url="default.aspx">
      <siteMapNode title="Introduction" url="intro.aspx" />
      <siteMapNode title="Acknowledgements" url="ack.aspx" />
         <siteMapNode title="References" url="ref.aspx" />
      </siteMapNode>
      <siteMapNode title="Chapters" url="toc.aspx" />
      <siteMapNode title="ASP.NET at a glance" url="ch01.aspx" />
      <siteMapNode title="HTTP Handlers and Modules" url="ch02.aspx" />
         ...
      </siteMapNode>
      <siteMapNode title="Appendix" url="appendix.aspx">
      <siteMapNode title="Sample Code" url="samples.aspx" />
         ...
      </siteMapNode>
   </siteMapNode>
</siteMap>
A site map XML file is composed of a collection of <siteMapNode> elements rooted in a <siteMap> node. Each page in the Web site is represented with a <siteMapNode> element. Hierarchies can be created by nesting <siteMapNode> elements, as in the preceding code snippets. In most cases, the root <siteMap> node contains just one child <siteMapNode> element, even though this is not a strict rule hard-coded in the schema of the XML file. All URLs linked from the site map file should belong to the same application using the file. Also in this case, though, exceptions are acceptable. In other words, you are allowed to specify links to pages in other applications, but the site navigation API won’t check these links. As long as links belong to the same application, the API can verify them and return design-time errors if there are broken links.
Table 8-4 lists the feasible attributes of the <siteMapNode> element.
Table 8-4. Attributes of the <siteMapNode> Element
The roles attribute is key to implementing a feature known as security trimming. Security trimming essentially refers to the site map API capability of preventing unauthorized users from viewing pages that require a particular role.
In addition to using the attributes listed in Table 8-4, you can use custom attributes too. You cannot use custom nodes. A .sitemap file can contain only <siteMapNode> elements and a <siteMap> root node.
The site navigation subsystem is provider based, meaning that you can use custom providers to define some site map contents. A custom site map provider reads information from a different storage medium, be it another XML file with a distinct schema, a text file or, perhaps, a database. A custom site map provider is a class that inherits from SiteMapProvider or, better yet, from an intermediate class named StaticSiteMapProvider.
Note that you can optionally use multiple providers at the same time. For example, by setting the provider attribute on a <siteMapNode> node, you instruct the site map subsystem to use that site map provider to retrieve nodes to insert at that point of the hierarchy.
<siteMap>
    <siteMapNode title="Intro" url="intro.aspx" >
        <siteMapNode title="Acknowledgements" url="ack.aspx" />
        <siteMapNode title="References" url="ref.aspx" />
    </siteMapNode>
    <siteMapNode provider="SimpleTextSiteMapProvider" />
    ...
</siteMap>
The additional provider must be registered in the configuration file and feature all information needed to connect to its own data source. Here’s an example for the sample text file provider:
<system.web>
    <siteMap defaultProvider="XmlSiteMapProvider">
        <providers>
            <add name="SimpleTextSiteMapProvider"
                type="SimpleTextSiteMapProvider, Samples"
                siteMapFile="MySiteMap.txt" />
        </providers>
    </siteMap>
</system.web>
The <siteMapNode> linked to the SimpleTextSiteMapProvider component will contain all the nodes as defined in the MySiteMap.txt file. Reading and parsing to nodes any information in MySiteMap.txt is the responsibility of the custom provider. As a result, you have a site map file that uses two providers at the same time: the default XmlSiteMapProvider and the custom SimpleTextSiteMapProvider.
Creating the map of a site is only the first step. Once it is created, in fact, this information must be easily and programmatically accessible. Although most of the time you consume site information through a bunch of ad hoc controls, it’s useful to take a look at the class that acts as the official container of site map information—the SiteMap class. When an ASP.NET application runs, the site map structure is exposed through a global instance of the SiteMap class.
Defined in the System.Web assembly and namespace, the SiteMap class has only static members. It exposes a collection of node objects that contain properties for each node in the map. The class is instantiated and populated when the application starts up; the data loaded is cached and refreshed care of the provider. In particular, the XML site map provider monitors the site map file for changes and refreshes itself accordingly.
Table 8-5 shows and describes the syntax and behavior of the members featured by the SiteMap class.
Table 8-5. Members of the SiteMap Class
The SiteMap class retrieves the CurrentNode property by making a request to the provider. A null value is returned if no node exists for the requested page in the site map, or if role information for the current user doesn’t match the role enabled on the node.
A site map path is the overall combination of text and links that appears in some pages to indicate the path from the home page to the displayed resource—the classic page breadcrumb. (See Figure 8-11.)
ASP.NET provides a made-to-measure navigation path control—the SiteMapPath control—that supports many options for customizing the appearance of the links.
SiteMapPath reflects node data supplied by the SiteMap object. The control takes limited space in the page and makes parent pages of the current page only one click away. Table 8-6 shows the properties supported by the SiteMapPath control.
Table 8-6. Properties of the SiteMapPath Control
The SiteMapPath control works by taking the URL of the current page and populating an instance of the SiteMapNode class with information obtained from the site map. Retrieved information includes the URL, title, description, and location of the page in the navigation hierarchy. The node is then rendered out as a sequence of templates—mostly hyperlinks—styled as appropriate.
No code is required to use a SiteMapPath control. All that you have to do is place the following markup in the .aspx source file:
<asp:SiteMapPath ID="SiteMapPath1" runat="server"
      RenderCurrentNodeAsLink="True" PathSeparator=" : " >
    <PathSeparatorStyle Font-Bold="true" />
    <NodeStyle Font-Bold="true" />
    <RootNodeStyle Font-Bold="true" />
</asp:SiteMapPath>
As you can guess, style properties in the preceding markup are not essential to make the control work and can be omitted for brevity.
Note
Style properties that most ASP.NET server controls expose represent the heart of the ongoing conflict between themes and CSS styles. Style properties form an alternate—in a way, a higher level—syntax to style controls. In the end, it boils down to a sort of architecture choice: if you choose to go with server controls, use style properties (and themes), but at that point ignore CSS and client-side configurations. Otherwise, ignore themes and style properties and take more care of the emitted markup. In this case, however, are you sure you’re still OK with ASP.NET Web Forms?
There are various ways to further configure the site map file to address specific real-world scenarios. For example, you can tie together distinct site map files, localize the title and description of pages, and serve each user a site map that complies with his or her roles in the application’s security infrastructure. Let’s tackle each of these situations.
As mentioned, the default site map provider reads its information from the web.sitemap file located in the application’s root directory. Additional .sitemap files written according to the same XML schema can be used to describe portions of the site.
The idea is that each <siteMapNode> element can define its subtree either explicitly by listing all child nodes or implicitly by referencing an external .sitemap file, as shown here:
<siteMap>
   <siteMapNode title="My Book" url="default.aspx">
      <siteMapNode siteMapFile="introduction.sitemap" />
      <siteMapNode siteMapFile="chapters.sitemap" />
      <siteMapNode siteMapFile="appendix.sitemap" />
   </siteMapNode>
</siteMap>
The content of each of the child site map files is injected in the final tree representation of the data at the exact point where the link appears in the root web.sitemap file. Child site map files can be located in child directories if you desire. The value assigned to the siteMapFile attribute is the virtual path of the file in the context of the current application.
Note that in this case all site map files are processed by the same site map provider component—the default XmlSiteMapProvider component. In the previous section, we examined a scenario where different providers were used to process distinct sections of the site map. The two features are not mutually exclusive and, in the end, you can have a default site map file that spans multiple .sitemap files, with portions of it provided by a different provider. In this case, as you’ve seen, all settings for the custom provider must be set in the web.config file.
Most Web sites require that only certain members be allowed to see certain pages. How should you specify that in a site map? The most effective and efficient approach is using roles. Basically, you associate each node in the site map with a list of authorized roles, and the ASP.NET infrastructure guarantees that no unauthorized users will ever view that page through the site map. This approach is advantageous because you define roles and map them to users once—for security purposes and membership—and use them also for site maps.
A feature known as site map security trimming provides a way to hide navigational links in a site map based on security roles. Enabled on the site map provider and individual nodes, security trimming serves user-specific views of a site. It does only that, though. It hides links from view whenever the content of the site map is displayed through hierarchical UI controls such as TreeView and Menu. However, it doesn’t block users from accessing pages by typing the URL in the address bar of the browser or following links from other pages. For ensuring that unauthorized users don’t access pages, you need to configure roles and bind them to the identity of the connected user. (See Chapter 19.)
By default, nonprogrammatic access to .sitemap files is protected and results in a forbidden resource ASP.NET exception. Be aware of this, if you plan to replace the default site map configuration and use files with a custom extension. In this case, make sure you explicitly prohibit access to these files through IIS. To further improve security, grant NETWORK SERVICE or ASPNET—the ASP.NET runtime accounts—read-only access to these custom site map files. If you store site maps in a database, configure any involved tables to make them accessible to the smallest number of accounts with the least possible set of privileges.
Note
An excessively large site map file can use a lot of memory and CPU. Aside from a possible performance hit, this situation configures a potential security risk in a hosted environment. By restricting the size of site maps for a Web site, you better protect your site against denial-of-service attacks.
There are a few properties that you can localize in a site map. They are Title, Description, and all custom properties. You can use an explicit or implicit expression to localize the property. First of all, though, you should enable localization by adding a Boolean attribute to the <siteMap> node:
<siteMap enableLocalization="true">
    ...
</siteMap>
Localizing site map properties consists of binding properties with $Resources expressions. You can explicitly bind the attribute to a global resource or have it implicitly associated with a value that results from a local resource key. Here’s an example of explicit expressions:
<siteMap enableLocalization="true">
    <siteMapNode
        url="~/homepage.aspx"
        title="$Resources:MyLocalizations,HomePage" />
    ...
</siteMap>
An explicit expression is a $Resources expression that points to a global .resx file and extracts a value by name from there. If the MyLocalizations.resx file contains an entry named HomePage, the value will be read and assigned to the attribute. If it isn’t there, an implicit expression takes over.
An implicit expression takes values out of a local resource file. The localizable <siteMapNode> is associated with a resource key and all of its localizable properties are defined in the RESX file as entries named after the following pattern:
[resourceKey].[Attribute]
The following site map snippet shows how to use implicit expressions:
<siteMap enableLocalization="true">
    <siteMapNode
        resourceKey="Home"
        url="~/homepage.aspx"
        description="default"
        title="default" />
    ...
</siteMap>
In this case, the resource file has the same name of the .sitemap file plus the .resx extension. In the default case, it will be web.sitemap.resx. This file is expected to contain entries named Home.description and Home.title. If these exist, their values will be used to determine the value of the title and description attributes. In the case of implicit expressions, the values that localizable attributes might have in the .sitemap file are considered default values to be used in case of trouble with the localized resource files.
What if you want to adapt the navigation structure to a given locale? Unfortunately, the Url property cannot be localized in a site map in the same way as the Title and Description properties. If you want to change URLs, or perhaps change the structure of the site, you create a distinct site map for each supported culture and register all of them in the configuration file:
<siteMap defaultProvider="XmlSiteMapProvider">
    <providers>
        <add name="DefaultSiteMap"
            type="System.Web.XmlSiteMapProvider"
            siteMapFile="default.sitemap" />
        <add name="FrenchSiteMap"
            type="System.Web.XmlSiteMapProvider"
            siteMapFile="fr.sitemap" />
        ...
        <add name="ItalianSiteMap"
            type="System.Web.XmlSiteMapProvider"
            siteMapFile="it.sitemap" />
    </providers>
</siteMap>
Essentially, you have multiple providers of the same type—XmlSiteMapProvider—but working on distinct site map files. When you access site map information programmatically, you can specify which site map you want to use. (I’ll say more about this in a moment.)
More often than not, Web sites are planned and created by developers and designers without much assistance from usability experts. So the site might look great and have great content but still end up being hard to work with for the real users. Designers and developers are clearly power users of a Web site, but can the same be said for the intended audience of the site? A fundamental item in any usability checklist must be “Test the site on real users.”
Beyond that, you have the problem of ensuring that each page behave as expected and react as expected to users’ solicitations. This is another facet of testing—definitely a more developer-oriented facet.
To effectively test the site on real users and test the functionality of pages, tools are required. Tools to help test Web pages are a hot new field in the industry.
An ASP.NET Web Forms page results from the combined effect of a view template (ASPX) and a code-behind class. The code-behind class is responsible for any logic you want the page to expose. Testing a code-behind class is a matter of writing the code with testability in mind and then using a unit-testing tool such as the MSTest environment integrated in Microsoft Visual Studio 2010. (In Chapter 12, I’ll return to design principles and testability.)
The logic of the page is also responsible for the actual markup being sent to the browser. What is this markup? Is it relatively static? Or is it rich with JavaScript and dynamic behavior? If you consider the structure of the page trivial or just static, it might suffice that you ensure the correct data is assigned to server controls in the view template. This is not hard to figure out from a bunch of unit tests.
If the structure of the page might differ depending on run-time conditions or parameters, you probably need to look around for some tools that help you test the front end of a Web application.
Testing the front end of a Web application goes beyond classic unit testing and requires ad hoc tools. In this regard, ASP.NET Web Forms is not much different from ASP.NET MVC, or even from Java or PHP Web applications.
You need a tool that allows you to programmatically define a sequence of typical user actions and observe the resulting DOM tree. In other words, you want to test the layout and content of the response when the user performs a given series of actions.
Such tools have recording features, and they keep track of user actions as they are performed and store them as a reusable script to play back. Some tools also offer you the ability to edit test scripts or write them from scratch. Here’s a sample test program written for one of the most popular of these front-end test tools—WatiN. The program tests the sample page we discussed earlier with a drop-down list and a grid
public class SampleViewTests
{
   private Process webServer;

   [TestInitialize]
   public void Setup()
   {
      webServer = new Process();
      webServer.StartInfo.FileName = "WebDev.WebServer.exe";
      string path = ...;
      webServer.StartInfo.Arguments = String.Format(
             "/port:8080 /path: {0}", path);

      webServer.Start();
   }

   [TestMethod]
   public void CheckIfNicknameIsNotUsed()
   {
      using (IE ie = new IE("http://localhost:8080/Samples/Datagrid"))
      {
         // Select a particular customer ID
         ie.SelectList("ddCustomerList").Option("1").Select();

         // Check the resulting HTML on first row, second cell
         Assert.AreEqual(
                "A Bike Store",
                ie.Table(Find.ById("gridOrders").TableRow[0].TableCells[1].InnerHtml));
      }
   }

   [TestCleanup]
   public void TearDown()
   {
      webServer.Kill();
   }
}
The testing tool triggers the local Web server and points it to the page of choice. Next, it simulates some user actions and checks the resulting HTML.
Different tools might support a different syntax and might integrate with different environments and in different ways. However, the previous example gives you the gist of what it means to test the front end.
Web UI testing tools can be integrated as extensions into browsers (for example, Firefox), but they also offer an API for you to write test applications in C# or test harnesses using MSTest, NUnit, or other test frameworks. Table 8-7 lists a few popular tools.
In ASP.NET MVC, testing the actual behavior of code-behind classes is relatively easy if you refactor the code to take that code out to a controller or a presenter. However, each method you test is expected to receive a bunch of parameters, either through the signature or via ASP.NET intrinsic objects.
How can you test that the browser really passes in correct data? In other words, how can you test posted data.
Sending automated POST requests to a URL is a feature that all the tools in Table 8-7 support. They all let you fill in and post a form. However, in that case, at least, the local Web server must be up and running. Posting to test pages that do nothing but return a Boolean answer (expected/unexpected) is a possible way to speed up things.
If you want to simply look at what is being transmitted, you can turn your attention to tools such as Fiddler (http://www.fiddler2.com/fiddler2) or HttpWatch (http://www.httpwatch.com).
Note
ASP.NET Web Forms was not designed with testability in mind. You can still test Web pages but at the cost of spinning up the entire ASP.NET runtime; or, more likely, you will reduce your efforts to just testing what’s strictly necessary at the code-behind level. The tools in Table 8-7 address, instead, the need to test the client user interface and simulate user actions that result in posted data.
A Web page is a special type of a standalone component that has the additional tricky requirement of being able to work with the rest of the site. Amazingly, this generates a bunch of extra work because developers, architects, and designers must cooperate to produce a common and appealing look and feel, ease of maintenance, consistent rendering, navigation capabilities, and personalization capabilities. All around, there’s room for a new professional with ad hoc and somewhat unique skills, such as Web testers and SEO and usability experts.
A successful Web site results from a usable composition of pages, which in turn result from a consistent composition of UI blocks. In this chapter, we first reviewed the technologies for page composition that you find available in ASP.NET (primarily, master pages), and then we moved toward other side topics, such as cross-browser rendering, search-engine optimization navigation, and UI testing.
In the next chapter, we’ll complete the basics of the Web page by looking at input forms.