Beware of the man who won’t be bothered with details.
By nature, Web applications are subject to several types of attacks whose damage and impact can vary quite a bit, depending on the characteristics of the application itself. The most secure Web application is the application that actually resists attacks, not the application just designed to. Security is a rather intricate puzzle whose solution varies from one application to another. The important thing to remember is that, more often than not, security is manifested through a successful mix of application-level and system-level measures.
Many developers have learned on their own that security is not a feature that can be easily added to existing applications or introduced late in the development stage. Security is inherently tied to the functions of an application and should be planned as one of the first features, very early at the design level. For example, isolating modules of the application particularly sensitive to security would greatly simplify using stricter security measures without impacting the rest of the application.
ASP.NET simplifies programming secure applications by providing a built-in infrastructure that supplies application-level protection against unauthorized access to Web pages. Be aware, though, that this kind of security is only one side of the coin. A really secure Web site is especially well protected against server attacks, which can sneakily be used to scale the highest protective walls of the application logic.
In this chapter, we will discuss the security context of ASP.NET, including its relationship with server-side Internet Information Services (IIS) authentication mechanisms and best coding practices to fend off Web attacks.
The concept of security implies the presence of an enemy we’re protecting against. In Table 19-1, you find summarized the most common types of Web attacks.
Table 19-1. Common Web Attacks
The bottom line is that whenever you insert any sort of user input into the browser’s markup, you potentially expose yourself to a code-injection attack (that is, any variations of SQL injection and XSS). In addition, sensitive data should never be sent across the wire (let alone as clear text) and must be stored safely on the server.
If there’s a way to write a bulletproof and tamper-resistant application, it can consist only of the combination of the following aspects:
Coding practices Data validation, type and buffer-length checking, and antitampering measures
Data access strategies Using roles to ensure the weakest possible account is used on the server to limit server resource access, and using stored procedures or, at least, parameterized commands
Effective storage and administration No sending of critical data down to the client, using hashed values to detect manipulation, authenticating users and protecting identities, and applying rigorous policies for passwords
As you can see from this list, a secure application can result only from the combined efforts of developers, architects, and administrators. Don’t imagine that you can get it right otherwise.
From an application point of view, security is mostly a matter of authenticating users and authorizing actions on the system’s resources. ASP.NET provides a range of authentication and authorization mechanisms implemented in conjunction with IIS, the Microsoft .NET Framework, and the underlying security services of the operating system. The overall security context of an ASP.NET application is composed of three distinct levels:
The IIS level associates a valid security token with the sender of the request. The security token is determined according to the current IIS authentication mechanism.
The ASP.NET worker process level determines the identity of the thread in the ASP.NET worker process serving the request. If enabled, impersonation settings can change the security token associated with the thread. The identity of the process model is determined by settings in the configuration file or the IIS metabase, according to the process model in use. These two levels are unified if the ASP.NET application runs in integrated mode on IIS 7 and later.
The ASP.NET pipeline level gets the credentials of the application-specific user who is using the application. The way this task is accomplished depends on the application settings in the configuration files for authentication and authorization. A common setting for most ASP.NET applications is choosing to use Forms Authentication.
Among other things, the identity of the ASP.NET worker process influences access to local files, folders, and databases.
When an ASP.NET request arrives at the Web server machine, IIS picks it up and assigns the request to one of its pooled threads. IIS runs under the SYSTEM account—the most powerful account in Microsoft Windows. From this point forward when processing this request, the three security contexts of ASP.NET applications I mentioned execute one after the other.
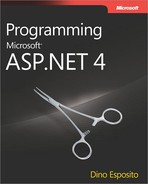
The thread that physically handles the request impersonates an identity according to the current IIS authentication setting, whether it is Basic, Windows, or Anonymous. If the site is configured for anonymous access, the identity impersonated by the thread is the one you set through the dialog box shown in Figure 19-1. By default, it is named IUSR_xxx, where xxx stands for the machine name.
Basic authentication is an HTTP standard supported by virtually any browser (and disabled by default in IIS 7). With this type of authentication, a request bounces back with a particular HTTP status code (HTTP 401) that the browser understands as a demand to display a standard dialog box to request the user’s credentials. The information gathered is sent to IIS, which attempts to match it with any of the Web server’s accounts. Because credentials are sent out as Base64-encoded text, essentially in clear text, Basic authentication is recommended only for use over HTTPS secure channels.
Note that the default installation of IIS 7 doesn’t include Digest authentication. Digest authentication differs from Basic authentication mostly because it hashes credentials before sending. Digest authentication is an HTTP 1.1 feature and, as such, is not supported by some old browsers. Both Basic and Digest authentication work well through firewalls and proxy servers. To use Digest authentication on IIS 7, you must install the appropriate Digest role service and disable anonymous authentication.
Integrated Windows authentication sets up a conversation between the browser and the Web server. The browser passes the credentials of the currently logged-on user, who is not required to type anything. The user needs to have a valid account on the Web server or in a trusted domain to be successfully authenticated. The authentication can take place through the NTLM challenge/response method or by using Kerberos. The technique has limited browser support and is impractical in the presence of firewalls. It is designed for intranet use.
Note
Yet another type of authentication mode exists and is based on certificates. You can use the Secure Sockets Layer (SSL) security features of IIS and use client certificates to authenticate users requesting information on your Web site. SSL checks the contents of the certificate submitted by the browser for the user during the logon. Users obtain client certificates from a trusted third-party organization. In an intranet scenario, users can also get their certificate from an authority managed by the company itself.
In IIS 7, you can also leverage ASP.NET Forms authentication at the IIS level as well as ASP.NET impersonation. ASP.NET Forms authentication essentially redirects to an application-specific login page. If you enable impersonation, instead, your ASP.NET application will run under the security context of the user authenticated by IIS 7 or under the specific account you indicate by editing the impersonation settings in the IIS manager.
After authentication, the thread dispatches the request to the appropriate module. For an ASP.NET application, the request is queued to the application pool and picked up by the copy of the w3wp.exe IIS worker process that serves that application pool. What is the identity of the worker process?
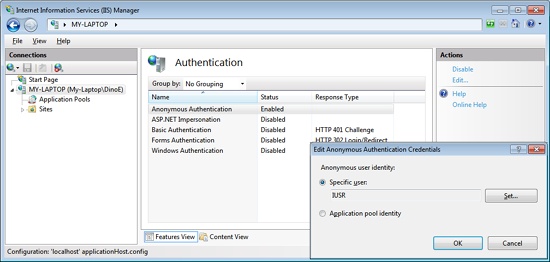
As you saw in Chapter 2, the worker process typically runs under the identity of the NETWORK SERVICE account or under a virtual account associated with the application pool. You can change it through the Advanced Settings dialog box of the application pool as shown in Figure 19-2.
Inside the worker process, a pooled thread picks up the request to serve it. What’s the identity of this thread? If impersonation is disabled in the ASP.NET application, this thread will inherit the identity of the worker process. This is what happens by default. If impersonation is enabled, the worker thread will inherit the security token passed by IIS.
When impersonation is active, the worker process account doesn’t change. The worker process still compiles pages and reads configuration files using the original account. Impersonation is used only with the code executed within the page, not for all the preliminary steps that happen before the request is handed to the page handler. For example, this means that any access to local files or databases occur using the impersonated account, not the worker process’s account.
The third security context indicates the identity of the user making the request. The point here is authenticating the user and authorizing access to the page and its embedded resources. Obviously, if the requested page is freely available, no further step is performed; the page output is generated and served to the user.
To protect pages against unauthorized access, an ASP.NET application needs to define an authentication policy—typically Forms authentication. Authentication modules hook up requests for protected pages and manage to obtain the user’s credentials. The user is directed to the page only if the credentials are deemed valid and authorize access to the requested resource.
In a situation in which you want to change the default ASP.NET account to give it more privileges, how should you proceed? Is it preferable to create a custom account and use it for the worker process, or should you opt for the worker process to impersonate a fixed identity?
Note
You’ll find that it’s difficult to create a new, functional account with less than the privileges granted to NETWORK SERVICE or the virtual account of the application pool. If you give it a try, make sure you pass through a careful testing phase and ensure it really works for your application.
Using the dialog box shown in Figure 19-2 is the only way to change the real identity of the ASP.NET process. If you change the process identity, all threads in the process will use this as the base identity and no extra work is needed on thread switches. More importantly, you should make sure the new account has at least full permissions on the Temporary ASP.NET Files folder. (Review carefully the list of permissions granted to the standard ASP.NET accounts, which you can find in the Privileges of the ASP.NET Default Account section.)
Alternatively, you can require the worker process to impersonate a fixed identity through the <identity> section of the web.config file. Note that when fixed impersonation is used, every worker thread processing a request needs to impersonate the specified account. Impersonation will then be performed for each thread switch because a thread switch event takes the thread identity back to the process identity.
To impersonate a fixed identity, you first define the user account and then add a setting to the web.config file. The following snippet shows an example:
<identity impersonate="true"
    userName="MyAspNetAccnt" password="ILoveA$pnet*SinceVer1.0" />
As mentioned earlier, impersonation doesn’t really change the physical identity of the process running ASP.NET. More simply, all threads serving in the context of the ASP.NET worker process always impersonate a given user for the duration of the application.
Impersonating a fixed identity is different from classic, per-request impersonation such as impersonating the identity of the Windows user making the request. Per-request impersonation refers to the situation in which you enable impersonation without specifying a fixed identity. In this case, the security token with identity information is created by IIS and inherited by the worker process. When a fixed identity is involved, the security token must be generated by the ASP.NET worker process. When running under a poorly privileged account, though, the ASP.NET worker process sometimes lacks the permission to do that.
A third possibility to change the identity of the ASP.NET worker process is by impersonating through the anonymous account. The idea is that the ASP.NET application grants access to anonymous users, and the anonymous account is configured to be the desired account for the application.
In this case, the application uses per-request impersonation and the ASP.NET code executes as the impersonated account. The process account remains set to NETWORK SERVICE or the virtual account, which means you don’t have to worry about replicating into the new account the minimum set of permissions on folders that allow ASP.NET to work.
Of all the possible user rights assignments, ASPNET and NETWORK SERVICE are granted only the following five:
In addition, the accounts are given some NTFS permissions to oper ate on certain folders and create temporary files and assemblies. The folders involved are these:
.NET Framework Root Folder This folder contains some .NET Framework system assemblies that ASP.NET must be able to access. The physical folder is normally Microsoft.NETFramework[version] and is located under the Windows folder. ASP.NET has only read and list permissions on this folder.
Temporary ASP.NET Files This folder represents the file system subtree in which all temporary files are generated. ASP.NET is granted full control over the entire subtree.
Global Assembly Cache ASP.NET needs to gain read permissions on the assemblies in the global assembly cache (GAC). The GAC is located in the WindowsAssemblyGAC folder. The GAC folder is not visible in Windows Explorer, but you can view the installed assemblies by opening the WindowsAssembly folder.
Windows System Folder The ASP.NET process needs to access and read the System32 Windows folder to load any necessary Win32 DLLs.
Application Root Folder The ASP.NET process needs to access and read the files that make up the Web application. The folder is typically located under Inetpubwwwroot.
Web Site Root ASP.NET might have the need to scan the root of the Web server—typically, Inetpubwwwroot—looking for configuration files to read.
An ASP.NET application running under an account that lacks some of these permissions might fail. Granting at least all these permissions is highly recommended for all accounts used for fixed-account impersonation.
ASP.NET applications are made of managed code and run inside the common language runtime (CLR). In the CLR, running code is assigned to a security zone based on the evidence it provides about its origin—for example, the originating URL. Each security zone corresponds to a set of permissions. Each set of permissions corresponds to a trust level. By default, ASP.NET applications run from the MyComputer zone with full trust. Is this default setting just evil?
An ASP.NET application runs on the Web server and doesn’t hurt the user that connects to it via the browser. An ASP.NET application cannot be consumed in ways other than through the browser. So why do some people feel cold shivers down their spine when they think of using ASP.NET full trust?
The problem is not with the ASP.NET application itself, but with the fact that it is publicly exposed over the Internet—one of the most hostile environments for computer security you can imagine. If a fully trusted ASP.NET account is hijacked, a hacker can perform restricted actions from within the worker thread. In other words, a publicly exposed, fully trusted application is a potential platform for hackers to launch attacks. The less an application is trusted, the more secure that application happens to be.
By default, ASP.NET applications run unrestricted and are allowed to do whatever their account is allowed to do. The actual security restrictions that sometimes apply to ASP.NET applications (for example, the inability to write files) are not a sign of partial trust, but more simply the effect of the underprivileged account under which ASP.NET applications normally run.
By tweaking the <trust> section in the root web.config file, you can configure code access security permissions for a Web application and decide whether it has to run fully or partially trusted:
<trust level="Medium" originUrl="" />
Table 19-2 describes the levels of trust available.
Table 19-2. Levels Permitted in the <trust> Section
Level | Description |
|---|---|
Full | Applications run fully trusted and can execute arbitrary native code in the process context in which they run. This is the default setting. |
High | Code can use most permissions that support partial trust. This level is appropriate for applications you want to run with least privilege to mitigate risks. |
Medium | Code can read and write its own application directories and can interact with databases. |
Low | Code can read its own application resources but can’t interact with resources located outside of its application space. |
Minimal | Code can’t interact with any protected resources. Appropriate for nonprofessional hosting sites that simply intend to support generic HTML code and highly isolated business logic. |
Admittedly, restricting the set of things an application can do might be painful at first. However, in the long run (read, if you don’t just give up and deliver the application), it produces better and safer code.
Note
The <trust> section supports an attribute named originUrl. The attribute is a sort of misnomer. If you set it, the specified URL is granted the permission to access an HTTP resource using either a Socket or WebRequest class. The permission class involved with this is WebPermission. Of course, the Web permission is granted only if the specified <trust> level supports that. Medium and higher trust levels do.
Let’s review in more detail the permission granted to ASP.NET applications when the various trust levels are applied. Key ASP.NET permissions for each trust level are outlined in Table 19-3.
Table 19-3. Main Permissions in ASP.NET Trust Levels
High | Medium | Low | Minimal | |
|---|---|---|---|---|
FileIO | Unrestricted | Read | None | |
IsolatedStorage | Unrestricted | ByUser | ByUser (maximum of 1 MB) | None |
Printing | DefaultPrinting | Same as High | None | None |
Security | Assertion, Execution, ControlThread, ControlPrincipal | Same as High | Execution | Execution |
SqlClient | Unrestricted | Unrestricted (no blank password allowed) | None | None |
Registry | Unrestricted | None | None | None |
Environment | Unrestricted | None | None | None |
Reflection | ReflectionEmit | None | None | None |
Socket | Unrestricted | None | None | None |
Web | Unrestricted | Connect to origin host, if configured | Same as Medium | None |
More detailed information about the permissions actually granted to the default trust levels are available in the security configuration files for each level. The name of the file for each level is stored in the <trustLevel> section.
In the end, full-trust applications run unrestricted. High-trust applications have read/write permission for all the files in their application space. However, the physical access to files is still ruled by the NTFS access control list on the resource. High-trust applications have unrestricted access to Microsoft SQL Server but not, for example, to OLE DB classes. (The OleDbPermission and other managed provider permissions are denied to all but fully trusted applications.) Reflection calls are denied, with the exception of those directed at classes in the System.Reflection.Emit namespace.
Medium applications have unrestricted access to SQL Server, but only as long as they don’t use blank passwords for accounts. The WebPermission is granted to both medium-trust and low-trust applications, but it requires that the URL be configured in the <trust> section through the originUrl attribute. Low-trust applications have read-only permission for files in their application directories. Isolated storage is still permitted but limited to a 1-MB quota.
A rule of thumb is that Medium trust should be fine for most ASP.NET applications and applying it shouldn’t cause significant headaches, provided that you don’t need to access legacy Component Object Model (COM) objects or databases exposed via OLE DB providers. However, there are a few common situations in which adapting an application to Medium trust requires some configuration work. A popular example is setting NHibernate to work in a Medium-trust environment. (See http://blog.yeticode.co.uk/2010/03/running-nhibernate-in-medium-trust for details.)
What if one of the tasks to perform requires privileges that the trust level doesn’t grant? There are two basic approaches. The simplest approach is to customize the policy file for the trust level and add any permissions you need. The solution is easy to implement and doesn’t require code changes. It does require administrator rights to edit the security policy files. From a pure security perspective, it is not a great solution because you’re just adding to the whole application the permissions you need for a particular method of a particular page or assembly.
The second approach requires a bit of refactoring but leads to better and safer code. The idea is to sandbox the server-side code and make it delegate to external components (for example, serviced components or command-line programs) the execution of any tasks that exceed the application’s permission set. Obviously, the external component will be configured to have all required permissions.
Note
Code sandboxing is the only option you have if your partially trusted ASP.NET application is trying to make calls into an assembly that doesn’t include the AllowPartiallyTrustedCallers attribute. For more information on programming for medium trust, check out the contents at the following URL: http://msdn2.microsoft.com/en-us/library/ms998341.aspx. In spite of the title, which refers to ASP.NET 2, the content is still up to date.
Depending on the type of the requested resource, IIS might or might not be able to handle the request itself. If the resource needs the involvement of ASP.NET (for example, it is an .aspx file), IIS hands the request over to ASP.NET along with the security token of the authenticated, or anonymous, user. What happens next depends on the ASP.NET configuration.
Originally, ASP.NET supported three types of authentication methods: Windows, Passport, and Forms. A fourth possibility is None, meaning that ASP.NET does not even attempt to perform its own authentication and completely relies on the authentication already carried out by IIS. In this case, anonymous users can connect and resources are accessed using the default ASP.NET account. In ASP.NET 4, Passport authentication is marked as obsolete. It is largely replaced by oAuth. In particular, you can use your Windows Live ID with oAuth.
You choose the ASP.NET authentication mechanism using the <authentication> section in the root web.config file. Child subdirectories inherit the authentication mode chosen for the application. By default, the authentication mode is set to Windows. Let’s briefly examine Windows authentication and reserve wider coverage for the most commonly used authentication method—Forms authentication.
When using Windows authentication, ASP.NET works in conjunction with IIS. The real authentication is performed by IIS, which uses one of its authentication methods: Basic or Integrated Windows. When IIS has authenticated the user, it passes the security token on to ASP.NET. When in Windows authentication mode, ASP.NET does not perform any further authentication steps and limits its use of the IIS token to authorizing access to the resources.
Typically, you use the Windows authentication method in intranet scenarios when the users of your application have Windows accounts that can be authenticated only by the Web server. Let’s assume that you configured the Web server to work with the Integrated Windows authentication mode and that you disabled anonymous access. The ASP.NET application works in Windows authentication mode. What happens when a user connects to the application? First, IIS authenticates the user (popping up a dialog box if the account of the local user doesn’t match any accounts on the Web server or in the trusted domain) and then hands the security token over to ASP.NET.
In most cases, Windows authentication is used in conjunction with file authorization—via the FileAuthorizationModule HTTP module. User-specific pages in the Web application can be protected from unauthorized access by using access control lists (ACLs) on the file. When ASP.NET is about to access a resource, the FileAuthorizationModule HTTP module is called into action. File authorization performs an ACL check on ASP.NET files using the caller’s identity. For example, it will be sure that the user Joe will never be able to access an .aspx page whose ACL doesn’t include an entry for him.
Note, though, that file authorization does not require impersonation at the ASP.NET level and, more importantly, it works regardless of whether the impersonation flag is turned on. Once you’ve set an appropriately configured ACL on an ASP.NET resource, you’re pretty much done. Nobody will be able to access the resource without permission.
The .NET Framework (starting with 3.0) contains a new technology that can be used with ASP.NET Web sites to authenticate users: Windows CardSpace. Any page that includes the Identity Selector object, uses the identity cards of the connected user to send credentials to the server. Each user can manage her own cards by using the Windows CardSpace applet in Control Panel of any client machines equipped with the .NET Framework 3.0 or later.
The Identity Selector is an <object> tag of type application/x-informationcard. By requesting the value property of this object, you force an enabled browser to bring up the CardSpace applet. The user then picks up the right card to send. The server-side login page will then access the content of the card and make any necessary checks to authorize the request. If it becomes widely accepted, Windows CardSpace could be the perfect tool for authentication over the Internet. For more information, you can start reading the following MSDN article: http://msdn.microsoft.com/en-us/magazine/cc163434.aspx.
Windows authentication is seldom practical for real-world Internet applications. Windows authentication is based on Windows accounts and NTFS ACL tokens and, as such, assumes that clients are connecting from Windows-equipped machines. Useful and effective in intranet and possibly in some extranet scenarios, Windows authentication is simply unrealistic in more common situations because the Web application users are required to have Windows accounts in the application’s domain. So what is the ideal authentication mechanism for real Web developers?
Today, Forms authentication is the most commonly used way to collect and validate user credentials—for example, against a database of user accounts. The login pattern implemented by Forms authentication doesn’t look radically different from Windows authentication. The key difference is that with Forms authentication everything happens under the strict control of the Web application.
You set up an ASP.NET application for Forms authentication by tweaking its root web.config file. You enter the following script:
<system.web>
    <authentication mode="Forms">
        <forms loginUrl="login.aspx" />
    </authentication>
    <authorization>
        <deny users="?" />
    </authorization>
</system.web>
The <authentication> section indicates the URL of the user-defined login form. ASP.NET displays the form only to users who have explicitly been denied access in the <authorization> section. The ? symbol indicates any anonymous, unauthenticated users. Note that the anonymous user here is not the IIS anonymous user but simply a user who has not been authenticated through your login form.
All blocked users are redirected to the login page, where they are asked to enter their credentials.
Note
The Forms authentication mechanism protects any ASP.NET resource located in a folder for which Forms authentication and authorization is enabled. Note that only resource types explicitly handled by ASP.NET are protected. The list includes .aspx, .asmx, and .ashx files, but not plain HTML pages or classic ASP pages. In IIS 7.0, though, you are given the tools to change this by setting a Web server-level web.config file where you assign new resources to the ASP.NET standard HTTP handler.
Form-based authentication is governed by an HTTP module implemented in the FormsAuthenticationModule class. The behavior of the component is driven by the contents of the web.config file. When the browser attempts to access a protected resource, the module kicks in and attempts to locate an authentication ticket for the caller. By default, a ticket is merely a cookie with a particular (and configurable) name. However, it can be configured to be a value embedded in the URL. In this case, we talk about cookieless Forms authentication.
If no valid ticket is found, the module redirects the request to a login page. Information about the originating page is placed in the query string. The login page is then displayed. The programmer creates this page, which, at a minimum, contains text boxes for the user-name and the password and a button for submitting credentials. The handler for the button click event validates the credentials using an application-specific algorithm and data store. If the credentials are authenticated, the user code redirects the browser to the original URL.
The original URL is attached to the query string of the request for the login page, as shown here:
http://YourApp/login.aspx?ReturnUrl=original.aspx
Authenticating a user means that an authentication ticket is issued and attached to the request. When the browser places its second request for the page, the HTTP module retrieves the authentication ticket and lets the request pass.
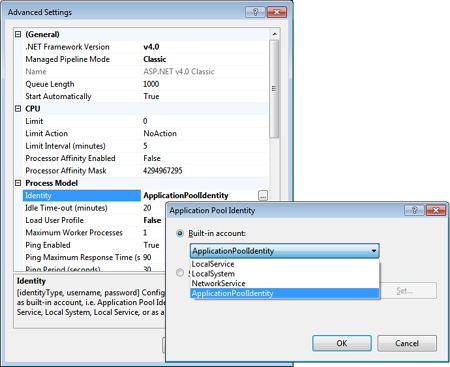
Let’s see how Forms-based authentication works in practice and consider a scenario in which users are not allowed to connect anonymously to any pages in the application. The user types the URL of the page—say welcome.aspx—and goes. As a result, the HTTP module redirects to the login page any users for which an authentication ticket does not exist, as shown in Figure 19-3.
Important
There are inherent security concerns that arise with Forms authentication related to the fact that any data is transmitted as clear text. Unfortunately, with today’s browser technology, these potential security concerns can be removed only by resorting to secure channels (HTTPS). I’ll return to this topic later in the General Security Issues section.
The layout of a login page is nearly the same—a couple of text boxes for the user name and password, a button to confirm, and perhaps a label to display error messages. However, you can make it as complex as needed and add as many graphics as appropriate. The user enters the credentials, typically in a case-sensitive way, and then clicks the button to log on. When the login page posts back, the following code runs:
void LogonUser(object sender, EventArgs e)
{
    string user = userName.Text;
    string pswd = passWord.Text;

    // Custom authentication
    bool bAuthenticated = AuthenticateUser(user, pswd);
    if (bAuthenticated)
        FormsAuthentication.RedirectFromLoginPage(user, false);
    else
        errorMsg.Text = "Sorry, yours seems not to be a valid account.";
}
The event handler retrieves the strings typed in the user name and password fields and calls into a local function named AuthenticateUser. The function verifies the supplied credentials and returns a Boolean value. If the user has been successfully authenticated, the code invokes the RedirectFromLoginPage static method on the FormsAuthentication class to inform the browser that it’s time to issue a new request to the original page.
The RedirectFromLoginPage method redirects an authenticated user back to the originally requested URL. It has two overloads with the following prototypes:
public static void RedirectFromLoginPage(string, bool);
public static void RedirectFromLoginPage(string, bool, string);
The first argument is the name of the user to store in the authentication ticket. The second argument is a Boolean value that denotes the duration of the cookie, if any, being created for the authentication ticket. If this argument is true, the cookie is given a duration that equals the number of minutes set by the timeout attribute (which is 30 minutes by default). In this way, you get a cookie that persists across browser sessions. Otherwise, your authentication cookie will last for the current session only. Finally, the third argument optionally specifies the cookie path.
The authenticating algorithm—that is, the code inside the AuthenticateUser method seen earlier—is entirely up to you. For example, you might want to check the credentials against a database or any other user-defined storage device. The following listing shows a (rather naïve) function that compares the user name and password against the firstname and lastname columns of the Northwind Employees table in SQL Server:
private bool AuthenticateUser(string username, string pswd)
{
   // Performs authentication here
   string connString = "...";
   string cmdText = "SELECT COUNT(*) FROM employees " +
                    "WHERE firstname=@user AND lastname=@pswd";

   int found = 0;
   using(SqlConnection conn = new SqlConnection(connString))
   {
      SqlCommand cmd = new SqlCommand(cmdText, conn);
      cmd.Parameters.Add("@user",
           SqlDbType.NVarChar, 10).Value = username;
      cmd.Parameters.Add("@pswd",
           SqlDbType.NVarChar, 20).Value = pswd;
      conn.Open();
      found = (int)cmd.ExecuteScalar();
      conn.Close();
   }
   return (found > 0);
}
The query is configured to return an integer that represents the number of rows in the table that match the specified user name and password. Notice the use of typed and sized parameters in the SQL command as a line of defense against possible injection of malicious code. Notice also that the SQL code just shown does not support strong passwords because the SQL = operator in the WHERE clause doesn’t perform case-sensitive comparisons. To make provisions for that, you should rewrite the command as follows:
SELECT COUNT(*) FROM employees WHERE
    CAST(RTRIM(firstname) AS VarBinary)=CAST(RTRIM(@user) AS VarBinary)
    AND
    CAST(RTRIM(lastname) AS VarBinary)=CAST(RTRIM(@pswd) AS VarBinary)
The CAST operator converts the value into its binary representation, while the RTRIM operator removes trailing blanks. To capture the name of the currently logged-in user, a page should just use the following code block:
Welcome, <%= User.Identity.Name %>.
While an explicit sign-in is always required by Web sites that need authentication, an explicit sign-out is less common but legitimate nonetheless. The Forms authentication module provides an explicit method to sign out. The SignOut method on the FormsAuthentication class takes no argument and resets the authentication ticket. In particular, when cookies are used, the SignOut method removes the current ticket from the Cookies collection of the current HttpResponse object and replaces it with an empty and expired cookie.
After you call SignOut, you might want to redirect the application to another page. The FormsAuthentication class has a method—RedirectToLoginPage—that provides the described functionality and transfers the user to a given page using Response.Redirect.
Let’s now take a look at the methods of the FormsAuthentication class and the configurable parameters you find in the web.config file. After this, I’ll move on to introduce the membership API and role management.
The FormsAuthentication class supplies some static methods you can use to manipulate authentication tickets and execute basic authentication operations. You typically use the RedirectFromLoginPage method to redirect an authenticated user back to the originally requested URL; likewise, you call SignOut to remove the authentication ticket for the current user. Other methods and properties are for manipulating and renewing the ticket and the associated cookie.
Table 19-4 lists the properties of the FormsAuthentication class. As you can see, many of them deal with cookie naming and usage and expose the content of configuration attributes in the <forms> section. We’ll look at the underpinnings of the <forms> XML configuration element in the next section. All the properties of the FormsAuthentication class shown in the table are static.
Table 19-4. Properties of the FormsAuthentication Class
Most of the properties are initialized with the values read from the <forms> configuration section of the web.config file when the application starts up.
Table 19-5 details the methods supported by the FormsAuthentication class. All the methods listed in the table are static.
Table 19-5. Methods of the FormsAuthentication Class
Description | |
|---|---|
Authenticate | Attempts to validate the supplied credentials against those contained in the configured <credentials> section. (I’ll say more about this later.) |
Decrypt | Given a valid authentication ticket, it returns an instance of the FormsAuthenticationTicket class. |
Encrypt | Produces a string containing the printable representation of an authentication ticket. The string contains, encoded to URL-compliant characters, the user’s credentials optionally hashed and encrypted. |
GetAuthCookie | Creates an authentication ticket for a given user name. |
GetRedirectUrl | Returns the redirect URL for the original request that caused the redirect to the login page. |
HashPasswordForStoringInConfigFile | Given a password and a string identifying the hash type, the method hashes the password for storage in the web.config file. |
Initialize | Initializes the FormsAuthentication class. |
RedirectFromLoginPage | Redirects an authenticated user back to the originally requested URL. |
RedirectToLoginPage | Performs a redirect to the configured or default login page. |
RenewTicketIfOld | Conditionally updates the sliding expiration on an authentication ticket. |
SetAuthCookie | Creates an authentication ticket, and attaches it to the outgoing response. It does not redirect to the originally requested URL. |
SignOut | Removes the authentication ticket. |
The Initialize method is called only once in the application’s lifetime and initializes the properties in Table 19-4 by reading the configuration file. The method also gets the cookie values and encryption keys to be used for the application.
Note
In spite of their names, in ASP.NET both the GetAuthCookie method and the SetAuthCookie method get and set an authentication ticket, regardless of what it means to the application. If the application is configured to do Forms authentication in a cookieless manner, the two methods read and write ticket information from and to the URL of the request. They read and write a cookie if the authentication method is configured to use cookies.
Although ASP.NET Forms authentication is fairly simple to understand, it still provides a rich set of options to deal with to fine-tune the behavior of the authentication mechanism. Most of the settable options revolve around the use of cookies for storing the authentication ticket. All of them find their place in the <forms> section under the <authentication> section.
Forms authentication is driven by the contents of the <forms> section child of the <authentication> section. The overall syntax is shown here:
<forms name="cookie"
    loginUrl="url"
    protection="All|None|Encryption|Validation"
    timeout="30"
    requireSSL="true|false"
    slidingExpiration="true|false"
    path="/"
    enableCrossAppsRedirects="true|false"
    cookieless="UseCookies|UseUri|AutoDetect|UseDeviceProfile"
    defaultUrl="url"
    domain="string">
</forms>
The various attributes are described in Table 19-6.
Table 19-6. Attributes for Forms Authentication
The defaultUrl attribute lets you set the default name of the page to return after a request has been successfully authenticated. This URL is configurable. But isn’t the URL of the return page embedded in the query string, in the ReturnUrl parameter? So when is defaultUrl useful?
If a user is redirected to the login page by the authentication module, the ReturnUrl variable is always correctly set and the value of defaultUrl is blissfully ignored. However, if your page contains a link to the login page, or if it needs to transfer programmatically to the login page (for example, after the current user has logged off), you are responsible for setting the ReturnUrl variable. If it is not set, the URL stored in the defaultUrl attribute will be used.
The default way of putting Forms authentication at work is through cookies. The content of the authentication ticket is stored in a cookie named after the value of the name attribute in the <forms> section. The cookie contains any information that helps to identify the user making the request.
By default, a cookie used for authentication lasts 30 minutes and is protected using both data validation and encryption. Data validation ensures that the contents of the cookie have not been tampered with along the way. Encryption uses the Rijndael encryption algorithm (also known as AES) to scramble the content. You can force it to use DES or 3DES if you like, however.
When validation is turned on, the cookie is created by concatenating a validation key with the cookie data, computing a Machine Authentication Code (MAC) and appending the MAC to the outgoing cookie. The validation key, as well as the hash algorithm to use for the MAC, are read out of the <machineKey> section in the web.config file. The same section also specifies the cryptographic key for when encryption is enabled.
Cookies are not the only way of putting Forms authentication to work. ASP.NET can offer an alternative API that exposes a nearly identical programming interface but makes no use of cookies.
When cookieless authentication is on, the ticket it is incorporated into the URL in much the same way as for cookieless sessions. The URL of the page served to an authenticated user follows the pattern shown here:
http://YourApp/(F(XYZ...1234))/samples/default.aspxThe ticket, properly encoded to a URL-compliant alphabet, is inserted in the URL right after the server name.
Note
No matter which settings you might have for validation and encryption, or whether your authentication scheme is cookied or cookieless, the information stored in the authentication ticket is encoded so that it is not immediately human-readable. Forms authentication uses a URI-safe derivative of the Base64 encoding that carries six bits of encoding per character.
Cookieless authentication requires an ISAPI filter to intercept the request, extract the ticket, and rewrite the correct path to the application. The filter also exposes the authentication ticket as another request header. The same aspnet_filter.dll component that we saw in Chapter 17, for cookieless sessions is used to parse the URL when cookieless authentication is used. To avoid confusion, each extra piece of information stuffed in the URL is wrapped by unique delimiters: S(…) for a session ID and F(…) for an authentication ticket. The filter extracts the information, removes URL adornments, and places the ticket information in a header named AspAuthenticationTicket.
To enable cookieless authentication, you set the cookieless attribute in the <forms> section of the configuration file to a particular value. The attribute specifies if and how cookies are used to store the authentication ticket. It can take any of the values listed in Table 19-7.
Table 19-7. Values for the cookieless Attribute
There’s a subtle difference between UseDeviceProfile and AutoDetect. Let’s make it clear with an example. Imagine a user making a request through Internet Explorer. The browser does have support for cookies as reported in the browser capabilities database installed with ASP.NET. However, a particular user might have disabled cookies support for her own browser. AutoDetect can correctly handle the latter scenario, and it will opt for cookieless authentication. UseDeviceProfile doesn’t probe for cookies being enabled, and it stops at what’s reported by the capabilities database. It will incorrectly opt for cookied authentication, causing an exception to be thrown.
The default value for the cookieless attribute is UseDeviceProfile. You should consider changing it to AutoDetect.
Note
When assigning a value to the cookieless attribute in the <forms> section, pay attention to how you type any of the possible values in Table 19-7. Case does matter here—for instance, UseUri is a different thing than useuri. Only the former will work.
Let’s tackle a few less obvious issues that might arise when working with Forms authentication.
HTTP cookies support a path attribute to let you define the application path the cookie is valid within. Pages outside of that path cannot read or use the cookie. If the path is not set explicitly, it defaults to the URL of the page creating the cookie. For authentication cookies, the path defaults to the root of the application so that it is valid for all pages in the application. So far, so good.
In ASP.NET, two applications in the same Internet domain can share their own authentication cookies, implementing a sort of single sign-on model. Typically, both applications provide their own login pages, and users can log on using any of them and then freely navigate between the pages of both. For this to happen, you only have to ensure that some settings in the root web.config files are the same for both applications. In particular, the settings for the name, protection, and path attributes in the <forms> section must be identical. Moreover, a <machineKey> section should be added to both web.config files with explicit validation and decryption keys:
<machineKey
    validationKey="C50B3C89CB21F4F1422FF158A5B42D0...E"
    decryptionKey="8A9BE8FD67AF6979E7D20198C...D"
    validation="SHA1" />
Read Knowledge Base article 312906 (located at http://support.microsoft.com/default.aspx?scid=kb;en-us;312906) for suggestions on how to create machine keys. Note that, by default, validation and decryption keys are set to AutoGenerate. The keyword indicates that a random key has been generated at setup time and stored in the Local Security Authority (LSA). LSA is a Windows service that manages all the security on the local system. If you leave the AutoGenerate value, each machine will use distinct keys and no shared cookie can be read.
Suppose now you run two ASP.NET Web sites, named www.contoso.com and blogs.contoso.com. Each of these sites generates authentication cookies not usable by the other. This is because, by default, authentication cookies are associated with the originating domain. All HTTP cookies, though, support a domain attribute, which takes the flexibility of their path attribute to the next level. If set, the domain attribute indicates the domain the cookie is valid for. Cookies can be assigned to an entire Internet domain, a subdomain, or even multiple subdomains.
In ASP.NET, the domain attribute in the <forms> section determines the value of the domain attribute on the authentication cookie being created.
<forms domain="contoso.com" />
Add the preceding script to the web.config file of the Web sites named www.contoso.com and blogs.contoso.com and you’ll have them share the authentication cookies (if the client browser recognizes the domain attribute of the cookie, which most modern browsers do).
The effect of the setting is that the primary domain (www) and any other subdomains will be able to handle each other’s authentication cookies, always with the proviso that their web.config files are synchronized on the machine key values.
Note
Setting the domain attribute doesn’t cause anything to be emitted into the authentication ticket; it simply forces all Forms authentication methods to properly set the domain property on each issued or renewed ticket. The attribute is ignored if cookieless authentication is used. The domain attribute of the <forms> section takes precedence over the domain field used in the <httpCookies> section and is valid for all cookies created in the ASP.NET application.
Forms authentication also supports having the login page specified in another application in the same Web site:
<forms loginUrl="/anotherApp/login1.aspx" />
The two applications must have identical machine keys configured for this to work. If the application is using cookied authentication tickets, no additional work is necessary. The authentication ticket will be stored in a cookie and sent back to the original application.
If cookieless authentication is used, some extra work is required to enable the external application to authenticate for us. You need to set the enableCrossAppRedirects attribute in <forms> in the web.config file of both applications.
<forms ... enableCrossAppRedirects="true" />
Upon successful authentication, the ticket is generated and attached to a query string parameter to be marshaled back to the original application.
If the enableCrossAppRedirects attribute is missing and cookieless authentication is used, the external application will throw an exception.
A hacker who manages to steal a valid authentication ticket is in a position to perpetrate a replay attack for the lifetime of the ticket. To mitigate the risk of replay attacks, you can perform authentication over a secured socket. Using secured sockets also removes the threat represented by applications such as Firesheep (http://en.wikipedia.org/wiki/Firesheep) that can sniff unencrypted cookies.
This means that first you must deploy your login page on an HTTPS-capable server, and second you need to set the requireSSL attribute to true in the <forms> section. This setting causes the ASP.NET application to enable the Secure attribute on the HTTP cookie being created. When the Secure attribute is set, compliant browsers send back only the cookie containing the ticket over a resource that is protected with SSL. In this way, you can still use a broad cookie scope, such as the whole application (‘/’) while providing a reasonable security level for the ticket in transit.
If you don’t want to use SSL to protect the ticket, the best you can do to alleviate the risk of replay attacks is set the shortest lifetime for the authentication ticket to a value that is reasonable for the application. Even if the ticket is intercepted, there won’t be much time remaining for the attacker to do his or her (bad) things.
As a final note regarding SSL, consider the following. If requireSSL is set and the user attempts to log in on a request not made over SSL, an exception is thrown. If requireSSL is set and an authentication cookie (a possibly stolen one at that) is provided over a non-SSL request, no exception is thrown; however, the cookie is wiped out and a regular login page is displayed through the browser.
Note that if the same happens with cookieless authentication, no protocol check is made and the request is served to the user…or the attacker.
Functionally speaking, Forms authentication is the most appropriate authentication method for Web and ASP.NET applications. However, a few general security issues shouldn’t pass without comment.
To start with, Forms authentication credentials are sent out as clear text from the client. SSL can be used to protect the communication, but in the end Forms authentication is as weak as IIS Basic authentication.
As mentioned, a stolen authentication cookie can be used to plan replay attacks as long as it is valid. This risk can be partially mitigated by reducing the lifetime of the ticket. Requiring an SSL connection for the cookie transmission resolves the issue if cookied authentication is used, but not if a cookieless solution is employed.
Finally, Forms authentication is based on application code, which is good news and bad news at the same time. It is good because you can keep everything under control. It is bad because any bug you leave in your code opens a security hole. A way to mitigate the risk of vulnerabilities stemming from incorrect code is to resort to the membership API.
The User property on the HttpContext object is of type IPrincipal—the public contract that all principal objects must fulfill. Most of the time, the real type behind the User property is GenericPrincipal. If role management is enabled at the application level, instead, the type is RolePrincipal. (We’ll cover role management in just a few moments.)
Common principal classes are certainly useful but may prove to be quite generic in most applications. In real-world scenarios, you sometimes need to add some custom information to the security context so that once you have authenticated a user you know much more about him than just the user name and roles. Let’s see how to tweak the authentication process to create a custom cookie and then how to retrieve that information and pack it into a custom principal object.
In the event handler responsible for validating credentials, you add the following code:
var customInfo = "some|value";
var ticket = new FormsAuthenticationTicket(
    4,                             // Version number
    userName,                      // Username
    DateTime.Now,                  // Issue date
    DateTime.Now.AddMinutes(30),   // Expiration date
    createPersistentCookie,        // Is it persistent?
    customInfo                     // User data
);
var encTicket = FormsAuthentication.Encrypt(ticket);

// Store the ticket into a cookie
var cookie = FormsAuthentication.GetAuthCookie(
                    FormsAuthentication.FormsCookieName,
                    createPersistentCookie);
cookie.Value = encTicket;

// Append the cookie to the response and redirect
HttpContext.Current.Response.Cookies.Add(cookie);
HttpContext.Response.Redirect(FormsAuthentication.DefaultUrl);
You create your own ticket and stuff some custom data in it. You must get your own instance of the FormsAuthenticationTicket class in order to do so. Next, you encrypt the ticket and write it to a cookie with the default name of authentication cookies. The preceding code replaces the following call, which is what would happen by default:
FormsAuthentication.SetAuthCookie(userName, createPersistentCookie);
The next step is retrieving the custom information stored in the authentication cookie. You can do that in the authentication step of global.asax, as shown here:
protected void Application_PostAuthenticateRequest()
{
    // Collect current security information
    var principal = HttpContext.Current.User as GenericPrincipal;
    if (principal == null)
        return;
    var identity = principal.Identity as FormsIdentity;
    if (identity == null)
        return;

    // Extract user data in the authentication ticket
    var customInfo = identity.Ticket.UserData;
    var tokens = customInfo.Split('|'),

    // Build a richer principal object
    var myPrincipal = new MyPrincipal(identity, roles)
                      {
                          CurrentTime = tokens[0],
                          Number = tokens[1]
                      };

    // Store the new principal in the HttpContext
    HttpContext.Current.User = myPrincipal;
}
Having done all of this, you can now cast the HttpContext.User object to your principal type (MyPrincipal in the example) and use the additional properties in any page. MyPrincipal is a plain class that inherits from GenericPrincipal:
public class MyPrincipal : GenericPrincipal
{
    public MyPrincipal(IIdentity identity, String[] roles) :
        base(identity, roles)
    { }

    // Extra properties
    public String CurrentTime { get; set; }
    public String Number { get; set; }
}
The membership API provides a set of classes to let you manage users and roles. Partnered with the FormsAuthentication class, the Membership and Roles classes form a complete security toolkit for ASP.NET developers. The Membership class supplies methods to manage user accounts—for adding or deleting a new user and editing any associated user information, such as the e-mail address and password. The Roles class creates and manages associations between users and roles.
What does the expression “managing user accounts” mean exactly? Simply put, it states that the Membership class knows how to create a new user or change his or her password. How do you create a user? Typically, you add a new record to some sort of data store. If that’s the case, who is in charge of deciding which data store to use and how to actually write the new user information? These tasks represent the core functionality the membership API is designed to provide.
The membership API doesn’t bind you to a fixed data store and data scheme. Quite the reverse, I’d say. It leaves you free to choose any data store and scheme you want, but it binds you to a fixed API through which users and roles are managed. The membership API is based on a provider model, and it delegates to the selected provider the implementation of all the features defined by the API itself. The provider component is only bound to implementing a contracted interface.
Centered on the Membership static class, the membership API shields you from the details of how the credentials and other user information are retrieved and compared. The Membership class contains a few methods that you use to obtain a unique identity for each connected user. This information can also be used with other ASP.NET services, including role-based function enabling and personalization.
Among the members of the class are methods for creating, updating, and deleting users, but not methods for managing roles and programmatically setting what a user can and cannot do. For that, you have to turn to the Roles class, which we’ll cover later.
The Membership class defaults to a provider that stores user information in a SQL Express database in a predefined format. If you want to use a custom data store (such as a personal database), you can create your own provider and just plug it in.
Table 19-8 lists the properties exposed by the Membership class.
Table 19-8. Properties of the Membership Class
Description | |
|---|---|
ApplicationName | A string to identify the application. It defaults to the application’s root path. |
EnablePasswordReset | Returns true if the provider supports password reset. |
EnablePasswordRetrieval | Returns true if the provider supports password retrieval. |
MaxInvalidPasswordAttempts | Returns the maximum number of invalid password attempts allowed before the user is locked out. |
MinRequiredNonAlphanumericCharacters | Returns the minimum number of punctuation characters required in the password. |
MinRequiredPasswordLength | Returns the minimum required length for a password. |
PasswordAttemptWindow | Returns the number of minutes in which a maximum number of invalid password or password answer attempts are allowed before the user is locked out. |
PasswordStrengthRegularExpression | Returns the regular expression that the password must comply with. |
Provider | Returns an instance of the provider being used. |
Providers | Returns the collection of all registered providers. |
RequiresQuestionAndAnswer | Returns true if the provider requires a password question/answer when retrieving or resetting the password. |
UserIsOnlineTimeWindow | Number of minutes after the last activity for which the user is considered on line. |
The Provider property returns a reference to the membership provider currently in use. As you’ll see in a moment, the provider is selected in the configuration file. ASP.NET comes with a couple of predefined providers that target MDF files in SQL Server Express and Active Directory. However, many more membership providers are in the works from Microsoft and third-party vendors, or you can even derive your own. You can obtain the list of installed providers for a given application through the Providers collection.
All properties are static and read-only. All of them share a pretty simple implementation. Each property just accesses the corresponding member on the current provider, as shown here:
public static int PasswordAttemptWindow
{
   get
   {
      Membership.Initialize();
      return Membership.Provider.PasswordAttemptWindow;
   }
}
As the name suggests, the Initialize method ensures that the internal structure of the Membership class is properly initialized and that a reference to the provider exists.
The class supports fairly advanced functionality, such as estimating the number of users currently using the application. It uses the value assigned to the UserIsOnlineTimeWindow property to determine this number. A user is considered on line if he has done something with the application during the previous time window. The default value for the UserIsOnlineTimeWindow property is 15 minutes. After 15 minutes of inactivity, a user is considered off line.
Table 19-9 details the methods supported by the Membership class. This list clarifies the tasks the class accomplishes.
Table 19-9. Methods of the Membership Class
Description | |
|---|---|
CreateUser | Creates a new user and fails if the user already exists. The method returns a MembershipUser object representing any available information about the user. |
DeleteUser | Deletes the user corresponding to the specified name. |
FindUsersByEmail | Returns a collection of MembershipUser objects whose e-mail address corresponds to the specified e-mail. |
FindUsersByName | Returns a collection of MembershipUser objects whose user name matches the specified user name. |
GeneratePassword | Generates a random password of the specified length. |
GetAllUsers | |
GetNumberOfUsersOnline | Returns the total number of users currently on line. |
GetUser | Retrieves the MembershipUser object associated with the current or specified user. |
GetUserNameByEmail | Obtains the user name that corresponds to the specified e-mail. If more users share the same e-mail, the first is retrieved. |
UpdateUser | Takes a MembershipUser object and updates the information stored for the user. |
ValidateUser | Authenticates a user by using supplied credentials. |
To build an authentication layer based on the membership API, you start by choosing the default provider and establish the data store. In the simplest case, you can stay with the default predefined provider, which saves user information in a local MDF file in SQL Server Express.
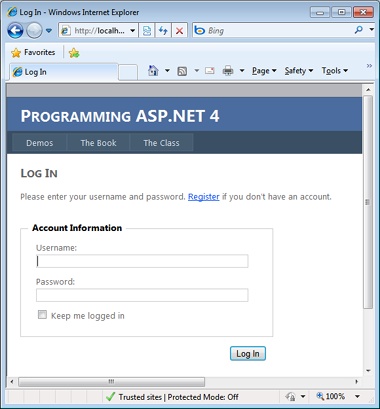
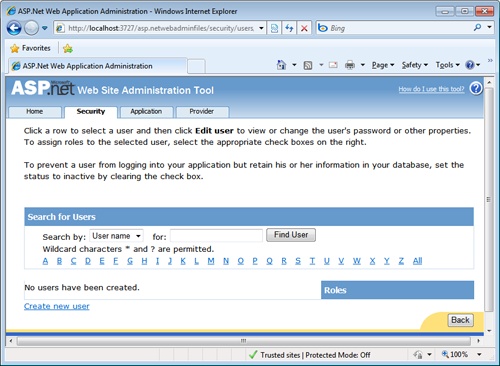
The Web Site Administration Tool (WSAT) in Microsoft Visual Studio provides a user interface for creating and administering the registered users of your application. Figure 19-4 provides a glimpse of the user interface.
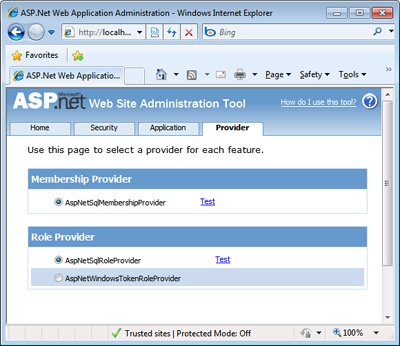
To add a new user or to edit properties of an existing one, you use the links shown in the figure. When you edit the properties of a new user, you use the page in Figure 19-5.
At this point, we’re ready to write some code that uses the membership API. Let’s start with the most common operation—authenticating credentials. Using the features of the membership subsystem, you can rewrite the code in the login page you saw previously to authenticate a user as follows:
void LogonUser(Object sender, EventArgs e)
{
    var user = userName.Text;
    var pswd = passWord.Text;

   if (Membership.ValidateUser(user, pswd))
        FormsAuthentication.RedirectFromLoginPage(user, false);
    else
        errorMsg.Text = "Sorry, yours seems not to be a valid account.";
}
This code doesn’t look much different from what you would write without providers, but there’s one big difference: the use of the built-in ValidateUser function. Here is the pseudocode of this method as it is implemented in the system.web assembly:
public static Boolean ValidateUser(String username, String password)
{
return Membership.Provider.ValidateUser(username, password);
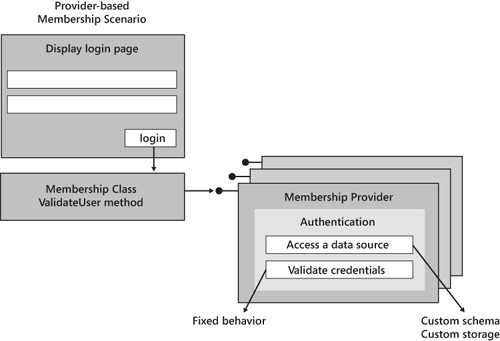
}As you can see, all the core functionality that performs the authentication lives in the provider. What’s nice is that the name of the provider is written in the web.config file and can be changed without touching the source code of the application. The overall schema is illustrated in Figure 19-6.
The Membership class provides easy-to-use methods for creating and managing user data. For example, to create a new user programmatically, all you do is place a call to the CreateUser method:
Membership.CreateUser(userName, pswd);
To delete a user, you call the DeleteUser method:
Membership.DeleteUser(userName);
You can just as easily get information about a particular user by using the GetUser method. The method takes the user name and returns a MembershipUser object:
var user = Membership.GetUser("DinoE");Once you’ve got a MembershipUser object, you know all you need to know about a particular user, and you can, for example, programmatically change the password (or other user-specific information). An application commonly needs to execute several operations on passwords, including changing the password, sending a user her password, or resetting the password, possibly with a question/answer challenge protocol. Here is the code that changes the password for a user:
var user = Membership.GetUser("DinoE");
user.ChangePassword(user.GetPassword(), newPswd);
To use the ChangePassword method, you must pass in the old password. In some cases, you might want to allow users to simply reset their password instead of changing it. You do this by using the ResetPassword method:
MembershipUser user = Membership.GetUser("DinoE");
string newPswd = user.ResetPassword();
In this case, the page that calls ResetPassword is also in charge of sending the new password to the user—for example, via e-mail. Both the GetPassword and ResetPassword methods have a second overload that takes a string parameter. If specified, this string represents the answer to the user’s “forgot password” question. The underlying membership provider matches the supplied answer against the stored answers; if a user is identified, the password is reset or returned as appropriate.
Note
It goes without saying that the ability to reset the password, as well as support for the password’s question/answer challenge protocol, is specific to the provider. You should note that not all the functions exposed by the membership API are necessarily implemented by the underlying provider. If the provider does not support a given feature, an exception is thrown if the method is invoked.
The beauty of the membership model lies not merely in the extremely compact code you need to write to validate or manage users but also in the fact that the model is abstract and extensible. For example, if you have an existing data store filled with user information, you can integrate it with the membership API without much effort. All you have to do is write a custom data provider—that is, a class that inherits from MembershipProvider which, in turn, inherits from ProviderBase:
public class MyAppMembershipProvider : MembershipProvider
{
   // Implements all abstract members of the class and, if
   // needed, defines custom functionality
   ...
}
This approach can be successfully employed to migrate existing authentication code to newer versions of ASP.NET applications and, perhaps more importantly, to link a custom and existing data store to the membership API. We’ll return to this subject in a moment.
All the providers used in ASP.NET—not just membership providers—implement a common set of members: the members defined by the ProviderBase class. The class comes with one method, Initialize, and one property, Name. The Name property returns the official name of the provider class. The Initialize method takes the name of the provider and a name/value collection object packed with the content of the provider’s configuration section. The method is supposed to initialize its internal state with the values just read out of the web.config file.
Many of the methods and properties used with the Membership class are actually implemented by calling into a corresponding method or property in the underlying provider. It comes as no surprise, then, that many of the methods listed in Table 19-10, which are defined by the MembershipProvider base class, support the functions you saw in Table 19-9 that are implemented by the dependent Membership class. However, note that Table 19-9 and Table 19-10 are very similar but not identical.
Table 19-10. Methods of the MembershipProvider Class
Method | Description |
|---|---|
ChangePassword | Takes a user name in addition to the old and new password, and changes the user’s password. |
ChangePasswordQuestionAndAnswer | Takes a user name and password, and changes the pair of question/answer challenges that allows reading and changing the password. |
CreateUser | Creates a new user account, and returns a MembershipUser-derived class. The method takes the user name, password, and e-mail address. |
DeleteUser | Deletes the record that corresponds to the specified user name. |
FindUsersByEmail | Returns a collection of membership users whose e-mail address corresponds to the specified e-mail. |
FindUsersByName | Returns a collection of membership users whose user name matches the specified user name. |
GetAllUsers | Returns the collection of all users managed by the provider. |
GetNumberOfUsersOnline | Returns the number of users that are currently considered to be on line. |
GetPassword | Takes the user name and the password’s answer, and returns the current password for the user. |
GetUser | Returns the information available about the specified user name. |
GetUserNameByEmail | Takes an e-mail address, and returns the corresponding user name. |
ResetPassword | Takes the user name and the password’s answer, and resets the user password to an auto-generated password. |
UpdateUser | Updates the information available about the specified user. |
ValidateUser | Validates the specified credentials against the stored list of users. |
All these methods are marked as abstract virtual in the class (must-inherit, overridable in Visual Basic .NET jargon). The MembershipProvider class also features a few properties. They are listed in Table 19-11.
Table 19-11. Properties of the MembershipProvider Class
Description | |
|---|---|
ApplicationName | |
EnablePasswordReset | Indicates whether the provider supports password reset. |
EnablePasswordRetrieval | Indicates whether the provider supports password retrieval. |
MaxInvalidPasswordAttempts | Returns the maximum number of invalid password attempts allowed before the user is locked out. |
MinRequiredNonAlphanumericCharacters | Returns the minimum number of punctuation characters required in the password. |
MinRequiredPasswordLength | Returns the minimum required length for a password. |
PasswordAttemptWindow | Returns the number of minutes in which a maximum number of invalid password attempts are allowed before the user is locked out. |
PasswordStrengthRegularExpression | Returns the regular expression that the password must comply with. |
RequiresQuestionAndAnswer | Indicates whether the provider requires a question/answer challenge to enable password changes. |
Indicates whether the provider is configured to require a unique e-mail address for each user name. |
The provider can also store additional information with each user. For example, you can derive a custom class from MembershipUser, add any extra members, and return an instance of that class via the standard GetUser method of the membership API.
To use the new class, you cast the object returned by GetUser to the proper type, as shown here:
var user = Membership.GetUser(name) as MyCompanyUser;
In addition to the members listed in Table 19-10 and Table 19-11, a custom membership provider can add new methods and properties. These are defined outside the official schema of the provider base class and are therefore available only to applications aware of this custom provider.
var provider = Membership.Provider as MyCompanyProvider;
Note
The Providers collection property allows you to use a dynamically selected provider:
var prov = Membership.Providers["ProviderName"];
This feature allows applications to support multiple providers simultaneously. For example, you can design your application to support a legacy database of users through a custom provider, while storing new users in a standard SQL Server table. In this case, you use different membership providers for different users.
Unless you’re building an ASP.NET application entirely from scratch with total freedom to decide where and how to store settings and data, you have some legacy code or schema to deal with. A savvy strategy, then, is creating a custom membership provider to provide access to legacy data via a canonical programming interface. I would even say that almost any ASP.NET application needs its own membership provider. Here’s some sample code:
public class MyMembershipProvider : MembershipProvider
{
   public MyMembershipProvider()
   {
   }
   public override bool ChangePassword(string username,
         string oldPassword, string newPassword)
   {
       // If you don't intend to support a given method
       // just throw an exception
       throw new NotSupportedException();
   }

   ...

   public override bool ValidateUser(string username, string password)
   {
       return AuthenticateUser(username, password);
   }

   private bool AuthenticateUser(string username, string pswd)
   {
       // Place here any code that would use the existing API/schema
       // and authenticate against the provided credentials
    }
}
You define a new class derived from MembershipProvider. In this class definition, you have to override all the members in Table 19-10 and Table 19-11. If you don’t intend to support a given method or property, for that method just throw a NotSupportedException exception. For the methods you do plan to support—which for the previous example included only ValidateUser—you write the supporting code. At this point, nothing prevents you from reusing code from your old application. There are two key benefits with this approach: you reuse most of your code (perhaps with a little bit of refactoring), and your application now fully embraces the membership model of ASP.NET.
Generally speaking, when writing providers, there are three key issues to look at: the lifetime of the provider, thread-safety, and atomicity. The provider is instantiated as soon as it proves necessary, but only once per ASP.NET application. This fact gives the provider the status of a stateful component, but it does so at the price of protecting that state from cross-thread access. A provider is not thread-safe, and it will be your responsibility to guarantee that any critical data is locked before use. Finally, some functions in a provider can be made of multiple steps. Developers are responsible for ensuring the atomicity of the operations either through database transactions (whenever possible) or through locks.
You register a new provider through the <membership> section of the web.config file. The section contains a child <providers> element under which additional providers are configured:
<membership>
   <providers>
      <add name="MyMembershipProvider"
           type="Samples.MyMembershipProvider" />
   </providers>
</membership>
You can change the default provider through the defaultProvider attribute of the <membership> section.
With the new provider in place, the code to verify credentials reduces to the following code, which is the same as you saw earlier in the chapter:
void LogonUser(object sender, EventArgs e)
{
    string user = userName.Text;
    string pswd = passWord.Text;
    if (Membership.ValidateUser(user, pswd))
        FormsAuthentication.RedirectFromLoginPage(user, false);
    else
        errorMsg.Text = "Sorry, yours seems not to be a valid account.";
}
There’s more than just this with the membership API. Now a login page has a relatively standard structure and relatively standard code attached. At least in the simplest scenarios, it can be reduced to a composite control with no binding code. This is exactly what security controls do. Before we get to cover this new family of server controls, though, let’s review roles and their provider-based management.
Roles in ASP.NET simplify the implementation of applications that require authorization. A role is just a logical attribute assigned to a user. An ASP.NET role is a plain string that refers to the logical role the user plays in the context of the application. In terms of configuration, each user can be assigned one or more roles. This information is attached to the identity object, and the application code can check it before the execution of critical operations.
For example, an application might define two roles—Admin and Guest, each representative of a set of application-specific permissions. Users belonging to the Admin role can perform tasks that other users are prohibited from performing. Assigning roles to a user account doesn’t add any security restrictions by itself. It is the responsibility of the application to ensure that authorized users perform critical operations only if they are members of a certain role.
In ASP.NET, the role manager feature simply maintains the relationship between users and roles.
Note
The Role Management API, although it consists of different methods and properties, works like the Membership API from a mechanical standpoint. Many of the concepts you read in the previous section also apply to role management.
The role management API lets you define roles as well as specify programmatically which users are in which roles. The easiest way to configure role management, define roles, add users to roles, and create access rules is to use WSAT. (See Figure 19-4.) You enable role management by adding the following script to your application’s web.config file:
<roleManager enabled="true" />
You can use roles to establish access rules for pages and folders. The following <authorization> block states that only Admin members can access all the pages controlled by the web.config file:
<configuration>
<system.web>
    <authorization>
       <allow roles="Admin" />
       <deny users="*" />
    </authorization>
</system.web>
</configuration>
The order in which you place <allow> and <deny>tags is important. Permissions and denies are processed in the order in which they appear in the configuration file.
WSAT provides a visual interface for creating associations between users and roles. If necessary, you can instead perform this task programmatically by calling various role manager methods. The following code snippet demonstrates how to create the Admin and Guest roles and populate them with user names:
Roles.CreateRole("Admin");
Roles.AddUsersToRole("DinoE", "Admin");
Roles.CreateRole("Guest");
var guests = new String[2];
guests[0] = "JoeUsers";
guests[1] = "Godzilla";
Roles.AddUsersToRole(guests, "Guest")
At run time, information about the logged-in user is available through the HTTP context User object. The following code demonstrates how to determine whether the current user is in a certain role and subsequently enable specific functions:
if (User.IsInRole("Admin"))
{
      // Enable functions specific to the role
      ...
}
When role management is enabled, ASP.NET looks up the roles for the current user and binds that information to the User object.
When role management is enabled, ASP.NET creates an instance of the Roles class and adds it to the current request context—the HttpContext object. The Roles class features the methods listed in Table 19-12.
Table 19-12. Methods of the Roles Class
Description | |
|---|---|
AddUsersToRole | Adds an array of users to a role. |
AddUsersToRoles | Adds an array of users to multiple roles. |
AddUserToRole | Adds a user to a role. |
AddUserToRoles | Adds a user to multiple roles. |
CreateRole | Creates a new role. |
DeleteCookie | Deletes the cookie that the role manager used to cache all the role data. |
DeleteRole | Deletes an existing role. |
FindUsersInRole | Retrieves all the user names in the specified role that match the provider user name string. The user names found are returned as a string array. |
GetAllRoles | Returns all the available roles. |
GetRolesForUser | Returns a string array listing the roles that a particular member belongs to. |
GetUsersInRole | Returns a string array listing the users who belong to a particular role. |
IsUserInRole | Determines whether the specified user is in a particular role. |
RemoveUserFromRole | Removes a user from a role. |
RemoveUserFromRoles | Removes a user from multiple roles. |
RemoveUsersFromRole | Removes multiple users from a role. |
RemoveUsersFromRoles | Removes multiple users from multiple roles. |
RoleExists |
Table 19-13 lists the properties available in the Roles class. All the properties are static and read-only. They owe their value to the settings in the <roleManager> configuration section.
Table 19-13. Properties of the Roles Class
Description | |
|---|---|
ApplicationName | Returns the provider’s nickname. |
CacheRolesInCookie | Returns true if cookie storage for role data is enabled. |
CookieName | Specifies the name of the cookie used by the role manager to store the roles. It defaults to .ASPXROLES. |
CookiePath | Specifies the cookie path. |
CookieProtectionValue | Specifies an option for securing the roles cookie. Possible values are All, Clear, Hashed, and Encrypted. |
CookieRequireSSL | Indicates whether the cookie requires SSL. |
CookieSlidingExpiration | Indicates whether the cookie has a fixed expiration time or a sliding expiration. |
CookieTimeout | Returns the time, in minutes, after which the cookie will expire. |
CreatePersistentCookie | Creates a role cookie that survives the current session. |
Domain | Indicates the domain of the role cookie. |
Enabled | |
MaxCachedResults | Indicates the maximum number of roles that can be stored in a cookie for a user. |
Provider | Returns the current role provider. |
Providers |
Some methods in the Roles class need to query continuously for the roles associated with a given user, so when possible, the roles for a given user are stored in an encrypted cookie. On each request, ASP.NET checks to see whether the cookie is present; if so, it decrypts the role ticket and attaches any role information to the User object. By default, the cookie is a session cookie and expires as soon as the user closes the browser.
Note that the cookie is valid only if the request is for the current user. When you request role information for other users, the information is read from the data store using the configured role provider.
For its I/O activity, the role manager uses the provider model and a provider component. The role provider is a class that inherits the RoleProvider class. The schema of a role provider is not much different from that of a membership provider. Table 19-14 details the members of the RoleProvider class.
Table 19-14. Methods of the RoleProvider Class
Description | |
|---|---|
AddUsersToRoles | Adds an array of users to multiple roles. |
CreateRole | |
DeleteRole | Deletes the specified role. |
FindUsersInRole | Returns the name of users in a role matching a given user name pattern. |
GetAllRoles | Returns the list of all available roles. |
GetRolesForUser | Gets all the roles a user belongs to. |
GetUsersInRole | Gets all the users who participate in the given role. |
IsUserInRole | Indicates whether the user belongs to the role. |
RemoveUsersFromRoles | Removes an array of users from multiple roles. |
RoleExists | Indicates whether a given role exists. |
You can see the similarity between some of these methods and the programming interface of the Roles class. As you saw for membership, this is not just coincidental.
ASP.NET ships with a few built-in role providers—SqlRoleProvider (default), WindowsTokenRoleProvider, and AuthorizationStoreRoleProvider. The SqlStoreProvider class stores role information in the same MDF file in SQL Server Express as the default membership provider. For WindowsTokenRoleProvider, role information is obtained based on the settings defined for the Windows domain (or Active Directory) the user is authenticating against. This provider does not allow for adding or removing roles. The AuthorizationStoreRoleProvider class manages storage of role information for an authorization manager (AzMan) policy store. AzMan is a Windows download that enables you to group individual operations together to form tasks. You can then authorize roles to perform specific tasks, individual operations, or both. AzMan provides an MMC snap-in to manage roles, tasks, operations, and users. Role information is stored in a proper policy store, which can be an XML file, an Active Directory, or an ADAM server.
Custom role providers can be created deriving from RoleProvider and registered using the child <providers> section in the <roleManager> section. Note that the process for doing this is nearly identical to the process you saw for the custom membership provider we explored previously.
Unlike many other aspects of programming, authentication has always been devoid of any level of indirection. This means that developers have always taken care of any details of the authentication API at quite a low level of abstraction and with deep knowledge of the technical aspects.
A key challenge, then, is carrying the world of security toward a different model, where the concept of outsourcing is central and development teams can focus on selecting the best provider for authentication. The new model is centered on Windows Identity Foundation (WIF) and uses claims instead of direct management of user credentials to implement authentication-based features.
Classic authentication is based on two steps: getting the user credentials and validating them against some known values. If the provided information matches the stored information, the user is recognized and authenticated and can gain access to specific features of the application.
Getting user credentials, however, often requires dealing with different technologies and possessing a wide range of skills. You can use, for example, certificate, Forms, or Windows authentication. In any of these cases, you must be familiar with technical details. As a result, your application recognizes the identity of a user from provided credentials that hopefully have been validated successfully.
Claims-based identity is something different.
The key idea behind claims-based identity is that an application (and not just an ASP.NET application) uses a third-party provider that assumes responsibility for returning a few true statements about a user. These statements are known as claims. The calling application gets the list of claims and, based on that, decides which sections of the site should be unveiled to the user and which features should be enabled.
For developers, the biggest change is that you don’t include in your codebase anything that deals with authentication and authorization. You simply arrange a conversation with an external identity provider, tell it about the statements you’re interested in verifying, and wait for a response. The user is redirected somewhere else (presumably to the identity provider site), provides requested credentials, and gets authenticated.
So, in the end, it is still about having a piece of code that collects and verifies credentials, isn’t it? Ultimately, it has to be this way because this is the only way in which authentication works. As a developer, though, you just outsource authentication to an external provider that you trust and that you have explicitly selected.
Figure 19-7 illustrates the typical workflow that characterizes a claims-based authentication process. The user initially connects to the application and attempts to log in. If all goes well, the user is ultimately redirected to the requested (and protected) page—nearly the same as in the authentication process we just reviewed. However, everything else is different under the surface.
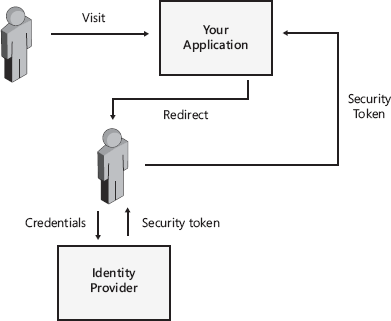
An application designed to take advantage of claims-based identity redirects the user to the identity provider of choice. The user interacts with the site of the provider and enters any information that the provider reckons to be useful to authenticate the request. If the operation is successful, the identity provider issues a security token and redirects back to the application. The security token that is then handed over to the application contains claims about the user. These claims are trusted by the application.
So a claim is nothing more than a statement that has been verified by the identity provider, and the identity provider guarantees it is true. What kind of statements are we talking about, however? A claim is strictly bound to the provider. Different providers can issue different claims, and not all providers can validate a given claim.
A canonical example often discussed to introduce the concept of a claim is an online wine shop that needs to be sure about the age of the people placing orders. In this case, the classic approach of having users register with the site, provide a birth date, and proceed with purchasing products doesn’t work. Who can reliably prove that the user is really of the legal age for purchasing alcohol? Certainly not the user himself!
In a claims-based system, the wine shop application might rely on an identity provider that “claims” to be able to verify the age of a user. The provider can ask for a driver’s license number and cross check that number with the database of the Driving and Licensing department. Any identity provider must expose a policy document that lists its requirements (protocols, endpoints, data formats) and the list of claims it can support. An application must likewise incorporate a policy document with the list of security requirements—facts the application needs to know for sure in order to proceed. Furthermore, the application must include a list of valid and trusted providers.
Issued by the identity provider, a security token travels the network to reach the requesting application and carry information. The security token is digitally signed, can’t be tampered with, and can be related to the issuing provider.
Strictly related to identity providers are the Security Token Service (STS). An STS provides a standards-based method of authenticating users and completely hides the details of how this is done internally.
To use claims-based identity in your ASP.NET application, you must pick up an STS and understand what it can do for you. Next, you disable any classic security and add code talk to the selected STS.
As mentioned, WIF is the Microsoft infrastructure for working with claims-based identity. You can download the WIF runtime from http://www.microsoft.com/downloads/en/details.aspx?FamilyID=EB9C345F-E830-40B8-A5FE-AE7A864C4D76. The WIF SDK, instead, is available here: http://www.microsoft.com/downloads/en/details.aspx?FamilyID=c148b2df-c7af-46bb-9162-2c9422208504.
To make an ASP.NET application claims-aware, you first need to get an STS. To start, you can use SelfSTS—a utility that emulates the minimal behavior of a realistic STS. You can get the STS from http://code.msdn.microsoft.com/SelfSTS.
If you use a Microsoft-provided project template for WIF, you then can rely on some tooling made to measure to add an STS reference and generate proper changes to code and configuration. At the end of the procedure, your authentication mode in the web.config file is probably set to None and a few HTTP modules have been added to the application’s runtime environment.
With STS configured and WIF modules in place, the type behind the HttpContext.User property is IClaimsPrincipal:
var claimsPrincipal = HttpContext.Current.User as IClaimsPrincipal;
var claimsIdentity = (IClaimsIdentity) claimsPrincipal.Identity;
You now own all claims as issued by the sample STS. You can enumerate claims with a plain loop, as shown here:
foreach(var claim in claimsIdentity.Claims)
{
    // Use claims. Properties are ClaimType and Value
}
You use claims to enable or disable the various features of the application on a per-user basis.
For a lot more information about WIF and motivation to use it, I invite you to read Vittorio Bertocci’s excellent book, “Programming Windows Identity Foundation” (Microsoft Press, 2010).
Compared to classic Forms authentication, claims-based identity has one noticeable difference for developers that can influence your decision to go with it or stick to more traditional solutions. You usually can’t have a list of all the users that could log into your application.
All that your application can do is make public the list of claims it needs. After that, the selected (and trusted) STS gains control over the implementation of user accounts, and all your application has to do is check claims presented by users and reject users who don’t match requested claims. In this way, you should never be required to modify the application to accommodate new users, even when these new users come from other sites as might be the case with federated sites.
ASP.NET offers several server controls that make programming security-related aspects of a Web application quick and easy: Login, LoginName, LoginStatus, LoginView, PasswordRecovery, ChangePassword, and CreateUserWizard. These are composite controls, and they provide a rich, customizable user interface. They encapsulate a large part of the boilerplate code and markup you would otherwise have to write repeatedly for each Web application you developed. Figure 19-8 offers a comprehensive view of the membership platform and illustrates the role of the login controls.
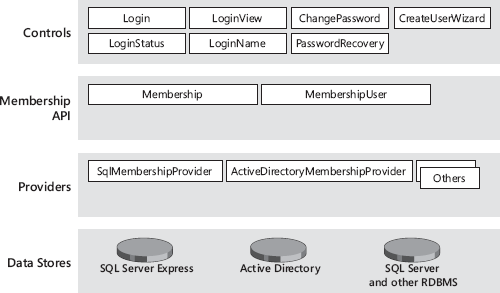
An application based on the Forms authentication model always needs a login page. Aside from the quality of the graphics, all login pages look alike. They contain a couple of text boxes (for username and password), a button to validate credentials, plus perhaps a Remember Me check box, and possibly links to click if the user has forgotten his or her password or needs to create a new account. The Login control provides all this for free, including the ability to validate the user against the default membership provider.
The Login control is a composite control that provides all the common user interface elements of a login form. To use it, you simply drop the control from the toolbox onto the Web form, or you just type the following code:
<asp:login runat="server" id="MyLoginForm" />
The Login control also has optional user-interface elements for functions such as password reminders, new user registration, help links, error messages, and a custom action used in the case of a successful login. When you drop the control onto a Visual Studio form, the AutoFormat verb lets you choose among a few predefined styles, as shown in Figure 19-9.
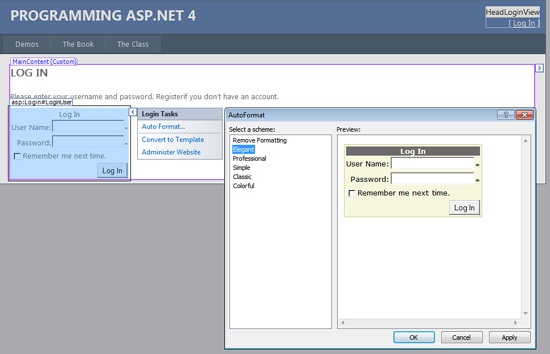
The appearance of the control is fully customizable through templates and style settings. All user-interface text messages are also customizable through properties of the class.
The control is modularized, and each constituent part can be individually customized. The parts include the Username and Password text boxes, the Submit button, the button to create a new user, the Remember Me check box, and instructions with guidance to the user.
If you don’t like the standard user interface of the control, you can define your own template too:
<asp:login runat="server" id="MyLoginForm">
     <layouttemplate>
        ...
     </layouttemplate>
</asp:login>
Your template can include new elements, and you can recycle default components. To do the latter, you should use the same ID for the controls as in the default template. To simplify this operation, right-click on the control in the Visual Studio designer, choose Convert To Template, and switch to the Source view. The markup you see is the default template of the control expressed as ASP.NET code. Use it as a starting point for creating your own template.
The Login control fires the server events listed in Table 19-15.
Table 19-15. Events of the Login Control
Description | |
|---|---|
Authenticate | Fires when a user is authenticated. |
LoggedIn | Fires when the user logs in to the site after a successful authentication. |
LoggingIn | Fires when a user submits login information but before the authentication takes place. At this time, the operation can still be canceled. |
LoginError | Fires when a login error is detected. |
In most common cases, though, you don’t need to handle any of these events, nor will you likely find it necessary to programmatically access any of the numerous properties of the control.
The most common use for the Login control is to use it as a single-control page to set up the user interface of the login page for use with Forms authentication. The control relies entirely on the membership API (and the selected provider) to execute standard operations, such as validating credentials, displaying error messages, and redirecting to the originally requested page in the case of a successful login.
If you have a provider with custom capabilities that you want to be reflected by the Login control, you need to modify the layout to add new visual elements bound to a code-behind method. In the code-behind method, you invoke the custom method on the custom provider.
The LoginName control is an extremely simple but useful server control. It works like a sort of label control and displays the user’s name on a Web page:
<asp:loginname runat="server" />
The control captures the name of the currently logged-in user from the User intrinsic object and outputs it using the current style. Internally, the control builds a dynamic instance of a Label control, sets fonts and color accordingly, and displays the text returned by the following expression:
string name = HttpContext.Current.User.Identity.Name;
The LoginName control has a pretty slim programming interface that consists of only one property—FormatString. FormatString defines the format of the text to display. It can contain only one placeholder, as shown here:
myLogin.FormatString = "Welcome, {0}";If Dino is the name of the current user, the code generates a “Welcome, Dino” message.
The LoginStatus control indicates the state of the authentication for the current user. Its user interface consists of a link button to log in or log out, depending on the current user logon state. If the user is acting as an anonymous user—that is, he or she never logged in—the control displays a link button to invite the user to log in. Otherwise, if the user successfully passed through the authentication layer, the control displays the logout button.
The LoginStatus control is often used in conjunction with the LoginName control to display the name of the current user (if any), plus a button to let the user log in or out. The style, text, and action associated with the button changes are conveniently based on the authentication state of the user.
The following code creates a table showing the name of the current user and a button to log in or log out:
<table width="100%" border="0"><tr>
    <td>
        <asp:loginname runat="server" FormatString="Welcome, {0}" />
    </td>
    <td align="right">
        <asp:loginstatus runat="server" LogoutText="Log off" />
    </td>
  </tr>
</table>
To detect whether the current user is authenticated and adapt the user interface, you can use the IsAuthenticated property of the User object:
void Page_Load(object sender, EventArgs e)
{
    if (User.Identity.IsAuthenticated)
       // Adjust the UI by outputting some text to a label
        Msg.Text = "Enjoy more features";
    else
        Msg.Text = "Login to enjoy more features.";
}Although the LoginStatus control is quite useful in its default form, it provides a bunch of properties and events you can use to configure it. The properties are listed in Table 19-16.
Table 19-16. Properties of the LoginStatus Control
Description | |
|---|---|
LoginImageUrl | Gets or sets the URL of the image used for the login link. |
LoginText | Gets or sets the text used for the login link. |
LogoutAction | Determines the action taken when a user logs out of a Web site. Possible values are Refresh, Redirect, and RedirectToLoginPage. Refresh reloads the current page with the user logged out. The other two values redirect the user to the logout page or the login page, respectively. |
LogoutImageUrl | Gets or sets the URL of the image used for the logout button. |
LogoutPageUrl | Gets or sets the URL of the logout page. |
LogoutText | Gets or sets the text used for the logout link. |
The control also features a couple events: LoggingOut and LoggedOut. The former fires before the user clicks to log off. The latter is raised immediately after the logout process has completed.
The LoginView control allows you to aggregate the LoginStatus and LoginName controls to display a custom user interface that takes into account the authentication state of the user as well as the user’s role or roles. The control, which is based on templates, simplifies creation of a user interface specific to the anonymous or connected state and particular roles to which they are assigned. In other words, you can create as many templates as you need, one per state or per role.
Table 19-17 lists the properties of the user interface of the LoginView control.
Table 19-17. Properties of the LoginView Class
Note that the LoggedInTemplate template is displayed only to logged-in users who are not members of one of the role groups specified in the RoleGroups property. The template (if any) specified in the <roleGroups> tag always takes precedence.
The LoginView control also fires the ViewChanging and ViewChanged events. The former reaches the application when the control is going to change the view (such as when a user logs in). The latter event fires when the view has changed.
The LoginView control lets you define two distinct templates to show to anonymous and logged-in users. You can use the following markup to give your pages a common layout and manage the template to show when the user is logged in:
<asp:loginview runat="server">
   <anonymoustemplate>
      <table width="100%" border="0"><tr><td>
         To enjoy more features,
         <asp:loginstatus runat="server">
      </td></tr></table>
   </anonymoustemplate>
   <loggedintemplate>
      <table width="100%" border="0"><tr>
         <td><asp:loginname runat="server" /></td>
         <td align="right"><asp:loginstatus runat="server" /></td>
      </tr></table>
   </loggedintemplate>
</asp:loginview>
Basically, the LoginView control provides a more flexible, template-based programming interface to distinguish between logged-in and anonymous scenarios, as we did in the previous example by combining LoginStatus and LoginName.
The LoginView control also allows you to define blocks of user interface to display to all logged-in users who belong to a particular role. As mentioned, these templates take precedence over the <loggedintemplate> template, if both apply.
<asp:loginview runat="server">
   <rolegroups>
      <asp:rolegroup roles="Admin">
         <contenttemplate>
            ...
         </contenttemplate>
      </asp:rolegroup>
      <asp:rolegroup roles="Guest">
         <contenttemplate>
            ...
         </contenttemplate>
      </asp:rolegroup>
   </rolegroups>
</asp:loginview>
The content of each <contenttemplate> block is displayed only to users whose role matches the value of the roles attribute. You can use this feature to create areas in a page whose contents are strictly role-specific. For the LoginView control to work fine, role management must be enabled, of course. The control uses the default provider.
The PasswordRecovery control is another server control that wraps a common piece of Web user interface in an out-of-the-box component. The control represents the form that enables a user to recover or reset a lost password. The user will receive the password through an e-mail message sent to the e-mail address associated with his or her account.
The control supports three views, depending on the user’s password recovery stage, as follows. The first view is where the user provides the user name and forces the control to query the membership provider for a corresponding membership user object. The second view is where the user must provide the answer to a predetermined question to obtain or reset the password. Finally, the third view is where the user is informed of the success of the operation.
For the control to work properly, you must first ensure that the selected membership provider supports password retrieval. The password retrieval also requires the provider to define a MembershipUser object and implement the GetUser methods. Remember that the membership provider decides how to store passwords: clear text, hashed, or encrypted. Best practice, of course, is to only store hashed passwords.
If passwords are stored as hashed values, the control doesn’t work. Hash algorithms are not two-way algorithms. In other words, the hash mechanism is great at encrypting and comparing passwords, but it doesn’t retrieve the clear text. If you plan to use the PasswordRecovery control, you must ensure that the provider stores passwords as clear text or encrypted data.
The PasswordRecovery control supports a child element named MailDefinition:
<asp:passwordrecovery runat="server">
   <maildefinition from="[email protected]" />
</asp:passwordrecovery>
The <MailDefinition> element configures the e-mail message and indicates the sender as well as the format of the body (text or HTML), priority, subject, and carbon-copy (CC). For the same settings, you can also use a bunch of equivalent properties on the associated Framework class and set values programmatically.
If the user who has lost the password has a question/answer pair defined, the PasswordRecovery control changes its user interface to display the question and ask for the answer before the password is retrieved and sent back.
The control first asks the user to provide the user name; next it retrieves associated information and displays the security question, if any is defined for the user. Finally, if an e-mail address is known, the control sends a message with details. Bear in mind that you need to have proper e-mail settings in the web.config file, specifically in the <system.net> section, as shown here:
<system.net>
  <mailSettings>
    <smtp deliveryMethod="Network">
      <network host="your.smtp.server" />
    </smtp>
  </mailSettings>
</system.net>
The ChangePassword control provides an out-of-the-box and virtually codeless solution that enables end users to change their password to the site. The control supplies a modifiable and customizable user interface and built-in behaviors to retrieve the old password and save a new one:
<asp:ChangePassword ID="ChangePassword1" runat="server" />
The underlying API for password management is the same membership API we discussed earlier in this chapter.
The ChangePassword control will work in scenarios where a user might or might not be already authenticated. However, note that the User Name text box is optional. If you choose not to display the user name and still permit nonauthenticated users to change their password, the control will always fail.
If the user is not authenticated but the User Name text box is displayed, the user will be able to enter his or her user name, current password, and new password at the same time.
The change of the password is performed using the ChangePassword method on the MembershipUser object that represents the user making the attempt. Note that the provider might pose an upper limit to the invalid attempts to change or reset the password. If set, this limit affects the ChangePassword control. The control won’t work any longer after the limit has been exceeded.
After the password has been successfully changed, the control can send—if properly configured—a confirmation e-mail to the user. The e-mail message is configured through the same <MailDefinition> element you saw earlier for the PasswordRecovery control.
The Continue button points the page with the control to a new destination URL to let users continue working. If you don’t set the ContinuePageDestinationUrl property, clicking the button simply refreshes the current page.
The CreateUserWizard control is designed to provide a native functionality for creating and configuring a new user using the membership API. The control offers a basic behavior that the developer can extend to send a confirmation e-mail to the new user and add steps to the wizard to collect additional information, such as address, phone number, or perhaps roles.
Customization is supported in two ways: by customizing one of the default steps, and by adding more user-defined steps. Figure 19-10 shows the control in action in the Create User page of the WSAT tool.
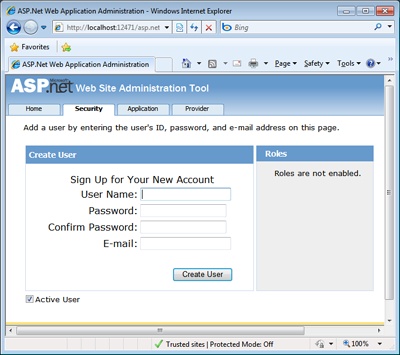
The difference between this control and the CreateUser method on the membership provider is that the method just adds the user name and password. The wizard provides a user interface and lets you add more information in a single shot.
How can we design and code secure ASP.NET applications? First of all, security is strictly related to the application’s usage, its popularity, and the type of users who connect to it and work with it. Paradoxically, a poorly secured application that isn’t attractive to hackers can be perceived as being much more secure than a well-armored application with just one loophole or two. Successful attacks are possible through holes in the system-level and application-level security apparatus.
When it comes to security, don’t look for a magic wand to do the job for you. Security is a state of mind, and insecurity is often the result of loose coding styles, if not true programming laziness. Never blindly trust anything regarding Web and ASP.NET security. Always keep in mind that security for Web applications is mostly about raising the bar higher and higher to make it hard for bad guys to jump over.