
Chapter 6. Implementing device management
Chapter 5 covered how device management can be used to help meet the challenges brought about by implementing BYOD in enterprise environments to support both company-owned and employee-owned devices. The chapter also described the business requirements to keep company data secure, mobile device usage policies that need to be enforced, and how employees must accept these requirements as a compromise to enabling the flexibility for them to get their jobs done on almost any device and from almost anywhere.
In this chapter, you again adopt the persona of the senior enterprise administrator for Blue Yonder Airlines and work to address the requirements of the second phase of the EMS implementation plan described at the end of Chapter 2. Remember that in this phase, you are responsible for preparing for, and successfully implementing, device management for the company, and the airline’s employees, to fully support BYOD.
Scenario description
As the senior enterprise administrator for Blue Yonder Airlines, you are responsible for planning, designing, and implementing the company’s EMS solution. You have completed the first phase of the EMS implementation plan to configure hybrid identity leveraging the existing on-premises Active Directory with Azure Active Directory (Azure AD) to populate cloud service users successfully. Now you must address the device management requirements to support company-owned devices as well as all of the personal devices being brought to work by Blue Yonder Airlines employees without your knowledge.
You know that Blue Yonder Airlines has made investments in iPads that are used by many of the pilots and stewards employed by the company at remote locations and the Windows Phones used by the IT department, but you are also aware of the fact that several employees are using their personal iPhones and Android devices to access corporate email and resources. Company employees accessing corporate data through unmanaged devices represents a security risk that must be mitigated during this phase of the implementation plan. Therefore, you need to plan to support all devices in use as well as implement policies to keep corporate data secure regardless of what device is being used.
Implementation goals
Building on the capabilities enabled by hybrid identity, you now need to address the following implementation goals to successfully complete the second phase of the EMS rollout for Blue Yonder Airlines:
![]() Prepare the Microsoft Intune service for device enrollment as described in Chapter 5.
Prepare the Microsoft Intune service for device enrollment as described in Chapter 5.
![]() Address the Mobile Device Management (MDM) enrollment considerations for iOS and Windows devices.
Address the Mobile Device Management (MDM) enrollment considerations for iOS and Windows devices.
![]() Successfully enroll employee devices into the Microsoft Intune service instance managed by Blue Yonder Airlines IT.
Successfully enroll employee devices into the Microsoft Intune service instance managed by Blue Yonder Airlines IT.
![]() Restrict access to corporate email to only those devices managed by Microsoft Intune and in compliance with Blue Yonder Airlines company policies.
Restrict access to corporate email to only those devices managed by Microsoft Intune and in compliance with Blue Yonder Airlines company policies.
Solution diagram
To meet the EMS implementation goals for the second phase of the EMS project, you will need to implement the solution shown in Figure 6-1.
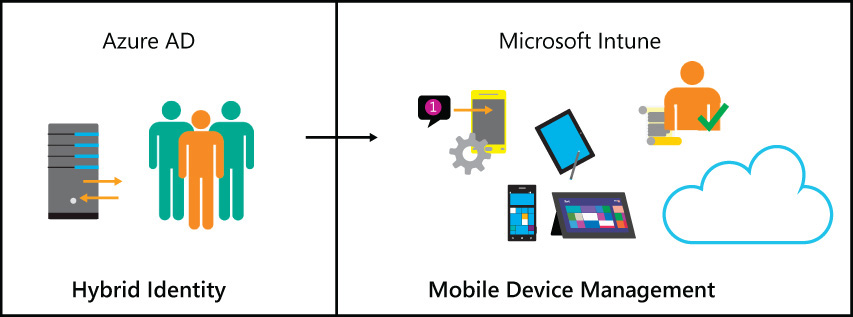
FIGURE 6-1 Building on hybrid identity to implement MDM to manage devices and control access to corporate email
Tip
This solution diagram is meant to provide a high-level overview and basic description of the intended solution architecture. Planning and design considerations for each element of the solution will be further described in the next section.
This solution is comprised of the following two pieces:
![]() Hybrid identity The hybrid identity capabilities that were enabled earlier in the EMS implementation will be leveraged to ensure that only authorized and authenticated Blue Yonder Airlines employees will be able to enroll their devices into management or access the Company Portal.
Hybrid identity The hybrid identity capabilities that were enabled earlier in the EMS implementation will be leveraged to ensure that only authorized and authenticated Blue Yonder Airlines employees will be able to enroll their devices into management or access the Company Portal.
![]() Mobile Device Management Once properly authenticated, Blue Yonder Airlines employees will be able to enroll their mobile devices into management by Microsoft Intune. Their devices must be managed, and in compliance with company policy, before they will be able to access corporate email via Exchange Online.
Mobile Device Management Once properly authenticated, Blue Yonder Airlines employees will be able to enroll their mobile devices into management by Microsoft Intune. Their devices must be managed, and in compliance with company policy, before they will be able to access corporate email via Exchange Online.
Planning and designing the solution
Now that you have developed your implementation goals and the proposed solution, you need to be sure that you understand all of the planning and design considerations that must be addressed for this phase to be completed successfully.
Although many of these considerations were introduced at a high-level in Chapter 5, you should carefully review the information in this section to be sure you are ready to put your plan into action to implement MDM in support of Blue Yonder Airlines’ BYOD policy.
Tip
This planning and design section is meant to provide you with additional details about the components and considerations to consider while implementing MDM with Microsoft Intune. The next section will guide you through the actual implementation steps and explain each component.
Microsoft Intune service configuration considerations
As you learned in Chapter 5, Microsoft Intune is the device management component of EMS that enables organizations to provide their employees access to apps and data from almost anywhere on almost any device while also helping to keep company information secure. As you prepare to implement MDM for Blue Yonder Airlines, you need to consider how you will customize your Microsoft Intune service instance to best support the customized and specific needs of Blue Yonder Airlines.
Mobile Device Management authority
The very first thing you need to do to support device management with Microsoft Intune is to set the MDM authority. This step prepares the Microsoft Intune service to accept enrollment requests and configures it as a standalone management service rather than one integrated with a System Center Configuration Manager 2012 R2 hierarchy.
As you plan for this step, carefully consider whether you will take advantage of the System Center Configuration Manager 2012 R2 license usage rights that come with EMS. If you set the MDM authority to use Microsoft Intune to manage your mobile devices and later decide to configure a hybrid management environment, you will not be able to easily modify the MDM authority setting to enable that alternate scenario.
Device enrollment profiles
Microsoft Intune uses device enrollment profiles to control which device group a newly enrolled device is automatically added to. As you plan for enabling users to enroll their devices from the Company Portal, you need to create at least one device enrollment profile.
When creating the device enrollment profile, consider what to name the profile and the description you will give it to ensure other administrators know why you have created the profile. Other details for device enrollment to plan for include whether you will prompt iOS users during enrollment to support user affiliation and the device group you will use to support service enrollment for devices associated with this profile. You will need to either create a custom device group or select an existing custom device group from the Groups workspace of the Microsoft Intune Admin Console that will be referenced by the enrollment profile. If you create multiple device enrollment profiles, be sure to set the one that you want to use as the default enrollment profile.
Customize the Company Portal
The Blue Yonder Airlines Company Portal is the way that most, if not all, BYOD devices will be enrolled into management and it is also where your users will go to access apps, maintain their profile information, and look for helpdesk contact information.
As the enterprise administrator, you should plan to present a professional and familiar experience to your users. Customizing the Company Portal to provide a company-branded experience will give your users confidence that they are enabling MDM for a trusted entity. In addition to displaying the company name as the title of the Company Portal, be sure that you are ready to customize the Company Portal with the following:
![]() Company contact information This information is used by Blue Yonder Airlines employees to determine how to contact the IT department. Here you need to provide the IT department contact name, phone number, email address, and any additional information you want displayed to end users on the Company Portal.
Company contact information This information is used by Blue Yonder Airlines employees to determine how to contact the IT department. Here you need to provide the IT department contact name, phone number, email address, and any additional information you want displayed to end users on the Company Portal.
This is also where you can provide a link to the Blue Yonder Airlines privacy statement webpage that discloses some or all of the ways that the company will use, disclose, or manage collected employee data. Users can access the target URL by clicking the privacy link at the bottom of the Company Portal.
![]() Support contact information You can provide the address to the support website to which you want to send end users who have questions. To complete this information, you need to know the support website URL and you should consider using a friendly name for the link that will be displayed on the Company Portal. If you do not enter a support website URL or friendly name, then Go To IT Website is displayed on the Contact IT page in the Company Portal.
Support contact information You can provide the address to the support website to which you want to send end users who have questions. To complete this information, you need to know the support website URL and you should consider using a friendly name for the link that will be displayed on the Company Portal. If you do not enter a support website URL or friendly name, then Go To IT Website is displayed on the Contact IT page in the Company Portal.
![]() Company branding The final Company Portal customization to consider is how you will brand it to provide Blue Yonder Employees a familiar experience. Consider what theme color you will choose from the following available colors: blue, red, orange, green, or purple.
Company branding The final Company Portal customization to consider is how you will brand it to provide Blue Yonder Employees a familiar experience. Consider what theme color you will choose from the following available colors: blue, red, orange, green, or purple.
You also need to upload two versions of the company logo; one to be displayed when the Company Portal background is white and another to show when the selected Company Portal theme color is in use. In either case, the logo file itself must be no larger than 400 x 100 pixels and 750 KB.
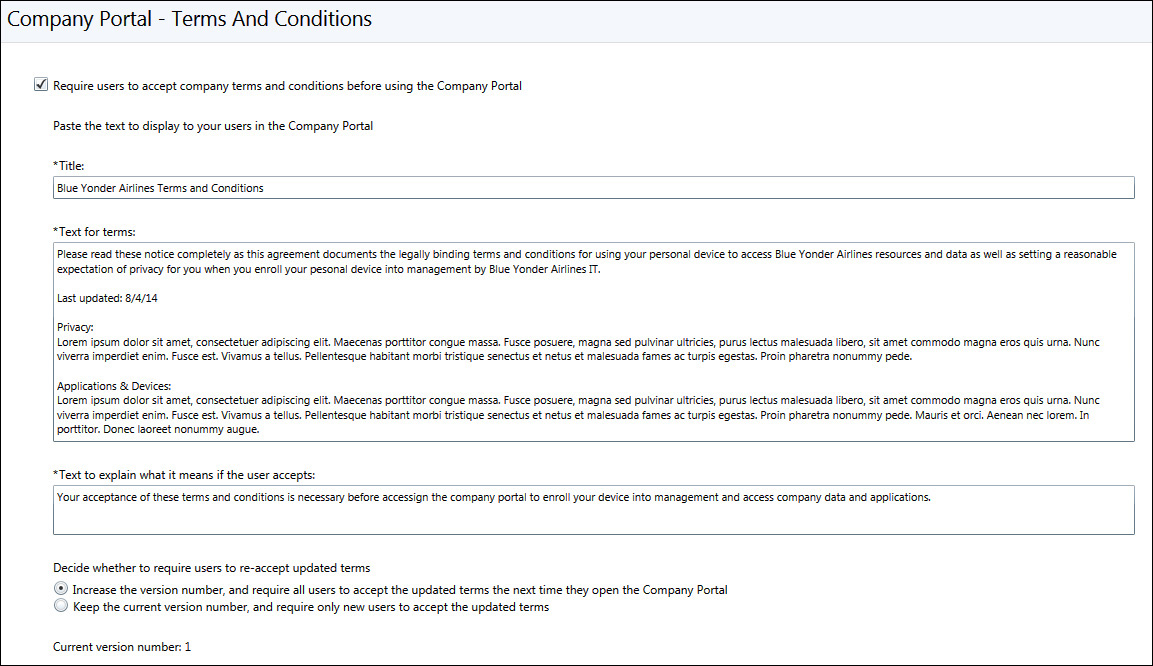
Terms and conditions
This part of implementation planning focuses on defining custom terms and conditions that all Blue Yonder Airlines employees need to aware of, and agree to, before accessing the Company Portal and using their personal devices at work. You will probably need to work with the Legal department and HR department to define the final text to display when users log on to the Company Portal for the first time.
In addition to the content, you need to carefully consider whether to enforce acceptance of the terms and conditions before allowing users to access company resources and enroll their devices into management. If you require acceptance of the terms and conditions, as shown in Figure 6-2, each Blue Yonder Airlines employee logging on to the Company Portal must accept those terms to continue. If an employee does not accept the terms and conditions, he will be denied access to the Company Portal. However, if the employee who doesn’t accept the terms and conditions already has a device under management, it will remain so until he uninstalls the Company Portal from his device.
Policies
Before you or your users begin enrolling devices, you need to carefully plan for and deploy both configuration and compliance policies that will take effect as soon as a Blue Yonder Airlines employee’s device is enrolled into management. It is a good idea to plan carefully and document completely each of the policy settings that you will put into effect to ensure that you are meeting your implementation goals and ensuring compliance with company mobile device configuration policies.
Configuration policies
Configuration policies make it easy for your users to use their personal devices at work and ensure that the devices being used are properly configured in accordance with company policies.
The first configuration policy that you should plan for is the basic Mobile Device Security Policy. This policy is used to ensure that all mobile devices are configured for basic security settings immediately after they are enrolled into management. For this configuration policy, you need to determine what template settings need to be enforced according to company policy. In addition to common security requirements, such as requiring a password, you also need to consider the following settings:
![]() Cloud Policy Settings Be sure that you plan whether to allow end-user devices to access cloud resources, such as iCloud, Work Folders, or Google backups.
Cloud Policy Settings Be sure that you plan whether to allow end-user devices to access cloud resources, such as iCloud, Work Folders, or Google backups.
![]() Email Policy Settings These policy settings control how email accounts and related functionality are configured on your user’s mobile devices. You can control whether users can download email attachments, how long email is synchronized on the devices, and several other email-related settings.
Email Policy Settings These policy settings control how email accounts and related functionality are configured on your user’s mobile devices. You can control whether users can download email attachments, how long email is synchronized on the devices, and several other email-related settings.
![]() Application Settings These settings control how users and mobile devices interact with applications while under management. You can pre-configure several browser settings, define whether the device app store will be available, and even allow or deny gaming options.
Application Settings These settings control how users and mobile devices interact with applications while under management. You can pre-configure several browser settings, define whether the device app store will be available, and even allow or deny gaming options.
![]() Device Capability Settings The final section of the Mobile Device Security Policy is very powerful and will enable you to configure the physical devices used by Blue Yonder Airlines at a very granular level. These settings allow you to control hardware capabilities, such as the camera, Wi-Fi, Bluetooth, and other aspects of device usage (such as data roaming and copy and paste functionality).
Device Capability Settings The final section of the Mobile Device Security Policy is very powerful and will enable you to configure the physical devices used by Blue Yonder Airlines at a very granular level. These settings allow you to control hardware capabilities, such as the camera, Wi-Fi, Bluetooth, and other aspects of device usage (such as data roaming and copy and paste functionality).
In addition to the basic mobile device security settings that will be applied to all mobile devices that are enrolled into management, you can simplify user access to company data and email by pre-defining wireless connections, VPN connections, and email settings. This will enable them to automatically join local Wi-Fi networks and access corporate network resources or email effortlessly and without any manual configurations on their part. While Wi-Fi and VPN profiles are not within the scope of your initial deployment, you will want to deploy and manage email profiles for your users.
Pre-configuring these email profile settings will make it much easier for your users and will save both you and your users a lot of time and increase productivity. To configure these settings for Android (Samsung KNOX 4.0 and later), iOS (5 and later), and Windows Phones (8 and later), you should have the following information ready:
![]() Exchange ActiveSync host name
Exchange ActiveSync host name
![]() Account name you will display on the device
Account name you will display on the device
![]() Username (either the User Principle Name or Primary SMTP Address)
Username (either the User Principle Name or Primary SMTP Address)
![]() Email address (either the User Principle Name or Primary SMTP Address)
Email address (either the User Principle Name or Primary SMTP Address)
![]() Authentication method you will use
Authentication method you will use
In addition, you should also plan for how you will configure several other synchronization options:
![]() Number of days of email to synchronize (from three days to unlimited)
Number of days of email to synchronize (from three days to unlimited)
![]() Sync schedule (from manual to as messages arrive)
Sync schedule (from manual to as messages arrive)
![]() Whether or not to use SSL
Whether or not to use SSL
![]() Determine the content types to synchronize (Email, Contacts, Calendar, and Tasks)
Determine the content types to synchronize (Email, Contacts, Calendar, and Tasks)
Tip
There are many more options and configuration policy settings that go beyond the scope of this book that you should review and consider implementing as part of your configuration policy settings. You can learn more about the Mobile Device Security Policy settings on TechNet at http://technet.microsoft.com/en-us/library/dn646984.aspx and other general configuration policy settings at http://technet.microsoft.com/en-us/library/dn743712.aspx.
Compliance policies
After you have completed your research and fully documented the configuration policy settings that you will deploy to users who are accessing company resources from mobile devices, you must consider how you will enforce compliance to those settings.
While configuration policies will set the various aspects about how mobile devices are used in the Blue Yonder Airlines enterprise environment, you know that several users will either accidentally or purposely not comply with those recommended settings. To ensure that your users are in compliance with the configuration you have defined, you will need to define and deploy a compliance policy that will enforce compliance on password settings, encryption, whether a device is jailbroken, and whether email accounts for iOS (6+) devices must be managed by Microsoft Intune.
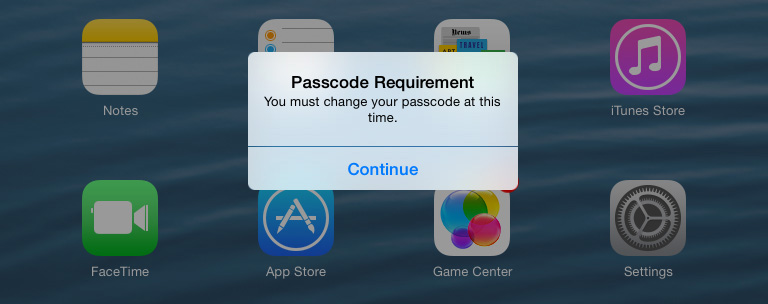
Enrolled devices will synchronize with the Microsoft Intune service on a regular basis to check for updated policy settings and at the same time they will also evaluate policy compliance. If the device is found to be noncompliant, messages are displayed to users on their devices, giving them about an hour to bring their devices into compliance, as shown in Figure 6-3. As you plan for the compliance settings that you will enforce, you should also consider the impact of these messages on end users who have previously been using unmanaged devices and are not accustomed to these kinds of messages and restrictions being placed on them. This might be a good scenario to cover on your tech support website.
Conditional access policies
The final policy that you need to plan for before implementing MDM for Blue Yonder Airlines is the Conditional Access Policy. This policy helps you to meet the implementation goal of restricting access to corporate email to only those devices managed by Microsoft Intune. Because Blue Yonder Airlines uses Office 365, you will need to configure the Conditional Access For Exchange Online Policy.
Before you can create the Conditional Access Policy, you first need to set up the service-to-service connector to link your Microsoft Intune service with your Exchange online environment. Once that is set up and working, you need to plan for creating the Exchange Online policy itself.
As you plan for the settings for this policy that will block access to email if a device is noncompliant, another prerequisite is to create or identify an Active Directory security group already synchronized with Azure AD that you will apply the policy to. If you want to exempt some users from this policy, you can also identify a security group to be exempted as part of the policy. The final planning step for this policy is to determine whether you will allow or block access to email from devices that are not supported by Microsoft Intune.
Mobile Device Management enrollment considerations
With the Microsoft Intune service implementation steps properly planned for, you can turn your attention to preparing for enrolling the different types of mobile devices that you will need to support as part of the Enterprise Mobility Strategy for Blue Yonder Airlines.
You know that users are already bringing their Android, iOS, and Windows Phone devices to work, so you will plan for all possible devices. As you learned in Chapter 5, Android devices do not have any device-specific requirements that you need to plan for as you prepare for device enrollment. However, you will need to plan for and configure several external dependencies to support iOS and Windows devices to be successfully enrolled into Microsoft Intune.
iOS devices
To enable iOS device enrollment, you need to obtain an Apple Push Notification service (APNs) certificate. To get this certificate, download an APNs certificate request from within the Microsoft Intune Admin Console and then upload it, using an Apple ID, to the Apple Push Certificates Portal. After you successfully obtain the APNs certificate, usually named something like MDM_Microsoft Corporation_Certificate.pem, you save it locally so that you can upload it into the Microsoft Intune Admin Console as part of the implementation process.
Remember that this certificate will need to be periodically renewed, so ensure that you will have access to the Apple ID and password used to request the APNs certificate even if the person who originally requests it leaves the company. You can easily create an Apple ID for this purpose at https://appleid.apple.com/account.
To obtain the Blue Yonder Airlines APNs certificate, you must plan for and complete the following actions:
1. Generate an APN certificate signing request file This request file (.csr) is created from within the Microsoft Intune Admin Console by navigating to Administration, Mobile Device Management, iOS, Upload An APNs Certificate and then clicking the option to Download The APNs Certificate Request. Give the certificate request file a name and then save it locally.
2. Sign in to the Apple Push Certificates Portal Use your company Apple ID credentials to sign in to the Apple Push Certificates Portal at http://go.microsoft.com/fwlink/?LinkId=261984.
3. Create the APNs certificate Select the Create A Certificate option to begin the process of creating the APNs certificate. Next, read and accept the terms of use to continue.
4. Upload the APNs certificate request (.csr) file On this page, you can enter notes as a description for the push certificate or just click Browse to select the .csr file that you created in Step 1 that will be used to create the certificate when you select the Upload option.
5. Download the certificate The completed APNs certificate should now be created and displayed in the available certificates listed for the Apple ID that you have used, as shown in Figure 6-4. Click the Download button to download the .pem file locally.

Windows Phone 8.0
To prepare for enrolling Windows Phone 8.0 devices, download the Windows Phone 8.0 Company Portal app from the Microsoft Download Center, install the Windows Phone 8.0 Software Development Kit (SDK), code-sign the Company Portal app with SignTool.exe included with the SDK, and then upload the signed Company Portal app to the Microsoft Intune Admin Console before enrolling any Windows Phone 8.0 devices.
Follow theses steps to code-sign the Windows Phone 8.0 Company Portal app in preparation for enrolling those devices:
1. Register as an app developer and get a company publisher ID at the Windows Phone Dev Center at http://dev.windows.com/join.
2. Use the company publisher ID to purchase an enterprise mobile code-signing certificate from Symantec at https://products.websecurity.symantec.com/orders/enrollment/microsoftCert.do.
3. Download the Windows Phone 8 Company Portal app from the Microsoft Download Center at http://www.microsoft.com/download/details.aspx?id=36060.
4. Download and install the Windows Phone 8.0 SDK at http://www.microsoft.com/download/details.aspx?id=35471.
5. Use SignTool.exe1, installed with the Windows Phone 8 SDK, to sign the Windows Phone 8.0 Company Portal app with the Symantec code-signing certificate.
1 You can learn more about SignTool.exe at http://msdn.microsoft.com/en-us/library/8s9b9yaz(v=vs.110).aspx.
Tip
You will need to upload both the APNs certificate and the signed Windows Phone 8.0 Company Portal app later during the implementation phase.
Windows device name resolution
The final step that you must plan for in preparation for enrolling mobile devices is name resolution for Windows devices. To complete this step, you need to create a DNS CNAME record with your domain registrar to enable Windows devices to locate the enrollment server.
Specifically, you create a CNAME record that redirects name resolution requests for enterpriseenrollment.<yourdomainnamegoeshere> to manage.microsoft.com. For example, if the publicly registered, and Azure-verified, domain name that you want to use is blueyonderairlines.com, your DNS CNAME record would need to redirect DNS requests for enterpriseenrollment.blueyonderairlines.com to manage.microsoft.com, as shown in Figure 6-5.
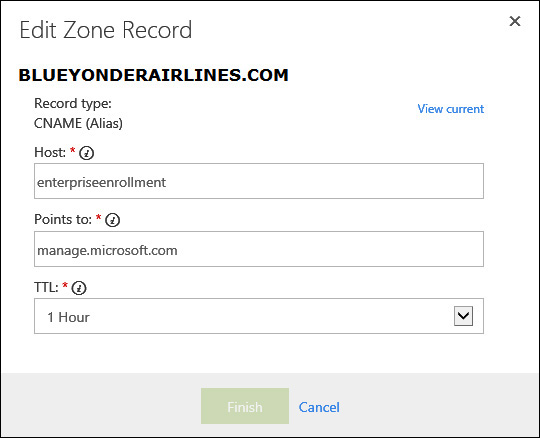
FIGURE 6-5 An example DNS CNAME record to enable enrollment server name resolution for Windows devices
Tip
If you do not have access or permissions to modify your public domain DNS records, you will need to plan for how you will accomplish this DNS zone file update before you begin enrolling Windows devices.
Implementing device management
Now that you have a deeper understanding of the components involved and you have completed the prerequisite planning to successfully implement MDM for Blue Yonder Airlines, you are ready to take action to complete phase 2 of the EMS implementation plan. You will start by preparing the Microsoft Intune service for device enrollment, then enroll devices, and, finally, ensure that access to corporate email is safeguarded using conditional access.
Prepare the Microsoft Intune service for device enrollment
Follow the steps in this section to configure Blue Yonder Airlines’ Microsoft Intune service for mobile device enrollment and management. Using the information gained during your implementation planning, you are now ready to properly configure the service so that your users can seamlessly enroll their devices into management, that those mobile devices are kept in compliance with all company policies, and that users can easily access corporate data, apps, and email.
Set the Mobile Device Management authority
The first step to be taken in the Microsoft Intune Admin Console to begin the process of managing mobile devices with the service is to set the MDM authority to Microsoft Intune. Doing this also enables other MDM settings and options that will be configured later.
Complete the following steps to set the MDM authority to Microsoft Intune:
1. Sign in to the Microsoft Intune Admin Console with administrator permissions.
2. In the Admin Console, navigate to ADMIN, Mobile Device Management.
3. In the Tasks list, click Set Mobile Device Management Authority.
4. Select the Use Microsoft Intune To Manage My Mobile Devices check box and then click Yes to use Microsoft Intune to manage mobile devices.
Create a default device enrollment profile
Now that Microsoft Intune is configured to manage mobile devices, you need to create the default device enrollment profile that will manage how newly enrolled devices are pre-assigned to a group in the Microsoft Intune Admin Console.
Follow these steps to create the default device enrollment profile based on the information you prepared during the planning phase:
1. Ensure you are still signed in to the Microsoft Intune Admin Console with administrator permissions.
2. In the Admin Console, navigate to Policy, Corporate Device Enrollment.
3. In the Tasks list, click Add.
4. Enter a policy name and description.
5. Because at least initially you will not prompt for user affinity for iOS devices, select No User Affinity under the Enrollment Details section.
6. Select the group name that newly enrolled devices will automatically be assigned to that you created as part of the planning phase.
7. Select the Save Profile option to complete the default enrollment profile. If this is the first enrollment profile that you have created, it will automatically be set as the default policy. If there is more than one enrollment policy listed, be sure that you use the Set As Default option to make the enrollment policy you have just created as the default.
Customize the Company Portal
The next step in preparing the service is to customize the Company Portal to provide Blue Yonder Airlines employees with support information and to present a streamlined, company-branded experience.
Use these steps to customize the Company Portal for your end-users:
1. Ensure you are still signed in to the Microsoft Intune Admin Console with administrator permissions.
2. Navigate to Admin, Company Portal.
3. Enter the appropriate information gathered during your planning in the Specify Company Name, Company Contact Information And Privacy Statement section:
![]() Company Name
Company Name
![]() IT Department Contact Name
IT Department Contact Name
![]() IT Department Phone Number
IT Department Phone Number
![]() IT Department Email Address
IT Department Email Address
![]() Company Privacy Statement URL
Company Privacy Statement URL
4. In the Specify A Website That Users Can Contact For Support section, provide the tech support website information that your users will select when they need help:
![]() Support Website URL (Not Displayed)
Support Website URL (Not Displayed)
![]() Website Name (Displayed To User)
Website Name (Displayed To User)
5. The Customization section is where you will use the logo files you collected during the planning phase to company-brand the Company Portal for your users, as shown in Figure 6-6.
![]() Select a theme color (blue, red, orange, green, or purple).
Select a theme color (blue, red, orange, green, or purple).
![]() Browse to select the logo that will be used when the Company Portal background is white.
Browse to select the logo that will be used when the Company Portal background is white.
![]() Browse to select a second logo that will be used when the Company Portal uses your selected color scheme. Here you can also choose to display the company name next to the logo.
Browse to select a second logo that will be used when the Company Portal uses your selected color scheme. Here you can also choose to display the company name next to the logo.
![]() Finally, choose a background for the Windows 8 Company Portal app to use (default or white).
Finally, choose a background for the Windows 8 Company Portal app to use (default or white).
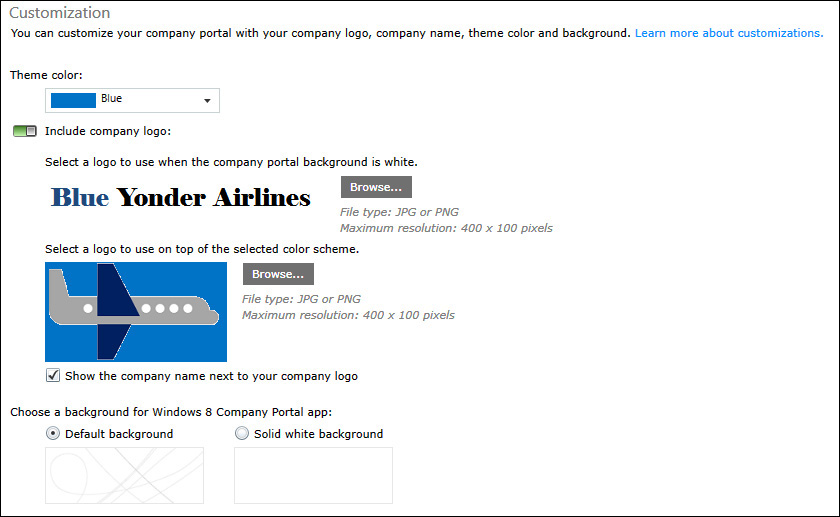
FIGURE 6-6 The Company Portal Customization options configured to support Blue Yonder Airlines company branding
6. The last step of configuring the Company Portal is to click the Microsoft Intune Company Portal link (https://portal.manage.microsoft.com) from the Microsoft Intune Company Portal URLs section to review your changes and ensure they are displayed correctly. Don’t worry if the customizations don’t immediately appear; these updates might take a few minutes to take effect.
Customize usage terms and conditions
With the Company Portal fully customized for your users, your next step is to modify the terms and conditions that you will require all Blue Yonder Airlines employees who will enroll devices into management to agree to before allowing them access to the Company Portal or corporate email.
Tip
The easiest way to do this is to simply copy and paste the terms and conditions text from the document you obtained from HR and Legal during the planning phase.
Use these steps to customize the Company Portal for your end-users:
1. While still signed in to the Microsoft Intune Admin Console with administrator permissions, navigate to Admin, Company Portal, Terms And Conditions.
2. Select the Require Users To Accept Company Terms And Conditions Before Using The Company Portal check box.
3. Enter the required terms and conditions information:
![]() Title
Title
![]() Text for terms
Text for terms
![]() Text to explain what it means if the user accepts the terms and conditions
Text to explain what it means if the user accepts the terms and conditions
4. Select one of the Decide Whether To Require Users To Re-accept Updated Terms options.
5. Click Save to finish customizing the terms and conditions.
Create and deploy the Mobile Device Security Policy
Your next task is to create and deploy the Mobile Device Security Policy for Blue Yonder Airlines. Because the Mobile Device Security Policy options you have selected are already covered by the recommended settings, you can simply create and deploy a policy with recommended settings by following these steps:
1. Ensure you are still signed in to the Microsoft Intune Admin Console with administrator permissions.
2. Navigate to Policy, Configuration Policies.
3. Select Add from the tasks list at the top of the page.
4. In the Create a New Policy dialog box, expand Common Mobile Device Settings
5. Select the Mobile Device Security Policy option and the Create And Deploy A Policy With The Recommended Settings option.
6. Click Create Policy. This will create the recommended Mobile Device Security Policy and name it Mobile Device Security Policy followed by the creation date and time.
7. In the Select The Groups To Which You Want To Deploy This Policy dialog box, select All Users, Add and then click OK to close the deployment dialog box. This completes the policy creation and deployment process.
Create and deploy email profile configuration policies
While still in the Configuration Policies node of the Policy workspace, now is a good time to create the email profile configuration policies to support Blue Yonder Airlines employees. Because you will support Android, iOS, and Windows devices, you will need to create three separate policies and deploy them to the All Users group to ensure your users receive the appropriate email profile policy setting regardless of the type of device they use to access email.
Follow these steps to create an email profile configuration policy to enable Blue Yonder Airlines users to access corporate email hosted by Exchange Online (Exchange ActiveSync host name outlook.office365.com and account name Blue Yonder Airlines Email Profile):
1. While still signed in to the Microsoft Intune Admin Console with administrator permissions, navigate to Policy, Configuration Policies.
2. Select Add from the tasks list at the top of the page to open the Create A New Policy dialog box.
3. Create and deploy email profile configuration policies for each mobile device type:
![]() Android Devices Expand Android, select Email Profile For Samsung KNOX Standard (4.0 And Later), and then click Create Policy. Enter the required information and click Save Policy. Click Yes in the Deploy Policy dialog box and deploy it to the All Users group.
Android Devices Expand Android, select Email Profile For Samsung KNOX Standard (4.0 And Later), and then click Create Policy. Enter the required information and click Save Policy. Click Yes in the Deploy Policy dialog box and deploy it to the All Users group.
![]() iOS Devices Expand iOS, select Email Profile (iOS 5 And Later), and then click Create Policy. Enter the required information and click Save Policy. Click Yes in the Deploy Policy dialog box and deploy it to the All Users group.
iOS Devices Expand iOS, select Email Profile (iOS 5 And Later), and then click Create Policy. Enter the required information and click Save Policy. Click Yes in the Deploy Policy dialog box and deploy it to the All Users group.
![]() Windows Phone Devices Expand Windows, select Email Profile (Windows Phone 8 And Later), and then click Create Policy. Enter the required information and click Save Policy. Click Yes in the Deploy Policy dialog box and deploy it to the All Users group.
Windows Phone Devices Expand Windows, select Email Profile (Windows Phone 8 And Later), and then click Create Policy. Enter the required information and click Save Policy. Click Yes in the Deploy Policy dialog box and deploy it to the All Users group.
Compliance policies
Now that you have established your MDM setting baselines using configuration policies, you need to ensure that those devices remain compliant with your recommended settings. It is a good idea to refer back to your Mobile Device Security Policy documentation as you create the compliance policy because you will want to use the compliance policy to enforce many of those same settings.
As the enterprise administrator for Blue Yonder Airlines, you will need to take the following actions to create and deploy the compliance policy for your organization:
1. While still signed in to the Microsoft Intune Admin Console with administrator permissions, navigate to Policy, Compliance Policies.
2. Select Add from the tasks list at the top of the page to open the Create Policy dialog box.
3. In the General section, give the compliance policy a name and description (optional).
4. Next, you can decide if you will configure all possible compliance settings or just the ones recommended for you. Because the recommended settings cover the basic Mobile Device Security Policy settings you have configured, you can safely ignore that switch for now. Later, you might want to come back and adjust some settings to further tighten security and feature functionality on BYOD devices in use.
Tip
Ensure that you configure the remaining compliance setting rules in the following sections to match what you have defined in the mobile device security settings.
5. You can accept the defaults in the Password section because those settings match what you have in the Mobile Device Security Policy.
6. The only setting in the Advanced Passwords Settings section that you need to enable and configure is the Required Password Type setting. Set this to match what you have in the Mobile Device Security Policy (Alphanumeric or Numeric).
7. Configure the Require Encryption On Mobile Devices setting to match the Mobile Device Security Policy setting (recommended yes).
8. Because company security policy is to not allow this, enable the Jailbreak option to verify that devices are not jailbroken or rooted.
9. Because you will be managing the email profiles for Blue Yonder Airlines employees, you can enable the Email Profiles option to ensure that email accounts are managed by Microsoft Intune (iOS 6+ only). After you enable this option, you will need to use the drop-down list to select the iOS email profile configuration policy you created earlier to preconfigure Blue Yonder Airlines email access for your users.
10. Click Save Policy.
11. In the Deploy Policy dialog box, click Yes to manage the deployment of the compliance policy.
12. In the Select The Groups To Which You Want To Deploy This Policy dialog box, select All Users, Add, and then click OK to close the deployment dialog box. This completes the policy creation and deployment process.
Conditional access policies
The last policy that needs to be addressed before you can turn your focus to enrolling devices is the Conditional Access Policy. Remember, this is the policy that will restrict access to corporate email to only those devices managed by Microsoft Intune and in compliance with Blue Yonder Airlines company policies that you have just previously defined.
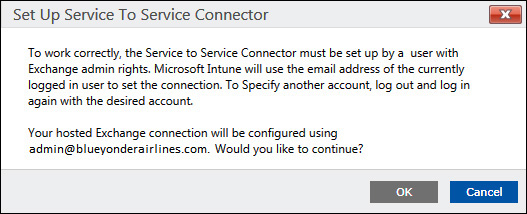
There are several prerequisites that must be in place to create and deploy this policy. You have already identified an Active Directory security group that you will apply the policy to during planning and you have also just deployed a compliance policy, but before creating the Conditional Access Policy, you still need to set up the Microsoft Intune Online Connector for Online Exchange. This connector allows you to discover and manage mobile devices connecting to the Exchange Online instance for Blue Yonder Airlines that are otherwise unmanaged. To do that, follow these steps:
1. Ensure you are still signed in to the Microsoft Intune Admin Console with administrator permissions to both Microsoft Intune and to your Exchange Online instance and then navigate to Admin, Mobile Device Management, Microsoft Exchange and select the Set Up A Connection To Exchange Environment option.
2. Select the Set Up Service To Service Connector option.
3. You should see a message similar to the one shown in Figure 6-7. Click OK to continue.
4. In the Admin Console, you should now select the Run Quick Sync option to immediately start the synchronization process between Microsoft Intune and Exchange Online.
5. Navigate to Groups, All Devices, All Mobile Devices, All Exchange ActiveSync Managed Devices to verify that the synchronization is working. It might take a few minutes, but eventually you should see devices listed there that are currently being managed only by Exchange ActiveSync.
Tip
These devices will also be the ones blocked from accessing Exchange email until they are managed by Microsoft Intune based on the Conditional Access Policy you are about to deploy. It might be a good time to alert affected users that this change is coming and give them the opportunity to self-enroll their devices before their email access is blocked.
With all of the prerequisites out of the way, you are now ready to create and deploy the Blue Yonder Airlines Conditional Access Policy using the following steps:
1. Ensure you are still signed in to the Microsoft Intune Admin Console with administrator permissions and navigate to Policy, Conditional Access, Exchange Online Policy.
2. Select the Block Email Apps From Accessing Exchange Online If The Device Is Noncompliant option.
3. In the Targeted Groups section, search for and add the security group that you have previously created during planning that includes the users that you want to apply this policy to.
4. In the Exempted Groups section, search for and add the security group that you have previously created during planning that includes the users that you do not want to apply this policy to.
5. In the Unsupported Platforms section, select an option to either block or allow access to email on devices that are not supported by Microsoft Intune. In this case, select the option to allow access.
6. Click Save to complete the Conditional Access Policy creation and deployment process.
Satisfy external device enrollment dependencies
At this point you have completed all of the necessary Microsoft Intune service configurations, but there are still some external dependencies that must be addressed before you can successfully enroll and manage iOS and Windows mobile devices.
iOS devices
As part of your planning, you have already requested and obtained an APNs certificate. That certificate must now be uploaded to the Blue Yonder Airlines Microsoft Intune service to create the trust between the Microsoft Intune service and the Apple Push Notification service to interact with the iOS devices that you want to manage.
To prepare your Microsoft Intune service to support iOS devices, you must plan for, and complete, the following actions:
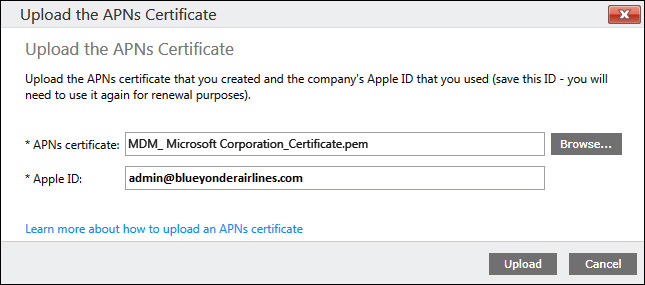
1. While signed in to the Microsoft Intune Admin Console with administrator permissions, navigate to Admin, Mobile Device Management, iOS.
2. Select the Upload An APNs Certificate option to open the Upload An APNs Certificate page.
3. Select the option to Upload The APNs Certificate and then browse to the .pem file that you previously downloaded during the planning process. You will also need to provide the Apple ID used to obtain the certificate. When you are ready to upload the APNs certificate, the dialog box should look similar to Figure 6-8.
4. To verify that these steps were completed successfully, look for a message displayed in the Microsoft Intune Admin Console notifying you that the service is ready for iOS enrollment along with details about your APNs certificate.
Windows devices
Because you have previously created a CNAME record with your domain registrar to enable Windows devices to locate the enrollment server, all you need to do at this point is verify that the DNS zone file updates have completed and that Windows devices will be able to successfully locate the enrollment server when users try to enroll their devices. Follow these steps:
1. Back in the Microsoft Intune Admin Portal with admin rights, navigate to Admin, Mobile Device Management, Windows, enter your public domain name in the Step 1 text box area, and select the Test Auto-Detection option. You should receive a message stating that the test was successful.
2. Now navigate to Admin, Mobile Device Management, Windows Phone, enter your public domain name in the Step 1 text box area, and select the Test Auto-Detection option.
3. You should receive another message stating that the test was successful, similar to Figure 6-9.
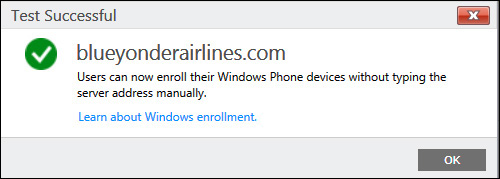
FIGURE 6-9 A successful name resolution test for Windows devices to access the enrollment server for Blue Yonder Airlines
Windows Phone 8.0
Because you have already done all the hard work and preparation for supporting Windows Phone 8.0 devices in the planning phase, all that remains is to upload the signed Windows Phone 8.0 Company Portal app into the Microsoft Intune service. Follow these steps:
1. In the Microsoft Intune Admin Console, navigate to Admin, Mobile Device Management, Windows Phone.
2. Select the option to Upload Signed App.
3. Sign in to the Add Software wizard using an account with administrator permissions.
4. Use the Browse button to find and select your signed Company Portal app (.xap file).
5. Clear the option to use the sample Symantec code-signing certificate2.
2 When evaluating Microsoft Intune, you can use the support tool for Microsoft Intune trial management of Windows Phone; it is a download that includes a Windows Phone 8 Company Portal app and several sample programs that have been code-signed using a sample Symantec code-signing certificate. Use the production-ready, code-signed Windows Phone 8.0 Company Portal app that you created during the planning phase. You can learn more about the sample tools for Microsoft Intune trials at http://www.microsoft.com/en-us/download/details.aspx?id=39079.
6. Upload and complete the wizard to deploy the signed Windows Phone 8.0 Company Portal app.
Tip
At this point you have completed all the necessary service configurations and prerequisites required for enrolling mobile devices! To double-check, navigate to the Admin, Mobile Device Management page and ensure that you see green check marks for each mobile device platform that you want to support.
Enrolling devices
As an administrator, you can assign device-enrollment managers who will be authorized by the service to enroll more than five devices—the device limit normally set by Microsoft Intune. This role is useful when enrolling several company-owned devices into management with Microsoft Intune. Another bulk enrollment option for iOS devices is to use the Apple Configurator tool running on a Mac computer to bulk enroll company-owned iOS devices. However, in the following BYOD scenario, users will enroll up to five of their own personal devices into management with Microsoft Intune using the Company Portal app or a mobile device setting.
The following sections describe the enrollment process for each of the devices supported by Microsoft Intune:
![]() iOS
iOS
![]() Android
Android
![]() Windows devices (Windows Phone 8.0, Windows Phone 8.1, and Windows 8.1 computers enrolled as devices).
Windows devices (Windows Phone 8.0, Windows Phone 8.1, and Windows 8.1 computers enrolled as devices).
You can check BYOD self-enrollment progress and verify that each of your users’ devices enrolls successfully by looking in the custom device group that you specified in the default enrollment profile to see devices as they are enrolled.
Enrolling iOS devices
The process to enroll iOS devices is the same for both iPhones and iPads. Because the APNs certificate is already provisioned, users can download the iOS Company Portal app and follow these simple instructions to get their devices enrolled into management:
1. On the iOS device, open the Apple App Store and search for the Microsoft Intune Company Portal app.
2. Install the app and then open it.
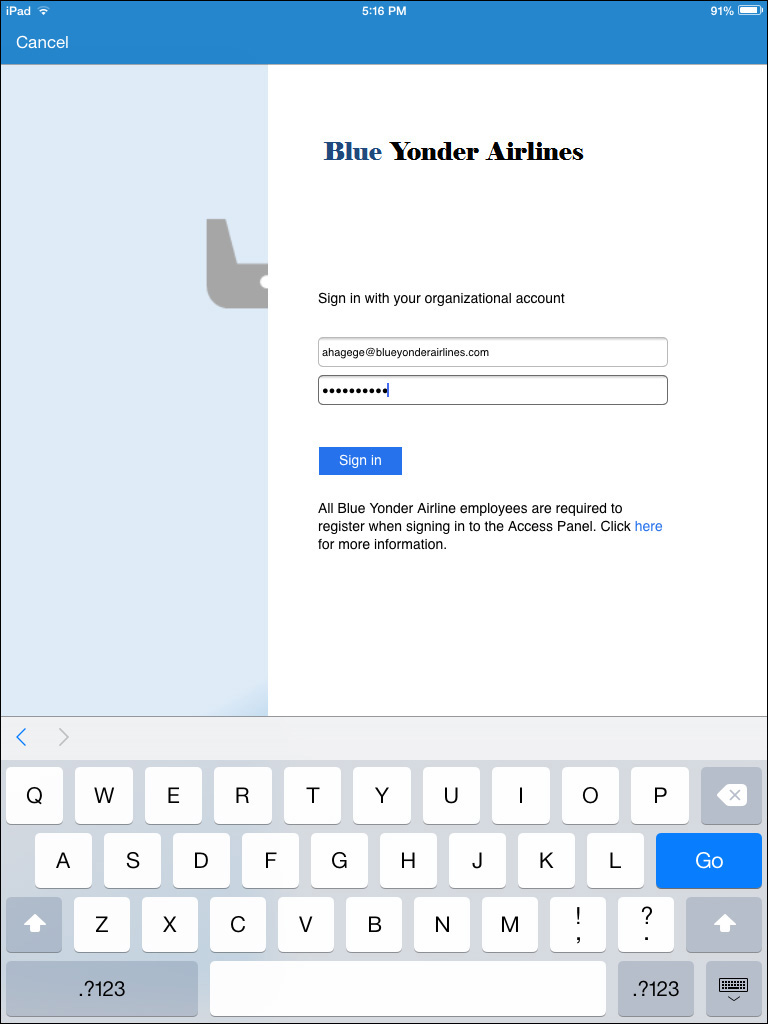
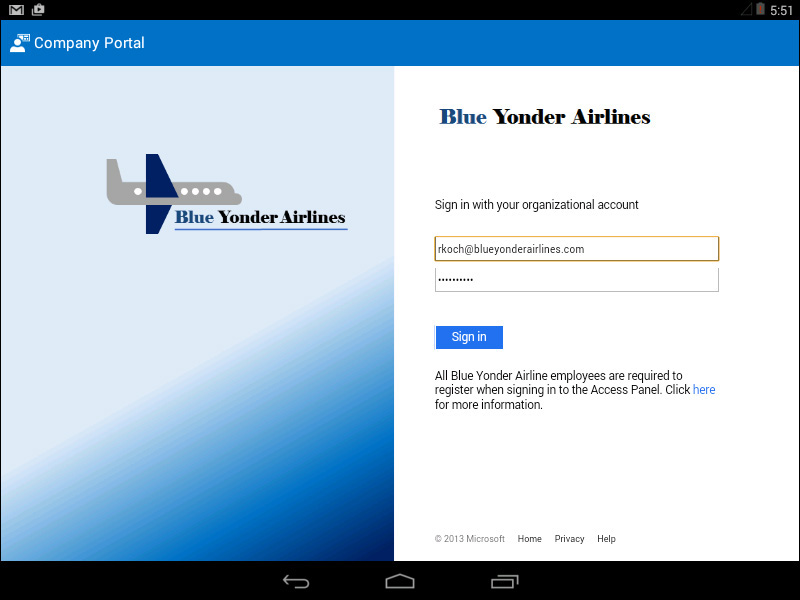
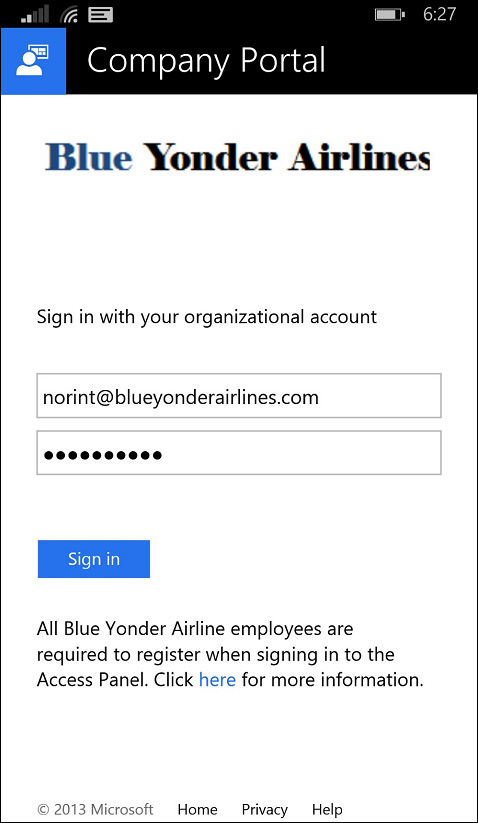
3. Sign in to the Company Portal using your corporate credentials. As soon as you enter your name, the page should be redirected to your custom AD FS sign-in page, similar to what is shown in Figure 6-10.
4. The Device Enrollment dialog box will appear. Review the details about device enrollment and then click Enroll to continue.
5. Click Install to install the management profile for your company (Blue Yonder Airlines) on the iOS device utilizing the trust protected by the APNs certificate.
6. Review the Warning dialog box that describes administrator actions that will be enabled by installing this management profile and then click Install to continue.
7. In the Remote Management dialog box, tap Trust to verify that you trust the source of the trust to remotely manage the device.
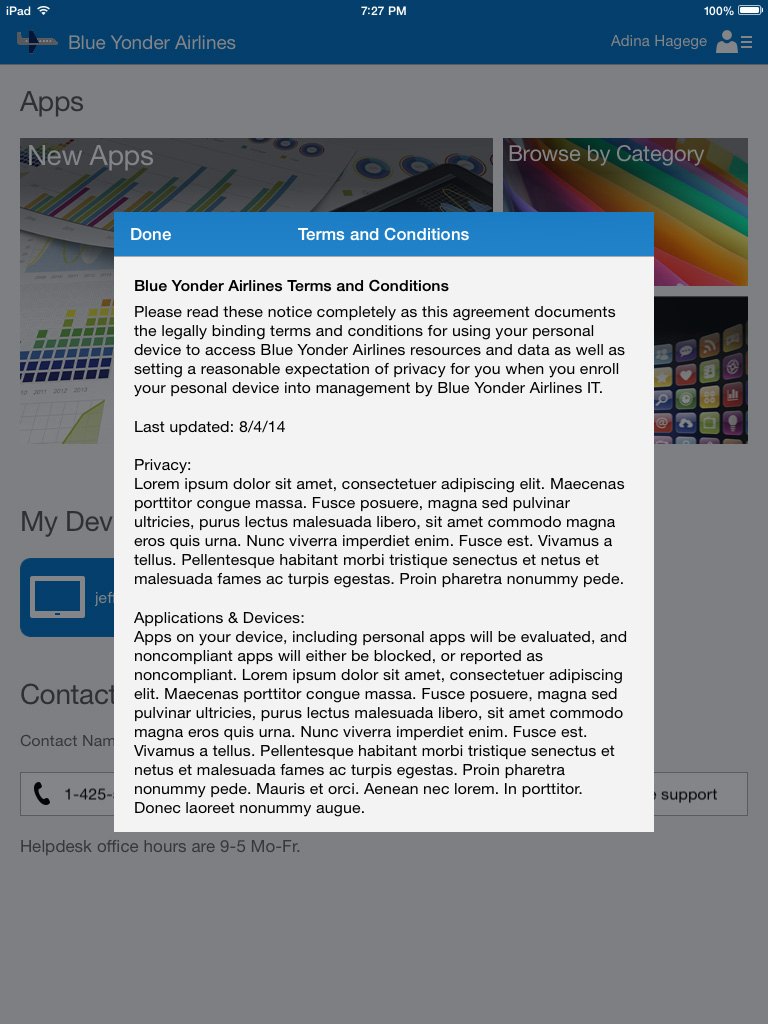
8. When profile installation completes, tap Done to open the Company Portal app. Because you have previously configured the option to enforce acceptance of the terms and conditions, those terms and conditions will now be displayed and they must be accepted by tapping Done, as shown in Figure 6-11.
9. The device is now enrolled and will begin synchronizing with the Microsoft Intune service to apply policies, including pre-configuring the email profile to connect to Exchange Online, and verify compliance with the configuration policies that you previously created and deployed. Any applications that have been deployed to the user and the device type she is using will be displayed as well as any Company Portal customizations you have made, as shown in Figure 6-12.
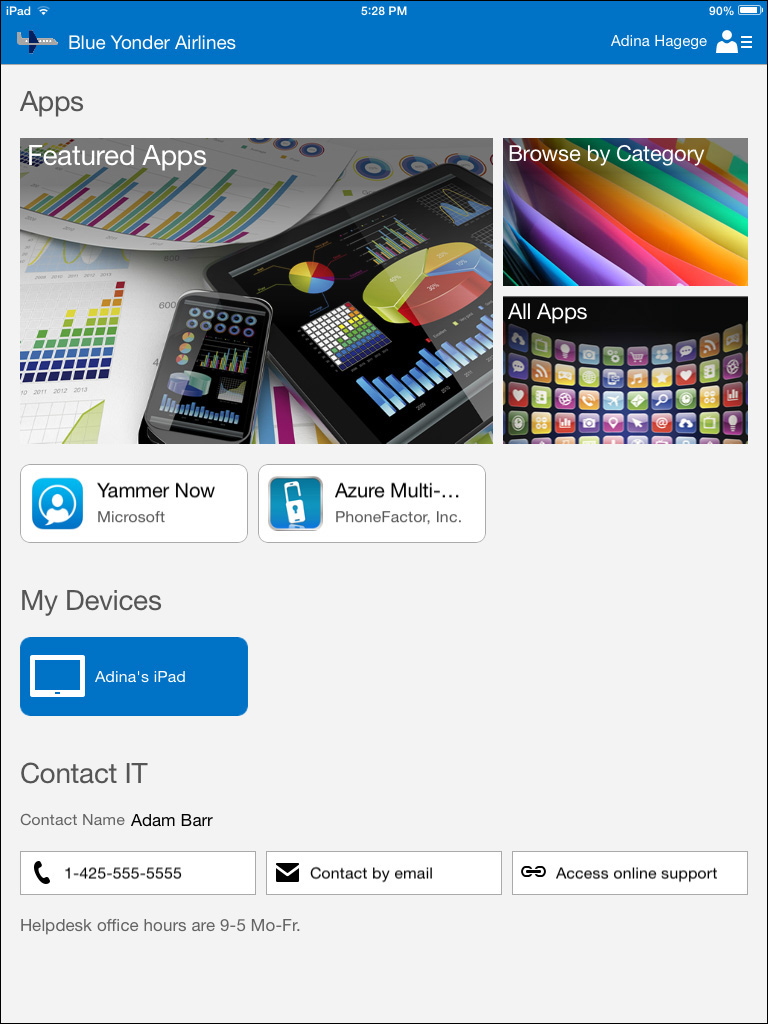
FIGURE 6-12 The customized Company Portal as seen by a signed-in Blue Yonder Airlines employee on her iPad
Enrolling Android devices
The process to enroll an Android device into management with Microsoft Intune is very similar to that used to enroll an iOS device, but in this case, end users need to install the Company Portal app from the Google Play Store.
In this example, you can see how conditional access policies are used to ensure that all devices accessing corporate email are managed by Microsoft Intune and are in compliance with administrator-defined policies. This might be the way many of your users discover the need to enroll their devices if they have previously configured corporate email on their devices. If that is the case, they will receive an email similar to the one shown in Figure 6-13, informing them of the need to enroll their devices into management and providing instructions for doing so. The email is the same regardless of which devices they are using, but it will be the last email they receive on that particular device until they are in compliance with company policy, at which time normal email functions will resume.
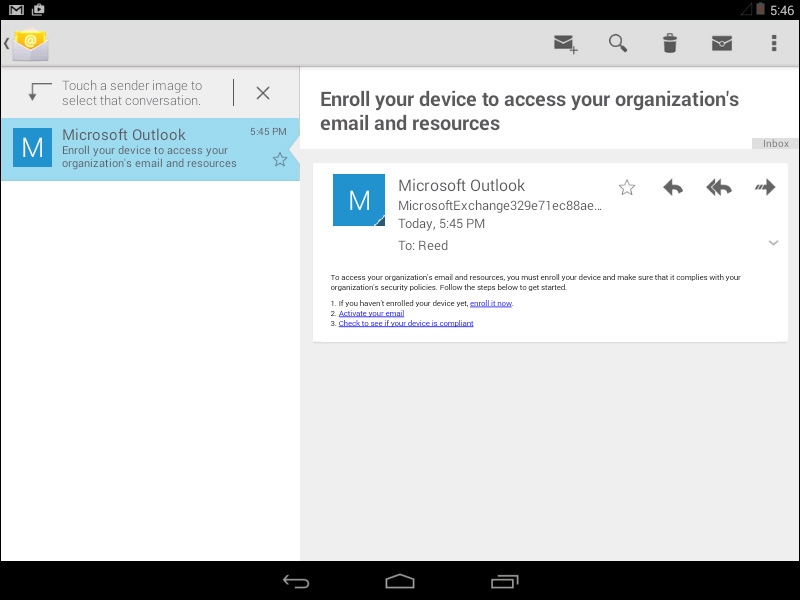
FIGURE 6-13 A user being notified that he must enroll his Android device into management to regain email access
Users who have been denied access to Exchange email on their Android devices via conditional access policies can use the following steps to enroll their devices and regain access to email:
1. Click the Enroll It Now link found in Step 1 of the email generated by the Conditional Access policy. A webpage will be opened on the device.
2. Select the only option available on that webpage to Get The App. You might be prompted at this point by a Complete Action dialog box. If that happens, select the Play Store to complete the task.
Tip
Alternatively, if the user just wants to enroll his Android device, he can search for the Microsoft Intune Company Portal app from the Google Play Store and follow the remaining steps.
3. The Microsoft Intune Company Portal app will be displayed on the screen. Click Install to install it on the device.
4. The Company Portal app permissions are displayed and must be accepted before continuing.
5. Once installed, click Open to launch the Company Portal app and then click Next to begin the device enrollment process.
6. The user is prompted to sign in and should be automatically redirected to the customized company AD FS sign-in page, similar to what is shown in Figure 6-14.
7. Once signed in, the custom company terms and conditions will be displayed to the user. Click Accept to accept the usage terms and conditions.
8. The device will prompt you to activate the device administrator to enable the Company Portal app to perform administrative actions on the device. Click Activate to continue.
The device will now complete the enrollment process and the apps and company resources available to the user on Android devices will now be shown, as seen in Figure 6-15.
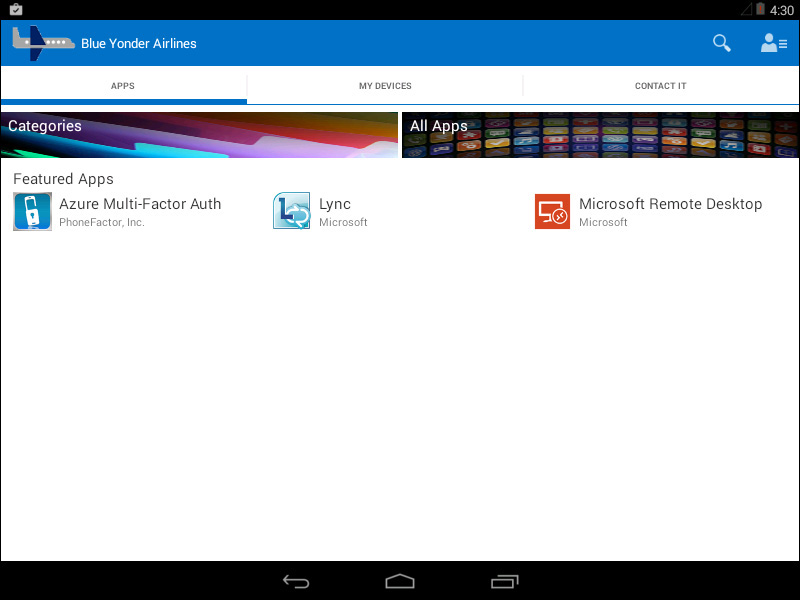
FIGURE 6-15 The customized Company Portal as seen by a signed-in Blue Yonder Airlines employee on his Android tablet
Enrolling Windows devices
The process for enrolling Windows devices is also pretty straightforward, but the steps vary according to the type of Windows device that you are enrolling.
The following sections explain how to enroll some of the various supported Windows devices your users might be using.
Enrolling Windows Phone 8.0 devices
Now is when all the hard work to code-sign the Windows Phone 8.0 Company Portal app pays off. Because you have already code-signed and uploaded the app to the Microsoft Intune service, it will be available for your users to install by following these simple steps:
1. On the Windows Phone 8.0 device, open Settings and then scroll down and tap Company Apps.
2. Review the information about the significance of adding a company account to the device and then tap Add Account.
3. Provide company credentials and select Sign In.
At this point, the device will begin searching for the enrollment server and for the settings that should be applied to the device.
Tip
This is when the device will be searching for the enrollment server based on the CNAME DNS record you created earlier to direct it to manage.microsoft.com.
4. When the account is successfully added, the device will now be enrolled into management. The Windows Phone 8.0 Company Portal app can now be installed by selecting the Install Company App Or Hub option and then tapping Done, as shown in Figure 6-16.
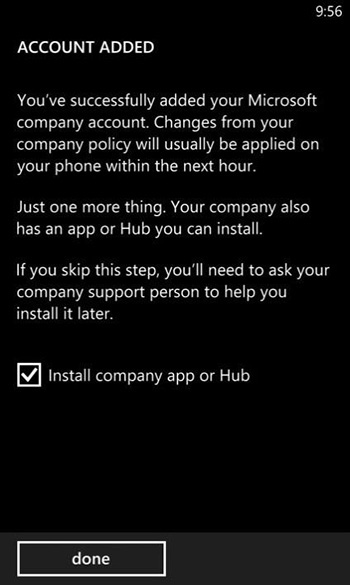
FIGURE 6-16 A user installing the signed Windows Phone 8.0 Company Portal app during device enrollment
Enrolling Windows Phone 8.1
The process for enrolling a Windows Phone 8.1 device is very similar to that used by both Android and iOS devices. Users simply need to install the Company Portal app and sign in to enroll their devices using these steps:
1. On the Windows Phone 8.1 device, open the Microsoft Store and search for the Microsoft Intune Company Portal app.
2. Install the app and then open it.
3. Sign in with company credentials after being redirected to the custom AD FS sign-in page.
4. Read and accept the custom company terms and conditions by clicking Accept.
5. At this point you will be granted access to the Company Portal and any Windows device apps available to you, as shown in Figure 6-17. However, the device will not be enrolled yet.
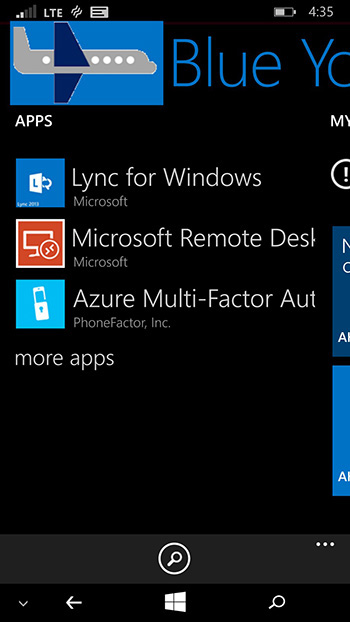
FIGURE 6-17 A Blue Yonder Airlines employee signed in to the Company Portal on her Windows 8.1 phone
6. To enroll the device, swipe over to the My Devices screen and tap the Tap To Enroll This Device option.
7. On the workplace screen, tap Add Account.
8. Enter the same credentials used to sign in to the Company Portal on the workplace email address page and tap Sign In. After being redirected to the custom AD FS sign-in page, enter the password for the account and tap Sign In, as shown in Figure 6-18.
9. The device will begin searching for the enrollment server and other account settings. Once found, the device is enrolled and tapping Done completes the process.
10. You can verify or change the enrollment settings on this device from the workplace page in the phone settings.
Enrolling Windows 8.1 computers as devices
Windows 8.1 computers can be managed by Microsoft Intune as either managed computers or enrolled devices. To manage Windows 8.1 computers as managed computers, administrators can install the Microsoft Intune agent on the computers manually, through Group Policy, or even as part of a computer operating system image.
However, in this example, users self-enroll their computers as devices from the Company Portal website using the following steps. Each computer that they enroll will then automatically be linked to their user accounts.
The following steps require that the logged-on user be an administrator on the computer being enrolled into the Microsoft Intune service.
1. A user with administrative rights on the computer logs on to the computer and then uses Internet Explorer to browse to the Company Portal website at https://portal.manage.microsoft.com/.
2. The user logs into the Company Portal website using company credentials, which automatically redirect her to the custom AD FS sign-in page.
3. The custom terms and conditions are displayed and must be accepted before continuing.
4. When the Company Portal is displayed, the user clicks the Add Device option from the task list at the top of the screen, as shown in Figure 6-19.
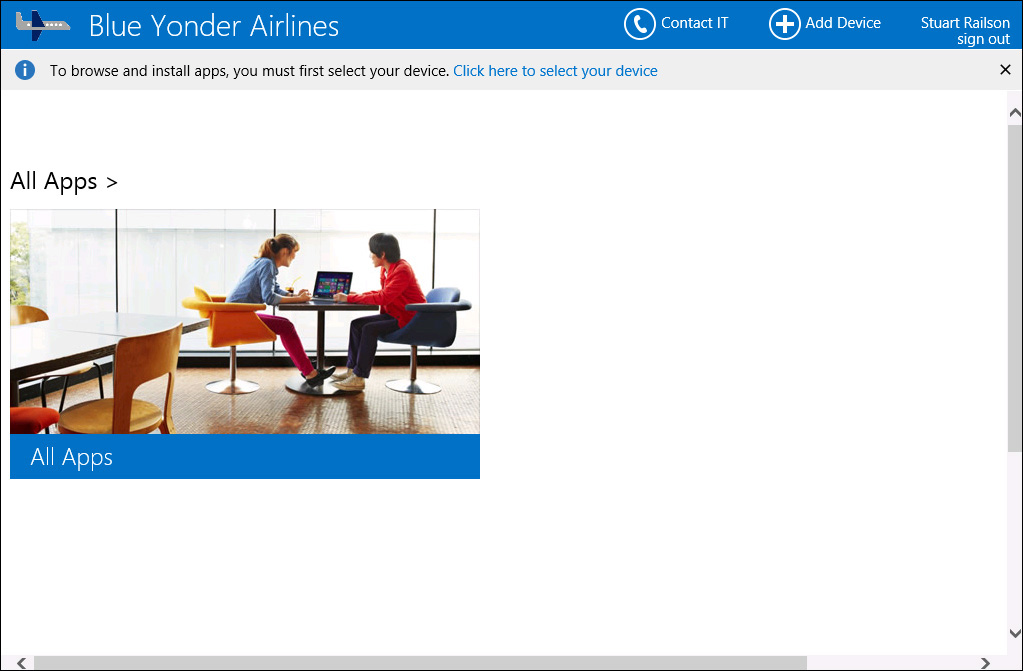
FIGURE 6-19 A Blue Yonder Airlines employee signed in to the Company Portal website on her Windows 8.1 computer
5. Click the Download Software button to download the Microsoft Intune software to the local computer.
6. At the bottom of the web browser, select the Run Microsoft_Intune_Setup.exe option. At this point, the Microsoft Intune client software will be downloaded and run on the local computer.
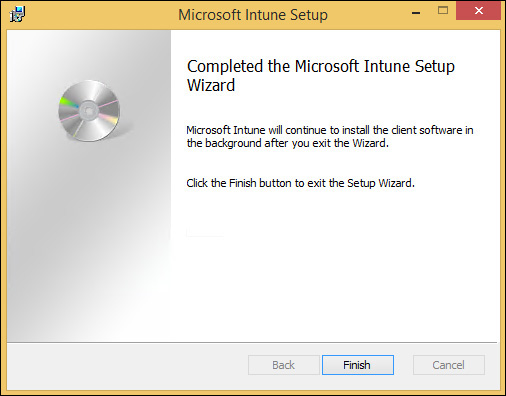
7. Click Finish to complete the Microsoft Intune Setup Wizard, as shown in Figure 6-20.
8. After a few minutes, the Microsoft Intune computer client software will complete installation, which makes the Microsoft Intune Center and Company Portal options available from the taskbar.
This completes the Windows 8.1 computer enrollment process. With the Microsoft Intune client software installed, administrators can remotely take actions to manage application deployment, software update installation, Endpoint Protection to defend against malware, and remote assistance options (on supported operating systems).