
IN THIS CHAPTER
While you were collecting inventory, distributing packages, managing patches, and performing the other activities covered in this book, a significant amount of data has made its way to the Configuration Manager (ConfigMgr) 2007 site database. As part of the discussion of creating and distributing packages in Chapter 13, “Creating Packages,” and Chapter 14, “Distributing Packages,” you were introduced to queries, which are data requests performed against the site database to obtain information about resources.
You can use ConfigMgr queries for a variety of purposes. You can create a query to return information regarding certain hardware and software prerequisites before sending a package to selected client systems. You can also create a query to display the status of an advertisement. Queries are also used to define collection memberships, as discussed in Chapter 14. You can use queries to retrieve any information stored in the site database.
This chapter discusses using queries as a means to obtain information. It steps through using the Query Builder, introduces WQL, discusses querying the Status Message System, and using query results.
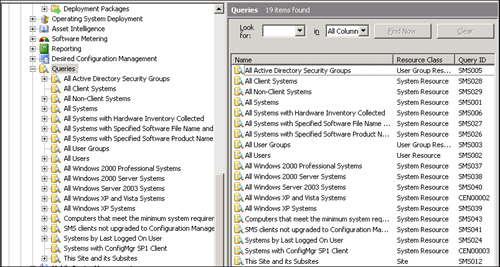
ConfigMgr queries are located in the ConfigMgr console, under System Center Configuration Manager -> Site Database -> Computer Management -> Queries. By default, the Queries node displays the name, resource class, and query ID for each query. The resource class is the type of Windows Management Instrumentation (WMI) object returned in the result set. Predefined queries have a query ID beginning with Systems Management Server (SMS), whereas those you create, similar to collections, will begin with the site code.
To customize the columns displayed in the query list, right-click the Queries node and choose View -> Add/Remove Columns. Here are the available columns not displayed by default:
• Comments— This is self-explanatory.
• Expression— This is the WMI statement for the query.
• Limit to collection ID— This is the ID of the collection from which the query will retrieve results. If you do not specify a collection ID, the query is not limited to a specific collection.
Figure 17.1 displays the default view of the Queries node.
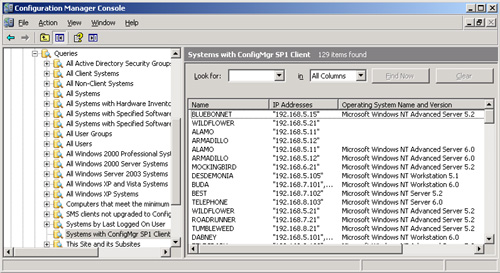
You can click a query to retrieve and display its results. Figure 17.2 displays the results for the Systems with ConfigMgr SP1 Client query. Notice the search bar at the top of the results pane; this allows you to enter a search term and choose the columns to search. You can also export the displayed data to a tab or comma- delimited text file by right-clicking the query name in the console tree and choosing View -> Export list. The “ConfigMgr Query Builder” section of this chapter shows how the Systems with ConfigMgr SP1 Client query was created.
The built-in queries are just a sample of the data available in ConfigMgr. You will want to review the properties of the built-in queries to get a better idea of how they are created, and then begin building your own queries!
Creating queries is a safe way to obtain data from ConfigMgr. When you use the Query Builder, the class joins are automatically created, thus reducing the risk of an improper join that could be resource intensive. The following sections provide additional insight into the query language, as well as the types of objects you can query.
ConfigMgr queries use the WMI Query Language (WQL) to gather information from the site database. In this way, queries differ from Configuration Manager reports (discussed in Chapter 18, “Reporting”), which use standard SQL syntax to access database information. ConfigMgr uses WMI for much more than just ConfigMgr queries. The ConfigMgr Software Development Kit (SDK) is a great place to learn more about WMI and WQL as well as Configuration Manager’s use of these technologies.
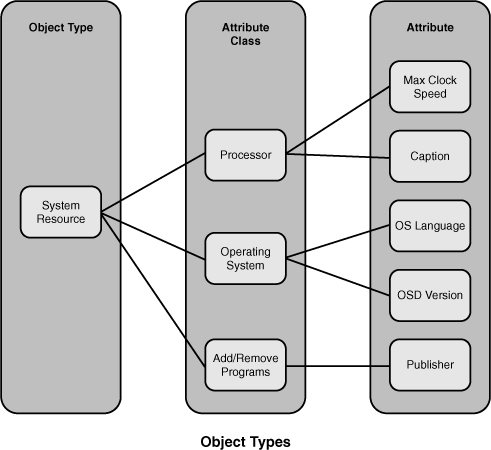
Prior to building queries, let’s discuss the terminology and the objects you will use. When selecting data in a query, you select an object type, one or more attribute classes, and one or more attributes. These terms are defined in the following list:
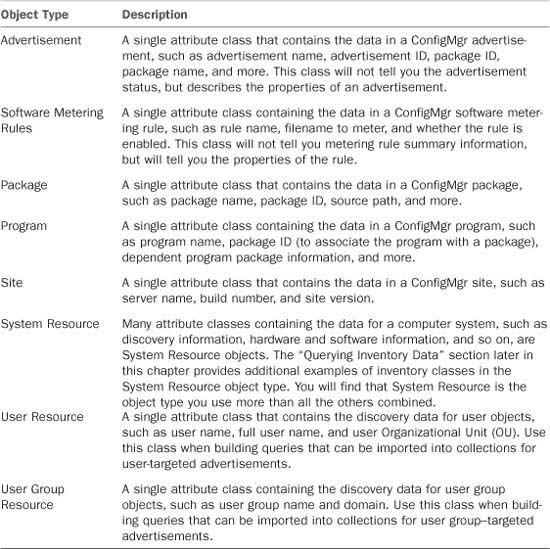
• Object type— A set of attributes that represents a ConfigMgr database object, such as a client, package, or advertisement. Table 17.1 shows the object types available for queries.
• Attribute class— A container object that groups related attributes. For example, the Processor attribute class contains attributes such as Device ID, Manufacturer, Resource ID, and more. You can control many of the attributes in the attribute class by modifying the attributes collected in inventory by modifying the SMS_Def.mof file. Most attributes you will use in ConfigMgr queries are members of the System Resource Object type, because all hardware and software inventory information is a member of this object type. The “Querying Inventory Data” section of this chapter includes additional examples of inventory classes in the System Resource object type. If later you decide to build a web report (which uses SQL instead of WQL), you will find a SQL view with a similar name. As an example, the Computer System attribute class in WQL has a corresponding SQL view named v_GS_COMPUTER_SYSTEM.
• Attribute— The specific property that the query searches in criteria and/or displays for query results.
Figure 17.3 provides an example of object types and their relationships discussed in this section. It shows the selected object type System Resource. Within the System Resource object type, three attribute classes (Processor, Operating System, and Add/Remove Programs) are selected. The lines between each object type represent the joins that are required between classes. Here is the WQL equivalent of Figure 17.3:
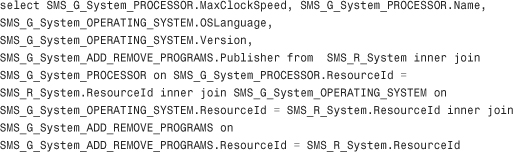
As you can see from this code, WQL looks very similar to SQL. You will also notice that no criterion is specified (the query does not contain a WHERE clause). This particular example did not specify criteria, which is another feature of ConfigMgr queries—you may want to see all the data on occasion. You will learn in the next section how you can easily create a WQL query with criterion.
Creating a query in ConfigMgr is fairly simple. The easiest way to create and run a query is by using the New Query Wizard, which is built in to the ConfigMgr console. Perform the following steps:
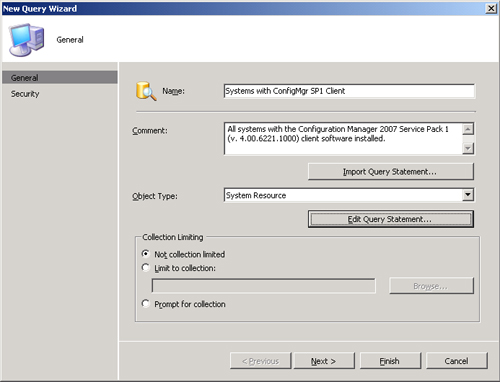
- To launch the wizard, right-click the Queries node and then choose New -> Query. Figure 17.4 displays the New Query Wizard’s General page. This example shows the name Systems with ConfigMgr SP1 Client entered, along with a description for the query. The default object type of System Resource is selected from the dropdown Object Type list box.
-
The General page includes the Import Query Statement button, which allows you to browse the existing queries and select one to use as a starting point for your new query. The Collection Limiting section of the page lets you select objects only from a collection you specify or a collection supplied by the user at runtime. The Systems with ConfigMgr SP1 Client query will be a new query statement created from scratch, and will not limit the results to a specific collection.
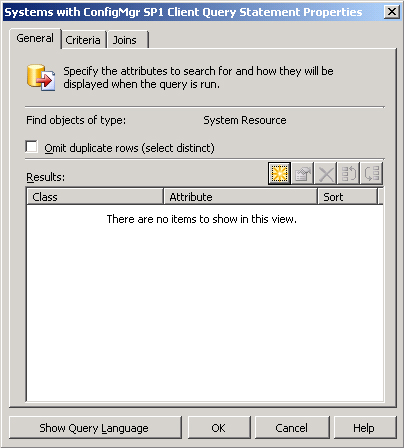
To create the query statement, click the Edit Query Statement button. The New Query Wizard now displays the Query Statement Properties dialog box, displayed in Figure 17.5.
-
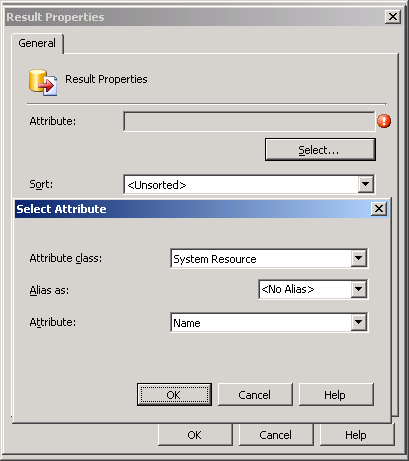
You can click the New button to display the Result Properties dialog box, which allows you to select the resource type and attributes that the query will retrieve. On the Result Properties dialog box, you can click the Select button to display the Select Attribute dialog box. Figure 17.6 displays the Result Properties dialog box, with the Select Attribute dialog box in the foreground.
Figure 17.6 also shows the System Resource attribute class and Name attribute selected. Optionally, you could supply an alias to use as the column header for the Name column.
After clicking OK to return to the Result Properties dialog box, add three additional system resource attributes to the query results:
• IPAddresses
• OperatingSystemNameandVersion
• OperatingSystemServicePack
-
After you determine that the query will display system resources and have selected those attributes you want to see, the next step in designing the query is to specify criteria for the systems you want to display.
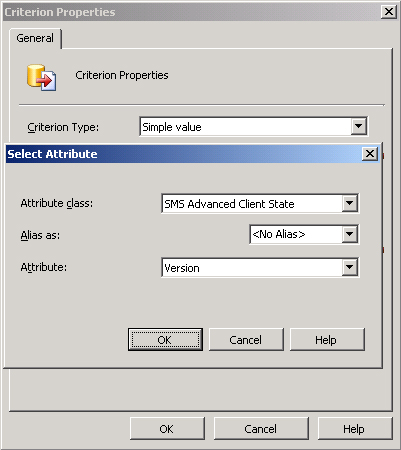
On the Query Statement Properties dialog box’s Criteria tab, click the New button to display the Criterion Properties dialog box. On the Criterion Properties dialog box, choose Simple Value from the Criterion Type list box and then click the Select button to select the attribute to use in the criterion. Figure 17.7 displays the Criterion Properties dialog box with the Select Attribute dialog box in the foreground. The attribute class used here is SMS Advanced Client State, and the specific attribute is Version.
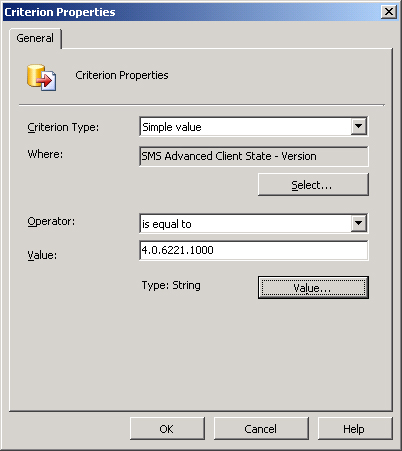
- After choosing the criterion attribute and clicking OK to return to the Criterion Properties dialog box, you can choose the operator and value for the selection criterion. Figure 17.8 shows the full criterion used: SMS Advanced Client State – Version is equal to 4.0.6221.1000. This is the client version for Configuration Manager 2007 Service Pack (SP) 1.
- To complete the wizard, click OK to accept the criterion properties and OK again to complete the query properties. Click Next to return to the New Query Wizard’s General page. You will now have an opportunity to modify security on your query. Chapter 20, “Security and Delegation in Configuration Manager 2007,” discusses security. You can click Finish on the Security page to complete creating the query.
If you plan to build a query-based collections, you may want to consider creating a ConfigMgr query first. By creating a query, you can see the data on which you based your criteria in the WQL statement. As an example, you need to create a collection of systems that have a specific piece of software installed. When you create a query-based collection based on an installed file, the collection members will appear in the collection, but not the specific criteria built in the WQL statement. If you create that same WQL statement in a ConfigMgr query, you will be able to see the value of your criteria, which enables you to verify visually that your query is returning exactly what you intended. After verifying the data, insert the WQL into a query-based rule for the desired collection. The “Creating a Collection Based on Query Results” section later in this chapter contains additional information.
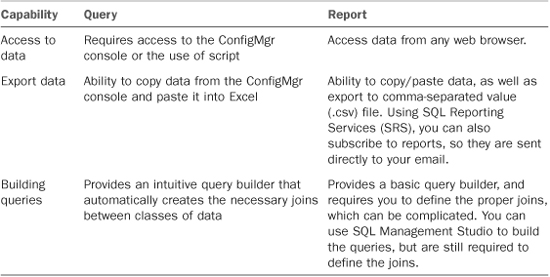
Table 17.2 lists some points to consider when deciding between queries and reports.
The previous section, “ConfigMgr Query Builder,” briefly described criterion, operators, and values (each displayed in Figure 17.9). However, each of these elements of a query deserves additional detail:
• Criterion— Specify the type of criterion to use for comparison. The options follow:
• Null value—
Compares a query attribute to a null value. An example of where you may find a null value would be for a system that is discovered but has not yet reported inventory. The System class would have valid data, but the Computer System class would have no information, which would be a null value. Another example would be when looking for systems that are not ConfigMgr clients. You see that SystemResource contains the Client attribute. Simply setting SystemResource.Client is not equal to 1 will not provide the expected results, because that attribute only exists if the site knows that the system is not a client. The proper query would include SystemResource.Client is NULL Or SystemResource.Client is 0.
• Prompted value— This is a placeholder for a simple value that prompts the user at runtime. Using a prompted value provides additional flexibility to a query. As an example, if you are querying information for a specific computer, instead of statically entering the computer name into the query, you can elect to use a prompted value. This capability allows you to easily run the query for multiple systems without the need to create additional queries. Another example is creating a query such as “C: drive has less than x MB free.” Here, using a prompted value allows you to define the value of x when running the query. The prompted value type exists in queries, but not in collections.
• Simple value— Compares to a constant value. Selecting Simple value enables the simple value settings. This is the most basic of operators. Use Simple value when you are looking for a single criterion.
• Attribute reference— Compares to another attribute. Selecting Attribute reference enables the attribute reference settings. In this case, you compare two different attributes. One example is to find out all the PCs in which the processor’s current clock speed is less than the maximum clock speed.
• SubSelected values— Compares to results returned by another query. Selecting SubSelected values enables the subselected values settings. You can use this when you want to compare an attribute with the results of another query. One good example is to find out all the computers that do not have specific software. Jeff Gilbert’s blog posting at http://myitforum.com/cs2/blogs/jgilbert/archive/2008/07/22/subselect-queries-the-easy-way.aspx provides additional information.
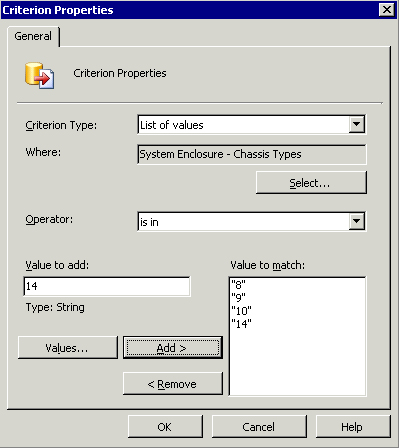
• List of values— Compares to a list of constant values. Selecting List of values enables the list of values settings. A classic example is listing all systems where the chassis is classified as a notebook. For additional information on chassis types, review information on the Win32_SystemEnclosure at http://msdn.microsoft.com/en-us/library/aa394474.aspx.
Figure 17.9 shows the Criterion Properties dialog box, where List of values is specified as the Criterion Type setting. Cross-referencing the values shown in Figure 17.9 with the Chassis Types property of the Win32_SystemEnclosure class will show you that this query is for Portable, Laptop, Notebook, and Sub Notebook chassis types.
• Operator— This dropdown field specifies how to assess the values. Options vary, depending on the value defined for the criterion type. When the criterion type is Simple, these values include the following:
Is equal to
Is greater than
Is greater than or equal to
Is less than
Is less than or equal to
Is like
Is not equal to
Is not like
Lowercase is equal to
Lowercase is greater than or equal to
Lowercase is less than
Lowercase is less than or equal to
Lowercase is like
Lowercase is not equal to
Lowercase it not like
Uppercase is equal to
Uppercase is greater than or equal to
Uppercase is less than
Uppercase is less than or equal to
Uppercase is like
Uppercase is not equal to
Uppercase is not like
• Values— Specify a value by entering it into the Value text box. You can also click the Values... button, which will query ConfigMgr for a list of possible values and allow you to select a value. If the number of possible values is very large, the list is truncated. You can use wildcards with strings by selecting one of the operators that uses the Like clause:
• _ (underscore)— Matches any one character
• % (percent)— Matches any zero or more characters
You can also use this information when building query-based rules for a collection, as discussed in Chapter 14.
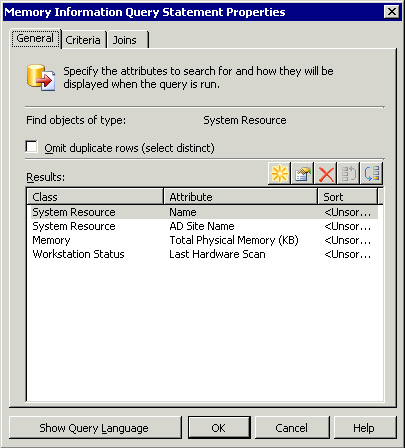
A favorite feature of the Query Builder is that it automatically creates the joins for you. As an example, say you want a list of all computers and the total amount of physical memory. To make things a little more complex, your boss also wants this listing to display the Active Directory Site Name, as well as a date/time stamp of when the ConfigMgr client inventoried the information. Using the Query Builder, you simply select the classes and properties you want to display (this example will use the classes of System Resource, Memory, and Workstation Status) and then run the report. The Query Builder creates all the joins for you. To see the detail, simply click the Show Query Language button (displayed previously in Figure 17.5) after you write your query. For additional information on converting WQL to SQL, see the “Converting WQL to SQL” sidebar later in this chapter. In addition to using the Query Builder, you can write the query statements yourself. Using WQL, you specify the WMI object classes and attributes the query will use to search the ConfigMgr site database. As an example, perhaps you want to display all systems that have reported hardware inventory in the past 30 days. There is no native way to do this using the Query Builder. Luckily, ConfigMgr supports Extended WMI Query Language, which allows you to use the following functions:
• GetDate()—
This function returns the current date and time on the system. The data is returned in date-time format (for example, 12:56 AM 12/02/2009).
• DateDiff()—
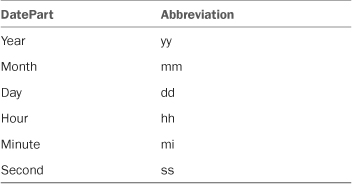
This function returns the difference between two date-time values in the increment you specify (for example, minute, hour, day). The DateParts listed in Table 17.3 are supported when using DateDiff in a WHERE clause in SMS WQL. Here’s the proper syntax for DateDiff:
DateDiff ( DatePart, StartDate, EndDate )
• DatePart is the part of the date you want to calculate (minute, day, month, and so on).
• StartDate is the begin date.
• EndDate is the ending date.
• DateAdd()—
Returns a new date-time value based on adding an interval to the specified date. Testing validated that the DateParts listed in Table 17.3 are supported when using DateAdd in a WHERE clause in SMS WQL. The proper syntax for DateAdd follows:
DateAdd ( DatePart, Number, Date )
• DatePart is the part of the date you want to calculate (minute, day, month, and so on).
• Number is the value to increment DatePart.
• Date is a valid date-time value used to calculate the new date.
Table 17.3 shows the DataParts and their abbreviations.
As you can see, ConfigMgr provides a considerable amount of power in configuring queries. If you plan to create a custom query-based collection, first try to create a query using the Query Builder. Then take the next step, if necessary, to incorporate your custom query details. The next sections provide examples of using Extended WQL.
Use this query to retrieve all systems that have reported a LastHardwareScan date within the last 30 days:
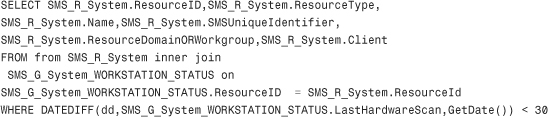
Notice the WHERE clause in the WQL statement, which is using the DateDiff function. The query uses dd to specify the difference in days, then the LastHardwareScan property is compared to the current date using GetDate(). If the difference in days is less than 30, the system is included in the query.
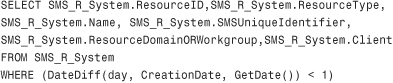
The following example includes all systems discovered since midnight, based on the CreationDate property in the discovery record.
Converting WQL to SQL
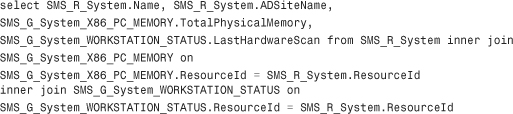
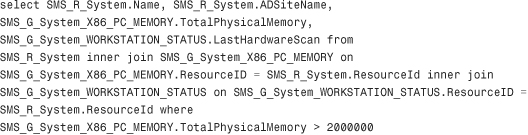
Now that you understand how to create queries using the Query Builder, you may also want to create these queries in ConfigMgr web reports. If you have built any web reports, you probably know that there is no query builder type of tool. It is not well known, but you can easily translate your WQL queries to SQL. As an example, look at the query created in Figure 17.10, which shows you the system name, AD site, total physical memory, and last hardware scan. The WQL looks like this:
To convert this WQL to SQL, simply execute the query. Next, review the smsprov.log on the site server, looking for a line that contains Execute SQL =. For this example, you would find a log entry similar to this:

This log entry gives you the SQL syntax! For additional information on converting WQL to SQL, review Brian Leary’s article at http://www.myitforum.com/articles/8/view.asp?id=9908.
As discussed in the “ConfigMgr Query Builder” section of this chapter, the Query Builder automatically creates the relational joins between different attribute classes. You can view these joins by looking at the WQL statement directly (using the Show Query Language button in Figures 17.10 and 17.11) or by viewing the Joins tab on the Query Statement Properties dialog box. ResourceID is the attribute generally used for joins. You may occasionally find that MachineID and ItemKey in one attribute class map to ResourceID in another attribute class. You can also use relationships, operations, and joins to query discovery and inventory data, as discussed in the following sections.
You can use the following classes to query discovery data:
• System Resource— Use the System Resource class for system properties such as System Container Name, System OU Name, AD Site Name, ConfigMgr Client Version, System IP Address, System Name, and more. If you are building queries manually, join classes in WQL using the ResourceID property of the SMS_R_System class. For example, for a simple WQL query to include the Active Directory site named TestLab, enter the following query:
![]()
• User Resource— This class is used for user properties, such as User OU Name, User Group Name, and User Name.
• User Group Resource— The User Group Resource class is used for AD user group properties, such as User Group Name, Unique User Group Name, and Domain.
The most important piece of information to remember about discovery data is that most of it is available to you even before the computer system has a ConfigMgr client installed. As an example, you will be able to query for systems in an Active Directory site even if you have not installed clients. This is an important step when deploying ConfigMgr to a new environment. Use this data to enable discovery methods, and build queries and reports to obtain a better idea of the locations of your enterprise systems—prior to installing clients.
The “ConfigMgr Query Builder” section of this chapter provided detailed information on creating a basic query. This section provides additional information for selecting inventory data classes and attributes.
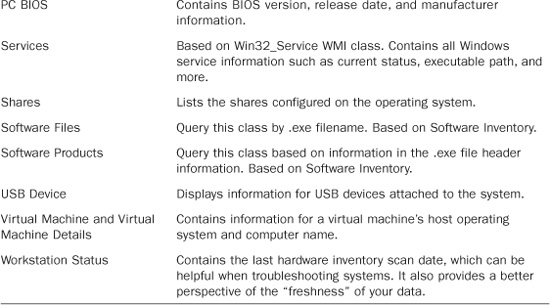
All hardware and software inventory will appear through the System Resource object type. If you extend SMS_Def.mof (described in Chapter 12, “Client Management”), the hardware inventory classes and attributes will also appear in the System Resource object type. Figure 17.7 showed an example of querying the hardware inventory class named SMS Advanced Client State. The SMS Advanced Client State class is inventoried using WMI during a hardware inventory cycle. Several favorite inventory classes appear in Table 17.4, along with a brief description.
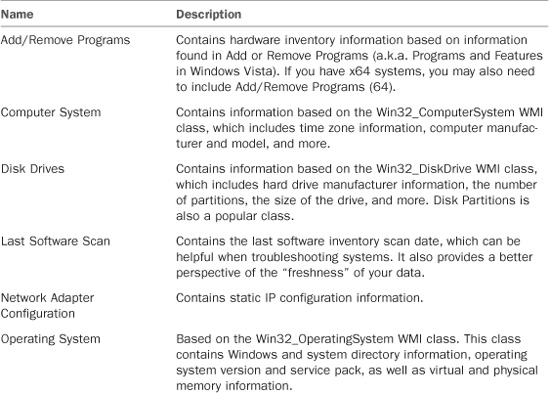
If any of the inventory attributes do not appear in your environment, you may need to review the classes and attributes you have configured to inventory using SMS_Def.mof, as described in Chapter 12. If you find this information is missing for a specific system, you need to verify that system is healthy, because you need a healthy ConfigMgr client to send its inventory to the ConfigMgr site. If you do not see any inventory for any system, you may need to confirm that hardware/software inventory is configured for your site.
Building queries is a great way for administrators to review inventory data, discovery data, advertisement data, and other site information. You can also use information in query results to create collections as well as export data to a text file. The next sections discuss these topics.
Execute the query so the results display in the results pane. Then right-click the query name and select View -> Export List. You can then specify to export to tab-delimited or comma-delimited files. You can also specify to use Unicode, if required.
You can also import and export queries between sites, and share with your favorite ConfigMgr administrators. To export a query, right-click the query object and then select Export Objects. Follow the Export Objects Wizard, and specify a filename (with an .mof extension) to save the exported query.
To import a query at the receiving site, simply right-click the Queries node and select Import Objects. Follow the prompts in the wizard to complete the import process.
Collections and queries both use WQL, making moving from a query to a collection fairly simple. It is a best practice to create a query to “test” the WQL before creating a query-based collection. When you create a query, you can review the values of the attributes that you used for the query criteria. If you build a collection, you probably will not be able to see the values of those attributes. So create the query, and verify that it performs exactly as expected, and then you can copy (or import) that query into a collection.
To use the WQL from a query in a collection, you must not specify any attributes to display. As an example, Figure 17.10 shows the General tab of a query to display memory information.
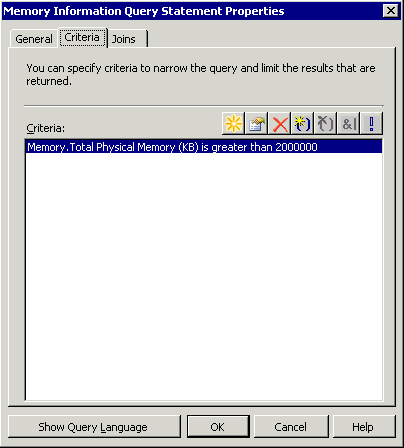
Figure 17.11 shows the Criteria tab of this query. Notice that the query has a criterion specified to display only systems with more than 2,000,000KB of total physical memory.
Here’s the WQL for this query:
Simply remove all attributes from the General tab so that only criteria information remains. Next, click the Show Query Language button to reveal the updated WQL statement, which appears as follows:

Finally, paste this new WQL into a query rule for a collection.
Use ConfigMgr status message queries to view information about ConfigMgr components, audit messages, and changed objects (such as advertisements). Status messages allow you to see a little deeper into the ConfigMgr site for tasks that occur on your site. You can create custom status messages, as well as use one of more than 60 standard status message queries. To view status message queries, perform the following steps:
- Expand Site Database -> System Status and then click Status Message Queries.
-
You will now see all the standard status messages. Simply select a status message, right-click it, and select Show Message.
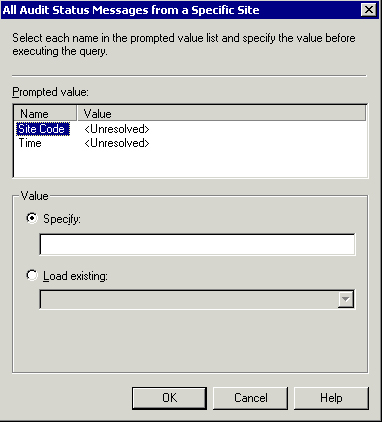
If the status message query requires additional information, you will receive a prompt. As an example, execute the All Audit Status Messages from a Specific Site status message query. You will be prompted for information, as shown in Figure 17.12.
- As shown for the Site Code value in Figure 17.12, you can directly specify the site code, or you can select the Load Existing radio button and ConfigMgr will populate the dropdown box with valid selections. (Use caution when selecting the Load Existing radio button—if the number of selections is large, such as for computer name, this process could take several hours!) Specify or select a site code and then click the Time option. For Time options, you can select an exact date and time, or you can use the built-in options for 1 hour ago, 12 hours ago, and other intervals.
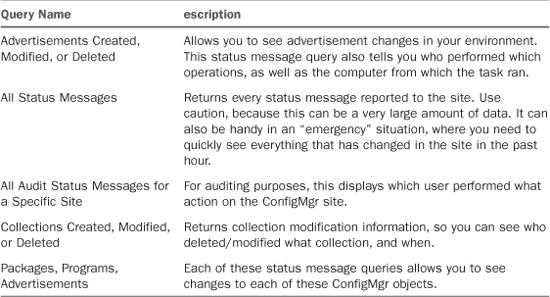
Although the names of the status message queries are fairly descriptive, it is helpful to point out several queries that tend to be particularly beneficial when troubleshooting issues. Table 17.5 lists some favorite status message queries.
You may also want to review the following Microsoft TechCenter articles:
• Information discussing using status messages for ConfigMgr troubleshooting can be found at http://technet.microsoft.com/en-us/library/bb632870.aspx.
• An overview of the ConfigMgr status message viewer is available at http://technet.microsoft.com/en-us/library/bb632357.aspx.
This chapter provided an overview for how to create standard and custom queries, and how to create a collection based on a query. You learned about the differences between ConfigMgr queries and ConfigMgr web reports. Queries are a great tool for the ConfigMgr admin to gather data, as well as to test the query rules used in a collection. Reports are preferred for large amounts of data, and for data that you want to make available to a larger number of users on a regular basis. You learned how to convert WQL queries to SQL queries using log files. You also learned how to use status message queries (soon to be one of your new best friends).