
IN THIS CHAPTER
Although patch management can be the bane of administrators and users alike due to the overall disruption it causes to computer systems, it is a key check box on any security check list. Microsoft’s products have their fair share of patches to apply—and with their near ubiquitous presence in corporate America, patching Microsoft products is of utmost importance.
It is often illuminating to see how people look at the patching process. One of our coauthors remembers forwarding a story to a colleague some years ago about a Windows administrator who was bragging he had not rebooted his Windows NT 4.0 primary domain controller (PDC) in over a year and it was still running fine. Although the administrator thought this was just great, the colleague’s first reaction was the administrator had not patched the system for over a year and the PDC was now a security risk!
Patching software products for security holes is an unpleasant fact for all network administrators, regardless of the operating system or software vendors involved. Fortunately, Microsoft is now ahead of the curve, both in patching its products and providing tools to simplify deployment of patches, such as Configuration Manager (ConfigMgr), Microsoft’s premiere tool for patch management. The company completely rewrote the patching mechanism in ConfigMgr 2007, simplifying its use and merging the power of ConfigMgr with Windows Updates. The clunky Inventory Tool for Microsoft Updates (ITMU) used by previous versions of Systems Management Server (SMS) is completely gone (unless you must continue to support SMS 2003 clients), as are the various scan tools used to detect whether patches are necessary.
Using ConfigMgr 2007, you can seamlessly scan for and deploy updates for every supported Microsoft operating system (OS), most Microsoft server products, and selected Microsoft desktop applications such as Microsoft Office. You can also scan and deploy patches for supported third-party products using the new software update capabilities in ConfigMgr. Adobe, Citrix, and other software vendors have released update catalogs that seamlessly integrate into ConfigMgr—these are available at http://technet.microsoft.com/en-us/configmgr/bb892875.aspx.
This chapter discusses how ConfigMgr handles patching chores using its built-in Software Updates mechanism. It also touches on using Wake On LAN for delivering patches, and integrating the Network Policy Server (NPS) role built in to Windows Server 2008, which is used to ensure all your clients are up to date, including those that only touch the network occasionally. The chapter describes how to find those updates applicable to your organization, download them, and successfully deploy them in a flexible, cohesive manner using ConfigMgr.
Deploying patches successfully with any tool requires planning and preparation. There are numerous aspects to consider, many of which depend on your specific environment and user requirements. This section lists items to consider when developing your patch management strategy:
• Scope— Start by determining which systems and applications to patch. Although not updating all systems or applications for a particular flaw may pose a security risk, there may be specific reasons not to patch a particular piece of software (for example, due to third-party vendor support, as described in the next bullet).
• Third-party support— Check with the vendors of your applications before applying patches. Many vendors will not support their products if you apply a Windows patch they have not tested with that product. Vendors may also issue patches to a product because a Microsoft patch caused it to break. This is vendor dependent, and varies from vendor to vendor.
Depending on the severity of the flaw a patch addresses, you may have to weigh the risk of not applying it versus the possibility of breaking the application or going out of compliance with the vendor’s recommended Windows patch level. Only you, in coordination with your user population and other Information Technology (IT) support staff, can decide to apply the patch.
• Patch testing— Testing patches before deploying them to your production systems is highly recommended. Even if you do not have a full test environment at your disposal, do not let that deter you from testing. At a minimum, identify a group of systems for each patch category as your guinea pigs. You might categorize this by operating system (such as Windows Vista workstations or Windows 2008 servers) or hosted application (such as PeopleSoft servers or Finance department workstations).
Deploy patches to your identified test systems before the scheduled production rollout of the patches, leaving you sufficient time to troubleshoot and resolve any problems caused by the patches.
• Coordination and scheduling— Because Windows patches typically require a reboot, they do not lend themselves to deployment during business hours. Coordinate with other IT staff, server administrators, application administrators, your users, and management to establish maintenance windows defining acceptable times to reboot servers and workstations. Although maintenance windows are useful for all types of system maintenance, they are a definite requirement for patch management.
Do not necessarily limit yourself to a single maintenance window for all your systems, because deploying everywhere at once increases the risk of a single bad patch affecting your entire environment. Additionally, rebooting all your systems in a short period of time most likely will result in unexpected side effects from resource dependencies or other contention-type issues. As an example, if you patch your Domain Name System (DNS) servers and they all reboot at the same time, clients will not be able to resolve Internet Protocol (IP) addresses until those servers are operational. This may, in turn, cause other applications that rely on resolving IP addresses to fail.
Additionally, there may be application-specific jobs that run at particular times. Rebooting the system running the job or a remote system referenced by the job may cause that job to fail. Examples of scheduled jobs include accounting reports, payroll processing, and database maintenance.
Many organizations include patch management in their established change control process or create a process to deal with the many ramifications of updates and patches.
• Notification— Always issue fair warning to anyone potentially affected by a patch update or a system reboot. Even when you coordinate maintenance windows, sending additional notifications to other administrators and users to let them know what will transpire prevents a lot of finger pointing and many sleepless nights. Consider using multiple notifications from different sources and different channels. Notifications from an IT manager, CIO, and such are also highly recommended because they carry additional political weight and garner more attention. As an example, an email blast from the IT manager and an announcement on the company intranet or newsletter not only goes a long way in preventing the “I didn’t know” excuse, but also actually invalidates it!
• Political policies and support— IT professionals all know the risks of not patching systems and applications. To implement a successful patching strategy, you must have the political support in your organization to establish a policy that dictates and enforces applying patches. Without such a top-down policy, you will continue to face opposition to patching, not only from users but also within IT. A policy enforced by your CIO (or equivalent) will eliminate any quibbling over patching.
Compliance regulations in the United States such as the Health Insurance Portability and Accountability Act (HIPAA), Sarbanes-Oxley Act of 2002 (SOX), and Gramm-Leach-Bliley Act (GLBA) are another driver for patching, eliminating any question about its necessity. Although none of these compliance laws specifically requires patching, it is one of the first things checked by auditors.
Based on the information listed, plus other factors that may be unique to your own organization or environment, consider developing a patch strategy and policy document that include things such as a timeline, rollback process, and testing procedure. Update this document every month to indicate which patches are in scope, and distribute it as part of your notification process.
The recommendations in this section are applicable no matter which tool you use to update and patch your systems, including the ITMU in SMS 2003. However, the ITMU used with SMS 2003 and Software Updates in ConfigMgr 2007 are distinctly different tools using very different ways to get the same job done. The next section discusses these differences.
ConfigMgr Software Updates replaces the ITMU feature pack used in SMS 2003 and SMS 2.0. Microsoft designed ConfigMgr’s Software Updates to be a first-class citizen in ConfigMgr 2007 and take advantage of the built-in Windows Updates infrastructure. The following sections discuss the Windows Update Agent used by WSUS and ConfigMgr as well as compare the ConfigMgr patching process to that in ITMU and WSUS.
The Windows Update Agent (WUA), in Windows operating systems since Windows 2000 Service Pack (SP) 1, provides a standard method to detect and report patch applicability for Windows and other Microsoft products—such as Office—on all Windows systems. Additionally, Microsoft updates the agent regularly to ensure it can properly detect the need for the latest available patches. You can configure the Windows Update Agent manually or through group policy to detect, download, and apply necessary patches automatically.
ConfigMgr 2007 uses the WUA to detect which patches are necessary on a system. This eliminates using separate scanning tools, which frees up the ConfigMgr administrator from maintaining these tools and Microsoft’s ConfigMgr development team from creating and testing them. Using the WUA also ensures consistent patch-scanning results between ConfigMgr, Windows Server Update Services (WSUS), and manual patching.
The ITMU is an add-on that never seemed to fit well with the rest of Microsoft’s SMS product. The ITMU incorporates a separate scanning tool to detect when patches are necessary on managed systems. On occasion, Microsoft has released separate scanning tools to detect if specific patches are applicable because the base ITMU scanning tool did not detect them. Using multiple scanning utilities causes the ITMU and Windows Update to detect patch applicability differently, occasionally causing discrepancies between the two tools when identifying necessary patches.
Both the ITMU and ConfigMgr deliver and apply patches using packages. The ConfigMgr packages (called update packages) differ from the ITMU because they have their own branch in the Configuration Manager console, displayed in Figure 15.1. Unlike ConfigMgr software packages (discussed in Chapter 13, “Creating Packages”), update packages do not have programs, although you must install the packages on distribution points (DPs) to use them.

The ITMU and Software Updates also download Microsoft’s catalog of available updates differently:
• The ITMU uses a separate command-line tool that runs using a Software Distribution package.
• Software Updates integrates with an installation of WSUS, removing from ConfigMgr the task of downloading the catalog from the Internet and instead using the standard mechanism built in to WSUS. Managed systems connect to this instance of WSUS to perform scans, although they do not actually report results to it.
With a standalone installation of WSUS, clients are configured (either manually or with group policy) to report their status to a WSUS server and pull applicable updates from that WSUS server. Configuring when updates are installed is somewhat limited, particularly if group policy is not used. Reporting is also limited, and centrally managing and deploying patches to systems connected through a wide area network (WAN), Virtual Private Network (VPN), or the Internet is problematic.
Using Software Updates in ConfigMgr 2007 addresses the shortcomings of WSUS, eliminates the requirement for ITMU, and utilizes the now ubiquitous WUA. It also provides powerful and customizable reporting that integrates with ConfigMgr’s asset management and inventory capabilities. The next section begins discussing the steps required to start using this new tool.
You must prepare ConfigMgr and your Windows infrastructure for the Software Updates functionality. Although it is relatively straightforward to install and configure, you must make several decisions along the way and be patient, because the initial synchronization process can take some time to complete. Preparation tasks include the following:
• Installing WSUS
• Adding software update points
• Preparing for synchronization
• Configuring the agents
• Establishing group policies
The following sections discuss these areas.
WSUS is the only real prerequisite to enable Software Updates in ConfigMgr. Download WSUS and (as a minimum) install the WSUS Software Development Kit (SDK) on the primary site server; you do this by installing the WSUS administrator console. You must also install the WSUS server component on either the primary site server or another accessible server that meets the requirements for WSUS, as listed at http://technet.microsoft.com/en-us/wsus/bb466188.aspx:
• Microsoft Windows Server 2008 (Standard or Enterprise Edition), or Microsoft Windows Server 2003 (Standard or Enterprise Edition), or Microsoft Windows 2000 Server or Advanced Server with Service Pack 4 (SP 4) or later
• 1GB or more RAM
• 1GHz Pentium III or higher processor
• Microsoft .NET Framework 1.1 SP 1
• Microsoft Background Intelligent Transfer Services (BITS) 2.0
• Microsoft Internet Explorer 6 SP 1
• Internet Information Services (IIS) 5.0 or later
WSUS also requires a SQL Server database. Generally, you use the same SQL Server installation for WSUS that you use for ConfigMgr. You can create a separate SQL Server instance for ConfigMgr to allow for granular resource control; however, this is not required as the instance of WSUS does not manage any client data and requires very little overhead on the database server, regardless of the size of the ConfigMgr installation.
WSUS 3.0 Service Pack 1 is required for ConfigMgr 2007 Service Pack 1 and Release 2 (R2) for installation on Windows Server 2008. Both 64-bit and 32-bit versions of WSUS are available.
Microsoft recommends installing WSUS on a dedicated server for larger sites. Each WSUS instance can handle up to 25,000 clients; for sites that are larger, you should deploy a Network Load Balanced (NLB) cluster to scale out the capacity of WSUS. Every ConfigMgr primary site must have a separate WSUS instance; this instance is optional for secondary sites to offload work and network traffic from the primary site WSUS server.
WSUS installation is straightforward and wizard driven, with the following guidance:
• Choose to store updates locally on the system rather than Microsoft Update, as shown in Figure 15.2. This setting allows WSUS to download and store license terms for specific software updates in the update content folder that you choose; ConfigMgr handles the actual download and deployment of updates. During the update synchronization process, ConfigMgr looks for applicable license terms in the content folder. If it cannot find the license terms, it will not synchronize the update. Additionally, clients must also have access to the applicable license terms in order to scan for update compliance.

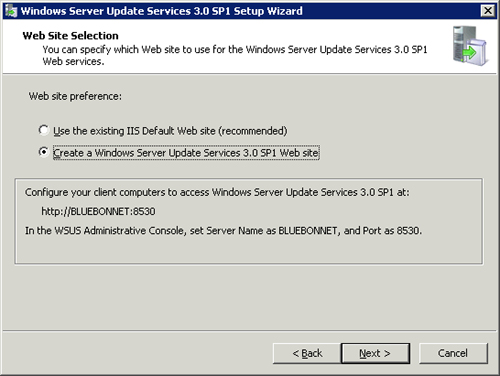
• If using a dedicated system for WSUS, use the default website to host WSUS. If you are hosting any other ConfigMgr roles on the system, create a dedicated IIS site; although this is not necessarily a standard best practice and not a technical requirement, it is the opinion of the authors that a dedicated site keeps things nice and tidy and prevents any confusion over which site handles the WSUS responsibilities. The port numbers for a dedicated site are 8530 and 8531 for Secure Socket Layer (SSL) connections. Figure 15.3 displays these options.
• Click Cancel to skip the Configuration Wizard that launches at the end of installation. WSUS does not require manual configuration because ConfigMgr 2007 takes over the control and configuration of WSUS once you install a software update point (SUP).
Tip
Setting Up a WSUS and SUP Role with NLB
A good article on configuring a ConfigMgr SUP with NLB can be found at http://blogs.msdn.com/shitanshu/archive/2008/05/13/how-to-setup-wsus-sup-role-in-nlb-in-sccm.aspx.
You may use an existing WSUS server installation as an SUP for ConfigMgr; however, you should first delete the update catalog and associated metadata from WSUS to reset WSUS back to a clean state, thus allowing ConfigMgr to properly manage and control it. In addition, because ConfigMgr takes complete control over the WSUS configuration, do not configure any clients not managed by ConfigMgr to use this WSUS installation, as this is not a supported configuration.
Software update points play a key role in the process of distributing updates to clients. They do not actually deliver the update files to clients like a standalone WSUS server; rather, they download the update catalog from Microsoft (or another upstream WSUS server) and make the update catalog available to clients for compliance scanning. Therefore, adding at least one SUP is required to enable software updates. Adding an SUP as a role to a site system is similar to adding any ConfigMgr role to any other site system. To do so, perform the following steps:
-
In the ConfigMgr console, start by navigating to Site Database -> Site Management -> <Site Code> <Site Name> -> Site Settings -> Site Systems.
• If the system running WSUS is not currently a site system, right-click Site Systems and then choose New -> Server to launch the New Site System Server Wizard, displayed in Figure 15.4. Enter the name of the site system and the intranet accessible Fully Qualified Domain Name (FQDN) of the WSUS server.
• If the WSUS server already is a ConfigMgr site system, right-click it and choose New Roles. This launches the New Site Role Wizard, which looks and acts exactly like the New Site System Server Wizard, except this wizard fills in the site system name and intranet FQDN for you.
- For either wizard, choose Next and then choose Software update point from the list of available site roles.
- At the Software Update Point screen, enter the applicable proxy server information for your environment, including credentials if necessary. WSUS uses these credentials to contact Microsoft or an upstream WSUS server to retrieve the update catalog.
-
For Active Software Update Point Properties, choose whether this SUP will be the active SUP for the site.
There can only be one active SUP per site. An active SUP is responsible for synchronizing the updates catalog for the site from the parent site’s SUP or from Microsoft if the site is the central site. Active SUPs are also responsible for communication with client systems that request the update catalog in the site where the SUP is designated active. Although it is possible to configure nonactive SUPs in any site, the only time you would not make an SUP the active SUP is if you are configuring a node to be part of an NLB SUP. It is also possible to create a nonactive SUP for redundancy purposes, although SUPs do not store any critical data you cannot easily replace (so maintaining nonactive SUPs may be considered excessive, based on your particular requirements).
Configure the ports used by WSUS. If you used the default IIS site, these should be 80 and 443; if you used a custom site, they should be 8530 and 8531.
-
At the Synchronization Source screen, choose from where to synchronize the update catalog:
• Microsoft Update— This setting is used for the active SUP that is highest in the ConfigMgr site hierarchy; typically, this is the active SUP for the central site.
• An upstream update server— This setting is used for down-level child SUPs in the site hierarchy and Internet-based SUPs. SUPs configured with this setting configure their respective WSUS services to synchronize their updates from their parent site.
• Do not synchronize from Microsoft Update or an upstream update server— Configuring this setting on an SUP causes it not to synchronize automatically with any other SUP. To add updates to an SUP configured with this setting, you must manually export the updates from another WSUS system and then manually import them using WSUSutil and the export and import options.
By default, WSUSutil.exe is located at %ProgramFiles%Update ServicesTools. The syntax for the export command is
WSUSutil.exe export <exportfile> <logfile>, where<exportfile>is the name of a .cab file to export the update metadata to and <logfile>is the name of a log file to write a record of the exported metadata to. The syntax for the import command isWUSutil.exe import<packagename> <logfile>. Additionally, you must copy the WSUSContent folder from the source server to the destination server. This folder, typically located at <WSUSInstallationDrive>WSUSWSUSContent, contains license terms and potentially other downloaded content referenced by the transferred metadata.The wizard also asks you to choose whether to send reporting events to WSUS. This is generally not required and you can leave it disabled.
-
At the Synchronization Schedule screen, configure whether you want to enable synchronization on a schedule, and if so how often and when to update the catalog from the configured source.
• The default simple schedule of every 7 days is usually sufficient; you do not need to change it unless there is a specific reason to do so.
• If you need detailed control over the download schedule, including the frequency and exact time of day, choose and configure a custom schedule.
- Proceed to the Update Classifications screen. Microsoft categorizes updates in the catalog by classification. This page of the wizard, shown in Figure 15.5, allows you to choose all the update classifications you wish to scan for and deploy.
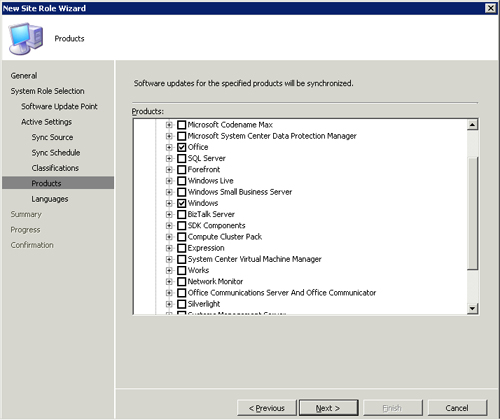
- At the Products screen, choose the Microsoft products to include in the update catalog that WSUS will download. You can specify nearly every Microsoft server product and most Microsoft desktop products. By default, the nodes chosen include Microsoft Office and Microsoft Windows products, as displayed in Figure 15.6. This list is not initially complete, and it is updated with additional products the first time WSUS synchronizes.
- Many Microsoft products are available in a variety of languages and require patches specific to their language. On the Languages page of the wizard, choose the language(s) in which ConfigMgr will download update files and summary details.


Only steps 1–4 are applicable for child sites. ConfigMgr automatically configures SUPs in child sites to use the SUPs in their parent site as an upstream WSUS server. The child SUP downloads its entire configuration from the upstream/parent SUP as well as the update catalog. This is not configurable.
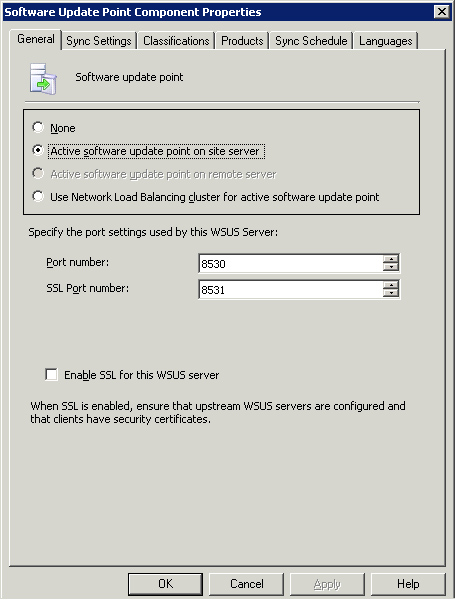
To review or change any of these settings after installing the SUP, navigate to Site Management -> <Site Code> <Site Name> -> Site Settings -> Component Configuration in the ConfigMgr console. Right-click Software Update Point Component in the right pane and then choose Properties to launch the Software Update Point Component Properties dialog box displayed in Figure 15.7.
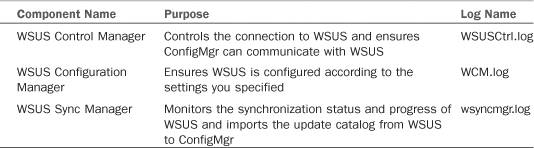
After you complete the wizard, ConfigMgr installs three primary components related to WSUS, as described in Table 15.1. These components immediately go to work; if you configured everything correctly, the synchronization process will begin.
An installed SUP can download the Windows Update catalog and associated metadata from Microsoft or an upstream server; the process is identical for either source. If a primary SUP cannot directly communicate with Microsoft to retrieve updates, you can manually import an update catalog from a server that downloaded the catalog from Microsoft. Both WSUS 2.0 and 3.0 use the same catalog format; this makes it possible to use either version to export the catalog manually using the same commands, as outlined here:
-
On the Internet-connected WSUS server, open a command prompt and run the following command:
WSUSutil export <export filename.cab> <export log filename>
WSUSUutil is typically located in the %ProgramFiles%Update ServicesTools folder. The export process takes from 10 to 20 minutes to run (potentially more), depending on your hardware. WSUSutil writes to the log file after the export completes. The file is in XML format.
- Copy the export file to the SUP using whatever method is appropriate for your environment.
-
Open a command prompt on the destination WSUS server and run WSUSutil import:
WSUSutil import <import filename.cab> <import log filename>
The import process is more extensive than the export process and may take over an hour to complete, so be patient. As with the export process, WSUSutil does not write to the XML log file until the import completes.
To initiate synchronization manually from Microsoft or an upstream server, navigate to Computer Management in the ConfigMgr console, expand Software Updates, right-click Update Repository, and choose Run Synchronization.
Aside from the obvious manual intervention required, there are two differences between the manual synchronization and a scheduled one:
• A manual synchronization only performs a delta synchronization, meaning it only downloads changes to the catalog of available updates. Scheduled synchronizations download the entire update catalog.
• With a scheduled synchronization, superseded updates are only marked as expired when you do a full catalog update.
After a successful synchronization, WSUS imports the update catalog into the WSUS database. The WSUS Synchronization Manager (SMS_WSUS_SYNC_MANAGER) component of ConfigMgr initiates an import of the update catalog from the WSUS database to the ConfigMgr database. Synchronization of direct child site SUPs are then initiated and the process continues down the ConfigMgr hierarchy.
To configure specific Software Updates settings on client systems, open the ConfigMgr console and navigate to Site Database -> Site Management -> <Site Code> <Site Name> -> Site Settings -> Client Agents. Right-click the Software Updates Client agent and choose Properties. This opens the Software Updates Client Agent Properties dialog box, where you can configure the following settings:
• Enable software updates on clients— The first setting determines whether the agent is actually enabled. If it is not, the client does not scan for updates and ConfigMgr will not deploy updates to it. As with other ConfigMgr Client agents, disabling the agent does not remove it from the client; this simply causes it to do nothing.
• Scan schedule— This setting determines how often to scan the client system for available updates. You can use the default schedule or configure a custom schedule:
• The default schedule is a simple schedule run every 7 days. The advantage of a simple schedule is it allows update scans to catch up when the system was powered off or unable to contact an SUP.
• A custom schedule gives you granular control over when to perform update scans. Scans on a custom schedule may not start for up to 2 hours after the specified time. The actual wait time for each client after the scheduled time is random and prevents client activity from overwhelming the SUP.
The scan schedule is completely independent of actual update deployment.
• Enforce mandatory deployments— If you use multiple mandatory deployments, your systems may also be subject to multiple reboots. Enabling this setting instructs the agent to install updates from all applicable mandatory updates on a system, in effect combining the deployments and reducing the number of reboots to one. The agent combines all deployments with deadlines up to 7 days in the future by default, although this is customizable, as shown in Figure 15.8.

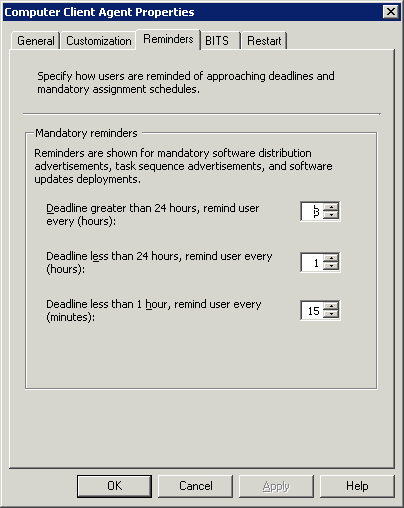
• Hide deployment from end users— By default, users receive a balloon notification from the agent indicating updates are available. Depending on your organization’s practices and policies, you may not want users to receive automated notifications. This setting allows you to disable the notification. You can also individually enable or disable the setting for specific update deployments.
The balloon notification allows users to initiate deploying updates at their convenience before a configured mandatory deadline. Also by default, the agent displays the notification to users at configured intervals according to Table 15.2. You can customize the intervals by navigating to the Reminders tab of the Computer Client Agent setting dialog box.
• Deployment reevaluation— Update reevaluation scans ensure that old updates previously deployed to a system are still on that system. If ConfigMgr detects an update from a previous (but still applicable) deployment is no longer there, it immediately reinstalls the update. Reinstallation takes place without regard to maintenance windows and may be disruptive.
Using a group policy object (GPO) is the standard way to configure WSUS and the WUA. When you’re installing and configuring Software Updates, typical questions include the following:
• Is it necessary to create a GPO to support ConfigMgr Software Updates?
• What should be done with in-place Windows Updates GPOs?
You do not need to create a GPO to support ConfigMgr Software Updates. However, if you choose to create a GPO to support client installation (see Chapter 12, “Client Management,” for additional information on client installations) or use an in-place GPO, you must configure the Windows Updates server option to point to the active SUP in the site. This is because ConfigMgr creates a local policy on clients, pointing them to the SUP. A domain-based GPO overrides the local policy settings, causing software updates to fail on the client if the GPO does not specify the SUP as its update server. Additionally, an effective GPO must not disable the Windows Updates service or the WUA.
To avoid any possible conflicts, Microsoft recommends not applying GPOs that enforce Windows Updates settings to ConfigMgr-managed systems. If you use a GPO to deploy clients via WSUS, you should utilize Windows Management Instrumentation (WMI) filtering, security group filtering, or another mechanism to prevent these GPOs from being applied to managed systems.
Caution
Disabling a Windows Update GPO
Be careful when removing or disabling a GPO that applies Windows Updates settings because the local computer’s Windows Updates setting for downloading and installing updates will take effect. The local settings may cause updates to immediately download and install, or previously downloaded updates to install at the time configured in the local policy. Reboots often accompany update installation; these will be unexpected and most likely undesirable, particularly if the reboot occurs on a server. Because you do not actually approve updates in WSUS when used with ConfigMgr, this is a one-time cutover issue only.
If you are unsure of the local Windows Updates settings on your managed systems, you may want to configure a new GPO (or change an existing one) to notify users of applicable updates only; this will prevent any automatic installations. Do not use a GPO to disable Windows Updates because this will interfere with ConfigMgr Software Updates.
You can divide the actual software update process in ConfigMgr 2007 into four separate steps:
- Catalog synchronization—The first step when applying patches is to define which patches are available for installation. Thankfully, Microsoft provides a catalog of all available updates for Microsoft products; it specifies how to detect whether a patch is applicable to a system. WSUS and its integration into ConfigMgr as an SUP handles the catalog-download process, as discussed in the “Synchronization Process” section earlier in this chapter. Microsoft and other third-party documentation may also refer to the update catalog as update metadata.
-
Compliance scanning—After the update catalog is downloaded and imported into ConfigMgr, a new ConfigMgr machine policy is created, informing each managed system that a new update catalog is available. Managed systems retrieve the policy according to their policy download cycle (by default every 60 minutes). After receiving the new policy, clients randomly schedule an update scan to occur within the next 2 hours, clear the previous scan history, and configure the local policy to point the WUA at the WSUS server.
At the randomly scheduled time, the ConfigMgr Client agent invokes the local WUA to initiate a compliance scan. The WUA contacts WSUS to retrieve the catalog and scan for the updates it needs. Every 5 minutes, information about required updates is cached and forwarded en masse to the site’s management point with state messages; these state messages are subsequently inserted into the ConfigMgr database. This process ensures that update compliance information is available in a timely manner.
Note
WUA Version
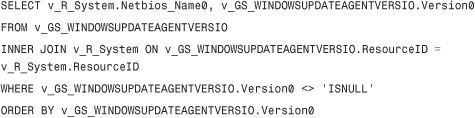
A common cause of scan compliance failures is the absence of the correct version of the WUA on clients; these are listed as “unknowns” in the console. Because the WUA is automatically updated by Microsoft Windows Update and WSUS, if you are moving clients from this type of environment your clients should all be updated to the latest version of the WUA (version 7.2.6001.788 as of May 2009 as described in KB article 949104 at http://support.microsoft.com/kb/949104).
To verify the current version of the WUA on all clients, run the Scan 1 – Last scan states by collection or Scan 2 – Last scan states by site report, use the Resource Explorer, or create a query containing the following syntax:
To distribute the latest WUA to all clients, download the installation package from KB article 949104 referenced above, and create a Software Distribution package to deploy it. For the program information, specify the following command-line text:
WindowsUpdateAgent30-<platform>.exe /quiet /norestart /wuforce
The Software Updates Client agent on each system classifies each update into one of four states after a compliance scan, as described in Table 15.3. Information relating to compliance status is also available at http://technet.microsoft.com/en-us/library/bb694299.aspx.
Forced and Unforced Scans
Compliance scans are initiated as either forced or unforced. Forced scans always happen; unforced scans may be deemed unnecessary and do not occur if the last compliance scan time, referred to as the time to live (TTL) of the last scan, is less than 24 hours old.
Additionally, clients perform compliance scans in one of two ways—online or offline:
• In an online scan, the full update catalog is retrieved by the client; this is typically an expensive operation network-wise.
• An offline scan uses the locally cached catalog on the client.
If not forced to use an online scan, clients choose between an online and offline scan based on the version of the update catalog currently cached. If the cached version is the same as that on the SUP or the SUP cannot be contacted, an offline scan is performed using the currently cached copy. If the version on the SUP is newer, the client downloads the new catalog and then performs the scan.
Table 15.4 summarizes both the scan initiation types and the scan compliance types.
-
Update preparation—In this manual step, you must determine which updates to deploy to your managed systems. ConfigMgr helps significantly by identifying how many systems are requesting specific patches, but the final determination of which updates to deploy is up to you.
After deciding what to deploy, download the updates into update packages and create deployments to direct managed systems to install the updates. These two steps are analogous to the normal software distribution process using software distribution packages and assignments.
-
Update distribution—This “rubber hits the road” step is automatically handled by ConfigMgr, similar to the way it handles software distribution. Here are some key points:
• When a managed system receives a deployment policy, it immediately initiates another update compliance scan using the WUA to ensure the state of the system has not changed.
• After the scan, the systems immediately download applicable updates for mandatory deployments and schedule installation according to their maintenance windows. If there are no maintenance windows, installation occurs immediately.
• Updates for optional deployments are not downloaded until they are manually initiated.
• The client only downloads individual updates identified as necessary by the compliance scan—complete update packages are not downloaded.
State messages communicate back to the site to ensure the update status in the database is accurate, eliminating the need to perform another compliance scan. This allows ConfigMgr to have current information about the exact patch status of a system in a short period of time rather than waiting for the next compliance scan, which may not take place until the next day or perhaps next week. Full compliance scans needlessly strain the system while obtaining the same information that simple status messages makes available.

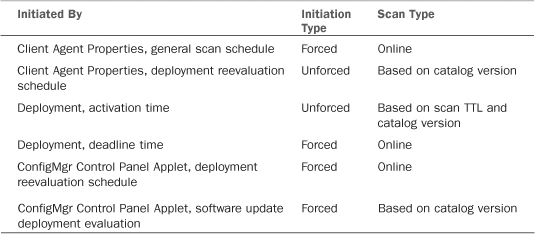
Figure 15.9 depicts this four-step process:
-
The update catalog is downloaded from Microsoft and imported into the WSUS database.
The update catalog is synchronized from the WSUS database to the ConfigMgr database.
-
The site creates a policy informing clients of the availability of a new update catalog; the management point downloads this policy and makes it available for retrieval by clients.
Clients download the new policy from the management point.
Clients retrieve the update catalog from WSUS and perform a compliance scan.
Clients report their compliance status to the management point.
Client compliance states are sent to the database.
- Search folders, update lists, deployments, and deployment packages are created according to the steps outlined in the next few sections.
- Updates, based on defined deployments, are downloaded from distribution points and installed. New client compliance information status is sent to the distribution point immediately and then to the ConfigMgr database.

ConfigMgr provides five distinct objects for you to control the deployment of updates in your environment. A subnode under Software Updates in the ConfigMgr console tree represents each of these objects:
• Update Repository
• Update Lists
• Deployment Templates
• Deployment Management
• Deployment Packages
The like-named sections of the chapter discuss these objects in detail, but first let’s look at a step-by-step sample configuration to help get you up and running quickly.
Getting started with Software Updates can definitely be a bit confusing at first. The following example steps you through the initial configuration for a pilot group of workstations:
- Create a collection for the pilot systems (called Pilot Systems in this example). Add the identified systems to the collection using direct rules.
-
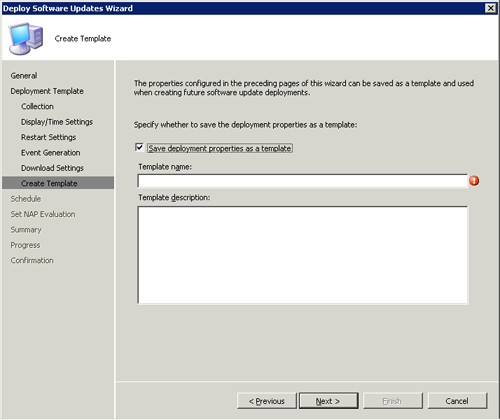
Create a deployment template to store the settings for deployments targeted to this collection. Use the following settings:
• Template Name— Pilot Systems Deployment Template
• Collection— Pilot Systems
• Display/Time Settings— Allow display notification on clients; Client local time; 2-week duration
• Restart Settings— None selected
• Event Generation— None
• Download Settings— Do not install software updates; Download software updates from unprotected distribution point and install
• SMS 2003 Settings— None
-
Create a search folder to list all the updates for Windows with the following parameters:
• Superseded— No
• Expired— No
• Products— Windows XP, Windows Vista
• Search all folders under this feature— Yes
• Name— All Current Windows XP and Vista Updates
-
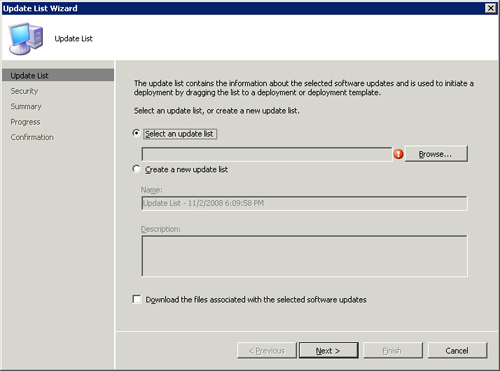
Select the search folder you just created in the console tree under Search Folders. The updates meeting the criteria just specified appear in the Details pane on the right. Select the updates, right-click, and choose Update List. The resulting Update List Wizard creates an update list and a deployment package then downloads the updates for you. Use the following settings for the Update List Wizard:
• On the first page of the wizard, create a new update list and name it All Windows XP and Vista Updates List. Select the Download the files associated with the selected software updates check box at the bottom of the page.
• On the next page of the wizard, choose to create a new package and name it All Windows XP and Vista Updates. Fill in the location to create the package. Note that this location should be empty, the current user must have write access to the location, and ConfigMgr creates the folders if they do not currently exist.
• Choose which distribution points to copy the package to.
• Choose Download updates from the Internet.
• Verify the languages selected and correct them if necessary.
-
After the downloads complete (which in this case may take more than an hour), right-click the update list All Windows XP and Vista Updates List that you just created and choose Deploy Software Updates. Use the following settings for the Deploy Software Updates Wizard:
• Name— All Windows XP and Vista Updates to Pilot Systems
• Deployment Template— Pilot Systems Deployment Template
• Schedule— Choose As soon as possible for availability and then adjust the deadline to your liking. Note that this deadline is exactly 2 weeks (to the minute) from the time you launched the wizard because the deployment template specified a 2-week deadline.
That’s it. The patches you selected and put into the All Windows XP and Vista updates list are now queued for delivery to your pilot systems and are automatically deployed at the time you specified for the deadline.
Going forward, every time Microsoft releases new updates, start at step 3 of this process, creating or using a new search folder to identify the new patches. You can use the search folder shown later in Figure 15.11 and described in the “Update Repository” section as a model, creating a search folder that shows only the newest updates each month or by whatever timeframe you choose. The flow chart in Figure 15.18 (later in this chapter) also reflects this monthly, cyclical process.
After importing the update catalog into the ConfigMgr database, you can browse and search the catalog using the Update Repository node under Software Updates in the ConfigMgr console, displayed in Figure 15.10. Under the Update Repository node are subfolders for each update classification you chose to include in the update catalog. These folders are divided further into subfolders, based on vendor and then product. A separate subfolder also exists under the Update Repository for updates specific to WSUS Infrastructure Updates; this node is always included and you cannot disable it.

Using the Search Folders subfolder, you can define custom queries based on attributes of the patches. These attributes include the following:
The search folders you create are dynamic and reevaluated each time you access them.
Search folders are the easiest way to find updates and should be your starting point for working with updates and patches. To create a new search folder, perform the following steps:
- Right-click the Search Folders node and then select New Search Folder. This launches the Search Folder Criteria dialog box displayed in Figure 15.11, which is similar to the Rules Wizard in Microsoft Outlook.
-
You must give your new search folder a name and define the update properties for filtering.
The following list includes the properties most commonly used to filter updates:
• Date Released— The filter for this property is not a specific date; it is the date an update was released relative to today’s date. Some possible filter values include last 1 day, last 1 month, and last 1 year.
• Product— With this filter, you can limit your query to specific products. The filter list includes all products, not just the ones that you configured to include in the update catalog.
• Severity— Many updates from Microsoft, particularly security patches, are categorized according to how important Microsoft feels they are. The severity property of an update captures this information.
• Superseded— Some updates released by Microsoft are superseded by newer updates because they were either flawed or rolled into the newer update. It is usually not a good idea to deploy superseded patches; you can filter them out with this property. Possible values include Yes and No.
• Update Classification— As this property’s name implies, you can filter updates based on their classification. Possible filter values include all available update classifications, not only the ones you chose to include in the update catalog.
Note that some properties cannot be used to filter updates, even though they appear in the Search Folder Criteria dialog box. These are marked with the trailing comment (property is not searchable) and include % Compliant, Language, License Terms, Maximum Run Time, and Nap Evaluation.
Somewhat confusing in this figure is the check box labeled Search all folders under this feature. Here are some points to keep in mind when using this check box:
• If the option is checked, the Search Folder queries the entire update repository. For most simple searches, you should check this option.
• If this option is unchecked, the Search Folder only searches the current folder in the ConfigMgr console, enabling you to build nested queries or a hierarchical Search Folder structure.
The search folder displayed in Figure 15.11 queries the entire update repository for all Windows XP critical updates in the last month.

After creating a search folder and selecting it from the console tree, you can view and sort updates in the Details pane circled on the right of Figure 15.12. You can also select an update and view extended information about it in the pane appearing at the bottom. You can right-click an update and select Properties to view some of the same extended details in a dialog box, update the maximum runtime, and assign a custom severity. You can then use the custom severity assigned to updates to refine further the queries used for search folders.

Update lists are intermediate objects used to build static lists of updates. Using update lists is optional but recommended. Update lists are static, rather than dynamic like search folders; this capability allows you to create a list to monitor the life cycle of a set of updates, including download status, deployment status, and compliance reporting. You can also use update lists as a delegation mechanism, allowing separate lists for different administrative use. As an example, you can create one set of lists for desktops and one set for servers, delegating the proper rights on each.
You can view the details of updates in an update list the same way you view them though the update repository—by selecting the Update List in the console tree. The result is similar to Figure 15.12. Additionally, you can customize the columns displayed in a list.
As an example, you may only want to see the Bulletin ID and percent compliance details for updates. To customize the columns, right-click the list in the ConfigMgr console tree on the left and select View -> Add/Remove columns... to launch the Add/Remove Columns dialog box, where you can move columns between the Available and Displayed lists.
To add updates to a list, select any number of updates in the update repository and do one of the following:
• Right-click and choose Update List.
• Drag the updates from the update repository to an existing list.
Both methods launch the Update List Wizard (displayed in Figure 15.13) to guide you through the process. If you add updates using the right-click method, the first page of the wizard allows you to choose to add the updates to an existing list or create a new list. This is the only method available to create a new list.
In both cases, the first page of the wizard contains a check box to initiate downloading the updates. The second page varies based on whether or not you are creating a new package:
• If you choose to download the updates using the wizard, the next page prompts you to select an existing update package or to create a new package.
• If you choose to create a new package, you must name the package and specify a source location. ConfigMgr will download the applicable files for the chosen updates to the source location.
The source location must be in Universal Naming Convention (UNC) format and accessible by the current user of the ConfigMgr console. Additionally, the wizard adds a Distribution Points page, where you can specify the distribution points on which to install the package.
Update lists are also particularly useful in a multisite ConfigMgr hierarchy. Lists created at parent sites replicate to child sites; these replicated lists are read-only at the child sites. Administrators of the child sites can then use these replicated lists to expedite the deployment of the updates in those lists—they no longer have to worry about actually discovering applicable updates, just deploying them using existing collections and templates. This replication process can be used to approve updates at higher levels of the organization and push them down as “approved” patches to the lower levels for use in a delegated model of software update maintenance.
You typically will create multiple deployments to manage distributing updates, with the only difference being the collection or the deadline for the updates. Deployment templates provide a group of common settings used to create update deployments (discussed in the section “Creating and Managing Deployments”); with templates, you can predefine the common settings for deployments, including the following:
• Collection— The collection for the deployment.
• User Notification— Suppress or allow user notification.
• Deployment time interpretation— Determines how a client interprets the deployment time—either as client local time or Coordinated Universal Time (UTC).
• Duration— The amount of time until a deployment becomes mandatory. This setting determines the actual deadline of a deployment when you use a template to create a deployment by adding the duration to the current date and time. Figure 15.14 shows the Deployment Template Wizard page to set this option.

• Restart Suppression— You can choose to suppress restarts on servers, workstations, or both.
• Ignore Maintenance Windows— Tells the deployment to ignore any configured maintenance windows (discussed in the “Maintenance Windows” section of this chapter). This is useful when deploying critical updates or zero-day updates that need immediate installation.
• Operations Manager Integration— Unexpected restarts and update installations may generate many warnings and alerts in Operations Manager. The following are your options:
• You can instruct the ConfigMgr agent to put the Operations Manager (OpsMgr) agent on that system into maintenance mode, thus preventing unnecessary warnings and alerts.
Note
Specifying that ConfigMgr place the Operations Manager agent into maintenance mode does not truly place the OpsMgr agent health service watcher into maintenance mode; instead, it merely pauses the health service on the managed system. This should change in a future Configuration Manager service pack or maintenance release.
• You can also configure the deployment to generate an Operations Manager alert if an update installation fails.
Both options assume an Operations Manager environment and an Operations Manager agent installed on the client system.
• Download Settings— These settings dictate whether to download updates if the client is connected to a distribution point in a slow network, or if the client is connected to an unprotected distribution point when a protected DP is available but without the specified updates.
If you only allow content to download from distribution points in a local or fast boundary and no DPs are available to a client, the updates cannot download and the deployment will fail. This may happen with roaming clients, because they move from location to location. If you have a population of systems that roam between sites with local distribution points, be sure to define the slow boundaries and make the deployments available to the slow boundaries.
Updates in a mandatory deployment download to a client when they become available, as configured on the Schedule tab of the deployment’s properties page. This capability allows clients to pre-stage the updates and ensures those updates are available when the deadline for the deployment hits, regardless of the availability on a local distribution point.
Pre-staging also prevents a distribution point from overloading with requests for updates once a deadline hits. Updates in nonmandatory deployments—those without a deadline—are not downloaded to the client until the client initiates installing updates in the deployment.
You can create new update deployments with an update template using the New Deployment Wizard. Utilizing a template makes creating deployments quicker, and ensures you can create multiple deployments using identical settings with a minimal effort. Deployment templates are optional but recommended.
To create a deployment template, launch the new Deployment Template wizard by right-clicking on the Deployment Templates node and selecting New Deployment Template. Alternatively, if you create a deployment using the New Deployment Wizard without a deployment template, you are prompted (as shown in Figure 15.15) to create a new template using the settings you just entered to create the deployment.
There is no link between a template and deployments created using that template. ConfigMgr copies the settings from the template to the deployment but does not establish or maintain a relationship between the two.
Update deployments are similar to advertisements because they control the details of actually deploying and installing updates on managed systems. The next sections discuss creating update deployments, deployment deadlines, and scheduling when using maintenance windows.
There are two methods to create a new deployment:
• Select a set of updates from the Update Repository, right-click them, and choose Deploy Software Updates.
• Right-click an update list and choose Deploy Software Updates.
The only difference between the two options is that the first uses updates you manually selected, whereas the second uses updates from a list you preconfigured. Creating deployments using a list is preferred because the list persists after you create the deployment and is available for other things, in particular reporting.
Both options launch the Deploy Software Updates Wizard. You use the wizard to configure the details of the deployment, which are the same as the details used to configure a deployment template. The wizard gives you the option to use a previously created template, in which case ConfigMgr copies all the settings from the template to the deployment. The New Update Deployment Wizard prompts for any settings not configured in the template. Additionally, you can specify the following:
• Start time for the deployment
• Whether or not the deployment is mandatory, and a deadline time
• To use Wake On LAN
• To ignore maintenance windows
Similar to update lists, deployments are replicated down a ConfigMgr hierarchy from parent sites to their children. However, instead of being available for use at the down-level sites, replicated deployments are enforced where applicable. Thus, if you create and apply a deployment at a parent site on a collection that contains systems from child sites, the deployment is enforced by the child site. This model is useful for centralized administration and enforcement of software updates in an organizational hierarchy; it forces compliance with the policy established at the top level without any intervention by down-level administrators.
A distinction between update deployments and advertisements is that rather than provide a mandatory time for installation, update deployments use deployment deadlines. Deployments are optionally available to users until the specified date and time, and they are enforced after this date and time. This is an oft-misunderstood concept and bears restating: Updates in a deployment are not forced to install until after the specified deadline.
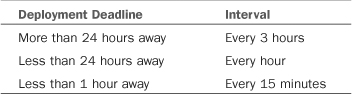
Users can manually initiate the deployment until the deadline. By default, ConfigMgr prompts users to initiate deployments with a system tray balloon notification, basing the notification interval on the deadline according to Table 15.5. (You may notice these are actually the same intervals discussed in the “Agent Configuration” section of this chapter.)

You can customize these default intervals by going to the Reminders tab of the Computer Client Agent Properties dialog box. You get to this dialog box by navigating to Site Database -> Site Management -> <Site Code> <Site Name> -> Site Settings -> Client Agents in the ConfigMgr console, right-clicking Computer Client Agent, selecting Properties from the context menu, and then clicking the Reminders tab. Figure 15.16 shows an example of this tab. If necessary, you can completely suppress notifications for specific deployments.
At the time of the deadline, the ConfigMgr agent reevaluates compliance status of the local managed system to determine which updates are still applicable, and then schedules installing the updates.
Analogous to software distribution packages, deployment packages (Site Database -> Computer Management -> Software Updates -> Deployment Packages) are simply the collection of files needed for a defined set of updates. You manage update packages identically to software distribution packages—they must have a source folder and be available to clients by installing them on distribution points.
There are two structural differences between software distribution packages and deployment packages:
• Deployment packages do not have customizable programs and therefore do not have a Programs subnode in the console.
• Deployment packages contain specially formatted updates and accordingly have an Updates subnode, where you can add and remove updates.
Although the console does not include a specific selection to create a deployment package, there are two methods to create one:
• Choose to download updates on the first page of the Update List Wizard (see the “Update Lists” section of this chapter).
• Select updates in the update repository or an update list. Then right-click and choose Download Software Updates.
The second method launches the Download Updates Wizard, displayed in Figure 15.17. This wizard has three main pages:
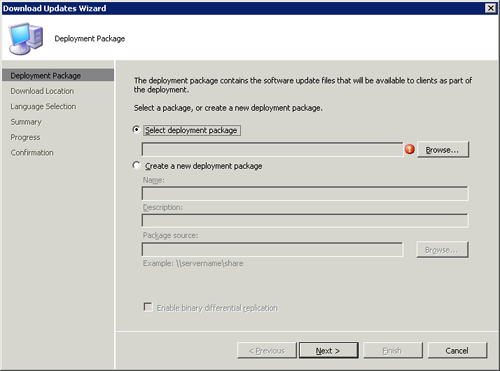
• Deployment Package— On this page, you can choose to use an existing package or create a new one. If you create a new package, you must give it a name and specify a source location. ConfigMgr will download the applicable files for the chosen updates to the source location. The source location must be a UNC (\<servername><share>) location and the current user of the ConfigMgr console must have security credentials to access that UNC location. Additionally, the wizard has some other pages for new package-specific information:
• Distribution Points
• Data Access
• Distribution Settings
Note
Deployment Packages Are Not Linked
Update lists and deployment packages are not linked to each other, and updates added to a list are not automatically added to any update packages you create from the list. The reverse of this is also true—updates added to a package are not automatically added to update lists used to create the package.
Similarly, deployments and deployment packages are also not linked to each other. Adding updates to a deployment package will not add them to any deployments.
• Download Location— Choose to download updates from Microsoft using an Internet location or from a network location.
• Language Selection— Many updates are localized and only applicable to corresponding localized versions of Windows. On this page of the wizard, you choose which localized updates to download. It is a best practice to select only the languages that exist in your environment, thus minimizing the amount of Internet traffic to download your selected updates.
The steps used to create a deployment are variable and dependent on whether you use a delegated model and either or both of the two optional components—update lists and deployment templates (both previously discussed in like-named sections). Although you have the flexibility to fit the model to your needs and requirements, it presents some ambiguity. The following section discusses implementing the third step of the four-step software update process—update preparation (previously discussed in the “Software Updates Process” section of the chapter).
It is best to start with a recommended or generic way to set up a complex process such as Software Updates, particularly when the process offers many different paths. Figure 15.18 shows a flowchart presenting one possible path, based on best practices, for creating and managing your deployments.

The flowchart includes the following steps:
• Create collections—Similar to advertisements, update deployments are targeted to specific collections or subcollections. You can create a series of collections specifically for targeting your update deployments, where each collection has a separate deployment targeted to it, with any differences in the deployments defined by corresponding deployment templates.
• Create deployment templates—Create a deployment template for each combination of settings needed. You can use these templates each time you create a new deployment, greatly reducing the time it takes to create a deployment and ensuring all deployments follow your defined practices for deploying updates.
• Determine applicable updates—Based on your organization’s needs, requirements, and policies, you must determine which updates are applicable for your environment. You can also use compliance scan data returned from managed systems to aid in this decision. Creating search folders (previously discussed in the “Update Repository” section) will isolate updates and help you identify applicable updates.
• Create or modify update lists—Create update lists for each area of interest where compliance reporting and tracking are required. Consider creating update lists for each operating system type that exists. You may also want to create a new update list every time Microsoft releases a new batch of updates—typically the second Tuesday of every month. Using the Update Repository or Search Folders node in the console, copy updates into applicable lists. Note that updates can be part of multiple lists.
• Create or modify deployment packages—As you add updates to update lists, use the Update List Wizard to add updates to deployment packages, as described earlier in the “Update Lists” section of this chapter. You are free to create packages in whichever manner you choose.
Managed systems do not download an entire package; they only download those specific updates they require from each package regardless of which package the updates are in. This capability, in combination with ConfigMgr’s ability to use binary delta replication to replicate only changed bits in a package, eliminates the need for you to limit package sizes.
In general, you should create a single package containing all updates for each calendar year. This prevents numerous downloads of updates applicable to multiple systems for multiple packages. ConfigMgr uses file delta (default) or binary delta replication to install the package on distribution points, so the size of the package and its impact on network bandwidth should not be a concern.
• Create or modify deployments—Create the actual deployments used to distribute and install the updates to managed systems by right-clicking an update list and choosing Deploy Software Updates; then choose to add the updates to an existing deployment or create a new one. By creating a new deployment for each new set of updates, you can maintain the same deadline for previously created deployments. A previously created deployment template populates the actual settings for the deployment.
Perform the last four steps of the flowchart in Figure 15.18 every time Microsoft releases new updates or your organization determines there are updates requiring installation.
Best practices are always tricky business—what works for one organization is not necessarily the best fit for another organization. Nevertheless, it is always good to have a starting point, a set of guidelines or recommendations from those that have been through the trenches and survived. Actually, you can learn from those who didn’t survive; things like “Don’t step there” or “Don’t drink the water.” The following list is meant to be just that, a general set of guidelines to dispel any myths and reinforce the information presented in the rest of this chapter:
• Manual intervention— Unlike the standalone version of WSUS, some manual intervention is required on an on-going basis to deploy updates with ConfigMgr. You must identify and download updates every time you want to deploy them. There is no way to automate this. Some may feel that this is a knock against the ConfigMgr Software Updates function, but this manual intervention is relatively minor and ensures that no updates are distributed in an organization without explicit, hands-on configuration.
• Update packages— Clients will pull applicable updates from any available package. Because of this, there is no specific need to separate updates into multiple packages. The only real limitation is a recommended technical limit of 500 updates per package. Some separation of updates is therefore logical, and the general guideline is to create a single update package for every calendar year of updates. Separating updates by operating system will produce duplication because some patches do cross operating system boundaries or are not operating system specific.
• Update lists— Update lists are the perfect way to track what updates were actually deployed in a given update deployment cycle. Because Microsoft sticks to its monthly update release rather vigorously, it makes sense to create a new list every month to contain the newly released updates. In addition, update lists only contain references to updates, so creating multiple update lists based on operating systems or some other criteria does not create any duplication.
• Deployments— After the deadline for a deployment passes, the need to have a separate deployment for the updates referenced in that deployment goes away. Therefore, on a regular cycle, something like every 3, 6, or 12 months, it makes sense to collapse the updates referenced in individual deployments with past deadlines into larger deployments. This simplifies deployment management and minimizes the number of individual deployments listed in the console.
• Initial setup— When you are first setting up Software Updates, it makes sense to create one large list for all updates before a given date. You can then create a deployment for this list to ensure that any new systems introduced into the environment and any existing ones are fully patched with all updates issued before you started using Software Updates. You can store updates for this list in one large package as long as it does not break the 500-update barrier.
• Naming conventions— Unlike the rest of the nodes in ConfigMgr, subfolders cannot be created under Update Lists, Deployment Management, and Deployment Packages. For this reason, you should establish and stick to a strong naming convention for these object types. This naming convention should clearly describe the criteria used to choose the updates contained in the given object, and ensure that objects are sorted chronologically. Table 15.6 contains a sample naming convention for each of these types of objects.

Deployments are somewhat limited in that they do not define an exact time that updates should or must be installed; they merely define a time when updates become mandatory. This limitation could easily cause disruption to your users and your servers if updates install at various times after the deadline.
Maintenance windows are the perfect solution to this dilemma. In general, maintenance windows prevent the ConfigMgr client from undertaking any action that could disrupt the end user on a system. This includes preventing Software Updates deployments, Software Distribution advertisements, and restarts initiated by ConfigMgr for software updates.
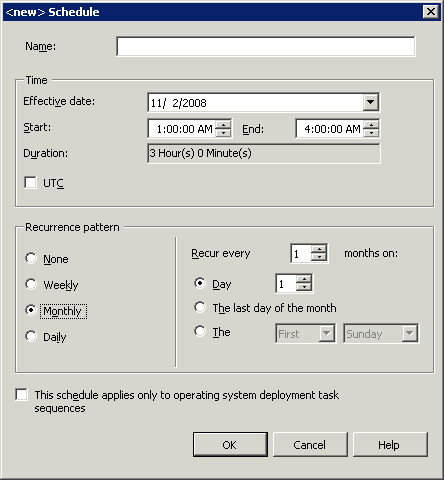
Because they are set on a per-collection basis, you can create maintenance windows for specific recurring and nonrecurring start and stop times. You edit these schedules by right-clicking any collection and choosing Modify Collection Settings. This displays the Collection Settings dialog box, where the first tab, Maintenance Windows, manipulates these windows. The interface for creating maintenance window schedules, displayed in Figure 15.19, is quite flexible and allows you to specify settings such as every third Tuesday of the month.
Note
Maintenance Windows and Software Distribution
Maintenance windows also affect Software Distribution advertisements. In the same way that they delay the distribution of updates in a deployment, they also delay the execution of mandatory advertised programs. Be aware of this when setting up your collections and maintenance windows. If necessary, you can configure your mandatory advertisements to ignore maintenance windows using the Schedule tab on the advertisement.
If the collection where the deployment is effective has a maintenance window, the agent schedules installation for the start of the next occurrence of that maintenance window. The agent also calculates how much time it will take to install all the identified updates, ensuring the updates will not break the maintenance window. Additionally, 15 minutes are also added to this calculated window of time to account for a system restart. If installing the updates will exceed the window, the agent chooses a subset of the updates. If no applicable maintenance window exists, the agent immediately starts installing all updates.
After a deployment completes on a managed system, an additional compliance scan occurs to ensure successful installation of all updates. ConfigMgr forwards the results for this scan to the management point using state messages. This process is significantly expedited compared to the ITMU process and ensures the compliance data in the ConfigMgr database is always current.
Maintenance windows affect software updates; they prevent updates in a mandatory deployment from installing on a system outside configured maintenance window times. This causes any mandatory deployment past its deadline to wait until the next configured maintenance window before installing its updates.
You can create multiple maintenance windows on a single collection. Any system belonging to multiple collections is also subject to the maintenance windows of those collections, because multiple maintenance windows on a single system do not cancel each other.
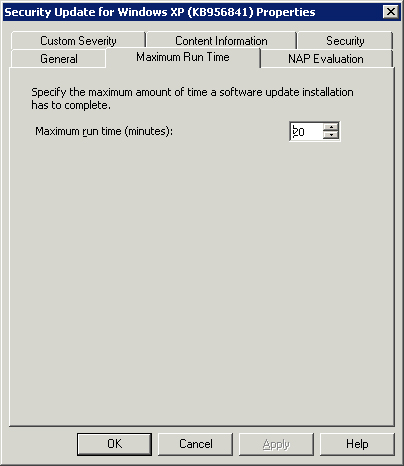
Another check performed by the Client agent is the maximum runtime for each applicable update in a deployment. If the sum of these maximum runtimes is greater than the maintenance window allows for, the Client agent will not install all applicable updates. The updates will be culled based on their maximum runtime, ensuring they complete before the window ends. To view or edit the maximum runtime for any update, find the update (in the update repository, an update list, a deployment, or even a deployment package), right-click it, and choose Properties. This opens a Properties dialog box for the update with a Maximum Run Time tab, shown in Figure 15.20; the value listed is editable. You can also multiselect updates to change their maximum runtimes in the same way. By default, all updates have a maximum runtime of 20 minutes.
Note that clients begin downloading updates as soon as deployments are available to them. This prevents the time required by clients to actually download updates from affecting the time available in the maintenance window.
Configure specific deployments to ignore configured maintenance windows by selecting the Ignore maintenance windows and install immediately at deadline check box on the Schedule tab of a deployment. Use this option very carefully if you have gone through the trouble of defining and setting up maintenance windows, because it will disrupt your carefully planned update scheduling. However, in the case of zero-day updates, the disruption may be necessary.
ConfigMgr 2007 continues to support down-level SMS 2003 clients to varying degrees; this support includes software update functionality. This support is critical during a large, in-place upgrade from SMS 2003, when it may be impossible to transition the entire client base quickly. This section discusses deploying updates to these SMS 2003 clients; the information assumes a knowledge and understanding of software updates in SMS 2003.
Tip
Upgrading SMS Site Servers
For information on upgrading your SMS site servers to Configuration Manager 2007, see Chapter 9, “Migrating to Configuration Manager 2007.”
The upgrade maintains the following data in the site database:
• Software updates metadata— Includes items such as name, description, applicability rules, and article ID
• Compliance information— Includes the number of scanned clients for which a software update is required or not required
• Client status information— Includes the revision for the Microsoft Update catalog used by clients when scanning for software updates compliance
The SMS 2003 upgrade process automatically upgrades the actual ITMU scan tool to a new, ConfigMgr-compatible version. ConfigMgr 2007 does not support other separately released supplementary scan tools such as the Inventory Tool for Dell Updates or the February 2005 Security Update Scan Tool; any data pertaining to these tools is removed from the database after the upgrade.
SMS 2003 update advertisements are also migrated during the ConfigMgr upgrade; these continue to function as expected. The upgrade moves the advertisements in the console to the SMS2003 Advertisements node, under Site Database -> Computer Management -> Software Updates -> Deployment Management.
Because the SMS 2003 Client agent does not have the same tight integration with the WUA as the ConfigMgr Client agent, SMS 2003 clients must continue to receive their update catalog by means of an ITMU-based scan advertisement. Ensure you are only targeting SMS 2003 clients with this advertisement! Targeting ConfigMgr clients will produce unexpected results and is unsupported.
Similarly, you must download the updates catalog from Microsoft using a separate catalog synchronization advertisement—this process is identical to the process existing in SMS 2003. All updates migrated from SMS 2003 to ConfigMgr have (LEGACY) appended to their title until the initial ITMU catalog synchronization completes. Do not create new deployments using updates marked with (LEGACY), because these only exist to support migrated deployments and for reporting.
After synchronizing the ITMU update catalog and scanning SMS 2003 clients with the ITMU scan tool, you are once again ready to deploy updates to those clients. The actual process for deploying updates to SMS 2003 clients is nearly identical to the process outlined previously for ConfigMgr clients, with a few minor differences or exceptions:
• Software repository— A searchable attribute exists on all updates called Deployable to SMS2003. As this name implies, the attribute identifies updates that you can deploy to SMS 2003 clients. Using this attribute, you can build search folders specific to your SMS 2003 clients.
• Deployments and deployments packages— The loose association of deployments and deployment packages does not apply to those created for SMS 2003 clients; they roughly revert to the behavior of ITMU-based update packages and advertisements in SMS 2003.
Each deployment package used for SMS 2003 clients contains a legacy program, listed under the SMS2003 Programs subnode of the package, to deploy the updates in that package. Each of these programs is then advertised to clients using an advertisement listed under the SMS2003 advertisements subnode of deployment management.
Because this pertains to legacy SMS 2003-based clients, the programs are specific only to the updates in the package that contains the program. Additionally, the SMS 2003 agent is not intelligent enough to download only the updates that it requires and instead downloads the entire package.
• Deployment templates and deployments— SMS 2003–specific settings exist for both these objects. Choose these settings while running either the Deployment or the Deployment Template Creation Wizard, or after creation using the SMS 2003 tab of the Properties dialog box. The settings include the following:
• Collect Hardware Inventory Immediately—In SMS 2003, software update compliance information is stored locally on clients in the WMI repository and returned to the site using hardware inventory. It may be desirable to return this information immediately to the site database rather than waiting for the next hardware inventory cycle; this option initiates a new hardware inventory, which returns the software update compliance information to the site database immediately after update installation.
• Distribution Point Locally Available—This option allows you to specify downloading updates first from the local distribution point or directly access them from that DP if it is locally available.
• No Distribution Point Locally Available—This option allows you to specify to first download updates from a remote distribution point, or directly access them from a remote distribution point if a distribution point is not locally available. You can also specify not to install updates at all if a distribution point is not available locally.
Once you eliminate all SMS 2003 clients in your infrastructure, you can uninstall the ITMU. Until then, the hybrid approach outlined here offers a seamless and relatively painless path to managing updates for both types of clients.
As with other site roles, some special configuration is required to configure an SUP for use with a native mode ConfigMgr site. This involves configuring the WSUS IIS site to use SSL-secured communication and telling WSUS itself to use the SSL certificate. Adding this certificate authenticates the SUP to the clients and secures all communication between the SUP and the clients. Perform the following steps:
-
Begin by acquiring the SSL certificate from your Public Key Infrastructure (PKI). You must install this certificate into the Personal certificate store of the computer account on the SUP; this process is dependent on your PKI implementation.
The requirements for this certificate are as follows:
• The Enhanced Key Usage value must contain Server Authentication (1.3.6.1.5.5.7.3.1).
• If the site system accepts connections from the Internet, the Subject Name or Subject Alternative Name must contain the Internet FQDN of the SUP.
• If the site system accepts connections from the intranet, the Subject Name or Subject Alternative Name must contain either the intranet FQDN (recommended) or the computer’s NetBIOS name, depending on configuration of the site system.
• If the site system accepts connections from both the Internet and the intranet, you must specify both the Internet FQDN and the intranet FQDN (or computer NetBIOS name) using the ampersand (&) symbol delimiter between the two names.
-
Configure the WSUS site in IIS to use the certificate. The steps differ between Windows Server 2008 and Windows Server 2003. For IIS 7.0 on Windows Server 2008, follow these steps:
• Open the IIS 7 Administration console.
• Expand Sites and select the website used by WSUS (Default Web Site if you installed WSUS into the default site, or WSUS Administration if you used a custom site).
• Select Edit Bindings.
• Configure HTTPS to use the appropriate certificate.
For IIS 6.0 on Windows Server 2003, use the following steps:
• Open the IIS 6 Administration console.
• Edit the properties of the website used by WSUS (Default Web Site if you installed WSUS into the default site, or WSUS Administration if you used a custom site).
• Click Server Certificate on the Directory Security tab.
• The Web Server Certificate Wizard launches, prompting you to select the web server certificate to use.
-
Next, configure the following WSUS virtual folders to allow only SSL communication:
• APIRemoting30
• ClientWebService
• DSSAuthWebService
• ServerSyncWebService
• SimpleAuthWebService
You will perform this differently in Windows 2003 and Windows 2008. For IIS 7.0 on Windows Server 2008, complete these steps in the IIS 7 Administration console:
• Expand Sites and select the website used by WSUS (Default Web Site if you installed WSUS into the default site, or WSUS Administration if you used a custom site).
• For each of the virtual folders listed previously, double-click SSL Settings in Features View, select Require SSL on the SSL Settings page, and then click Apply in the Actions pane.
For IIS 6.0 on Windows Server 2003, use the following steps:
• Edit the properties of the website used by WSUS (Default Web Site if you installed WSUS into the default site, or WSUS Administration if you used a custom site).
• For each of the virtual folders listed previously, click the Directory Security tab. Then click Edit in the Secure Communications section, select Require secure channel (SSL), and then click OK and click OK again to close the properties for the virtual root.
-
Finish by configuring WSUS to use SSL. To do this, run a single command from the command prompt:

In this case,
<subject name in the signing certificate>is typically the FQDN of the system hosting WSUS based on the certificate requirements listed previously.
One hindrance to updating systems with the latest updates is the power status of the system; specifically, if the system is not powered on, how can you or a tool maintain that system? Traditionally, the best time to update systems in an organization is when no one is using them—at night. However, many users turn off their desktop systems when they leave for the day, even if instructed not to, and some systems may go into a power-saving hibernation mode. Powered-down systems present an obvious problem with no easy workaround and give us systems that either are not patched or are slammed with patches the moment users log into the network in the morning.
The solution to this is Wake On LAN (WOL). WOL is an industry-standard method of sending a remote signal over the network to a system to “wake” it up when the system is powered off or hibernating. It does this by sending a specially crafted network packet known as a magic packet to the destination system. The network interface card (NIC) of the destination system receives this magic packet (also referred as a wake-up packet in the ConfigMgr console) and proceeds to wake up the system. Chapter 6, “Architecture Design Planning,” discusses magic packets.
There are two ConfigMgr-specific prerequisites and three external prerequisites to fully enable WOL capabilities in ConfigMgr.
• Enable hardware inventory.
• Install the ConfigMgr agent on destination systems.
• Network interface cards must support WOL and the use of the magic packet.
• Enable WOL on NICs and in the BIOS of destination systems.
• If subnet-directed broadcasts (discussed in the next section) are used, configure the network infrastructure to forward subnet-directed broadcasts.
ConfigMgr supports two types of WOL:
• Unicast— With unicast WOL, a single magic packet is sent to the IP address of the system that needs to be woken up. The IP address is taken from the hardware inventory of the destination system (thus the requirement for hardware inventory to be enabled).
You do not have to make changes to most network infrastructures for this type of WOL to function. The magic packet is simply a specially crafted UDP (User Datagram Protocol) packet sent directly to the destination system’s IP address.
The magic packet includes the Media Access Control (MAC) address of the system. The destination NIC compares the MAC address to its own before actually waking up the system; if the MAC address in the magic packet does not match the MAC address on the destination NIC, the NIC does not signal the system to wake up. This prevents a situation where the desired destination system changes its IP address, but the magic packet is sent to a different system that acquired the old IP address of the destination system. In this case, there is no way to actually wake up the destination system because its new IP address is unknown to ConfigMgr!
• Subnet directed— With subnet-directed WOL, ConfigMgr broadcasts the magic packet to the IP subnet of the destination system. All NICs on that subnet receive the magic packet. Each compares the MAC address specified in the magic packet to its own; if there is a match, the NIC wakes up its system. This allows ConfigMgr to wake up those systems with changed IP addresses that remain on the same subnet.
Subnet-directed WOL requires support from your network infrastructure; specifically your network infrastructure must support subnet-directed broadcasts. These broadcasts are often disabled due to overhead. Additionally, it is a security best practice to change the default port used by subnet-directed WOL packets and configure the network infrastructure to allow only subnet-directed broadcasts from your ConfigMgr site server.
Several configuration options are available for WOL in ConfigMgr. You perform all customizations from the Wake On LAN and Ports tabs of the <Site> Properties dialog box (see Figure 15.21). Right-click Site Database -> Site Management -> <Site Code> <Site Name> and then choose Properties to get there.
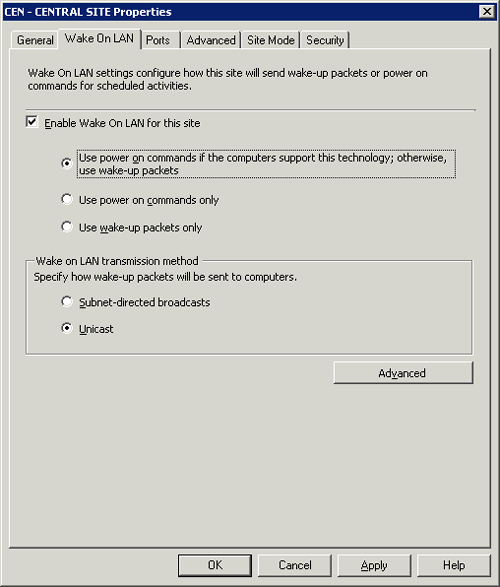
Enable WOL on the Wake On LAN tab and configure whether you want to use unicast or subnet-directed broadcasts. New in R2 is the ability to use the power-on functionality of the Intel AMT technology. This is an alternative to the magic packets used by traditional WOL, but requires Out of Band (OOB) management support (discussed in Chapter 6) on the destination system; OOB also must be fully configured and enabled in ConfigMgr. To support the AMT power-on capability, R2 includes three new options:
• Use power-on commands if the computers support this technology; otherwise, use wake-up packets.
• Use power-on commands only.
• Use wake-up packets only.
You can also access advanced options from the Wake On LAN tab by clicking the Advanced button displayed in Figure 15.21. These options are mainly network and ConfigMgr throttling controls; only change them if you are experiencing issues.
To view the port used by ConfigMgr for the magic packet, switch to the Ports tab of the <Site> Properties dialog box. ConfigMgr uses UDP port 9 by default. To change the port, select the Wake On LAN entry in the list box and click the Properties button (the button looks like a hand pointing to a box). The Port Details dialog box launches, allowing you to change this port number. Only a single port number is supported.
ConfigMgr takes care of all the details for actually implementing WOL. You simply have to tell the system when to use it. ConfigMgr 2007 supports WOL for the following three activities:
• Software distribution mandatory advertisements
• Task sequence mandatory advertisements
• Software update mandatory deployments
A check box is present on the Schedule tab of the Properties dialog box for each of these activities. Once one is selected, ConfigMgr sends the WOL request to each applicable destination system at the scheduled mandatory time. When the destination system wakes up, it initiates the mandatory advertisement or deployment.
WOL is a great addition to the ConfigMgr toolset. Although third-party tools were previously available to fill this gap, having the capability built in is always better—and cheaper. WOL is not complicated, and Microsoft maintains this simplicity by seamlessly integrating WOL into the console and functionality of ConfigMgr.
A Windows 2008 server installed with the NPS role implements system health checks against Windows systems on the network. Those systems failing these health checks are subject to various actions, including the following:
• Reported on
• Denied access to the network
• Placed into a quarantine status with limited network access
The Network Access Protection (NAP) functionality included in ConfigMgr 2007 extends the NAP functionality built in to Windows Server 2008, implementing a system health check based on the mandatory software updates configured in ConfigMgr. The next sections discuss this process.
ConfigMgr implements NAP using a new site system role—the System Health Validator (SHV) point. Install this new role on a Windows Server 2008 system that has the NPS role already installed. (Installing and configuring the NPS role is beyond the scope of this book; for detailed information see http://technet.microsoft.com/en-us/network/bb545879.aspx.) Perform the following steps on this system to install the SHV:
-
In the ConfigMgr console, navigate to Site Database -> Site Management -> <Site Code> <Site Name> -> Site Settings -> Site Systems.
• If the system running NAP is not currently a site system, right-click Site Systems and then choose New -> Server to launch the New Site System Server Wizard. Enter the name of the site system and the intranet-accessible FQDN of the NAP server.
• If the NAP server already is a ConfigMgr site system, right-click the server and choose New Roles from the context menu. This launches the New Site Role Wizard, which looks and acts exactly like the New Site System Server Wizard, except the wizard has already filled in the site system name and intranet FQDN for you.
- For either wizard, choose Next and then choose System Health Validator Point from the list of available site roles.
- Click Next on each subsequent wizard page. There are no configuration options inside ConfigMgr itself.
Additionally, you must extend Active Directory for ConfigMgr (see Chapter 3, “Looking Inside Configuration Manager,” for details). Extending AD is required because NAP uses the System container to store Health State References. The site server publishes Health State References used during client evaluation to ensure the most current policies are used. If you plan to use NAP in a multiforest environment, you must prepare each forest and the NAP site server role according to the instructions at http://technet.microsoft.com/en-us/library/bb694120.aspx.
On the client side, NAP only works with Windows Vista, Windows Server 2008, and Windows XP SP 3 (and above) clients. This is because only these operating systems include the NPS agent. Unfortunately, no download is available to make any other version of Windows work with NPS or NAP.
By default, the NPS Client agent is disabled in a ConfigMgr site and must be enabled. Perform the following steps:
- In the ConfigMgr console, navigate to Site Database -> Site Management -> <Site Code> <Site Name> -> Site Settings -> Client Agents.
-
Right-click Network Access Protection Client Agent and then select Properties.
The first page of the Network Access Protection Client Agent Properties dialog box has a single check box allowing you to enable (or disable) the agent.
On the Evaluation tab, displayed in Figure 15.22, you can configure three settings:
• UTC (Coordinated Universal Time)— This configures the client agent to assess computer system health according to UTC time rather than client local time. This setting is beneficial for those clients that roam between time zones, and ensures reevaluations are performed on a fixed time scale rather than a variable one caused by the client moving between the time zones.
• Force a fresh scan for each evaluation— This option ensures cached evaluation results are not used when a client reconnects to a network in between configured evaluation times. Forcing an additional scan can cause delays in connecting to the network, which can adversely affect mobile systems.
• Schedule— This section of the page lets you set either a simple or a detailed schedule of when you want to perform a system health check.
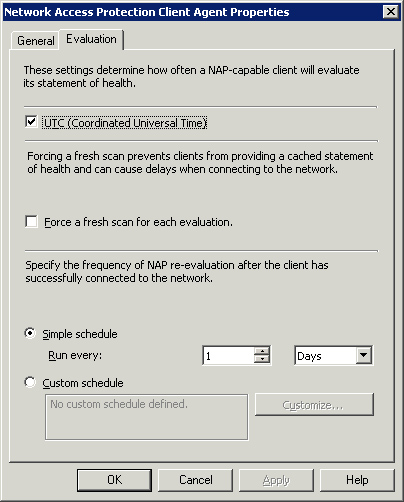
Similar to other ConfigMgr Client agents, the NPS Client agent settings are sitewide without a direct way to override them for individual systems.
Those clients subject to the policies of the NPS will report to the NPS using their built-in NPS client. The NPS Client agent retrieves policies from the NPS and evaluates the health of a system against the checks defined in the policy encapsulating the results, known as a Statement of Health (SoH). The SoH contains results from all the checks performed on the system, and the NPS Client agent submits the SoH to the NPS. The NPS receives the SoH and compares it against the NPS policies:
• If the system appears compliant with the policies, it is allowed on the network.
• If deemed noncompliant, the system can be granted limited access to the network, allowing for correction of any issues that caused it to be considered noncompliant.
NPS policies, known as health policies, are based on server-side components called System Health Validators. These SHVs plug in to the NPS server and enable performing specific checks on a client to validate its health. As an example, the built-in Windows Security SHV defines checks for the status of the Windows Firewall, existence of antivirus software, and other settings typically associated with the Windows Security Center. Each check results in one of two states: Pass or Fail. The status of a client as a whole may also be reported in one of three different states:
• Transitional— This state indicates that the client is not ready to report its status. In the ConfigMgr context, this could mean the client agent is not yet enabled on the system.
• Infected— This state is primarily used by antivirus SHVs and is not used by the ConfigMgr client.
• Unknown— This is a catchall state often used to indicate client credential issues.
The health policies define which SHVs to use and what conditions must be met for a system to match a health policy. The following conditions are possible in a health policy:
• Client passes all SHV checks
• Client fails all SHV checks
• Client passes one or more SHV checks
• Client fails one or more SHV checks
• Client reported as transitional by one or more SHVs
• Client reported as infected by one or more SHVs
• Client reported as unknown by one or more SHVs
The ConfigMgr SHV point implements the SHV that plugs in to an NPS. The policies produced by this SHV instruct the NPS Client agent to compare the exact patch status of a system against the applicable mandatory updates configured in the NAP policies in the ConfigMgr console (Site Database -> Computer Management -> Network Access Protection -> Policies). See the “Compliance” section of this chapter for a description of these policies.
A System Health Agent (SHA) is a component that plugs in to the NPS agent on the client; each server-side SHV has a corresponding client-side SHA. SHAs perform the actual checks on a system and produce the Pass/Fail results that go into the client’s SoH.
The ConfigMgr client implements the ConfigMgr SHA. This SHA performs the actual comparison of the current update status on the client with the mandatory deployments applicable to the system, adding the results to the SoH for that system.
The ConfigMgr SHA first performs a series of nonconfigurable checks to determine the compliance state of the client. These checks include the following:
• Is this a new client? If a new client has not downloaded the policies yet, the client is marked as compliant.
• Are the site code and site ID invalid? If yes, the client is marked as Unknown.
• Is the NAP Client agent disabled? If yes, the client is marked as compliant.
• Is the SoH older than the “Date created must be after” date? If yes, mark the client as noncompliant.
If any of these checks succeed, the status updates in the SoH and the series of checks ceases. If the client makes it through these checks, the SHA compares the configured NAP polices against the client. Each NAP policy must define two things:
• Updates— This is the set of updates that, if applicable to a client system, must be installed on that system for it to be marked as compliant. As an example, if an update is not applicable to a client system because it is for a different version of Windows, it is not considered. Update status is based on the last successful software updates scan of the system.
• Effective Date— This is the date when the updates defined in an NAP policy are considered mandatory. If the updates in the policy are not installed on a client system after this date, the system is considered noncompliant.
See http://technet.microsoft.com/en-us/library/bb680968.aspx for a detailed flowchart of the checks performed by the SHA.
You can configure multiple NAP policies, allowing for multiple sets of updates and effective dates. These policies are not targeted in any way and are applied to all systems equally. You can create an NAP policy in one of two ways:
• Right-click the Policies node (Site Database -> Computer Management -> Network Access Protection -> Policies) in the ConfigMgr console and select New. This action opens the New Policies Wizard displayed in Figure 15.23, with two primary pages—one to choose updates, and one to set the effective date for the policy. You can only choose updates from Deployment Packages.

• Right-click any single update or multiselected updates in the Update Repository, an Update List, Deployment, or Deployment Package and then select Properties from the context menu. This launches a Properties dialog box with an NAP Evaluation tab, displayed in Figure 15.24. Here, you can enable NAP evaluation and configure an effective date by the selected updates. This creates a new NAP policy under the Policies node, which you can later modify or delete.
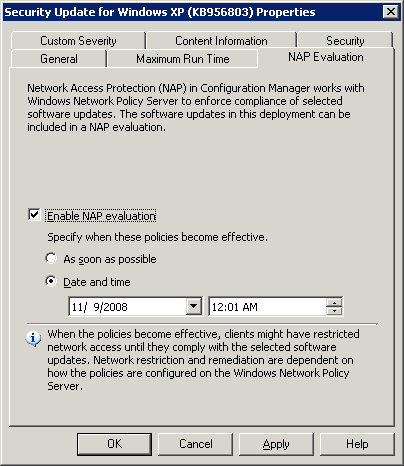
If the ConfigMgr SHV deems a client system noncompliant, the system may be placed in a quarantine status based on the Network Policy configuration on the NPS server. In this quarantine status, the client system has limited access to network resources. This limited network connectivity, known as remediation, allows the client to correct conditions that caused it to be noncompliant.
With ConfigMgr 2007, the remediation process is automatic—the client automatically requests updates from ConfigMgr and installs them based on the NAP policies. The only required configuration is to add specific infrastructure servers to a remediation server group in the NPS. This group identifies which servers are accessible by systems placed into the quarantine status. You should add the following types of servers that host critical network services into this group:
• DNS servers for name resolution
• Domain controllers for authentication and group policy
• A global catalog server for locating Configuration Manager 2007 services
Do not place Configuration Manager servers in the remediation server group, because access to these systems is dynamically granted.
Tip
Utilizing Remediation to Protect Against Zero-Day Exploits
Although the obvious purpose for remediation is to prevent systems from accessing the network that are not patched up to a defined level, a not-so-obvious purpose is to deploy updates for zero-day exploits. In this case, you can use NAP to deploy updates by configuring a specific NAP policy for the update and making it effective immediately. As clients check in with your NPS infrastructure, they will immediately be out of compliance and fall into remediation, and automatically install the update. You must also ensure that the patch is available in a deployment package in this scenario.
Although it comes with some overhead in the form of the Windows Server 2008 NPS role, NAP increases the security posture of your network greatly by interrogating systems as they try to connect to the network and enforcing a minimum patch level. It can also help you deploy updates for those annoying (and upper-management attention-getting) zero-day exploits.
The entire software update process can break at many different points. Multiple components coordinate their efforts to make the process hum along normally; however, when something goes wrong, the first step is identifying which component is having issues. Depending on the exact failure point, you can review a variety of log files for error messages. It is also important to track and report on the status of software updates to “the powers that be” or the “senior partners,” whichever you are subject to. The next sections discuss how to monitor software updates as well as those areas that typically have issues and how to diagnose and (hopefully) fix them.
There are two primary ways to monitor your software update status in ConfigMgr. The first and traditional way is to use reporting. As of ConfigMgr 2007 R2, there are 34 reports out of the box specific to tracking various aspects of Software Updates, including client scan states, update applicability, deployment progress, and compliance. Like all ConfigMgr reports, you can copy and customize these to fit your exact needs.
The second way to monitor Software Updates is using the Software Updates home page, accessible by directly selecting the Software Updates node in the ConfigMgr admin console tree (Site Database -> Computer Management -> Software Updates). This page provides a dashboard for finding summary information concerning your Software Updates stance. Figure 15.25 displays an example of this home page.
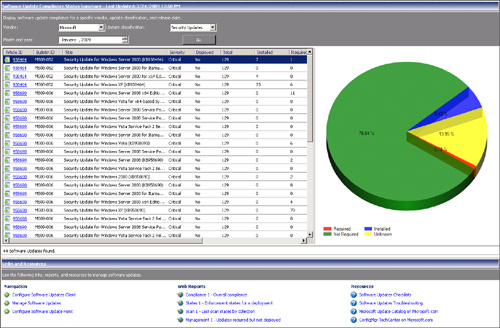
You can select a subset of updates from the update repository by defining filter criteria for the Vendor, Month and Year, and Classification. This populates the list box on the left with updates matching the specified filter criteria. For Microsoft Updates, the listed Article IDs are actually hyperlinks that take you directly to the TechNet knowledge base article describing the update. The % Compliant column also contains hyperlinks that launch the specific software update states report, which details the count and percentage of computers in each compliance state for the specified software update. In addition to the list of updates on the left, a pie chart summarizing the compliance state of updates selected in the list is displayed on the right. You can select multiple updates in the usual way to update the pie chart with aggregate data from all the updates selected.
Links at the bottom of the page take you to other nodes in the admin console, significant reports, and applicable help documentation.
The first component in Software Updates is WSUS. WSUS is significant because it acquires all information about available updates and distributes that catalog of updates to clients. Luckily, ConfigMgr takes over control of WSUS using an SUP and creates detailed log files of the WSUS operation. Here are the three main log files for WSUS and an SUP, located in <ConfigMgrInstallPath>Logs:
• WCM.log— Provides information about the software update point configuration and connecting to the WSUS server for subscribed update categories, classifications, and languages.
• WSUSCtrl.log— This log file provides information about the configuration, database connectivity, and health of the WSUS server for the site.
• wsyncmgr.log— Provides information about the software updates synchronization process.
Most errors experienced with WSUS are configuration errors, including not matching the ports configured during installation of WSUS and then configured in the SUP (Site Database -> Site Management -> <Site Code> <Site Name> -> Site Settings -> Site Systems -> ConfigMgr software update point).
Also common are Internet connectivity issues due to firewalls, proxy servers, or other mitigating factors. Always confirm that the system running WSUS has Internet connectivity if you are downloading the update catalog directly from Microsoft, and ensure that you have properly configured the proxy account if one is required (Site Management -> <Site Code> <Site Name> -> Site Settings -> Component Configuration -> Software Update Point Component).
It is possible for the update downloads from Microsoft to fail. Recall that WSUS does not download the updates in ConfigMgr; you must manually initiate download of all updates. This is an interactive process; the ConfigMgr console connects to the Microsoft download servers using the credentials of the user currently logged in to the console. You can easily test connectivity for the current user by opening Internet Explorer and navigating to http://www.microsoft.com/downloads. (If a proxy server is required to connect to the Internet, configure the settings in Internet Explorer.) If the logged-in user does not have permission to perform the action, the download will not take place.
The PatchDownloader.log file logs download activity for updates. This log contains information about every patch the console attempts to download. The file is located in one of two places:
• %ProgramFiles%Microsoft Configuration ManagerLogs— If you are running the console on the site server
• %ProgramFiles%Microsoft Configuration Manager ConsoleAdminUIAdminUILog— If you are running the console remotely
WUA on the local system handles the process of scanning a client for applicable updates. The ConfigMgr agent initiates the scanning according to the defined schedules or any on-demand requests; the WUA will in turn report back to the ConfigMgr agent. The following client-side log files, located in the %SystemRoot%System32CCMlogs folder on 32-bit clients and %SystemRoot%SysWOW64CCMlogs on 64-bit clients, can help when investigating failures:
• ScanAgent.log— Provides information about the scan requests for software updates, the tool requested for the scan, the WSUS location, and so on
• UpdatesDeployment.log— Provides information about the deployment on the client. This includes software update activation, evaluation, and enforcement
• UpdatesHandler.log— Provides information about software update compliance scanning as well as download and installation of software updates on the client
• UpdatesStore.log— Provides information about the compliance status for software updates assessed during the compliance scan cycle
• WUAHandler.log— Provides information regarding when the Windows Update Agent on the client searches for software updates
Tip
ConfigMgr Log Files
An excellent utility is included with the ConfigMgr 2007 Toolkit (available through Microsoft’s download site at http://www.microsoft.com/downloads/details.aspx?FamilyID=948e477e-fd3b-4a09-9015-141683c7ad5f&DisplayLang=en or go to www.microsoft.com/downloads and search for System Center Configuration Manager 2007 Toolkit) to view log files—Trace32, also called the SMS log viewer. This utility, introduced in Chapter 3, provides a real-time view of a selected log file.
One of the main issues that can affect the scanning process is having a domain-based GPO override the Windows Updates settings. The WUAHandler.log file will clearly indicate if this issue exists in your environment.
Although many tools exist for maintaining and deploying updates to Windows systems, Configuration Manager Software Updates takes this process to a new level by integrating the process into a robust, cradle-to-grave, systems management tool. By using existing software tools such as WSUS and the WUA, ConfigMgr 2007 is able to leverage existing, known-good processes and code while extending them to new levels. This chapter discussed the new ConfigMgr Software Update functionality, implementing it successfully within your organization, and taking advantage of supplementary tools such as WOL and NAP. The combination of these tools gives you the flexibility to deploy updates in a manner that is user friendly and meets the needs of your organization, big or small.
The next chapter discusses using Desired Configuration Management, which enables you to assess compliance of computers in regard to specified configurations.