
IN THIS CHAPTER
Chapter 13, “Creating Packages,” discussed several approaches for deploying software in Windows environments. It also provided details regarding the software packaging processes used in Configuration Manager (ConfigMgr) 2007. After you configure software for distribution in Configuration Manager, the next step is distributing it to client systems.
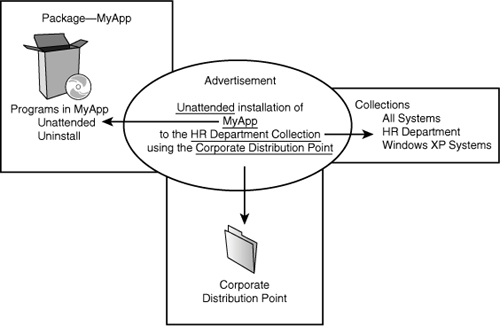
Using those packages and programs created in Chapter 13, this chapter discusses the steps necessary to move them through the software distribution process via queries, collections, distribution points, and advertisements. Figure 14.1 shows how these components combine to distribute software using Configuration Manager 2007.
The chapter also discusses distributing software using application virtualization, which is Microsoft’s new direction for software distribution in ConfigMgr 2007.
Queries, which are covered in depth in Chapter 17, “Configuration Manager Queries,” are similar to collections in that you can use them to show information about resources matching specified criteria (behind the scenes a collection actually contains its own query, defined by a membership rule, which is used to specify the data that will populate the collection). From a functional perspective, you can use either a collection or a query to show what resources match the criteria you specify. However, queries run on an ad-hoc basis, whereas collections are sets of discovered resources typically based on hardware and software inventory, with the membership updated on a scheduled basis. Both queries and collections can be static, with a predefined membership. However, the results of a query always reflect the current state, whereas a collection may require updating to reflect the present state of those resources.
You can use both hardware and software inventory as criteria in queries and collections, making it important to activate both the ConfigMgr hardware and software inventory functions, and to collect that inventory information frequently to keep the information current. Hardware inventory is particularly important, because you can extend the SMS_Def.mof file to gather additional information with the hardware inventory component.
You can use queries for the following functions:
• Providing information— Queries can easily identify resources matching specified criteria. As an example, running the All Windows XP Systems query will list all Windows XP systems identified by Configuration Manager. Queries are not the same as reports (the data does not appear in a report-ready format), but can be used to gather information quickly based on the results of the query you defined.
• As a basis for performing actions— You can use queries to perform actions on the resources within the query. For instance, you can highlight a server and activate the Resource Explorer to see the current hardware and software inventory for the system, install an agent, or perform other tasks.
• Creating collections— When you create a collection, you can use existing queries to develop the criteria required for a resource to be a member of a collection. The “Creating a Dynamic Collection” section in this chapter discusses this technique, which uses the Query Rule Properties screen of the New Collection Wizard.
What is the main difference between a query and a collection? Collections are used to organize and group systems and users together for a similar purpose, such as software distribution or to advertise task sequences. The software distribution process does not use queries. You create queries on an ad-hoc basis, meaning they reflect current resources that match the criteria. With a collection, on the other hand, you would schedule to update its resources on a daily basis.
Understanding the differences between queries and collections and the function of queries provides context to help you understand collections in Configuration Manager 2007.
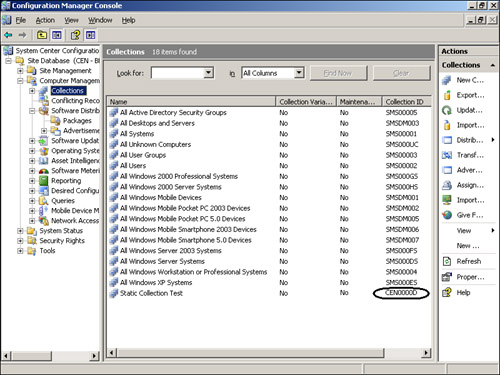
Collections represent resources within ConfigMgr; they consist of computers, users, or groups. You use collections to target ConfigMgr functions such as defining maintenance windows and performing software distributions, and you can define them as static or dynamic. ConfigMgr includes a set of predefined collections, providing a solid set of collections to use for targeting and presenting good templates for developing additional custom collections that you can build on. Figure 14.2 displays a set of predefined collections in ConfigMgr in the Configuration Manager console.
Tip
Identifying Predefined Collections
If you are in the habit of using the same naming convention for your collections as those supplied by Microsoft (such as All Windows 2003 Server Systems), it can become difficult to determine whether a particular collection was predefined or custom built.
To identify predefined collections, look at the Collection ID field. ConfigMgr’s predefined collections start with SMS or SMSDM (for example, SMS Device Management). ConfigMgr creates custom collections using the site name, as you can see in Figure 14.2, where the collection ID for Static Collection Test starts with CEN (the three-letter code for the central site in the SCCMUnleashed environment).
Static collections are the easiest type of collection to create, and they are useful when you want to define a limited number of systems or users in a collection when the collection membership does not change frequently.
To understand how static collections work, you will create a static collection for a single computer system, which is one of the most common static collections. Perform the following steps:
- Collections are defined in the ConfigMgr console. Navigate to Site Database -> Computer Management -> Collections. Right-click and choose New Collection to start the New Collection Wizard.
-
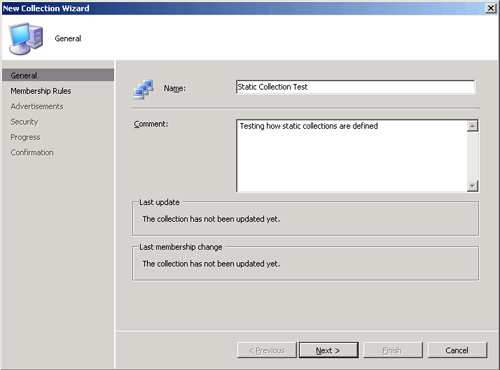
On the General screen (shown in Figure 14.3), define the name of the new collection and a description that is stored in the Comment field. A good approach to naming the collection is to use names similar to collections that already exist. For example, you would name a new collection containing Windows 2008 servers “All Windows 2008 Server Systems,” and a new collection with Windows servers in the Dallas site might be “All Windows Server Systems in Dallas.”
This example creates a sample collection named Static Collection Test, used temporarily for this environment.
-
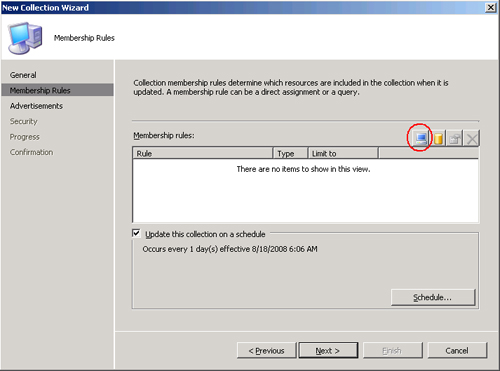
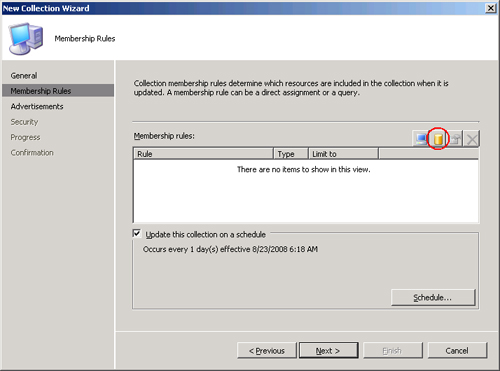
There are no members in the collection by default. To add a static member to this collection, click the computer icon (circled in Figure 14.4) to open the Create Direct Membership Rule Wizard.
Alternatively, clicking the query icon (next to the computer icon) opens the Query Rule Properties dialog box, discussed in the “Dynamic Collections” section.
-
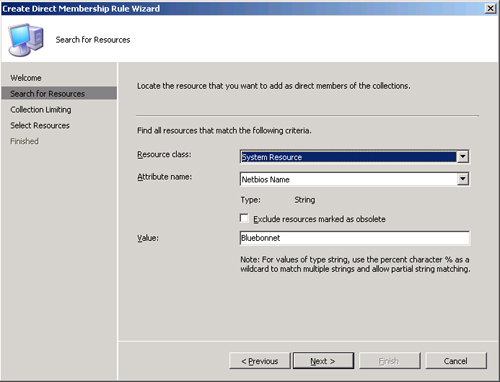
After the Welcome screen of the Create Direct Membership Rule Wizard, the wizard proceeds to the Search for Resources step, asking you how to find resources to add to the collection. The Search for Resources screen in Figure 14.5 defines the following fields:
• Resource class— Provides the list of available resource classes, including Unknown Computer, User Group Resource, User Resource (default), System Resource, and IP Network. This example will use System Resource to identify the name of the computer that will be a member of the static collection.
• Attribute name— The attributes available vary depending on the resource class previously chosen. Figure 14.5 shows the Netbios Name selected, as a means to identify the name of the computer that will be a member of the collection.
• Value— This field defines the potential values for this area. Wildcards are available as needed; as an example, the use of % in this field will identify all available NetBIOS names in the environment. The example shown in Figure 14.5 specifies the Bluebonnet server.
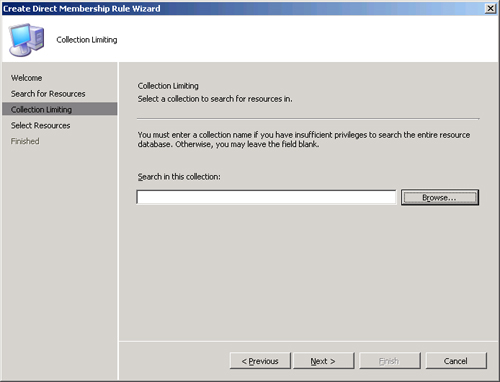
- You can limit collections to contain only members that exist in another collection. As an example, if a collection is restricted to all Windows 2003 systems, any systems without Windows 2003 installed are not included as a potential member in the collection. Because the potential membership for this collection is already limited by using the value Bluebonnet (previously defined on the Search for Resources screen in Figure 14.5), Figure 14.6 leaves the Search in this collection field blank. Limiting the membership is also required when you are using the ConfigMgr console and do not have full rights to ConfigMgr resource database; this lets you limit your scope to the collection that your account has access to.
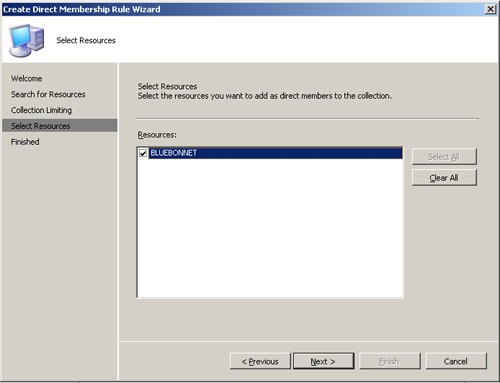
- The previous pages in this wizard defined the potential membership for the collection as a specific resource—Bluebonnet (shown in Figure 14.7). If multiple resources match those restrictions already specified, they would now appear on the Select Resources page to select the resource(s) for the collection. As an example, if the collection was restricted to all Windows 2003 systems matching the value of SRV%, the Select Resources page would list all the Windows 2003 servers starting with a name containing SRV (SRVAD01, SRVEXCH02, and so on).
-
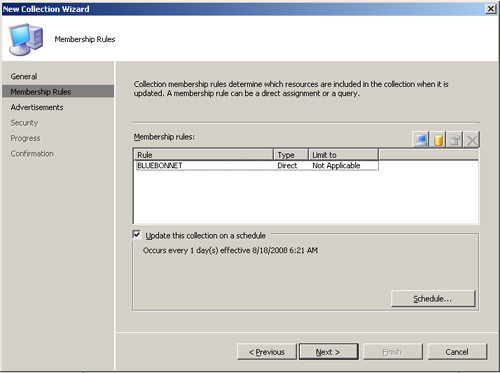
The Membership Rules screen shows the resources in the new collection. This example creates a new collection containing a single server named Bluebonnet. After moving to the Finished page, the wizard returns to the New Collection Wizard with a direct membership rule created for the Bluebonnet server, displayed in Figure 14.8.
The Membership Rules screen also provides the capability to schedule when (or if) to update the collection. Notice the checked box for Update this collection on a schedule, which is the default configuration. Also notice that the collection is scheduled to update each day at the same time it was created.
Collections will automatically update their contents on a scheduled basis, keeping the contents of the collection current with existing resources. You can also update a collection at any time by right-clicking the collection and choosing the option Update Collection Membership. (However, there is rarely a requirement to update a static membership collection manually.)
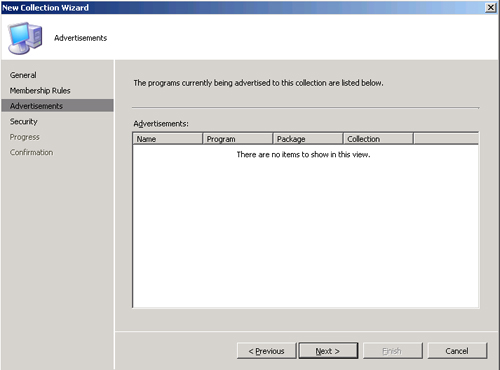
- Next is the Advertisements screen, which shows a list of advertisements currently defined for this collection. Because you did not create any advertisements for this collection, this screen is empty, as displayed in Figure 14.9.
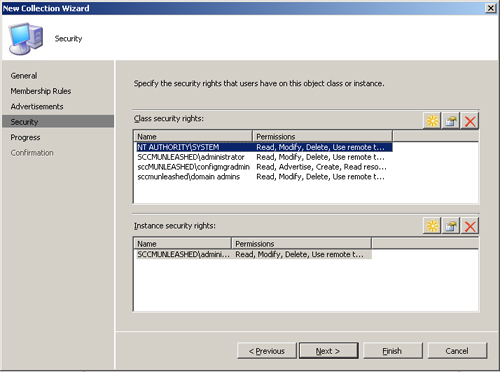
- The Security screen (shown in Figure 14.10) provides a list of the class and instance security rights that exist for this collection (who has access to do what to this collection). The default rights provided with this wizard are specified in the Site Database -> Security Rights section of the Configuration Manager console. You can add, edit, or delete security rights using the buttons to the right, above the listed permissions.
- The remaining screens of the New Collection Wizard display the progress as ConfigMgr creates the collection and a confirmation that the collection has been created.
Static collections have a place, particularly if you are creating test environments where you want to limit the systems involved in the tests. This differs from dynamic collections, which have the potential to add more resources to the collection based on those resources matching the criteria for the collection. For this example, a static collection provides a simple way to provide a target to use for deploying software.
Sometimes static collections are not only static. You can interact with static collections (and dynamic collections) to add and remove members even outside of the ConfigMgr console. Consider the following example.
During the Systems Management Server (SMS) 2003 timeframe, a consulting organization was using SMS 2003 with the Operating System Deployment (OSD) feature pack to deploy operating systems. This organization also packaged a significant number of applications to deploy during the OSD process. Although most of these functioned as expected, a small subset of the software packages would freeze during the installation process, which caused the operating system deployment to freeze as well.
To address this situation, they created a collection (PostOSDInstall) that had a list of all the workstations deployed with OSD. As OSD completed the installation of each workstation, they added a task to run a script that added the workstation name to the PostOSDInstall collection. The collection was configured to update membership very frequently; once the workstation was added to the PostOSDInstall collection, the software packages advertised to the collection would begin to deploy shortly after the OSD process completed. Using this technique provided a way to deploy software that was failing within the OSD process through ConfigMgr—by approaching it from a different perspective.
Although this is a relatively in-depth example, it is included to show the type of functionality available through static collections that are added to dynamically.
Now that you have gone through the process to create a static collection, let’s talk about dynamic collections. A dynamic collection uses a query-based membership to determine the members of that collection. This means that dynamic collections change, based on the criteria defined for the collection.
Chapter 13 created a software package for Microsoft Forefront Client Security. This section will create collections for both the Microsoft Forefront Client Security package and for the Operation Manager client. These collections are used later for targeting in the “Forefront Advertisement” and “OpsMgr Advertisement” sections in this chapter, respectively.
The SCCMUnleashed.com organization is starting the process of deploying the Forefront client to a set of workstations, but wants to limit the size of the deployment to mitigate the risk of affecting large numbers of workstations simultaneously. This can be addressed by creating a dynamic collection to target all Windows XP or Vista systems, restricted in its reach by being limited to systems only in a specific Organizational Unit (OU). To create this dynamic collection, perform the following steps:
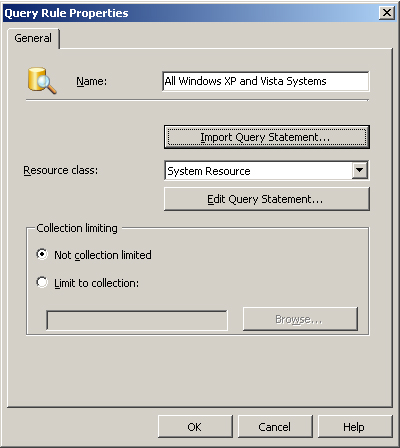
- The first step of this process is creating a collection containing all Windows XP and Vista systems. You create a dynamic collection in a similar manner to a static collection within the ConfigMgr console -> Site Database -> Computer Management -> Collections. Right-click and choose New Collection. Name this collection All Windows XP and Vista Systems, and this time use the query icon (circled in Figure 14.11) to define the collection membership.
- Define the name of the collection as All Windows XP and Vista Systems and then use the Import Query Statement button (shown in Figure 14.12) to import an existing query. Choose the query most similar to the one you want to create—All Windows XP Systems, in this case. After selecting the query, edit it using the Edit Query Statement button.
- Editing the query statement on the General tab shows the various attributes for the collection. The focus for this particular collection is on the Criteria tab, which is what needs to change to alter the collection to display both Vista and XP systems. To edit the criteria, either double-click the line showing the criteria or click the modify button (circled in Figure 14.13).
-
Editing the criteria opens the Criterion Properties dialog box. This dialog box (shown in Figure 14.14) allows you to define how to configure the criteria for this query. The following fields affect how the query works:
• Criterion Type— Options include Null, Simple value, Attribute reference, Subselected values, and List of values. Chapter 17 describes these fields in more detail.
• Null value— Compares the query attribute to a null value.
• Simple value— Compares to a constant value. Selecting Simple value enables the simple value settings.
• Attribute reference— Compares to another attribute. Selecting Attribute reference enables the attribute reference settings.
• SubSelected values— Compares to results returned by another query. Selecting SubSelected values enables the subselected values settings.
• List of values— Compares to a list of constant values. Selecting List of values enables the list of values settings.
The All Windows XP Systems query in Figure 14.14 originally used a simple value.
• Where— The Where field is grayed out and shows the Where clause defined for the query. Use the Select button in Figure 14.14 to change the content of this field.
• Operator— This dropdown field specifies how to assess the values. Options vary, depending on the value defined for the criterion type.
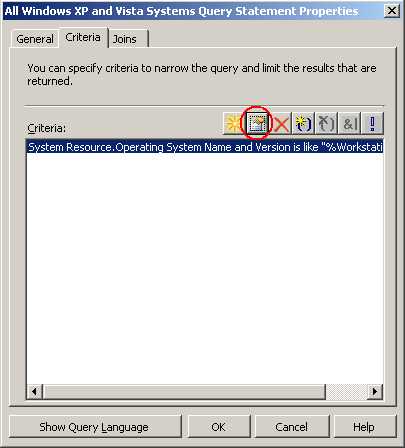
The All Windows XP Systems query is using the “is like” value.
• Value— This field defines the value the criteria needs to match. As an example, the value required for the All Windows XP Systems query is %Workstation 5.1%.
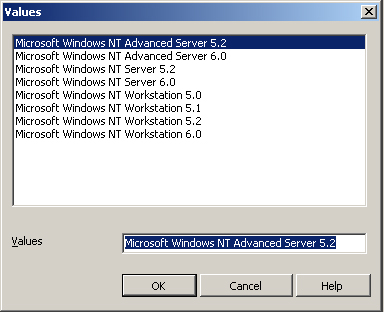
- For this example, change the Criterion Type setting to List of values (to be able to match multiple different operating systems using the query). List of values is only one of the available criteria discussed in step 4, but it most closely matches the requirements for this particular collection. This change alters the Operator field, which now defaults to a value of “is in.” Use the Value button to display the values currently known for the field defined in the Where clause. In this example, this is all known operating system versions; Figure 14.15 displays these values.
-
To make this query match the values for all Windows XP and Vista systems, use the Value button (shown in Figure 14.16) to add the different operating system values matching that value—Microsoft Windows NT Workstation 5.1, Microsoft Windows NT Workstation 5.2, Microsoft Windows NT Workstation 6.0. These values are selected based on the value that is selected (these do not need to be typed in if they are selected from the Values list).
These versions match to Windows XP, Windows XP 64, and Windows Vista. A good reference for Windows version numbers is available at http://en.wikipedia.org/wiki/Windows_NT.
Here are two ways to create this collection:
• Defining a collection that would match all operating system versions that include workstation but also match previous operating system versions (such as Windows 2000 Professional System)
• Creating a collection that would match all operating system versions containing %Microsoft Windows NT Workstation 5.% or %Microsoft Windows NT Workstation 6.%
The second approach is more straightforward, meets the criteria, and will adapt if additional workstation versions are created that match the criteria. ConfigMgr is a flexible tool, and offers multiple ways to achieve the same result.


Tip
Approach for Creating Collections
It is best to create collections based on the criteria most logical to you so that they perform as you expect them to and are easier to debug.
To verify the membership of the collection, complete the wizard and verify that the members of the new collection match the members expected, based on the query just defined.
After creating a collection that includes all the Windows XP and Windows Vista systems, you can use that collection to limit the available members of another collection, in this case a Forefront collection, to target the Forefront client software for deployment. Perform the following steps:
-
Create a second collection, calling it Forefront Client Deployment. Provide a description for the collection and move on to the Membership Rules screen. Use the Query icon (circled previously in Figure 14.11) to define the collection membership.
-
Define the name as Forefront Client Deployment and limit the collection to the All Windows XP and Vista Systems collection created earlier in the “Creating a Dynamic Collection” section. Figure 14.17 displays this configuration.
-
You will need to create a new query statement to limit this collection to only system resources that are part of a specific OU structure. To do this, choose the Edit Query Statement button and set the Resource class to System Resource. On the next page, choose Simple value where the System Resource – System OU Name is equal to the value of the OU used to store these resources. For this example, the value is SCCMUnleashed/Test (the domain name followed by a slash and then the name of the OU).
If several different OU structures existed, you could use the List of values option, as previously discussed in the “Creating a Dynamic Collection” section. With only a single OU location, it is simpler to define this as a simple value, as displayed in Figure 14.18.
-
To verify the membership of the collection, complete the wizard and verify the members of the new collection match the members expected, based on the query defined in step 3. For this example, the expected result is Windows XP or Windows Vista systems existing in the Test OU structure.


This collection is used to target the Forefront client, discussed later in the “Forefront Advertisement” section.
In Configuration Manager, you can use subcollections to associate one collection with another collection. There are two different types of subcollections:
The next two sections discuss these types.
Use a linked collection to tie a collection to an existing ConfigMgr collection. To create a linked subcollection, highlight the collection you want to link and then choose the New -> Link to collection option. Note that linked subcollections can exist in multiple locations in the collection structure. As an example, you could link the All Windows XP and Vista systems collection created in the “Creating a Dynamic Collection” section in this chapter to multiple locations in the ConfigMgr collection so it appears in multiple places with the same name.
Linked collections do not draw their membership from the collection they are linked under. This means you could create a collection called My Static Collection (with two hard-coded systems defined as members) and then link the All Desktops and Servers collection to it. The membership of the All Desktops and Servers collection is not limited to the two members of the top-level collection My Static Collection, but rather shows the full list of members that exist in the All Desktops and Servers collection.
You create a dependent subcollection when you highlight an existing collection and define a new collection under the original collection.
Why would you want to use dependent subcollections? A common usage is for software distribution targeting. Create a top-level collection for all systems that need the software package deployed, with subcollections for the different types of programs that will run on the systems. As an example, create the collections used to deploy the Operations Manager (OpsMgr) client, which will vary depending on whether the system is amd64, i386, or ia64. Perform the following steps:
- Begin by creating a top-level collection called All Client Systems, based on the existing All Client Systems query. The next collection you define (step 2) will use this collection and limit the members to those systems that are ConfigMgr clients.
-
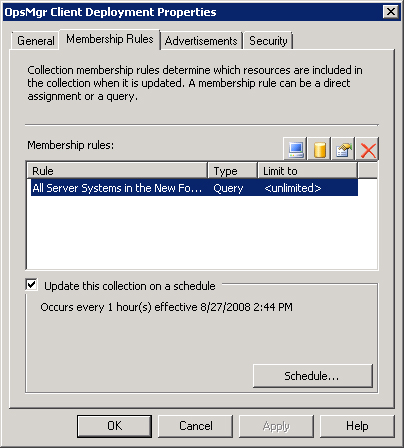
Create another top-level collection, named OpsMgr Client Deployment. Define this collection to contain all Windows Server operating systems that have ConfigMgr agents deployed to them.
Create this collection using the same process used in the “Creating a Dynamic Collection” section of the chapter (but the criteria used is %Server% instead of %Workstation%) and limit the collection membership to the All Client Systems collection.
-
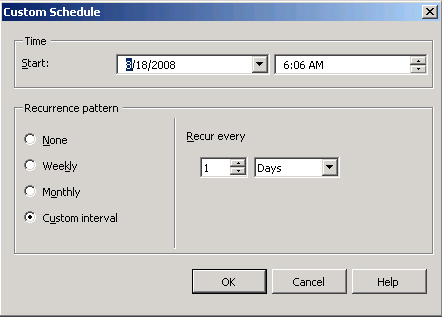
To define a different time to update this collection, select the Schedule button in Figure 14.19 to open the Custom Schedule dialog box displayed in Figure 14.20.
This dialog box is used with dynamic collections only; static collections do not have scheduled update times, because they will not change unless the membership is changed manually. The Custom Schedule dialog box contains several fields:
In this case, the recurrence pattern is set to update daily. Click OK to return to the Membership Rules screen and then clear the option Update this collection on a schedule.• Time Start— This is a two-part field specifying the date and time the collection updates, which defaults to the date and time you created the collection.
• Recurrence pattern— Options include None, Weekly, Monthly, and Custom Interval.
• Recur every— The value for this field varies depending on the recurrence pattern chosen:
If you choose None, there are no options for this field.
If you choose Weekly, the number of weeks can be defined (defaults to 1) and you can specify the day of the week to update the collection.
If you choose Monthly, the number of months can be defined (defaults to 1) and you can specify the day of the month as a number (default of 1) or the last day of the month. You can also specify a fixed day (such as the first Tuesday of the month).
-
Now that you have a top-level collection for the OpsMgr software deployment, the next step is to create the dependent subcollections. Highlight the OpsMgr Client Deployment collection, right-click, and choose New -> Collection.
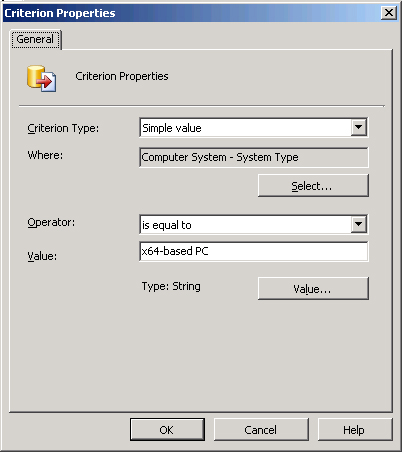
Name the first subcollection OpsMgr AMD64. Create it as a dynamic collection and specify the membership such that the criterion matches a simple value for Computer System – System Type, where it is equal to x64-based PC, as shown in Figure 14.21. As a reference, the OpsMgr agent has three folders for the different hardware types:
Tip
Identifying Criteria for Collections
With all the information ConfigMgr gathers from hardware and software inventory, it can be difficult to identify which criteria to use to restrict collection membership. Although the Criterion Properties dialog box provides a list of values available for the various categories, it is often helpful to see the fields and values in a different format to find what you are looking for.
Using the Resource Explorer provides hardware and software inventory information in a format that is easy to browse. Highlight a system you know will have the value, right-click, and choose Start -> Resource Explorer.
Although this approach does not provide all available information that may be used in a collection, it does present a large quantity of information you can utilize for collection criteria.
The “OpsMgr Advertisement” section will reference these new subcollections (OpsMgr AMD64, OpsMgr I386, and OpsMgr IA64) when creating advertisements for the OpsMgr agent deployment.
Note
How Subcollections Become Linked Collections
The page at http://technet.microsoft.com/en-us/library/bb680976.aspx provides the following information regarding dependent subcollections:
“Dependent subcollections are created as a new collection under an existing collection. When you create a subcollection, it is dependent on the collection under which it was created, as long as you do not link other collections to it. If the subcollection is linked to other collections, the subcollection becomes a linked collection while attached to more than one collection. When you delete a collection, any dependent subcollections of that collection are also deleted. Any advertisements, queries, or collection membership rules that are dependent on the subcollection are affected by its deletion. Because of this, it is strongly recommended that you use the Delete Collection Wizard to delete any collections that may contain dependent subcollections.”
Subcollections are very useful for logically gathering groups of collections, and can be nested multiple levels deep (as an example, collection1 can have subcollection1, which contains subcollection2, which contains subcollection3, and so on). Although subcollections can be to almost any depth, you should use fewer than 10 levels to minimize the complexity.
An interesting situation occurs when trying to create a collection for systems that do not match a condition. As an example, it is easy to create a collection of systems that have a particular file deployed to them. It is more difficult to create a collection of systems without that file deployed to them. You can accomplish this by creating a custom query that uses a subselect to exclude the members of another query.
Exclusion collections are useful in situations where you want software to deploy to a large number of systems but have specific systems you want to exclude. An example of where this applies is with validated systems. A validated system is one that has a strict process to validate system functionality any time software is installed on it. Typically, these types of systems are patched less frequently, with larger number of patches occurring at the same time to minimize the time required to execute the validation process.
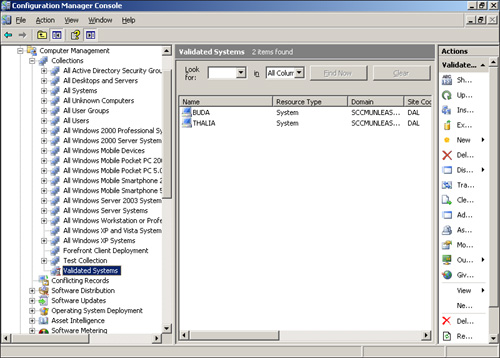
To create an exclusion collection, the first thing to do is identify the collection you want to exclude. Navigate to Collection IDs in the Configuration Manager console by going to System Center Configuration Manager -> Site Database -> Computer Management -> Collections. In this case, Validated Systems is the collection you want to exclude, and it has a Collection ID of CEN0000E, as displayed in Figure 14.22.

The goal is to create a collection based on the Forefront Client Deployment collection that does not include the members of the Validated Systems collection. As you see in Figure 14.23, there are currently 11 systems meeting the criteria defined earlier for the original Forefront Client Deployment collection, discussed in the “Creating a Dynamic Collection Limited to a Collection” section.

In contrast to the Forefront Client Deployment collection, the Validated Systems collection displayed in Figure 14.24 is a static collection with Buda and Thalia as members (see the “Creating a Static Collection” section for the steps to create a static collection).
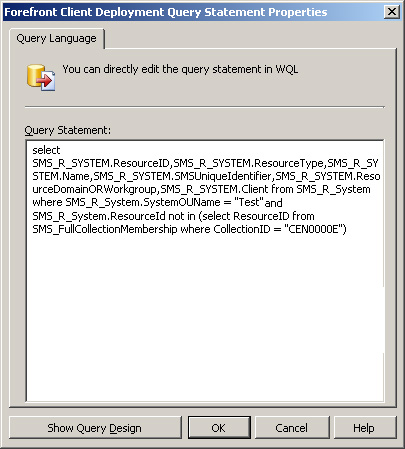
There now are two collections: One contains 11 members (including Buda and Thalia) and the second contains only two members (Buda and Thalia). You can modify the query that defines the Forefront Client Deployment collection to tell the first collection to exclude members of the second collection. Add the following code to the original query:
and SMS_R_System.ResourceID not in (Select ResourceID from
SMS_FullCollectionMembership where CollectionID="<collection ID>")
The query restricts this particular collection to the collection ID CEN0000E. The complete query will look like Figure 14.25.
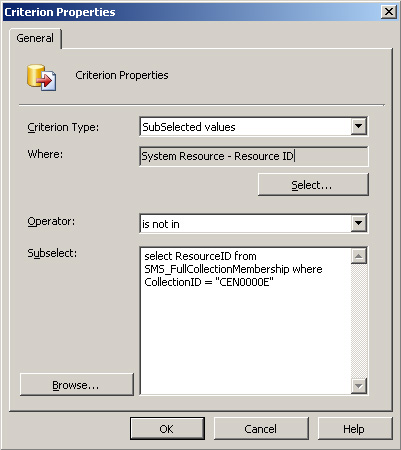
By editing the WMI Query Language (WQL) code directly, you can create additional criteria to limit the collection. Here, System Resource – ResourceID (SMS_R_System.ResourceID) is added to the criteria list as a subselect type, and “not in” is used as the operator.
You can use the same concept to exclude multiple collections. Simply specify multiple collections to exclude, such as:
and SMS_R_System.ResourceID not in (Select ResourceID from
SMS_FullCollectionMembership where CollectionID="<collection ID>",
"<collection ID 2>", ...)
You can also add this directly via the user interface (UI) through the Criterion Properties, shown in Figure 14.26, which shows the original collection criterion changed to remove the members of the CEN0000E collection.
Tip
Benefits of Using Two Collections
You may find it useful to have both a “not in” collection and a collection defined as “which ones are missing from the other collection.” This technique allows you to define a very complicated collection for the actual membership; then the second collection is just a comparison between (as an example) all systems and the “not in” collection.
To illustrate how this can work, consider a case using antivirus systems. Here, you may want one collection that has all systems that have McAfee and another collection that has all systems that do not have McAfee. One is used to get an action (perhaps to update a date file) and the other is set with another action (deploy the McAfee software).
You can also easily create a collection that excludes members from one collection and from a second collection, such as a “servers without antivirus” collection, which is a collection containing any server without McAfee or Norton or Forefront, and so on.
The original Forefront Client Deployment collection had 11 resources, and the Validated Systems has two resources that overlap between the two collections. By excluding those resources in the second collection, the expectation is the new collection will only have nine resources and not contain the resources from the Validated Systems collection (Buda and Thalia). The contents of the new Forefront Client Deployment collection, displayed in Figure 14.27, confirm that the collection does not include the members of the Validated Systems collection.

This chapter has discussed several ways to define collections in ConfigMgr. These include collections with static members, dynamic memberships, subcollections, and exclusion collections. Each of these demonstrates the flexibility of the ConfigMgr collection functionality, which really comes down to the powerful ability to target exactly what you need to target with your collections.
After creating packages/programs and the collection you intend to advertise them to, it is important to understand how ConfigMgr distributes programs. Here are the three major types of distribution points in ConfigMgr:
• Standard distribution points
• BITS-enabled standard distribution points
In addition, each type of distribution may be “protected.” The next sections discuss each of these distribution points and their usage in the ConfigMgr 2007 software deployment process.
Tip
Client Roaming and Distribution Points
Client roaming allows clients to move between sites in the ConfigMgr hierarchy and still be managed while making the best use of available network resources. Roaming allows a client currently not in the boundaries of its site to find the closest distribution point to download source files for functions such as software distribution. Roaming clients can access advertisement content as long as the content is available from the distribution point if the setting “When a client is connected within a slow or unreliable network boundary: Do not run program” is unchecked on the advertisement (configured on the Advertisement Properties, Distribution Points tab). If a client is roaming to a subnet boundary outside the boundaries of a ConfigMgr site, it will be unable to access ConfigMgr resources. Details on complex roaming configurations are available at http://technet.microsoft.com/en-us/library/bb694028.aspx. This example assumes the client is roaming to a subnet boundary controlled by another site. Roaming within a site involves both regional and global roaming, as discussed in Chapter 4, “Configuration Manager Solution Design.”
ConfigMgr deploys software using distribution points. A distribution point (DP) is a server role in ConfigMgr that receives packages for distribution throughout the site. DPs provide local network access to software distributed by ConfigMgr. As an example, if Microsoft Office is being deployed to an environment with locations in Dallas, Houston, Beijing, and Brussels, it is preferable for each of these locations to install from the local area network (LAN), versus copying the data across the link multiple times to install the software on the client workstations in that location.
Distribution points are server roles defined in ConfigMgr console -> Site Database -> Site Management -> <Site Code> <Site Name> Site Settings -> Site Systems. ConfigMgr adds new servers as either a new server or a new server share.
Note
Comparing Server and Server Share Distribution Points
A distribution point is the only site system you can create as a server share; all other roles are created as servers. Server shares allow you to choose a specific drive and create a Windows share that ConfigMgr uses for the distribution point role—but the disadvantage is you have to monitor that share to ensure the drive does not fill up. When the distribution point is a server, ConfigMgr will manage the space for you by creating new SMSPKGx$ shares when more space is required. The downside with server-based distribution points is you cannot control growth; ConfigMgr can potentially take over all available NTFS drive space on the designated server. Distribution points on servers can also be configured as branch distribution points and support Internet-based clients; these DPs are not supported with server shares.
For additional information, see http://technet.microsoft.com/en-us/library/bb892801.aspx.
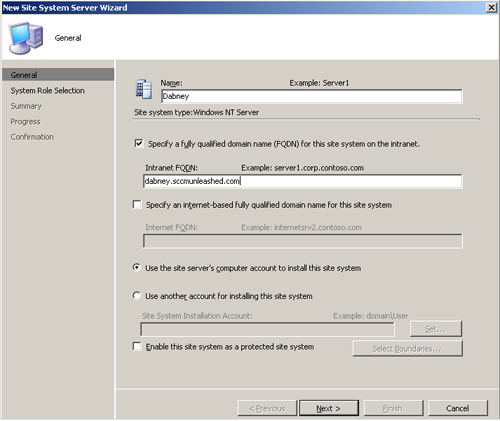
After defining a server as a site server, you can assign the various server roles available, including the distribution point server role. To add the distribution point server role to the Wildflower site server in the DAL ConfigMgr site, perform the following steps:
-
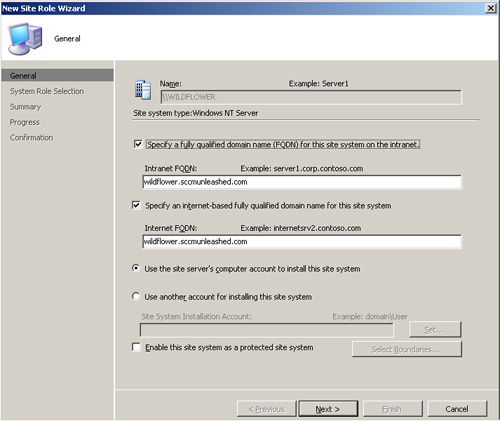
Start by highlighting the Wildflower server under Site Database -> Site Management -> <Site Code> <Site Name> Site Settings -> Site Systems. Right-click and choose New Roles to initiate the New Site Role Wizard. On the first page, specify the settings shown in Figure 14.28:
• Intranet FQDN— Specify the Fully Qualified Domain Name (FQDN) for this site system on the intranet. This setting determines the name intranet-based systems will use to connect to the server, and is required for native mode and publishing in DNS. Enter the default FQDN, which is wildflower.sccmunleashed.com.
• Internet FQDN— Specify the Internet-based Fully Qualified Domain Name for this site system. This setting determines what name Internet-based systems will use when connecting to the server. Enter the default FQDN, wildflower.sccmunleashed.com.
• Account— You can select Use the site server’s computer account to install this site system or Use another account for installing this site system. Choose the default setting, which is using the site server’s computer account.
• Protected Site System— Set this site server to be configured as a protected site system. The “Protected Distribution Points” section discusses this setting in more detail. For this configuration, leave the default setting, which is unchecked.
- On the System Role Selection screen, specify the available roles to activate on this site system. Only those site system roles not previously assigned to the site system are displayed. For this example, add the distribution point role, as shown in Figure 14.29.
-
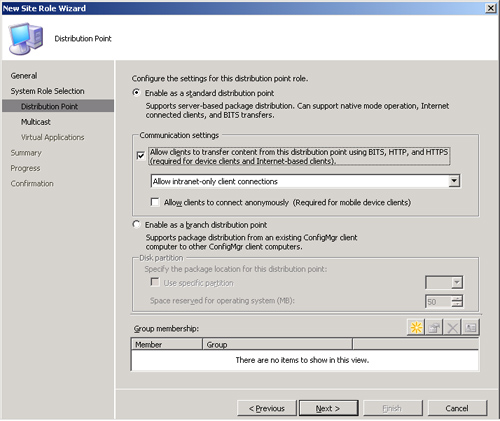
Specify the details for the configuration of the distribution point role you are creating on Wildflower. This includes several settings, displayed in Figure 14.30:
• Enable as a standard distribution point— This is the default configuration, which allows configuring the Communication Settings section of the screen. Because you are creating a standard distribution point, select this option.
Note
Binary Differential Replication and Delta Replication in ConfigMgr
One of the benefits of Configuration Manager 2007 is its ability to update source files for a previously deployed package by only sending changes that occurred after deploying the package. As an example, the OpsMgr packages were pushed out to the various distribution points, but the agent now needs updating to include a newly released version of the software. When the new version of the package is sent to the distribution points, ConfigMgr only sends those parts of the package that changed after it was last sent to those distribution points. This approach helps minimize the network impact of updating packages in a ConfigMgr environment. Additional details on binary differential replication are available at http://technet.microsoft.com/en-us/library/bb693953.aspx.
Binary delta replication and delta replication are not the same. Delta replication is performed at the file level, whereas binary delta replication is performed at the byte level. Delta replication can work while binary delta replication is disabled. If you enable binary delta replication, standard delta replication is disabled as a result.
• Communication settings— Allow clients to transfer content from this distribution point using BITS, HTTP, and HTTPS (required for device clients and Internet-based clients). Options available for this setting include the following:
• Allow intranet-only client connections
• Allow Internet-only client connections
• Allow both intranet and Internet client connections
See Chapter 5, “Network Design,” for additional detail on BITS.
Tip
Why Does Only the Intranet Option Appear?
If your ConfigMgr environment is in native mode, three communications settings options appear on the Distribution Point page of the New Site Role Wizard:
• Allow intranet-only client connections
• Allow Internet-only client connections
• Allow both intranet and Internet client connections
If your ConfigMgr environment is in mixed mode (the case with the site shown in Figure 14.30), the only option available is Allow intranet-only client connections.
Also in native mode, the box for Allow clients to connect anonymously is checked and grayed out, whereas in mixed mode this option can be checked or unchecked.
This setting indicates whether BITS will be used for the DP, and is required for connections from mobile device clients and Internet-based clients. For Windows 2008 server systems, you will need to download, install, and configure WebDAV manually if your DP will be using this setting. BITS is used on the distribution point, so check this option, as shown in Figure 14.30.
• Enable as a branch distribution point— This sets the distribution point to be a branch distribution point, discussed later in the “Branch Distribution Points” section.
For this option to be available, the site system you are configuring must be listed as a client in the collection. This is because the branch distribution is a client component (rather than a server component) and will require a healthy ConfigMgr client for activation.
• Group membership— Provides a way to group distribution points together into logical groupings. As an example, you could create a grouping for all distribution points in a site. Take the default configuration, which is not to identify any group memberships for this distribution point.
- Finish the New Site Role Wizard process through the Summary, Progress, and Confirmation pages to complete creating the new distribution point.

In summary, distribution points are most useful in environments where the systems will receive software deployments and a local server (part of the LAN) can provide the software distribution point role. Using regular or standard distribution points is suggested for those environments without a requirement to restrict which systems can communicate with the DP.
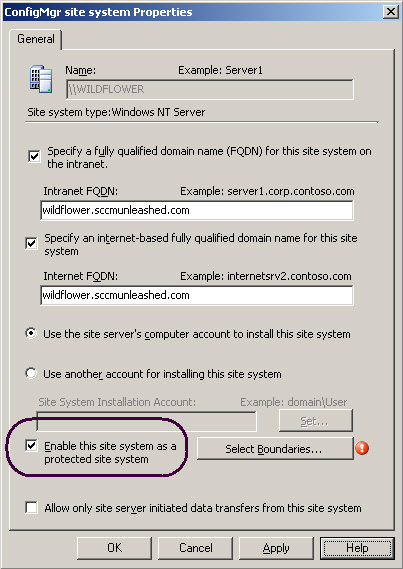
A protected distribution point (PDP) is a distribution point on a site system configured as a protected site system. You can define protected site systems for distribution points or state migration points. Using a protected site system means only clients within the boundaries defined for the site system can use that site system. In the case of a distribution point, this means only clients that are part of the boundaries defined for the protected distribution point can use the distribution point for software installation.
You can use PDPs to minimize wide area network (WAN) traffic by restricting ConfigMgr clients to use only those distribution points local to those systems. If the clients cannot access a distribution point, they cannot install software packages—so this restriction may require additional distribution points to provide redundancy. Defining additional distribution points enables a site to provide software distribution even if one of the protected distribution points is offline. Note that you cannot use protected distribution points for connections from clients over the Internet.
You can configure protected distribution points when you create the site system, or later by changing the properties of the site system. To convert the new distribution point created on the Wildflower server in the “Standard Distribution Points” section of the chapter, perform the following steps:
- In the ConfigMgr console, navigate to Site Database -> Site Management -> <Site Code> <Site Name> -> Site Settings -> Site Systems -> Wildflower -> ConfigMgr Site System. Then right-click and choose Properties.
- Enable this site system as a protected site system by checking the appropriate box on the properties of the Wildflower site system, as circled in Figure 14.31.
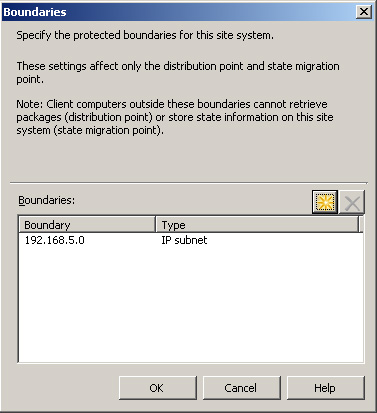
- After enabling this setting, you need to select the boundaries for the protected site system. If no boundaries are defined for the protected site system, no clients will be able to use the site system! To determine the boundaries for this protected site system, click the Select Boundaries button (Figure 14.31) and choose from the available subnets that display. For this example, the 192.168.5.0 subnet was selected for the boundaries on the protected site system, as displayed in Figure 14.32. For more information on subnets in ConfigMgr 2007, see Chapter 5.
For those environments with a requirement to minimize the potential impact to the network, protected distribution points are highly recommended.
A branch distribution point (BDP) is a distribution point on a site system designed to provide distribution point functionality in those locations where a server is not available, such as a small or distributed office. You can install branch distribution points on workstation or server-class systems, which gives ConfigMgr 2007 the ability to distribute software from the local network without a local distribution point. A branch distribution point requires a BITS-enabled standard distribution point containing the content to be delivered to the BDP. If a branch distribution point is communicating with a protected standard distribution point, the boundaries of that standard distribution point need to include the branch distribution point.
You can define multiple branch distribution points for a location. This is a recommended configuration, because workstations are more likely to be rebooted during the day than server systems.
To install a branch distribution point, the system must be an existing ConfigMgr client that is not in a workgroup, running Windows 2000, or configured to use an Internet-based management point. Perform the following steps to add a branch distribution point:
-
Change the configuration for Wildflower so that it will be a BITS-enabled standard distribution point.
Set this by navigating in the ConfigMgr console to Site Database -> Site Settings -> <Site Code> <Site Name> -> Site Systems -> Wildflower -> ConfigMgr Distribution Point. Right-click and choose Properties.
- Check the Communication settings box (shown in Figure 14.33) and set the drop-down option to Allow intranet-only client connections. (There are no plans to allow Internet-based clients in this site.)
- Now that there is a BITS-enabled standard distribution point, you will create a branch distribution point to communicate with it. To create the branch distribution point, navigate in the console to Site Database -> Site Management -> <Site Code> <Site Name> -> Site Settings -> Site Systems. Then right-click and choose New -> Server.
- Because the branch distribution point will be on the Dabney system, specify that system’s name and FQDN, as shown in Figure 14.34. It is not a requirement in all cases to specify the FQDN on this page, although this option is checked and may be filled in by default. You must specify the FQDN if you will be using native mode and Internet-based clients, if the site has clients in different domains with automatic approval of clients, for IPv6-only environments, or for environments not using WINS.
-
When selecting the system role, check the distribution point role, similar to Figure 14.29.
On the Distribution Point screen of the New Site Role Wizard, select the option Enable as a branch distribution point, as displayed in Figure 14.35.
Figure 14.35. Distribution Point settings of the New Site Role Wizard for the Dabney branch distribution point

After checking this option, you can choose a partition on which to store the branch distribution data, and specify an amount of space to reserve for the operating system. If you do not specify a partition for the branch distribution data, the wizard will automatically select the drive with the largest amount of free space. In Figure 14.35, the amount of space to reserve for the operating system is kept at the default of 50MB.

After you create the branch distribution point for Dabney, it is visible in the console when specifying a distribution point to use for your packages (Navigate to Site Database -> Computer Management -> Software Distribution -> Packages -> <Package Name> -> Distribution Points). You can also see it under the site settings (Site Database -> Site Management -> <Site Code> <Site Name> -> Site Settings -> Site Systems -> <servername>). In both cases, the console lists the standard distribution points as type Server whereas the branch distribution points show as type Branch.
Branch distribution points provide an effective way to minimize network usage and increase performance when distributing software packages to locations where a standard distribution point is not viable.
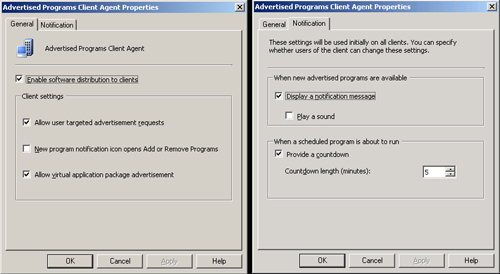
Prior to sending out any advertisements in Configuration Manager 2007, you must enable the client agent for advertised programs. Navigate in the ConfigMgr console to Site Management -> <Site Code> <Site Name> -> Site Settings -> Client Agents -> Advertised Programs Client Agent. Right-click and choose Properties. On the General tab, specify the following:
• Enable software distribution to clients— Check this option to distribute software to clients with ConfigMgr.
• Allow user targeted advertisement requests— If this option is checked, users can be targeted (in addition to computers) to receive software. If you will not use user targeting, uncheck this option to decrease the amount of policy data sent between the client and the ConfigMgr servers.
• New program notification icon opens Add or Remove Programs— Checking this option means that when a new program is available and the user clicks the new program notification icon, the Add or Remove Programs applet in Control Panel will display.
On the Notification tab, specify the following:
• Display a notification message— Displays a visual cue that a new advertisement is available. This appears on the task bar in the notifications area.
• Play a sound— Creates an audible cue that a new advertisement is available.
• Provide a countdown— Provides a visual countdown that a program is about to install.
• Countdown length (minutes)— If a countdown is checked, this is the number of minutes to display the countdown. This field defaults to 5 minutes.
Figure 14.36 displays the General and Notification tabs for the Advertised Programs Client Agent Properties.
With the Advertised Programs Client agent configured, the next step is creating advertisements.
At this point, you have stepped through the processes to create a package/program, created a collection to distribute them to, and created distribution points, specifying the method to use when distributing the software. Now it is time to tie these together and distribute software. Distribution is achieved through advertisements, which tie all these concepts together (as displayed earlier in Figure 14.1) to distribute software using ConfigMgr.
As part of the advertisement, you will use the packages/programs defined in Chapter 13 and the collections and distribution points defined in this chapter, providing a targeted software deployment for both Forefront client software and OpsMgr client software. Let’s start with deploying the Forefront client to a single collection.
Chapter 13 presented the steps to create a package and a program that will execute an installation for the Forefront Client Security agent (see Chapter 13 for details). This chapter then stepped through the process of creating a collection named Forefront Client Deployment (see “Creating a Dynamic Collection”) that contains Windows Vista and XP systems located in a specific OU structure.
Using an advertisement ties these concepts together. There are multiple ways to create an advertisement:
• Navigate to the Advertisement section of the ConfigMgr console (Site Database -> Computer Management -> Software Distribution -> Advertisements), right-click, and select New Advertisement. This process starts the New Advertisement Wizard, where you need to specify all the settings for the advertisement you create.
Tip
Using the New Advertisement Wizard for More Control
This section discusses using the Distribute Software to Collection Wizard to deploy software. Several options are not available when using this particular wizard, including setting priority, rerun behavior, how to interact with distribution points, whether to allow manual interaction with the advertisements, whether to use a custom countdown, and configuring security. As a result, most advanced ConfigMgr users recommend using the New Advertisement Wizard to provide more control for these types of configurations. This chapter recommends the Distribute Software to Collection Wizard to provide a solid starting point for how to deploy software, but as you spend additional time distributing software, you may decide the New Advertisement Wizard is your preferred method to use.
• Navigate to the Packages section of the ConfigMgr console (Site Database -> Computer Management -> Software Distribution -> Packages), right-click, and select Distribute Software. This starts the Distribute Package Wizard, which will pass the package information and thus require less configuration information.
• Navigate to the collection previously defined for the software distribution in the ConfigMgr console (Site Database -> Computer Management -> Collections -> Forefront Client Deployment), right-click, and select Distribute Software. This starts the Distribute Software to Collection Wizard, passing the collection information, again saving you from inputting much of the configuration information.
It is really a personal preference as to which approach to use, but the authors’ preference is to use the last method to create the advertisement, as long as the collection that will be used for targeting is already defined. To create the advertisement in this manner, perform the following steps:
- The Distribute Software to Collection Wizard starts with a Welcome screen and then prompts for package information. Because this example will distribute the Forefront Client Security Agent package already created, choose Select an existing package. Then use the Browse button, as shown in Figure 14.37.
- The next screen specifies the distribution points where clients will access this package. Both distribution points are unchecked by default (see Figure 14.38). Check both and continue with the wizard.
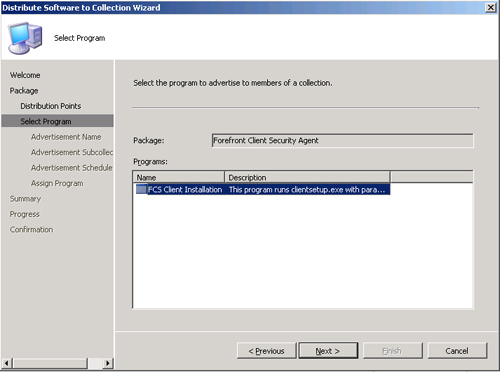
- The Select Program screen, shown in Figure 14.39, displays the program created for the Forefront Client Security agent (if multiple programs are available for this package, choose the program to run from the list displayed with the package).
-
The following screen defines the Advertisement Name setting, which defaults to a concatenation of the name of the package (Forefront Client Security Agent) followed by “–” and then the name of the program (FCS Client Installation). This is followed by “to” and the name of the collection (Forefront Client Deployment). This makes the full name for this advertisement Forefront Client Security Agent – FCS Client Installation to Forefront Client Deployment.
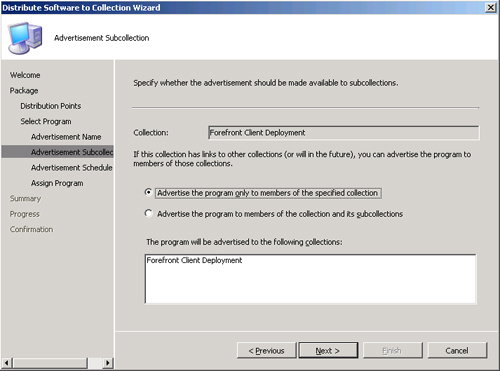
Next, on the Advertisement Subcollection screen, you choose whether the advertisement will apply to subcollections or only to the specified collection. Although no subcollections exist at this time, to avoid the chance of distributing the software to unexpected systems, select the option Advertise the program only to members of the specified collection, as displayed in Figure 14.40.
-
The Advertisement Schedule screen (shown in Figure 14.41) specifies when an advertisement becomes available, when or if it expires, and whether content is downloaded and run locally. The fields on this page include the following:
• Advertise the program after— Use this field to make an advertisement available beginning at a future point in time. The field defaults to the date and time the advertisement was created. For most packages, the default configuration is preferred; but this setting allows you to configure a specific time to advertise those packages requiring a later time.
• Expiration— Two options are available: “No, the advertisement never expires” and “Yes, the advertisement should expire.”
The default is No, and is the preferred situation unless there is a reason why the program would no longer be viable after a certain date and time. If you choose the expiration option of Yes, define the expiration date and time here.
• Download content from unprotected distribution point and run locally— By default, this option is checked. When checked, this specifies that when the program is advertised it will download to the client before ConfigMgr attempts to run it. This option applies when the client and distribution point are connected on a fast (LAN) network boundary.
Note
Client Cache Settings
Configuration Manager 2007 uses the client cache if a program is configured to download and run locally to the system. The cache folder is stored on the same partition as the operating system, by default in the %windir%System32CCMcache directory.
The default size of the client cache has increased in ConfigMgr 2007. It is now 5GB, and allocates space as required in the cache. If less than 5GB of free space is available, ConfigMgr uses a percentage of the available free space.
Take the default time to advertise the program, select no expiration date, and check the option for the content to download and run locally. See Figure 14.41 for these selections.
-
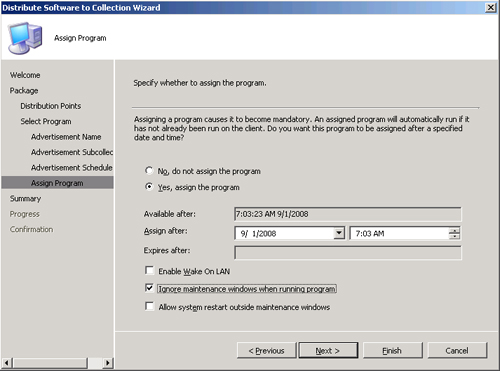
The Assign Program screen specifies whether a program is assigned and how the assignment is configured. The fields on this page include the following:
• Assignment— The two options are “No, do not assign the program” and “Yes, assign the program.” This defaults to the No option, making the advertisement available for users to install, although it does not force installing the software package. The unassigned approach is useful for programs that are not mandatory and during package testing phases.
Depending on the configuration of the Advertised Programs Client agent (discussed in the “Advertised Programs Client Agent” section), users may be notified that there is software available to install. When connecting to remote systems via Remote Desktop Protocol (RDP), you must be logged in to the console session to see these notifications.
• Assign after— Configures the date and time when the advertisement is assigned to the systems in the collection.
• Enable Wake On LAN— Specifies whether to send a Wake On LAN transmission to wake up the client computer before the advertisement occurs.
This option defaults to unchecked.
• Ignore maintenance windows when running program— If this option is checked, the program will install regardless of any defined maintenance windows. If this option is unchecked, the software will not distribute until a maintenance window occurs.
Maintenance windows are defined on the collection level. To configure a maintenance window, right-click the collection and choose Modify Collection Settings.
This option defaults to unchecked.
• Allow system restart outside of maintenance windows— If this option is checked and the program requires a reboot, the system will restart regardless of any defined maintenance windows.
This option defaults to unchecked.
The example in Figure 14.42 will deploy antivirus software as assigned, effective the time the advertisement was created. ConfigMgr will ignore any maintenance windows when running the program, although it is not using Wake On LAN and system restarts outside of the maintenance window are not allowed.


After completing the wizard process, you have distributed your first software package using Configuration Manager 2007! The next logical step is to track how the package and advertisement are functioning. You can monitor the status in the ConfigMgr console by navigating to Site Database -> System Status section. Perform the following steps:
-
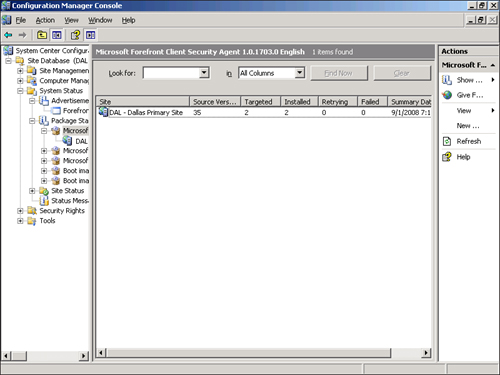
The first step is to check on the status of the package being distributed. You will want to know whether the package was sent successfully to the specified distribution points. In the System Status screen, open the Package Status -> Microsoft Forefront Client Security Agent package. Here, you can track the status of the package and whether it deploys correctly to the distribution points. Figure 14.43 shows two targeted distribution points and two installed distribution points, meaning the distribution points successfully received the software package.
If issues are referenced on this screen (such as distribution points in a retry or failed state), right-click and choose Show Messages to track either information, warning, error, or all messages related to the push of this software package to these distribution points.
- The next step is to check on the status of the advertisement because the package was verified as successfully sent to the distribution points. Do this from the System Status section of the ConfigMgr console, this time opening Advertisement Status -> Forefront Client Security Agent. From here, you can see how many systems have received the advertisement, how many have failed, how many have started, and how many have program errors or successes.
The “OpsMgr Advertisement” section investigates the status of an advertisement in more detail.
The steps in Chapter 13 also created three packages that contain the programs to install the OpsMgr agent for the AMD64, I386, and IA64 platforms. This chapter then defined a top-level collection called OpsMgr Client Deployment and three subcollections, designed to contain only members of the OpsMgr Client Deployment collection and meet the defined client platform. You can use an advertisement to combine these packages/programs with the collections previously defined; this provides a targeted method for deploying the OpsMgr platform-specific client. Perform the following steps:
- Start by creating three advertisements. The first advertisement assigns the AMD64 version of the OpsMgr client to the OpsMgr AMD64 subcollection. Navigate in the ConfigMgr console to Site Database -> Computer Management -> Collections -> OpsMgr Client Deployment -> OpsMgr AMD64. Right-click and select Distribute Software.
-
Operations Manager 2007 agents should not be distributed to root management servers, management servers, or gateway servers. Agent distribution to an existing OpsMgr server of this type can cause significant technical issues that are best avoided; you will want to consider this when distributing agents for OpsMgr. Create a new static collection named OpsMgr Management Servers, including the various management servers in this collection. Use the concepts discussed in the “Exclusion Collections” section to update the top-level OpsMgr collection to exclude the OpsMgr Management Servers collection. Next, update the collection membership of the top-level and subcollections. Once this is completed, check the collections by validating that the OpsMgr Client Deployment collection does not include the members of the OpsMgr Management Servers collection and that no subcollections contain any members of OpsMgr Management Servers.
Tip
Active Directory Integration and Operations Manager
Prior to deploying the OpsMgr agents via Configuration Manager 2007, configure Operations Manager 2007 for AD Integration. System Center Operations Manager 2007 Unleashed (Sams Publishing, 2008) discusses AD Integration and other topics related to OpsMgr agent deployment.
-
The process to create an OpsMgr advertisement is the same as discussed in the “Forefront Advertisement” section. Select the AMD64 version of the package as well as the Per-system unattended installation program. Assign the program and configure it to ignore maintenance windows. Once you create the advertisement, you can validate the status of the package as it is sent to the distribution points, as discussed earlier in the “Forefront Advertisement” section.
Create three different advertisements for these programs so the AMD64 program is sent to the OpsMgr AMD64 collection, the I386 version to the OpsMgr I386 collection, and the IA64 version is sent to the OpsMgr IA64 collection.
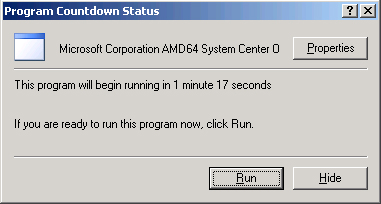
When you assign an advertisement to a system, its behavior depends on how you defined the settings for the Advertised Programs Client agent (ConfigMgr Console -> Site Database -> Site Management -> <Site Code> <Site Name> -> Site Settings -> Client Agents -> Advertised Programs Client Agent). This particular configuration displays a notification (shown in Figure 14.44) and provides a countdown prior to launching the application.
-
Identify any errors related to the advertisement. Navigate to the System Status section of the ConfigMgr console and open Advertisement Status -> AMD64 System Center Operations Manager Agent. This section of the console provides a high-level overview of the success or failure of the advertisement.
Right-clicking the advertisement and choosing Show Messages provides information on any updates that occurred related to this program. Common items to debug include software deployments targeted to the wrong platform (a reason to create different collections for targeting) and failures to install the program (potentially related to a variety of issues, including errors with how the package and program were created).
- When you’re debugging software advertisement issues, the Advertisement Status screen provides good high-level information, but additional detail may be necessary to identify and resolve the issues. Reviewing server and client log files helps take this to the next level.
Employing the Distribute Software to Collection Wizard, as was used for the Forefront and OpsMgr advertisements, provides a straightforward way to create an advertisement, but makes some assumptions regarding how you want to configure the settings of your advertisement. Knowing all the configurations available for customizing an advertisement can greatly extend the flexibility of how ConfigMgr will advertise software.
To change these configurations, review the properties available when an advertisement is created by right-clicking the advertisement (in the ConfigMgr console under Site Database -> Computer Management -> Software Distribution -> Advertisements -> <Advertisement Name>) and choosing Properties. The General tab has items previously configured, such as the name of the advertisement, the package, the program, the collection, and whether members of subcollections are included. However, additional tabs provide further configurations. These tabs are discussed in the next sections and include the Schedule, Distribution Points, Interaction, and Security tabs.
The advertisement Schedule tab provides each of the configurations shown when creating the advertisement with the Distribute Software to Collection Wizard. These include when an advertisement is scheduled to start, whether it is assigned as mandatory, whether it should use Wake On LAN, whether to ignore maintenance windows when running programs, and whether to allow system restarts outside of maintenance windows.
This tab also allows you to change either the priority or the program rerun behavior, as shown in Figure 14.45.
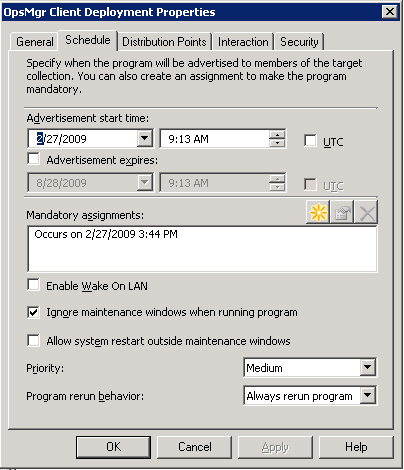
• Priority— This includes the following options:
• Medium (default)—This setting is effective for most situations.
• Low—This setting is useful when the advertisement is not particularly time critical.
• High—This setting is useful when the advertisement is really time critical.
• Program rerun behavior— Program rerun behavior includes the options to never rerun an advertised program, to always rerun the program (the default configuration), to rerun if the previous attempt failed, and to rerun if the previous attempt succeeded. This setting only has an impact on an advertisement if it is assigned, because users can run optional programs at any time and ConfigMgr does not restrict a program from rerunning.
The advertisement Distribution Points tab shows the configuration decided upon in the Distribute Software to Collection Wizard, which is the option to run the program from a distribution point or to download the content from a distribution point and run it locally.
• When a client is connected within a slow or unreliable network boundary— Three options are available for how a client will respond when connected on a slow or unreliable network boundary:
• To not run the program. (The default configuration is shown in Figure 14.46.)
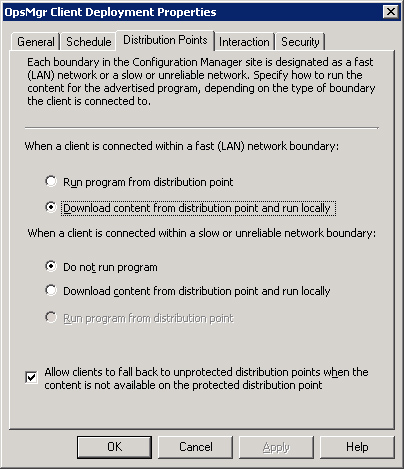
• To download content from a distribution point and run it locally.
• To run a program from the distribution point. (This option is unavailable and grayed out when a client is connected within a slow or unreliable network boundary.)
• Allow clients to fall back to unprotected distribution points when the content is not available on the protected distribution point— By default, this option is checked. When checked, this specifies the client should fall back to an unprotected distribution point if the content is not available on the protected distribution point. Downloading content from the distribution point and running it locally is useful when BITS is enabled on the distribution point, because the client can download all the content regardless of the network speed or reliability. If your environment is limited to only protected distribution points, this option is not beneficial—the client will not fail over to anything because there is nothing that is unprotected to allow the failover.
See Chapter 5 for additional information on fast and slow networks.
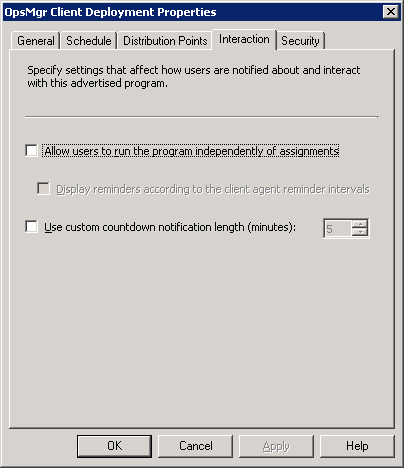
The advertisement Interaction tab (shown in Figure 14.47) provides settings that were not configurable running the Distribute Software to Collection Wizard. These include the following:
• Allow users to run the program independently of advertisements— Provides the ability to allow users to run the program independent of assignments (unchecked by default). If there is a requirement for users to be able to run the program that is advertised (whether it is assigned or not), the first box should be checked to allow this to occur. This causes the program to list as available for installation in the Run Advertised Programs within ConfigMgr.
• Display reminders according to the client agent reminder intervals— Specify whether reminders are broadcast to the client according to the default interval configured on the Computer Client agent (grayed out unless the previous option is selected).
• Use custom countdown notification length (minutes)— Set a custom count-down notification length—as an example, for an advertisement that will run for a long time or require a reboot at the end of the installation (this option is unchecked by default).
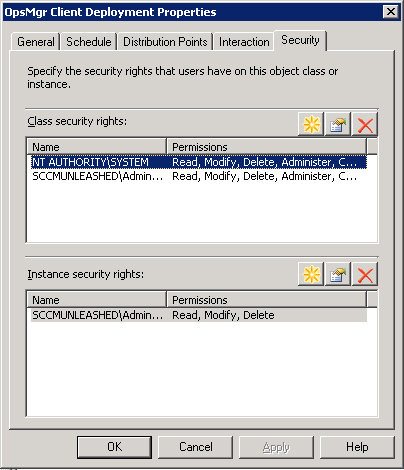
When you use the Distribute Software to Collection Wizard to create an advertisement, the default class and instance rights are associated with that advertisement. Figure 14.48 displays these settings, which default to allow the user creating the advertisement to control the advertisement. You can change advertisement permissions by selecting the Security tab on the advertisement. You can also define advertisement permissions in the Security Rights section of the ConfigMgr console under Site Database -> Security Rights -> Rights. You can configure permissions on the class or instance level in either of these two locations, defining which users have what level of permissions to the advertisement. For more information on security, see Chapter 20, “Security and Delegation in Configuration Manager 2007.”
Chapter 13 discussed creating an Adobe Reader virtual application for distribution using Configuration Manager. This virtual application was created in a ConfigMgr 2007 Release 2 (R2) environment configured to enable virtual applications. Because the application is packaged, you can follow the standard application distribution approaches discussed throughout this chapter:
• Create a collection
• Advertise the program
• Send it to a distribution point
However, before starting the process to distribute the virtual application, you should perform some preliminary steps to remove the following common virtual application issues:
• Installing the App-V 4.5 client
• Testing application distribution
After preliminary testing, you will create the test collection and distribute the virtual application.
Microsoft Application Virtualization (App-V 4.5) uses both a client and a server. Although the ConfigMgr environment can provide the server functionality, the App-V client is still required for virtual applications to run on a client system. You must install both the ConfigMgr client and the App-V client on any ConfigMgr client that will run virtual applications.
App-V requires the Microsoft Desktop Optimization Pack (MDOP). MDOP is a separate download, available as part of Microsoft’s Software Assurance program or purchased as part of an optional subscription license for volume license customers. More information about MDOP is available at http://www.microsoft.com/windows/enterprise/products/mdop.aspx.
During initial virtual application deployment testing, it is best to install the App-V client manually on test systems, thus eliminating problems with the client install during any troubleshooting efforts. This client is available as part of the App-V 4.5 software, and installed using the MSAppVirt_ts_client_setup_4.5.0.1485.exe program. The App-V client has the following prerequisites you must install:
• Microsoft Application Error Reporting
• Microsoft Visual C++ 2005 SP 1 Redistributable Package
• Microsoft Core XML Services 6.0 SP 1
After completing the testing phase, you can package the App-V client (with its prerequisites) to distribute throughout the ConfigMgr environment to those systems that will run virtual applications. Additional information on how to package the App-V client is available at http://scug.be/blogs/sccm/archive/2008/12/23/sccm-deploying-the-app-v-4-5-client.aspx.
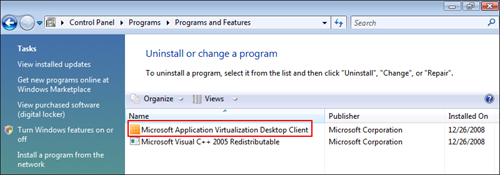
To verify that the App-V client deployed successfully on a system, check the Add/Remove Programs applet (or Programs and Features on Windows Vista, as shown in Figure 14.49).
To verify the functionality of the App-V client, a series of prepackaged applications are available on the web at http://www.instantapp.net/. Downloading and installing one or more of these applications will validate the functionality of the App-V 4.5 client.
To ensure things are working properly, you will want to deploy a nonvirtual application to your test systems before deploying a virtualized application. Both types of application deployment depend on many of the same ConfigMgr functions; experience shows it is easier to debug nonvirtual applications first and then deploy virtual applications. Successful distribution of the Forefront Client (see Chapter 13) or other packages to the test client will verify the functionality of both the ConfigMgr distribution point and the ConfigMgr client.
Testing application distribution prior to distributing a virtual application significantly decreases the complexity of debugging if issues occur when attempting to distribute the virtual application.
The test collection should be created as a static collection (see Chapter 13 for details), which will include only those systems selected for testing virtual applications. This collection should span the variety of operating systems that will be running virtual applications. For most environments, this would include at least one system running Windows XP X86, Windows XP X64, Windows Vista X86, and Windows Vista X64. For this test, you would have previously created the Adobe Reader Deployment collection.
After completing initial preparation, create an advertisement that will tie the virtual application to a test collection, using a specified distribution point. Navigate in the ConfigMgr console to Site Database -> Computer Management -> Collections -> Adobe Reader Deployment (a static collection created to test deployments, similar to the one previously created in the “Static Collections” section). Right-click and select Distribute Software. Perform the following steps:
- After the Welcome screen, select an existing package (in this case, the Adobe Reader Virtual application shown in Figure 14.50). The Distribute Software to Collection Wizard will adapt its steps to facilitate distributing virtual applications.
- Specify the distribution point to use for the virtual application. This example uses the Bluebonnet distribution point, because it is the only DP available within this site, as shown in Figure 14.51. When you are testing virtual application deployment, specify those distribution points closest to the systems you are testing. Using local distribution points increases the speed of the virtual application deployment and decreases the overhead on the network when virtual applications deploy.
- The next page shows the virtual program already defined, because no program configuration is required for virtual applications. The package is defined as Adobe_Reader_Adobe_9_MNT, and the virtual application is defined as [Virtual application]. Both of these fields are grayed out, as shown in Figure 14.52. You can verify this under Site Database -> Computer Management -> Software Distribution -> Packages by comparing virtual applications to nonvirtual applications.
- Specify the name of the advertisement. This defaults to the name of the virtual application combined with the name of the target collection, as shown in Figure 14.53.
- Take the defaults on the Advertisement Subcollection page, which will advertise to the members of the collection and its subcollections. You should also accept the defaults on the Advertisement Schedule page. This will advertise the virtual application after the time it was created, without an expiration date, and download the content from unprotected distribution points and run it locally, as shown in Figure 14.54.
- On the Assign Program page, you will determine whether to assign the virtual application, which makes the program mandatory for members of the collection. This will be configured with the default, which is not mandatory (see Figure 14.55). However, after testing is complete you will most likely assign the virtual application so users do not need to specify they want to install it.
-
As with other software distributions in ConfigMgr, the next page shows a summary of the advertisement you are creating. This is followed with a progress page, and then a final confirmation page. ConfigMgr will advertise the virtual application to members of the collection once the wizard completes.
You can check the status of the package and whether it is distributed to the distribution point using the System Status section of the console under Site Database -> System Status -> Package Status. Figure 14.56 shows the Adobe Reader package has been targeted to one distribution point and installed on one distribution point.
-
After verifying the virtual application has reached the distribution point, you can monitor the status of the virtual application distribution either within the ConfigMgr console under Site Database -> System Status -> Advertisement Status or by checking the individual systems.
For debugging purposes, this was not defined as a mandatory advertisement, so you will need to choose to install the virtual application on a client system. After the advertisement is available, the application will display that it requires a download and then that it is in the process of downloading (see Figure 14.57).
- Once distribution of the virtual application completes, the Adobe application is available on the Start menu, as highlighted in Figure 14.58.

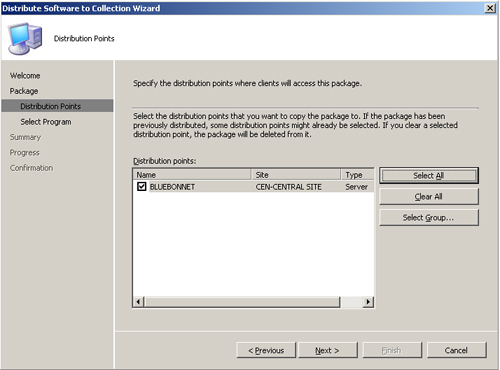
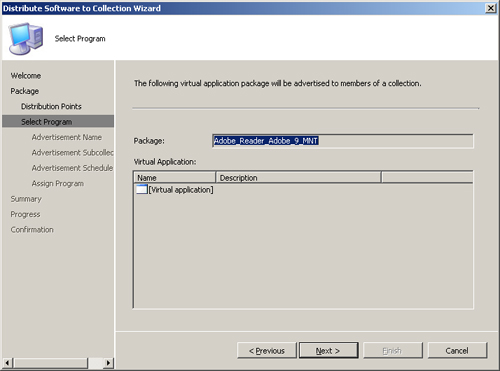


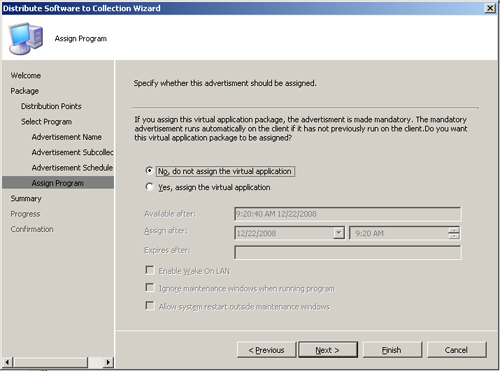

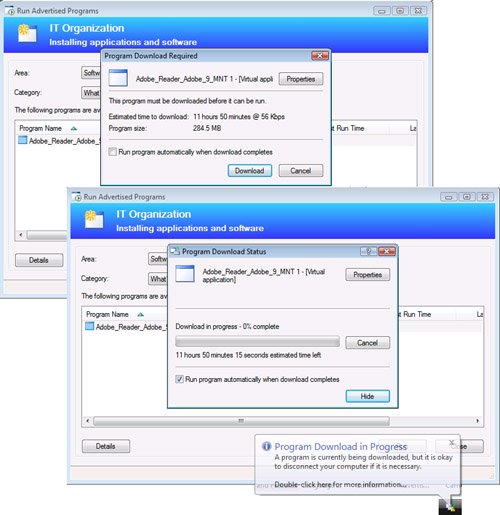
After the Adobe Reader virtual application is available, you can run it and view PDF files, thus providing a good test of the application functionality. Figure 14.59 shows the Adobe Reader virtual application running. The building-block icon shown on the task bar (at the bottom right of the figure) indicates this is a virtual application.
The Adobe Reader virtual application is a good example of how you can integrate virtual applications with ConfigMgr, providing an extremely flexible method to distribute applications. The following material is recommended for additional reading on App-V and ConfigMgr:
• App-V 4.5 documentation— http://technet.microsoft.com/en-us/appvirtualization/cc843994.aspx
• Raymond Chow’s experiences with integrating ConfigMgr and App-V— http://mymomexperience.blogspot.com/2008/05/marrying-sccm-r2-and-softgrid-45.html
• Steve Rachui’s post on the process of deploying virtual applications in Configuration Manager— http://blogs.msdn.com/steverac/archive/2008/12/22/deploying-virtual-apps-with-sccm.aspx
• Desktop Control’s blog on integrating ConfigMgr and App-V— http://desktopcontrol.blogspot.com/2008/09/app-v-application-deployment-in.html
Several common issues may occur when distributing software in Configuration Manager. There are several recommended best practices to assist with troubleshooting these issues. The next sections discuss two of these approaches.
When distributing software with Configuration Manager 2007, you will always want to begin with simple applications and work your way up to more complex applications.
As an example, it is not a good idea to start your first software distribution with a global deployment of Office 2007. Rather, start small with a relatively simple application to package, such as WinZip or the Forefront client, and deploy it from a single distribution point to a set of test clients. You can then move to a larger number of distribution points to validate the distribution point functionality. After distributing simple applications, select ones that are more complex for this same phased approach to deployment. This process should help you identify and resolve issues more quickly.
This approach will make it easier to debug if you need to address low-level issues before they affect large numbers of systems.
The ConfigMgr console provides a large amount of status information that can assist with troubleshooting software distribution in an environment. This is stored under Site Database -> System Status. Chapter 17 also discusses checking system status.
• The Advertisement Status section assists in determining the status of the advertisements that are active and whether they are successfully deploying.
• The Package Status section shows the source version of the package, the number of distribution points targeted to receive the package, and the number of distribution points that already received the package. You can track the status messages for each package to determine whether there are issues with distributing the software packages to the various distribution points in the site.
• The Site Status section shows the overall health of ConfigMgr and can assist in determining whether low-level issues are causing software to not distribute correctly within the site.
Many low-level technical issues can be identified within the System Status section of the ConfigMgr console, and it’s far more intuitive than digging through the log files on both the server and the client to determine what’s going wrong during a software deployment (see Appendix A for more detail on ConfigMgr log files).
This chapter used the packages and programs created in Chapter 13 and took them through the software deployment process. It discussed queries and collections as well as created custom collections to meet the requirements of the software distribution process. The chapter also discussed distribution points and their configurations, and distributing applications with advertisements. It covered distributing virtual applications, Microsoft’s new direction for software distribution in Configuration Manager 2007. Finally, the chapter discussed how to avoid common problems when deploying software with ConfigMgr. The next chapter discusses patch management using Configuration Manager 2007.