
Terms you’ll need to understand:
✓ | Performance |
✓ | Reliability |
✓ | Task Manager |
✓ | Data Collector Set (DCS) |
✓ | Windows Reliability and Performance Monitor |
✓ | Chkdsk |
✓ | Defragmentation |
✓ | ReadyBoost |
✓ | ReadyDrive |
✓ | Memory Diagnostic tool |
✓ | Startup Repair tool (StR) |
✓ | Safe mode |
Techniques/concepts you’ll need to master:
✓ | Use the Windows Reliability and Performance Monitor and Task Manager to identify bottlenecks. |
✓ | Run Chkdsk to verify the integrity of the drive. |
✓ | Run Disk Defragmenter to optimize your drive. |
✓ | Configure the paging file for optimum performance. |
✓ | Describe, enable, and configure ReadyBoost and ReadyDrive. |
✓ | Run multiple troubleshooting tools, including the Memory Diagnostic tool, Network Diagnostic tool, Startup Repair tool, System Configuration tool, and the Problems Reports and Solutions tool. |
✓ | Troubleshoot various computer problems in Safe mode. |
✓ | Use Event Viewer to view errors and warnings when troubleshooting a problem. |
Performance is the overall effectiveness of how data moves through the system. To be able to improve performance, you must determine the part of the system that is slowing down the throughput. Processor speed, the amount of RAM on the machine, the speed of the disk system, the speed of the network adapter card, or another factor can affect performance. This limiting factor is referred to as the bottleneck of the system.
Reliability is a measure of how often a system deviates from configured, expected behavior. Reliability problems occur as the result of application crashes, service freezes and restarts, driver initialization failures, and operating system failures.
Hardware, memory, and performance diagnostics are the heart of the Windows Vista self-correcting architecture. Hardware diagnostics can detect error conditions and either repair the problem automatically or guide the user through a recovery process. With potential disk failures, hardware diagnostics guide users through the backup procedure to minimize downtime and data loss.
Windows Reliability and Performance Monitor is a Microsoft Management Console (MMC) snap-in that provides tools for analyzing system performance. From a single console, you can monitor application and hardware performance in real time, customize what data you want to collect in logs, define thresholds for alerts and automatic actions, generate reports, and view past performance data in a variety of ways.
An important feature in Windows Reliability and Performance Monitor is the Data Collector Set (DCS), which groups data collectors into reusable elements. After a Data Collector Set is defined, you can schedule the collection of data using the DCS or see it in real time.
Windows Reliability and Performance Monitor consists of three monitoring tools:
Resource View
Performance Monitor
Reliability Monitor
To start the Reliability and Performance Monitor, follow these steps:
Click Start, right-click Computer, and click Manage.
Expand System Tools and click Reliability and Performance.
Note
To be able to view the performance counters, a user needs to be in the Performance Monitor Users group or an administrator.
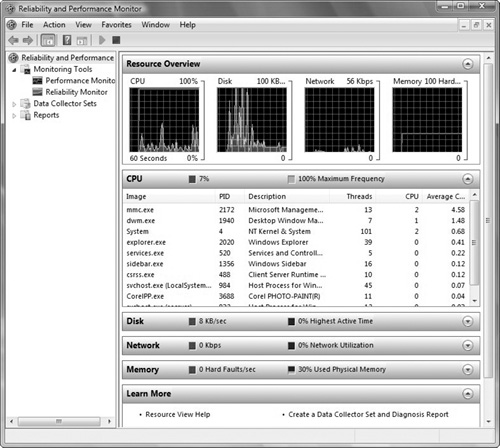
Windows Reliability and Performance Monitor will start with the Resource view display, which enables you to monitor the usage and performance of the major system subcomponents: processors, disks, network, and memory resources in real time (see Figure 9.1). You can then click the Detail button to see which processes are using which resources.
Note
If Resource view does not display real-time data when Windows Reliability and Performance Monitor starts, click the green Start button in the toolbar.
Performance Monitor provides a visual display of built-in Windows performance counters, either in real time or as a way to review historical data (see Figure 9.2).
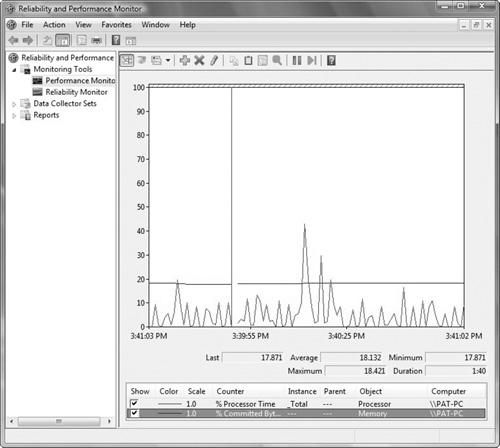
You can add performance counters to Performance Monitor by dragging and dropping, or by creating custom DCSs. It features multiple graph views that enable you to visually review performance log data. You can create custom views in Performance Monitor that can be exported as DCSs for use with performance and logging features.
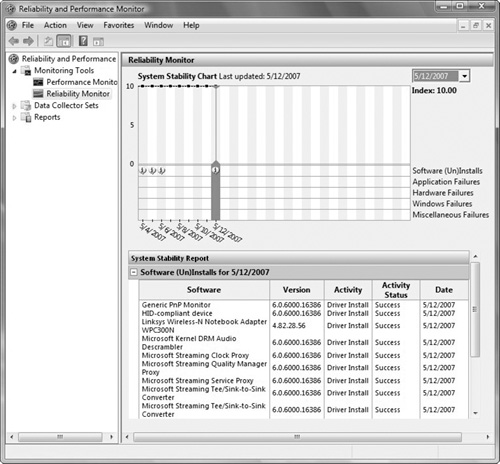
Besides combing through the Event Viewer, you can use the Reliability Monitor to give you an overview of the system stability and to view individual events that affect overall stability. Some of the events shown are software installation, operating system updates, and hardware failures (see Figure 9.3).
Another tool that you can use to view system performance is the Windows Task Manager. The Performance tab includes four graphs (see Figure 9.4). The top two graphs show how much CPU is being used, both at the moment, and for the past few minutes. (If the CPU Usage History graph appears split, your computer either has multiple CPUs, a single dual-core CPU, or both.) A high percentage means that programs or processes are requiring a lot of CPU resources, which can slow your computer. If the percentage appears frozen at or near 100 percent, a program might not be responding.
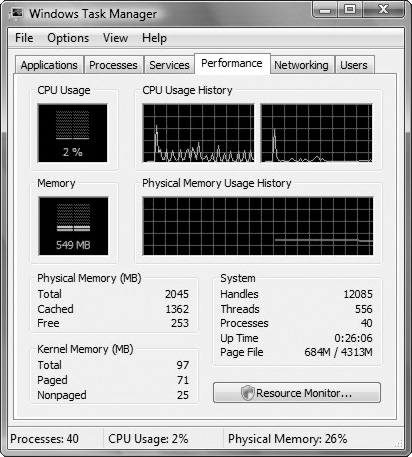
The bottom two graphs display how much RAM, or physical memory, is being used in megabytes (MB), both at the current moment and for the past few minutes. The percentage of memory being used is listed at the bottom of the Task Manager window. If memory use seems consistently high or slows your computer’s performance noticeably, try reducing the number of programs you have open at one time or install more RAM.
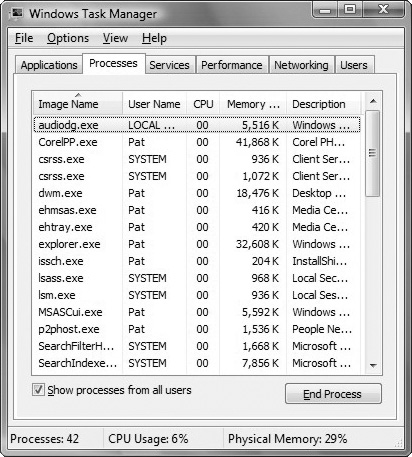
To get a list of all individual processes or programs running in memory and how much processor utilization and memory use each application is using, click the Processes tab. You can also manually end any process here, which comes in handy when a process stops responding (see Figure 9.5).
One of the key components to the system is the disk. Because in Windows your applications and the data come from the hard drive, you must keep the hard drive optimized to keep your system performing well. Of course, as mentioned in Chapter 6, “Configuring User Account Security,” it is important that you use the NTFS file system. You should then monitor free disk space, check your drive for errors, and defrag your hard drive on a regular basis.
You should closely monitor disk space usage on all system drives. When a system drive fills up, the performance and reliability of Windows can be greatly reduced, particularly if the system runs low on space for storing virtual memory or temporary files. One way to reduce disk space usage is to use the Disk Cleanup tool to remove unnecessary files and compress old files.
You should periodically use the Check Disk tool (Chkdsk.exe) to check the integrity of disks. Chkdsk examines and corrects many types of common errors. It cannot fix a corrupt file, however. You can run Chkdsk from the command line or through a graphical user interface (GUI).
If you open an elevated command prompt, you can test the C: drive by entering the following:
chkdsk C:
Without the /f option, Chkdsk will report only the status of the C: drive and any problems that it finds. To fix the problems, you need to enter the following:
chkdsk C: /f
To run the graphical interface of Chkdsk, follow these steps:
Click Start, and then click Computer. Under Hard Disk Drives, right-click a drive, and then select Properties.
On the Tools tab, click Check Now.
If you are using the command prompt or the graphical interface and Chkdsk is in use, Chkdsk displays a prompt to schedule the disk to be checked the next time you restart the system.
When a file is created, it is assigned the number of clusters needed to hold the amount of data. After the file is saved to the disk, other information is usually saved to the clusters following those assigned to the saved file. Therefore, if the original file is changed or more information is added to it, the bigger file doesn’t fit within the allocated clusters when it is saved back to the disk. Part of the file will be saved in the original clusters, and the remaining amount will be placed elsewhere on the disk. Over time, files become fragmented as they are spread across the disk. The fragmented files are still complete when they are opened, but it takes longer for the computer to read them, and opening them causes more wear and tear on the hard disk.
To reduce fragmentation, Windows Vista automatically defragments disks periodically using Disk Defragmenter. By default, Windows Vista runs Disk Defragmenter automatically at 4 a.m. every Sunday. As long as the computer is on at the scheduled run time, automatic defragmentation will occur. You can cancel automated defragmentation or modify the defragmentation schedule by following these steps:
Click Start, and then click Computer.
Under Hard Disk Drives, right-click a drive, and then select Properties.
On the Tools tab, click Defragment Now to open the Disk Defragmenter dialog box.
To cancel automated defragmentation, clear Run Automatically, and then click OK twice. To modify the defragmentation schedule, click Modify Schedule. Use the Modify Schedule dialog box to set the desired run schedule.
Click OK twice to save your settings.
To manually defragment a disk, follow these steps:
When your computer does not have enough memory to perform all of its functions, Windows and your programs can stop working. To help prevent data loss, Windows will notify you when your computer is low on memory. Other signs of low memory include poor performance and screen problems. You can also check the Event Viewer and the Windows Reliability and Performance Monitor.
Your computer has two types of memory: random access memory (RAM), also known as physical memory; and virtual memory, also known as a paging file. All programs use RAM, but when there is not enough RAM for the program you’re trying to run, Windows temporarily moves information that would normally be stored in RAM to the virtual memory.
Virtual memory is disk space that acts like RAM, which allows the operating system to load more programs and data. Parts of all the programs and data to be accessed are constantly swapped back and forth between RAM and disk so that the virtual memory looks and acts like regular RAM. This is beneficial to the user because disk memory is much cheaper than RAM.
The RAM and virtual memory are broken down into chucks called pages, which are monitored by the operating system. When the RAM becomes full, the virtual memory system copies the least recently used programs and data to the virtual memory. Because this frees part of the RAM, it then has room to copy something else from virtual memory, load another program, or load more data. Windows Vista calls the virtual memory a paging file.
If you have low memory, you should consider
Installing more memory
Increasing the size of the paging file
Determining whether a program overuses memory
To determine how much RAM your system has, you can use the Welcome Center, Task Manager, or the System Information. Open System Information, and then follow these steps:
Click the Start button and select All Programs
Select Accessories, and then select System Tools.
Select System Information. The total amount of RAM is listed under Total Physical Memory.
Windows Vista does a much better job of managing virtual memory than earlier versions of Windows. Windows Vista will set the minimum size of the paging file at the amount of RAM installed on your computer plus 300 MB and the maximum size at three times the amount of RAM installed on your computer. If you want to manually manage virtual memory, use a fixed virtual memory size in most cases. To do this, set the initial size and the maximum size to the same value. This ensures that the paging file is consistent and can be written to a single contiguous file (if possible, given the amount of space on the volume).
Exam Alert
A high value for pages/sec counter in Performance Monitor most likely means that you are low on physical memory because pages/sec shows how often it has to access the paging file.
To manually configure virtual memory, follow these steps:
Click Start, and then click Control Panel.
In the Control Panel, click the System and Maintenance category heading link.
Click System.
In the System Console, click Change Settings under Computer Name, Domain, and Workgroup Settings. Or, click Advanced System Settings in the left pane.
Click the Advanced tab in the System Properties dialog box.
Click Settings in the Performance section to display the Performance Options dialog box.
Click the Advanced tab, and then click Change to display the Virtual Memory dialog box.
Clear the Automatically Manage Paging File Size for All Drives check box.
Under Drive Volume Label, click the drive that contains the paging file you want to change.
Click Custom Size, enter a new size in megabytes in the Initial Size (MB) or Maximum Size (MB) box, click Set, and then click OK.
Increases in size usually do not require a restart, but if you decrease the size, you must restart your computer for the changes to take effect. We recommend that you don’t disable or delete the paging file.
Windows Vista has several features that affect how disks are used, including the following:
Windows ReadyBoost boosts system performance by using USB flash devices as additional sources for caching.
Windows ReadyDrive boosts system performance on mobile computers equipped with hybrid drives.
With Windows ReadyBoost, USB flash devices with sufficiently fast memory (flash devices can be read up to 10 times faster than physical disk drives) are used to extend the disk caching capabilities of the computer’s main memory. Using flash devices for caching enables Windows Vista to make random reads faster by caching data on the USB flash device rather than on a disk drive. Because this caching is applied to all disk content, not just the page file or system dynamic link libraries (DLLs), the computer’s overall performance is boosted.
USB flash devices that can be used with Windows ReadyBoost include USB 2.0 flash drives, Secure Digital (SD) cards, and CompactFlash cards. These devices must have sufficiently fast flash memory and be at least 256 MB or larger in size. Windows Vista can use an amount of flash memory equal to twice the amount of physical memory (RAM) on the computer.
When you insert a USB flash device into a USB 2.0 or later port, Windows Vista analyzes the speed of the flash memory on the device. When you click Speed Up My System Using Windows ReadyBoost, Windows Vista extends the computer’s physical memory to the device. The default configuration enables Windows ReadyBoost to reserve all available space on the device for boosting system speed.
To use Windows ReadyBoost with a USB flash device that you either already inserted or that you previously declined to use with Windows ReadyBoost, follow these steps:
Click Start, and then click Computer.
Right-click the USB flash device in the Devices with Removable Storage list, and then choose Properties.
On the ReadyBoost tab, select Use This Device, and then click OK.
For USB flash devices that do not support ReadyBoost, you cannot enable the device. The only option you’ll have is to stop retesting the device when you plug it in. The Stop Retesting This Device When I Plug It In option is selected by default.
If the USB flash drive has both slow and fast flash memory, you will not be able to use the slow flash memory portion of the USB storage device to speed up the computer performance. As a result, you might not see all the memory of the USB device when it is added to your physical memory.
Windows ReadyDrive improves performance on mobile computers equipped with hybrid drives. A hybrid drive is a drive that uses both flash RAM and a physical drive for storage. Because flash RAM is much faster than a physical disk, mobile computers running Windows Vista write data and changes to data to the flash memory first and periodically sync these writes and changes to the physical disk. This approach reduces the spinning of the physical drive and thus saves battery power.
The flash RAM on hybrid drives can be used to provide faster startup and resume from sleep or hibernation. In this case, the information needed for starting or resuming the operating system is written to the flash RAM prior to shutting down, entering sleep, or going into hibernation. When you start or wake the computer, this information is read from the flash RAM.
You do not need to enable ReadyDrive. ReadyDrive is enabled for use automatically on mobile computers with hybrid drives.
Windows Vista has multiple tools for diagnosing and resolving problems. To proactively and automatically identify potential problems, Windows Vista includes built-in diagnostics that can automatically detect and diagnose common support problems. The Windows Vista built-in diagnostics can automatically identify and help users resolve the following problems:
Hardware error conditions
Failing disks
Degraded performance
Failure to shut down properly
Memory problems
Problems related to installing drivers and applications
Problems related to using drivers and applications
In most cases, the built-in diagnostics prompt users to make them aware of any problems as they occur and then help to guide users through resolving the problem.
Bad memory can cause a wide assortment of problems with your system, including causing Windows not to be reliable. The Memory Diagnostic tool is used to diagnose physical memory problems, including memory leaks and failing memory. The tool also works with the Microsoft Online Crash Analysis tool to detect system crashes possibly caused by failing memory, which then prompts the user to schedule a memory test the next time the computer is restarted.
If you suspect that a computer has a memory problem that is not being automatically detected, you can run Windows Memory Diagnostic manually by completing the following steps:
Click Start, point to All Programs, and then click Accessories.
Right-click Command Prompt, and then select Run As Administrator.
At the command prompt, enter mdsched.exe.
You can choose to restart the computer and run the tool immediately or schedule the tool to run at the next restart.
The Windows Memory Diagnostic tool can also be run manually from Administrative Tools in the Control Panel or from the boot menu before Windows loads.
If you choose to run the tool at the next restart, Windows Memory Diagnostic runs automatically after the computer restart, allowing you to choose the type of testing to perform. When the computer restarts and the memory is tested, you are provided with an easy-to-understand report detailing the problem. Information is also written to the event log for future analysis.
While the test is running, you can press F1 to access advanced diagnostic options, including the following:
Test Mix. Choose what type of test you want to run.
Cache. Choose the cache setting you want for each test.
Pass Count. Type the number of times you want to repeat the tests.
Press the Tab key to move between the different advanced options. When you have selected your options, press F10 to start the test.
The Windows Network Diagnostic Tool, discussed in Chapter 4, “Configuring Advanced Networking,” helps resolve network-related issues. When a user is unable to connect to a network resource, the user is presented with a repair option, which will run the Windows Network Diagnostic Tool. You can also choose to run the tool manually by using the Diagnose option on the Local Area Connections Status property sheet.
System Configuration is an advanced tool that can help identify problems that might prevent Windows from starting correctly. You can start Windows with common services and startup programs turned off and then turn them back on, one at a time. If a problem does not occur when a service is turned off, but does occur when turned on, the service could be the cause of the problem. System Configuration is intended to find and isolate problems, but it is not meant as a startup management program.
The System Configuration tool can be loaded from the Administrative Tools. The tabs found in the System Configuration tool include those listed in Table 9.1.
Table 9.1. System Configuration Tabs
Tab | Description |
|---|---|
General | Lists choices for startup configuration modes:
|
Boot | Shows configuration options for the operating system and advanced debugging settings, including the following:
|
Services | Lists all services that are registered with Windows and displays their current status (running or stopped). You can use the Services tab to enable or disable individual services so that you can isolate a problematic service that loads during boot up. You can select Hide all Microsoft Services to show only third-party applications in the services list. |
Startup | Lists applications that start when the computer boots, including the name of their publisher, the path to the executable file, and the location of the registry key or shortcut that causes the application to run. This option is used to isolate problematic programs that load during boot. |
Tools | Provides a list of diagnostic tools. |
The Advanced Boot Options menu lets you start Windows in advanced troubleshooting modes. To access the advanced startup options, do the following:
If your computer has a single operating system installed, repeatedly press the F8 key as your computer restarts. You need to press F8 before the Windows logo appears. If the Windows logo appears, you will need to try again.
If your computer has more than one operating system, use the arrow keys to highlight the operating system you want to start in Safe mode, and then press F8.
On the Advanced Boot Options screen, use the arrow keys to highlight the Safe mode option you want, and then press Enter. Log on to your computer with a user account that has administrator rights. When your computer is in Safe mode, you’ll see the words Safe Mode in the corners of the display. To exit Safe mode, restart your computer and let Windows start normally.
Some options, such as Safe mode, start Windows in a limited state, where only the bare essentials are started. If a problem does not reappear when you start in Safe mode, you can eliminate the default settings and basic device drivers as possible causes. Other options start Windows with advanced features intended for use by system administrators and IT professionals.
The options that are available are as follows:
Repair Your Computer. Shows a list of system recovery tools (Startup Repair tool) you can use to repair startup problems, run diagnostics, or restore your system. This option is available only if you install the tools onto the computer. If they are not installed, the system recovery tools are located on the Windows installation disc.
Safe Mode. Starts Windows with a minimal set of drivers and services.
Safe Mode with Networking. Starts Windows in Safe mode but also enables networking.
Safe Mode with Command Prompt. Starts Windows in Safe mode with a command prompt window rather than the Windows GUI. This option is intended for IT professionals and administrators.
Enable Boot Logging. Lists all the drivers that are installed during startup in the ntbtlog.txt file. The ntbtlog.txt file can be used to determine which driver failed if Windows cannot start properly.
Enable Low-Resolution Video (640x480). Boots to the Windows GUI in minimal VGA mode using the standard VGA drivers (640x480 resolution and 16 colors).
Last Known Good Configuration (advanced). Starts Windows with the last registry and driver configuration that worked when the last user logged on successfully.
Directory Services Restore Mode. Starts Windows in Directory Services Restore mode so that you can restore or repair Active Directory.
Debugging Mode. Shows driver names as the drivers are loaded during the boot process.
Disable Automatic Restart on System Failure. Prevents Windows from automatically restarting if an error occurs during boot. Use this option if Windows constantly fails and reboots.
Disable Driver Signature Enforcement. Allows drivers containing improper signatures to be installed.
Start Windows Normally. Starts Windows in its normal mode.
In earlier versions of Windows, corrupted system files were one of the most common causes of startup failure. Some of these problems would be fixed by replacing the corrupted files, whereas others would be fixed using the Recovery Console. At other times, the system could be recovered only by attempting to repair the installation or reinstalling the operating system.
Windows Vista includes the Startup Repair tool (StR) to automatically fix many common problems, including incompatible drivers, missing or corrupted startup configuration settings, and corrupted startup files. Once started, StR performs diagnostics and attempts to determine the cause of the startup failure by analyzing startup logs and error reports. If the problem cannot be corrected, StR will restore the system to its last known good working state, and then provides diagnostic information and support options to make further troubleshooting easier for the user or administrator.
StR is included on the Windows Vista installation disc and can be preinstalled so that it shows on the Windows Advanced Startup Options menu. To launch the StR from the installation CD, follow these steps:
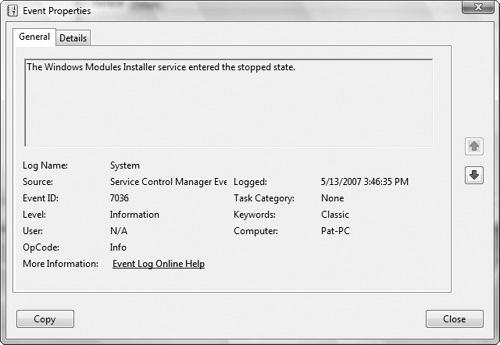
The Event Viewer is a useful tool for viewing and managing logs of system, program, and security events on your computer. Event Viewer gathers information about hardware and software problems and monitors Windows security events. The Event Viewer can be found in Administrative Tools, and it is contained within the Computer Management Console (see Figure 9.6).
The Problems Reports and Solutions tool works with the Windows Error Reporting services to provide a history of attempts to diagnose problems on your computer. It also prompts users if they want to send error information to Microsoft over the Internet. It can also check for solutions over the Internet. You can view a list of current problems at any time by following these steps:
If you install driver and you encounter problems with the driver, you can roll back the driver. To roll back a device driver, open the Device Manager from within the Control Panel. If you are prompted for an administrator password or confirmation, enter the password or provide confirmation. Double-click the category containing your device driver, and then double-click the name of the device you want to restore to a previous driver version. Click the Driver tab, and then click Roll Back Driver. If there’s no previous version of the driver software installed for the selected device, the Roll Back Driver button will be unavailable. If the machine does not boot, you can try loading Safe mode before accessing Device Manager.
System Restore helps you restore your computer’s system files to an earlier point in time. It’s a way to undo system changes to your computer without affecting your personal files, such as e-mail, documents, or photos. This comes in handy when you install a program or a drive that causes Windows to behave unpredictable. If uninstalling does not fix the problem, you can try restoring your computer’s system to an earlier date when everything worked correctly.
System Restore uses a feature called System Protection to regularly create and save restore points on your computer. These restore points contain information about registry settings and other system information that Windows uses. You can also create restore points manually.
System Restore is not intended for backing up personal files, so it cannot help you recover a personal file that has been deleted or damaged. You should regularly back up your personal files and important data using a backup program.
Restore points are created automatically every day, and just before significant system events, such as the installation of a program or device driver. You can also create a restore point manually.
System Restore automatically recommends the most recent restore point created before a significant change, such as installing a program. You can also choose from a list of restore points. Try using restore points created just before the date and time you started noticing problems.
To access the System Restore utility, follow these steps:
Starting with Windows XP, Microsoft introduced Remote Desktop and Remote Assistance. Similar to Terminal Services used in Windows 2000 servers, you can have access to a Windows session that is running on your computer when at another computer. This means, for example, that you can connect your work computer from home and have access to all of your applications, files, and network resources as though you are in front of your computer at work. You can leave programs running at work, and when you get home you can see your desktop at work displayed on your home computer, with the same programs running. Another example of using Remote Desktop and Remote Assistance is to remotely troubleshoot or administer a computer that is not nearby.
You would use Remote Desktop to access one computer from another remotely. With Remote Desktop Connection, you can access a computer running Windows from another computer running Windows that is connected to the same network or to the Internet. For example, you can use all of your work computer’s programs, files, and network resources from your home computer, and it’s just like you’re sitting in front of your computer at work.
Exam Alert
You cannot use Remote Desktop Connection to connect to computers running Windows Vista Starter, Windows Vista Home Basic, Windows Vista Home Basic N, or Windows Vista Home Premium. You can create outgoing connections only from those editions of Windows Vista. Windows Vista Business, Ultimate, and Enterprise editions offer full Remote Desktop Connection capability.
Note
You cannot use Remote Desktop Connection to connect to computers running Windows XP Home edition.
To connect to a remote computer, that computer must be turned on, it must have a network connection, Remote Desktop must be enabled, you must have network access to the remote computer (this could be through the Internet), and you must have permission to connect (a member of the Administrators group or the Remote Desktop Users group). For permission to connect, you must be on the list of users. The steps that follow include adding names to that list.
Exam Alert
To use Remote Desktop, the computer that you are trying to connect to must be on, Remote Desktop must be enabled, and you must have the proper permissions.
To allow remote connections on the computer you want to connect to, follow these steps:
Click the Start button. Right-click Computer, and select Properties.
Click Remote Settings, and then select one of the three options under Remote Desktop. If you are prompted for an administrator password or confirmation, enter the password or provide confirmation.
Click Select Users. If you are enabling Remote Desktop for your current user account, your name will automatically be added to this list of remote users, and you can skip the next two steps.
In the Remote Desktop Users dialog box, click Add. This will add users to the Remote Desktop Users group.
In the Select Users dialog box, do the following:
To specify the search location, click Locations, and then select the location you want to search.
In Enter the Object Names to Select, type the name of the user who you want to add, and then click OK.
The name will be displayed in the list of users in the Remote Desktop Users dialog box.
To start Remote Desktop on the computer you want to work from, follow these steps:
Open Remote Desktop Connection by clicking the Start button, selecting Accessories, and selecting Remote Desktop Connection.
In the Computer box, enter the name of the computer that you want to connect to, and then click Connect. (You can also type the IP address rather than the computer name if you want.)
For more advanced options before the connection, click the Options button.
Remote Assistance is used to give or receive assistance remotely. For example, a friend or a technical support person can access your computer to help you with a computer problem or show you how to do something. You can help someone else the same way. In either case, both you and the other person see the same computer screen. If you decide to share control of your computer with your helper, you will both be able to control the mouse cursor.
To use Remote Assistance, first you invite a person to help you, using e-mail or an instant message. You can also reuse an invitation that you have sent before. After the person accepts the invitation, Windows Remote Assistance creates an encrypted connection between the two computers over the Internet or the network that both computers are connected to. You give the other person a password so that he or she can connect. You can also offer assistance to someone else, and when that person accepts your offer, Windows Remote Assistance creates an encrypted connection between the two computers. To start a Remote Assistance session and to create invitations, click All Programs, Maintenance, and then click Windows Remote Assistance.
Answer B is correct. Windows ReadyBoost boosts system performance by using USB flash devices as additional sources for caching. Answer A is incorrect because SuperFetch utilizes machine-learning techniques to analyze usage patterns to allow Windows Vista to make intelligent decisions about what content should be present in system memory at any given time. Answer C is incorrect because ReadyDrive boosts system performance on mobile computers equipped with hybrid drives. Answer D is incorrect because the Memory Diagnostic tool is used to test memory and not to increase performance. | |
Answer D is correct. If you open System Configuration, select the Boot tab, and you select OS Boot Information, it will show you the driver names that are loaded during startup. Answers A, B, and C are incorrect because those options do not provide that information. Base Video starts the monitor with a 640x480 resolution. The Boot Log generates a log that can be accessed after it boots. The No GUI Boot check box starts in with a command prompt. | |
Answer C is correct. To get the benefit of ReadyBoost, your USB device needs to use fast flash memory. Therefore, if you insert a USB flash device that consists of slow and fast flash memory, ReadyBoost will only use the fast flash memory. Therefore, answers A and B are incorrect. Because ReadyBoost recognizes some of the memory, you can assume that the USB flash device meets the minimum requirements. Therefore, answer D is incorrect. | |
Answer C is correct. For standard users to run the Performance Monitor, you must add them to the Performance Monitor Users group or make them administrators. Because there is no need to make them administrators, it is best to only add them to the Performance Monitor Users group. Therefore, answer D is incorrect. Answer A is incorrect because Power Users groups are only there for backward compatibility. Answer B is incorrect because there is no such group. | |
Answer B is correct. To see how much paging takes place between RAM and the paging file, you use the pagessec counter. A high value indicates that you need to use paging often, which means you are running out of physical memory. Answer A is incorrect because CPU utilization shows how hard the processor is working. Answer C is incorrect because network utilization indicates how much bandwidth is being used on the network. Answer D is incorrect because a high value for interruptssec might indicate a faulty device or device driver. | |
Answer B is correct. The two places to look for a history of problems are the Event Viewer and the Reliability Monitor. Answer A is incorrect because Performance Monitor is used to measure performance. Answer C is incorrect because the Data Collector Set is used to group counters together so that you can call them up as needed or schedule them to be measured. Answer D is incorrect because the Resource Overview tool shows the performance of the major subcomponents, including CPU, memory, network, and disk. | |
Answer B is correct. Because you cannot start the computer, there might be a problem with the startup files. Therefore, you need to run the Startup Repair tool. Answer A is incorrect because you don’t want to go back to an old operating system. Answers C and D are incorrect because you cannot start Windows to get to the Software Explorer or msconfig.exe (System Configuration tool). | |
Answer D is correct. If you load a driver and your machine does not boot properly, you can access the Advanced Boot menu and try Last Known Good Configuration. Answer A is incorrect because you cannot access SYSEDIT because you cannot get the Windows GUI to load. Answer B is incorrect because reinstalling Windows takes a lot of effort and may not correct the problem. Answer C is incorrect because there is no emergency repair disk to use with Windows Vista; everything is included with the Windows Vista installation disc. | |
Answer C is correct. If you cannot boot the computer, the next logical step is to boot Windows in Safe mode. In Safe mode, minimum drivers are loaded. Answer A is not a viable option because most systems do not have another hard drive with another Windows version. This solution can also become very messy. Answer B is incorrect because you cannot use DOS to correct most Windows problems. Answer D is incorrect because you need to first load Windows before you can use the System Configuration tool. | |
Answer B is correct. The System Configuration tool is a diagnostic tool that can help you isolate startup programs and services that prevent Windows from booting. Answer A is incorrect because Device Manager manages devices, not services. Answer C is incorrect because the boot.ini file (used in Windows 2000 and Windows XP) is used to select certain drive parameters and to provide a boot menu so that you can choose which operating system to boot on a multiboot system. Answer D is used to revert back when you load a driver, service, or program that prevents Windows from loading. It does not disable a service. | |
Answer D is correct. System Restore can reconfigure Windows back to its original settings before the problem occurred. Answer A is incorrect because this is not a device problem. Answer B is incorrect because you can load Windows, so you don’t need to use Safe mode. Answer C is incorrect because if you log on to Windows successfully, it will overwrite the last known good configuration. | |
Answer C is correct. Windows Vista Ultimate does support Remote Desktop. You cannot connect to computers with Remote Desktop that have Windows Vista Home Basic, Windows Vista Home Premium, or Windows Vista Starter. Therefore, answers A, B, and D are incorrect. | |
Answers A and D are correct. All administrators are automatically given the necessary permission to use Windows Remote Desktop. For other users, you must add them to the Remote Desktop Users group. Answer B is incorrect because the Power Users group is mostly used for backward compatibility. Answer C is incorrect because there is no Remote Desktop Administrators group. |
Mitch Tulloch, Tony Northrup, Jerry Honeycutt, Ed Wilson, Ralph Ramos, and the Windows Vista Team, Windows Vista Resource Kit (Pro - Resource Kit) (Redmond, Washington: Microsoft Press, 2007).
William R. Stanek, Introducing Microsoft Windows Vista (Redmond, Washington: Microsoft Press, 2006).
Patrick Regan, Working with Windows 2000 and 2003 (Upper Saddle River, New Jersey: Prentice Hall, 2004).
Patrick Regan, Troubleshooting the PC with A+ Preparation, 3rd Edition (Upper Saddle River, New Jersey: Prentice Hall, 2006).