
Chapter 5: Git Workflows
So far, we’ve covered the basics of Git and how to use them as part of a team. But teams differ in the way they utilize Git in their projects. A Git workflow is a set of guidelines that a team should follow to manage a project.
In this chapter, we’ll explore the most commonly used Git workflows. A workflow generally provides guidelines on the following items:
- the architecture of the project
- how contributions are made to the project
- how the work of others is merged into the project
Git’s flexibility allows you to set up diverse guidelines for your project. This can potentially lead to a large number of workflows. How do you ensure that team members follow these guidelines? It may be a good idea to follow a specific, well-defined workflow.
As workflows are described in this chapter, remember that they represent broad guidelines for using Git in your project, and that developers often make minor changes to these guidelines for their convenience. When you’re assessing a workflow, make sure you ask the following questions:
- How difficult is it for a new team member to get started?
- How much effort goes into reverting the status of the repository after an unwanted change?
- Does the workflow scale up well to your team size growth projections?
As each workflow is described, the discussion will be structured around these items.
The Centralized Workflow

Features
While Git is a distributed version control system, it’s still possible to implement a centralized workflow, inspired by centralized version control systems like Subversion. A centralized workflow is the simplest of Git workflows, in which just a single branch (typically the master branch) is used for all operations. It’s called a “centralized” workflow because a single copy of the repository is treated as the main copy, into which every developer syncs their changes. The centralized workflow is also called the “trunk” workflow, as subversion’s master branch is called trunk. For this workflow to work seamlessly, you need to give every team member access to your master branch. The central repository can be on a local server at a location every developer can access, or it can be hosted on a central platform like GitHub or Bitbucket.
New Team Member Orientation
If you’re a new team member, you start by cloning the central repository. All you need to do is make changes to your master branch and push it to the central repository. If someone has updated the master since you last updated your local branch, you’re prompted to merge the changes first and then push them.
Pros and Cons
The biggest advantage of this workflow is its simplicity. The centralized workflow doesn’t use the branching feature of Git. Beginners often find the branching feature of Git to be the most difficult to understand, so the simplicity of this workflow works best for beginners. Developers who are familiar with Subversion and new to Git also find this workflow very intuitive. It’s also ideal for smaller teams that require minimal code review before a merge. If you’re managing a personal project, the centralized workflow is an intuitive choice as well.
On the other hand, the centralized workflow gets tedious with an increase in team size. Managing changes in code is a challenge if you have multiple people working on the same branch at the same time.
Finally, giving all team members access to the master branch may not be a good idea in a large team. A single error, if introduced in the codebase, can corrupt the whole repository. No one can really make changes to the codebase until it’s fixed. Therefore, a more robust workflow is needed as your team grows in size.
Who Should Use the Centralized Workflow
The simplicity of the centralized workflow makes it perfect for two types of users. If you’re new to Git and your team is exploring the use of version control in your projects, you should start with the centralized workflow. Secondly, if you use Git to manage a personal project, the centralized workflow is ideal. For instance, if you’re a student who manages academic assignments, or an author managing your texts, the centralized workflow fits into your needs perfectly.
The Feature-branch Workflow
Features
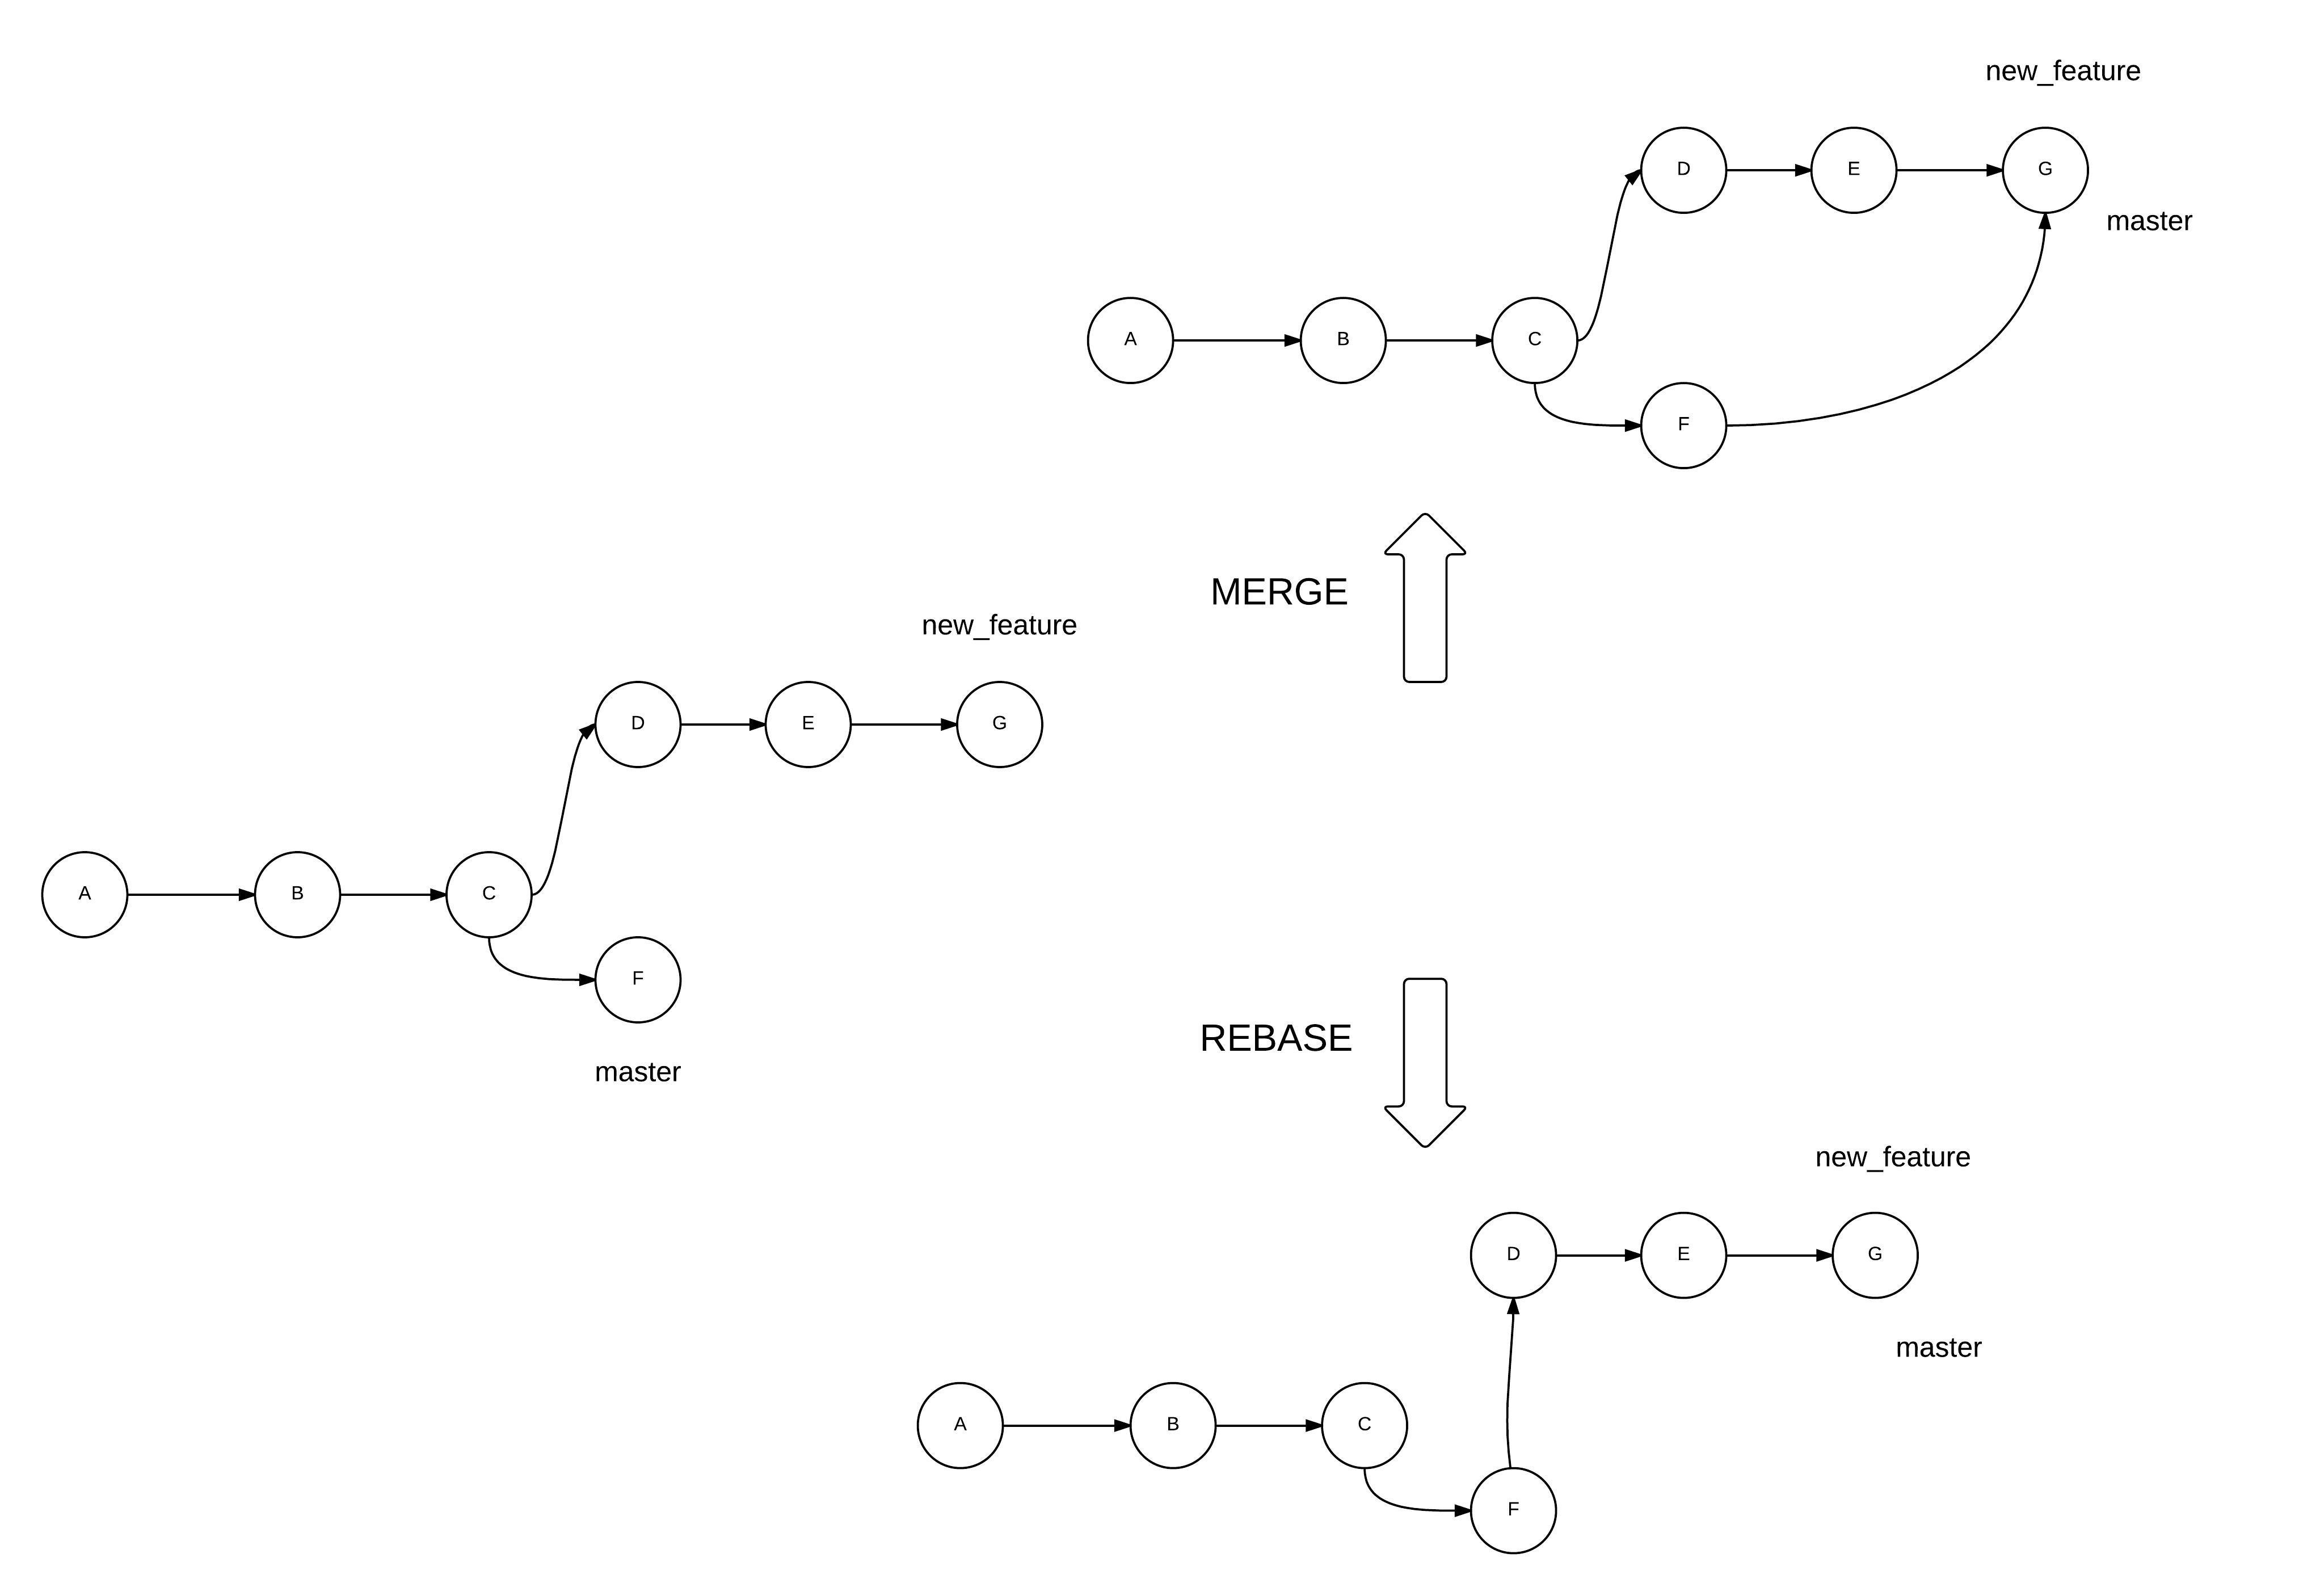
Because the centralized workflow doesn’t utilize the branching features of Git, the next logical step up from that is to introduce branches for specific changes in your codebase. This results in what’s known as the “feature-branch” workflow. The feature-branch workflow follows the concept of feature development in separate branches, without affecting the master branch. You can either merge or rebase the feature branch into the master, as shown above (we'll cover rebase in detail later in the section "Rebase" in Chapter 7).
New Team Member Orientation
You must maintain a repository at a central location in the feature-branch workflow, with read access to the master branch to all developers. A new developer must first clone the master branch and create a new local branch for every feature they start. While the definition of a feature differs from project to project, it’s a good idea to logically separate each “feature” before starting development on it. When a feature is ready, a developer should request the core developers to pull changes from this feature branch to the master of the core. This initiates the code review, which concludes with the merge of the feature into the master.
The separation of feature development from the codebase allows for a detailed code review process before merging into the main codebase. This allows the core developers to comment on proposed changes in a review and to request further action before merging them into the main codebase. Code reviews are interactive and easy if you’re using a cloud-based solution to host your central repository, allowing feature-rich discussions before merging the code into the main repository.
Pros and Cons
Interestingly, a consequence of this workflow is that a developer must never directly commit to the local master branch. When their feature is accepted into the core repository, they should pull changes from the core master to the local master to keep it up to date.
The departure from the centralized workflow makes it easy for developers to work on multiple features, while keeping the core codebase operational. At the same time, any critical bug fixes are directly committed to the master branch, and pulled into the feature branches being worked on.
As the core developers have a final say before a merge into the main codebase, you can selectively give write access to your master branch, thus making the process secure. An open-source project must follow at least a feature-branch workflow to ensure code reviews happen before code merges from contributors. Finally, this workflow gives you more control over your code, and therefore solves the issues of scaling up.
Who Should Use the Feature-branch Workflow
The feature-branch workflow provides a key benefit over centralized workflows: the ability to logically manage multiple changes and multiple contributors. If you initially followed the centralized workflow because your team was small, you may need to switch to the feature-branch workflow as your team grows. The target of every team project following the centralized workflow should be to eventually migrate to the feature-branch workflow.
Gitflow Workflow
Features
While the feature-branch workflow works well for any project, adding specific roles for different types of branches can further tighten up your development cycle. The Gitflow workflow was initially tested and popularized by Vincent Driessen at nvie.com. The core Git concepts involved in the Gitflow workflow remain the same as the feature-branch workflow.

As mentioned, the Gitflow workflow works as an extension of the feature-branch workflow. A primary issue with the feature-branch workflow is the loose definition of the term “feature”: it could potentially be interpreted differently depending on the developer, culture, or project. Further, there was no well-defined provision for other tasks such as regular maintenance and bug fixes. The Gitflow workflow essentially solves this by defining many types of branches and their functions.
There are two core branches in the Gitflow workflow—the master and develop branches. The develop branch serves as the latest development version of the software, while the master branch contains only the last stable release.
If you want to work on a new feature, you create a feature branch from the develop branch. Once you’ve finished working on your feature, you request a merge to the develop branch. As a developer, you’re essentially never directly involved with the master branch, treating the develop branch as a pseudo master.
In addition to a feature branch, the Gitflow workflow also defines a release branch. All the planned changes, based on your roadmap for what should feature in the next release cycle, go into the release branch. A release branch is created from the develop branch. When all the changes for a release are done, it’s merged with the master with a relevant tag attached to it. Only the core developers get to work on the release branch by choosing which merges should go into it.
Finally, the next type of branch in the Gitflow workflow is the hotfix branch. Any critical bug that’s identified needs to be fixed immediately, so a hotfix branch is created from the master branch to solve the bug. Once it’s solved, the hotfix branch is merged with the master and develop branches to ensure the changes are reflected in both of these.
New Team Member Orientation
Because of the concepts involved, the Gitflow workflow is certainly more complex than the feature-branch workflow. Even so, getting started is arguably not very difficult. A developer working on just a single feature only needs to be concerned with the develop branch and a corresponding feature branch. Once the developer’s role in the project grows, they may be introduced to new tasks and given further responsibilities.
Pros and Cons
The Gitflow workflow shares the same advantages as the feature-branch workflow, with the added clarity of handling various scenarios in the software development cycle. Even if you’re encouraged to adopt this workflow from the start, you may consider moving to it from the feature-branch workflow once your project has matured a bit.
Who Should Use the Gitflow Workflow
The Gitflow workflow allows a team to manage a number of scenarios effectively. As the Gitflow workflow is an extension of the feature-branch workflow, the transition is easy to handle. Imagine that you have a project with a good mix of new and experienced developers. The end product also has a significant number of users, who may be using multiple versions of it. Such a project demands the use of the Gitflow workflow to effectively handle any situation that may come up. Popular open-source projects often use the Gitflow workflow.
Forking Workflow
Features
The forking workflow is an implementation of the feature-branch workflow—in the cloud. It introduces an extra layer between the central repository of the organization and the local repository of a developer—known as a “fork”.
A fork is a developer’s personal copy of the central repository within the cloud. When you use a cloud-based Git solution, a developer clones their own fork from the cloud. Any changes they make on the local repository are pushed to this fork. To merge the code into the main repository, the developer creates a pull request from the fork to the main repository. This pull request initiates a code review, which the administrators of the repository assess before merging into the main repository.

New Team Member Orientation
A new member first creates a fork of the main repository on the cloud, and then clones this fork to a local machine. Changes are made to a new feature branch and pushed to the developer’s fork on the cloud. Next, the developer creates a pull request from a feature branch of the fork to a corresponding branch in the main repository. This initiates a review and conversation with the core developers to get the changes merged into the codebase.
The origin remote of the local repository typically points to the fork, and the upstream remote points to the central repository.
Pros and Cons
Code management and review through pull requests is much easier when it’s done on the cloud with the help of the web GUI of cloud hosts. Multiple developers can also get involved in the review process through a pull request.
At the same time, it may be overwhelming for a new member to work around Git’s features and related cloud concepts towards the beginning of their project tenure.
Who Should Use the Forking Workflow
Anyone using the cloud for their Git repositories should implement the forking workflow! This workflow serves as an additional layer to any other workflow. Thus, it allows you to incorporate features of other workflows without any issues.
If your project is open source, you shouldn’t have any issue with hosting the code on the cloud. However, if you don’t want the code of your project to be publicly available, you can use private repositories on the cloud. Further, if your code is highly sensitive and you can’t afford to have it on a public cloud, you can try the enterprise solutions of GitHub or Bitbucket, which allow you to host your code on your own servers.
Conclusion
Now that we’ve discussed various workflows, you may wonder which is right for you. As mentioned earlier, a workflow is supposed to serve as a set of guidelines that you follow when managing your code with Git. Therefore, you don’t really need to be tied to a specific workflow to use Git. For instance, you may follow the Gitflow workflow but never use a release branch.
What Have You Learned?
In this chapter, we covered:
- what workflows are
- the centralized workflow
- the feature-branch workflow
- the Gitflow workflow
- the forking workflow
What’s Next?
In the next chapter, we’ll explore common mistakes in Git. First, we’ll focus on amending errors while working with Git. Then we’ll move on to debugging in Git with two useful commands—blame and bisect.