Chapter 3: Branching in Git
In Chapter 1, I talked about my one-time fear of trying out new things in a project. What if I tried something ambitious and it broke everything that was working earlier? This problem is solved by the use of branches in Git.
What Are Branches?
Creating a new branch in a project essentially means creating a new copy of that project. You can experiment with this copy without affecting the original. So if the experiment fails, you can just abandon it and return to the original—the master branch.
But if the experiment is successful, Git makes it easy to incorporate the experimental elements into the master. And if, at a later stage, you change your mind, you can easily revert back to the state of the project before this merge.
So a branch in Git is an independent path of development. You can create new commits in a branch while not affecting other branches. This ease of working with branches is one of the best features of Git. (Although other version control options like CVS had this branching option, the experience of merging branches on CVS was a very tedious one. If you’ve had experience with branches in other version control systems, be assured that working with branches in Git is quite different.)
In Git, you find yourself in the master branch by default. The name “master” doesn’t imply that it’s superior in any way. It’s just the convention to call it that.
Branch Conventions
Although you’re free to use a different branch as your base branch in Git, people usually expect to find the latest, up-to-date code of a particular project in the master branch.
You might argue that, with the ability to go back to any commit, there’s no need for branches. However, imagine a situation where you need to show your work to your superior, while also working on a new, cool feature that’s not a part of your completed work. As branching is used to separate different ideas, it makes the code in your repository easy to understand. Further, branching enables you to keep only the important commits in the master branch or the main branch.
Yet another use of branches is that they give you the ability to work on multiple things at the same time, without them interfering with each other. Let’s say you submit feature 1 for review, but your supervisor needs some time before reviewing it. Meanwhile, you need to work on feature 2. In this scenario, branches come into play. If you work on your new idea on a separate branch, you can always switch back to your earlier branch to return the repository to its previous state, which doesn’t contain any code related to your idea.
Further, imagine your team suddenly discovers a bug in your project and you urgently need to fix it. A new branch would have to be created for this fix and merged with all existing branches once it’s fixed. You’ll learn more about branch naming conventions in Chapter 5, “Git Workflows”.
Let’s now start working with branches in Git. To see the list of branches and the current branch you’re working on, run the following command:
git branch
Cloning is the process of creating a local copy of a repository from a different source. If you’ve cloned your repository or set a remote, you can see the remote branches too. Just postfix -a to the command above:
$ git branch
* master
$ git branch -a
* master
  remotes/origin/HEAD -> origin/master
  remotes/origin/another_feature
  remotes/origin/master
  remotes/origin/new_feature
As shown above, the branches that start with “remotes” signify that they’re on a remote. In our case, we can see the various branches that are present in the origin remote.
Create a Branch
There are various ways of creating a branch in Git. To create a new branch and stay in your current branch, run the following:
git branch test_branch
Here, test_branch is the name of the created branch. However, on running git branch, it seems that the active branch is still the master branch. To change the active branch, we can run the checkout command:
$ git checkout test_branch
$ git branch
git branch
  master
* test_branch
What Does checkout Do?
checkout is used for multiple purposes in Git. You’ll come across many such examples over the course of this book. In this example, checkout enables you to change the current branch of the repository, essentially “checking out” to a new branch.
You can also combine the two commands above and thereby create and checkout to a new branch in a single command by postfixing -b to the checkout command:
$ git checkout -b new_test_branch
Switched to a new branch 'new_test_branch'
$ git branch
  master
* new_test_branch
  test_branch
The branches we’ve just created are based on the latest commit of the current active branch—which in our case is master. If you notice an unwanted change or error in the latest commit and would like to explore an earlier version of the repository, you can create a branch from an older commit. To create a branch (say old_commit_branch) based on an older commit—such as cafb55d—you can run the following command:
$ git checkout -b old_commit_branch cafb55d
Switched to a new branch 'old_commit_branch'
$ git log --oneline
cafb55d (HEAD -> old_commit_branch) Merge commit '5ef655a4caf8'
cc48fb3 Added lines 1 and 3 using add -p
5ef655a Fixed conflict from another_feature branch
96f7c5e Another change in the master branch
7534bc2 Some change in the master branch
49ed357 Added another feature
7e0eea2 (origin/new_feature) Removed line
f87d1a5 Dummy change
f934591 - Changed two files - This looks like a cooler interface to write commit messages
8dd76fc My first commit
The --oneline option shows a compact form of the Git history, with one line for each commit.
To rename the current branch to renamed_branch, run the following command:
git branch -m renamed_branch
Delete a Branch
To delete a branch, run the following command:
git branch -D new_test_branch
Don’t Delete Branches Unless You Have To
As there’s not really any downside to keeping branches, as a precaution I’d suggest not deleting them unless the number of branches in the repository becomes too large to be manageable.
The -D option used above deletes a branch even if it hasn’t been synchronized with a remote branch. This means that, if you have commits in your current branch that haven’t been pushed yet, -D will still delete your branch without providing any warning. To ensure you don’t lose data, you can postfix -d as an alternative to -D. -d only deletes a branch if it’s been synchronized with a remote branch. Since our branches haven’t been synced yet, this is what happens if we postfix -d:
$ git branch -d new_test_branch
The branch 'new_test_branch' is not fully merged. If you are sure you want to delete it, run 'git branch -D test_branch'.
As you can see, Git gives you a warning and aborts the operation, as the data hasn’t been merged with a branch yet.
Branches and HEAD
Now that we’ve had a chance to experiment with the basics of branching, let’s spend a little time discussing how branches work in Git, and also introduce an important concept: HEAD.
As mentioned above, a branch is just a link between different commits, or a pathway through the commits. The HEAD of a branch points to the latest commit in the branch. In other words, it refers to the tip of a branch. We’ll refer to HEAD a lot in upcoming chapters.
A branch is essentially a pointer to a commit, which has a parent commit, a grandparent commit, and so on. This chain of commits forms the pathway I mentioned above. How, then, do you link a branch and HEAD? Well, HEAD and the tip of the current branch point to the same commit. The following diagram illustrates this idea.

As shown in Figure 3-1, BRANCH_ONE initially is the active branch and HEAD points to commit C. Commit A is the base commit and doesn’t have any parent commit, so the commits in BRANCH_ONE in reverse chronological order (which also forms the pathway I’ve talked about) are C → B → A. The commits in BRANCH_TWO are E → D → B → A. The HEAD points to the latest commit of the active BRANCH_ONE, which is commit C. When we add a commit, it’s added to the active branch. After the commit, BRANCH_ONE points to F, and the branch follows F → C → B → A, whereas BRANCH_TWO remains the same. HEAD now points to commit F. Similarly, the changes when we add yet another commit are demonstrated in the figure.
Advanced Branching: Merging Branches
As mentioned earlier, one of Git’s biggest advantages is that, compared to Subversion, merging branches is especially easy. For instance, it’s difficult to store linkages between branches and the master branch (called trunk) in Subversion. Working on a branch for a long time makes it really difficult to go back and merge with the trunk, as it requires the developer to figure out where to merge. All of these issues are fixed in Git.
Let’s now look at how branching works in Git.
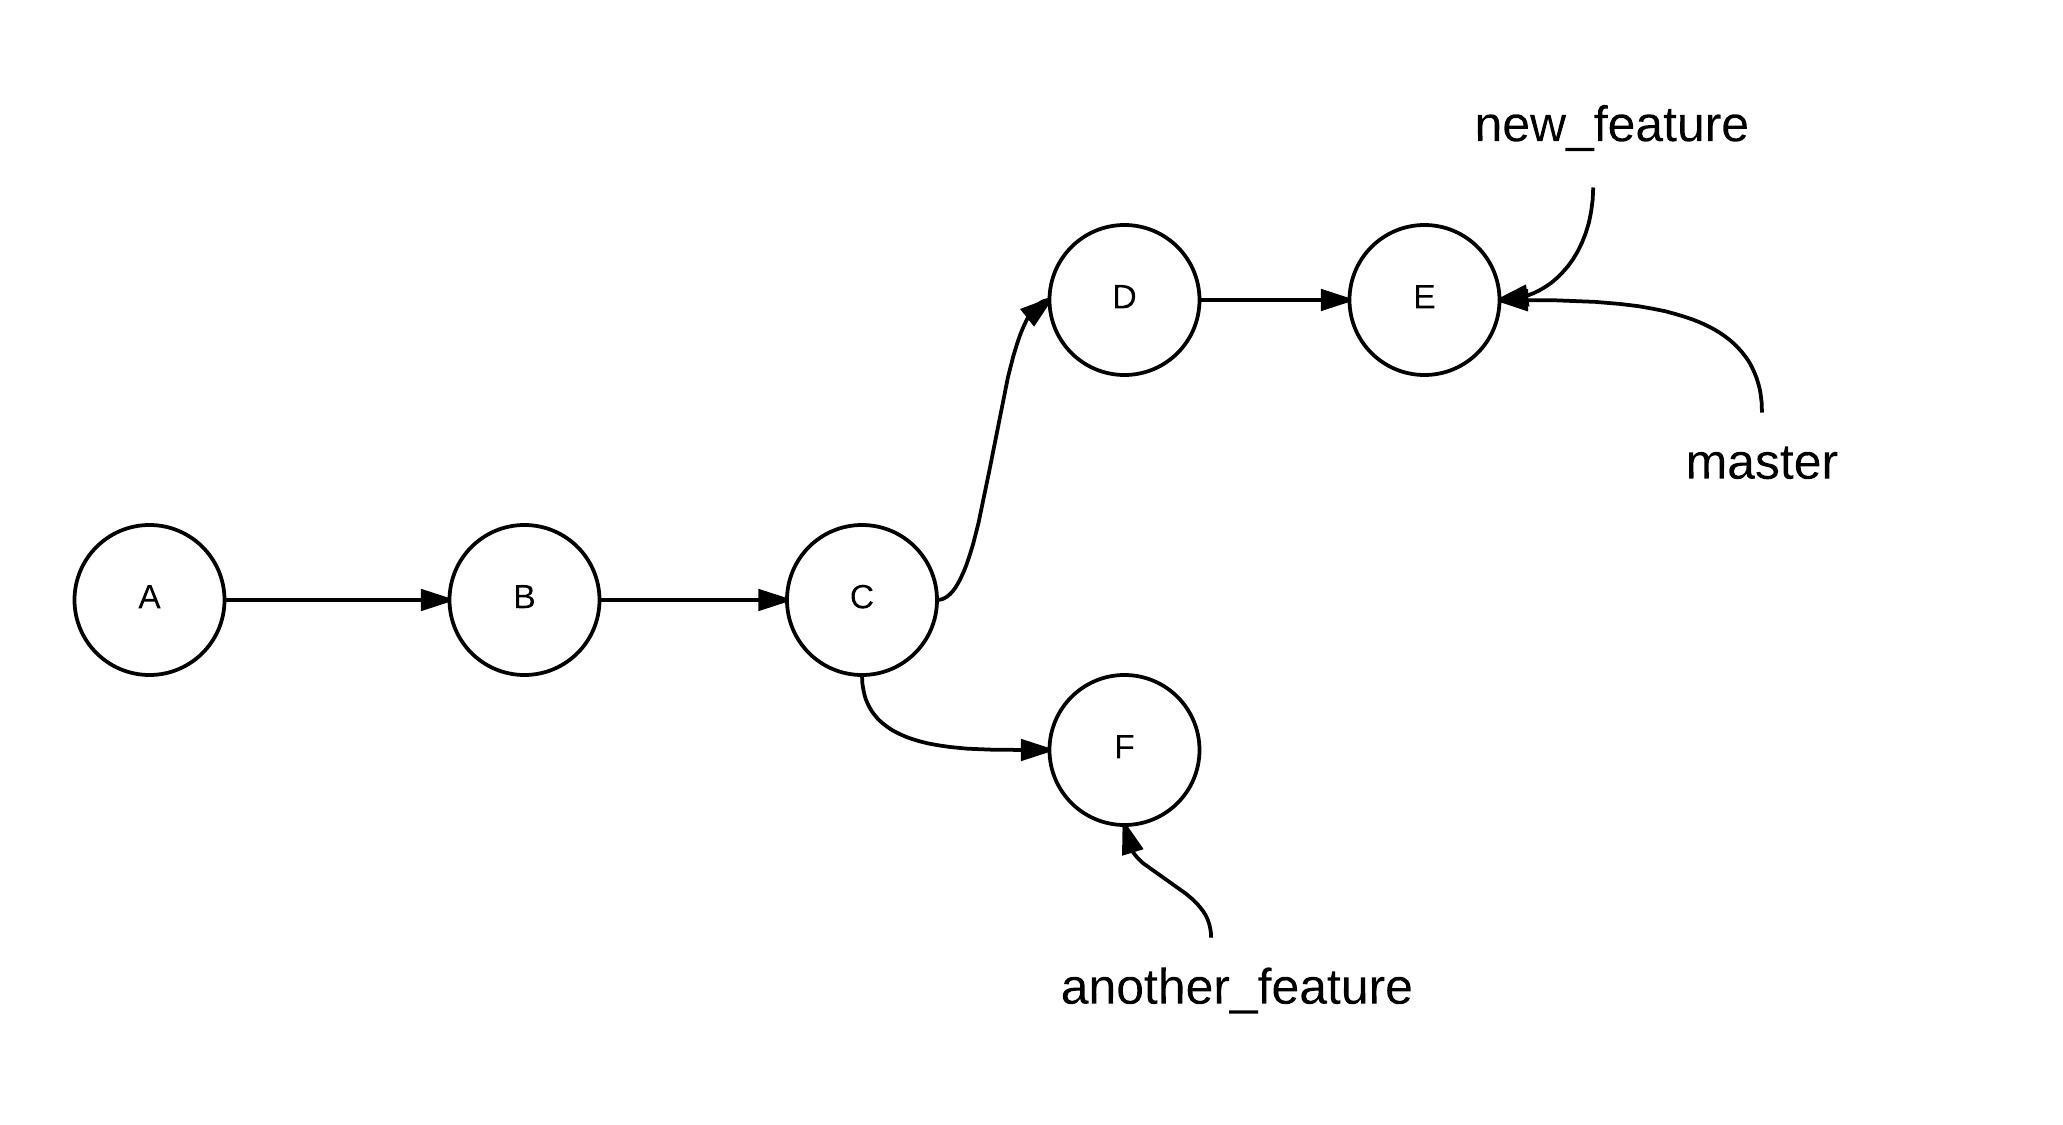
We’ll create two new branches—new_feature and another_feature—and add a few dummy commits. Checking the history in each branch shows us that the branch another_feature is ahead by one commit, as shown below:
$ git checkout another_feature
Switched to a new branch 'another_feature'
$ git log --oneline
49ed357 Added another feature
7e0eea2 Removed line
f87d1a5 Dummy change
f934591 - Changed two files - This looks like a cooler interface to write commit messages
8dd76fc My first commit
$ git checkout new_feature
Switched to a new branch 'new_feature'
$ git log --oneline
7e0eea2 Removed line
f87d1a5 Dummy change
f934591 - Changed two files - This looks like a cooler interface to write commit messages
8dd76fc My first commit
This situation is illustrated in Figure 3-2. Each circle represents a commit, and the branch name points to its HEAD (the tip of the branch).

To merge new_feature with master, run the following (after first making sure the master branch is active):
git checkout master
git merge new_feature
The result is illustrated in Figure 3-3.
To merge another_feature with new_feature, just run the following (making sure that the branch new_feature is active):
git checkout new_feature
git merge another_feature
The result is illustrated in Figure 3-4.
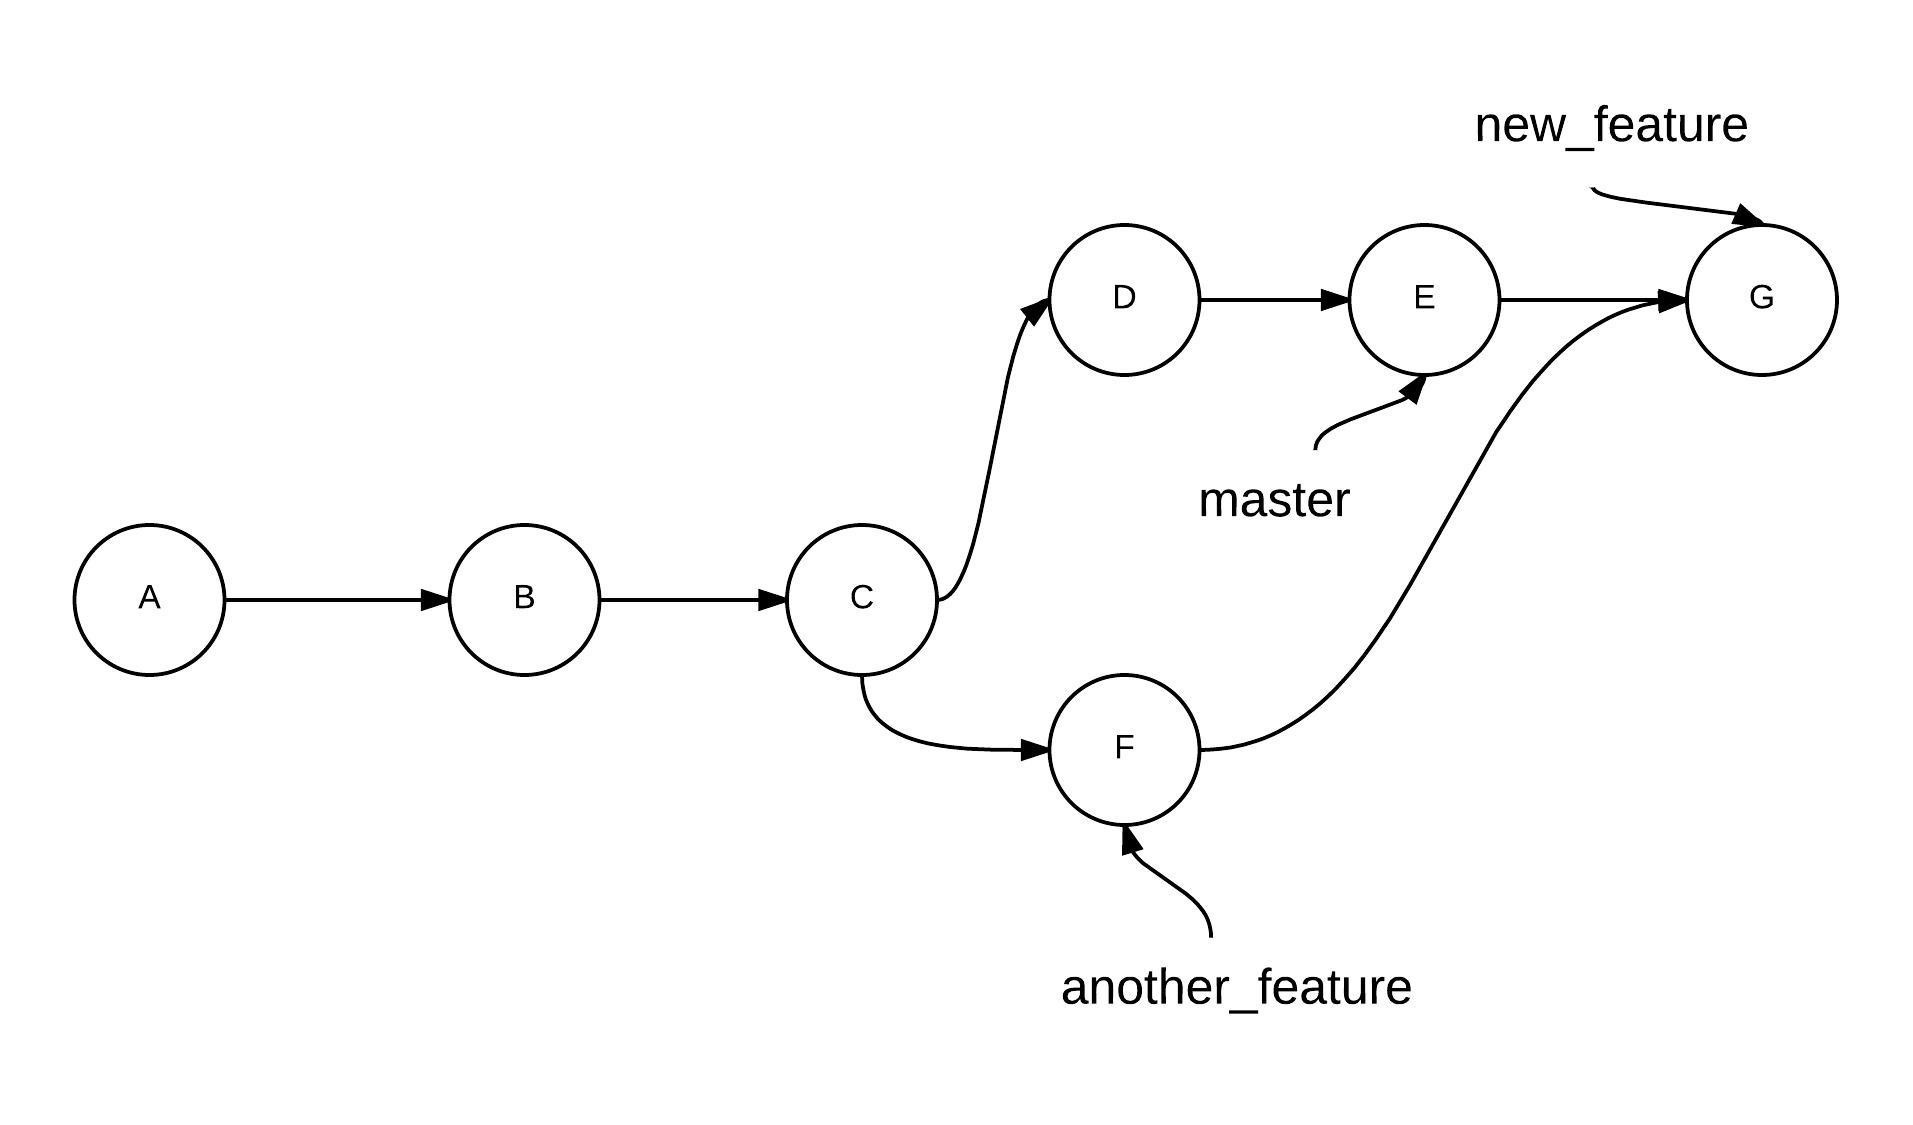
Watch Out for Loops
The diagram above shows that this merge has created a loop in your project history across the two commits, where the workflows diverged and converged, respectively. While working individually or in small teams, such loops might not be an issue. However, in a larger team—where there might have been a lot of commits since the time you diverged from the main branch—such large loops make it difficult to navigate the history and understand the changes. We’ll explore a way of merging branches without creating loops using the rebase command in Chapter 7, “Unlocking Git’s Full Potential”.
This merge happened without any “conflicts”. The simple reason for that is that no new commits had been added to branch new_feature as compared to the branch another_feature. Conflicts in Git happen when the same file has been modified in non-common commits in both branches. Git raises a conflict to make sure you don’t lose any data.
We’ll discuss conflicts in detail in the next chapter. I mentioned earlier that branches can be visualized by just a simple pathway through commits. When we merge branches and there are no conflicts, such as above, only the branch pathway is changed and the HEAD of the branch is updated. This is called the fast-forward type of merge.
The alternate way of merging branches is the no-fast-forward merge, by postfixing --no-ff to the merge command. In this way, a new commit is created on the base branch with the changes from the other branch. You’re also asked to specify a commit message:
git checkout master
git merge --no-ff new_feature
In the example above, the former (merging new_feature with master) was a fast-forward merge, whereas the latter was a no fast-forward merge with a merge commit.
While the fast-forward style of merges is default, it’s generally a good idea to go for the no-fast-forward method for merges into the master branch. In the long run, a new commit that identifies a new feature merge might be beneficial, as it logically separates the part of the code that’s responsible for the new feature into a commit.
Conclusion
What Have You Learned?
In this chapter, we discussed the following characteristics about branches in Git:
- what branches are in Git
- how to create new branches from existing branches
- the process of merging branches, and how Git’s history is affected
What’s Next?
I’ve already spoken about how Git is beneficial to developers working in teams. The next chapter will look at this in more detail, as well as specific Git actions and commands that are frequently used while working in a distributed team.
So far, we’ve looked at managing source code by starting a Git project, working with branches, and pushing code to a remote repository. In the following chapter, we’ll focus on the features of Git that help you contribute in a team.
We’ve seen how useful Git’s version control tools can be for a sole coder. Git’s power is even more evident when it comes to managing a project with many contributors. It enables members of a team to work independently on a project and stay in sync—even when they’re located far apart from each other.