Chapter 4: Using Git in a Team
Earlier, we performed a push operation to GitHub, sending a copy of our local repository to the cloud. This is the process you follow when the repository has been created on your local system.
However, if you’re working on a team, it’s possible that some work has already been done on the repository when you join. In this scenario, you need to grab a copy of the code from a central repository and work on it. The process of grabbing this repository is called “cloning”. Cloning is the process of creating a copy of a remote repository. The copy (or clone) that you create has its own project history, and any work done on it is independent of the development on the remote.
The Source Is the origin
If you clone a repository, the source you clone it from is designated as the origin remote by default.
Think of cloning as creating photocopies of a document. If you overwrite something in the photocopy, the original document remains untouched. Similarly, if you change the original document after making the photocopy, the photocopy retains the contents of the original document. Until you merge the clone with the original remote, they are separate entities.
To clone a remote repository, you need to know its location. This location usually takes the form of a URL. In GitHub, you can find the URL of a project on the bottom-right corner of the home page of that project. Let’s look at an example of a repository on my own GitHub account, as shown in Figure 4-1.

To clone this project, we need to run the following command:
git clone https://github.com/sdaityari/my_git_project.git
When the repository is successfully cloned, a local directory is created with the same name as the project name (in our case, my_git_project), and all the files under the repository are present in that directory. It’s not necessary to keep the directory name; you can change it any time. If you want to change the root directory name of the repository while cloning it—let’s say to my_project—you’ll need to provide the name to the clone command:
git clone https://github.com/sdaityari/my_git_project.git my_project
You may also rename the directory after you’ve cloned the repository.
If you wish, you can verify that the origin remote points to the URL you just cloned:
$ git remote -v
origin    https://github.com/sdaityari/my_git_project.git (fetch)
origin    https://github.com/sdaityari/my_git_project.git (push)
The -v option is short for --verbose, and tells Git to display the URLs of the remotes next to the names.
Optional: Different Protocols While Cloning
In the command we used to clone the repository, you may have noticed that the URL starts with https. However, a situation may arise where this protocol won’t be useful. Perhaps your organization doesn’t use cloud services to host its projects, or a certain protocol may be restricted by the firewall.
In these situations, it makes sense to know about Git’s other protocols. The available options for any Git remote are as follows:
- local protocol
- Git protocol
- HTTP/HTTPS protocol
- SSH protocol
The local protocol involves cloning in the same local network. This protocol is helpful when all team members have access to a shared file system. For instance, if you’re working on a sensitive project that should remain in the confines of a single server, you could have team members remotely log in to the common system and continue their development.
You can clone a repository like so:
git clone /Users/donny/my_git_project
The biggest disadvantage is the access this protocol provides, which is limited to the local computer.
If you clone over the Git protocol, your URL starts with git instead of https: git://github.com/sdaityari/my_git_project.git. This doesn’t provide any security. You only get read-only access over the git protocol, and therefore you can’t push changes.
With the https protocol, your connection is encrypted. GitHub allows you to clone or pull code anonymously over https if the repository is public. However, for pushing any code, your username and password are verified first. GitHub recommends using https over ssh, because the https option always works, even if you’re behind a firewall or a proxy.
If you’re using the https protocol, you need to type in your credentials every time you push code. However, if you push your code frequently, you can make Git remember your credentials for a given amount of time after you successfully enter them once. This is done with the credential.helper setting. Run the following to enable credential storage:
git config --global credential.helper cache
By default, Git stores your credentials for 15 minutes. You may also set the timeout limit in seconds:
git config --global credential.helper "cache --timeout=3600"
This command makes Git store your credentials for an hour.
Alternative Credential Storage
An alternative but less secure way of saving the username and password indefinitely would be to store them within the remote path itself. In such a case, your remote would look like this: https://sdaityari:[email protected]/sdaityari/my_git_project.git.
The ssh protocol, on the other hand, authenticates your requests using public key authentication. You establish a connection with the remote server over ssh first, and then you request the resource. To set up authentication using ssh, you need to generate your public/private key pair.
In Linux or macOS, the following command generates a key pair:
ssh-keygen -t rsa -C "[email protected]"
In Windows, you need either PuTTY or Git Bash to generate the key. GitHub provides detailed instructions on the process of generating the key pair on Windows.
Git GUI Tools Can Generate Keys for You
If you use a Git GUI desktop client, the process of generating a key pair and linking it with your GitHub account is done automatically by the client. We’ll review clients in Chapter 9.
Your public key is stored in the file ~/.ssh/id_rsa.pub. You can view it using the cat command:
cat ~/.ssh/id_rsa.pub
The cat command prints the contents of a file in the terminal. ~ stands for the home directory of the current active user. For instance, if your username is donny, ~ points to /Users/donny/ on macOS and /home/donny on Linux.
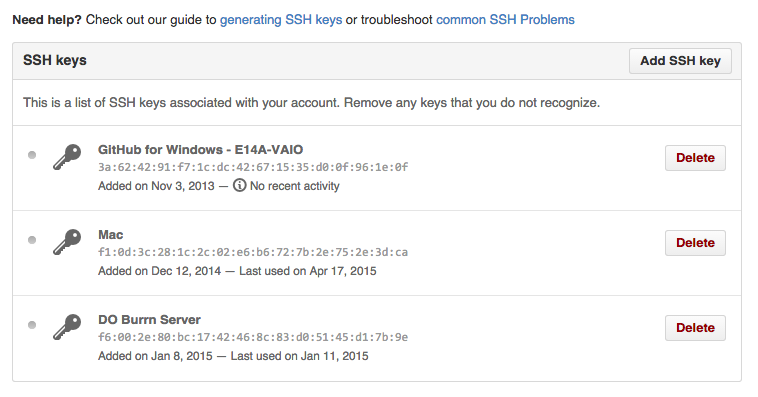
You need to add the contents of the public key to your GitHub SSH settings in order to establish ssh connections to GitHub, as shown in Figure 4-2.
Contributing to the Remote: Git Push Revisited
Earlier in this book, we created a repository in the cloud and pushed our local code to it. Once you’ve made changes to a repository, they need to be pushed to the remote if the central repository is to reflect them. git push is a simple command that does the trick:
git push
We’ll now explore push a little further. There are various ways to push code to a remote.
A git push simply pushes the code in the current branch to the origin remote branch of the same name. A branch is created if the branch with the same name as the current local branch doesn’t exist on the origin.
git push remote_name
This command pushes the code in the current branch to the remote_name remote branch. A branch is created on the remote if the branch with the same name as the current local branch doesn’t exist on the remote_name remote.
git push remote_name branch_name
This command pushes the code on the branch_name branch (irrespective of your current branch) to the remote branch of the same name. If branch_name doesn’t exist on the remote, it’s created. If branch_name doesn’t exist on the local repository, an error is shown.
git push remote_name local_branch:remote_branch
This command pushes the local_branch from the local repository to the remote_branch of the remote repository. Although it involves typing a longer command, I would always advise that you use this syntax for pushing your code, as it avoids mistakes.
Figure 4-3 gives a rough idea of how the states of the master and origin/master look before and after a push operation.

You Can Delete Branches Using git push
You can modify the syntax listed above to delete a branch on the remote:
git push remote_name :remote_branchIn this command, you’re essentially sending an empty branch to the remote_branch branch of remote_name, which empties the remote_branch, or in other words deletes it on the remote. You should therefore be careful while attempting this operation.
Keeping Yourself Updated with the Remote: Git Pull
Now that we’ve looked at how to push the changes to the remote, let’s explore the situation where others are working on the same project and you need to update your local repository with the changes other contributors have made.
The ideal way to update your local repository with the commits others have made to the remote is, firstly, by downloading the new data, and then by merging it with the appropriate branches.
To download the changes that have appeared in the remote, we run the following command:
git fetch remote_name
This updates our local branches from the remote remote_name. (We can skip the name of the remote by running just git fetch, and the command will update the branches of the local repository from the remote origin.)
When you clone a repository, local versions of its branches are also maintained. The fetch command updates these local versions with the latest commits from the remote.
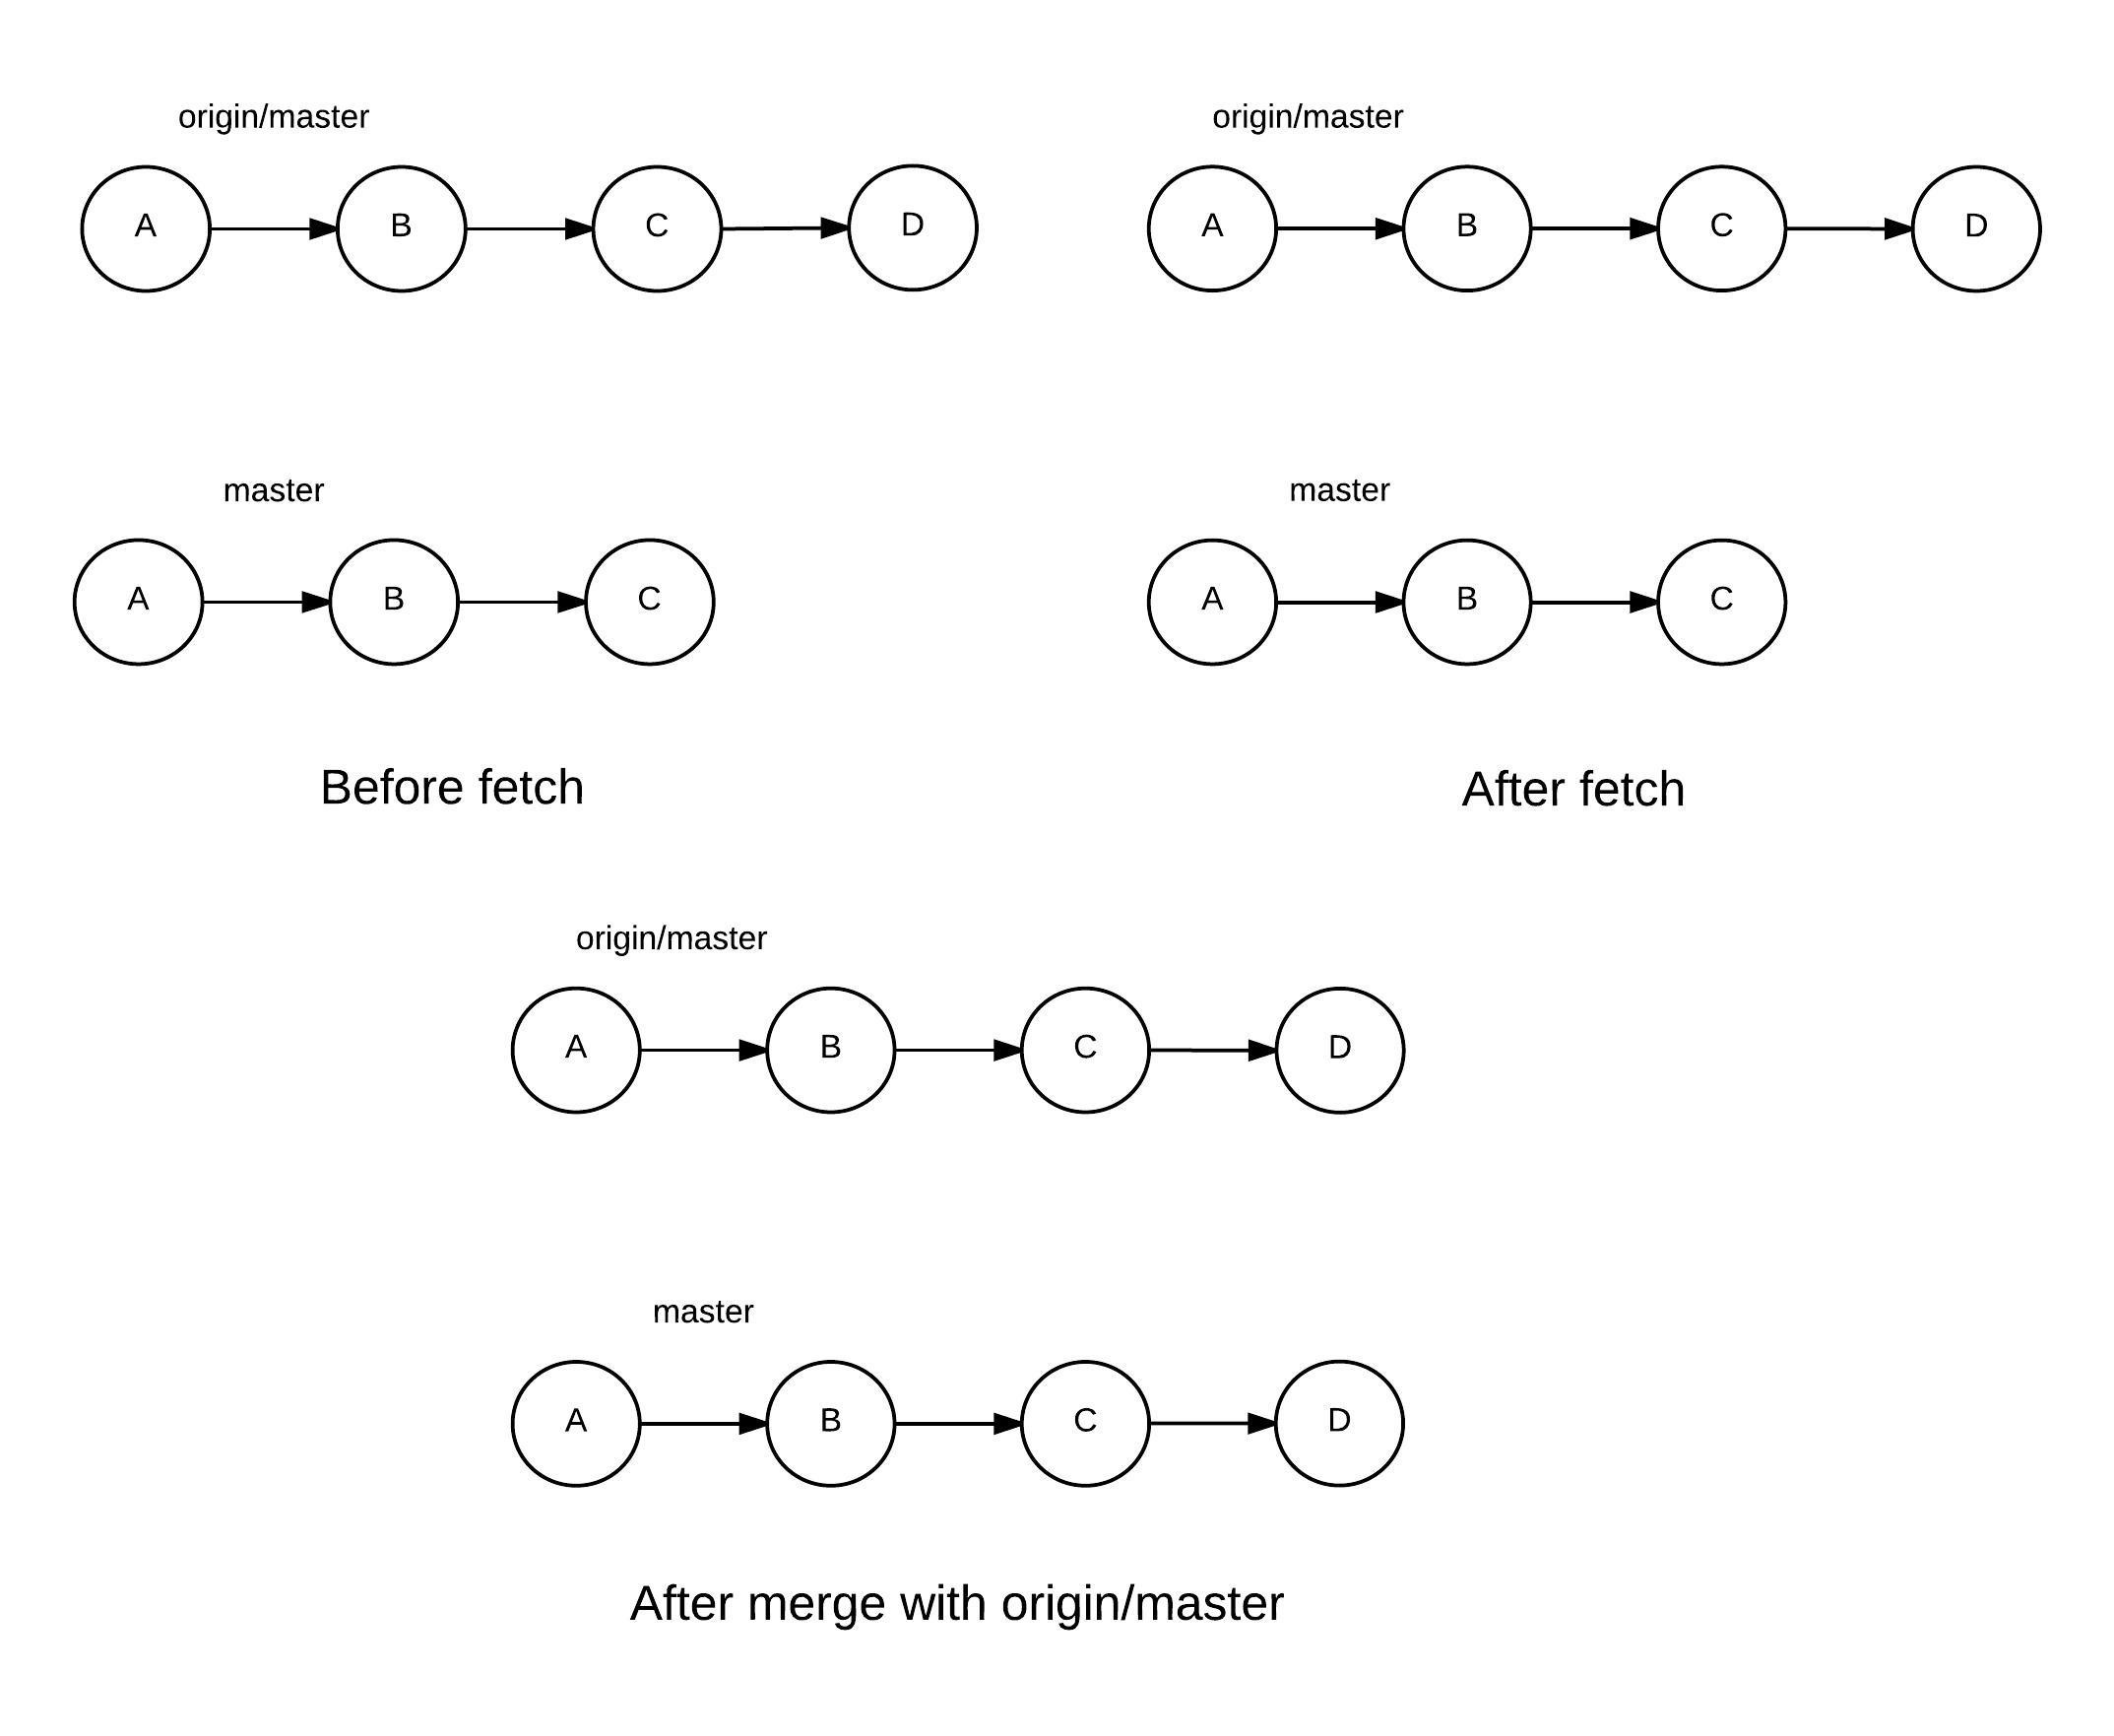
Following a fetch, to update your local branch you need to merge it with the appropriate branch from the remote. For instance, if you’re planning to update the local master branch with the remote’s master branch, run the following command:
git merge origin/master
This is basically merging the branch origin/master with your current active branch. Following the fetch, your origin/master is updated with the latest commits of the branch on the remote. You’ve therefore succeeded in updating a local branch with the latest commits from a remote branch.
To understand what’s going on, let’s explore further with the help of a diagram.
Alternatively, a shorter way of updating the local branch by downloading and merging a remote branch is by using pull. The git pull command is essentially a git fetch followed by a git merge. To update the current active branch through pull, run the following:
git pull origin master
Pulls Are Fast-forward by Default
Just as with merging, you can specify whether or not a pull should be a fast-forward. It is by default, but this can be overridden with the --no-ff postfix.
As with git push, it’s possible to specify different local and remote branches for git pull too:
git pull
A git pull simply downloads the code from the master branch of the origin remote branch. It then merges the code with the current active branch.
git pull remote_name
The command above first downloads the code from the master branch of the remote_name remote branch. It then merges the code with the current active branch.
git pull remote_name branch_name
The command above first downloads the code from the branch_name branch of the remote_name remote branch. It then merges the code with the current active branch.
git pull remote_name local_branch:remote_branch
This command first downloads the code from the remote_branch branch of the remote_name remote branch. It then merges the code with the local_branch in the local repository.
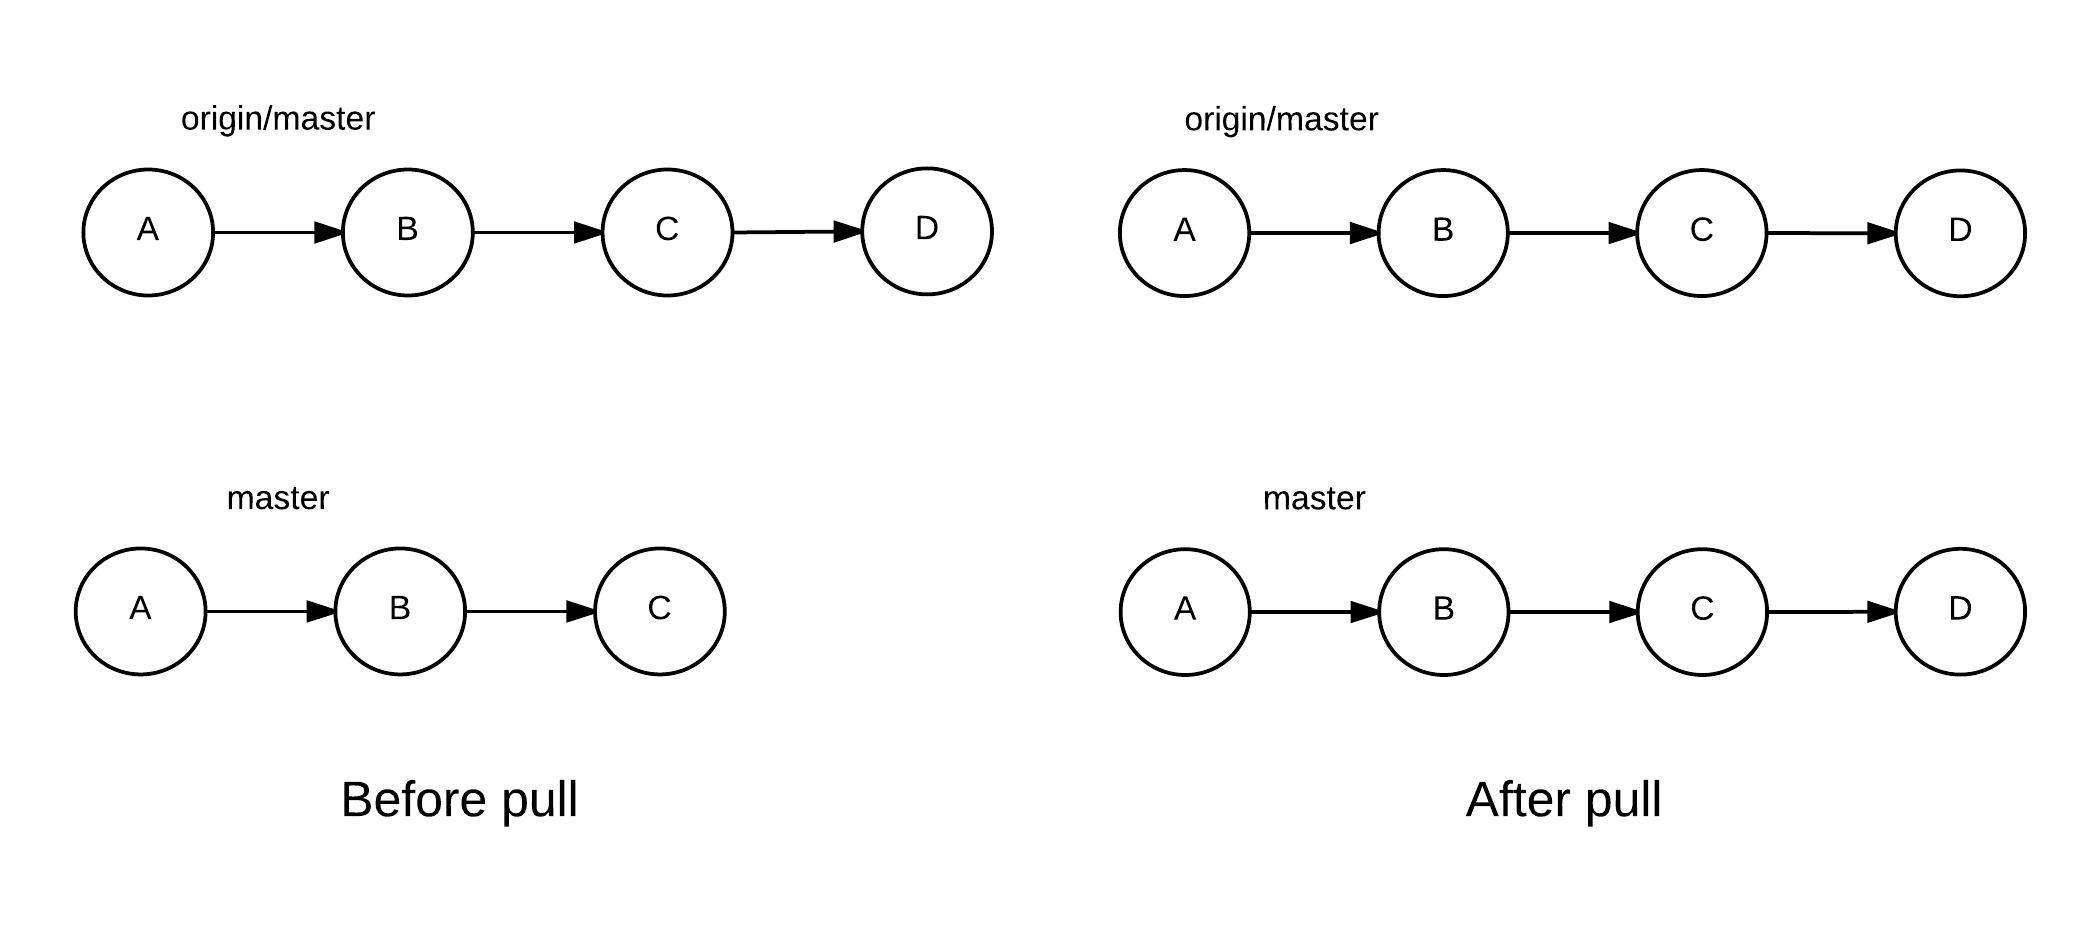
To help visualize the process of a git pull, the following diagram shows the status of the local repository before and after a pull.
Here Be Conflicts!
A fetch-merge or pull may result in a conflict. Git raises a conflict when a change is made to similar lines in the same file in both branches that you’re trying to merge. In such a case, you’ll need to resolve the conflicts before completing the merge or pull. We’ll discuss conflicts later in this chapter.
Dealing with a Rejected Git Push
Now that you have the knowledge of both sending and receiving updates in your local repository, let’s look at a special situation. It involves pushing new code to a remote branch that’s been updated since your last synchronization. In this case, your push would be rejected—with the message that it’s “non-fast-forward”. This simply means that, since changes were made to both the remote and your local copy, Git is not able to determine how to merge them.
In such a situation, you last synced the master branch from origin (hence referred to as origin/master) when it was at commit B (as named in the diagram below). You’ve proceeded with two commits, D and E. Since your last sync, a new commit C has been added to origin/master. Git doesn’t merge both these workflows, as they’ve taken different pathways. Therefore, you should first pull from origin/master and merge it with master, resolving any conflicts that appear. This would make commit C appear in your master branch. Git will then be able to accept the push.

Rebase?
In this example, we demonstrate a pull --rebase in Figure 4-6 rather than just a pull. For now, just ignore this, as I’ll explain rebase in Chapter 7, “Unlocking Git’s Full Potential”.
Conflicts
Let’s now address conflicts—the topic perhaps most dreaded by people working with Git.
Conflicts can occur when you’re trying to merge two branches or to perform a pull. However, as a pull operation essentially involves merging, we’ll address conflicts only during a merge. If you encounter a conflict during a pull, the process of resolving it remains the same.
A conflict arises when your current branch and the branch to be merged have diverged, and there are commits in your current branch that aren’t present in the other branch, and vice versa. Git isn’t able to determine which changes to keep, so it raises a conflict to ask the user to review the changes. The last common commit between the two branches—which is also the point where they diverged—is called the base commit.
When Git merges the two branches, it looks at the changes in each branch since the base commit. When there are unambiguous differences—like changes to different files, and sometimes different parts of the same file—the changes are applied. However, if there are changes to the same parts of the same file, and Git can’t determine which changes to keep, it raises a conflict.
To understand conflicts properly, let’s try to create an example conflict ourselves. We’ll create a reference branch named base_branch. Let’s also create a sample program in Python—sample.py—the contents of which are shown below:
CONSTANT = 5

def add_constant(number):
    return CONSTANT + number
It’s a simple program that adds a constant to a provided number. Now imagine a scenario where you make a branch, conflict_branch, where you change the value of CONSTANT to 7. And suppose a friend has worked on the same line numbers of the same file on the branch friend_branch, and changed the CONSTANT to 9. We can visualize this with Figure 4-7.

Now, let’s see what happens when we try to merge the friend_branch with our conflict_branch:
$ git merge friend_branch
Auto-merging sample.py
CONFLICT (content): Merge conflict in sample.py
Automatic merge failed; fix conflicts and then commit the result.
Git shows a message that the automatic merge failed, and that there are conflicts in sample.py that need to be resolved.
That doesn’t sound so great! Let’s do a git status to see what’s wrong:
$ git status
On branch conflict_branch

You have unmerged paths.
  (fix conflicts and run "git commit")
  (use "git merge --abort" to abort the merge)

Unmerged paths:
  (use "git add <file>..." to mark resolution)
    both modified:   sample.py

no changes added to commit (use "git add" and/or "git commit -a")
Git shows that both files have been modified, and that we need to make a commit after fixing the conflicts. Naturally, this isn’t a fast-forward commit, as Git has failed to automatically resolve the merge. A new commit will be created once you fix the conflicts and commit your changes.
Note that a conflict arises only when Git is unable to determine which lines to keep. To make sure no data is lost, you’re asked which lines should be kept.
Look at the contents of the file now. Since you initiated the merge, Git has modified the file to show you the changes in the two versions of the same file:
<<<<<<< HEAD
CONSTANT = 7
=======
CONSTANT = 9
>>>>>>> friend_branch

def add_constant(number):
    return CONSTANT + number
The lines between <<<<<<< HEAD and ======= contain your version of the part of the file, whereas the lines between ======= and >>>>>>> friend_branch contain the part of the file that’s present in the friend_branch. You should review these lines and decide which lines to keep. You may need to take up the issue with your team before you decide which version to keep. In our case, let’s keep the change we made in the branch friend_branch. In this case, the conflict is solved by keeping one set of changes. However, in a real-life situation, you may need to combine the two sets of changes as well.
Here are the contents of the edited file before we commit changes:
CONSTANT = 9

def add_constant(number):
    return CONSTANT + number
Multiple Conflicts
In our simple example, there was just one conflict in a single file. If there are conflicts in multiple files, they’ll appear when you run git status. You need to edit them individually to check which version to keep. If there are multiple conflicts in the same file, you should search for the word HEAD or <<<<< (multiple “less than” signs together are rarely used in your source code) to find out the instances within a file where conflicts have arisen, and then work on them individually.
After you’ve resolved the conflicts, you should stage the changed files for commit. In our case, there’s only a single file:
git add sample.py
You should then proceed to making a commit, as shown in the line of code below:
git commit -m "Concluded merge with friend_branch"
Aborting a Merge with Conflicts
After initiating a merge that’s resulted in conflicts, if you’re overwhelmed and want to go back to the pre-merge state, you can do so by aborting the merge:
$ git merge --abort
  $ git status
  On branch master

  nothing to commit, working tree clean
Conclusion
With this, we come to the end of another fairly lengthy chapter. Let’s briefly review the things we’ve covered.
What Have You Learned?
In this chapter, we covered how to:
- clone from a remote repository
- create, update, merge and delete branches
- keep a local repository updated
- send the changes from a local repository to a remote
- manage conflicts during merges
We also looked at general workflows while working with organizations.
What’s Next?
In the next chapter, we’ll discuss Git workflows—a set of guidelines to follow when using Git in an organization.