Chapter 2: Getting Started with Git
The first step is to install Git. Git’s official website provides detailed instructions on installing Git on your local machine, depending on your operating system.
The easiest way to install Git is through a package manager based on your operating system. Package managers usually have older but more reliable versions of Git.
If you’re using Linux, you can install Git through the terminal using a package manager. For the popular Linux distro Ubuntu, Git can be installed using
apt-get:apt-get install gitIn macOS, if you have Homebrew, you can install Git using the command line through the following command:
brew install gitIf you’re on Windows, the official build of Git can be downloaded from the Git website.
GUI Tools
For Windows and macOS, you can also install Git as a part of a GUI tool such as GitHub for Desktop and Sourcetree. We’ll cover GUI tools in detail in Chapter 9. However, for most parts of this book, we’ll stick to the command-line interface to really understand how Git works.
If you’re using an operating system other than these three, like Minix or HelenOS, or if you want to get the latest development version of Git for testing and development, you can install Git from its source. Grab a tarball of the desired version of Git from GitHub, untar it and check the README file for instructions on how to install Git. However, I wouldn’t recommend following this process unless you know what you’re doing, as it can lead to errors, and development versions may be unstable.
The Git Workflow
Git doesn’t track all of the files stored on your computer. You need to instruct Git to track certain files and directories. This process is called initialization. The parent directory containing your project—all the files and directories to be tracked by Git—is called a repository. This repository might contain many files and directories, or even just a single file.
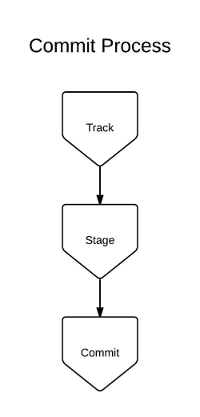
There are three basic operations performed by Git on your project (shown in Figure 2-1 below): track, stage, and commit.
Track. Once you’ve initialized your repository, you’ll need to add files to your project. Any files you add are initially untracked by Git. You need to specify that you want Git to track them. Git monitors tracked files for changes and ignores untracked files.
Stage. After making the required changes to your files, you need to stage them. Staging is a way of tagging certain (or all) changes that you want to keep a record of.
Commit. The next step is to create a commit. A commit is like a photograph that records the current state of your code. You can go back to a certain commit at a later time, view the status of the repository with respect to that commit, and check the changes that were made in the commit. The commit records the changes in a repository since the last commit. You can revert back to any commit at any point of time. Each commit contains a commit hash that uniquely identifies the commit, the author details, a commit message, and the list of changes in that commit.
Once you’ve committed your files, you may wish to push them to a remote location. A push refers to the process of sending the changes you’ve made in your local repository to a remote location. A remote location is a copy of your repository stored on a remote server. (We’ll set up a remote repository later in this chapter.)
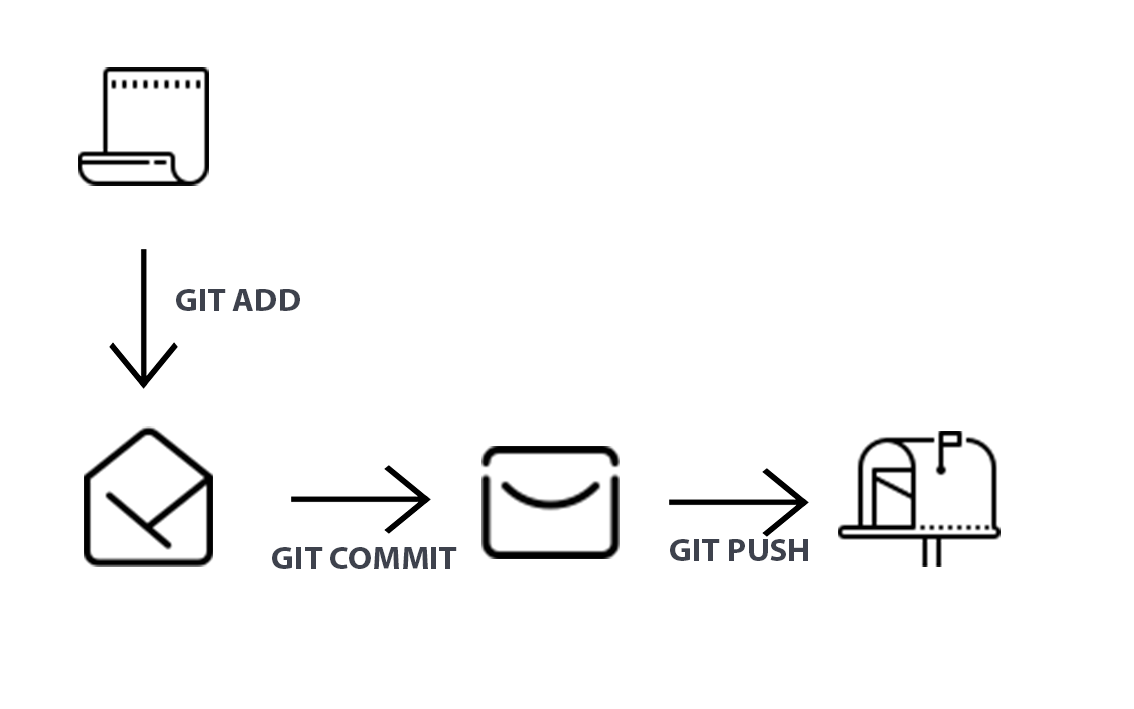
Essentially, the flow chart in Figure 2-2 below illustrates the steps we’ll follow in this chapter.

Baby Steps with Git: First Commands
Set Configuration Settings
Before we proceed with using Git in a project, let’s define a few global settings:
git config --global user.name "Shaumik"
git config --global user.email "[email protected]"
git config --global color.ui "auto"
The commands are fairly self-explanatory. We set the default name and email to be associated with our commits. We also set the color.ui to "auto" to enable Git to color-code the output of Git commands on the terminal. The --global setting allows these settings to be applied to any other repository you work on locally.
If you don’t set the values for name and email, they’re left empty. When you make a commit, it takes different values depending on the OS or the GUI tool you use. When you make a commit without setting these parameters, Git will automatically set them based on the username and hostname. For instance, the name is set to the name of the user that’s logged in to the computer in macOS, whereas in Linux, the name is set to be the username of the active user account. In both cases, the email is set as username@hostname.
If you want to check all the configuration settings for your repository, you can run the following command:
git config --list
Also, if you want to edit any of your configuration settings, you can do so by editing the ~.gitconfig file in Linux and macOS, where ~ refers to your home directory. In Windows, it’s located in your home directory: C:Users<username>.gitconfig.
Create a Git Project
Let’s first create a directory where we’ll store the files for our project:
mkdir my_git_project
cd my_git_project
The first command creates a new directory, and the second changes the active directory to the newly created one. These two commands work on all operating systems (Windows, macOS, and Linux).
So, my_git_project is the parent directory that will contain all the files for this project. From now on, we’ll refer to it as our project’s repository.
Now that we’re in the repository, we need to initiate Git for that directory using the following command:
git init
Issuing Git Commands
Just like git init, all Git commands start with the keyword git, followed by the command.
Git Autocomplete
When working in the terminal, developers often use the Tab key for autocompletion. However, this doesn’t work on Git commands by default. You can install an autocomplete script for Git using the following commands. Note that this only works on Linux and macOS.
Download the autocomplete script and place it in your home directory:
curl https://raw.githubusercontent.com/git/git/master/
  contrib/completion/git-completion.bash -o
  ~/.git-completion.bash
Add the following lines to the file
~/.bash_profile:if [ -f ~/.git-completion.bash ]; then . ~/.git-completion.bash fi
If you’re using Git Bash on Windows, autocompletion is preconfigured. If you’re using Windows command prompt (cmd.exe), you’ll need to install Clink.
Create Our First Commit
Let’s look at the repository again. Notice the newly created .git directory, the output of which is shown below (line 2). All information related to Git is stored in this repository. The .git directory, and its contents, are normally hidden from view:
$ my_git_project shaumik$ git init
Initialized empty Git repository in /Users/shaumik/test/my_git_project/.git/
$ my_git_project shaumik$ ls -al
total 0
drwxr-xr-x  3 shaumik  staff   96 Mar 21 23:05 .
drwxr-xr-x  3 shaumik  staff   96 Mar 21 23:05 ..
drwxr-xr-x  9 shaumik  staff  288 Mar 21 23:05 .git
Don’t Edit .git
Never edit any files in the .git directory. It can corrupt the whole repository. This book doesn’t discuss the internals of Git, and thus doesn’t include working on this hidden .git directory.
Now that we’ve initialized Git, let’s add a few files to our repository. On your computer, navigate to the my_git_project directory and add three text files with the following names: my_file, myfile2 and myfile3. Place some content in each one, such as a simple sentence.
Demonstration Only
The file names my_file, myfile2 and myfile3 are used for demonstration purposes. They signify three different files and not different versions of the same file.
After adding the files, let’s return to the terminal and run the following command to see how Git reacts:
git status
You can see the output below:
$ git status
On branch master

No commits yet

Untracked files:
  (use "git add <file>..." to include in what will be committed)
    my_file
    myfile2
    myfile3

nothing added to commit but untracked files present (use "git add" to track)
Checking the Status
git status is perhaps the most-used Git command—as you’ll see over the course of this book. In simple terms, this command shows the status of your repository. It provides a lot of information, such as which files are untracked, which are tracked and what their changes are, which is the current “branch”, and what the status of the current branch is with respect to a “remote” (we’ll discuss branches and remotes later). You should frequently check the status of your repository.
In a Git repository, any file that’s added is either “tracked” or “untracked”. A file is said to be tracked when Git monitors the changes being made to that file, whereas the changes to an untracked file are ignored by Git and don’t form a part of any commits.
Checking the status of our repository, we can see that three files are currently marked in red. They’re also grouped as untracked. Git doesn’t track all files in a repository. You can explicitly tell Git which files to track and which to ignore.
In order to track these files, we run the following command:
git add my_file myfile2 myfile3
As an alternative, you can simply run the following:
git add .
The . (period) is an alias for the current directory. Running git add . tells Git to track the current directory, as well as any files or subdirectories within the current directory.
Beware of Adding Unwanted Files
Don’t make a habit of using git add ., as you may end up adding unnecessary files to the repository. You should add only those files that are a part of your package. Adding files like compiled files and configuration files just increases the size of your repository. Configuration files may also contain database passwords, which could lead to a security risk if committed to a repository that’s open to the public.
Now that we’ve set our new files to be tracked by Git, let’s check the status of the repository again:
$ git add my_file myfile2 myfile3
$ git status
On branch master

No commits yet

Changes to be committed:
  (use "git rm --cached <file>..." to unstage)
    new file:   my_file
    new file:   myfile2
    new file:   myfile3
We’re now ready to make a commit:
$ git commit -m "First Commit"
[master (root-commit) ed90340] First Commit
 3 files changed, 0 insertions(+), 0 deletions(-)
 create mode 100644 my_file
 create mode 100644 myfile2
 create mode 100644 myfile3
The -m option specifies that you’re going to add a message within the command. (The message is the text in quotes after -m: “First Commit”.) Alternatively, you can just run git commit, and a text editor will open up and ask you to enter a commit message.
Make Your Commit Messages Meaningful!
A meaningful commit message is an essential part of your commit. You can give a meaningless commit message like “Commit X”, but in the future, it might be difficult for someone else (or even you) to understand why you created that commit.
Notice the string ed90340 shown in the code above (second line). It’s the hash of the commit, or its identity. A hash is a unique, identifying signature for each commit, generated automatically by Git. If you’re interested in how a commit hash is formed, you may want to check out “The anatomy of a Git commit”. What’s shown here is a short version of a considerably longer string, which we’ll look at further below.
Further Commits with Git
The first commit in a Git repository is a little different from subsequent commits. In subsequent commits, Git is already tracking the files you’re working on (unless you’re adding new files). So we’ll need another important command, git diff, which shows you the changes in the tracked files since the last commit.
Let’s make some changes to the files and see how Git reacts. For demonstration purposes, I’ve added a line to my_file, and some extra words to an existing line in myfile2. Let’s check the status of the repository by running the following command:
$ git status
On branch master
Changes not staged for commit:
  (use "git add <file>..." to update what will be committed)
  (use "git restore <file>..." to discard changes in working directory)
    modified:   my_file
    modified:   myfile2
As shown here, Git shows that certain changes have been made to two files. We can also see exactly what was changed in the files by running the following command:
$ git diff
diff --git a/my_file b/my_file
index e69de29..e32ce9e 100644
--- a/my_file
+++ b/my_file
@@ -0,0 +1 @@
+Sample line
diff --git a/myfile2 b/myfile2
index e69de29..d00491f 100644
--- a/myfile2
+++ b/myfile2
@@ -0,0 +1 @@
-Some more info
+Some more info! Changing this file too.
The diff command shows the changes that have been made to the tracked files in the repository since the last commit. In the output shown above, lines starting with a + sign (colored green) show what’s been added, and the line starting with a - sign (colored red) shows what’s been removed. (When you edit a line of code, the same thing happens: the old line is shown in red with a - sign, and the new version of the line is shown in green with a +.)
If you want to check the changes in a single file, add the file name after the diff command. For instance:
git diff my_file
Diff Only Shows Changes in Tracked Files
As mentioned earlier, Git tracks only the files that you ask it to. The git diff command shows the changes only in tracked files.
After you’ve reviewed the changes you made, you need to “stage” the changes to be committed:
git add my_file myfile2
Alternately, you can add all tracked files like so:
git add -u
You can go one step further and add only parts of the changes to a file to the commit. This process is a bit complex, though, and we’ll tackle it in Chapter 6, “Correcting Errors While Working with Git”.
Now that you’ve staged the files, they’re ready to be committed:
git commit -m "Made changes to two files"
Beware of Shortcuts
You can skip the adding (staging) of a modified file by postfixing -a to the git commit, which performs the add operation. However, you should avoid doing this, because it can lead to mistakes. Firstly, postfixing -a only adds tracked files—so you’d miss any untracked files that you may have wanted in the commit. Secondly, it may be that you’ve modified two files but want them to appear in separate commits. A git commit -a would add both files to the same commit.
Always Review Your Changes
I mentioned earlier that git status is perhaps the most-used command. However, the most important command is probably git diff. Never stage files for commit before reviewing the changes you’ve made in them. Also, stage files for commit individually after carefully reviewing the changes that were made to them.
Why git add Again?
At this point, you may think “Why add tracked files again?” Well, before you commit, Git needs you to specify which files you want to commit. It may happen that you’ve made changes to two files but only want to commit one of those files.
The process is like sending a package. git add is adding an item to the package. git commit is sealing the package and writing a note on it. git push (which I’ll explain shortly) is sending the package to the recipient.
Commit History
Now that we have more than one commit, let’s explore a new area of Git—the history of the project. The simplest way of reviewing the history of a project is by running git log, which shows the commits that we’ve made so far:
$ git log
commit 870e4d76e6dc6539315992f16a20f47a49e2ea79 (HEAD -$ master)
Author: Shaumik Daityari <[email protected]>
Date:   Sat Mar 21 23:31:16 2020 +0530

    Made changes to two files

commit ed90340105b9511381d76706f8e5d4e7df3f6458
Author: Shaumik Daityari <[email protected]>
Date:   Sat Mar 21 23:16:28 2020 +0530

    First Commit
The history shows the list of commits, each with a unique hash, an author, a timestamp and a commit message.
Previously in this chapter, we encountered a commit hash that was truncated. Although the long, 40-character commit hash uniquely identifies each commit, usually five or six characters are enough to identify them in a repository:
git show ed90340
The git show command lists information about a commit. Let’s see how short we can go until Git fails to identify the hash:
git show ed90340
git show ed9034
git show ed903
git show ed90
git show ed9
It’s only once we’re down to the first three characters that Git gives us a fatal error:
ambiguous argument 'ed9': unknown revision or path not in the working tree.
Although it only failed at three characters in our repository with a very short history, it will probably need to be longer in repositories with a considerably longer history.
The .gitignore File
Although I’ve mentioned that Git only tracks files you explicitly ask it to, it could happen that you ask it to track some files by mistake. You need a way to hide certain files, directories, or file extensions from Git that you know you’ll never want it to track. This is exactly what a .gitignore file does.
A .gitignore file is added to the root directory of the repository, and it lists files you don’t want Git to track or display as part of git status. You can add items to the .gitignore file and commit them.
Unintentionally Tracking a File Listed in .gitignore
Although a file listed in .gitignore is not meant to be tracked, it’s possible that you could accidentally tell Git to track a file that’s listed in there. In earlier versions of Git (before Git 1.5.3.6), you won’t get any error message. This is another reason you should avoid running git add ., as it may cause files to be tracked by Git unintentionally.
Examples of files that you might want to add to .gitignore include compiled files with extensions like .exe and .pyc, local configuration files, macOS .DS_Store files, Thumbs.db on Windows, directories of node modules in Node.js, and build folders of Grunt or gulp.js.
Let’s have a look at what a .gitignore file looks like:
configuration/
some_file.m
*.exe
The three lines in this sample file are used to tell Git to ignore a whole repository and its contents (the configuration directory), a single file some_file.m, and all files with a .exe extension.
The code sample below shows the effect of a .gitignore file that tells Git to ignore *.exe files that have already been committed to the repository. I’ve created a new file called somefile.exe in our project directory, but Git is ignoring it. git status shows that there is nothing to commit:
$ echo "some line" > somefile.exe
$ git status
On branch master

nothing to commit, working tree clean
Hiding .gitignore from Git
Although it’s advisable to add the .gitignore file to your repository, you can even hide the .gitignore file from Git. Just add a line .gitignore to the file and Git will ignore the .gitignore file. However, in such a situation, the file will only reside in the local copy of the repository.
Nowadays, many .gitignore templates are available online, depending on the framework you’re working on, such as Rails. You may want to browse through this huge collection of .gitignore files on GitHub. These .gitignore templates serve as handy starting points for new projects.
Set up Your .gitignore Early
Beginners often have a tendency to add a .gitignore file at the late stages of a project. However, if a file is already committed and you add it to the .gitignore file, it will continue to be committed in your repository and tracked by Git. The only way out in this case is to explicitly untrack the file in Git—after which Git will ignore the file. We’ll discuss how to untrack a tracked file in Git in a later chapter.
Remote Repositories
As we’ve seen so far, you can use Git on your local machine to manage versions of your work. However, because Git is a distributed version control system, many copies of the same repository can exist. So rather than just keep your repository locally, it’s common to store another copy in a centralized location on a centralized server (or in the cloud).
This also enables you to work in a team, as others can access the repository from the centralized copy. Any such copy of your repository can be linked to your repository to enable synchronization. Such an external copy is called a remote. A remote is simply a copy of your repository. It can be on a remote server, on a peer’s system, or even on a different location within your local system. Interestingly, if you have access to your co-worker’s repository (through SSH for instance), even that can be added as a remote.
For demonstration purposes, let’s create such a copy on GitHub.
GitHub Isn’t the Only Option
GitHub isn’t the only option for setting up a remote. A remote may also be on your own server. However, using cloud services like GitHub offers benefits like eliminating the need to run a separate server. You could also create remotes on GitLab or Bitbucket.
To set up a remote repository on GitHub, you first need to create an account on GitHub, or log in to GitHub with your credentials if you already have an account. After login, click on the + arrow on the top right and select New repository to create a new repository in the cloud, shown in the figure below.

Choose a name for your repository. You can also choose whether to display your repository publicly or to keep it private.
Once the repository has been created, we have three options: create a new repository from the command line and push to GitHub; push the code from an existing repository from the command line; or import code from another GitHub repository. We’ll take the second option here.
GitHub Offers Student Pricing
If you’re a student, you can apply for the GitHub Student Developer Pack to get a free GitHub Pro account, in addition to a lot of other services—which lasts as long as you’re a student.
Returning to your local repository, run the following command to synchronize it with the remote repository:
git remote add origin https://github.com/sdaityari/my_git_project.git
git push -u origin master
We first add a remote named origin to our repository, which points to the GitHub location. Next, the push command sends the commits from your local repository to the cloud repository. The -u option links your repository to the remote for future reference. When you add commits later, Git will show the status of your local copy in relation to this remote repository. master is the name of the branch that we want to synchronize with the origin remote. We’ll discuss branches in detail in the next chapter.
Conclusion
What Have You Learned?
In this chapter, we covered the basics of Git:
- the various ways to install Git on your system
- the three basic operations of track, stage, and commit
- the Git workflow of initialization, tracking, committing and pushing a repository
- starting a Git project from scratch
- the history of a repository
- the use of
.gitignore - setting up a remote on GitHub and pushing your code to the cloud
What’s Next?
In the next chapter, we’ll explore a few more Git commands, focusing on the use of branches in Git.
You’ve encountered quite a few new things in this chapter, especially if you’re new to version control. I think you may want to call it a day. Get a coffee and enjoy a well-deserved break!