Chapter 6: Correcting Errors While Working with Git
In the last few chapters, we’ve built a good foundation in Git basics. We’ve gone through the basic Git commands, followed by some more advanced processes that help you contribute to an organization. Up to this point, we haven’t discussed how to fix mistakes you might make while working with Git.
Alexander Pope once said “To err is human”—and it’s only human to commit mistakes during the Git workflow. Git makes it possible to correct mistakes at each stage of a project—which is yet another reason why it’s so popular with developers.
In this chapter, we’ll first look at how you can correct your own mistakes. Then we’ll look at how to weed out bugs introduced at various points into a repository either by you or by others.
Amending Errors in the Git Workflow
With Git, it’s fairly easy to undo changes you’ve made. In this section, we’ll look at three examples: undoing a stage operation; undoing a commit, by reverting back to an older commit; and undoing a push, by rewriting the history of a remote repository.
Undo Git Add
The git add command either tells Git to track an untracked file, or to stage the changes in a tracked file for a commit.
If you’ve just asked Git to track a new file that you’ve created but not yet committed—let’s call it mistake_file—you can undo the operation by running the following command:
git rm --cached mistake_file
Here, rm stands for remove (just like the regular terminal command rm). When we postfix --cached, we ask Git to untrack the file, but let it remain in the file system.
Why Can’t I Just Delete the File?
If we simply delete the file, Git will show that a tracked file has been deleted—a change that needs to be staged and committed to appear in the history.
You can check the status of the repository to confirm that the file is untracked again:
$ echo "something" >mistake_file
$ git add mistake_file
$ git status
On branch master

Changes to be committed:
  (use "git restore --staged <file>..." to unstage)
    new file:   mistake_file

$ git rm --cached mistake_file
rm 'mistake_file'
$ git status
On branch master

Untracked files:
  (use "git add <file>..." to include in what will be committed)
    mistake_file

nothing added to commit but untracked files present (use "git add" to track)
The command git rm --cached can also be used to remove a file from the repository. Once a file has been removed, you need to commit the changes for them to take effect.
Forced Removal
If you run just git rm without the --cached option, it will lead to an error. The other option that can be postfixed with git rm is -f for forced removal. The -f option untracks the file and then removes it from your local system altogether. Therefore, you should be careful when you’re removing tracked files if you use this option. All the same, there is way to backtrack from rm -f too. Even if you commit after using rm -f on a file, you can still get the file back by reverting to an old commit. We’ll discuss the process of reset and reverting to an old commit shortly.
Let’s say you make changes to a tracked file (myfile2), and then run git add to stage it for commit. Then you realize you made a mistake before committing it. You can run the following command to unstage the changes:
$ git status
On branch master

Changes to be committed:
  (use "git restore --staged <file>..." to unstage)
    modified:   myfile2

$ git reset HEAD myfile2
Unstaged changes after reset:
M    myfile2
$ git status
On branch master

Changes not staged for commit:
  (use "git add <file>..." to update what will be committed)
  (use "git restore <file>..." to discard changes in working directory)
    modified:   myfile2

no changes added to commit (use "git add" and/or "git commit -a")
This command resets a file to the state where the HEAD, or the last commit, points to. This is the same as “unstaging” the changes in a file.
Once you’ve unstaged the changes in a file, you can undo the changes you made in the file as well, reverting it back to the state during the last commit. This is where the following command comes in:
$ git checkout myfile2
Updated 1 path from the index
$ git status
On branch master
  (use "git push" to publish your local commits)
nothing to commit, working tree clean
We’ve seen the checkout command used previously during the process of branching. It’s also used to restore any unstaged changes in a file, as seen above.
What Does checkout Really Do?
Basically, checkout updates the file(s) in the current status of the repository to an earlier version.
When we were changing branches, checkout changed the status of files to a different branch. In this case, checkout restores the file to its version at the time of the last commit in the branch.
Undo Git Commit
If you’ve already committed your changes and then realize your mistake, there’s a way to undo that too. Let’s make an unnecessary commit and try to revert back to the original. Run the following command to see Git do some magic:
$ git reset --soft HEAD~1
$ git status
On branch master
Your branch is up to date with 'origin/master'.

Changes to be committed:
  (use "git restore --staged <file>..." to unstage)
    modified:   tests.py
The --soft option undoes a commit, but it lets the changes you made in that commit remain staged for you to review. HEAD~1 means that you want to go back one commit from where your current HEAD points (which is the last commit).
What’s with HEAD~1?
We encountered HEAD earlier, and we know that it points to the last commit in the current branch. I’ve added ~ to HEAD in the example above. This refers to the parent of the last commit in the current branch. You can also use ^. Using either ~ or ^ refers to the parent of the last commit in the current branch, while ~~ and ^^ both refer to the grandparent of the last commit in the current branch. You can also add numbers to move back a specific number of commits in the hierarchy. However, adding numbers after either ~ or ^ can mean different things:
~2goes up two levels in the hierarchy of commits, via the first parent if a commit has more than one parent.^2refers to the second parent, where a commit has more than one parent (which could be the result of a merge).
You can also combine these postfixes. For instance, HEAD~3^2 refers to the second parent of the great-grandparent commit, which you reached through the first parent and grandparent.
The second option here is postfixing the --hard option to permanently undo commits. It’s generally advised that you avoid using the --hard option—unless you’re absolutely sure you want to do away with the commits.
A third option of reset is --mixed, which is also the default option. In this option, the commit is reverted, and the changes are unstaged.
The process of committing involves three steps: making changes in a file, staging it for a commit, and performing a commit operation. The --soft option takes us back to just before the commit, when the changes are staged. The --mixed option takes us back to just before the staging of the files, where the files have just been changed. The --hard option takes us to a state even before you changed the files.
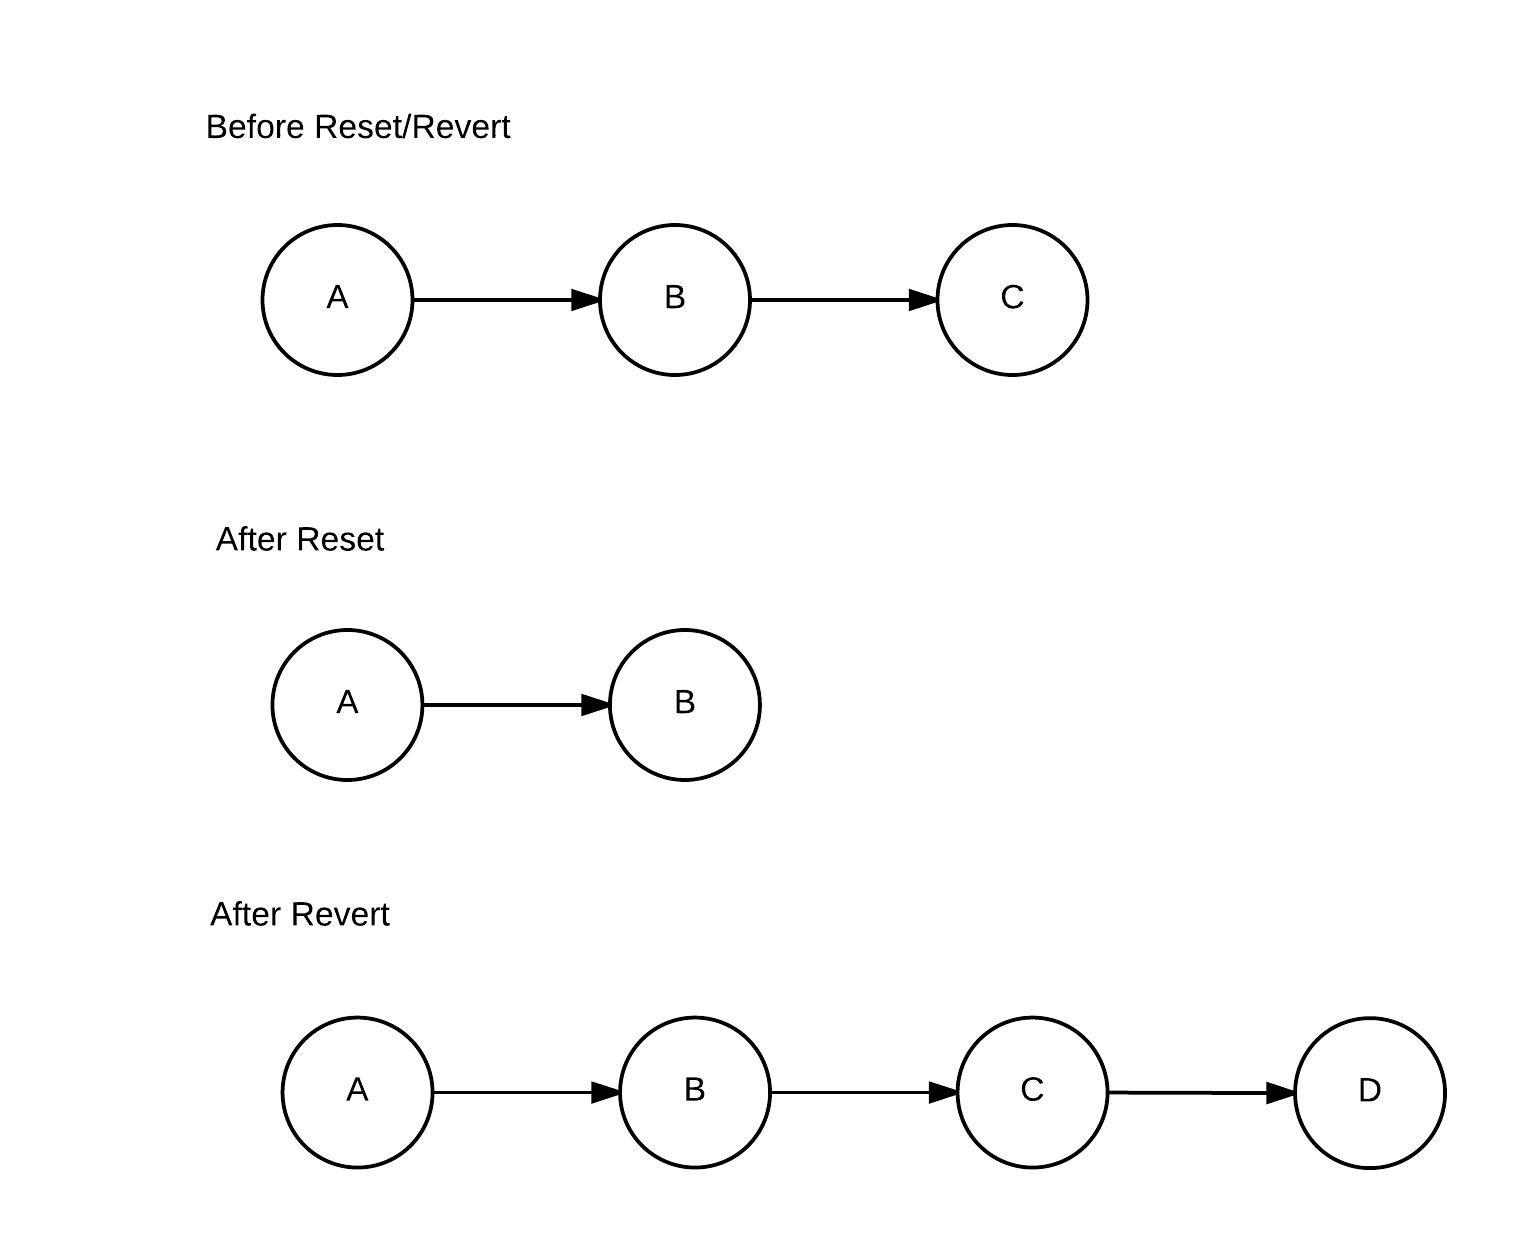
There’s yet another Git command that could help you in case you’ve committed changes by mistake. This is the revert command. The reset command changes the history of the project, but revert undoes the changes made by the faulty commit by creating a new commit that reverses the changes. Figure 5-1 shows the difference between revert and reset.
The following code shows how to go back one commit using revert. You can also modify the commit message for the commit that reverses the changes of the unwanted commits:
$ git revert HEAD~1
[master 623a519] Revert "Update data.csv"
 1 file changed, 6 insertions(+), 6 deletions(-)
$ git log --oneline
623a519 Revert "Update data.csv"
25313e5 Added new CSV file
c76ee85 Update data.csv
0d0d493 Added csv data
You can change the commit message of the last commit by running the following command:
$ git commit --amend -m "New Message"
[master 8a15b20] New Message
 Date: Sun Mar 22 00:48:43 2020 +0530
 1 file changed, 6 insertions(+), 6 deletions(-)
$ git log --oneline
8a15b20 New Message
25313e5 Added new CSV file
c76ee85 Update data.csv
0d0d493 Added csv data
083e7ee Added yet another test
The --amend -m option changes the commit message of the last commit. Notice that the hash changes too, effectively rewriting the history.
Undo Git Push
In case you’ve also pushed your changes to a remote, it’s possible to revert changes in the push too.
The simplest way is to go for a revert and push the new commit that undoes the changes:
git revert HEAD~1
git push origin master
However, if you also want the other commit(s) to vanish from the remote repository, you first need to go for a reset command—deleting the unwanted commit—and then push the changes to the remote. If you perform a normal git push, the push will be rejected, because the origin HEAD is at a more advanced position than your local branch. Therefore, you need to force the change with a postfix—-f—which forces the push on the remote origin:
git reset --hard HEAD~2
git push -f origin master
Use -f with Caution
Postfixing -f is a dangerous move, as it rewrites the remote without confirming it. Make sure you double-check your local changes before going for an -f push.
Debugging Tools
The scenarios we’ve discussed so far help you to undo changes in Git. They’ve dealt with mistakes you’ve committed in the near past and want to correct. Now we’ll look at dealing with bugs introduced by you or others in the past. This will involve exploring tools in Git that help in the process of debugging. These tools are required when you’re working on a relatively large codebase with a large number of contributors.
You may or may not know the location of the bug. If you know which file or set of files is the source of the bug, you can debug with git blame. If you don’t know the source of the bug, you can debug with git bisect. If you’ve written unit tests, you can also automate the process of debugging. So let’s explore the different ways of debugging your code in Git.
Git Blame
Running the git blame command on a file gives you detailed information about each line in the file. git blame lists the commits that introduced changes in a file, along with basic information about the commit, like the commit hash, author and date.
git blame is usually used when you know which file is causing a bug. Let’s see how it works:
$ git blame my_file
^8dd76fc (Shaumik 2019-05-06 15:28:03 +0530  1) This is some information!
f934591c (Shaumik 2019-05-06 15:31:00 +0530  2)
cc48fb3c (Shaumik 2019-06-11 22:38:21 +0530  3) Adding Line 1.
cc48fb3c (Shaumik 2019-06-11 22:38:21 +0530  4)
f934591c (Shaumik 2019-05-06 15:31:00 +0530  5) Changing the content of this file.
7534bc23 (Shaumik 2019-05-15 03:16:48 +0530  6)
cc48fb3c (Shaumik 2019-06-11 22:38:21 +0530  7) Adding Line 2.
cc48fb3c (Shaumik 2019-06-11 22:38:21 +0530  8)
7534bc23 (Shaumik 2019-05-15 03:16:48 +0530  9) This change is in the master branch!
96f7c5e6 (Shaumik 2019-05-15 03:17:18 +0530 10) Another line in the master branch.
cc48fb3c (Shaumik 2019-06-11 22:38:21 +0530 11)
cc48fb3c (Shaumik 2019-06-11 22:38:21 +0530 12) Adding Line 3.
b1175163 (Shaumik 2019-05-10 00:44:48 +0530 13)
b1175163 (Shaumik 2019-05-10 00:44:48 +0530 14) Adding yet another line after sum.py
As you can see in the code above, the command git blame displays each line of the file. These lines are prepended with information in the following order: the hash of the commit that added the line, and the commit author, date, time and time zone.
In this scenario, as you already know where the faulty code is, you can just display the details of the required commit to find out more about the bug that was created. Let’s assume it was commit f934591c that introduced the bug. You should therefore run the following:
$ git show f934591c
commit f934591cd1c04e4009dfa76a9684dda73cb30260
Author: Shaumik <[email protected]>
Date:   Tue May 6 15:31:00 2019 +0530

    - Changed two files
    - This looks like a cooler interface to write commit messages

diff --git a/my_file b/my_file
index 362eab3..0a0bd57 100644
— a/my_file
+++ b/my_file
@@ -1 +1,3 @@
 This is some information!
+
+I am changing the content of this file.
diff --git a/myfile2 b/myfile2
index d4a2d15..ec4dcc2 100644
— a/myfile2
+++ b/myfile2
@@ -1 +1 @@
-This is another file!
+This is another file! Changing this file too.
The git show commands shows the author of the commit, the date of the commit and the changes that constitutes the commit. Once you’ve figured out what caused the error, you can go ahead and fix it in your repository and then commit the changes.
Normally, though, you’ll most likely have no idea what caused the bug. So we need to explore some more debugging tools.
Git Bisect
There’s probably no better way to search for a bug than with bisect. Even if you have a thousand commits to check, bisect can help you do it in just a few steps.
Let’s assume you have no idea what’s causing an error. However, you do know that, at a certain point in time—after a particular commit—the bug wasn’t present in your code. Git’s bisect helps you quickly traverse between these stages to identify the commit that introduced the bug. bisect essentially performs a binary search through these commits.
To start the process, you select a “good” commit from the history, where you know the bug wasn’t present, and a “bad” commit (which is usually the latest commit). Git then changes the state of your repository to an intermediate commit and asks you if the bug is present there. You search for the bug and assign that commit as “good” or “bad”. This process continues until Git finds the faulty commit. Since a binary search algorithm is used, the number of steps required is a logarithmic value of the number of commits in between the initial “good” and “bad” commits.
An example will help explain how git bisect works. Let’s create a file in our repository—sum.py—containing a function that adds two numbers in Python. The contents of the file are as follows:
#sum.py
def add_two_numbers(a, b):
    '''
        Function to add two numbers
    '''
    addition = a + b
    return addition

if __name__ == '__main__':
    a = 5
    b = 7
    print(add_two_numbers(a, b))
I’ve intentionally added the second block of code to print the response of the function to two dummy values. We can run the program with the following:
python sum.py
After adding a few more commits, let’s change the file sum.py to introduce an error:
#sum.py
def add_two_numbers(a, b):
    '''
        Function to add two numbers
    '''
    addition = 0 + b
    return addition

if __name__ == '__main__':
    a = 5
    b = 7
    print(add_two_numbers(a, b))
Running the program now, we can see that the result is not 12, but 7. Let’s now demonstrate the use of git bisect. To decide the good and bad commits, we need to have a look at the commit history:
$ git log --oneline
083e7ee Added yet another test
49a6bec Added more tests
5199b4e ERROR COMMIT: Introduced error in sum.py
b00caea Added tests.py
b117516 Dummy Commit after adding sum.py
7d1b1ec Added sum.py
As is evident from the history, the latest commit 083e7ee (at the top) is “bad”, whereas the commit two positions before we introduced the bug—7d1b1ec—is “good”. To better identify the bug, I’ve mentioned in the commit message which commit introduced the error. We must now undertake the following steps to find out the bug:
- start the Git bisect wizard
- select a good commit
- select a bad commit
- assign commits as good or bad as the wizard takes you through the commits
- end the Git bisect wizard
Let’s go ahead and start the Git bisect wizard:
git bisect start
This takes Git into a binary search mode. Next, we need to tell Git the last known commit where the bug was absent, which in our case is 7d1b1ec:
git bisect good 7d1b1ec
Now assign the latest commit as the bad one:
$ git bisect bad 083e7ee
Bisecting: 2 revisions left to test after this (roughly 1 step)
[b00caea53381979ec1732d919d6f76e3baaf80fc] Added tests.py
Why is git bisect So Fast?
Notice that, in the code above, the bisect wizard tells you that there are two revisions left for us to perform in this process until it ends. Because bisect essentially performs a binary search, at each step it tries to cut the number of revisions to check by half. In our case, there are six commits to check, which will take about two steps. But 100 commits would require roughly seven steps, and 1000 commits would require about ten steps.
To combine the last three commands (start, good, and bad) into one, you may instead start the wizard with the following command:
git bisect start 083e7ee 7d1b1ec
As soon as you assign the good and bad commits, git bisect starts its work and takes the state of your repository to an intermediate commit. At this point, you’re shown the commit hash and commit message, and you’re asked whether or not the bug is present in that commit.
Learn More About Each Commit
If you want to know more about a commit during the time the bisect wizard is running, you can run git show for the commit.
In our situation, we just run the file sum.py to find out if the bug is present. For the commit b00caea, we see that the output is 12. So the bug is absent, and we mark it as good:
git bisect good
In the next step, we’re asked whether commit 49a6bec is good. We check the commit by running sum.py again and assign it as bad:
git bisect bad
Once we’re done with this, Git shows us the faulty commit as 5199b4e, which is also evident from the commit message I added when I introduced the error:
$ git bisect bad
Bisecting: 0 revisions left to test after this (roughly 0 steps)
[5199b4e10ba04b63ed1e76118259913123fbf72d] ERROR COMMIT: Introduced error in sum.py
Once you’ve found your faulty commit, you can exit the wizard by running the following:
git bisect reset
In this case, the use of git bisect was overkill and not necessary (as we knew the source of the bug already). However, in real life there are often bugs that are difficult to trace back to a file, but the bug is visible only in the way your code functions. For instance, you have a complex algorithm to find out the popularity of a person in social media and you find out that the results aren’t right. In such cases, you employ the bisect tool to find out which commit first introduced the error to rectify it.
Automated Bisect with Unit Tests
We’ve just seen how bisect helps you find the commit that introduced a bug. However, this process is tedious, as you need to check for the bug at every single step of the wizard.
The easiest way to automate the process is to write unit tests. You can also write custom scripts that test the required functionalities. In our case, we’ll write a custom file—test_sum.py—that tests the functionality of the function in sum.py. This file is just for demonstrating the functionality of bisect. (You don’t need to understand the code here. To learn more about testing in Python, you can read about Python’s unittest module.)
Exit Codes in Custom Shell Scripts
If you create a custom shell script to perform your tests, make sure it has custom exit codes, in addition to printing messages on the terminal about the status of the tests. In general, the 0 exit code is considered a success, whereas everything else is a failure.
#test_sum.py
import unittest
from sum import add_two_numbers

class TestsForAddFunction(unittest.TestCase):

    def test_zeros(self):
        result = add_two_numbers(0, 0)
        self.assertEqual(0, result)

    def test_both_positive(self):
        result = add_two_numbers(5, 7)
        self.assertEqual(12, result)

    def test_both_negative(self):
        result = add_two_numbers(-5, -7)
        self.assertEqual(-12, result)

    def test_one_negative(self):
        result = add_two_numbers(5, -7)
        self.assertEqual(-2, result)

if __name__ == '__main__':
    unittest.main()
Running the file test_sum.py runs the tests specified in it:
python test_sum.py
Running it on our current code shows errors.
Let’s start the bisect process again:
git bisect start 083e7ee 7d1b1ec
We next inform Git about the command that runs the tests:
git bisect run python test_sum.py
If you have a custom command to run your tests, replace python test_sum.py with your command.
On informing Git about the command that tests our code, the wizard runs it against the remaining commits and figures out which commit introduced the error.
Once the bug has been identified, reset the wizard:
git bisect reset
Beware of Using Old Test Files
If you’re using a testing script for the process of running bisect, be aware that when Git is testing an old commit, it’s also checking against the old version of the testing script.
You can instead provide your new test to the command by copying it outside the repository and modifying the test command. Even when old commits are being tested, your latest test files will be used for the testing process.
Once you’ve found out which commit introduced the error, you can look carefully into it to see the faulty code. Once you identify that, you can fix it and commit it to the repository.
Conclusion
What Have You Learned?
In this chapter, we looked at how Git lets you undo mistakes:
- undo
git add - undo
git commit - undo
git push
We’ve also looked at two debugging tools, which help you find bugs in your Git workflow:
- blame
- bisect
What’s Next?
In the next chapter, we’ll look at a list of useful commands that help you use Git to its fullest.