
Chapter 8
Securing VMware vSphere
On a scale of 1 to 10 in importance, security always rates close to a 10 in setting up and managing a vSphere environment. Well, maybe not—but it should. Even though VMware has increased the capabilities and features that come with its products, these same products and features must fit within the security policies applied to other servers. Most of the time, ESXi and vCenter Server fit easily and nicely within those security policies, but sometimes the process is a bit of a challenge. This chapter examines the tools and techniques that will help you ensure that your vSphere environment appropriately follows the security policies of your organization. In this chapter, you will learn to
- Configure and control authentication to vSphere
- Manage roles and access controls
- Control network access to services on ESXi hosts
- Integrate with Active Directory
Overview of vSphere Security
As with most other areas of security within information technology, securing a vSphere environment means securing all the different components of vSphere. Specifically, securing vSphere means securing the following components:
- The ESXi hosts
- vCenter Server
- The VMs, specifically the guest operating systems (guest OSes) running inside the VMs
- The applications running in the VMs
In this chapter we'll discuss the security considerations for the vSphere components: the ESXi hosts, Single Sign-On, vCenter Server, and the guest OSes running in your VMs. Each of these components has its own unique set of security challenges, and each has different ways of addressing those security challenges. For example, ESXi has a different set of security challenges than the Windows-based vCenter Server or the Linux-based vCenter Server virtual appliance. We won't address how to secure the applications within your VMs because that task falls well outside the scope of this book. We do encourage you, however, to be sure to keep application-level security in mind as you work toward securing your vSphere environment.
When considering how to secure the various components involved in a vSphere environment, you must consider the following three aspects to security:
- Authentication
- Authorization
- Accounting
This model—often referred to as the AAA model—describes the way in which a user must be authenticated (properly identified as who they claim to be), authorized (enabled or permitted to perform a task, which also includes network access controls), and accounted for (all actions are tracked and logged for future reference). In using this AAA model, you can ensure that you've covered the key aspects of securing the different components of a vSphere environment. We'll use the AAA model as a rough guideline to structure the discussion of securing vSphere in this chapter.
As you work your way through this chapter, keep in mind that some of the recommendations we make here have absolutely nothing to do with virtualization. Because virtualizing with vSphere affects many areas of the datacenter, you must also consider those areas when you look at security. Further, some of the recommendations we make are made elsewhere in the book, so you might see some duplicate information. Security should be woven into every aspect of your vSphere design and implementation, so it's completely natural that you'll see some of the same tips during this focused discussion on security.
The first components we discuss securing are the ESXi hosts.
Securing ESXi Hosts
VMware ESXi sits at the heart of vSphere, so any discussion of how to secure vSphere includes a discussion on how to secure ESXi. In the following sections, we'll discuss securing your ESXi hosts using the AAA model as a guiding framework, starting with the concept of authentication.
Working with ESXi Authentication
The majority of what you need to do as a vSphere administrator involves working with vCenter Server. Even so, it's still necessary to discuss how ESXi handles user authentication, because the mechanism vCenter Server uses to manage ESXi hosts also relies on ESXi authentication. Additionally, there are occasions where it might be necessary to connect directly to an ESXi host. Although using vCenter Server eliminates the largest part of the need to connect directly to an ESXi host, the need does not go away entirely. There are instances when a task cannot be accomplished through vCenter Server, such as, for example, in the following situations:
- vCenter Server is not available or is down.
- You are troubleshooting ESXi boot and configuration problems.
Because the need to authenticate to ESXi still exists (even if you are authenticating indirectly through vCenter Server), you need to understand the options for managing users and groups on ESXi hosts. There are two basic options: managing users and groups locally on each host or integrating with Active Directory. We'll cover each of these options in the following sections.
MANAGING USERS AND GROUPS LOCALLY
In most cases, the number and frequency of local user accounts on an ESXi host have both diminished considerably. Usually, you need only two or three accounts for access to an ESXi host. Why two or three and not just one? You need at least two accounts in case one account is unavailable during situations such as when a user is on vacation or is sick or an accident occurs. As you already know, users and groups on ESXi hosts are, by default, managed independently per ESXi host. Because you need fewer local accounts, many organizations find that the administrative overhead of managing only a few accounts across multiple ESXi hosts is an acceptable burden.
If this is the case in your environment, you have two ways of managing users and groups locally. You can use command-line tools, or you can use the vSphere Client. The method that is right for you will largely depend on your experience and preferences. For example, we feel very comfortable using the command line, so using the command-line interface (CLI) would be our first choice. However, if you are more comfortable with a Windows-based application, then the vSphere Client is the best option for you. We'll describe both methods so you can choose the method that works best for you.
Perform the following steps to view local users and groups with the vSphere Client:
- Launch the traditional vSphere Client if it is not already running, and connect to an ESXi host.
Remember, the vSphere Web Client cannot directly manage ESXi hosts and you cannot manage ESXi local users and groups in either client while connected to a vCenter Server instance.
- Select the ESXi host from the inventory list on the left.
- Click the Local Users & Groups tab in the content pane on the right.
On the Local Users & Groups tab, you can create new users or groups, edit existing users or groups (including changing the password), and delete users and groups. We'll walk through each of these tasks shortly.
You can also use the CLI to manage local users and groups. Although ESXi offers a local shell (covered in a bit more detail in the section “Controlling Local CLI Access”), the preferred way of using the CLI to work with ESXi is via the vSphere CLI (also referred to as the vCLI). We find using the vSphere Management Assistant (vMA) is the best way of working with the vSphere CLI. As we show you the process for creating, editing, and deleting local users or groups in the next few sections, the CLI environment we'll use and describe is the vMA.
Let's take a look at creating a user or group, editing a user or group, and deleting a user or group.
Creating a Local User or Group
Perform the following steps (these steps assume you're already viewing the Local Users & Groups tab in the vSphere Client) to create a local user or group using the vSphere Client:
- Right-click a blank area of the Local Users & Groups tab and select Add.
This opens the Add New User dialog box.
- Supply a login and (optionally) a UID and username.
If you do not supply a UID, the system will assign the next available UID, starting at 500. If the ESXi host is being managed by vCenter Server, UID 500 might already be taken by the vpxuser account, which we'll explain later in this chapter in the section “Understanding the vpxuser Account.”
- Enter and confirm the password for the new user account.
- If you want this user to be able to use the ESXi Shell, check Grant Shell Access To This User.
- Under Group Membership, select a group from the drop-down and click Add.
- Click OK to create the user with the specified values.
The new user appears in the list of users.
In the section “Managing ESXi Host Permissions,” we'll show you how to assign a role to this user to control what actions the user is allowed to perform.
ADDING “ROOT” USERS TO VSPHERE
Prior to vSphere 5.1, no functionality existed to create additional accounts with the same privileges as the built-in root account; everyone had to share the root account. This meant that whenever an escalated task was performed, it was impossible to relate that action back to a particular person. From vSphere 5.1 onward, the local ESXi “root” group gives actual “root” permissions.
Perform these steps to create a local group using the vSphere Client:
- Click the Groups button near the top of the Local Users & Groups tab.
- Right-click a blank area of the tab and select Add.
This opens the Create New Group dialog box.
- Specify a group name and, optionally, a group ID.
If you do not specify a group ID, the system will assign one automatically, starting with 500.
- From the drop-down list, select the user you'd like to add to this group and click Add. Repeat the process for each user you want to add.
- Click OK to create the group and return to the vSphere Client.
The new group will appear in the list of groups on the Local Users & Groups tab. You can also use the CLI to create users and groups. From the vMA, you can use the vicfg-user command to create users and groups on a specific ESXi host.
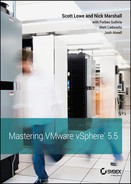
Perform these steps to create a user or group using the CLI:
- Establish an SSH session to the vMA.
- From the vMA command prompt, enter this command to create a new user account on a specific ESXi host:
vicfg-user --server server.domain.com --username root --entity user --login
LoginName --operation add
To create a new group, replace the --entity and --login parameters, like this:
vicfg-user --server server.domain.com --username root --entity group --group
GroupName --operation add
- Depending on your vMA configuration, you might be prompted for a password to execute the command. Enter the password for the user specified in the previous command (root, in this example).
- If you are creating a new user account, you will be prompted for the password for the new user. Enter the password you want assigned to the new user account you are creating, and then confirm that password when prompted again.
Figure 8.1 shows the vMA prompting for a password to perform the command as well as the password for the new user account.
FIGURE 8.1 The vicfg-user command prompts for a password to execute the command and then prompts for a password for the new user you are creating.
As we mentioned previously, creating a new user or group is only part of the process; in order to use that account with the vSphere Client, you also need to assign a role. We'll cover roles and permissions in the section “Managing ESXi Host Permissions” later in this chapter.
Now let's take a look at editing a user or group both from the vSphere Client and from the CLI.
Editing a Local User or Group
Perform the following steps to edit a local user or group using the vSphere Client:
- Assuming you've already launched the vSphere Client and connected to an ESXi host, select the ESXi host from the inventory and click the Local Users & Groups tab.
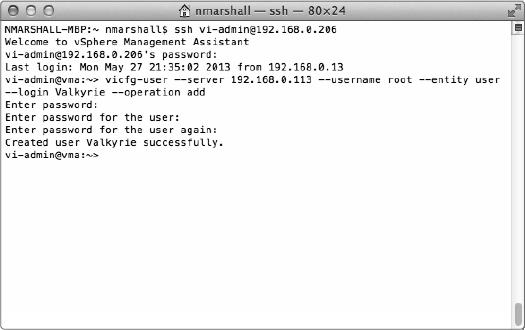
- Right-click the user you want to modify and select Edit.
This opens the Edit User dialog box.
- From the Edit User dialog box, make any necessary changes to the user account.
As you can see from Figure 8.2, the Login field cannot be changed.
FIGURE 8.2 For a user, you can change the UID, username, password, and group membership, but you can't change the Login field.
- Click OK to make the changes to the selected user account.
To edit a group using the vSphere Client, the steps are almost identical to the preceding steps. However, when you're editing a group, the context menu won't show an Edit command; you'll use Properties instead. Also, when editing a group, you can't change any properties of the group except its members.
Perform the following steps to edit a local user or group using the CLI:
- Using PuTTY.exe (Windows) or a terminal window (Mac OS X or Linux), establish an SSH session to the vMA instance.
- Use this command to modify a user account on a specific ESXi host:
vicfg-user --server esxi-03.lab.local --username root --entity user
--login LoginName --newusername "New Full Name" --operation modify
To modify a group, change the --entity and --login parameters, like this:
Vicfg-user --server esxi-03.lab.local --username root --entity group
--operation modify --group TestGroup --adduser testuser --removeuser bob
As with the vSphere Client, editing a group via vicfg-user is limited to adding users to or removing users from the group.
- If prompted for the password to execute the command (this will depend on your vMA configuration), enter the password for the user specified with the --username parameter.
Let's wrap up this discussion of managing local users and groups with a review of how to delete local users and groups from an ESXi host.
Deleting a Local User or Group
Perform the following steps to delete a local user or group from a specific ESXi host using the vSphere Client:
- After you've connected to the desired ESXi host using the vSphere Client, select the ESXi host from the inventory and click the Local Users & Groups tab.
- To delete a user, click the Users button. To delete a group, click the Groups button.
- Right-click the user or group you want to remove, and select Remove from the context menu. When prompted for confirmation, select Yes.
Perform these steps to delete a local user or group using the vCLI:
- Log into the vMA via SSH using PuTTY.exe (Windows) or a terminal window (Mac OS X or Linux).
- Use the following command to remove a user:
vicfg-user --server esxi-03.lab.local --username root --entity user
--operation delete --login UserName
To remove a group, change the --entity and --login parameters:
vicfg-user --server esxi-03.lab.local --username root --entity group
--operation delete --group GroupName
Note that you cannot delete a group from the CLI without first removing all of its members. This limitation does not apply when deleting a group from the vSphere Client.
TO VC OR NOT TO VC
The best way to administer your vSphere environment is to connect the vSphere Web Client to a vCenter Server instance. Although you can connect the legacy vSphere Client to an ESXi host directly, you lose a great deal of functionality. If you didn't purchase vCenter Server, you may have no other choice than to connect to the ESXi hosts. In such instances, you'd have to create user accounts locally on the ESXi hosts for VM administration as outlined in this section.
Now that you have an idea of the specific steps used to manage users and groups locally on each ESXi host, what are the security challenges involved in doing so? And how can those security challenges be addressed? Here are just a couple of examples:
- You must manually manage users and groups separately on each and every ESXi host. If you forget to delete a user account for a departing employee on a specific ESXi host, you've just created a potential security problem.
- There is no way to centrally enforce password policies. Although you can set password policies on each ESXi host, you have to do this separately on every ESXi host in your environment. If you ever need to change the password policy, you must do so on each ESXi host individually.
You can address both of these particular security challenges by leveraging functionality provided by VMware with ESXi to integrate authentication into Active Directory, as you'll see in the next section.
ENABLING ACTIVE DIRECTORY INTEGRATION
You've already seen how, by default, ESXi uses local users and groups to assign permissions to directories and files. The presence of these local users and groups is the key to the ESXi security model, as you'll see in the section “Managing ESXi Host Permissions.” Although these local users and groups form the foundation of the ESXi security model, managing them locally on every ESXi host in the enterprise can create a great deal of administrative overhead and has some security challenges, as we've already described.
What if you were able to continue to accommodate the need for local access to an ESXi host but in a way that avoided some of the security challenges of managing users and groups locally?
One answer to these security challenges is to use a centralized security authority. In vSphere you can use Microsoft Active Directory, a widely deployed directory service, as the centralized security authority for ESXi hosts. As you'll see in the section “Authenticating Users with Single Sign-On,” the Windows-based version of vCenter Server can already leverage Active Directory, so allowing your ESXi hosts to leverage the same security authority makes sense.
Before you can join your ESXi hosts into Active Directory, you need to satisfy four prerequisites:
- You must ensure that the time on your ESXi hosts is synchronized with the time on the Active Directory domain controllers. ESXi supports NTP, and in Chapter 2, “Planning and Installing VMware ESXi,” we showed you how to configure NTP on your ESXi hosts.
- You must ensure that your ESXi hosts can resolve the Active Directory domain name and locate the domain controllers via DNS. Typically, this means configuring the ESXi hosts to use the same DNS servers as the Active Directory domain controllers, and just like NTP, this is covered in Chapter 2.
- The fully qualified domain name (FQDN) of the ESXi host must use the same domain suffix as the Active Directory domain.
- You must create an ESX Admins group in Active Directory. Put the user accounts that should be permitted to connect to an ESXi host in this group. You can't use any other group name; it must be named ESX Admins.
Once you've satisfied these prerequisites, you can configure your ESXi host to authenticate to Active Directory.
Perform these steps to configure your ESXi host to use Active Directory as its centralized security authority:
- Log into the ESXi host using the vSphere Client and authenticating with the root account (or an equivalent account).
- Select the ESXi host from the inventory and click the Configuration tab.
- From the Software section, select Authentication Services.
- Click Properties in the upper-right corner.
- From the Directory Services Configuration dialog box, select Active Directory from the Select Directory Service Type drop-down list.
- Supply the DNS domain name of the Active Directory domain this ESXi host will use for authentication.
- Click the Join Domain button.
- Specify a username and password that has permission to allow the host to join the domain.
Once the ESXi host is joined to Active Directory, users will be able to authenticate to an ESXi host using their Active Directory credentials. Using the vSphere Client or the vCLI, users can use either the domainusername or username@domain syntax. From the vCLI, users must enclose the domainusername syntax in double quotes, as in this example:
vicfg-users --server esxi-03.lab.local --username "labadministrator"
--entity group --operation list
To further simplify the use of the vMA, you can also configure the vMA to use Active Directory authentication.
Although managing how users authenticate is important, it's also important to control how users access ESXi hosts. In the next section, we'll examine how you can control access to your ESXi hosts.
Controlling Access to ESXi Hosts
The second part of the AAA model is authorization, which encompasses access control mechanisms that affect local access or network access. In the following sections, we'll describe the mechanisms available to you to control access to your ESXi hosts.
CONTROLLING LOCAL ACCESS
ESXi offers direct access via the server console through the Direct Console User Interface, or DCUI. We've shown you screen shots of the DCUI in various other parts of this book, such as Chapter 2.
Access to the DCUI on an ESXi host is limited to users who have the Administrator role on it. We haven't discussed the concept of roles yet (see “Managing ESXi Host Permissions” later in this chapter for more details), but this limitation on the DCUI allows you to control who is permitted to access the DCUI. As with other forms of security, it's important to secure access to the host via the physical server console, and limiting DCUI access to users with the Administrator role helps accomplish that goal.
CONTROLLING LOCAL CLI ACCESS
ESXi has a CLI environment that is accessible from the server's physical console. However, by default, this CLI environment—known as the ESXi Shell—is disabled. If you need CLI access to ESXi, you must first enable the ESXi Shell. You can enable the ESXi Shell via the DCUI or via the vSphere Client.
Perform these steps to enable the ESXi Shell via the DCUI:
- Access the console of the ESXi host using the physical server console or some KVM mechanism (many server vendors provide remote console functionality).
- Press F2 to log into the DCUI. When prompted for username and password, supply a username and password with permission to access the DCUI (this user must have the Administrator role for this ESXi host).
- Navigate down to Troubleshooting Options and press Enter.
- Select Enable ESXi Shell.
This enables the CLI environment on the ESXi host.
- Press Esc until you return to the main DCUI screen.
- Press Alt+F1 to access the CLI environment on that ESXi host.
If your host is using local authentication, you can authenticate using a user account defined locally on that host. If your host is using Active Directory authentication as described in the previous section, you can log in using Active Directory credentials (using either the domainusername or username@domain syntax).
Perform the following steps to enable the ESXi Shell via the vSphere Client:
- Connect to the ESXi host using the vSphere Client.
- Select the ESXi host in the inventory, and click the Configuration tab.
- From the Software section, select Security Profile.
- Click the Properties hyperlink near Services.
This opens the Services Properties dialog box.
- Select ESXi Shell from the list of services and then click Options.
- Click Start.
- Click OK to return to the Services Properties dialog box.
The status for the ESXi Shell should now be listed as Running.
- Click OK to return to the vSphere Client.
The ESXi Shell is now available.
You can now use the local CLI at the ESXi host's console. It's important to note, though, that VMware doesn't recommend regular, routine use of the ESXi Shell as your primary means of managing and maintaining ESXi. Instead, you should use the vSphere Client and/or the vMA and resort to the ESXi Shell only when absolutely necessary.
While following these steps gets you local CLI access, it doesn't get you remote CLI access. For remote CLI access, another step is required, as you'll see in the next section.
CONTROLLING REMOTE CLI ACCESS VIA SSH
Secure Shell, often referred to just as SSH, is a widely known and widely used encrypted remote console protocol. SSH was originally developed in 1995 to replace other protocols, such as telnet, rsh, and rlogin, that did not provide strong authentication and did not protect against password-sniffing attacks on the network. SSH gained rapid adoption, and the SSH-2 protocol is now a proposed Internet standard with the Internet Engineering Task Force (IETF).
ESXi includes SSH as a method of remote console access. This allows vSphere administrators to use an SSH client, such as PuTTY.exe on Windows or OpenSSH on Linux or Mac OS X, to remotely access the CLI of an ESXi host in order to perform management tasks. However, as with the ESXi Shell, SSH access to an ESXi host is disabled by default. To gain remote CLI access to an ESXi host via SSH, you must first enable the ESXi Shell and enable SSH. You've already seen how to enable the ESXi Shell; now we'll show you how to enable SSH, both via the DCUI and via the vSphere Client.
Perform the following steps to enable SSH via the DCUI:
- Access the console of the ESXi host using the physical server console or some KVM mechanism (many server vendors provide remote console functionality).
- Press F2 to log into the DCUI. When prompted for username and password, supply a username and password with permission to access the DCUI (this user must have the Administrator role for this ESXi host).
- Navigate down to Troubleshooting Options and press Enter.
- Select Enable SSH. This enables the SSH server (or daemon) on the ESXi host.
- Press Esc until you return to the main DCUI screen.
Perform these steps to enable SSH via the vSphere Client:
- Connect to the ESXi host using the vSphere Client.
- Select the ESXi host in the inventory and click the Configuration tab.
- From the Software section, select Security Profile.
- Click the Properties hyperlink near Services.
This opens the Services Properties dialog box.
- Select SSH from the list of services; then click Options.
- Click Start.
- Click OK to return to the Services Properties dialog box.
The status for SSH should now be listed as Running.
- Click OK to return to the vSphere Client. You can now use PuTTY.exe (Windows) or OpenSSH (Mac OS X, Linux, and other Unix variants) to establish an SSH session to the ESXi host.
As with local CLI access, VMware recommends against using SSH as a means of routinely managing your ESXi hosts. In fact, in previous versions of vSphere, SSH access to ESXi was unsupported. It is supported in this version of vSphere, but VMware still recommends against its regular use. If you want to use a CLI environment, we recommend getting familiar with the vMA as your primary CLI environment.
ROOT LOGIN VIA SSH IS ENABLED BY DEFAULT
Generally speaking, allowing the root user to log into a host via SSH is considered a violation of security best practices. However, in vSphere 5.0, when SSH and the ESXi Shell are enabled, the root user is allowed to log in via SSH. This is yet one more reason to keep SSH and the ESXi Shell disabled during the normal course of operation.
Although VMware provides SSH as a means of accessing the CLI environment on an ESXi host, this version of SSH does not provide all the same flexibility as a “full” SSH installation. This further underscores the need to use SSH on an as-needed basis as well as the need for additional access controls for your ESXi hosts, such as a network firewall.
CONTROLLING NETWORK ACCESS VIA THE ESXI FIREWALL
ESXi ships with a firewall that controls network traffic into or out of the host. This firewall gives the vSphere administrator an additional level of control over what types of network traffic are allowed to enter or leave the ESXi hosts.
By default, the ESXi firewall allows only incoming and outgoing connections necessary for managing the VMs and the ESXi host. The following default ports are among those that are open:
- TCP 443 and 902: vSphere Client, vCenter Agent
- UDP 53: Domain Name System (DNS) client
- TCP and UDP 427: Common Information Model (CIM) Service Location Protocol (SLP)
- TCP 8000: vMotion
- TCP 22: SSH
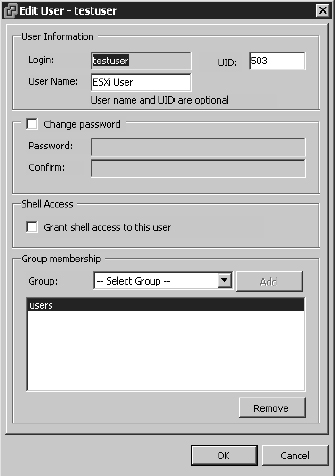
To see the full list of ports that are open on an ESXi host, you can use the vSphere Client connected directly to an ESXi host, as illustrated in Figure 8.3, or use the vSphere Web Client connected to a vCenter server, select a host, and navigate to Manage ![]() Settings
Settings ![]() Security Profile.
Security Profile.
From this same area of the vSphere Client, you can also enable additional ports through the firewall or disable ports that are currently open. There are a number of predefined ports and related services listed here that can be configured.
Perform the following steps to enable or disable traffic through the ESXi firewall:
- Launch the traditional vSphere Client and connect to an ESXi host.
- Select an ESXi host from the inventory view and select the Configuration tab.
- From the Software section, select Security Profile.
- Click the Properties hyperlink to the right of the Firewall heading.
- To enable a particular type of traffic through the ESXi firewall, select the check box next to that traffic type. To disable a type of traffic, deselect the check box for that traffic type.
- Click OK to return to the client.
FIGURE 8.3 The Security Profile area of the Configuration tab in the traditional vSphere Client shows the current ESXi firewall configuration.
The ESXi firewall also allows you to configure more fine-grained controls over network access by specifying particular source addresses from which traffic should be allowed. This gives you the ability to enable certain types of traffic through the ESXi firewall but restrict access to specific IP addresses or groups of IP addresses.
Perform these steps to limit access to a network service to a specific source:
- Launch the Web Client and connect to a vCenter Server instance.
- Select an ESXi host from the inventory view and select the Manage tab.
You might need to navigate to the Hosts And Clusters view first if you are connected to a vCenter Server instance.
- From the Settings section, select Security Profile.
- Click the Edit button to the right of the content area.
This opens the Firewall Properties dialog box.
- Select a particular port that is currently enabled through the firewall.
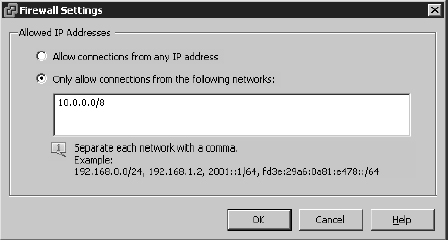
- To restrict access to a particular source, toward the bottom of the dialog box, deselect the check box labeled Allow Connections From Any IP Address.
You can then specify the allowed source address or addresses in three different formats:
- 192.168.1.24: A specific source IPv4 address
- 192.168.1.0/24: A specific subnet of source IPv4 addresses
- 2001::1/64: A subnet of source IPv6 addresses
Figure 8.4 shows a source subnet of 10.0.0.0/8 configured for the selected network traffic.
FIGURE 8.4 Traffic to the selected network traffic on this ESXi host will be limited to addresses from the specified subnet.
- Click OK to close the Firewall Settings dialog box and return to the Firewall Properties dialog box.
- Click OK to close the Firewall Properties dialog box and return to the vSphere Client.
This feature of the ESXi firewall gives you much more flexibility in not only defining what services are allowed into or out of your ESXi hosts but also in defining the source of the traffic into or out of the host. The two previous examples outline how to perform firewall tasks with both the traditional vSphere Client and the vSphere Web Client. There may be the odd occasion when you need to configure your own ports and services through the firewall, and this needs to be performed through the ESXi shell or via SSH.
The following steps will guide you through creating your own custom firewall rules.
- Log on to the ESXi shell via SSH.
- To display the current firewall rules run the following command:
esxcli network firewall ruleset list
- Make a backup of the firewall configuration file:
cp /etc/vmware/firewall/service.xml /etc/vmware/firewall/service.xml.bak
- Allow the firewall configuration file to be changed with the following:
chmod 644 /etc/vmware/firewall/service.xml
- Toggle the sticky bit flag using the following command:
chmod +t /etc/vmware/firewall/service.xml
- Open the firewall configuration file with a text editor; in this example Vi is used:
vi /etc/vmware/firewall/service.xml
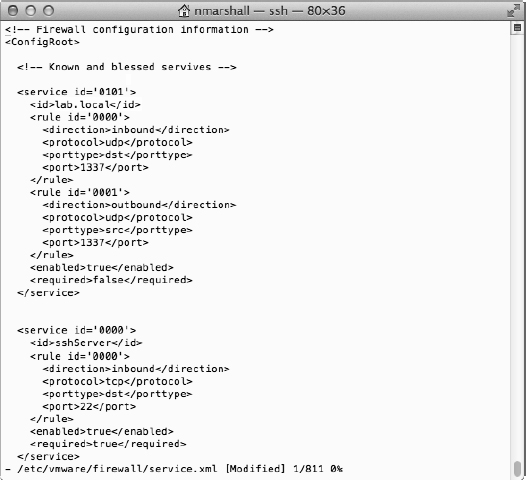
- As per Figure 8.5, add a service following the same syntax as those that already exist in the file:
<service id='0101'> <id>lab.local</id> <rule id='0000'> <direction>inbound</direction> <protocol>udp</protocol> <porttype>dst</porttype> <port>1337</port> </rule> <rule id='0001'> <direction>outbound</direction> <protocol>udp</protocol> <porttype>src</porttype> <port>1337</port> </rule> <enabled>true</enabled> <required>false</required> </service>FIGURE 8.5 Adding the correct XML to the services.xml file allows you to customize the ESXi host firewall ports.
- Change the firewall configuration permissions back to their original value:
chmod 444 /etc/vmware/firewall/service.xml
- Update the firewall configuration by running the following command:
esxcli network firewall refresh
- Finally, list the firewall rules again to ensure that the changes are active:
esxcli network firewall ruleset list
Maintaining the ESXi firewall configuration is an important part of ESXi host security.
Another recommended security practice is to isolate the ESXi management network to control network access to the management interfaces of your ESXi hosts. You can accomplish this using a network firewall, a technique we describe in the next section.
CONTROLLING NETWORK ACCESS TO THE ESXI MANAGEMENT INTERFACES
The ESXi firewall allows you to control access to specific TCP/IP ports on an ESXi host, but an additional step to consider is a network firewall to control access to the management interfaces of the ESXi host. Using a network firewall to enforce access control lists (ACLs) that govern which systems are allowed to make connections to the management interfaces of your ESXi hosts is a complementary step to using the ESXi firewall, and it follows the well-known recommended practice of using “defense in depth.”
Should you choose to isolate the management interfaces of your ESXi hosts on a separate network segment, keep in mind the following two important considerations:
- Be sure to allow proper access from vCenter Server to the ESXi hosts. You can handle this by allowing the appropriate ports through the firewall or by adding an extra network interface on the isolated management segment to the vCenter Server system. Personally, we prefer the latter approach, but both approaches are perfectly valid.
- Don't forget to allow access from the vMA or from systems on which you will run PowerCLI scripts if you'll be accessing the ESXi hosts directly. If the vMA or the PowerCLI scripts will be connecting to vCenter Server, then you just need to allow access to vCenter Server.
![]() Real World Scenario
Real World Scenario
USING A JUMP BOX
One technique that we've seen, and used, in a fair number of installations is a jump box. This is a system—typically a Windows Server–based system—that has network interfaces to the isolated management network as well as the rest of your network segments. You'll connect to the jump box and then connect from there to your vSphere environment using the vSphere Client, PowerCLI, vMA, or other tools. This neatly sidesteps the issue of having to create firewall rules to allow traffic into or out of the isolated management network but still provides access to manage the environment. If you are considering isolating the management interfaces of your ESXi hosts, a jump box might be an approach to consider for your environment.
Controlling network access to your ESXi hosts is an important part of your overall security strategy, but it's also important to keep your ESXi hosts patched against security vulnerabilities.
Keeping ESXi Hosts Patched
Another key component in maintaining the security of your vSphere environment is keeping your ESXi hosts fully patched and up-to-date. On an as-needed basis, VMware releases security patches for ESXi. Failing to apply these security patches could expose your vSphere environment to potential security risks.
vSphere Update Manager (VUM) is the tool VMware supplies with vSphere to address this need. We discussed the VUM extensively in Chapter 4, “vSphere Update Manager and the vCenter Support Tools.” In order to keep your vSphere environment as secure as possible, you should strongly consider using VUM in your environment to keep your ESXi hosts patched.
In the next section, we'll move on to another aspect of authorization: access controls to manage what a user is allowed to do on an ESXi host after being authenticated.
Managing ESXi Host Permissions
We've shown you how to manage users and groups, both locally and through Active Directory integration. Another key aspect of ESXi host security is the concept of roles.
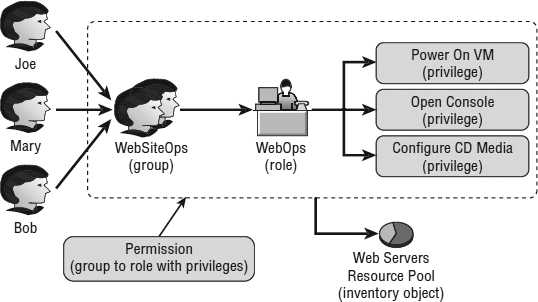
Both vCenter Server and ESXi hosts use the same structured security model to allow users to manage portions of the virtual infrastructure. This model consists of users, groups, roles, privileges, and permissions, as shown in Figure 8.6.
FIGURE 8.6 vCenter Server and ESXi share a common security model for assigning access control.
The items that differ between the non–vCenter Server environment and the vCenter Server environment are predominantly in the following two areas:
- The location of the user and group objects created
- The level of granularity of the roles and privileges available in each environment
You've already seen how ESXi can either use users and groups defined locally on each ESXi host or leverage Microsoft Active Directory as a centralized security authority. As you'll see later in the section “Authenticating Users with Single Sign-On,” vCenter can also leverage a directory such as Active Directory as a centralized security authority. Prior to vSphere 5.1, the Windows-based vCenter Server itself was a member of Active Directory, and permissions were leveraged through this connection. From vSphere 5.1 onward, the architecture has significantly changed with the introduction of vCenter Single Sign-On (SSO). We'll explain more about SSO later in this chapter. This is the first key difference in managing permissions for environments that don't use vCenter Server versus environments that do.
The second key difference is the level of granularity of the roles and privileges available in each environment. To explain this difference, we must first discuss and define roles and privileges.
For environments that don't have vCenter Server, or where the administrator chooses to have users authenticate directly to the ESXi hosts to perform management tasks, it is important to start with a discussion of the security model.
In the vCenter Server/ESXi security model's most basic format, users or groups are assigned to a role that has privileges. The user-role-privilege combination is then associated with an object in the inventory as a permission. This means there are four basic components to the vCenter Server/ESXi security model:
User or Group A user is an authentication mechanism; a group is a way of collecting users. In earlier sections of this chapter, we showed you how to manage users and groups and how ESXi can leverage either local users and groups or users and groups from Active Directory. Users and groups form a basic building block of the security model.
Privilege A privilege is an action that you can perform on an inventory object. This would include allocating space in a datastore, powering on a VM, configuring the network, or attaching a virtual CD/DVD to a VM.
Role A role is a collection of privileges. ESXi comes with some built-in roles, as we'll show you shortly, and you also have the ability to create your own custom roles.
Permission A permission allows a user or group to perform the activities specified by a role assigned to an inventory object. For example, you might assign a role that has all privileges to a particular inventory object. Attaching the role to the inventory object creates a permission.
This modular security model provides a great deal of flexibility. vSphere administrators can either use the built-in roles provided with ESXi or create custom roles with custom sets of privileges and assign those custom roles to inventory objects in order to properly re-create the correct set of abilities in the virtual infrastructure. By associating roles with users or groups, vSphere administrators need to define the role only once; then, anytime someone needs those privileges, all the administrator needs to do is associate the appropriate user or group with the appropriate role. This can really help simplify the management of permissions.
An ESXi host has the following three default roles:
No Access The No Access role works as the name suggests. This role prevents access to an object or objects in the inventory. The No Access role can be used if a user was granted access higher up in the inventory. The No Access role can also be used at lower-level objects to prevent object access. For example, if a user is granted permissions on the ESXi host but should be prevented from accessing a specific VM, you could use the No Access role on that specific VM.
Read-Only Read-Only allows a user to see the objects within the vSphere Client inventory. It does not allow the user to interact with any of the visible objects in any way. For example, a user with the Read-Only permission would be able to see a list of VMs in the inventory but could not act on any of them.
Administrator The Administrator role has the utmost authority, but it is only a role, and it needs to be assigned using a combination of a user or a group object and an inventory object such as a VM.
With only three built-in roles on ESXi hosts, the defaults don't leave room for much flexibility. In addition, the default roles just described can't be modified, so you can't customize them. However, don't let that slow you down. Any limits created by the default roles are easily overcome by creating custom roles. You can create custom roles that will better suit your needs, or you can clone existing roles to make additional roles to modify for your own purposes.
Let's take a closer look at how to create a custom role.
CREATING CUSTOM ROLES
If you find that the default roles provided with ESXi don't suit your organization's needs with regard to permissions and management, then you should create custom roles to better map to your business needs. For example, assume that a set of users needs to interact with the console of a VM and also needs to change the CD and floppy media of those VMs. These needs aren't properly reflected in any of the default roles, so a custom role is necessary.
Perform the following steps to create a custom role named Operator:
- Launch the traditional vSphere Client if it is not already running, and connect to an ESXi host.
- Navigate to the Administration area by using the navigation bar or by selecting View
 Administration Roles.
You can also press the Ctrl+Shift+R keyboard shortcut.
- Click the Add Role button.
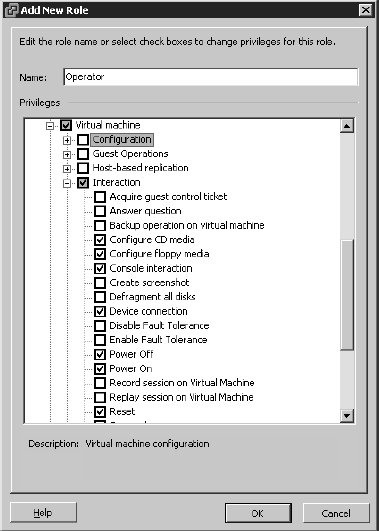
- Type the name of the new role in the Name text box (in this example, Operator), and then select the privileges that will be required by members of the role, as shown in Figure 8.7.
The privileges shown in Figure 8.7 allow users or groups assigned to the Operator role to interact with the console of a VM, change the CD and floppy media, and change the power state of a VM.
PERMISSIONS FOR CHANGING VIRTUAL MEDIA
To change floppy and CD media using floppy disk images (files with a .flp filename extension) and CD/DVD disk images (files with a .iso filename extension) that are stored on a SAN volume, you will also need to grant that group Browse Datastore privileges at the root of the hierarchy—in this case, at the ESXi host itself.
- Click OK to complete the custom role creation.
The new Operator role is now defined, but it's not operational yet. You must still assign users or groups to the role and apply the role to the ESXi host and/or individual VM(s).
GRANTING PERMISSIONS
As simple and useful as roles are, they are not functional until a user or group is assigned to the role and the role is then assigned to an inventory object as a permission. Assume that a group of users exists that needs to interact with all VMs that are web servers. If access control is managed through the ESXi host, then you have to create a user account on that host (or leverage an Active Directory user account) together with a new group—for example, WebServerOps. Once these users and groups exist, you can execute the security model.
FIGURE 8.7 Custom roles strengthen management capabilities and add flexibility to permission delegations.
Perform the following steps to grant VM access control to a user or group:
- Launch the traditional vSphere Client if it is not already running, and connect to an ESXi host.
- Right-click the object in the inventory tree on the left to which permission should be assigned, and click the Add Permission option. In this case, right-click the ESXi host.
- Click the Add button in the Assign Permissions dialog box.
- In the Select Users And Groups dialog box, select the appropriate user or group (for example, WinESXOps).
Use the Domain drop-down box to show users and groups from Active Directory if you've configured your ESXi host to integrate with Active Directory.
Once you've found the user or group you want, click the Add button, and then click OK. This returns you to the Assign Permissions dialog box, where the user or group is listed on the left side.
- From the Assigned Role drop-down list, choose the role to which the selected users or groups should be assigned. In this case, select Operator—the role you defined earlier—from the drop-down list to assign that role to the selected user or group.
What if you have an ESXi host that will host 30 VMs and only 10 of those are the web server VMs? If you assign the permission at the ESXi host level, as we just demonstrated, then you'll assign that role to all 30 VMs, not just the 10 web server VMs. This is because when you assign a permission, an option named Propagate To Child Objects is enabled by default. Figure 8.8 shows the Assign Permissions dialog box; note the option to propagate permissions in the lower-right corner of the dialog box.
FIGURE 8.8 By default, assigning a permission to an object will propagate that permission to all child objects.
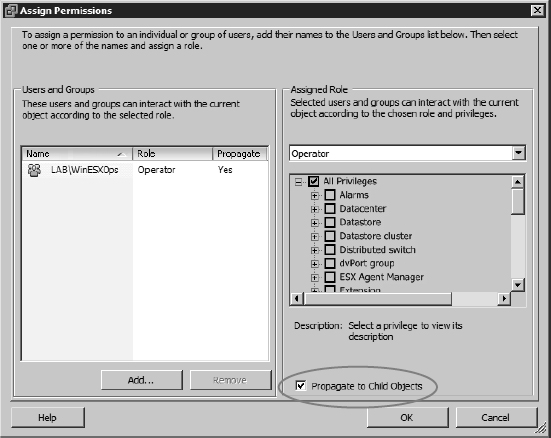
This option works like the security inheritance settings in a Windows filesystem. It allows the privileges assigned in this role to be applied to objects beneath the selected object. For example, if the Operator role is applied as a permission on the ESXi host in the inventory panel and the Propagate To Child Objects option is enabled, all members of the Operator role will be able to interact with all the VMs hosted on the ESXi host. Although this certainly simplifies access control implementation, it adds another problem: The permissions of the Operator role have been overextended and now apply to all VMs and not just the web servers. With access control granted at the host level, members of the Operator role will be able to change floppy and CD media and use the console of the web server VMs, but they will also be able to do that on any other VM in the inventory.
To make this work as you would expect, you would have to assign permissions on each of the 10 web server VMs individually. Clearly, this is not an efficient process. Further growth resulting in more web server VMs would require additional administrative effort to ensure access control.
Alternatively, you could use the No Access role on the non-web-server VMs to prevent access, but this method also does not scale well and requires administrative overhead.
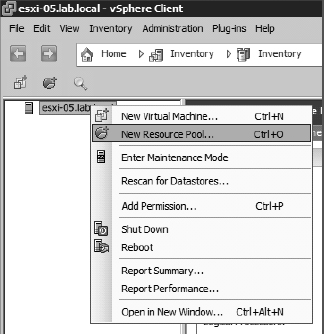
This issue presents one of the drawbacks of managing access control on an individual ESXi host. Keep in mind as well that all of the steps we have discussed so far would have to be performed on each ESXi host in the virtual infrastructure. What if there were a way to organize the inventory of VMs? In other words, what if you could create a “container object” for the web server VMs, such as a folder, and put all the web server VMs into it? Then you could assign the group to the role at the parent object level and let inheritance take over. As shown in Figure 8.9, the problem is that folder objects are not possible on a single ESXi host. That means your only option is a resource pool.
FIGURE 8.9 Folder objects cannot be added to an individual ESXi host, leaving resource pools as the only viable option to group VMs.
USING RESOURCE POOLS TO ASSIGN PERMISSIONS
A resource pool is actually a special object. Think of it as a folder of sorts. We'll discuss resource pools in much greater detail in Chapter 11, “Managing Resource Allocation”; we strongly urge you to read that chapter and understand the purpose behind resource pools and how they work before attempting to use them to organize your VMs. The focus here is on how resource pools can help you organize your VMs, but it's important to understand that using resource pools in this manner might have unintended side effects.
Perform the following steps to create a resource pool:
- Launch the vSphere Client if it is not already running, and connect to an ESXi host.
- Navigate to the inventory view by using the navigation bar, by using the Ctrl+Shift+H keyboard shortcut, or by selecting View Inventory Inventory from the menu.
- Right-click the ESXi host, and select New Resource Pool, as shown previously in Figure 8.9.
- Type a resource pool name in the Name text box, in this case WebServers.
- Configure the resource allocations, if desired, to establish limits and reservations for the resource pool.
The limit establishes a hard cap on the resource usage, while the reservations establish a resource guarantee.
- Click OK.
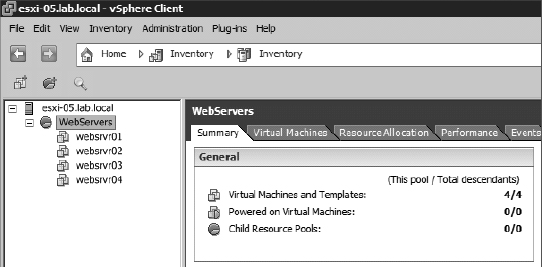
So now that you've created the WebServers resource pool, you can place VMs into it, as shown in Figure 8.10. Putting VMs into a resource pool is simply a matter of creating new VMs in it (refer to Chapter 9, “Creating and Managing Virtual Machines”) or dragging and dropping existing VMs into it.
FIGURE 8.10 As objects in the inventory, resource pools are potential levels of infrastructure management.
Additionally, resource pools become inventory objects to which you can assign permissions. The same process you followed earlier, described in the section “Granting Permissions,” applies here as well. Simply assign permission to the resource pool, and ensure that the Propagate To Child Objects check box is selected. Those permissions will also apply to all the VMs in the resource pool.
Using resource pools helps you accomplish a couple of key goals: better organization for your VMs and better control over permissions assigned to those VMs.
However, having said all of this, we must point out that we generally do not recommend using resource pools in this way. Although you can certainly use resource pools to organize VMs and assign permissions, resource pools are intended to help control resource allocation and consumption; they are not intended as a means of organizing VMs. In Chapter 11, we'll discuss resource allocation and why using resource pools solely for VM organization is generally not a good idea; we highly recommend reading that chapter and gaining a firm understanding of how resource pools affect resource allocation.
Now that we've shown you how to assign permissions, we need to show you how to remove permissions. Let's look at that next.
REMOVING PERMISSIONS
When your management needs change or if you've made some improper permissions assignments, you can remove permissions. In the section “Granting Permissions,” you walked through the process of assigning the Operator role permission on the ESXi host. Now that you have a resource group in place to give you more granular control over permissions, you should remove the permissions you previously applied to the host.
Perform the following steps to remove permissions on an object in the inventory:
- Launch the traditional vSphere Client if it is not already running, and connect to an ESXi host.
- Navigate to the inventory view using the navigation bar, the menu, or the keyboard shortcut.
- Select the object in the inventory, and then select the Permissions tab.
In this case, you need to remove the permissions from the ESXi host, so select the host from the inventory.
- Right-click the permissions entry to be deleted from the list of existing permissions, and then click the Delete option.
You should see a warning indicating that users may retain their permissions because of assignments on parent objects higher in the hierarchy. In this case, you want to remove the objects on the parent object (the ESXi host) because those permissions have been applied to the child object (the resource pool). In other cases, though, it might be necessary to keep permissions on the parent object.
After you assign permissions throughout the inventory, it is easy to lose track of what you have previously done. Of course, if your company mandates documentation, there might already be a solid audit trail. However, it is easy to see existing role usage from within the vSphere Client.
IDENTIFYING PERMISSION USAGE
As the inventory of VMs and resource pools grows larger and more complex, it's very likely that the permissions granted to these various objects will also become complex. In addition, as company needs and management strategies change over time, these permissions need to change as well. Combined, these factors can create an environment where the permissions usage is quite complex and hard to decipher.
To help combat this issue, the roles view for the vSphere Client helps administrators identify where roles have been assigned and what permissions have been granted in the inventory.
Perform the following steps to identify where a role has been assigned as a permission:
- Launch the traditional vSphere Client if it is not already running, and connect to an ESXi host.
- Navigate to the roles view using the navigation bar, the Ctrl+Shift+R keyboard shortcut, or the View Administration Roles menu item.
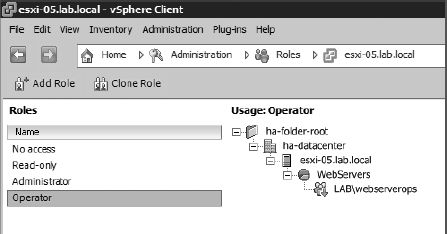
- Click the role whose usage you want to identify.
The details pane identifies where in the inventory hierarchy the role is used, as you can see illustrated in Figure 8.11.
Using the vSphere Client's roles view allows you, the administrator, to track down where permissions have been assigned so that you can edit or remove permissions when necessary. But it's not only permissions that need to be removed—sometimes roles need to be removed too.
FIGURE 8.11 The vSphere Client provides a breakdown of where roles are currently in use.
EDITING AND REMOVING ROLES
Over time, it is almost inevitable that management needs will change. At times, you might have to create new roles, edit an existing role, or even delete a role. If the privileges assigned to a role are no longer applicable in your environment, you should edit the role to add or remove the necessary privileges.
Perform the following steps to edit a role:
- Launch the vSphere Client if it is not already running, and connect to an ESXi host.
- Navigate to the roles view using the navigation bar, the Ctrl+Shift+R keyboard shortcut, or the View Administration Roles menu item.
- Right-click the role you want to edit, and select Edit Role.
- Make the desired changes by adding or removing privileges in the Edit Role dialog box. Click OK when you finish.
As we mentioned earlier in this chapter, ESXi won't allow you to edit the default roles.
If a role is no longer used, it should be removed to minimize the number of objects to be viewed and managed.
Perform the following steps to delete a role:
- Launch the vSphere Client if it is not already running, and connect to an ESXi host.
- Navigate to the roles view using the navigation bar, the Ctrl+Shift+R keyboard shortcut, or the View Administration Roles menu item.
- Right-click the role to be deleted, and select Remove.
When a role is in use and is selected for removal, the ESXi host offers the opportunity to transfer the existing role members to a new role or to simply drop all members from the role. This eliminates the chance of accidentally deleting roles that are being used in the inventory.
Now that you understand how to work with local users, groups, roles, and permissions on an individual ESXi host, be aware that you are unlikely to do much of this. Managing local user accounts is administratively more cumbersome because of the lack of centralized management and authentication. Active Directory integration addresses a great deal of this, allowing you to collapse your user and group management into one centralized directory. However, you will still find that you perform most, if not all, of your access control work within vCenter Server. As you'll see in the section “Managing vCenter Server Permissions,” vCenter Server offers greater flexibility than managing individual ESXi hosts.
The last area of ESXi host security we'll discuss pertains to the third A in the AAA model: accounting—in other words, logging. Let's take a closer look at how to handle logs for your ESXi hosts.
Configuring ESXi Host Logging
Capturing information in the system logs is an important aspect of computer and network security. The system logs provide a record, or an accounting, of the actions performed, the events encountered, the errors experienced, and the state of the ESXi host and the VMs on that host.
Every ESXi host runs a syslog daemon (service) that captures events and logs them for future reference. Assuming that you've installed ESXi onto some local disks, the default location for the logs is a 4 GB scratch partition that the ESXi installer creates. Although this provides long-term storage for the ESXi host logs, there is no centralized location for them, making analysis of the logs more difficult than it should be. An administrator would have to connect to each host individually to review the logs for that host.
Further, if you are booting from SAN or if you are using vSphere Auto Deploy, there is no local scratch partition, and logs are stored in memory on the ESXi host—which means they disappear when the ESXi host is restarted. Clearly, this is not an ideal configuration. Not only does it lack centralized access to the logs, but it also lacks long-term storage for the logs.
The typical solution to both of these issues is a third-party syslog server, a server that runs a syslog daemon and is prepared to accept the log entries from the various ESXi hosts. To make things easier, VMware supplies a syslog collector with vSphere 5 in three different forms:
- As a service you can install onto a Windows Server–based computer
- As a service preinstalled on the vCenter Server virtual appliance
- As part of the vMA's built-in syslog daemon
In Chapter 4 we show you how to install the VMware Syslog Collector on a Windows Server–based computer and how to configure your ESXi hosts to send their logs to this centralized syslog service.
Reviewing Other ESXi Security Recommendations
In addition to all the security recommendations we've made so far with regard to ESXi hosts, there are some other recommended practices that you should follow:
- Set a root password for the ESXi host. You can set the root password, if it has not already been set, via the server's console by pressing F2. More information on working with the ESXi console is available in Chapter 2.
- Use host profiles in vCenter Server. Host profiles can help ensure that the configuration of the ESXi hosts does not drift or change from the settings specified in the host profile. We discussed host profiles in Chapter 3, “Installing and Configuring vCenter Server.”
- Enable lockdown mode for your ESXi hosts. Enabling lockdown mode disables console-based user access and direct access via the vSphere Client. Root access via the vMA is also restricted.
Now that you've looked at the various ways to secure your ESXi hosts, it's time to move on to securing vCenter Server, the second major component in your vSphere environment.
Securing vCenter Server
For the most part, discussing how to secure vCenter Server entails discussing how to secure the underlying OS. For environments that have deployed the Windows Server–based version of vCenter Server, this means securing Windows Server. For environments using the Linux-based vCenter Server virtual appliance, it means securing SuSE Linux. Because it's a virtual appliance, though, there isn't a lot that you can do to secure the preinstalled SuSE Linux instance.
Securing Windows Server—for those environments running the Windows Server–based version of vCenter Server—is a topic that has been discussed many, many times, so we won't go into great detail here. The following security recommendations are among the more common ones:
- Stay current on all Windows Server patches and updates. This helps protect you against potential security exploits.
- Harden the Windows Server installation using published best practices and guidelines from Microsoft.
In addition to these standard security recommendations, we can offer a few other security recommendations that are specific to vCenter Server and its components such as SSO, the Inventory Service, and the Web Client:
- Be sure to stay current on vCenter Server patches and updates.
- Place the vCenter Server backend database on a separate system (physical or VM), if possible, and follow recommended practices to secure the separate system.
- If you are using Windows authentication with SQL Server, use a dedicated service account for vCenter Server—don't allow vCenter Server to share a Windows account with other services or applications.
- Be sure to secure the separate database server and backend database using published security practices from the appropriate vendor. This includes securing the database server itself (Microsoft SQL Server, or Oracle) as well as the underlying OS for that database server (Windows Server, Linux, or other).
- Replace the default self-signed SSL certificates with a valid SSL certificate from a trusted root authority for vCenter Server and all of its components.
SSL CERTIFICATE REPLACEMENT
With the separation of vCenter components for vSphere version 5.1 and above, the complexity for replacing the default SSL certificates has increased. VMware has addressed this complexity by creating tools to assist the process and also by providing extensive Knowledge Base articles on the topic. It would take a dedicated chapter to explain the entire process step-by-step, so if you're interested we recommend you read the Knowledge Base located at kb.vmware.com/kb/2034833.
In addition to these recommendations, there are other steps you should take to ensure that vCenter Server—and the infrastructure being managed by vCenter Server—is appropriately secured and protected.
Once again using the AAA model as a rough structure for the security discussion, we'll start with a review of vCenter Server authentication.
Authenticating Users with Single Sign-On
As with ESXi, users will need to authenticate to get access to vCenter Server in order to perform any tasks, but the process for how this authentication works changed significantly from vSphere 5.1 with the introduction of vCenter Single Sign-On. How you handle that authentication depends on your environment. Both the Windows Server–based version of vCenter Server and the Linux-based vCenter Server virtual appliance offer the same authentication mechanisms. Generally you will probably authenticate against Active Directory, although you could manage users and groups locally within Single Sign-On itself or even connect it to OpenLDAP. Because using Active Directory and using local SSO users are the most common methods of authentication, we'll focus on these for this discussion.
In the following sections, we'll cover these three topics:
- Configuring Single Sign-On for authentication against Active Directory
- Configuring Single Sign-On for authentication against local users
- Understanding how vCenter Server authenticates against ESXi with vpxuser
CONFIGURING SSO ON WINDOWS SERVER FOR ACTIVE DIRECTORY
In previous version of vSphere, when vCenter is installed on a Windows Server computer, leveraging Active Directory is pretty simple: Join the computer to an Active Directory domain before installing vCenter, and vCenter would—by virtue of how Windows integrates with Active Directory—automatically be able to take advantage of users and groups stored within Active Directory. If you choose not to join Active Directory, then the Windows-based version of vCenter will need to be configured for use with an external directory service.
vSphere 5.1 introduced SSO for the first time, and VMware has made some additional changes in vSphere 5.5. The key to SSO and Active Directory integration is the SSO administrator, or “master,” account. This account can be used to configure all additional directory services post installation.
When installing vCenter, you will be asked which user or group should be added as a vCenter administrator. By default, the built-in SSO [email protected] user account will be used. These default settings in SSO do not by default extend permissions to users within Active Directory. This is a good thing; we don't want to add users who aren't necessarily involved in the administration of the vSphere environment. Generally speaking, you want to assign a permission to only those users who actually need it; this is part of the principle of least privilege, a key concept in computer security.
The issue is this: Prior to vSphere .5.5, by default, the domain Administrators group—this is the Active Directory Administrators group—was given the Administrator role in vCenter Server (we'll discuss vCenter Server roles in more detail in the section “Managing vCenter Server Permissions” later in this chapter). This permission assignment happened at the vCenter Server object and was propagated down to all child objects. It has been our experience that in many organizations there are members of the Administrators group who don't have anything to do with the virtualization infrastructure. Granting those users privileges inside vCenter Server is a violation of security best practices; not having the domain group Administrators in SSO Server is, therefore, a good idea.
Perform the following steps to add Active Directory to be used as a source for vCenter Server users:
- Log on to the vCenter Web Client as the SSO administrator. Unless you have created another account, the username is [email protected].
- Click Administration in the Navigator pane.
- Under the Single Sign-On section, click Configuration.
- Select the middle tab, labeled Identity Sources.
- Click the green plus icon to add a new identity source.
- In the Add Identity Source dialog box, you have four options:
- Active Directory (Integrated Windows Authentication)
- Active Directory As A LDAP Server
- Open LDAP
- Local OS
The first two options relate to Active Directory, but their connection method is slightly different. Using Windows authentication requires a user or computer account with the relevant rights to traverse the entire directory and Kerberos is used to authenticate.
The second Active Directory option uses LDAP to connect instead of Kerberos.
The third option, Open LDAP, is quite simply a way to integrate with OpenLDAP. This could be a connection to a Windows- or Linux-based OpenLDAP system.
The final option is Local OS. This relates to the operating system on which SSO is installed, in our case a Windows Server 2008 R2 system. This integrates SSO with the local users that are configured within the operating system itself.
In this example, we'll connect to Active Directory using Windows authentication and a machine account. This is the simplest way to get SSO to integrate with Active Directory as it prepopulates the Active Directory domain name that the SSO server belongs to and can therefore use the machine account for authentication.
With these options selected, click OK to close the dialog box.
vCenter Server, more specifically Single Sign-On, is now linked with Active Directory. You now have the capability to add users and groups from your domain to specific roles within your vSphere environment. We will explain this in detail later in the chapter.
CONFIGURING SSO ON WINDOWS SERVER FOR LOCAL ACCOUNTS
In the previous sections we configured SSO to use Active Directory as a source for users and groups. Similarly, we can also configure SSO to use the local machine's users and groups as an identity source. One of the great things about SSO is that you can have multiple identity sources at the same time. This is especially helpful in situations with split operational roles as in outsourced IT environments. Adding the local OS is very similar to adding Active Directory; however, you may find that it's already configured by the SSO installer. In the event that you need to configure it manually, simply follow these steps:
- Log on to the vCenter Web Client as the SSO administrator. Unless you have created another account, the username is [email protected].
- Click Administration in the Navigator pane.
- Under the Single Sign-On section, click Configuration.
- Select the middle tab, labeled Identity Sources.
- Click the green plus icon to add a new identity source.
- Select the Local OS radio button.
- Type in a name for this identity source and click OK.
As we already mentioned, the local OS identity source is added by default as part of the SSO installation. This source can be removed in the Identity Sources tab. Simply highlight the source and click the red cross icon to delete it. The only identity source you cannot delete (or edit) is the vsphere.local (or SSO built-in) source.
In the next section, we'll cover how to configure the vCenter Server virtual appliance for use with Active Directory.
CONFIGURING THE VCENTER SERVER VIRTUAL APPLIANCE FOR ACTIVE DIRECTORY
Two steps are required to leverage Active Directory with the Linux-based vCenter Server virtual appliance:
- Enable Active Directory integration on the virtual appliance itself.
- Add appropriate permissions to the vCenter Server hierarchy to allow Active Directory accounts to log in and manage the inventory objects.
Let's look at each of these steps.
Enabling Active Directory Integration on the Virtual Appliance
To enable the Active Directory integration of the virtual appliance, use the management interface of the virtual appliance. The vCenter Server virtual appliance offers a web-based management interface accessible on port 5480 of the IP address assigned to the virtual appliance. For example, if you assigned the IP address 10.1.1.100 to the virtual appliance, you could access the web-based management interface at https://10.1.1.100:5480. At this point, you'll be prompted to log into the virtual appliance. The default login credentials are username root and password vmware.
Perform these steps to enable Active Directory integration after you've logged into the management interface:
- From the main web-based management screen, click the Authentication tab.
- Select Active Directory.
- Select Active Directory Enabled.
- Supply the name of the Active Directory domain and the username and password of an account that has permission to join the virtual appliance to the domain.
- Click Save Settings.
This screen notes that any change to the Active Directory configuration will require a restart of the virtual appliance, so the next step is to reboot the virtual appliance.
- Select the System tab.
- Click the Reboot button. When prompted for confirmation, select Reboot.
The virtual appliance will reboot.
You can monitor the progress of the reboot using the VM console within the vSphere Client. Once the virtual appliance has rebooted successfully, you can test the Active Directory integration by logging into the virtual appliance's web-based management interface using Active Directory credentials. You can use either the domainusername or the username@domain syntax to log in.
If the login is successful, you're ready to proceed to the next step. If not, you'll need to troubleshoot the Active Directory integration. The vCenter Server virtual appliance supports SSH logins, so you can log in via SSH and review the logs to see what errors were logged during the configuration.
If you're having problems with Active Directory integration, refer to the following list:
- Verify that the time on the virtual appliance is synchronized with the time on the Active Directory domain controllers.
- Ensure that the virtual appliance is able, via DNS, to resolve the domain name and locate the Active Directory domain controllers. This typically means using the same DNS servers that Active Directory uses.
- Verify that there is no firewall between the virtual appliance and the Active Directory domain controllers or that all necessary traffic is permitted through any firewalls that are present.
Once you've verified that the Active Directory integration is working, you're ready to proceed with the second step in configuring the vCenter Server virtual appliance for Active Directory.
Adding Permissions for Active Directory Users or Groups
Although you've successfully configured the Active Directory integration for the vCenter Server virtual appliance, you still can't use any Active Directory credentials to log in using the vSphere Client. To log in via the vSphere Client, you must first grant access to one or more Active Directory users or groups within the vCenter Server hierarchy.
Perform these steps to grant permissions to an Active Directory user or group in order to log into the vCenter Server virtual appliance via the vSphere Client:
- Launch the vSphere Client, if it is not already running.
- Specify the DNS name or IP address of the vCenter Server virtual appliance in the IP Address/Name field.
- Specify the username root and the password vmware, and click Login to log in to the vCenter Server virtual appliance.
- Select the vCenter Server object from the inventory pane; then click the Permissions tab.
- Right-click a blank area of the Permissions tab and select Add Permission.
- In the Assign Permissions dialog box, click the Add button.
- From the Domain drop-down box, select the Active Directory domain.
- Find the user or group to add, click the Add button, and then click OK.
We do not recommend using a specific user account here; instead, leverage a security group within Active Directory. Recall that ESXi integration into Active Directory requires a security group called ESX Admins; you might want to leverage that group here as well.
- In the Assign Permissions dialog box, select Administrator from the Assigned Role dropdown list, and make sure that Propagate To Child Objects is selected.
This ensures that the selected Active Directory users and/or groups have the Administrator role within the vCenter Server virtual appliance. By default, only the predefined root account has this role.
- Click OK to return to the vSphere Client.
After completing this process, you'll be able to log into the vCenter Server virtual appliance with the vSphere Client using an Active Directory username and password. You're all set—the vCenter Server virtual appliance is configured to use Active Directory.
Before we move on to the topic of managing permissions within vCenter Server, one quick item that we'd like to discuss pertains to how vCenter Server interacts with ESXi hosts. It's important to understand how vCenter Server uses a special user account as a proxy account for managing your ESXi hosts.
Understanding the vpxuser Account
At the beginning of this chapter, we showed you how the ESXi security model employs users, groups, roles, privileges, and permissions. We also showed you how to manage local users and groups and to integrate your ESXi hosts with Active Directory.
As you'll see in the section “Managing vCenter Server Permissions,” vCenter Server uses the same user/group-role-privilege-permission security model. When vCenter Server is present, all activities are funneled through vCenter Server using SSO accounts that have been assigned a role that has, in turn, been assigned to one or more inventory objects as a permission. This combination of SSO account, role, and inventory object creates a permission that allows (or disallows) the user to perform certain functions. The user accounts exist in Active Directory or OpenLDAP or on the SSO Server computer itself, not on the ESXi hosts, and the permissions and roles are defined within vCenter Server, not on the ESXi hosts. Because the user doesn't log into the ESXi host directly, this minimizes the need for many local user accounts on the ESXi host and thus provides better security. Alas, there still is a need, however small or infrequent, for local accounts on an ESXi host used primarily for administration, which is why we talked earlier about managing local users and groups and integrating ESXi authentication into Active Directory.
Because the user accounts exist outside the ESXi hosts, and because the roles, privileges, and permissions are defined outside the ESXi hosts, when you use vCenter Server to manage your virtual infrastructure, you are really only creating a task and not directly interacting with the ESXi hosts or the VMs. This is true for any user using vCenter Server to manage hosts or VMs. For instance, Shane, an administrator, wants to log into vCenter Server and create a new VM. Shane first needs the proper role—perhaps a custom role you created specifically for the purpose of creating new VMs—assigned to the proper inventory object or objects within vCenter Server.
Assuming the correct role has been assigned to the correct inventory objects—let's say it's a resource pool—Shane has what he needs to create, modify, and monitor VMs. But does Shane's user account have direct access to the ESXi hosts when he's logged into vCenter Server? No, it does not. In fact, a proxy account is used to communicate Shane's tasks to the appropriate ESXi host or VM. This account, vpxuser, is the only account that vCenter Server stores and tracks in its backend database.
VPXUSER SECURITY
The vpxuser account and password are stored in the vCenter Server database and on the ESXi hosts; it is used to communicate from a vCenter Server computer to an ESXi host. The vpxuser password consists of 32 (randomly selected) characters, is encrypted using SHA1 on an ESXi host, and is obfuscated on vCenter Server. Each vpxuser password is unique to the ESXi host being managed by vCenter Server.
No direct administrator intervention is warranted or advised for this account because that would break vCenter Server functions needing this account. The account and password are never used by humans, and they do not have shell access on any ESXi hosts. Thus, it isn't necessary to manage this account or include it with normal administrative and regular user account security policies.
Anytime vCenter Server polls an ESXi host or an administrator creates a task that needs to be communicated to an ESXi host, the vpxuser account is used. On the ESXi hosts that are managed by vCenter Server, the vpxuser account exists (it's created automatically by vCenter Server; this is why vCenter Server asks you for the root password when adding a host to the inventory) and is assigned the Administrator role. This gives the vpxuser account the ability to perform whatever tasks are necessary on the individual ESXi hosts managed by vCenter Server. When a user logs into vCenter Server, vCenter Server applies its security model (roles, privileges, and permissions) to that user, ensuring that the user is permitted to perform only the tasks for which they are authorized. On the backend, though, all these tasks are proxied onto the individual ESXi hosts as vpxuser.
You should now have a good idea of what's involved in vCenter Server authentication. We'd like to focus now on vCenter Server permissions, which control what users are allowed to do after they've authenticated to vCenter Server.
Managing vCenter Server Permissions
The security model for vCenter Server is identical to that explained in the previous section for an ESXi host: Take a user or group and assign them to a role (which has one or more privileges assigned) for a specific inventory object. The key difference is that vCenter Server enables new objects in the inventory hierarchy that aren't possible with individual ESXi hosts. This would include objects like clusters and folders (both of which we discussed in Chapter 3). vCenter Server also supports resource pools (which we introduced in the section “Using Resource Pools to Assign Permissions” and which we'll discuss in greater detail in Chapter 11). vCenter Server also allows you to assign permissions in different ways; for example, an ESXi host has only one inventory view, while vCenter Server has the Hosts And Clusters view, VMs And Templates view, Storage view, and Networking view. Permissions—the assignment of a role to one or more inventory objects—can occur in any of these views.
As you can see, this means that vCenter Server allows vSphere administrators to create much more complex permissions hierarchies than you could create using only ESXi hosts.
Recall that a key part of the security model is the role—the grouping of privileges that you assign to a user or group in a permission. Let's take a closer look at the predefined roles that come with vCenter Server.
REVIEWING VCENTER SERVER'S ROLES
Where the ESXi host is quite limited in its default roles, vCenter Server provides more, thereby offering a much greater degree of flexibility in constructing access control. Although both security models offer the flexibility of creating custom roles, ESXi includes three default roles, while vCenter Server provides nine, including the same three offered in ESXi. Figure 8.12 details the default vCenter Server roles. These roles are visible from within the vSphere Web Client by selecting Home ![]() Roles.
Roles.
FIGURE 8.12 The vCenter Server default roles offer much more flexibility than an individual ESXi host offers.
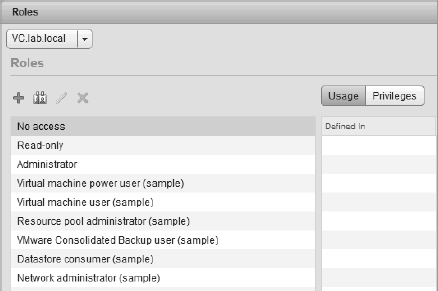
As you can see, VMware provides a large number of roles in a default vCenter Server installation. Remember, just as with the default ESXi roles, vCenter Server will prevent you from modifying the No Access, Read-Only, and Administrator roles—you must clone them in order to customize them. Once you clone one of the built-in roles, you can customize the privileges assigned to that role to meet your specific needs.
The key to using these roles effectively is to understand the functions of each:
No Access This role is just what it sounds like—it prevents a user or group from gaining access. But why do you need it? The idea behind this role is to prevent a user or group that has permissions at some point higher in the hierarchy from having permissions on the object to which this role is assigned. For instance, you may have granted Eileen the Virtual Machine User role at the datacenter level, which would allow her to administer all of the VMs in the datacenter, but there is a security concern about her having access to one of the accounting VMs in that datacenter. You could assign Eileen to the No Access role on the Accounting VM, which would effectively supersede her Virtual Machine User privileges.
Read-Only Read-Only allows users to see the vCenter Server inventory. It does not allow them to interact with any of the VMs in any way through the vSphere Client or the web client except to see the power status of each VM in the inventory where they have the Read-Only role applied.
Administrator A user assigned to an object with the Administrator role will have full administrative capabilities over that object in vCenter Server. Note that this does not grant any privileges within the guest OSes installed inside the VMs. For instance, a user assigned the Administrator role for a VM may be able to change the RAM assigned to the VM and alter its performance parameters (Shares, Reservations, and Limits) but may not even have the permissions to log into that VM unless they have been granted that right from within the guest OS.
The Administrator role can be granted at any object level in the hierarchy, and the user or group that is assigned the role at that level will have vCenter Server administrative privileges over that object and (if the inheritance box is selected) any child objects in the hierarchy.
Aside from the No Access, Read-Only, and Administrator roles, the rest of the roles are sample roles. These are intended to provide vSphere administrators with an idea of how to organize roles and permissions to model the appropriate administrative structure.
Virtual Machine Power User (Sample) The Virtual Machine Power User sample role assigns permissions to allow a user to perform most functions on VMs. This includes tasks such as configuring CD and floppy media, changing the power state, taking and deleting snapshots, and modifying the configuration. These permissions apply only to VMs. The idea here is, as an example, if users are granted this role at a datacenter level, they would be able to manage only VMs in that datacenter and would not be able to change settings on objects such as resource pools in that datacenter.
Virtual Machine User (Sample) The Virtual Machine User sample role grants the user the ability to interact with a VM but not the ability to change its configuration. Users can operate the VM's power controls and change the media in the virtual CD-ROM drive or floppy drive as long as they also have access to the media they want to change. For instance, a user who is assigned this role for a VM will be able to change the CD media from an ISO image on a shared storage volume to their own client system's physical CD-ROM drive. If you want them to be able to change from one ISO file to another (both stored on a Virtual Machine File System [VMFS] volume or Network File System [NFS] volume), they will also need to be granted the Browse Datastore permission at the parent of the datastore object in the vCenter Server hierarchy—usually the datacenter in which the ESX/ESXi host is located.
Resource Pool Administrator (Sample) The Resource Pool Administrator sample role grants the user the ability to manage and configure resources with a resource pool, including VMs, child pools, scheduled tasks, and alarms.
VMware Consolidated Backup User (Sample) As the role name suggests, the VMware Consolidated Backup User sample role grants the user the privileges required for performing a backup of a VM using VCB.
Datastore Consumer (Sample) The Datastore Consumer sample role is targeted at users who need only a single permission: the permission to allocate space from a datastore. Clearly, this role is very limited.
Network Administrator (Sample) Similar to the Datastore Consumer role, the Network Administrator sample role has only a single permission, and that is the permission to assign networks.
These default roles provide a good starting point, but they won't meet every company's needs. If you need something more than what is provided by default, you'll need to create a custom role. We describe this process in the next section.
WORKING WITH VCENTER SERVER ROLES
What if the default roles supplied with vCenter Server don't provide you with the necessary functionality for a particular grouping of users? Well, it depends on what the problem is. Let's take the most basic problem. You've chosen a best-fit role to assign a user privileges, but the role you've selected lacks a key permission, or perhaps the role you've selected grants a few permissions that you don't want included. To get the exact fit you need, you can simply clone the role and then customize it.
Perform the following steps to clone a role in vCenter Server:
- Launch the vSphere Web Client if it is not already running, and connect to a vCenter Server instance.
- Navigate to the Roles area from the Home screen.
- Right-click the role that you want to clone, and select Clone from the context menu or select the role and click the clone icon above the list.
After you've cloned the role, you can add or remove privileges as needed. We described the process of editing a role in the section “Editing and Removing Roles.”
LEAVE THE BUILT-IN SAMPLE ROLES INTACT
We recommend leaving all of the built-in sample roles intact and unmodified. vCenter Server prevents you from modifying the No Access, Read-Only, and Administrator roles but does not prevent you from modifying the rest of the roles. To help avoid confusion among multiple administrators, we recommend leaving the built-in sample roles intact and cloning them to a new custom role instead.
To assign a permission to an object within vCenter, you use the same principles as with ESXi hosts. Assign a user to a role and then the role to an object within the vCenter Web Client. Before we delve into what privileges will be assigned to a role, let's run through an example of how to assign a permission to an object within the vSphere Web Client:
- Log on to the vCenter Web Client as a vCenter administrator. Unless you have created another account, the account is [email protected].
- Navigate to the object for which you wish to change the permissions. In this example, locate the vCenter Server object.
- Select the Manage tab and then click the Permissions subsection.
- Click the green plus arrow to bring up the Add Permission dialog box.
- In the left column, click the Add button.
- The Select Users/Groups dialog box allows you to select from a Domain drop-down list. This list is populated with your identity sources previously configured within SSO. Select your Active Directory identity source.
- Find the Active Directory user from the list. Click the Add button and then the OK button.
- With the user now specified in the list, it's time to assign a role. Select Administrator from the Assigned Role drop-down list and then click the OK button.
- The Active Directory user can now log in using the vSphere Web Client and can manage vCenter.
By default, just as with the vSphere Client, the Propagate To Children check box is selected. All objects that are children of the currently selected object will also receive the permission you are granting. By assigning permissions at a vCenter object and leaving Propagate To Children selected, we are giving this user permissions over every object this vCenter Server instance manages. This includes ESXi hosts, VMs, networks, and datastores, to name a few. Keep this in mind when assigning permissions and only ever give the minimum required access.
UNDERSTANDING VCENTER SERVER PRIVILEGES
Roles are very useful, but now that you've started to peek into the properties of the roles and how to edit roles, you also need to understand each of the privileges and what they do for you in terms of customizing roles. Remember that privileges are individual tasks that are assigned to roles. Without privileges assigned, roles are useless, so it's important to understand the privileges available within vCenter Server.
The list of privileges is rather long, but it's broken down into some general categories, so let's look at what each of the categories means in general terms:
Alarms Controls the ability to create, modify, delete, disable, and acknowledge vCenter Server alarms.
Auto Deploy Controls the ability to use vSphere Auto Deploy for dynamically provisioning ESXi hosts at boot time.
Datacenter Controls the ability to create, delete, move, and rename datacenters inside vCenter Server. The privilege for working with an IP pool is also found in the Datacenter category.
Datastore Controls who can access files stored on an ESXi attached volume. These privileges need to be assigned at the parent object of the ESXi host itself—for instance, a data-center, an ESXi cluster, or a folder that contains ESXi hosts.
Datastore Cluster Controls who is permitted to configure a datastore cluster (used with profile-based storage and Storage DRS).
Distributed Switch Controls who can create, delete, or modify distributed virtual switches.
ESX Agent Manager Controls the ability to view, configure, or modify ESX host agents.
Extension Controls the ability to register, update, or unregister extensions in vCenter Server. An example of an extension is vSphere Update Manager (VUM).
Folder Controls the creation, deletion, and general manipulation of folders in the vCenter Server hierarchy.
Global Includes the ability to manage vCenter Server license settings and server settings such as SNMP and SMTP.
Host Controls what users can do with ESXi hosts in the inventory. This includes tasks such as adding and removing ESXi hosts from the inventory, changing the host's memory configuration, and changing the firewall settings.
Host Profile Controls creating, editing, deleting, and viewing host profiles.
Network Controls the configuration or removal of networks from the vCenter Server inventory.
Performance Controls the ability of users to modify the intervals at which the performance chart information is displayed on the Performance tab of an object.
Permissions Controls who has the ability to modify the permissions assigned to a role and who can manipulate a role/user combination for a particular object.
Profile-Driven Storage Controls who can view and update profile-driven storage.
Resource Controls resource pool manipulation, including creating, deleting, or renaming the pool; also controls migration by using vMotion and applying DRS recommendations.
Scheduled Task Controls the configuration of tasks and the ability to run a task that is scheduled inside vCenter Server.
Sessions Controls the ability to view and disconnect vSphere Client sessions connected to vCenter Server and to send a global message to connected vSphere Client users.
Storage Views Controls changing the server configuration and looking at storage views.
Tasks Controls the ability to create or update tasks.
VRMPolicy Controls settings around virtual rights management (VRM). VRM centers on the management of security policies and access controls for VMs.
Virtual Machine Controls the manipulation of VMs in the vCenter Server inventory, including the ability to create, delete, or connect to the remote console of a VM; controls the power state of a VM; controls the ability to change floppy and CD media and to manipulate templates, among other privileges.
Distributed Virtual Port (dvPort) Group Controls who can create, delete, and modify distributed virtual port groups on distributed virtual switches.
vApp Controls the configuration and management of vApps, such as the ability to add VMs to a vApp; clone, create, delete, export, or import a vApp; power on or power off the vApp; and view the Open Virtualization Format (OVF) environment.
Inventory Service Controls who can access the tagging capabilities of the vCenter Inventory Service.
vService Controls the ability to create, remove, and modify vService dependencies with vApps.
How these various privileges are assigned to roles is what really matters. As you saw earlier, vCenter Server ships with some default roles already defined. Some of these—namely, the No Access, Read-Only, and Administrator roles—are fairly well understood and cannot be modified. The other predefined roles are listed in Table 8.1 along with the privileges that are assigned to each role by default.
TABLE 8.1: Table of privileges for default roles
| PREDEFINED ROLE | ASSIGNED PRIVILEGES |
| Virtual Machine Power User | Datastore Global Scheduled Task Virtual Machine Virtual Machine Virtual Machine |
| Virtual Machine User | Global Scheduled Task Virtual Machine |
| source Pool Administrator | Alarms Datastore Folder Global Permissions Resource Scheduled Task Virtual Machine Virtual Machine Virtual Machine Virtual Machine Virtual Machine |
| VMware Consolidated | Virtual Machine |
| Backup User | Virtual Machine Virtual Machine |
| Datastore Consumer | Datastore |
| Network Administrator | Network |
As you can see, vCenter Server is very specific about the privileges you can assign to roles. Because these privileges are specific, this can sometimes complicate the process of granting users the ability to perform seemingly simple tasks within vCenter Server. Let's review a couple of examples of how privileges, roles, and permissions combine in vCenter Server.
DELEGATING THE ABILITY TO CREATE VIRTUAL MACHINES AND INSTALL A GUEST OS
One common access control delegation in a virtual infrastructure is to give a group of users (for example, a provisioning or deployment team) the rights to create VMs. After just browsing through the list of available privileges, it might seem simple to accomplish this. It is, however, more complex than meets the eye. Providing a user with the ability to create a VM involves assigning a combination of privileges at multiple levels throughout the vCenter Server inventory.
COMBINING PRIVILEGES, ROLES, AND PERMISSIONS IN VCENTER SERVER
So far, we've shown you all the pieces you need to know in order to structure vCenter Server to support your company's management and operational requirements. How these pieces fit together, though, can sometimes be more complex than you might expect. In the next few paragraphs, we will walk you through an example.
Here's the scenario: Within your IT department, one group handles building all Windows servers. Once the servers are built, operational control of the servers is handed off to a separate group. Now that you have virtualized your datacenter, this same separation of duties needs to be re-created within vCenter Server. Sounds simple, right? You just need to configure vCenter Server so that this group has the ability to create VMs. This group is represented within Active Directory with a group object (this Active Directory group is named IT-Provisioning), and you'd like to leverage the Active Directory group membership to control who is granted these permissions within vCenter Server.
In the following steps, we've deliberately kept some of the items at a high level. For example, we don't go into how to create a role or how to assign that role to an inventory object as a permission because those tasks are covered elsewhere in this chapter.
Perform the following steps to allow a Windows-based group to create VMs:
- Use the vSphere Web Client to connect to a vCenter Server instance. Log in with a user account that has been assigned the Administrator role within vCenter Server.
- On the Home screen, click on the Roles icon.
- Create a new role called VMCreator.
- Assign the following privileges to the VMCreator role:
Datastore
Allocate SpaceVirtual Machine
Inventory Create NewVirtual Machine
Configuration Add New DiskVirtual Machine
Configuration Add Existing DiskVirtual Machine
Configuration Raw DeviceResource
Assign Virtual Machine To Resource PoolThese permissions allow the VMCreator role to only create new VMs, not clone existing VMs or deploy from templates. Those actions would require additional privileges. For example, to allow this role to create new VMs from existing VMs, you would add the following privileges to the VMCreator role:
Virtual Machine
Inventory Create From ExistingVirtual Machine
Provisioning Clone Virtual MachineVirtual Machine
Provisioning Customize - Add a permission on a folder, datacenter, cluster, or host for the Windows-based group (IT-Provisioning in our example) with the VMCreator role.
If you don't assign the role to a datacenter object, then you'll need to assign it separately to a folder in the VMs And Templates view. Otherwise, you'll run into an error when trying to create the VM.
Similarly, if you don't assign the role to the datacenter object, then the group won't have permission on any datastore objects. Datastore objects are children of the datacenter object, so permissions applied to a datacenter object will, by default, propagate to the datastores. Without permissions on at least one datastore object (either via propagation or via direct assignment), you'll end up unable to create a new VM because you can't choose a datastore in which to store the VM.
- If you want or need the Windows-based group to see other objects within the vCenter Server hierarchy, then assign the group the Read-Only role on the applicable objects.
For example, if the group should see all objects within the datacenter, add the Read-Only role on the datacenter object.
At this point, the privileges for creating a VM are complete; however, the IT-Provisioning group does not have the rights to mount a CD/DVD image and therefore cannot install a guest OS. Therefore, more permissions are required to allow the IT-Provisioning group to not only create the VMs and put them in the right place within vCenter Server but also to install the guest OS within those VMs.
Perform the following steps to allow the Windows-based IT-Provisioning group to install a guest OS from a CD/DVD image file:
- Use the vSphere Web Client to connect to a vCenter Server instance. Log in with a user account that has been assigned the Administrator role within vCenter Server.
- On the Home screen, click the Roles icon.
- Create a new role named GOS-Installers.
- Assign the following privileges to the GOS-Installers role:
Datastore
Browse DatastoreVirtual Machine
ConfigurationVirtual Machine
Interaction - Assign the desired Windows-based group (IT-Provisioning in our example) the GOS-Installers role on the datacenter, folder, cluster, or host, as applicable.
Keep in mind that you can't have the same user or group with two different roles on the same object.
As you can see, the seemingly simple task of creating a VM actually involves a couple of different roles and a number of permissions. This is only a single example; there are obviously an almost infinite number of other configurations where you can create roles and assign permissions to the various objects within ESXi and vCenter Server.
VCENTER SERVER PERMISSIONS INTERACTION
In organizations both large and small, users often belong to multiple groups, and those groups are assigned different levels of permissions on different objects. Let's look at the effects of multiple group memberships and permission assignments in the virtual infrastructure.
In one scenario, let's look at the effective permissions when a user belongs to multiple groups with different permissions on objects at different levels in the inventory. In this example, a user named Rick Avsom is a member of the Res_Pool_Admins and VM_Auditors Windows groups. The Res_Pool_Admins group is assigned membership in the Resource Pool Admins vCenter Server role, and the permission is set at the Production resource pool. The VM_Auditors group is assigned membership in the Read-Only vCenter Server role, and the permission is set at the Win2008-02 VM. The Win2008-02 VM resides within the Production resource pool.
When the user is logged on to the vCenter Server computer as Rick Avsom, the inventory reflects only the objects available to him through his permissions. Based on the permission assignment described, Rick Avsom will be able to manage the Production resource pool and will have full privileges over the Win2008-01 VM to which the Resource Pool Admin privileges are propagating. However, Rick Avsom cannot manage the Win2008-02 VM, for which he is limited to Read-Only privileges. Thus, users in multiple groups with conflicting permissions on objects lower in the inventory are granted only the permissions configured directly on the object.
Another common scenario involves the effective permissions when a user belongs to multiple groups with different permissions on the same objects. In this example, a user named Sue Rindlee is a member of the VM_Admins and VM_Auditors Windows groups. The VM_Admins group has been assigned membership in the Virtual Machine Power User vCenter Server role, and the VM_Auditors group is assigned membership in the Read-Only vCenter Server role. Both of these roles have been assigned permissions on the Production resource pool.
When the user is logged on to the vCenter Server computer as Sue Rindlee, the inventory reflects only the objects available to her through her permissions. Based on the permission assignment described, Sue Rindlee will be able to modify all of the VMs in the Production resource pool. This validates that Sue's Virtual Machine Power User status through membership in the VM_Admin group prevails over the Read-Only status obtained through her membership in the VM_Auditors group.
In this scenario, the effective permission is a cumulative permission when a user belongs to multiple groups with different permissions on the same object. Even if Sue Rindlee belonged to a group assigned to the No Access vCenter Server role, her Virtual Machine Power User role would prevail. However, if Sue Rindlee's user account was added directly to a vCenter Server object and assigned the No Access role, then she would not have access to any of the objects to which that permission has propagated.
Even with a good understanding of permission propagation, you should always proceed with caution and maintain the principle of least privilege to ensure that no user has been extended privileges beyond those necessary as part of a job role.
When delegating authority, it is always better to err on the side of caution. Do not provide more permissions than are necessary for the job at hand. Just as in any other information systems environment, your access-control implementation is a living object that will consistently require consideration and revision. Manage your permissions carefully, be flexible, and expect that users and administrators alike are going to be curious and will push their access levels to the limits. Stay a step ahead, and always remember the principle of least privilege.
We'll conclude the discussion of vCenter Server security with a quick look at vCenter Server logging.
Examining vCenter Server Logging
As we mentioned in the section “Configuring ESXi Host Logging,” logging is an important part of security, as well as an extremely useful tool in troubleshooting. You've seen how to handle logging for ESXi; now let's take a quick look at vCenter Server logging.
vCenter Server can forward its logs to a centralized VMware-based log server called vCenter Log Insight. However, this is a separate product and outside the scope of this book. The vSphere Web Client does provide a way to view the logs that vCenter Server generates. From the home screen of the vSphere Web Client, select Log Browser to examine the logs. Figure 8.13 shows this section of the vSphere Web Client.
This screen allows you to review the vCenter Server logs for additional information on tasks performed, actions requested, and configuration changes made.
From this screen, you can also search, filter, and export the system logs, a task we described earlier in Chapter 3.
In the next section of this chapter, we'll shift the focus to securing the third and final component of your vSphere environment: the VMs.
FIGURE 8.13 vCenter Server's logs are visible from within the Log Browser section of the vSphere Web Client.
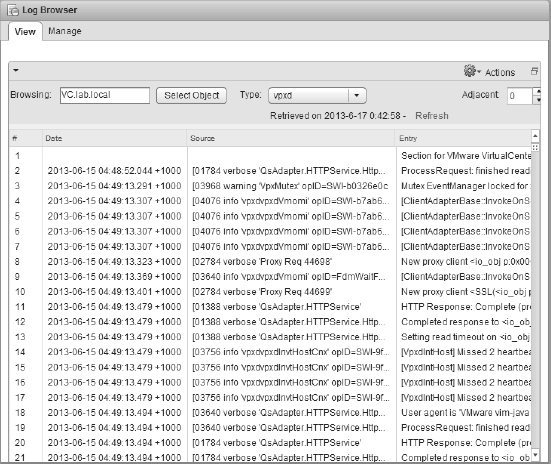
Securing Virtual Machines
As with vCenter Server, any discussion of how to secure a VM is really a discussion of how to secure the guest OS within that VM. Entire books have been and are being written about how to secure Windows, Linux, Solaris, and the other guest OSes vSphere supports, so we won't attempt to cover that sort of material here. We will provide two recommendations around securing VMs. One of these is specific to the vSphere virtualized environment, whereas the other is broader and more general.
First, we want to call your attention to the vSphere network security policies.
Configuring Network Security Policies
vSphere provides some outstanding virtual networking functionality, particularly with the addition of the vSphere Distributed Switch and third-party distributed virtual switches. These virtual switches provide several different security-related policies you can set to help ensure that the security of your VMs is maintained. We discussed all these settings in Chapter 5, “Creating and Configuring Virtual Networks.”
The key security-related network security policies you can set in the vSphere virtual networking environment are as follows:
- Promiscuous mode
- MAC address changes
- Forged transmits
VMware recommends keeping all of these policies set to Reject. If there is a valid business need for one of these features to be allowed, you can use per-port group settings to enable the appropriate feature only for the specific VM or machines that require such functionality. One example we've used before is a network-based intrusion detection/intrusion prevention system (IDS/IPS). Rather than allowing promiscuous mode—required for most IDS/IPS to work—on the entire vSwitch, create a separate port group just for that VM and allow promiscuous mode on that port group only.
When considering the security of your VMs, be sure to keep these network security policies in mind, and be sure that they are configured for the correct balance of functionality versus security.
Our next recommendation with regard to securing VMs is much more general but still a valid recommendation nevertheless.
Keeping VMs Patched
As with your ESXi hosts and your vCenter Server computer, it's imperative to keep the guest OSes in your VMs properly patched. Our experience has shown us that many security problems could have been avoided with a proactive patching strategy for the guest OSes in the VMs.
In vSphere 4.x, you could use vSphere Update Manager (then called vCenter Update Manager) to patch the guest OSes inside your VMs. From vSphere 5.0, this functionality has been removed, and vSphere Update Manager—covered in detail in Chapter 4—focuses on keeping your ESXi hosts patched and up-to-date. It's important, therefore, to deploy some sort of guest OS patching solution that will help you ensure that your guest OSes remain patched and current with all vendor-supplied security fixes and updates. In the next chapter, we'll delve into the process of creating and managing VMs.
The Bottom Line
Configure and control authentication to vSphere. Both ESXi and vCenter Server have authentication mechanisms, and both products can utilize local users and groups or users and groups defined in external directories. Authentication is a basic tenet of security; it's important to verify that users are who they claim to be. You can manage local users and groups on your ESXi hosts using either the traditional vSphere Client or the command-line interface (such as the vSphere Management Assistant). Both the Windows-based and the Linux-based virtual appliance versions of vCenter Server can leverage Active Directory, OpenLDAP, or local SSO accounts for authentication as well.
Master It You've asked an administrator on your team to create some accounts on an ESXi host. The administrator is uncomfortable with the command line and is having a problem figuring out how to create the users. Is there another way for this administrator to perform this task?
Manage roles and access controls. Both ESXi and vCenter Server possess a role-based access control system that combines users, groups, privileges, roles, and permissions. vSphere administrators can use this role-based access control system to define very granular permissions that define what users are allowed to do with the vSphere Client against an ESXi host or the vSphere Web Client against a vCenter Server instance. For example, vSphere administrators can limit users to specific actions on specific types of objects within the vSphere Client. vCenter Server ships with some sample roles that help provide an example of how you can use the role-based access control system.
Master It Describe the differences between a role, a privilege, and a permission in the ESXi/vCenter Server security model.
Control network access to services on ESXi hosts. ESXi provides a network firewall that you can use to control network access to services on your ESXi hosts. This firewall can control both inbound and outbound traffic, and you have the ability to further limit traffic to specific source IP addresses or subnets.
Master It Describe how you can use the ESXi firewall to limit traffic to a specific source IP address.
Integrate with Active Directory. All the major components of vSphere—the ESXi hosts and vCenter Server (both the Windows Server–based version and the Linux-based virtual appliance) as well as the vSphere Management Assistant—support integration into Microsoft Active Directory. This gives vSphere administrators the option of using Active Directory as their centralized directory service for all major components of vSphere 5.5.
Master It You've just installed a new ESXi host into your vSphere environment and you are trying to configure the host to enable integration with your Active Directory environment. For some reason, though, it doesn't seem to work. What could be the problem?