
7.1 The focusing options available in the Live View shooting menu 1 tab.
Chapter 7: Using the Live View Shooting Mode
At times, composing still images with the viewfinder can be inconvenient or even impossible, and that’s when Live View shooting mode ( ![]() ) is a good alternative. In Live View mode (
) is a good alternative. In Live View mode ( ![]() ), you can use the 3-inch LCD monitor to compose images and magnify the scene up to 10X to ensure tack-sharp focus.
), you can use the 3-inch LCD monitor to compose images and magnify the scene up to 10X to ensure tack-sharp focus.
Live View mode ( ![]() ) is a good choice for still life, product, self-portrait, and macro shooting, as well as video applications. As you’re shooting, you can monitor the exposure using the live histogram.
) is a good choice for still life, product, self-portrait, and macro shooting, as well as video applications. As you’re shooting, you can monitor the exposure using the live histogram.
Live View shooting ( ![]() ) has several focusing modes, including Automatic (
) has several focusing modes, including Automatic ( ![]() ), Manual (
), Manual ( ![]() ), and Face Detection Live (
), and Face Detection Live ( ![]() ). Once you get used to these modes, you can transfer your knowledge to shooting movies. Overall, Live View shooting (
). Once you get used to these modes, you can transfer your knowledge to shooting movies. Overall, Live View shooting ( ![]() ) increases the versatility of the 6D and enhances your shooting options.
) increases the versatility of the 6D and enhances your shooting options.
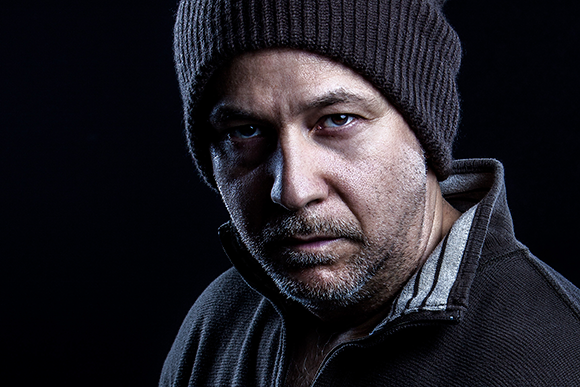
Live View made unassisted remote focusing easy when I created this self-portrait. Exposure: ISO 100, f/11, 1/125 second with a Canon 70-200mm f/2.8L IS USM.
About Live View Mode
On most point-and-shoot digital cameras, you shoot using the camera’s LCD screen to compose and focus. However, with a dSLR, normally the camera can’t see the live scene because the shutter and reflex mirror blocks the view to the image sensor. The 6D overcomes this blind spot with a mechanical shutter that stays completely open during Live View shooting to give you a real-time view of the scene.
Live View offers some advantages; for example, you can zoom in and set precise focus by using the large LCD screen, shoot in scenes where you can’t use the viewfinder, and use the option for “silent” shooting that reduces the noise of the shutter cocking.
For most photographers, a tripod is a necessity when shooting in Live View mode ( ![]() ).
).
Live View shooting is handy, but it comes with a few caveats:
• Temperature affects the number of shots you can get using Live View (![]() ). With a fully charged LP-E6 battery, you can expect 220 shots without flash use in temperatures of 23ºF to 73ºF. In freezing temperatures, expect 190 shots without flash use. With a fully charged battery, you get approximately 1.5 hours of continuous Live View shooting in 23ºF to 73ºF temperatures before the battery is exhausted, and an hour and 20 minutes in colder temperatures.
). With a fully charged LP-E6 battery, you can expect 220 shots without flash use in temperatures of 23ºF to 73ºF. In freezing temperatures, expect 190 shots without flash use. With a fully charged battery, you get approximately 1.5 hours of continuous Live View shooting in 23ºF to 73ºF temperatures before the battery is exhausted, and an hour and 20 minutes in colder temperatures.
• High temperatures, high ISO speeds, and long exposures can degrade image quality. In short, anything that heats up the sensor — whether it’s high internal or external temperatures — can cause image problems, as can high ISO settings. Additionally, high ISO settings combined with high temperatures are double-trouble and result in images with both digital noise and inaccurate image colors, even before the camera warns you of a high internal temperature. A little common sense prevents most problems. Take the camera out of a hot car or out of a bag that has been in the sun or in hot temperatures and let it cool before you use it. If you’re shooting long exposures, let the camera cool down between exposures. The camera warns you when the temperature is high; in fact, you get two warnings. The first is a white thermometer that appears on the LCD monitor, warning you to stop shooting and let the camera cool down. If you continue shooting, a second warning — a blinking red icon — warns you that the camera will automatically stop shooting very soon. If the camera stops shooting, then you have to wait for the camera to cool down before you can use it again.
• Certain conditions cause Live View mode (![]() ) to reflect the captured image inaccurately. Image brightness may not be accurately reflected in low- and bright-light conditions. If you move from low to a bright light and if the LCD monitor’s brightness level is high, the Live View may display chrominance (color) noise, but the noise will not appear in the captured image. Also, suddenly moving the camera in a different direction can cause the rendering of the image brightness to be inaccurate. If you focus and capture an image in a magnified view, the exposure and focus may not be correct. Be sure to return to an unmagnified view before shooting.
) to reflect the captured image inaccurately. Image brightness may not be accurately reflected in low- and bright-light conditions. If you move from low to a bright light and if the LCD monitor’s brightness level is high, the Live View may display chrominance (color) noise, but the noise will not appear in the captured image. Also, suddenly moving the camera in a different direction can cause the rendering of the image brightness to be inaccurate. If you focus and capture an image in a magnified view, the exposure and focus may not be correct. Be sure to return to an unmagnified view before shooting.
• Certain features don’t work in Live View (![]() ). The focus preset function is possible for Live View only when using a (super) telephoto lens equipped with a focus preset mode marketed since the second half of 2011, and you can’t use Flash Exposure Lock (
). The focus preset function is possible for Live View only when using a (super) telephoto lens equipped with a focus preset mode marketed since the second half of 2011, and you can’t use Flash Exposure Lock ( ![]() ) or modeling flash if you shoot with a Speedlite. Also, certain Custom Function (
) or modeling flash if you shoot with a Speedlite. Also, certain Custom Function ( ![]() ) settings are ignored in Live View shooting.
) settings are ignored in Live View shooting.
Custom Functions are detailed in Chapter 6.
Live View Mode Features and Functions
Some aspects of Live View shooting differ from standard shooting, while others are the same. For example, in Live View shooting, the LCD panel functions remain the same. In addition, when you press any of the LCD panel buttons, the options are displayed on the LCD screen, where you can select them using the Main dial ( ![]() ) and Quick Control dial (
) and Quick Control dial ( ![]() ). You can also press the Info button (
). You can also press the Info button ( ![]() ) to display more or less information along with a Brightness histogram or the RGB histograms on the LCD screen. However, focusing options and techniques change in Live View. Also, you can opt to quiet the sound of the shutter during Live View shooting (
) to display more or less information along with a Brightness histogram or the RGB histograms on the LCD screen. However, focusing options and techniques change in Live View. Also, you can opt to quiet the sound of the shutter during Live View shooting ( ![]() ). The following sections help you learn about and set up for shooting in Live View mode (
). The following sections help you learn about and set up for shooting in Live View mode ( ![]() ).
).
Live View is enabled by default. To disable Live View functionality, press the Menu button ( ![]() ), use the Main dial (
), use the Main dial ( ![]() ) to navigate to the Live View shooting menu 1 tab (
) to navigate to the Live View shooting menu 1 tab ( ![]() ), and use the Quick Control dial (
), and use the Quick Control dial ( ![]() ) to highlight Live View shoot. Next press the Set button (
) to highlight Live View shoot. Next press the Set button ( ![]() ) to enter the Live View shoot options menu, use the Quick Control dial (
) to enter the Live View shoot options menu, use the Quick Control dial ( ![]() ) to highlight Disable, and press the Set button (
) to highlight Disable, and press the Set button ( ![]() ) to confirm your settings. To enable Live View, follow the previous steps, but choose Enable.
) to confirm your settings. To enable Live View, follow the previous steps, but choose Enable.
Focus options
An advantage of Live View shooting is that you can use the large, bright LCD monitor combined with magnification up to 10X to ensure tack-sharp focus. However, focusing is slightly different in Live View than it is in standard shooting with the viewfinder. You should try each of the focus modes, so you know in advance which work best for the scenes and subjects you shoot most often. Here is an overview of the focusing options available in Live View mode (they can also be used to shoot movies):
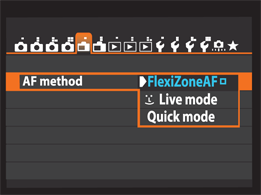
7.1 The focusing options available in the Live View shooting menu 1 tab.
• FlexiZone – Single AF mode (![]() ). With this option, the camera’s image sensor detects subject contrast when attempting to obtain focus. The camera looks for edge contrast and variations in brightness. When the contrast of the subject is maximized, the camera considers the image to be in focus. Contrast detection is slow compared to Quick mode. I recommend using Live View mode (
). With this option, the camera’s image sensor detects subject contrast when attempting to obtain focus. The camera looks for edge contrast and variations in brightness. When the contrast of the subject is maximized, the camera considers the image to be in focus. Contrast detection is slow compared to Quick mode. I recommend using Live View mode ( ![]() ) with fairly still subjects in good light. With FlexiZone Single AF focusing (
) with fairly still subjects in good light. With FlexiZone Single AF focusing ( ![]() ), the reflex mirror stays up so that you have an uninterrupted view of the scene while focusing. You have a single autofocus (AF) point in Live View mode (
), the reflex mirror stays up so that you have an uninterrupted view of the scene while focusing. You have a single autofocus (AF) point in Live View mode ( ![]() ). To focus, use the Multi-controller (
). To focus, use the Multi-controller ( ![]() ) to move the focusing point over the subject, and then press the shutter button halfway. The AF point turns green when focus is achieved. (The AF point turns orange if the camera can’t establish focus.) Then press the shutter button completely to make the picture.
) to move the focusing point over the subject, and then press the shutter button halfway. The AF point turns green when focus is achieved. (The AF point turns orange if the camera can’t establish focus.) Then press the shutter button completely to make the picture.
• Face Detection Live mode (![]() ). This is the same as FlexiZone Single AF mode (
). This is the same as FlexiZone Single AF mode ( ![]() ), except that the camera automatically looks for and focuses on a human face in the scene. If the camera does not choose the face of the subject you want, you can use the Multi-controller (
), except that the camera automatically looks for and focuses on a human face in the scene. If the camera does not choose the face of the subject you want, you can use the Multi-controller ( ![]() ) to move the focusing frame to the correct face. If multiple faces are found, then the AF point displays arrows on the left and right, indicating that you can move the AF point over another face using the Multi-controller (
) to move the focusing frame to the correct face. If multiple faces are found, then the AF point displays arrows on the left and right, indicating that you can move the AF point over another face using the Multi-controller ( ![]() ). If the camera cannot detect a face, then the AF point reverts to the center AF point, and you can move the AF point manually to the face you want. If your subjects are far from the camera, the camera may not lock onto the faces. Also, if your lens offers manual focus, you can manually bring the focus into range, and then focus by half-pressing the shutter button. Face detection does not work with extreme close-ups of a face, with distant subjects, or when subjects are too bright or dark, partially obscured, or tilted horizontally or diagonally. Also, you can’t use the Magnify button (
). If the camera cannot detect a face, then the AF point reverts to the center AF point, and you can move the AF point manually to the face you want. If your subjects are far from the camera, the camera may not lock onto the faces. Also, if your lens offers manual focus, you can manually bring the focus into range, and then focus by half-pressing the shutter button. Face detection does not work with extreme close-ups of a face, with distant subjects, or when subjects are too bright or dark, partially obscured, or tilted horizontally or diagonally. Also, you can’t use the Magnify button ( ![]() ) to zoom in on the image on the LCD screen. In both the Face Detection Live (
) to zoom in on the image on the LCD screen. In both the Face Detection Live ( ![]() ) and FlexiZone Single AF (
) and FlexiZone Single AF ( ![]() ) modes, you can’t focus at the edges of the frame.
) modes, you can’t focus at the edges of the frame.
In low light with Face Detection Live focusing ( ![]() ), establishing focus can be painfully slow. Unfortunately, you can’t use the AF-assist beam on an EX Speedlite to help the camera focus. However, if you have an EX-series Speedlite with an LED, such as the Speedlite 320EX, then use it because the LED will automatically illuminate to help the camera find focus.
), establishing focus can be painfully slow. Unfortunately, you can’t use the AF-assist beam on an EX Speedlite to help the camera focus. However, if you have an EX-series Speedlite with an LED, such as the Speedlite 320EX, then use it because the LED will automatically illuminate to help the camera find focus.
• Quick mode (![]() ). This focusing mode uses the camera’s autofocus system, and you focus in the same way you do when using the viewfinder in all Creative Zone exposure modes. In Basic Zone exposure modes, 11-point automatic AF selection is automatically set and the AF point cannot be selected. In Creative Zone exposure modes, you can choose the AF area selection mode and the AF point as you do with non-Live View shooting. Follow these steps:
). This focusing mode uses the camera’s autofocus system, and you focus in the same way you do when using the viewfinder in all Creative Zone exposure modes. In Basic Zone exposure modes, 11-point automatic AF selection is automatically set and the AF point cannot be selected. In Creative Zone exposure modes, you can choose the AF area selection mode and the AF point as you do with non-Live View shooting. Follow these steps:
1. Activate Live View by pressing the Start/Stop button (![]() ). You must do this because in Quick mode (
). You must do this because in Quick mode ( ![]() ), the Live View mode (
), the Live View mode ( ![]() ) on the LCD monitor is suspended when the reflex mirror drops down to establish focus.
) on the LCD monitor is suspended when the reflex mirror drops down to establish focus.
2. Press the AF-point selection button (![]() ) to switch between the automatic AF zone and Manual focus point selection. Use the Set button (
) to switch between the automatic AF zone and Manual focus point selection. Use the Set button ( ![]() ) to toggle between the center AF point and all AF zone focus points.
) to toggle between the center AF point and all AF zone focus points.
3. To select an individual focus point manually, use the Multi-controller (![]() ), Quick Control dial (
), Quick Control dial (![]() ), or Main dial (
), or Main dial (![]() ). Then, press the AF Start button (
). Then, press the AF Start button ( ![]() ) in Basic and Creative Zone modes to engage Quick mode focusing. The reflex mirror flips down, and then back up. Check your focus and if it’s locked, press the shutter button to make the picture.
) in Basic and Creative Zone modes to engage Quick mode focusing. The reflex mirror flips down, and then back up. Check your focus and if it’s locked, press the shutter button to make the picture.
• Manual Focus (![]() ). While not a menu option, this is the most accurate focusing method, and you get the best focusing results when you magnify the image. Also, with manual focusing, Live View is not interrupted during focusing. The prerequisite, of course, is having a lens that offers manual focus. To focus manually, first set your lens focus mode switch to Manual Focus (
). While not a menu option, this is the most accurate focusing method, and you get the best focusing results when you magnify the image. Also, with manual focusing, Live View is not interrupted during focusing. The prerequisite, of course, is having a lens that offers manual focus. To focus manually, first set your lens focus mode switch to Manual Focus ( ![]() ). Next, activate Live View by switching the Live View shooting/Movie shooting switch (
). Next, activate Live View by switching the Live View shooting/Movie shooting switch ( ![]() ) to the Live View shooting symbol (
) to the Live View shooting symbol ( ![]() ) and pressing the Start/Stop button (
) and pressing the Start/Stop button ( ![]() ) to engage Live View. Press the Magnify button (
) to engage Live View. Press the Magnify button ( ![]() ) once to activate the magnification frame, and use the Multi-controller to position the magnification frame over the desired focus area of the image. Press the Magnify button (
) once to activate the magnification frame, and use the Multi-controller to position the magnification frame over the desired focus area of the image. Press the Magnify button ( ![]() ) again to zoom in 5X on that area or three times for 10X magnification. Turn the focusing ring on the lens to obtain focus. Then press the Magnify button (
) again to zoom in 5X on that area or three times for 10X magnification. Turn the focusing ring on the lens to obtain focus. Then press the Magnify button ( ![]() ) to return to normal view and make the picture.
) to return to normal view and make the picture.
If you use Live View mode ( ![]() ) with Continuous shooting (
) with Continuous shooting ( ![]() ), the exposure is set for the first shot, and is used for all images in the burst.
), the exposure is set for the first shot, and is used for all images in the burst.
Aspect ratio
By setting an aspect ratio, an option available in each of the Creative Zone exposure modes, you can compose and save JPEG images with the selected aspect ratio. Aspect ratio refers to the relationship of the image width to height. Standard print sizes have aspect ratios that may be different from the image’s aspect ratio. For example, a 4 × 6-inch print has a 3:2 aspect ratio, while an 8 × 10-inch print has a 5:4 aspect ratio. By setting an aspect ratio for JPEG images, you can fit the image to the print’s aspect ratio with varying amounts of cropping to make the image fit the paper size. To figure out the print size that each aspect ratio produces, multiply each number in the ratio by 2. A 3:2 aspect ratio translates to 6 × 4, or if you transpose the numbers, a 4 × 6-inch print.

7.2 These are the aspect ratios from which you can choose.
When you set the aspect ratio, a black mask is added to the Live View display to show the cropped image area. While the mask does not appear if an image is eventually printed, it helps you compose the image for the aspect ratio you’ve chosen. If you’re shooting JPEG images, the images are saved at the aspect ratio you choose. If you shoot RAW, the aspect ratio can be applied during RAW image conversion in Canon’s Digital Photo Professional, a program provided on the EOS Digital Solutions Disk that comes with the camera.
The aspect ratio you set affects only images shot in Live View. Table 7.1 shows the aspect ratios you can choose and the resulting image resolution.

Exposure simulation
If you use Live View Exposure simulation, the image you see on the LCD monitor replicates what the final image will look like at the current exposure settings and with exposure modifications, including Auto Lighting Optimizer and Highlight Tone Priority. In addition, the image shows the effect of the selected Picture Style, white balance, and aspect ratio, if you’ve set one.
You have three choices for exposure simulation. To access those choices, press the Menu button ( ![]() ), use the Main dial (
), use the Main dial ( ![]() ) to navigate to the Live View shooting menu 1 tab (
) to navigate to the Live View shooting menu 1 tab ( ![]() ), and then use the Quick Control dial (
), and then use the Quick Control dial ( ![]() ) to highlight Expo. simulation. Press the Set button (
) to highlight Expo. simulation. Press the Set button ( ![]() ) to enter the Expo. simulation options menu, and then use the Quick Control dial (
) to enter the Expo. simulation options menu, and then use the Quick Control dial ( ![]() ) to highlight and select one of the following three options: Enable, During, or Disable.
) to highlight and select one of the following three options: Enable, During, or Disable.
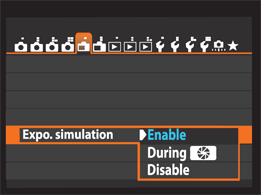
7.3 The exposure simulation options.
Once you’ve selected one, you see the following options; press the Set button ( ![]() ) to confirm your settings:
) to confirm your settings:
• Enable (![]() ). This option turns on exposure simulation. The final exposure is simulated on the LCD monitor during Live View shooting.
). This option turns on exposure simulation. The final exposure is simulated on the LCD monitor during Live View shooting.
• During (![]() ). With this option, you can choose to view the exposure simulation only when you hold the depth-of-field preview button. Otherwise, the image is displayed at standard LCD monitor brightness.
). With this option, you can choose to view the exposure simulation only when you hold the depth-of-field preview button. Otherwise, the image is displayed at standard LCD monitor brightness.
• Disable (![]() ). The image is displayed at the standard LCD monitor brightness with no exposure simulation. While the image is easy to view, you can’t see the result of exposure modifications you make, such as applying exposure compensation or using Auto Lighting Optimizer. If you choose this option, be sure to display the Brightness histogram so you know if the exposure needs adjustment. To display the histogram, press the Info button (
). The image is displayed at the standard LCD monitor brightness with no exposure simulation. While the image is easy to view, you can’t see the result of exposure modifications you make, such as applying exposure compensation or using Auto Lighting Optimizer. If you choose this option, be sure to display the Brightness histogram so you know if the exposure needs adjustment. To display the histogram, press the Info button ( ![]() ).
).
Silent shooting modes
Live View shooting offers two Silent shooting modes, and you can even use quiet shooting during continuous shooting. In either Silent LV shooting mode 1 or 2, the shutter noise is noticeably reduced. The following list includes summaries of the two Silent shooting modes and the Disable option:
• Mode 1. In this mode, the shutter cocking noise is reduced significantly. If you combine this with Flexizone Single mode ( ![]() ), the camera is very quiet. In Quick mode (
), the camera is very quiet. In Quick mode ( ![]() ), the sound of the mirror action is noisy, but the shutter sound is significantly reduced. If you’re shooting an event where low noise is important, then use Flexizone Single (
), the sound of the mirror action is noisy, but the shutter sound is significantly reduced. If you’re shooting an event where low noise is important, then use Flexizone Single ( ![]() ) and this mode because it enables high-speed continuous shooting at 4.1 fps (frames per second) by holding down the shutter button completely.
) and this mode because it enables high-speed continuous shooting at 4.1 fps (frames per second) by holding down the shutter button completely.
• Mode 2. This mode delays shutter noise as long as you keep the shutter button pressed, thus delaying the recocking sound of the shutter. If the camera is in Continuous drive mode ( ![]() ), only one image is made because the shutter does not recock until you release the shutter button. Again, use Live mode focusing (
), only one image is made because the shutter does not recock until you release the shutter button. Again, use Live mode focusing ( ![]() ) if you want to keep both focusing and shutter release quiet. If you choose this option and use remote control shooting with the RC-6, RC-1, or RC-5 remote releases, then the result is like using Mode 1.
) if you want to keep both focusing and shutter release quiet. If you choose this option and use remote control shooting with the RC-6, RC-1, or RC-5 remote releases, then the result is like using Mode 1.
• Disable. This is the setting to choose if you use a tilt-and-shift (TS-E) lens and make a vertical shift movement or if you use extension tubes on the lens. Pressing the shutter button sounds like two images are being taken, but only one image is made. Also choose this option if you are using a non-Canon flash; otherwise, the flash will not fire.
Silent shooting isn’t possible with flash units.
Metering timer
During Live View ( ![]() ), you can choose from Evaluative metering mode (
), you can choose from Evaluative metering mode ( ![]() ), Partial metering mode (
), Partial metering mode ( ![]() ), Spot metering mode (
), Spot metering mode ( ![]() ), and Center-weighted metering mode (
), and Center-weighted metering mode ( ![]() ). The latest meter reading is maintained for 16 seconds by default. You can choose from a list of presets that control how long the exposure will remain locked.. If the light in the scene remains constant, then you can speed up shooting by using the existing meter reading for a longer amount of time. If the light changes frequently, then set a shorter amount of time.
). The latest meter reading is maintained for 16 seconds by default. You can choose from a list of presets that control how long the exposure will remain locked.. If the light in the scene remains constant, then you can speed up shooting by using the existing meter reading for a longer amount of time. If the light changes frequently, then set a shorter amount of time.
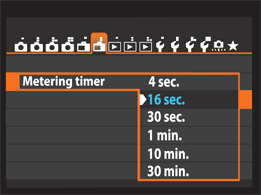
7.4 The metering timer options on the Live View shooting menu 2 tab.
To help you square up scene lines with the frame and to aid in composing images, display one of three grids: 3 × 3, 6 × 4, and 3 × 3 plus diagonal (X) lines. Just choose Grid display on the Live View shooting menu 1 tab ( ![]() ), and choose the grid you want.
), and choose the grid you want.
Using a flash
When you’re shooting in Live View with an accessory Speedlite, the shooting sequence (after fully pressing the shutter button) is for the reflex mirror to drop to allow the camera to gather the preflash data. The mirror then moves up out of the optical path for the actual exposure. As a result, you hear a series of clicks, but only one image is taken.
Here are some things you should know about using Live View shooting mode ( ![]() ) with a flash unit:
) with a flash unit:
• With an EX-series Speedlite, FE Lock, modeling flash, and test firing cannot be used except for wireless flash shooting.
• If you are using a Canon Speedlite and have the camera set to Silent mode 1 or 2, the camera automatically switches to the Disable option. This temporarily disables the flash. The flash will be enabled again once you have exited from either of these modes. Non-Canon flash units do not automatically switch to Disable, so you must manually set the camera to Disable.
Working with Live View Mode
Now that you have a good idea of the features and options you can choose for Live View shooting ( ![]() ), you can begin shooting. Shooting with the LCD monitor offers the same exposure controls and menu options as shooting with the viewfinder. The exception is when you’re shooting in Live View with Scene Intelligent Auto (
), you can begin shooting. Shooting with the LCD monitor offers the same exposure controls and menu options as shooting with the viewfinder. The exception is when you’re shooting in Live View with Scene Intelligent Auto ( ![]() ) — in this mode, the menus are abbreviated, as they are with viewfinder shooting.
) — in this mode, the menus are abbreviated, as they are with viewfinder shooting.
Setting up to shoot
You can find the settings for Live View shooting on the Live View shooting menu 1 tab ( ![]() ). You choose your Live View options and preferences here.
). You choose your Live View options and preferences here.
For all step-by-step tasks in this chapter, set the Mode dial to any Creative Zone exposure mode, except where Basic Zone exposure modes are noted.
To set up the 6D for Live View shooting ( ![]() ) and to set your preferences, follow these steps:
) and to set your preferences, follow these steps:
1. Press the Menu button (![]() ) to activate the camera’s menu system, and use the Main dial (
) to activate the camera’s menu system, and use the Main dial (![]() ) to navigate to the Live View shooting menu 1 or 2 tabs. The options for Live View shooting appear on these menus. Use the Quick Control dial (
) to navigate to the Live View shooting menu 1 or 2 tabs. The options for Live View shooting appear on these menus. Use the Quick Control dial ( ![]() ) to highlight the desired setting, the Set button (
) to highlight the desired setting, the Set button ( ![]() ) to enter its option screen, and the Quick Control dial (
) to enter its option screen, and the Quick Control dial ( ![]() ) to highlight your option choice. Press the Set button (
) to highlight your option choice. Press the Set button ( ![]() ) to confirm your choices.
) to confirm your choices.
7.5 The Live View shooting menu 1 tab.
2. Highlight Live View shoot., press the Set button (![]() ), and then use the Quick Control dial (
), and then use the Quick Control dial (![]() ) to choose Enable. Press the Set button (
) to choose Enable. Press the Set button ( ![]() ) to confirm the setting. Live View shooting is enabled by default so you may be able to skip this step.
) to confirm the setting. Live View shooting is enabled by default so you may be able to skip this step.
3. Highlight any of the following options on the Live View shooting menu 1 tab using the Quick Control dial (![]() ), and then press the Set button (
), and then press the Set button (![]() ) to enter its options menu. Use the Quick Control dial (
) to enter its options menu. Use the Quick Control dial ( ![]() ) to change settings as desired and press the Set button (
) to change settings as desired and press the Set button ( ![]() ) to confirm your changes.
) to confirm your changes.
If you’re using any of the Basic Zone exposure modes, the options available on the Live View shooting menu 1 tab will be limited to Live View shooting mode ( ![]() ).
).
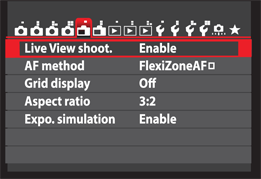
The following Live View options appear on the Live View shooting menu 1 tab (follow the instructions covered earlier in this chapter to set them):
• Live View shoot. Select Enable or Disable.
• AF mode. Select FlexiZone – Single AF ( ![]() ), Face Detection Live mode (
), Face Detection Live mode ( ![]() ), or Quick mode (
), or Quick mode ( ![]() ), described previously.
), described previously.
• Grid display. Select a 3 × 3, 6 × 4, or 3 × 3+diag grid to help you align horizontal and vertical lines in the scene. Select Off if you do not want to use a grid.
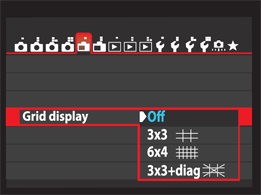
7.6 The Grid display options.
• Aspect ratio. Select 3:2, 4:3, 16:9, or 1:1 as the aspect ratio.
• Expo. simulation. Choose Enable to see an approximation of the final exposure on the LCD monitor continually. Choose During ![]() to see the simulation only when you press the depth-of-field preview button. Alternatively, choose Disable to view the scene at standard LCD monitor brightness.
to see the simulation only when you press the depth-of-field preview button. Alternatively, choose Disable to view the scene at standard LCD monitor brightness.
The Live View shooting menu 2 tab is available only when using Creative Zone exposure modes.
• Silent LV shoot. Choose Mode 1 to reduce the sound of the shutter, even during Continuous drive mode ( ![]() ). Choose Mode 2 to delay the sound of the shutter until you release the shutter button. Choose Disable if you don’t need silent operation or if you’re using a non-Canon flash, certain tilt-and-shift lens, or a lens extender.
). Choose Mode 2 to delay the sound of the shutter until you release the shutter button. Choose Disable if you don’t need silent operation or if you’re using a non-Canon flash, certain tilt-and-shift lens, or a lens extender.
• Metering timer. Choose 4, 16, or 30 seconds, or 1, 10, or 30 minutes, to determine how long the camera locks the exposure. If the light changes often, choose a shorter time.
Using the Quick Control button
With Live View activated, pressing the Quick Control button ( ![]() ) brings up a menu screen you can use to control camera settings. Use the Multi-controller (
) brings up a menu screen you can use to control camera settings. Use the Multi-controller ( ![]() ) to select the desired setting and use the Multi-controller (
) to select the desired setting and use the Multi-controller ( ![]() ), Quick Control dial (
), Quick Control dial ( ![]() ), or Main dial (
), or Main dial ( ![]() ) to scroll through and set available options.
) to scroll through and set available options.
The Quick Control screen contains the following options when using Creative Zone exposure modes: AF method, drive mode, metering mode, image quality, white balance, Picture Style, and Auto Lighting Optimizer. In Basic Zone exposure modes, the Quick Control menu displays the following abbreviated menu of options: AF method, drive mode, and image quality. Press the Set button ( ![]() ) to exit the Quick Control screen.
) to exit the Quick Control screen.
Using metering modes
The 6D offers selectable metering modes when you are using Live View. Choose from Evaluative metering mode ( ![]() ), Partial metering mode (
), Partial metering mode ( ![]() ), Spot metering mode (
), Spot metering mode ( ![]() ), and Center-weighted metering mode (
), and Center-weighted metering mode ( ![]() ).
).
In Live View shooting mode, Partial metering mode ( ![]() ) and Spot metering mode (
) and Spot metering mode ( ![]() ) each provide helpful on-screen metering area circles, which are automatically displayed and indicate exactly where their metering areas begin and end.
) each provide helpful on-screen metering area circles, which are automatically displayed and indicate exactly where their metering areas begin and end.
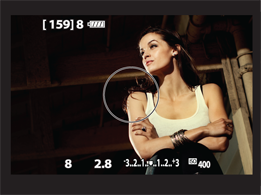
7.7 The abbreviated shooting information display. The metering area circle appears automatically when you use either the Partial or Spot metering modes in Live View.
Shooting in Live View mode
The operation of the camera during Live View is easy once you get started. However, just a few minutes of watching the real-time view on the LCD monitor will convince you that a tripod is necessary for Live View shooting. With any focal length approaching telephoto, Live View provides a real-time gauge of just how steady or unsteady your hands are.
Before you begin shooting, set the ISO. I always manually set the ISO, and I keep it as low as I can. As I mentioned early in the chapter, shooting in Live View heats the sensor faster than shooting with the viewfinder. Additionally, if you combine the potential for higher-than-usual internal temperatures with high ISO settings, you not only get unsightly digital noise, but also irregular colors in captured images.
Because Live View shooting ( ![]() ) drains the battery quickly, it’s wise to have a spare charged battery handy if you plan to shoot for a long time. If you’re using FlexiZone – Single AF (
) drains the battery quickly, it’s wise to have a spare charged battery handy if you plan to shoot for a long time. If you’re using FlexiZone – Single AF ( ![]() ), or the Face Detection Live (
), or the Face Detection Live ( ![]() ) or Quick (
) or Quick ( ![]() ) modes, be sure the lens switch is set to autofocus.
) modes, be sure the lens switch is set to autofocus.
If you have followed along and set your camera to the focusing mode and options you want, follow these steps to begin using Live View mode ( ![]() ):
):
1. Set the camera to the shooting mode you want. I typically use Aperture-priority AE ( ![]() ) or Shutter-priority AE (
) or Shutter-priority AE ( ![]() ) mode, but if you want to set the exposure yourself, then choose Manual Exposure (
) mode, but if you want to set the exposure yourself, then choose Manual Exposure ( ![]() ).
).
2. Set the Live View shooting switch to Live View (![]() ) instead of Movie shooting (
) instead of Movie shooting (![]() ).
).
3. Press the Start/Stop button (![]() ) to display a real-time view of the scene on the LCD screen.
) to display a real-time view of the scene on the LCD screen.
4. Press the Quick Control button (![]() ) to display options you can change. To move between the options, use the Multi-controller (
) to display options you can change. To move between the options, use the Multi-controller ( ![]() ).
).
5. Press the Info button (![]() ) once to display the Exposure Level Indicator and abbreviated shooting information at the bottom of the display. Press it twice to display additional camera settings, including the shooting, drive, and focus modes, white balance, Picture Style, Auto Lighting Optimizer, and card writing sequence. Press it a third time to display a live Brightness histogram. Press it four times to display the Electronic Level. Press it a fifth time to hide all information so that only the AF point is displayed.
) once to display the Exposure Level Indicator and abbreviated shooting information at the bottom of the display. Press it twice to display additional camera settings, including the shooting, drive, and focus modes, white balance, Picture Style, Auto Lighting Optimizer, and card writing sequence. Press it a third time to display a live Brightness histogram. Press it four times to display the Electronic Level. Press it a fifth time to hide all information so that only the AF point is displayed.
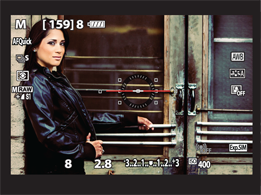
7.8 The Live View screen with the Electronic level displayed.
The Electronic level display is unavailable in Face Detection Live mode ( ![]() ).
).
Here is how to use the different focusing modes:
• FlexiZone – Single AF (![]() ). Use the Multi-controller (
). Use the Multi-controller ( ![]() ) to move the AF point over the subject where you want the sharp focus. As with normal focusing, half-press the shutter button to focus. When the rectangle turns green, press the shutter button completely. If the rectangle turns red, it means that focus couldn’t be achieved. In these situations, shift the camera slightly to an area with stronger contrast to help the camera find focus.
) to move the AF point over the subject where you want the sharp focus. As with normal focusing, half-press the shutter button to focus. When the rectangle turns green, press the shutter button completely. If the rectangle turns red, it means that focus couldn’t be achieved. In these situations, shift the camera slightly to an area with stronger contrast to help the camera find focus.
• Face Detection Live mode (![]() ). The rectangle appears around the face of a person in the scene when you half-press the shutter button. If you don’t want to focus on that person, use the Multi-controller (
). The rectangle appears around the face of a person in the scene when you half-press the shutter button. If you don’t want to focus on that person, use the Multi-controller ( ![]() ) to move the frame to another person. If the camera doesn’t detect a face, the AF point will change to look as it does in FlexiZone mode (
) to move the frame to another person. If the camera doesn’t detect a face, the AF point will change to look as it does in FlexiZone mode ( ![]() ) and it will be at the center of the LCD screen. You can then use the FlexiZone – Single AF mode (
) and it will be at the center of the LCD screen. You can then use the FlexiZone – Single AF mode ( ![]() ) process to move the AF point manually on a face.
) process to move the AF point manually on a face.
• Quick mode (![]() ). Press the AF point selection button (
). Press the AF point selection button ( ![]() ), and use the Multi-controller (
), and use the Multi-controller ( ![]() ) to select the AF point you want to use. You can also use the Multi-controller (
) to select the AF point you want to use. You can also use the Multi-controller ( ![]() ) to change the AF area selection mode.
) to change the AF area selection mode.
• Manual Focus mode. If you have a lens that allows manual focusing, set the lens switch to Manual Focus ( ![]() ). Move the focusing frame over the subject by using the Multi-controller (
). Move the focusing frame over the subject by using the Multi-controller ( ![]() ). Turn the focusing ring on the lens to focus, or press the Magnify button (
). Turn the focusing ring on the lens to focus, or press the Magnify button ( ![]() ) to zoom in and then focus. After the focus is set, zoom out and make the picture.
) to zoom in and then focus. After the focus is set, zoom out and make the picture.