
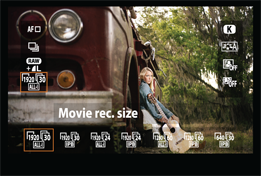
8.1 The Movie rec. size screen.
Chapter 8: Recording and Watching Movies
Making high-quality movies isn’t new for dSLRs: the Canon EOS 6D benefits from trickle-down features from the costlier models, including improvements over its predecessors. Features include a choice of file-compression options, continuous shooting with the camera automatically creating new files when the current file reaches the 4GB limit, a timecode feature, 1080p Full HD recording, and the capability to record 29.59 minutes of video.
There is an approximate 2-stop improvement with high ISO shooting compared to previous models, as well as improved performance in controlling moiré and false colors. These features, along with lovely image quality, make the 6D a very capable tool for recording videos. This chapter gives you a solid introduction to shooting movies on the 6D. Keep in mind that the 6D doesn’t include a headphone jack. In my opinion, this isn’t a major issue because external audio recorders are a much better bet for quality audio.
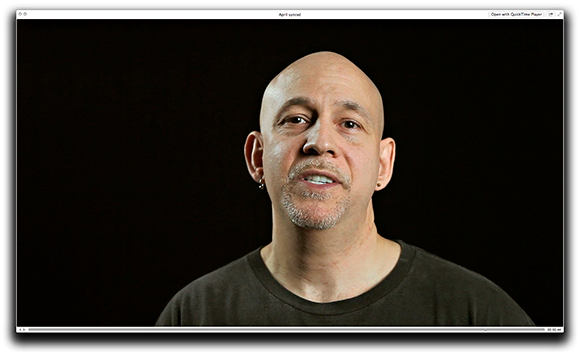
A robust set of features make the Canon EOS 6D a very capable camera for capturing HD video, like this shot from a Speedlite training video I recently recorded.
About Movies
The ability to shoot movies offers two obvious benefits: It expands your creative options with the camera, and it gives you the potential to increase your income by shooting both stills and videos for clients. The 6D is well suited for shooting movies at weddings, news, commercials, and even television shows. Granted, the camera becomes truly functional for movie shooting when you add stabilization and focus accessories. However, with or without the accessories, the 6D is a great tool for expanding your work and income.
If you’re new to recording movies, then get ready to learn a new set of technical details and terms. There’s no better place to begin than with a discussion of the industry standards.
Video standards
Learning about industry standards opens the door to understanding some of the language related to video, and how the 6D’s features and options fit these standards. In the world of video, there are several industry standards, including the following resolutions: 720p, 1080i, and 1080p.
The numbers 720 and 1080 represent vertical resolution. The 720 standard has a resolution of 921,600 pixels, or 720 (vertical pixels) × 1280 (horizontal pixels). The 1080 standard has a resolution of 2,073,600 pixels, or 1080 × 1920. It seems obvious that the 1080 standard provides the highest resolution, and so you would think that it would be preferable. However, that is not the entire story.
More of the story is contained in the i and p designations. The i stands for interlaced. Interlacing is a method of displaying video where each frame is displayed on the screen in two passes — first, a pass that displays odd-numbered lines, and second, a pass that displays even-numbered lines. Each pass is referred to as a field, and two fields comprise a single video frame. This double-pass approach was engineered to keep the transmission bandwidth for televisions manageable. The interlaced transmission works only because your mind automatically merges the two fields, so that the motion seems smooth with no flickering. Interlacing, however, is the old way of transmitting moving pictures.
The newer way of transmitting video is referred to as progressive scan; hence, the p designation. Progressive scan quickly displays a line at a time until the entire frame is displayed. The scan happens so quickly that you see it as if it were being displayed all at once. The advantage of 720 standard resolution progressive scanning is most apparent in scenes where either the camera or the subject is moving fast. With interlaced transmission, fast camera action or moving subjects tend to blur between fields. That is not the case with progressive scan.
Another piece of the digital video story is the frame rate. In the world of film, a frame rate of 24 frames per second (fps) provided the classic cinematic look of old movies. In the world of digital video, the standard frame rate is 30 fps. Anything less than 24 fps makes the video jerk. The TV and movie industries use standard frame rates. For example, 60i produces 29.97 fps, and is used for NTSC (National Television Standards Committee); 50i produces 25 fps, and is used for PAL (Phase Alternating Line), a standard used in some parts of the world; 30p produces 30 fps, a rate that produces smooth rendition for fast-moving subjects.
Videographers who want a cinematic look prefer cameras that convert, or pull down, 30 fps to 24 fps.
With this very brief background on video, you can look at the digital video options on the 6D.
NTSC is the standard for North America, Japan, Korea, Mexico, and other countries. PAL is the standard for Europe, Russia, China, Australia, and other countries.
Video on the 6D
If you’re new to video, then you probably have questions, including how the 6D compares to industry standards, how long you can record, and how big the files are. The following list offers a rundown of the digital video recording options that you can choose on the 6D:
• Full HD (Full High-Definition) at 1920 × 1080p at 30 fps (actual 29.97), 25 fps when set to PAL, or 24 (actual 23.976) fps. With the 6D, you choose not only the resolution and frame rate but also the type of compression, either IPB or ALL-I (detailed later in this chapter). With IPB compression, you get approximately 16 minutes of recording on a 4GB memory card, and 1 hour, 4 minutes with a 16GB card. The file size is 235MB per minute. With ALL-I compression, you get approximately 5 minutes of recording time with a 4GB card and approximately 22 minutes with a 16GB card. The file size is 685MB/minute with ALL-I. The aspect ratio is 16:9.
• HD (High-Definition) at 1280 × 720p at 60 fps (actual 59.94) and 50 fps when set to PAL. With IPB compression, you get approximately 18 minutes of recording time with a 4GB card, and 1 hour, 14 minutes with a 16GB card. The file size is 205MB/minute. With ALL-I, you get approximately 6 minutes of recording on a 4GB card and 25 minutes on a 16GB card. The file size is approximately 610MB/minute. The aspect ratio is 16:9.
• SD (Standard-Definition recording) at 640 × 480 at 30 fps (actual 29.97) or actual 25 fps when set to PAL. The only compression you can choose is IPB, and you get 48 minutes of recording time with a 4GB card, and 3 hours and 14 minutes with a 16GB card. The file size is 78MB per minute. The aspect ratio is 4:3.
You have two high-quality video options, albeit at different frame rates. The 30 fps option is the traditional recording speed for online use whereas the actual 29.97 speed is the TV standard in North America (NTSC). As a result, the 30 fps option is suitable for materials destined for DVD or display on a standard-definition or HD TV. Although 24 fps is more film like, it can produce jerky motion for moving subjects, and it requires slower shutter speeds. In addition, the actual 29.97 frame rate makes it easier to sync audio when it is recorded separately using a video-editing program.
Shooting HD at 50 or 60 fps using ALL-I recording puts the greatest demand on the media card, with HD 720p requiring 30MB/sec. for CF (CompactFlash) cards and 14MB/sec for SD (Secure Digital) cards.
Here are some other aspects to consider about video shooting on the 6D:
• Audio. You can use the 6D’s built-in monaural microphone, which is adequate, if you do not want to invest in a separate audio recorder and microphone. The audio is 16-bit at a sampling rate of 48 kHz and is output in mono. If you use the built-in microphone, be aware that all the mechanical camera functions are recorded, including the sound of the Image Stabilization (IS) function on the lens, the focusing motor, and ambient noise on the set. The microphone features a wind-cut filter that is on at all times when using the internal microphone. With the 6D, you can control the audio recording up to 64 levels. If you use an accessory microphone, a 3.5mm stereo input jack on the side of the camera records at 48 kHz. The 6D has no headphone jack.
• Exposure and camera settings. Exposure control ranges from fully automatic to full manual, with semiautomatic modes such as Aperture-priority AE ( ![]() ) and Shutter-priority AE (
) and Shutter-priority AE ( ![]() ) enabling you to set the aperture or shutter speed, respectively. Shutter speeds are linked to the frame rate. For example, the slowest frame rate at 30, 25, or 24 fps is 1/30 second, and at 60 or 50 fps, it is 1/60 second. The maximum shutter speed is 1/4000 second for all frame rates. You can set the ISO automatically or manually. Manual ISO settings range from 100 to 12800, or it can be expanded to 25600/H. In Scene Intelligent Auto (
) enabling you to set the aperture or shutter speed, respectively. Shutter speeds are linked to the frame rate. For example, the slowest frame rate at 30, 25, or 24 fps is 1/30 second, and at 60 or 50 fps, it is 1/60 second. The maximum shutter speed is 1/4000 second for all frame rates. You can set the ISO automatically or manually. Manual ISO settings range from 100 to 12800, or it can be expanded to 25600/H. In Scene Intelligent Auto ( ![]() ) exposure mode, the ISO is automatically set from 100 to 12800. You can also use AE Lock (
) exposure mode, the ISO is automatically set from 100 to 12800. You can also use AE Lock ( ![]() ) and set exposure compensation of ± 3 stops for movies or ± 5 stops for still images in all exposure modes, except Scene Intelligent Auto (
) and set exposure compensation of ± 3 stops for movies or ± 5 stops for still images in all exposure modes, except Scene Intelligent Auto ( ![]() ). You can adjust the Picture Style, white balance, still-image quality, and other settings in Movie mode (
). You can adjust the Picture Style, white balance, still-image quality, and other settings in Movie mode ( ![]() ).
).
• Battery life. At normal temperatures, you can expect to shoot for approximately 90 minutes, with the time diminishing in colder temperatures to approximately 80 minutes.
• Video clip size and length. The upper limit of a single video file is 4GB. When the movie approaches the 4GB point, the timecode, or elapsed time display, blinks. Then the camera automatically creates a new file while you continue recording uninterrupted. Given sufficient space on the memory card, you can record up to 29 minutes and 59 seconds of video, and the video is stored in series of 4GB files. During editing, the individual clips can be placed sequentially for a continuous movie, with no evidence of file transitions or dropped frames.
• Memory cards. The 6D supports SD (Secure Digital), SDHC (Secure Digital High Capacity), or SDXC (Secure Digital Xtended Capacity) cards. Choose an SD card that is 6MB per second or faster for IPB compression; for ALL-I compression, use one with a 20MB per second or faster write speed. If you shoot still images during recording, go with a faster card than the ones recommended. With slower cards, the movie may not record correctly.
• Image simulation. The LCD monitor simulates the exposure, Picture Style, White balance, White balance correction, Ambience-based shots, Light/scene-based shots, Metering mode, Exposure, Depth of field, Auto Lighting Optimizer, Peripheral illumination correction, Highlight tone priority, and Aspect ratio.
• Still-image shots during recording. You can capture, or grab, a still image at any time during video recording by pressing the shutter button completely. This results in a 1-second pause in the video and a full-resolution still image. The still image is recorded as a separate file from the video. The still image is captured at the image-quality setting that is set for still-image shooting. The aspect ratio is 16:9 except with the 640 × 480 recording size, where it is 4:3. The camera automatically sets the aperture and shutter speed when you shoot in the Scene Intelligent Auto ( ![]() ), Program AE (
), Program AE ( ![]() ), or Bulb (
), or Bulb ( ![]() ) shooting modes, and the ISO range is 100 to 12800. In the Shutter-priority AE (
) shooting modes, and the ISO range is 100 to 12800. In the Shutter-priority AE ( ![]() ), Aperure-priority AE (
), Aperure-priority AE ( ![]() ), and Manual (
), and Manual ( ![]() ) modes, you can set the shutter speed, aperture, or both, respectively, as with regular shooting.
) modes, you can set the shutter speed, aperture, or both, respectively, as with regular shooting.
• Temperature cautions. As with Live View shooting, the camera’s internal temperature increases faster when shooting video. The camera displays a white thermometer-like icon as a first warning. If you keep shooting, a blinking red temperature icon appears to encourage you to let the camera cool down. If you still keep shooting, the camera stops recording automatically, and it won’t start again until it has cooled off sufficiently. If you shoot while the white warning icon is displayed, the movie quality won’t suffer, but still images you capture may show degradation.
Preparing to Record
A little planning, or even a lot of planning, goes a long way in creating interesting and polished videos. The 6D offers a number of setup choices that deserve discussion. The following sections walk through the controls and options you can set to suit your recording preferences. Some of the setup options are the same as or similar to those offered in Live View shooting. In particular, the focusing modes are the same in both cases.
This section discusses focusing, white balance, Picture Styles, and other options you can set before you begin recording.
Choosing the resolution and exposure mode
The choices when preparing to shoot video are many and varied. When you make the decision on what resolution to use, most often it is dictated by a client, stock agency, network, the playback device(s), or even the content of the clip. For example, progressive video capture is best suited for post-capture frame-based editing, and it is compatible with DVD and Blu-ray players. The frame rate you choose may depend on the look you want to achieve as well as on the area in which you live. For example, choose 30 or 60 fps for NTSC TV format used in North America, Japan, Korea, Mexico, and other areas. However, choose 25 or 50 fps if you are shooting for the PAL TV format used in Europe, Russia, China, Australia, and other countries.
To choose the resolution, frame rate, and compression method, move the Live View Shooting/Movie shooting switch to Movie mode ( ![]() ), use the Main dial (
), use the Main dial ( ![]() ) to navigate to the Movie shooting menu 2 tab (
) to navigate to the Movie shooting menu 2 tab ( ![]() ), use the Quick Control dial (
), use the Quick Control dial ( ![]() ) to highlight Movie rec. size, press the Set button (
) to highlight Movie rec. size, press the Set button ( ![]() ), and then choose a size and compression method.
), and then choose a size and compression method.
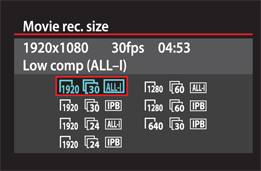
8.1 The Movie rec. size screen.
Another decision you need to make is whether you want to control all, part, or none of the exposure. As with still shooting, you can use any of the shooting modes on the camera, and Table 8.1 details how they operate in Movie mode ( ![]() ). Most of the operations are straightforward with little change from still-image shooting.
). Most of the operations are straightforward with little change from still-image shooting.

Selecting a High ISO for Movies
Although using the highest ISO sensitivity for movies is not recommended, it may be required in low-light scenes. If you want to record at ISO 25600/H (the highest allowable ISO setting for movies), then the ISO speed range option on the Shooting menu 3 tab ( ![]() ) must be set to the 25600/H option, rather than the 25600 option without the H designation. If you set the 25600 option, the highest ISO setting will be 12800.
) must be set to the 25600/H option, rather than the 25600 option without the H designation. If you set the 25600 option, the highest ISO setting will be 12800.
Also, if you’ve set the Maximum to H1 (51200) or H2 (102400), the ISO used will be 25600. This applies when you use Creative zone exposure modes — Program AE ( ![]() ), Aperture-priority AE (
), Aperture-priority AE ( ![]() ), and Bulb (
), and Bulb ( ![]() ). (The ISO speed range cannot be set for Shutter-priority AE (
). (The ISO speed range cannot be set for Shutter-priority AE ( ![]() ) mode).
) mode).
The lowest ISO setting for movies is 100 unless you have Highlight Tone Priority enabled, and then it is 200. If you have ISO 50 enabled as the Minimum ISO, the camera automatically uses 100.
The Creative Zone modes — Bulb ( ![]() ), Manual (
), Manual ( ![]() ), Aperture-priority AE (
), Aperture-priority AE ( ![]() ), Shutter-priority AE (
), Shutter-priority AE ( ![]() ), and Program AE (
), and Program AE ( ![]() ) — have several other noteworthy exposure options for movie making. To set exposure options in the Creative Zone modes, follow these steps:
) — have several other noteworthy exposure options for movie making. To set exposure options in the Creative Zone modes, follow these steps:
1. Press the AE lock button (![]() ) to lock the exposure. Pressing the autofocus (AF) point selection button (
) to lock the exposure. Pressing the autofocus (AF) point selection button ( ![]() ) will cancel Exposure Lock.
) will cancel Exposure Lock.
2. Enable exposure compensation by sliding the Multi-function lock switch (![]() ) to the left and using the Quick Control dial (
) to the left and using the Quick Control dial (![]() ).
).
3. Set Auto Lighting Optimizer using the Shooting menu 3 tab (![]() ). Auto Lighting Optimizer INFO can be disabled in the Manual (
). Auto Lighting Optimizer INFO can be disabled in the Manual ( ![]() ) and Bulb (
) and Bulb ( ![]() ) modes. However, in Movie mode, it defaults to Auto Exposure, even in Bulb mode (
) modes. However, in Movie mode, it defaults to Auto Exposure, even in Bulb mode ( ![]() ).
).
The Movie menu settings
Best practice is to go through the Movie mode menu options and set up the camera before shooting begins. When the 6D’s Live View shooting/Movie shooting switch is set to the Movie mode position ( ![]() ), two menu tabs, Movie shooting menu 1 (
), two menu tabs, Movie shooting menu 1 ( ![]() ) and Movie shooting menu 2 (
) and Movie shooting menu 2 ( ![]() ), are available for movie setup. These sections detail the options on both menus.
), are available for movie setup. These sections detail the options on both menus.
To set up the 6D for shooting movies, turn the Live View shooting/Movie shooting switch to the Movie mode position ( ![]() ). Then press the Menu button (
). Then press the Menu button ( ![]() ), and navigate to the Movie shooting menu 1 tab (
), and navigate to the Movie shooting menu 1 tab ( ![]() ). If you have the Mode dial set to Scene Intelligent Auto (
). If you have the Mode dial set to Scene Intelligent Auto ( ![]() ), fewer menu options are available than in the other shooting modes.
), fewer menu options are available than in the other shooting modes.
Movie shooting menu 1
Here are the options you can choose on the Movie shooting menu 1 tab ( ![]() ):
):
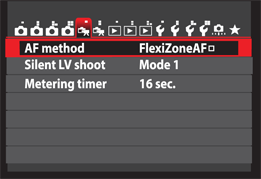
8.2 The Movie shooting menu 1 tab.
• AF method. Choose FlexiZone AF – Single ( ![]() ), Face Detection Live Mode (
), Face Detection Live Mode ( ![]() ), or Quick mode (
), or Quick mode ( ![]() ). These options operate in the same way as they do for Live View shooting (detailed in Chapter 7). Of course, you can also use manual focusing if the lens you’re using offers it. Professional videographers use manual focusing almost exclusively along with a follow-focus device that makes focusing and adjusting focus easier. (Focusing is discussed in more detail later in this chapter.)
). These options operate in the same way as they do for Live View shooting (detailed in Chapter 7). Of course, you can also use manual focusing if the lens you’re using offers it. Professional videographers use manual focusing almost exclusively along with a follow-focus device that makes focusing and adjusting focus easier. (Focusing is discussed in more detail later in this chapter.)
• Silent LV shoot. These options are used only when you make still images during movie recording. Choose Mode 1 to reduce the sound of the shutter, even during continuous shooting. Choose Mode 2 to delay the sound of the shutter until you release the shutter button. Choose Disable if you don’t need silent operation.
• Metering timer. Choose 4, 16, or 30 seconds, or 1, 10, or 30 minutes to determine how long the camera retains the exposure. If the light changes often, choose a shorter time.
Movie shooting menu 2
The Movie shooting menu 2 tab ( ![]() ) contains the following important settings:
) contains the following important settings:
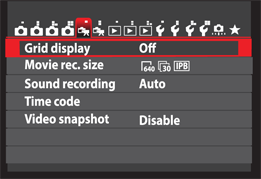
8.3 The Movie shooting menu 2 tab.
• Grid display. Choose a 3 × 3, 6 × 4, or 3 × 3+ diag grid to help you align horizontal and vertical lines in the scene. Select Off if you do not want to use a grid.
• Movie recording size and compression. These options are discussed earlier in this chapter (see Figure 8.1).
• Sound recording. You can choose Auto to have the camera automatically control the audio level. You can also choose Manual to record sound using the built-in monaural microphone that records 16-bit sound at 48 kHz. With this option, you can adjust the recording level to one of 64 increments using the Quick Control dial ( ![]() ). Then adjust the meter so that it occasionally hits the 12 (–12 dB) mark on the peak hold indicator at the bottom of the screen. You can also choose Disable. The Wind filter/Attenuator option helps to reduce the sound of wind for outdoor shooting. Choose Enable to activate this feature. Otherwise, choose Disable if there is no wind on the set. If you typically shoot with the built-in microphone where there is no wind noise, then leave this option disabled for better audio.
). Then adjust the meter so that it occasionally hits the 12 (–12 dB) mark on the peak hold indicator at the bottom of the screen. You can also choose Disable. The Wind filter/Attenuator option helps to reduce the sound of wind for outdoor shooting. Choose Enable to activate this feature. Otherwise, choose Disable if there is no wind on the set. If you typically shoot with the built-in microphone where there is no wind noise, then leave this option disabled for better audio.
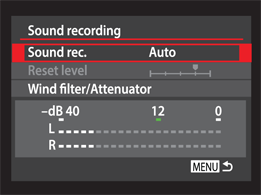
8.4 The Sound recording screen.
If you use an accessory stereo microphone, the camera automatically switches audio recording to the external microphone.
• Time code. The Time code option is fourth on the menu, and within that menu are Drop frame options. In video recording, a timecode is a frame-counting function. Time codes follow the standard set by the Society of Motion Picture and Television Engineers (SMPTE) for counting frames by hour:minute:second:frame, with the frame count running from 00 to 29 frames. A time code is an essential tool for referencing and synchronizing audio and video. Counting frames sounds simple enough until you recall that 30 fps actually records at 29.97 fps, and 60 fps actually records at 59.94 fps. So when the camera is recording at 30 fps, the time code counts frames to 29, and then 1 second is added to the 30th frame to return the counter to 00. This compensation is a little like having leap year compensate for the earth not spinning at exactly 24 hours a day. The compensation is less problematic with short videos and more problematic with long videos. A drop frame compensates for the frame-rate discrepancy. Drop frame is something of a misnomer because no frames are actually dropped; rather, the time code is adjusted to compensate as described previously. On the 6D, you can opt to use a time code, and you can determine how to compensate for dropped frames. You can set the time code in any of the following four ways. Just navigate to the Movie Shooting menu 2 tab ( ![]() ) and choose one of these options:
) and choose one of these options:
• Count up. This is the default setting, and, if you use it, then you can choose either Rec Run or Free Run. Rec Run means the timecode advances only during movie recording. This is a good option if only one camera is filming because you can organize clips in chronological order. Changing or formatting the media card or deleting a movie file does not reset the count. On the other hand, the Free Run option continues counting even if no movie is being recorded. Choose this option if several cameras are used to record the movie. Clips from the cameras can then be arranged chronologically during editing.
• Start time setting. With this option, you can choose the Manual input setting where you manually enter the hour, minute, second, and frame for beginning the timecode. Alternately, you can choose Reset so the counter is set to all zeros. If you choose Set to camera time, the current time on the camera’s internal clock is used and frames are set to 00.
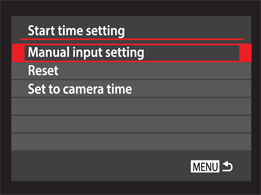
8.5 The Start time setting screen.
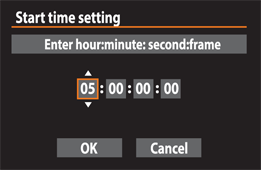
8.6 The Start time setting screen with the manual option to input the start time.
• Movie rec. count. This option determines what is displayed on the LCD monitor during movie recording. You can choose Rec. time to display the elapsed time on the LCD monitor during recording. You can also opt for Time code to display during recording.
If you shoot a still image during movie recording, then the actual time and time code will be not match.
• Movie play count. This option determines what is displayed during movie playback. You can choose Play time or Time code. The Play time option displays the elapsed time after shooting starts during playback.
• Drop frame. You can choose Drop frame with the frame rate is set to 30 fps or 60 fps. Choose Enable to have the camera correct the frame count automatically. With this option, the frame counter periodically drops two frames from its count total, typically frames 00 and 01, so the frames counted are the same as the actual number of frames. You can also choose Disable.
• Video Snapshot. The last item on the Movie shooting menu 2 tab ( ![]() ) is a fun feature called Video Snapshot. This feature allows you to shoot a series of short movie clips of 2, 4, or 8 seconds, and then save them in an album that is played as a single movie file. You can then post albums online, save them to your computer, or burn them to a DVD. Given the time limit of clips in Video snapshot mode, you probably want to plan scenes that fit within the 2-, 4-, or 8-second time limit. Keep in mind that the camera automatically stops recording when the time limit is reached. If you choose not to record sound with the video snapshots, you can add background music to the snapshot album. First, you need to copy music selections to the memory card from the EOS Utility, which is included on the EOS Digital Solution Disk that comes with the camera. The music selections include Angels, Beloved, Go Sports, Memories, and Travel Mind WAV files. Alternately, you can add music from your computer to the list of selections in the EOS Utility, and then register them on the memory card. Creating Video snapshot albums is easy; however, you will need to keep the following things in mind before shooting:
) is a fun feature called Video Snapshot. This feature allows you to shoot a series of short movie clips of 2, 4, or 8 seconds, and then save them in an album that is played as a single movie file. You can then post albums online, save them to your computer, or burn them to a DVD. Given the time limit of clips in Video snapshot mode, you probably want to plan scenes that fit within the 2-, 4-, or 8-second time limit. Keep in mind that the camera automatically stops recording when the time limit is reached. If you choose not to record sound with the video snapshots, you can add background music to the snapshot album. First, you need to copy music selections to the memory card from the EOS Utility, which is included on the EOS Digital Solution Disk that comes with the camera. The music selections include Angels, Beloved, Go Sports, Memories, and Travel Mind WAV files. Alternately, you can add music from your computer to the list of selections in the EOS Utility, and then register them on the memory card. Creating Video snapshot albums is easy; however, you will need to keep the following things in mind before shooting:
• You can’t mix shorter and longer video snapshots within the same album. All snapshots have to be the same length.
• Shoot all video snapshots for one album at one time. You don’t want to shoot video snapshots when you have to do any of the following: Turn off the camera, change the movie recording size, change the length of video snapshots, change the sound recording options, open or close the battery compartment cover, or update the camera’s firmware. If you do any of these tasks, the camera creates a new video album for the next group of snapshots you record.
• If you shoot a snapshot and decide not to add it to an album, you can delete it right after shooting. You also have the option of playing back the most recent video before adding (or not adding) it to the album.
• You can’t take still images during video snapshot recording.
Preplanning goes a long way toward creating a coherent album of snapshots because you are shooting short movies in 2-, 4-, or 8-second clips. When you download movies to the computer, video snapshot albums are indistinguishable from regular movie files. Albums have the same filename conventions as other movie files (MVI_[number].mov). You have to remember which files are albums based on the first-frame preview that is displayed.
To record a video snapshot and save it to an album, follow these steps:
1. With the camera in Movie shooting mode (![]() ), on the Movie Shooting menu 2 tab (
), on the Movie Shooting menu 2 tab (![]() ), highlight Video snapshot, and then press the Set button (
), highlight Video snapshot, and then press the Set button (![]() ). Four options appear: Video snapshot, Album settings, Snapshot length, and Album.
). Four options appear: Video snapshot, Album settings, Snapshot length, and Album.
2. Select Video snapshot using the Quick Control dial (![]() ), press the Set button (
), press the Set button (![]() ) to reveal the submenu, select Enable (or Disable) using the Quick Control dial (
) to reveal the submenu, select Enable (or Disable) using the Quick Control dial (![]() ), and then press the Set button (
), and then press the Set button (![]() ) to confirm your selection. The Album settings option below Video snapshot becomes active. Remember this step so that when you want to stop shooting video snapshots, you can come back to this option and choose Disable.
) to confirm your selection. The Album settings option below Video snapshot becomes active. Remember this step so that when you want to stop shooting video snapshots, you can come back to this option and choose Disable.
3. Use the Quick Control dial (![]() ) to select Album settings, and then press the Set button (
) to select Album settings, and then press the Set button (![]() ) to choose the Album settings option menu screen. The Create new album and Add to existing album (grayed out unless there is an existing album) options appear. Use the Quick Control dial (
) to choose the Album settings option menu screen. The Create new album and Add to existing album (grayed out unless there is an existing album) options appear. Use the Quick Control dial ( ![]() ) to highlight one of them.
) to highlight one of them.
4. Press the Set button (![]() ) to choose the Create new album or Add to existing album menu screen, and then choose the duration for the Video snapshots you’re about to record. Press the Set button (
) to choose the Create new album or Add to existing album menu screen, and then choose the duration for the Video snapshots you’re about to record. Press the Set button ( ![]() ) to enter the Snapshot length screen and use the Quick Control dial (
) to enter the Snapshot length screen and use the Quick Control dial ( ![]() ) to highlight the desired clip length. Press the Set button (
) to highlight the desired clip length. Press the Set button ( ![]() ) to confirm your selection.
) to confirm your selection.
5. Press the Movie shooting button (![]() ) on the back of the camera (to the right of the viewfinder) once to activate Live View on the LCD monitor, and again to record the video snapshot. As you record, a blue timer bar appears at the bottom of the LCD monitor and counts down the time. Then when the set recoding time for the Snapshot being recoded has elapsed, the Save as album screen appears with a selection of options at the bottom.
) on the back of the camera (to the right of the viewfinder) once to activate Live View on the LCD monitor, and again to record the video snapshot. As you record, a blue timer bar appears at the bottom of the LCD monitor and counts down the time. Then when the set recoding time for the Snapshot being recoded has elapsed, the Save as album screen appears with a selection of options at the bottom.
6. Use the Quick Control dial (![]() ) to select an option on the bottom of the screen. Here are the options from which you can choose, from left to right:
) to select an option on the bottom of the screen. Here are the options from which you can choose, from left to right:
• Save as album. This option appears when you record the first video snapshot. Press the Set button ( ![]() ) to save the video to a new album.
) to save the video to a new album.
• Add to album. After you record the second and subsequent video snapshots, you can choose this option to add the most recent video to the current album. Press the Set button ( ![]() ) to add the video to the album. The screen resets for you to record the next video snapshot.
) to add the video to the album. The screen resets for you to record the next video snapshot.
• Save as a new album. This option creates a new album. Use the Quick Control dial ( ![]() ) to select OK, and then press the Set button (
) to select OK, and then press the Set button ( ![]() ) to confirm your choice.
) to confirm your choice.
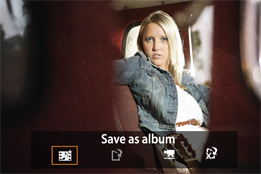
8.7 The options for saving the first video snapshot to a new album. These change after you shoot the second and subsequent video snapshots.
• Playback video snapshot. Press the Set button ( ![]() ) to display the first frame of the video and a selection of playback controls across the bottom of the screen. With the right arrow selected, press the Set button (
) to display the first frame of the video and a selection of playback controls across the bottom of the screen. With the right arrow selected, press the Set button ( ![]() ) to review the video. The screen returns to original screen with the Playback video snapshot option selected.
) to review the video. The screen returns to original screen with the Playback video snapshot option selected.
• Do not save to album. This option appears with the first video for an album. Press the Set button ( ![]() ) to discard the video.
) to discard the video.
• Delete without saving to album. This option appears with the second and subsequent video snapshots. Choose this option, select OK, and then press the Set button ( ![]() ) to delete the video.
) to delete the video.
When the album is complete, you can play it back, add background music, or edit the movie, either in the camera or on the computer. You can use the EOS Video Snapshot Task program, included with the ImageBrowser program on the Canon EOS Digital Solution Disk, to do basic editing, such as moving video frames.
To access EOS Video Snapshot Task, start ImageBrowser on your computer, navigate to an MOV (movie) file, and then choose Edit EOS Video Snapshot Task from the Edit menu.
Before you begin, install the EOS Utility program on the EOS Digital Solution Disk on your computer.
To copy background music to the memory card, follow these steps:
1. With the camera turned off and set to any shooting mode (except Movie), connect the camera to your computer using the supplied cable, and then turn on the camera. The EOS Utility screen appears on the computer.
2. Click Register Background Music. The Register Background Music screen appears with five music selections. If you do not see five selections, it means that you have not installed the EOS Digital Solution Disk with the EOS Sample Music. Stop and install it, and then begin again.
3. Click the Register button, and then click OK on the Warning screen. The music selections are transferred to the memory card in a new folder titled MUSIC. You can click the curved arrows to change the playlist order of songs before clicking the Register button. To preview a song, use the Play button.
You can also drag music files on your computer to add them to the list of background music to register section of the Register Background Music screen. You can add a total of 20 songs to the list. Individual songs cannot be longer than 29 minutes and 59 seconds.
4. Click the Close button, turn off the camera, and then disconnect the cable from the camera and computer.
Sample music files are in WAV format, and range from 5.6MB to 6.7MB.
To add music to the video snapshot album, follow these steps:
1. In Movie mode (![]() ), press the Playback button (
), press the Playback button (![]() ), and then use the Quick Control dial (
), and then use the Quick Control dial (![]() ) or the left and right sections on the Multi-controller (
) or the left and right sections on the Multi-controller (![]() ) to navigate to the Video snapshot album you want. The Video snapshot file icon (
) to navigate to the Video snapshot album you want. The Video snapshot file icon ( ![]() ) appears in the upper left-hand corner of the LCD monitor to indicate that Video snapshot files are being viewed. Press the Set button (
) appears in the upper left-hand corner of the LCD monitor to indicate that Video snapshot files are being viewed. Press the Set button ( ![]() ). The Playback icons — Playback (
). The Playback icons — Playback ( ![]() ), Slow motion playback (
), Slow motion playback ( ![]() ), First frame playback (
), First frame playback ( ![]() ), Previous frame playback (
), Previous frame playback ( ![]() ), Next frame playback (
), Next frame playback ( ![]() ), and Last frame playback (
), and Last frame playback ( ![]() ) — and the Background music (
) — and the Background music ( ![]() ), and Edit (
), and Edit ( ![]() ) icons appear at the bottom of the screen.
) icons appear at the bottom of the screen.
2. Use the left and right sections on the Multi-controller (![]() ) to select the Background music icon (
) to select the Background music icon (![]() ), and then press the Set button (
), and then press the Set button (![]() ). The Select/Play Background music menu screen appears.
). The Select/Play Background music menu screen appears.
3. Press the Set button (![]() ) to reveal the Background music drop-down menu and the Quick Control dial (
) to reveal the Background music drop-down menu and the Quick Control dial (![]() ) to select On (or Off). Press the Set button (
) to select On (or Off). Press the Set button ( ![]() ) to confirm your selection.
) to confirm your selection.
4. Press the Menu button (![]() ) to return to the main Playback screen. On now appears beside the Background music icon (
) to return to the main Playback screen. On now appears beside the Background music icon ( ![]() ).
).
5. Use the top and bottom sections on the Multi-controller (![]() ) to select the background music you want from the list below the Background On/Off option. A check mark appears next to the selection. You can repeat this step to choose more music selections.
) to select the background music you want from the list below the Background On/Off option. A check mark appears next to the selection. You can repeat this step to choose more music selections.
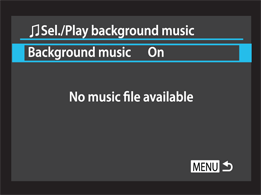
8.8 The background music options.
6. Press the Menu button (![]() ). The first frame of the video appears with the on-screen controls at the bottom.
). The first frame of the video appears with the on-screen controls at the bottom.
7. Press the left section on the Multi-controller (![]() ) to select the Playback button (
) to select the Playback button (![]() ), and then press the Set button (
), and then press the Set button (![]() ) to play the video with the selected background music. Turn the Main dial (
) to play the video with the selected background music. Turn the Main dial ( ![]() ) to control the volume.
) to control the volume.
When you format the memory card, the music folder is deleted from the card along with images and movies.
You can do limited editing of Video Snapshot clips in the camera by choosing the Edit mode ( ![]() ) and using the tools that appear along the bottom of the playback menu screen. You can change the order of Video Snapshot clips using the Move snapshot tool (
) and using the tools that appear along the bottom of the playback menu screen. You can change the order of Video Snapshot clips using the Move snapshot tool ( ![]() ), delete Video snapshot clips using the Erase button (
), delete Video snapshot clips using the Erase button ( ![]() ), play Video Snapshot clips using Playback (
), play Video Snapshot clips using Playback ( ![]() ), and save your changes using Save (
), and save your changes using Save ( ![]() ). Use the Main dial (
). Use the Main dial ( ![]() ) to adjust the audio volume prior to playing clips and the Menu button (
) to adjust the audio volume prior to playing clips and the Menu button ( ![]() ) to exit Edit mode (
) to exit Edit mode ( ![]() ).
).
Focusing options
Unlike camcorders, the 6D cannot autofocus continually. However, you can use the same focusing modes that are available in Live View shooting mode — FlexiZone AF – Single ( ![]() ), Face Detection Live Mode (
), Face Detection Live Mode ( ![]() ), Quick focus mode (
), Quick focus mode ( ![]() ), or manual focusing (
), or manual focusing ( ![]() ) (provided that the lens you’re using offers manual focusing). These focusing modes are useful particularly when you’re recording clips where the subject stays in the same, or approximately the same, position throughout the video. Therefore, if you’re recording an interview, a press conference, a sleeping baby, or the like, any of these are good focusing options because the subject distance remains constant.
) (provided that the lens you’re using offers manual focusing). These focusing modes are useful particularly when you’re recording clips where the subject stays in the same, or approximately the same, position throughout the video. Therefore, if you’re recording an interview, a press conference, a sleeping baby, or the like, any of these are good focusing options because the subject distance remains constant.
However, for movies in which people and objects move around, Face Detection Live Mode ( ![]() ) and Quick focus mode (
) and Quick focus mode ( ![]() ) are too slow and too visually intrusive to use. For example, if you half-press the shutter button to focus during movie recording, the process of the lens defocusing and then refocusing becomes part of the movie — and recording the focusing process distracts from the story you’re telling.
) are too slow and too visually intrusive to use. For example, if you half-press the shutter button to focus during movie recording, the process of the lens defocusing and then refocusing becomes part of the movie — and recording the focusing process distracts from the story you’re telling.
To focus smoothly, most photographers focus manually. To make that process smoother and precise, they add an accessory follow-focus system. A follow-focus system attaches to the lens’s focusing ring, and it has a hand wheel attached to one side. Then they focus by turning the hand wheel instead of the lens’s focusing ring to focus. This accessory not only enables a smooth focus pull, but it also minimizes the amount of shake in the video.
The calculations and techniques for manual focusing are many and complex. I recommend reading Mastering HD Video with Your DSLR by Helmut Kraus and Uwe Steinmueller.
At this writing, follow-focus systems range from $130 to thousands of dollars, and loupes range from $60 to several hundred dollars.
With manual focusing, you have to rely on the camera’s LCD monitor to verify sharp focus during recording. While zooming in on the subject helps confirm focus, there is sometimes still a problem with glare on the LCD monitor. This is where another accessory called a hood or loupe comes in handy. While the name for this accessory varies by manufacturer, a hood completely covers the LCD monitor, thereby eliminating glare, and it magnifies the image so you can verify that the focus is sharp.
If you are familiar with making depth-of-field calculations, then you have a leg up on manual focusing because you can judge the distances within which subjects will be in acceptably sharp focus. Thus, if you’re shooting people who are at different distances in the scene, the depth-of-field calculation tells you if all the subjects will appear sharp or nearly sharp. If the subjects aren’t sharp, you can change the aperture, the lens, or the position of the camera or the subject.
Depth of field is the area in front of and behind the plane of sharp focus that appears acceptably sharp. Depth of field varies depending on lens focal length, aperture, and shooting distance. Generally, the depth of field extends one-third in front of and two-thirds behind the plane of sharp focus.
Alternately, in Hollywood, filmmakers mark positions for actors to stand by placing masking tape on the floor. With the preset marks, the cameraperson can set and mark focus positions in advance of shooting. Then during shooting, the camera operator can pull focus to the preset marks as actors move between them. While you may not have marks set up for your subjects, using depth of field focusing is an effective technique.
Setting the ideal shutter speed
In movie recording, the available speeds are linked to the frame rate, as detailed earlier. However, it’s also important to use a shutter speed for the best rendering of motion. The general formula for determining shutter speed is 1/(fps*2). This translates to 1/48 second (round it up to 1/50 second) for 24p, 1/60 for 30p, and 1/120 (round it up to 1/125) for 60p shooting. For still photographers, these shutter speeds may seem too slow, but in video, slow shutter speeds translate into smooth motion. You can, of course, use faster shutter speeds. However, speeds faster than 1/125 second tend to make motion look jerky. Taken together, this effectively limits the usable range of shutter speeds. For example, if you’re shooting at 24p, the usable shutter speed range is 1/50 to 1/125 second.
If the light is too bright for the shutter speed you need, and if the aperture is set for the depth of field you want, then you can use various filters to vary the shutter speed. Here are some of the filters you can use:
• Neutral density (ND). ND filters reduce the amount of light entering the lens without changing its color. ND filters are available in different strengths, called factors, including 2, 4, and 8 as well as in a variety of different densities (stops) including 0.3 (1 stop), 0.45 (1.5 stops), 0.6 (2 stops), and 0.9 (3 stops).
• Variable neutral density. Variable neutral density filters enable you to continuously control the amount of light passing through the lens up to 8 stops. This makes it possible to use wider apertures and slow shutter speeds, even in brightly lit scenes. These filters can be pricey, but are a worthwhile addition to your gear bag.
• Graduated neutral density. These filters enable you to hold back the brightness in the sky from 1 to 3 f-stops to balance a darker foreground with a brighter sky. Filters are available in hard or soft-stop types and in different densities: 0.3 (1 stop), 0.45 (1.5 stops), 0.6 (2 stops), and 0.9 (3 stops).
If the light is too low, use a higher ISO or a faster lens.
Color, audio, and lighting settings
As I’ve mentioned with respect to still images, getting the color right during capture saves you a lot of time in postproduction. The same is true when you’re color-correcting video. Additionally, it is more of a challenge to color-correct video than still images. So, be sure to set the white balance to match the light. For the best color, set a Custom white balance for scenes where the light remains constant throughout the clip.
It is also a good idea to maintain the same Picture Style throughout the video for visual consistency. I normally do not recommend using the automatic exposure adjustment features on the camera, but I make an exception for movies when Auto Lighting Optimizer can produce nice results, especially in challenging lighting.
Another critical component of your video is the audio recording. While the onboard 48 kHz, 16-bit mono microphone can be used in a pinch, its recording quality isn’t optimal and its position makes it susceptible to recording internal camera and lens noises, as well as ambient noise.
If you want a professional-quality video, invest in an accessory microphone or external audio recorder. There are many types of accessory microphones — dynamic, condenser, mono, and stereo. Additionally, you can connect the 6D to an external mic using the 3.5mm stereo mic jack that records at 48 kHz. Most likely, the accessory microphone will need its own accessories, whether it’s a windshield, suspension unit, or boom and pole, not to mention necessary plugs and adapters. It’s beyond the scope of this book to describe each type of microphone, but you can read reviews of microphones in magazines and on the web. A good place to begin is by researching the microphone brands Rode, Marantz, and Sennheiser. I use a Rode shotgun mic, Azden wireless body packs with lavalier mics, and a Tascam DR-40 external recorder to capture quality audio.
With high-definition video, lighting is an important element. Many video shooters agree that HD video offers a broad contrast range, and softer lighting is favored. Continuous fluorescent, quartz, HMI (Hydrargyrum medium-arc iodide lamp, mercury vapor based continuous light), and tungsten lighting systems produce excellent color and brightness.
Recording a Movie
If you’ve followed along so far, then your 6D is set up and ready to record movies. While some of the camera controls are the same for movies as for still-image shooting, there are some differences. If you are using semiautomatic or manual exposure, this section provides some tips on setting the shutter speed and aperture.
Starting the recording
If you’re concerned that the options you’ve chosen so far may not be ideal, you can make adjustments during shooting. Depending on the shooting mode you use, you can change the ISO sensitivity, shutter speed, aperture, exposure compensation, and audio level. To make adjustments during shooting, just press the Quick Control button ( ![]() ). On the Quick Control screen, use the Multi-controller (
). On the Quick Control screen, use the Multi-controller ( ![]() ) to select the setting you want to change, and then turn the Main dial (
) to select the setting you want to change, and then turn the Main dial ( ![]() ) or Quick Control dial (
) or Quick Control dial ( ![]() ) to change the setting.
) to change the setting.
8.9 Press the Quick Control button to display the settings that you can change prior to recording. Here, the Movie recording size and compression are selected.
Still, it is wise to make as many adjustments as possible before recording, and to make as few adjustments as possible during recording. For example, if you change an exposure setting during recording, the change in brightness can be visually intrusive during playback. The fewer changes you make during recording, the smoother the movie will be.
Once the camera is set up, you can begin recording by following these general steps:
1. Mount the camera on a stabilization device and attach any accessories, such as a microphone, follow-focus system, or hood.
A variety of video stabilization devices and heads feature damping mechanisms for smooth pan-and-tilt movements. With devices such as a steadycam, you can hold the camera while the device absorbs movement.
2. Set the Mode dial to the shooting mode you want, and make all camera adjustments. Table 8.1 (shown earlier in this chapter) details the control that you have in each shooting mode. Make sure to set the white balance, Picture Style, and so on. Also, test the audio and set the audio level.
3. Set the Live View shooting/Movie shooting switch to Movie mode (![]() ). Press the Start/Stop button (
). Press the Start/Stop button ( ![]() ). The reflex mirror flips up and a current view of the scene appears on the LCD monitor.
). The reflex mirror flips up and a current view of the scene appears on the LCD monitor.
4. Turn the Main dial (![]() ) to set the shutter speed in Shutter-priority AE (
) to set the shutter speed in Shutter-priority AE (![]() ) and Manual (
) and Manual (![]() ) modes, and the aperture in Aperture-priority AE mode (
) modes, and the aperture in Aperture-priority AE mode (![]() ). At 30, 25, and 24 fps, you can choose 1/4000 to 1/30 second. At 50 or 60 fps, you can choose 1/4000 to 1/60 second. For smooth motion of moving subjects, shutter speeds of 1/30 to 1/125 second are recommended. See the shutter speed formula earlier in this chapter.
). At 30, 25, and 24 fps, you can choose 1/4000 to 1/30 second. At 50 or 60 fps, you can choose 1/4000 to 1/60 second. For smooth motion of moving subjects, shutter speeds of 1/30 to 1/125 second are recommended. See the shutter speed formula earlier in this chapter.
5. Use the Quick Control dial (![]() ) to set the aperture in Manual mode (
) to set the aperture in Manual mode (![]() ). In the Shutter-priority AE (
). In the Shutter-priority AE ( ![]() ) and Aperture-priority AE (
) and Aperture-priority AE ( ![]() ) modes, turning the Quick Control dial (
) modes, turning the Quick Control dial ( ![]() ) sets exposure compensation.
) sets exposure compensation.
Shooting with the same aperture is best to avoid recording exposure changes during the movie.
6. Press the ISO button (![]() ) above the LCD monitor, and then turn the Main dial (
) above the LCD monitor, and then turn the Main dial (![]() ) to set the ISO between 100 and 12800, or expand it to 25600/H. If you have Highlight Tone Priority enabled, the ISO range is 200 to 12800.
) to set the ISO between 100 and 12800, or expand it to 25600/H. If you have Highlight Tone Priority enabled, the ISO range is 200 to 12800.
7. Focus on the subject. Follow the steps for using the FlexiZone AF – Single mode ( ![]() ), Face Detection Live Mode (
), Face Detection Live Mode ( ![]() ), and Quick focus mode (
), and Quick focus mode ( ![]() ) focusing, which are detailed in Chapter 7. Alternately, focus manually, as described previously in this chapter.
) focusing, which are detailed in Chapter 7. Alternately, focus manually, as described previously in this chapter.
8. Press the Start/Stop button (![]() ) to begin recording the movie. The Movie mode (red) dot appears at the top right of the screen. Press the Start/Stop button (
) to begin recording the movie. The Movie mode (red) dot appears at the top right of the screen. Press the Start/Stop button ( ![]() ) again to stop recording.
) again to stop recording.
Unless your video requires extremely shallow depth of field, avoid using very wide apertures, such as f/1.2, f/2, and so on. While shallow depth of field can produce beautiful video footage with the 6D, it makes focusing at such a narrow depth of field critical. It’s much easier to get sharp focus at f/5.6 than at f/1.2.
You can change the amount of information displayed on the LCD monitor by pressing the Info button ( ![]() ) one or more times. One press displays the Exposure Level Indicator at the bottom of the screen along with a minimum of exposure and battery information. Pressing the Info button (
) one or more times. One press displays the Exposure Level Indicator at the bottom of the screen along with a minimum of exposure and battery information. Pressing the Info button ( ![]() ) twice displays shooting, white balance, Picture Style, memory card, recording quality, and audio level. If you want to add the Electronic Level to the display, press the Info button (
) twice displays shooting, white balance, Picture Style, memory card, recording quality, and audio level. If you want to add the Electronic Level to the display, press the Info button ( ![]() ) a third time.
) a third time.
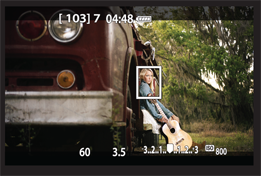
8.10 The Movie shooting screen with basic information displayed.
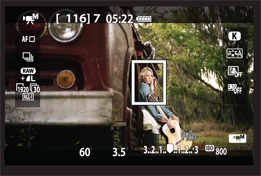
8.11 The Movie shooting display after pressing the Info button twice.
Tips for recording better movies
Here are a few tips to help you get better results with your videos:
• Storyboard the video scene by scene. Create storyboards based on a script or on your vision of the story you’re telling. Then you can easily plan locations, props, lenses, and lighting for each frame of the movie. Even if you’re shooting spontaneously, you’ll want a beginning, middle, and end to the movie, so watch for scenes that provide those elements.
• Make camera adjustments before recording. If you’re using the built-in microphone, think through camera adjustments that you can make before you begin shooting to keep the camera sounds they produce to a minimum during recording.
• Choose lenses for story-telling effect. Know the characteristics of lenses, as detailed in Chapter 10, and then use those characteristics as devices to help set scenes and tell the story. Every film has a point of view and perspective that is established by the focal length. Be aware of focal length during each segment of the movie and don’t change it unnecessarily.
• Use a lens hood or a matte box to avoid lens flare. A matte box is slightly larger than and shaped differently from a lens hood. The main benefit of a matte box over a hood is the ability to change its depth to suit just about any lens you care to use.
• Avoid wide-angle lens distortion. Distortion is most apparent at the edges of the frame, so keep important elements of the scene and story away from the edges.
• Make slow and steady moves. Always move the camera slowly and steadily to avoid distortion and rolling shutter artifacts that happen when you pan the camera quickly. Also, if the camera is panned too fast, diagonal lines in the scene skew or lean.
• Avoid unnecessary pans and zooms. Pans, no matter how smoothly executed, can seem unsettling to the viewer. Use them sparingly. The same advice goes for using zooms.
• Check that the red record light is lit in the upper-right corner of the LCD monitor. More than a few photographers have thought that they pressed ( ![]() ) only to find out too late that nothing was recorded.
) only to find out too late that nothing was recorded.
Playing Back Movies on the Camera
For a quick preview of your movies, you can play them back on the camera’s LCD monitor. Of course, with the camera’s high-definition quality, you will enjoy the movies much more by playing them back on a television or computer.
To play back a movie on the camera LCD monitor, press the Playback button ( ![]() ) and go to a movie file. Then you can do any of the following:
) and go to a movie file. Then you can do any of the following:
• Press the Set button (![]() ) twice to begin playing the movie. Press it again to stop playing the movie.
) twice to begin playing the movie. Press it again to stop playing the movie.
• To adjust the volume, turn the Main dial (![]() ) when the movie isn’t playing.
) when the movie isn’t playing.
• Turn the Quick Control dial (![]() ) to select a playback function displayed at the bottom of the screen. The options are Exit playback (
) to select a playback function displayed at the bottom of the screen. The options are Exit playback ( ![]() ) using the Menu button (
) using the Menu button ( ![]() ), Playback volume (
), Playback volume ( ![]() ), Playback (
), Playback ( ![]() ), Slow motion playback mode (
), Slow motion playback mode ( ![]() ), First frame playback mode (
), First frame playback mode ( ![]() ), Previous frame playback mode (
), Previous frame playback mode ( ![]() ), Next frame playback mode (
), Next frame playback mode ( ![]() ), Last frame playback mode (
), Last frame playback mode ( ![]() ), Edit mode (
), Edit mode ( ![]() ), and Background music mode (
), and Background music mode ( ![]() ).
).
You can also edit clips in the camera by choosing the Edit function when you’re playing back the clip. In Edit mode ( ![]() ), you can cut the beginning and end of the clip, choose Play to move to other frames, save your changes, and Exit (
), you can cut the beginning and end of the clip, choose Play to move to other frames, save your changes, and Exit ( ![]() ) Edit mode (
) Edit mode ( ![]() ) using the Menu button (
) using the Menu button ( ![]() ).
).