
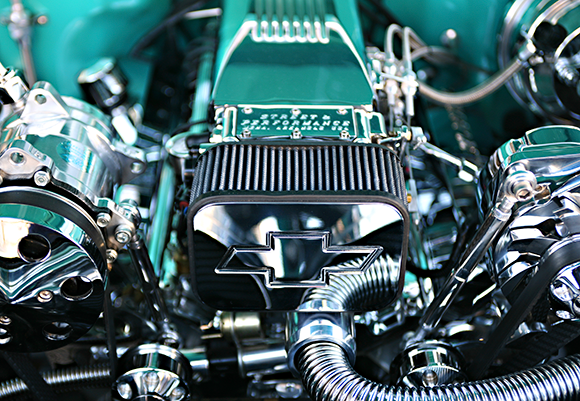
1.1 The Main dial.
Chapter 1: A Map of the Canon EOS 6D
If you’ve used the Canon EOS 6D, you know it delivers high-resolution images and provides snappy performance. Equally important, the camera offers a full complement of automated, semiautomatic, and manual creative controls. You also probably know that the 6D is the smallest and lightest full-frame dSLR available (at this writing), yet it still provides ample stability in your hands when you’re shooting. Controls on the back of the camera are streamlined, clearly labeled, and within easy reach during shooting. The exterior belies the power under the hood: the 6D includes Canon’s robust autofocus and metering systems and the very fast DIGIC 5+ image processor. There’s a lot that is new on the 6D, but its intuitive design makes it easy for both novice and experienced Canon shooters to jump right in. This chapter provides a roadmap to using the camera controls and the camera menus.
This chapter is designed to take you under the hood and help find your way around the Canon EOS 6D quickly and easily. Exposure: ISO 100, f/2.8, 1/60 second, with a Canon 28-70mm f/2.8 USM.
The Controls on the Canon EOS 6D
There are several main controls that you can use together or separately to control many functions on the 6D. Once you learn these controls, you can make camera adjustments more efficiently. Here is a summary of the controls:
• Main dial (![]() ) and Quick Control dial (
) and Quick Control dial (![]() ). Use these controls to make changes after pressing one of the four buttons located above the LCD panel: Autofocus (
). Use these controls to make changes after pressing one of the four buttons located above the LCD panel: Autofocus ( ![]() ), Drive (
), Drive ( ![]() ), ISO (
), ISO ( ![]() ), and Metering mode change (
), and Metering mode change ( ![]() ). On some camera menu screens, such as the Image quality screen, you can also use the Main dial (
). On some camera menu screens, such as the Image quality screen, you can also use the Main dial ( ![]() ) and Quick Control dial (
) and Quick Control dial ( ![]() ) to select different settings. You can also lock the Main dial (
) to select different settings. You can also lock the Main dial ( ![]() ) and Quick Control dial (
) and Quick Control dial ( ![]() ) to prevent unintentional changes to your settings by using Custom Function, C.Fn3: Operation/Others, option screen 3 - Multi-function lock. Simply assign a check mark to each dial you want to lock by highlighting the dial name using the Quick Control dial (
) to prevent unintentional changes to your settings by using Custom Function, C.Fn3: Operation/Others, option screen 3 - Multi-function lock. Simply assign a check mark to each dial you want to lock by highlighting the dial name using the Quick Control dial ( ![]() ), and then pressing the Set button (
), and then pressing the Set button ( ![]() ). Next slide the Multi-function lock switch to the right. This locks the selected controls.
). Next slide the Multi-function lock switch to the right. This locks the selected controls.
• Set button (![]() ). This button confirms changes you make to many menu items, and it opens submenus. On the Quick Control screen, which you access by pressing the Quick Control button (
). This button confirms changes you make to many menu items, and it opens submenus. On the Quick Control screen, which you access by pressing the Quick Control button ( ![]() ), you can select a setting using the Multi-controller (
), you can select a setting using the Multi-controller ( ![]() ), and then press the Set button (
), and then press the Set button ( ![]() ) to display all the options for the setting.
) to display all the options for the setting.
• Multi-controller (![]() ). This eight-way control functions as a joystick when tilted in any direction, and as a button when pressed. The Multi-controller (
). This eight-way control functions as a joystick when tilted in any direction, and as a button when pressed. The Multi-controller ( ![]() ) is the primary control on the Quick Control screen. You can also use the Multi-controller (
) is the primary control on the Quick Control screen. You can also use the Multi-controller ( ![]() ) to select the autofocus (AF) point, move through an image in magnified view during playback, and move the AF point in Live View. You can also use it to navigate through the camera menu tabs and options.
) to select the autofocus (AF) point, move through an image in magnified view during playback, and move the AF point in Live View. You can also use it to navigate through the camera menu tabs and options.
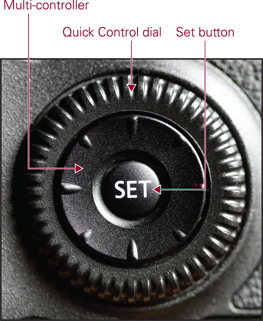
1.2 The Multi-controller, Quick Control dial, and Set button.
The front of the camera
While you don’t see the front of the camera often, the front includes important features, including the self-timer, the Depth-of-Field Preview button, the lens mount, and the Lens Release button. The front of the camera also includes the nicely sculpted grip that increases your control and balance when handling the camera.

1.3 The front of the Canon EOS 6D camera.
Here is a summary of the features on the camera’s front:
• Remote control sensor. This sensor works with the accessory Remote Controller RC-6 and provides remote release of the shutter up to 16.4 feet from the camera. Point the remote control at this sensor and press the transmit button. The Self-timer lamp lights when the Drive mode is set to one of the Self-timer modes.
• Self-timer lamp. In the two self-timer modes, this lamp flashes to count down the seconds (either 10 or 2) to shutter release.
• Microphone. The built-in monaural microphone is used for recording audio when you’re shooting a movie. You can adjust the recording level and use a built-in wind-cut filter to reduce noise from the wind when necessary. Alternatively, you can disable sound recording or use an accessory stereo microphone.
• Lens Release button. Press this button to release the lens from the lens mount. To disengage the lens, hold down the Lens Release button as you turn the lens so that the red index mark moves toward the top of the camera.
• Reflex mirror. As you compose an image, the reflex mirror reflects light from the lens to the pentaprism so you can see in the viewfinder what the imaging sensor will capture. The viewfinder offers approximately 100 percent frame coverage. In Live View shooting, the mirror is flipped up to allow a current view of the scene. If you are using Quick mode ( ![]() ), the mirror flips down to focus, thereby suspending Live View shooting mode (
), the mirror flips down to focus, thereby suspending Live View shooting mode ( ![]() ) momentarily. For long exposures, especially with a telephoto lens, you can lock up the mirror to prevent any vibration when the mirror flips up to make the exposure.
) momentarily. For long exposures, especially with a telephoto lens, you can lock up the mirror to prevent any vibration when the mirror flips up to make the exposure.
• Lens mount and contacts. The lens mount is compatible with Canon EF lenses. EF-S lenses are not compatible with the 6D. The lens mount has a red index marker, used in conjunction with the corresponding red marker on EF-mount lenses, to line up the camera and lens mounts when mounting a lens to the camera. The small series of eight, gold, male electronic contacts correspond to matching flat contacts on the back of the lens mount. These facilitate communication between the camera and the lens for things like autofocus and exposure data.
• Depth-of-Field Preview button. Press this button to stop down the lens diaphragm to the current aperture so that you can preview the depth of field. As you look through the viewfinder, the larger the area of darkness, the more extensive the depth of field will be. You can also use this button during Live View shooting, where the depth-of-field preview is displayed on the LCD panel. If the lens is set to the maximum aperture, pressing the depth-of-field preview button will have no effect because the diaphragm of the lens is already fully open. You can reassign the function for this button and other camera controls using Custom Function ( ![]() ), C.Fn3: Operation/Others, option screen 5 - Custom Controls.
), C.Fn3: Operation/Others, option screen 5 - Custom Controls.
• DC coupler cord socket. This enables you to use household power when using the accessory AC Adapter Kit ACK-E6.
The top of the camera
The dials and controls on the top of the camera give you access to frequently used shooting functions. The top of the camera is also home to the hot shoe and diopter control.
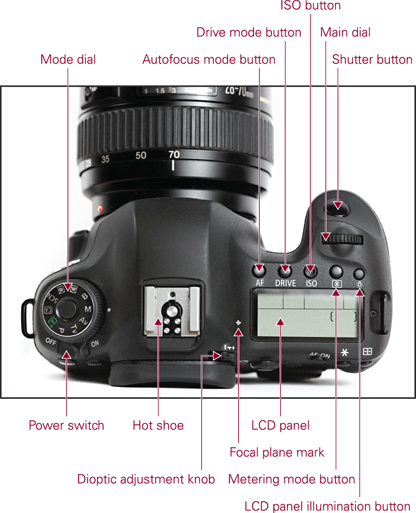
1.4 The top of the Canon EOS 6D.
The following descriptions will help you understand when and how to use the buttons, dials, readouts, hot shoe, and switch located on the top of the camera:
• Mode dial with lock button. Select an exposure mode by pressing the Mode dial lock release button, and then turning the Mode dial. Exposure modes are grouped as follows:
• Basic Zone shooting modes. These shooting modes are for automatic exposure settings and include Scene Intelligent Auto ( ![]() ), Creative Auto (
), Creative Auto ( ![]() ), and Special Scene (
), and Special Scene ( ![]() ).
).
• Creative Zone shooting modes. These shooting modes are for semiautomatic and manual exposure settings and include Program AE ( ![]() ), Shutter-priority AE (
), Shutter-priority AE ( ![]() ), Aperture-priority AE (
), Aperture-priority AE ( ![]() ), Manual (
), Manual ( ![]() ), Bulb (
), Bulb ( ![]() ), and two Custom shooting modes, (
), and two Custom shooting modes, ( ![]() ) and (
) and ( ![]() ). These two custom modes allow users to program their favorite camera settings, choosing from Program AE (
). These two custom modes allow users to program their favorite camera settings, choosing from Program AE ( ![]() ), Shutter-priority AE (
), Shutter-priority AE ( ![]() ), Aperture-priority AE (
), Aperture-priority AE ( ![]() ), Manual (
), Manual ( ![]() ), and Bulb (
), and Bulb ( ![]() ), and settings for autofocus operation, menu items, and others. Just turn the Mode dial to line up the exposure mode that you want to use with the white mark next to the Mode dial.
), and settings for autofocus operation, menu items, and others. Just turn the Mode dial to line up the exposure mode that you want to use with the white mark next to the Mode dial.
Exposure modes are detailed in Chapter 3. Chapter 6 explains how to set up the Custom shooting modes.
• Power switch. The power switch turns the camera off and on.
• Hot shoe. The hot shoe is where you mount an accessory flash unit. The mounting plate has flash sync contacts that allow the flash and camera to communicate. The 6D is a Type A camera that is compatible with E-TTL II auto flash with accessory Canon EX-series Speedlites. When using a compatible EX-series Speedlite, the 6D offers flash configuration from the camera menu.
• Dioptric adjustment knob. Turn this control forward or backward to adjust the sharpness in the viewfinder for your vision. The adjustment ranges from –3 to +1 diopters. If you wear eyeglasses or contact lenses for shooting, be sure to wear them as you turn the dioptric adjustment control. To make the adjustment, half press the shutter button and then turn the Dioptric adjustment knob until the information readout displayed at the bottom of the viewfinder is perfectly sharp.
• Focal plane mark (![]() ). The Focal plane mark (
). The Focal plane mark ( ![]() ) can be used to determine the actual camera to subject distance. Knowing the distance from the focal plane mark to your subject allows you to set focus manually using distance measurements, useful for still as well as video applications, or check the accuracy of the focusing scale of your lens.
) can be used to determine the actual camera to subject distance. Knowing the distance from the focal plane mark to your subject allows you to set focus manually using distance measurements, useful for still as well as video applications, or check the accuracy of the focusing scale of your lens.
• LCD panel. This panel displays current camera settings, including the white balance, aperture, shutter speed, exposure compensation, ISO, AF-point selection, and drive and autofocus modes, among others, as well as the remaining number of images that can be captured (based on size of the installed memory card and the image quality recording setting selected), battery level, GPS device connection, and Wi-Fi status.
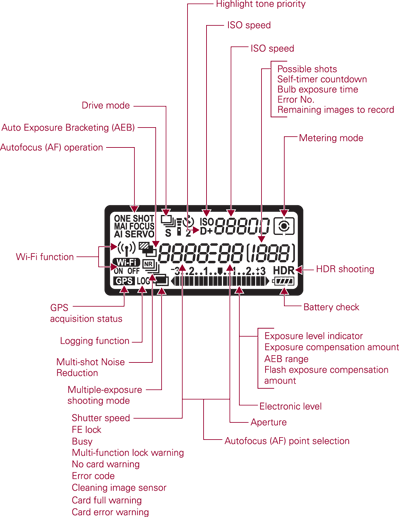
1.5 The LCD panel.
• Metering mode button (![]() ). Press this button to change the metering mode and/or the white balance settings. To change the metering mode, turn the Main dial (
). Press this button to change the metering mode and/or the white balance settings. To change the metering mode, turn the Main dial ( ![]() ) to choose from the following options: Evaluative (
) to choose from the following options: Evaluative ( ![]() , 63-zone TTL metering), Partial (
, 63-zone TTL metering), Partial (![]() , approximately 8 percent at center frame), Spot (
, approximately 8 percent at center frame), Spot (![]() , approximately 3.5 percent at center frame), and Center-weighted average (
, approximately 3.5 percent at center frame), and Center-weighted average (![]() ).
).
• Autofocus mode button (![]() ). Pressing this button enables you to change the Autofocus mode using the Main dial (
). Pressing this button enables you to change the Autofocus mode using the Main dial ( ![]() ). Autofocus mode options include One-shot AF (
). Autofocus mode options include One-shot AF ( ![]() ), AI Focus AF (
), AI Focus AF ( ![]() ), and AI Servo AF (
), and AI Servo AF ( ![]() ).
).
• Drive mode button (![]() ). Pressing this button enables you to change the Drive mode using the Quick Control dial (
). Pressing this button enables you to change the Drive mode using the Quick Control dial ( ![]() ) or Main dial (
) or Main dial ( ![]() ). Choose from Single shooting (
). Choose from Single shooting ( ![]() ), Continuous shooting (
), Continuous shooting ( ![]() ) (4.5 fps), Silent single shooting (
) (4.5 fps), Silent single shooting ( ![]() ), Silent continuous (
), Silent continuous ( ![]() ) (3 fps), Self-timer mode 10 seconds remote (
) (3 fps), Self-timer mode 10 seconds remote ( ![]() ), or Self-timer mode 2 seconds remote (
), or Self-timer mode 2 seconds remote ( ![]() ).
).
• ISO button (![]() ). Press this button to change the ISO sensitivity setting using the Main dial (
). Press this button to change the ISO sensitivity setting using the Main dial ( ![]() ) or Quick Control dial (
) or Quick Control dial ( ![]() ).
).
• LCD panel illumination button (![]() ). Pressing the LCD panel illumination button turns on an amber light to illuminate the LCD panel for approximately 5 seconds. This is a handy option for adjusting the LCD panel controls in low light or in the dark.
). Pressing the LCD panel illumination button turns on an amber light to illuminate the LCD panel for approximately 5 seconds. This is a handy option for adjusting the LCD panel controls in low light or in the dark.
• Main dial (![]() ). The Main dial (
). The Main dial ( ![]() ) selects a variety of options. Turn the Main dial (
) selects a variety of options. Turn the Main dial ( ![]() ) to cycle through camera menu tabs, move horizontally through the AF points when selecting an AF point manually, set the aperture in Aperture-priority AE mode (
) to cycle through camera menu tabs, move horizontally through the AF points when selecting an AF point manually, set the aperture in Aperture-priority AE mode ( ![]() ), set the shutter speed in Shutter-priority AE mode (
), set the shutter speed in Shutter-priority AE mode ( ![]() ) and Manual mode (
) and Manual mode ( ![]() ), and shift the exposure in Program AE (
), and shift the exposure in Program AE ( ![]() ) mode.
) mode.
• Shutter button. When you press the shutter button halfway, the 6D automatically meters the light in the scene and focuses on the subject. Completely pressing the shutter button opens the shutter and captures an image. In continuous shooting drive modes, you can press and hold the shutter button to shoot at approximately 4.5 frames per second (fps), and at 3 fps in silent continuous modes. In self-timer modes, pressing the shutter button completely initiates the 10- or 2-second timer, and after the timer delay, the shutter fires to make the picture.
The back of the camera
A large, bright, 3.0-inch, 1.04-million-dot, thin film transistor (TFT) LCD monitor dominates the back of the 6D. Thanks to gapless construction between the protective glass cover and the LCD screen, both refraction and reflection are reduced. The LCD monitor also has a multicoating that helps reduce reflections and glare.
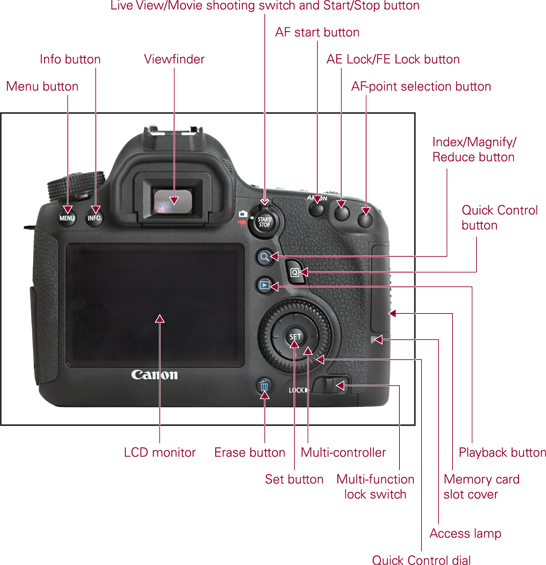
1.6 The back of the Canon EOS 6D.
Here is a look at what’s on the back of the 6D:
• Info button (![]() ). During shooting, you can press the Info button (
). During shooting, you can press the Info button ( ![]() ) to cycle through these displays: the shooting information screen that details the current camera settings, the Electronic Level, and the Quick Control screen. You can also choose to show no information on the LCD monitor. When playing back images, pressing the Info button (
) to cycle through these displays: the shooting information screen that details the current camera settings, the Electronic Level, and the Quick Control screen. You can also choose to show no information on the LCD monitor. When playing back images, pressing the Info button ( ![]() ) one or more times cycles through four different playback display modes, displaying varying degrees of capture information, the histogram, and the RGB histogram.
) one or more times cycles through four different playback display modes, displaying varying degrees of capture information, the histogram, and the RGB histogram.
• Menu button (![]() ). Pressing the Menu button (
). Pressing the Menu button ( ![]() ) displays the most recently accessed camera menu. To move among the menus, press the Quick Control button (
) displays the most recently accessed camera menu. To move among the menus, press the Quick Control button ( ![]() ), turn the Main dial (
), turn the Main dial ( ![]() ), or tilt the Multi-controller (
), or tilt the Multi-controller ( ![]() ).
).
• Magnify button (![]() ). Pressing the Magnify button (
). Pressing the Magnify button ( ![]() ) and then turning the Main dial (
) and then turning the Main dial ( ![]() ) enlarges the image on the LCD monitor up to 10 times. When comparing images side by side, press the Magnify button (
) enlarges the image on the LCD monitor up to 10 times. When comparing images side by side, press the Magnify button ( ![]() ), and then turn the Main dial (
), and then turn the Main dial ( ![]() ) to check focus and other details.
) to check focus and other details.
• Playback button (![]() ). Pressing this button displays the last captured or viewed image. To cycle through images on the card, turn the Quick Control dial (
). Pressing this button displays the last captured or viewed image. To cycle through images on the card, turn the Quick Control dial ( ![]() ) counterclockwise to view images from last taken to first, or turn the dial clockwise to view images from first taken to last. To change the information displayed with the image during playback, press the Info button (
) counterclockwise to view images from last taken to first, or turn the dial clockwise to view images from first taken to last. To change the information displayed with the image during playback, press the Info button ( ![]() ) one or more times.
) one or more times.
• Erase button (![]() ). Pressing the Erase button (
). Pressing the Erase button ( ![]() ) during image playback displays options to erase the currently displayed image as long as it does not have protection applied to it. Batches of images can be erased together via the Playback menu 1 tab (
) during image playback displays options to erase the currently displayed image as long as it does not have protection applied to it. Batches of images can be erased together via the Playback menu 1 tab ( ![]() ). Use the Main dial (
). Use the Main dial ( ![]() ) to navigate to Playback menu 1 tab (
) to navigate to Playback menu 1 tab ( ![]() ), use the Quick Control dial (
), use the Quick Control dial ( ![]() ) to highlight Erase images and press the Set button (
) to highlight Erase images and press the Set button ( ![]() ) to enter the Erase images options menu. Use the Quick Control dial (
) to enter the Erase images options menu. Use the Quick Control dial ( ![]() ) to Highlight the Select and erase images option, and then press the Set button (
) to Highlight the Select and erase images option, and then press the Set button ( ![]() ) to enter the Select and erase images menu. Here, you can review a moveable strip of images containing the three most recently captured. Rotate the Quick Control dial (
) to enter the Select and erase images menu. Here, you can review a moveable strip of images containing the three most recently captured. Rotate the Quick Control dial ( ![]() ) right or left to reveal and highlight additional images on the memory card. Below the images are empty boxes where checkmarks for images selected for deletion will appear. Select the images you want to delete one at a time by making sure they’re highlighted first and then pressing the Set button (
) right or left to reveal and highlight additional images on the memory card. Below the images are empty boxes where checkmarks for images selected for deletion will appear. Select the images you want to delete one at a time by making sure they’re highlighted first and then pressing the Set button ( ![]() ). Note the checkmark that now appears below those images. Press the Erase button (
). Note the checkmark that now appears below those images. Press the Erase button ( ![]() ) to delete the selected images. Next, you are prompted with an Erase images confirmation screen. Use the Quick Control dial (
) to delete the selected images. Next, you are prompted with an Erase images confirmation screen. Use the Quick Control dial ( ![]() ) to highlight the OK button and press the Set button (
) to highlight the OK button and press the Set button ( ![]() ) to confirm the deletion.
) to confirm the deletion.
• Viewfinder eyepiece and eyecup. The 6D viewfinder is an eye-level pentaprism with approximately 97 percent vertical and horizontal coverage.
• Live View shooting (![]() )/Movie shooting switch (
)/Movie shooting switch (![]() ) and the Start/Stop button (
) and the Start/Stop button (![]() ). Setting this switch to the Live View shooting (
). Setting this switch to the Live View shooting ( ![]() ) position and pressing the Start/Stop button (
) position and pressing the Start/Stop button ( ![]() ) button initiates Live View shooting. The reflex mirror flips up to display a current view of the scene on the LCD monitor. Alternatively, set the switch to Movie mode (
) button initiates Live View shooting. The reflex mirror flips up to display a current view of the scene on the LCD monitor. Alternatively, set the switch to Movie mode ( ![]() ), and then press the Start/Stop button (
), and then press the Start/Stop button ( ![]() ) to begin shooting movies. Press the Start/Stop button (
) to begin shooting movies. Press the Start/Stop button ( ![]() ) again to stop shooting in Live View (
) again to stop shooting in Live View ( ![]() ) or Movie (
) or Movie ( ![]() ) mode.
) mode.
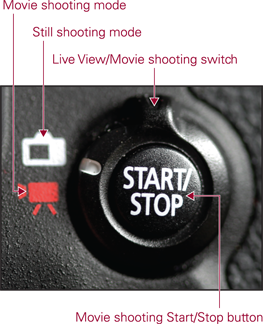
1.7 The Live View/Movie shooting switch and Start/Stop button.
• AF start button (![]() ). Pressing the AF start button (
). Pressing the AF start button ( ![]() ) initiates autofocusing in Program AE (
) initiates autofocusing in Program AE ( ![]() ), Shutter-priority AE (
), Shutter-priority AE ( ![]() ), Shutter-priority AE (
), Shutter-priority AE ( ![]() ), Manual (
), Manual ( ![]() ), and Bulb (
), and Bulb ( ![]() ).
).
• AE Lock/FE Lock button (![]() ). During shooting, pressing this button enables you to set and lock the exposure at a different point from where you focus.
). During shooting, pressing this button enables you to set and lock the exposure at a different point from where you focus.
• AF-point selection button (![]() ). During shooting, press this button, and then tilt the Multi-controller (
). During shooting, press this button, and then tilt the Multi-controller ( ![]() ) to choose an AF point manually.
) to choose an AF point manually.
• Multi-controller (![]() ). The eight-way (
). The eight-way ( ![]() ) functions as a button when pushed and as a joystick when tilted in any direction. During shooting, use it to select an AF point after pressing the AF point selection button (
) functions as a button when pushed and as a joystick when tilted in any direction. During shooting, use it to select an AF point after pressing the AF point selection button ( ![]() ) to move the AF point or magnifying frame in Live View shooting, or to select and set camera menu options. On the Quick Control screen, tilt the Multi-controller (
) to move the AF point or magnifying frame in Live View shooting, or to select and set camera menu options. On the Quick Control screen, tilt the Multi-controller ( ![]() ) to move among and select shooting and exposure options that you want to change. The Multi-controller (
) to move among and select shooting and exposure options that you want to change. The Multi-controller ( ![]() ) is also used to set white balance shift.
) is also used to set white balance shift.
• Quick Control button (![]() ). Pressing this button displays the Quick Control screen on the LCD monitor where you can make changes to the most commonly used camera settings. This is one of the handiest ways to quickly see and change camera and exposure settings with a minimum of hassle. You can use this screen to bypass the camera menus to adjust key camera settings as you shoot. To access the screen, press the Quick Control button (
). Pressing this button displays the Quick Control screen on the LCD monitor where you can make changes to the most commonly used camera settings. This is one of the handiest ways to quickly see and change camera and exposure settings with a minimum of hassle. You can use this screen to bypass the camera menus to adjust key camera settings as you shoot. To access the screen, press the Quick Control button ( ![]() ). Tilt the Multi-controller (
). Tilt the Multi-controller ( ![]() ) to select a setting you want to change, and then turn the Quick Control dial (
) to select a setting you want to change, and then turn the Quick Control dial ( ![]() ) to make the change, or press the Set button (
) to make the change, or press the Set button ( ![]() ) to display the settings screen where you can choose the setting you want.
) to display the settings screen where you can choose the setting you want.
• Quick Control dial (![]() ). The Quick Control dial (
). The Quick Control dial ( ![]() ) selects a variety of settings. Use it to choose options on the camera menus, and to move vertically through the AF points after pressing the AF point selection button (
) selects a variety of settings. Use it to choose options on the camera menus, and to move vertically through the AF points after pressing the AF point selection button ( ![]() ).
).
• Access lamp. This light, located to the right of the Quick Control dial ( ![]() ), lights or blinks red when any action related to taking, recording, reading, erasing, or transferring images is in progress. Whenever the light is lit or blinking, do not open the memory card slot door, turn off the camera, or remove the battery.
), lights or blinks red when any action related to taking, recording, reading, erasing, or transferring images is in progress. Whenever the light is lit or blinking, do not open the memory card slot door, turn off the camera, or remove the battery.
• Set button (![]() ). Pressing this button confirms menu selections, opens submenu screens, and, on the Quick Control screen, opens screens from which you can change settings such as the ISO, exposure compensation, and exposure bracketing.
). Pressing this button confirms menu selections, opens submenu screens, and, on the Quick Control screen, opens screens from which you can change settings such as the ISO, exposure compensation, and exposure bracketing.
• Multi-function lock switch (![]() ). You can program this switch to prevent accidental bumps to the Main dial (
). You can program this switch to prevent accidental bumps to the Main dial ( ![]() ), the Quick Control dial (
), the Quick Control dial ( ![]() ), and the Multi-controller (
), and the Multi-controller ( ![]() ), avoiding inadvertent changes to the camera settings. You can set up the use of the switch using Custom function C.FnIII, menu 3 - Operation/Others, Multi-function lock. Then when you set this switch to the right, locked position, it limits use of the controls to prevent accidental changes to camera settings. Setting it to the left, unlocked position, allows full use of the Quick Control dial (
), avoiding inadvertent changes to the camera settings. You can set up the use of the switch using Custom function C.FnIII, menu 3 - Operation/Others, Multi-function lock. Then when you set this switch to the right, locked position, it limits use of the controls to prevent accidental changes to camera settings. Setting it to the left, unlocked position, allows full use of the Quick Control dial ( ![]() ), the Main dial (
), the Main dial ( ![]() ), and the Multi-controller (
), and the Multi-controller ( ![]() ) to select camera options and settings.
) to select camera options and settings.
The side of the camera
On the side of the 6D is the door for the media card. Behind the door is a slot for a Secure Digital (SD) memory card. The opposite side of the camera is where you’ll find the camera’s speaker, which you can adjust during movie playback using the Main dial ( ![]() ), and two sets of camera terminals under individual rubber covers. The rubber covers are embossed with descriptive icons and text to identify the terminals.
), and two sets of camera terminals under individual rubber covers. The rubber covers are embossed with descriptive icons and text to identify the terminals.
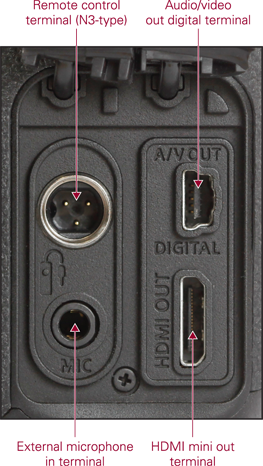
1.8 The Canon EOS 6D terminals.
Here is an overview of each camera terminal:
• Remote control terminal (![]() ). This N3-type terminal connects with the accessory Remote Switch RS-80N3, Timer Remote Controller TC-80N3, LC-5 Wireless Controller or other N3-type EOS accessories.
). This N3-type terminal connects with the accessory Remote Switch RS-80N3, Timer Remote Controller TC-80N3, LC-5 Wireless Controller or other N3-type EOS accessories.
• External microphone In terminal. This is a 3.5mm external microphone terminal for an accessory stereo microphone equipped with a miniature plug. When you use an accessory microphone for recording audio during movie shooting, the camera automatically switches audio recording to the external microphone.
• Audio/Video Out/Digital terminal. Use this terminal when you want to connect the camera to a non-HD TV to view images and movies stored on the media card. Be sure to use only the supplied A/V cable to make the connection. You can connect the camera directly to a computer to download images from the camera to the computer, or to a PictBridge-compatible printer to print images directly from a memory card.
• HDMI mini Out terminal. This terminal, coupled with the accessory HDMI Cable HTC-100, enables you to connect the camera to an HDTV. You cannot use the HDMI mini Out terminal simultaneously with the Audio/Video Out/Digital terminal.
Lens Controls
Using the controls on lenses, you can control whether to use automatic or manual focusing and Image Stabilization, as well as other functions depending on the lens you’re using. If you want to switch from autofocusing to manual focusing, you can position the switch on the side of the lens to Manual focusing mode ( ![]() ) on lenses that offer manual focusing. Manual focusing includes focus assist. As you adjust the focusing ring on the lens, the focus confirmation light in the lower-right side of the viewfinder lights steadily and the camera sounds a focus confirmation beep when sharp focus is achieved.
) on lenses that offer manual focusing. Manual focusing includes focus assist. As you adjust the focusing ring on the lens, the focus confirmation light in the lower-right side of the viewfinder lights steadily and the camera sounds a focus confirmation beep when sharp focus is achieved.
While a complete discussion of lenses is beyond the scope of this book, being able to navigate the camera includes being familiar with lens controls. Therefore, I included lens control descriptions for this purpose.

1.9 Lens controls, as shown on an EF 70-200mm f/2.8L IS USM.
Depending on the lens, the controls may include the following:
• Lens mounting index. The index mark on the lens is red for Canon EF lenses. Just match up with the red mark on the 6D’s lens mount to attach the lens to the camera. All lenses have a lens mounting index mark.
• Zoom ring. Turning this ring zooms the lens to the focal length marked on the ring. On some older lenses, such as the EF 100-400mm f/4.5-5.6L IS USM lens, zooming is accomplished by first releasing a zoom ring, and then pushing or pulling the lens to zoom out or in.
• Focusing distance range selection switch. This switch is offered on some lenses, and it limits the range that the lens uses when seeking focus. For example, if you choose the 2.5m to infinity focusing distance option on the EF 70-200mm, f/2.8L IS USM lens, then the lens does not seek focus at 2.5m and closer, and this speeds up autofocus. The focusing distance range options vary by lens.
• Distance scale and infinity compensation mark. The distance scale shows the lens’s minimum focusing distance through infinity. The scale includes an infinity compensation mark that can be used to compensate for shifting the infinity focus point that results from temperature changes.
• Focusing ring. Turning the focusing ring enables you to bring the subject into sharp focus when the lens is set to Manual Focus (MF). In Autofocus (AF), you can also turn the focusing ring to tweak the focus manually without damaging the lens. Not all lenses offer manual focusing.
• Focus mode switch. Choose Manual Focus (MF) or Autofocus (AF).
• Image stabilizer switch. This switch turns on or off optical Image Stabilization. Optical Image Stabilization (IS) corrects vibrations from handholding the camera. Corrections are made at any angle or at only right angles.
• Image stabilizer mode selector switch. On some telephoto lenses, this switch enables Image Stabilization for standard shooting and stabilization when you are panning with the subject movement at right angles to the camera.
The Viewfinder Display
Along with a 97 percent view of the scene, the eye-level pentaprism viewfinder also displays the 11 AF points, as well as the current exposure and camera settings. The diagram in Figure 1.10 shows what you see in the viewfinder, and what each element represents.
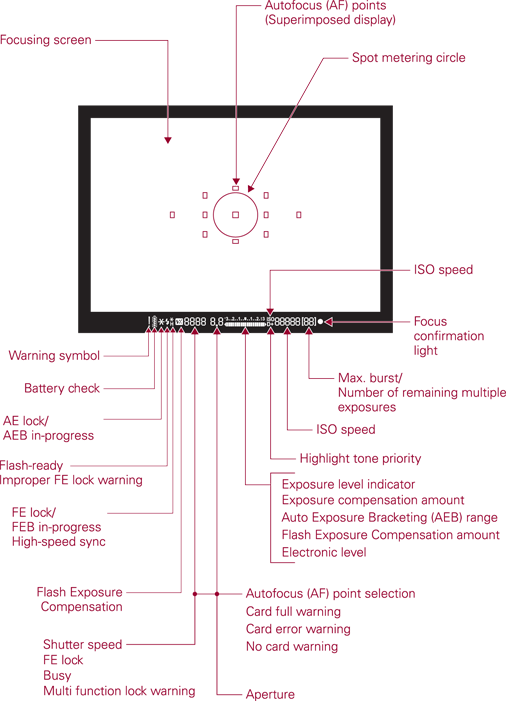
1.10 The Canon EOS 6D viewfinder display.
Looking through the viewfinder during shooting allows you to verify whether camera settings are as you want or if they need to be changed. In addition, you are alerted when any exposure element you have chosen is beyond the exposure capability of the light in the scene.
The 6D has interchangeable focusing screens inside the camera body. If you change the focusing screen that’s installed in the camera, be sure to select the corresponding custom function setting for the new focusing screen being used. Do this using Custom function C.FnIII, menu 2 - Operation/Others, Focusing Screen. The options are Standard Precision Matte, Precision Matte with Grid, and Super Precision Matte.
The Camera Menus
The 6D offers menus grouped as tabs in the categories of Shooting ( ![]() ), Live View shooting (
), Live View shooting ( ![]() ), Playback (
), Playback ( ![]() ), Setup (
), Setup ( ![]() ), Custom Functions (
), Custom Functions ( ![]() ), and My Menu (
), and My Menu ( ![]() ). Just press the Menu button (
). Just press the Menu button ( ![]() ) to open the camera menus.
) to open the camera menus.
The menus and options change based on the shooting mode you select. In the Basic Zone shooting modes — Scene Intelligent ( ![]() ), Creative Auto (
), Creative Auto ( ![]() ), and Special Scene (
), and Special Scene ( ![]() ) — the menus are abbreviated and you can make only limited changes to the exposure and camera settings.
) — the menus are abbreviated and you can make only limited changes to the exposure and camera settings.
But in the semiautomatic and manual shooting modes that make up the Creative Zone shooting modes — Program AE ( ![]() ), Shutter-priority AE (
), Shutter-priority AE ( ![]() ), Aperture-priority AE (
), Aperture-priority AE ( ![]() ), Manual (
), Manual ( ![]() ), Bulb (
), Bulb ( ![]() ), and the two Custom modes (
), and the two Custom modes ( ![]() ) and (
) and ( ![]() ) — all the menus are available.
) — all the menus are available.
Tables 1.1 through 1.17 show the camera menus and options that are displayed in Program AE ( ![]() ), Shutter-priority AE (
), Shutter-priority AE ( ![]() ), Aperture-priority AE (
), Aperture-priority AE ( ![]() ), Manual (
), Manual ( ![]() ), Bulb (
), Bulb ( ![]() ), and the two Custom modes (
), and the two Custom modes ( ![]() ) and (
) and ( ![]() ).
).
Table 1.1 Shooting Menu 1
|
Commands |
Options |
|
Image quality |
RAW ( |
|
Beep |
Enable, Disable |
|
Release shutter without a card |
Enable (ON), Disable (OFF) |
|
Image review |
Off, 2 sec., 4 sec., 8 sec., Hold |
Table 1.2 Shooting Menu 2
|
Commands |
Options |
|
Lens aberration correction |
Peripheral illumination: Enable, Disable Chromatic aberration: Enable, Disable |
|
External Speedlite control |
Flash firing, E-TTL II meter, Flash sync. speed in Av mode, Flash function settings, Flash C.Fn settings, Clear settings |
|
Mirror lockup |
Disable (OFF), Enable |
Table 1.3 Shooting Menu 3
|
Commands |
Options |
|
Expo. comp./AEB (This changes to Exposure comp. during movie recording) |
1/3-stop increments, up to +/–5 stops of exposure compensation and up to +/–3 stops of automatic exposure bracketing (AEB) |
|
ISO speed settings |
ISO speed, ISO speed range, Auto ISO range, Minimum shutter speed |
|
Auto Lighting Optimizer |
Disable, Low, Standard, High, Disable with manual exposure or bulb |
|
White Balance |
Auto ( |
|
Custom White Balance |
Set a manual white balance |
|
WB Shift/Bkt |
White balance correction using Blue/Amber (B/A) or Magenta/Green (M/G) color bias of +/–9 levels; White Balance Bracketing using B/A and M/G bias of +/–3 levels |
|
Color space |
sRGB, Adobe RGB |
Table 1.4 Shooting Menu 4
|
Commands |
Options |
|
Picture Style |
Auto ( |
|
Long exp. noise reduction |
Disable (OFF), Enable (ON), Auto (AUTO) |
|
High ISO speed NR |
Standard, Low, High, Disable, Multi Shot Noise Reduction |
|
Highlight tone priority |
Disable (OFF), Enable (D+) |
|
Dust Delete Data? |
Locates and records dust on the image sensor so you can use the data in the Canon Digital Photo Professional program to erase dust spots on images |
|
Multiple exposure |
Press the Set button ( |
|
HDR Mode |
Press the Set button ( |
Table 1.5 Live View Shooting Menu 1
|
Commands |
Options |
|
Live View shoot |
Enable, Disable |
|
AF mode |
FlexiZone AF — Single ( |
|
Grid display |
Off, 3 × 3, 6 × 4, 3 × 3+diag (diagonal X-shaped lines) |
|
Aspect ratio |
3:2, 4:3, 16:9, 1:1 |
|
Expo. simulation |
Enable, During (depth-of-field preview), Disable |
Table 1.6 Live View Shooting Menu 2
|
Commands |
Options |
|
Silent LV shooting |
Mode 1, Mode 2, Disable |
|
Metering timer |
4 sec., 16 sec., 30 sec., 1 min., 10 min., 30 min. |
Table 1.7 Movie Shooting Menu 1
|
Commands |
Options |
|
AF mode |
Face Detection Live Mode ( |
|
Silent LV shooting |
Mode 1, Mode 2, Disable |
|
Metering timer |
4 sec., 16 sec., 30 sec., 1 min., 10 min., 30 min. |
Table 1.8 Movie Shooting Menu 2
|
Commands |
Options |
|
Grid display |
Off, 3 × 3, 6 × 4, 3 × 3 + diag (diagonal X-shaped lines) |
|
Movie rec. size |
1920 × 1080 with options for 30, 25, or 24 fps, using either All-I or IPB compression 1280 × 720 with the option for 60 or 50 fps using either All-I or IPB compression 640 × 480 at 30 or 25 fps using IPB compression |
|
Sound recording |
Auto, Manual, Disable. Also Recording level, and Wind filter/Attenuator (Disable or Enable) |
|
Time code |
Count up (Rec run or Free run), Start time setting, Movie rec count (Rec time or Time code), Movie play count (Rec time or Time code), Drop frame (Enable, Disable) |
|
Video snapshot |
Enable, Disable. Snapshot length (2 sec. movie, 4 sec. movie, 8 sec. movie) Album settings (Create a new album, Add to existing album) |
Table 1.9 Playback Menu 1
|
Commands |
Options |
|
Protect images |
Select images, All images in folder, Unprotect all images in folder, All images on card, Unprotect all images on card |
|
Rotate image |
Rotate the selected vertical image |
|
Erase images |
Select and erase images, All images in folder, or All images on card |
|
Print order |
Select images to be printed (Digital Print Order Format [DPOF]) |
|
Photobook Set-up |
Select images, All images in folder, Clear all in folder, All images on card, Clear all on card |
|
RAW image processing |
Select and process RAW ( |
Table 1.10 Playback Menu 2
|
Commands |
Options |
|
Resize |
Select image and downsize the image to one of the next smaller sizes |
|
Rating |
OFF, choose a one- to five-star rating. |
|
Slide show |
All images, Setup, and Start a slide show of images on the selected media card |
|
Image jump w/ ( |
Move through images by: 1, 10, 100 (images at a time), Date, Folder, Movies, Stills, Rating |
Table 1.11 Playback Menu 3
|
Commands |
Options |
|
Highlight alert |
Disable, Enable |
|
AF point disp. |
Disable, Enable |
|
Playback grid |
OFF, 3 × 3, 6 × 4, 3 × 3+diag (with X-shaped diagonal lines) |
|
Histogram disp. |
Brightness, RGB |
|
Movie play count |
Rec time, Time code (linked to the Time code’s Movie play count on the Movie Shooting menu 2 tab ( |
|
Magnification (apx) |
1X (no magnification), 2X (magnify from center), 4X (magnify from center, 8X (magnify from center), 10X (magnify from center), Actual size (from selected point), Same as last magnify (from center) |
|
Ctrl over HDMI |
Disable, Enable |
Table 1.12 Setup Menu 1
|
Commands |
Options |
|
Select folder |
Select or create a folder |
|
File numbering |
Continuous, Auto reset, Manual reset |
|
Auto rotate |
On camera and computer, On computer, Off |
|
Format card |
Press the Set button ( |
Table 1.13 Setup Menu 2
|
Commands |
Options |
|
Auto power off |
1 min., 2 min., 4 min., 8 min., 15 min., 30 min., Disable |
|
LCD brightness |
Manual (seven adjustable levels of brightness) |
|
LCD off/on btn |
Remains on, Shutter button |
|
Date/Time/Zone |
Set the date (year/month/day) and time (hour/minute/second) |
|
Language |
Choose language |
|
GPS device settings |
Setting for the accessory GPS Receiver GP-E2 |
Table 1.14 Setup Menu 3
|
Commands |
Options |
|
Video system |
NTSC, PAL |
|
Feature guide |
Enable, Disable |
|
Info button ( |
Displays camera settings, Electronic level, Displays shooting functions |
|
Wi-Fi |
Enable, Disable |
|
Wi-Fi function |
Transfer images between cameras ( |
Refer to Chapter 10 for additional information on the 6D’s Wi-Fi functions.
Table 1.15 Setup Menu 4
|
Commands |
Options |
|
Sensor cleaning |
Auto cleaning (Enable), Clean now, Clean manually |
|
Battery info. |
View remaining battery capacity, shutter count, recharge performance, battery registration, and battery history |
|
Certification Logo Display |
Press the Set button ( |
|
Custom shooting mode (C1, C2) |
Press the Set button ( |
|
Clear all camera settings |
Restore the camera’s default settings |
|
Copyright information |
Press the Set button ( |
|
Firmware Ver. (Firmware version number) |
Press the Set button ( |
Table 1.16 Custom Functions Menu
|
Commands |
Options |
|
C.Fn I: Exposure |
Displays Custom Functions related to exposure, such as exposure level increments, ISO increments, bracketing auto cancel, bracketing sequence, number of bracketed shots, safety shift |
|
C.Fn II: Autofocus |
Displays Custom Functions related to autofocus, including Tracking sensitivity, Accel./decel. tracking, AI Servo 1st image priority, AI Servo 2nd image priority, AF-assist beam firing, Lens drive when AF impossible, Orientation linked AF point, Superimposed display, AF Microadjustment |
|
C.Fn III: Operation/Others |
Displays Custom Functions related to camera controls, including Dial direction in Tv/Av, Focusing Screen, Multi- function lock, Warnings ! in viewfinder, and Custom Controls |
|
Clear all Custom Func. (C.Fn) |
Restores all the camera’s default Custom Function settings |
Table 1.17 My Menu
|
Commands |
Options |
|
My Menu settings |
Choose My Menu settings and press the Set button ( |
..................Content has been hidden....................
You can't read the all page of ebook, please click here login for view all page.