
2.1 Image quality is highlighted on the Shooting menu 1 tab and the JPG Fine option has been selected.
Chapter 2: Camera Setup and Image Playback
Setting up the Canon EOS 6D to suit your shooting needs and preferences makes all the difference. This chapter details the setup options ranging from setting the image quality and customizing file numbering to playing back images. I compare the RAW and JPEG file formats and discuss their differences. I also cover the 6D’s ability to convert RAW file format images to JPEGs in-camera, as well as how to resize JPEGs in-camera. In this chapter, I also show you how to review single or multiple images, zoom in and out to check focus, and delete images you don’t want. This chapter also examines the corrections available for lens vignetting and color fringing, as well as a host of other useful features. (See Chapter 6 for additional ways to customize the 6D with Custom Functions.)
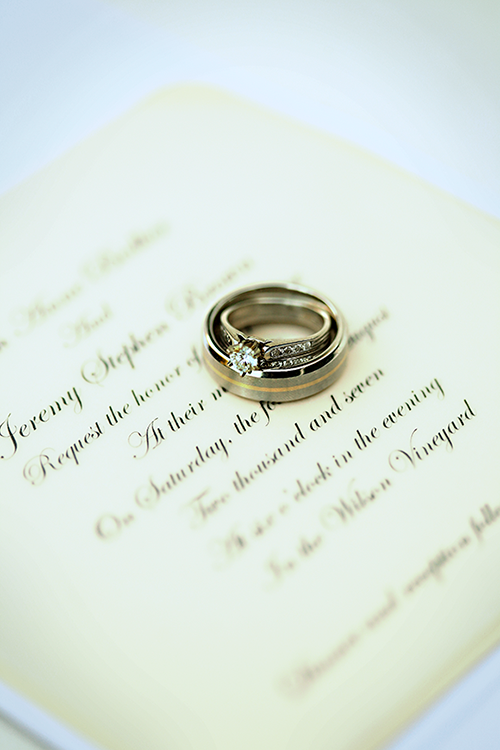
Selective focus and a shallow depth of field call attention to the rings sitting on top of a wedding invitation. Exposure: ISO 400, f/5.0, 1/250 second, with a Canon 100mm, f/2.8L USM.
Setting Image Quality and Processing RAW Images In-Camera
The image-quality setting you should choose varies depending on the shooting assignment or how you plan to use the files. For all but the rarest occasions I shoot in full-resolution RAW format for portraits, weddings, editorial, and commercial work. With the speed, capacity, and relatively low cost of media and hard drives, capturing the most information I can makes sense to me. This way I have all the quality and flexibility I need when it comes to retouching and printing. Your needs may be different, so consider which available options suit your workflow and give you the best prints at the size you need.
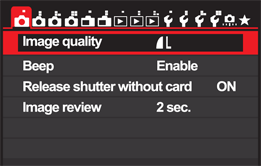
2.1 Image quality is highlighted on the Shooting menu 1 tab and the JPG Fine option has been selected.
JPEG format
JPEG is the default file format on the 6D. It offers efficient, high-quality file compression, which saves space on a memory card. Also, with the JPEG format, you can easily view a quick display of image files on the camera’s LCD monitor and on the computer. JPEG files can be displayed without special viewing programs or preprocessing; therefore, they’re compatible across computer platforms and easy for clients to view.
JPEG is known as a lossy file format because it discards some image data to reduce the file size. The higher the compression level, the more image data is discarded, and the smaller the image file size. Conversely, the lower the compression level, the less data is discarded, and the larger the file size. While data loss isn’t ideal, the amount of data lost at a low compression level is typically not noticeable in prints depending on their size.
The newer JPEG 2000 standard format offers a lossless compression, but JPEG 2000 is not currently offered as an option for the 6D.
Navigating the Menus
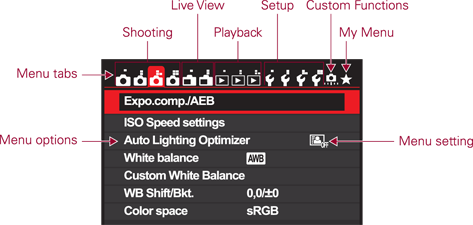
While you can access and adjust many of the settings that you change most often on the Quick Control screen, it’s often necessary to use the camera menus. The main camera menus have tabs, or submenus, that are denoted with dots or rectangles.
To navigate the camera’s menus and tabs, press the Menu button ( ![]() ) and then turn the Main dial (
) and then turn the Main dial ( ![]() ) to move through the individual tabs. Tabs are arranged in groups based on the functions they control.
) to move through the individual tabs. Tabs are arranged in groups based on the functions they control.
To access the Quick Control screen, which contains many of the most often used camera settings, press the Quick Control button ( ![]() ) to activate the Quick Control screen of options on the camera’s LCD monitor. Next use the Multi-controller (
) to activate the Quick Control screen of options on the camera’s LCD monitor. Next use the Multi-controller ( ![]() ) to navigate from setting to setting and the Quick Control dial (
) to navigate from setting to setting and the Quick Control dial ( ![]() ) to scroll through and select available options for those settings. Turn the Main dial (
) to scroll through and select available options for those settings. Turn the Main dial ( ![]() ) to move through a menu’s individual tabs. Pressing the Set button (
) to move through a menu’s individual tabs. Pressing the Set button ( ![]() ) when a setting is highlighted activates an options menu for that setting where you can see all the available options and their descriptions on one screen.
) when a setting is highlighted activates an options menu for that setting where you can see all the available options and their descriptions on one screen.
However, note that whether you’re using the camera’s menus or the Quick Control screen, you’ll have fewer menu options if you’re shooting in one of the Basic Zone exposure modes.
When you shoot JPEG images, the 6D processes the images before storing them on the media card. This image processing determines the color rendering, contrast, and sharpness, so you get a finished, printable file. You can then use the image as is, or you can edit it on the computer. With the 6D, you can control JPEG in-camera image processing to some extent by choosing among six Picture Styles.
If you edit JPEG images on the computer and then save them as JPEGs, data loss continues to occur. To preserve image data during editing, be sure to save JPEG images as TIFFs or in another file format before you begin editing.
Picture Styles and color spaces are described in Chapter 5.
JPEG is the image-quality option to choose when you want to get the maximum burst rate from the camera for shooting sports and action. For example, when you shoot the highest-quality JPEG images, the burst rate is 73 shots at 4.5 frames per second (fps). By comparison, the maximum burst rate with full-resolution RAW files is approximately 4.54 fps. JPEG capture offers a definite edge for getting the fastest performance from the 6D.
The 6D offers two JPEG compression levels: Fine and Medium. You can choose one of three image-recording sizes: 20, 8.9, or 5.0 megapixels. There are also S2 (2.5 megapixels) and S3 (0.3 megapixels) sizes intended for use in digital photo frames, for web display, and for e-mail messages. Of course, the higher the compression and the smaller the image size, the more images that you can capture in a continuous shooting burst, and the more images that will fit on a media card. The trade-off with high compression and low image size is that image quality suffers proportionally and noticeably.
Another aspect to consider with JPEG capture is the data lost with in-camera bit-depth conversions. Every 6D image is captured as a 14-bit file that delivers 16,384 colors in each of the three color channels: Red, Green, and Blue. Because the JPEG file format doesn’t support 14-bit files, the 6D automatically converts JPEG images to 8-bit files with only 256 colors per channel. While the conversion from 14- to 8-bit is done judiciously using internal camera algorithms, the fact remains that much of the image color information is discarded in the process.
Combine this data loss with automatic in-camera editing and JPEG compression, and you get a file that has one-third or more of its image data discarded before it’s written to the media card. Certainly, the JPEG image files are smaller, but with the data loss, the files don’t contain as much information about the colors they’re rendering as RAW files, and they offer less latitude and stability when you edit them on the computer. Depending on the output, the data loss may not be problematic. However, for files destined for maximum printing size, RAW offers a richer file with much greater flexibility.
The 6D is compatible with Secure Digital (SD), SDHC (SD High Capacity), and SDXC (SD Extended Capacity) media cards. SDHC and SDXC cards comply with the Ultra-High Speed (UHS-I) standard, and can be used in the 6D. You may also want to use the camera’s built in Wi-Fi to transmit images wirelessly from the camera to the computer and other devices.
See Chapter 10 for more information about the 6D’s wireless features.
RAW capture
Choose RAW capture to get the highest image quality that the 6D can deliver. RAW files are captured and stored on the media card with little in-camera processing and with no loss of data from compression or conversion. RAW files are not converted to 8-bit as with JPEG, but rather they are captured and stored as 14-bit images. 14-bit RAW files contain more information and are less susceptible to clipping of the highlights or shadows. Comparing histograms of the same image as 8-bit JPEG file in the sRGB color space and a 14-bit RAW file in the Adobe RGB color space demonstrates this. Note the shadow side of the 14-bit RAW format file’s histogram on the left side of Figure 2.2; the tonal range is greater and there's no clipping. The only settings the camera applies to RAW images are the aperture, ISO, and shutter speed. Other settings, such as Picture Style and white balance, are noted in the file but not applied.
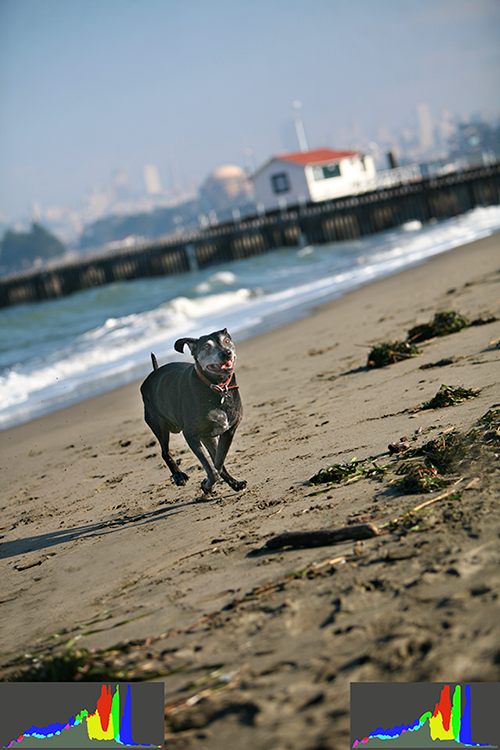
2.2 The inset histograms show an 8-bit JPEG file in the sRGB color space on the right and a 14-bit file in the Adobe RGB color space on the left. Exposure: ISO 200, f/10, 1/1000 second with a Canon 70-200mm, f/2.8L IS USM.
You convert RAW images using Canon Digital Photo Professional, Adobe Camera Raw, Adobe Lightroom, Capture One Pro, or Apple Aperture. During conversion, you adjust the image color, brightness, tonal range, contrast, and color saturation to your liking. If you use Digital Photo Professional, you can also apply a Picture Style, Auto Lighting Optimizer, lens correction settings, and other options just as you would apply them in the camera.
In addition, if images have blown highlights — areas where the highlights went to solid white with no image detail — you can often recover some or all of that image detail during conversion. If an image is underexposed, you can brighten it during conversion. All the adjustments made during RAW-image conversion are nondestructive, meaning that your original .cr2 digital negatives remain untouched. RAW files opened in RAW converters, like Canon Digital Photo Professional, Adobe Camera Raw, Adobe Photoshop Lightroom, Apple Aperture, and Capture One Pro, are saved as duplicates using a variety of file formats.
When the RAW file format conversion is finished, you have a file with much more information than an image captured as a JPEG. This additional information is useful when editing images in programs like Adobe Photoshop, Adobe Photoshop Lightroom, and others. While you can edit nondestructively using various techniques, the more information your original image file contains the less prone the image is to any possible degradation during the editing process. JPEG files can suffer posterization, or the loss of smooth gradation among tonal levels. By contrast, with RAW files, you begin with a rich, 14-bit file that you can save as a 16-bit file in a RAW conversion program. Basically, more information equals more latitude when making exposure and other corrections. A 16-bit RAW file can withstand image edits much better than an 8-bit JPEG file.
If you haven’t worked with RAW files, it’s important to know that you can set or adjust key settings such as white balance, brightness, contrast, and saturation after the image is captured.
You can opt to shoot using Canon’s medium or small RAW image-recording options, both of which offer the same advantages as full-size RAW files, but at a smaller image size. The 6D offers Medium RAW ( ![]() ) at 11 megapixels (18.5MB file), or Small RAW (
) at 11 megapixels (18.5MB file), or Small RAW ( ![]() ) at 5.0 megapixels (13MB file).
) at 5.0 megapixels (13MB file).
RAW capture has drawbacks, however. RAW files lack the portability of JPEG files. You cannot edit RAW files unless you’ve installed Digital Photo Professional or another RAW conversion program, such as Adobe Camera Raw, Adobe Photoshop Lightroom, Apple Aperture, and Capture One Pro. RAW files also add a step to the workflow because they must be converted and saved in another format such as TIFF, PSD, DNG, or even JPEG. Finally, RAW image file sizes are considerably larger than JPEG images.
When you know the advantages and disadvantages of JPEG and RAW capture, you are in a better position to choose when and whether you want to shoot JPEG or RAW images for various shooting scenarios. Table 2.1 details the options that you can select on the 6D and their effect on the burst rate during continuous shooting.
RAW+JPEG
Another option is to shoot both RAW and JPEG. The advantage is having a pre-edited JPEG file that you can print directly from the media card or quickly post online for client viewing. JPGs are also useful for wireless proofing on iPads and iPhones, and wirelessly sharing images on social media sites. You also have a RAW file, either full size or smaller, that you can later convert and edit.
Of course, a downside of shooting RAW+JPEG is the increased space needed on the installed media card. For example, on an 8GB card, you can store approximately 240 full-size RAW and Large Fine ( ![]() ) JPEG images; whereas, if you shoot only Large Fine (
) JPEG images; whereas, if you shoot only Large Fine ( ![]() ) JPEGs, you can store approximately 1,250 images on the card.
) JPEGs, you can store approximately 1,250 images on the card.
RAW+JPEG capture also slows down the continuous high-speed shooting burst rate, as shown in Table 2.1. (The estimates in Table 2.1 are approximate, and vary according to image factors, including ISO, Picture Style, and Custom Function settings, as well as card brand, type, and speed.)
When you capture both JPEG and RAW, the images are saved with the same file number in the same folder. They are distinguished by the file extensions of .jpg for the JPEG image and .cr2 for RAW ( ![]() ), Medium RAW (
), Medium RAW ( ![]() ), or Small RAW (
), or Small RAW ( ![]() ).
).
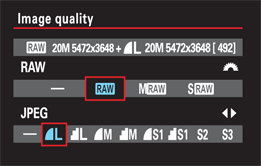
2.3 The Image quality screen enables you to select RAW file options by using the Main dial, and JPEG options by using the Quick Control dial.

To set the image format and quality, follow these steps:
1. On the Shooting menu 1 tab (![]() ), highlight Image quality, and then press the Set button (
), highlight Image quality, and then press the Set button (![]() ). The Image quality screen appears.
). The Image quality screen appears.
2. Turn the Main dial (![]() ) to highlight the RAW option you want. If you want to stop capturing RAW images, select the No RAW icon (
) to highlight the RAW option you want. If you want to stop capturing RAW images, select the No RAW icon ( ![]() ).
).
3. Turn the Quick Control dial (![]() ) to highlight the JPEG option you want. If you want to stop capturing a JPEG image, select the No JPG icon (
) to highlight the JPEG option you want. If you want to stop capturing a JPEG image, select the No JPG icon ( ![]() ).
).
To capture RAW+JPEG, choose a JPEG and RAW option in Steps 2 and 3.
4. Press the Set button (![]() ).
).
Processing RAW images in-camera
What happens if you’re shooting only RAW images and you need a JPEG version of a file on a media card while you’re in the field? With the 6D, you can process a full-size RAW file in the camera and save it as a JPEG. You don’t have as much control over the RAW conversion in the camera as you do on a computer. However, this option is handy when you’re shooting only RAW images, and need to print an image directly from a media card, upload an image to a social media site, e-mail an image, or proof an image wirelessly on an iPad or iPhone. These are all things you can’t do with RAW files.
Only full-size RAW files can be processed in the camera. Small and Medium RAW files can only be converted in Digital Photo Professional or another conversion program.
If you choose in-camera RAW conversion, you process the RAW file in the camera and save it as a JPEG copy of the RAW file. The original RAW image is also retained unaltered on the media card so you can convert it later. There is a good range of adjustments for RAW conversion in the camera. The adjustments include brightness, white balance, Picture Style, Auto Lighting Optimizer, High ISO speed noise reduction, color space, Peripheral Illumination Correction, Lens distortion correction, and Chromatic aberration correction. When you finish editing, you can set the JPEG image quality setting. If the image was shot in Live View with an aspect ratio of 4:3, 16:9, or 1:1, the image is displayed with that aspect ratio.
To convert a RAW image to JPEG in the camera, follow these steps:
1. On the Playback menu 1 tab (![]() ), highlight RAW image processing, and then press the Set button (
), highlight RAW image processing, and then press the Set button (![]() ). The camera displays the most recent RAW image on the card.
). The camera displays the most recent RAW image on the card.
2. Turn the Quick Control dial (![]() ) to navigate to the RAW image you want to convert, and then press the Set button (
) to navigate to the RAW image you want to convert, and then press the Set button (![]() ). The RAW processing screen is overlaid on the image so that you can make adjustments.
). The RAW processing screen is overlaid on the image so that you can make adjustments.

2.4 A RAW image selected for conversion to JPEG.
To display the RAW images as an index, press the Magnify button ( ![]() ), and then turn the Main dial (
), and then turn the Main dial ( ![]() ) to find the image you want.
) to find the image you want.
3. Tilt the Multi-controller (![]() ) to select an adjustment, and then turn the Quick Control dial (
) to select an adjustment, and then turn the Quick Control dial (![]() ) to change the setting. You can also press the Set button (
) to change the setting. You can also press the Set button ( ![]() ) to display a screen with all the settings for the adjustment. Then make the adjustment and press the Set button (
) to display a screen with all the settings for the adjustment. Then make the adjustment and press the Set button ( ![]() ). The image shows the effect of the adjustments you make. When making adjustments prior to initiating conversion, pressing the Info button (
). The image shows the effect of the adjustments you make. When making adjustments prior to initiating conversion, pressing the Info button ( ![]() ) will reset any adjustments made. Settings automatically reset once the image has been processed.
) will reset any adjustments made. Settings automatically reset once the image has been processed.
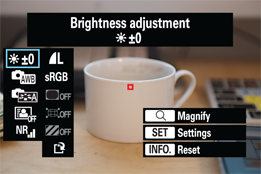
2.5 The processing options.
4. Tilt the Multi-controller (![]() ) to select Save at the bottom of the second column of options, and then press the Set button (
) to select Save at the bottom of the second column of options, and then press the Set button (![]() ). The Save as new file screen appears.
). The Save as new file screen appears.
5. Select OK, and then press the Set button (![]() ). A message appears giving you the folder and file number for the new image.
). A message appears giving you the folder and file number for the new image.
6. Press the Set button (![]() ) to choose OK, and then press the Menu button (
) to choose OK, and then press the Menu button (![]() ). You can repeat these steps to save the image with different settings as a different file if you want.
). You can repeat these steps to save the image with different settings as a different file if you want.
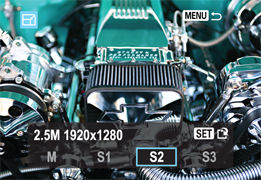
Resizing JPEG Files in the Camera
If you need a smaller version of a JPEG image on the card, you can create it and size it to any of the smaller JPEG image sizes. If you do this, the camera creates a new, downsized JPEG file and saves the original JPEG file at its original size. You cannot resize S3 JPEGs or RAW files.
Here is how to resize a JPEG:
1. On the Playback menu 2 tab (![]() ), highlight Resize, and then press the Set button (
), highlight Resize, and then press the Set button (![]() ). JPEG images are displayed on the LCD monitor.
). JPEG images are displayed on the LCD monitor.
2. Navigate to the image you want to copy at a smaller size, and then press the Set button (![]() ). Reduced file size options are displayed at the bottom of the LCD monitor with their corresponding file size and pixel dimensions.
). Reduced file size options are displayed at the bottom of the LCD monitor with their corresponding file size and pixel dimensions.
3. Turn the Quick Control dial (![]() ) to select the size, and then press the Set button (
) to select the size, and then press the Set button (![]() ). The Save as new file message appears.
). The Save as new file message appears.
4. Turn the Quick Control dial (![]() ) to select OK. The camera displays the folder and filename for the new image file.
) to select OK. The camera displays the folder and filename for the new image file.
5. Press the Set button (![]() ) to choose OK.
) to choose OK.
Improving Image Quality
Being vigilant about image quality means that you must pay attention to many factors. With digital images, that often means editing in post-capture for digital noise from long exposures and high ISO settings, color fringing on high-contrast edges that occurs from chromatic aberration, and vignetting from lens light falloff at the corners of the frame. With the 6D, you can deal with these quality issues in the camera.
Reducing digital noise in-camera
From the beginning of photography, grain has been an issue as photographers and technicians strove to create the best image quality possible. In digital capture this issue has been replaced with digital noise issues and finding ways to reduce it. Digital noise appears as unwanted multicolor pixels, particularly in the shadow areas and as grain similar to film grain. Noise is always present in an electronic device that receives a signal. There is less noise when the signal-to-noise ratio (SNR) is low. However, as you increase the SNR by cranking up the ISO, the noise also increases.
Anything that heats up the image sensor also increases digital noise. Long exposures definitely heat up the image sensor, thus producing digital noise. Another source of digital noise is underexposure that pushes the tonal range toward the shadows, which proportionally contain the fewest number of pixels. I try to balance low-light exposures by using the widest aperture I can, keeping the ISO sensitivity as low as possible, and using a shutter speed that’s fast enough to avoid camera shake. I shot the image in Figure 2.6 handheld after setting the ISO at 1000 and the shutter speed at 1/40 second. I used the Standard noise reduction option and consequently the digital noise is low.
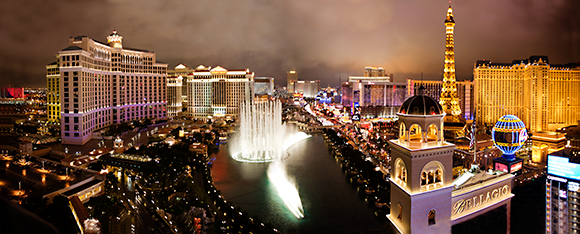
2.6 This panorama of the Las Vegas skyline at night demonstrates the use of Standard noise reduction. Exposure: ISO 1000, f/2.8, 1/40 second with a Canon 28-70mm f/2.8L USM.
On the 6D, you can control digital noise generated by both high ISO settings and long exposures. For high ISO settings, you can choose from several noise reduction settings:
• Standard. This is the default setting. It applies some color (chroma) and luminance noise reduction to images shot at all ISO sensitivity settings. If you seldom use high ISO settings, this is a good option for everyday shooting. In addition, it’s effective at moderately high ISO settings.
• Low. The camera performs some noise reduction on all images, not just high ISO images. You may not see much difference between this option and Standard.
• High. More aggressive noise reduction is applied, and the loss of fine detail in the image may be noticeable. In addition, it can reduce the burst rate in continuous drive mode ( ![]() ).
).
• Disable. No noise reduction is applied. Choose this option if you prefer to apply noise reduction during RAW image conversion or during image editing on the computer.
• Multi Shot. This offers greater noise reduction and results in better image quality than the High setting. A burst of four images is captured for each exposure and then automatically merged into a single JPEG.
Likewise, if you use long exposures, you can apply noise reduction in the camera using Long exp. noise reduction, found on the Shooting 4 menu tab ( ![]() ). You have three settings from which you can choose:
). You have three settings from which you can choose:
• Disable. No noise reduction is performed. Use this setting if you want to apply noise reduction later during image conversion or editing.
• Auto. Noise reduction is applied for exposures of 1 second or longer, provided that the camera detects noise. This is a good setting for everyday shooting. With this setting, noise reduction takes as long as the original exposure. Therefore, if the original exposure was 2 minutes, then the noise reduction will take 2 minutes as well. You can continue shooting during the noise reduction process if the maximum burst indicator in the viewfinder shows number 1 or higher.
• Enable. The camera applies noise reduction for 1-second and longer exposures. This setting can reduce noise that isn’t detected with the Auto setting. With Live View shooting, the LCD monitor displays a Busy notice ( ![]() ), and you can’t continue shooting until noise reduction is finished. Images shot at ISO 1600 and higher may have more grain with this setting than with the other two settings.
), and you can’t continue shooting until noise reduction is finished. Images shot at ISO 1600 and higher may have more grain with this setting than with the other two settings.
The process for setting noise reduction for high ISO settings and long exposures are similar. On the Shooting menu 4 tab ( ![]() ), highlight either Long exp. noise reduction or High ISO speed NR, and then press the Set button (
), highlight either Long exp. noise reduction or High ISO speed NR, and then press the Set button ( ![]() ). The Long exp. noise reduction or High ISO speed NR screen appears. Turn the Quick Control dial (
). The Long exp. noise reduction or High ISO speed NR screen appears. Turn the Quick Control dial ( ![]() ) to select the setting you want, and then press the Set button (
) to select the setting you want, and then press the Set button ( ![]() ).
).
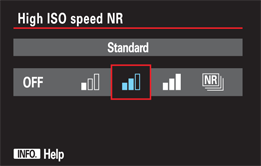
2.7 The High ISO speed noise reduction options.
Correcting vignetting and color fringing
Two other factors that affect the overall image quality are related to the lens you use, and they can be corrected in the camera. Depending on your lens, you may notice a bit of light falloff and darkening on the four corners of the frame. Light falloff describes when less light reaches the corners of the frame compared to the center of the frame. The darkening effect at the corners of the frame is known as vignetting. Vignetting is most likely to happen with wide-angle lenses, when you shoot at a lens’s maximum aperture, or when an obstruction such as the lens barrel rim or a filter reduces the light reaching the frame corners. You correct vignetting by using the lens Peripheral Illumination Correction option on the camera.
You can correct vignetting for JPEG images in the camera. RAW images can be corrected during conversion in Digital Photo Professional, a RAW conversion program provided on the EOS Digital Solution Disk that comes with the 6D, or using Adobe Camera Raw, Adobe Lightroom, Capture One Pro, or Apple Aperture.
You may want to test your lenses for vignetting before applying correction. To test the lens, photograph an evenly lit white subject such as a white paper background or wall at the lens’s maximum aperture and at a moderate f/8 aperture, and then examine the images for dark corners. Then you can enable lens Peripheral Illumination Correction, repeat the shot, and compare the results.
If you use Peripheral Illumination Correction for JPEG images, the amount of correction applied is just shy of the maximum amount. If you shoot RAW images, you can apply the maximum correction in Digital Photo Professional. Also, the amount of correction for JPEG images decreases as the ISO sensitivity setting increases. If the lens has little vignetting, the difference in using Peripheral Illumination Correction may be difficult to detect. If the lens does not communicate distance information to the camera, then less correction is applied. Canon recommends that you disable this option for non-Canon lenses, even if the lens appears to have correction information.
You can also correct for color fringing, generally referred to as chromatic aberration. The aberration appears as a red/cyan or blue/yellow fringe or outline around high-contrast edges within the image. Fringing is only one of several types of chromatic aberration.
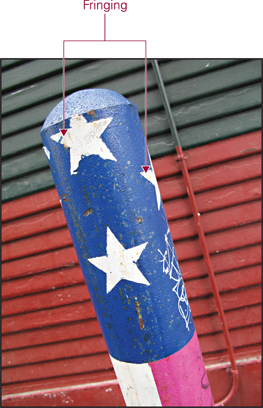
2.8 Purple fringing is most often seen along high-contrast edges. Exposure: ISO 80, f/3.2, 1/60 second with a Canon 7.4-44.4mm, f2.8-4.8 USM.
The 6D comes preloaded with lens correction information for approximately 27 lenses and can store data for up to 40 different lenses loaded into its memory. If the lens you’re using doesn’t have correction data registered, you can register it using EOS Utility, a program provided on the EOS Digital Solution Disk. To set lens Peripheral Illumination Correction, follow these steps:
1. On the Shooting menu 2 tab (![]() ), highlight Lens aberration correction, and then press the Set button (
), highlight Lens aberration correction, and then press the Set button (![]() ). The Lens aberration correction screen appears.
). The Lens aberration correction screen appears.

2.9 The Lens aberration correction options set to Enable.
2. Highlight Peripheral illumin., and then press the Set button (![]() ). Two options appear: Enable or Disable.
). Two options appear: Enable or Disable.
3. Select Enable to correct for vignetting, and then press the Set button (![]() ).
).
4. Highlight Chromatic aberration, and then press the Set button (![]() ). Two options appear.
). Two options appear.
5. Select Enable to correct chromatic aberration, and then press the Set button (![]() ).
).
Working with Folders and Files
While the 6D creates the starting folder in which images are stored, you have the option to create additional folders to organize images on the card. Creating additional folders is a handy way to keep images from two or more shooting sessions separate.
Also, by default, the 6D names image files, and for the first time, you can designate the first four letters of the file name, or you can designate the first three letters and have the camera automatically supply the fourth letter that indicates the file size. Setting up folders and file name options is one of the first steps to making your workflow as efficient as possible.
Creating and selecting folders
For those who are rigorous about keeping pictures on the media cards organized, the folder creation option will help with organization. With the 6D, you can create as many as 999 folders on each media card, and each folder holds up to 9,999 images. New folders must be created within the main folder, and folders can be created either in the camera or on the computer.
When image 9,999 is recorded within a folder on a media card, the camera displays an error message, and you cannot continue shooting until you replace the card, regardless of whether the card contains additional free space. This may sound innocuous, but it can cause you to miss shots if you’re not careful. So if the camera stops shooting unexpectedly, try replacing the media card.
Here are the folder guidelines using either option:
• Creating folders in the camera. Folders created in the camera are numbered sequentially starting from the folder that the camera automatically creates, 100EOS6D, so if you create a new folder, the next folder name will be 101EOS6D. When you create folders in the camera, the folder naming structure is preset and cannot be changed. If you insert a media card from another Canon EOS dSLR, the folder keeps its name until you format the media card in the 6D.
• Creating folders on the computer. You can also create folders on the computer and that offers more flexibility in file naming. However, you must follow the camera’s naming conventions. Each folder must be labeled with a unique three-digit number from 101 to 999. Then you can add a combination of up to five letters (upper- and/or lowercase), and you can use an underscore. No spaces are allowed in file names and the same three-digit number can’t be repeated. So, you can create a folder named 102MJC_W, but not one named 102MJC_P because the three digits are the same.
If you format one of the media cards, the folders you created either in the camera or on the computer are erased along with all images. The only one that isn’t erased is the default 100EOS6D folder. Thus, you need to create new folders after you format the card. To create a new folder, follow these steps:
1. On the Setup menu 1 tab (![]() ), highlight Select folder, and then press the Set button (
), highlight Select folder, and then press the Set button (![]() ). The Select folder screen appears.
). The Select folder screen appears.
2. Turn the Quick Control dial (![]() ) to select Folder, and then press the Set button (
) to select Folder, and then press the Set button (![]() ). The Select folder screen appears. The screen shows existing folders and the number of images in the folder displayed. On the far right, a preview of the images with the lowest and highest file numbers is displayed.
). The Select folder screen appears. The screen shows existing folders and the number of images in the folder displayed. On the far right, a preview of the images with the lowest and highest file numbers is displayed.
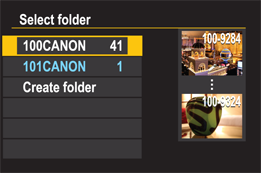
2.10 The Select folder screen.
3. To create a new folder, turn the Quick Control dial (![]() ) to highlight Create folder, and then press the Set button (
) to highlight Create folder, and then press the Set button (![]() ). The camera displays the Select folder screen with a confirmation message to create a folder with the next incremented number.
). The camera displays the Select folder screen with a confirmation message to create a folder with the next incremented number.
4. Select OK, and then press the Set button (![]() ). The Select folder screen appears with the newly created folder selected.
). The Select folder screen appears with the newly created folder selected.
Setting and changing file numbering
There may be times when you want to change the camera’s default file-naming sequence or reset it. There are three options from which you can choose: Continuous, Auto reset, and Manual reset. This section looks at each option and some of the shooting scenarios where each could offer an advantage.
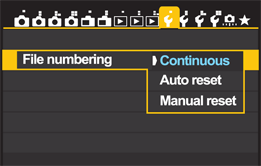
2.11 The File numbering options.
Continuous
Continuous file numbering is the default setting on the 6D, and every file is numbered sequentially beginning with 0001 through 9999. Image files are stored in the 100EOS6D folder located at the top level on the media card.
The camera automatically creates the 100EOS6D folder, and file numbering continues uninterrupted unless you insert a media card that has images stored on it. If the highest number on the card is higher than the last image number on the 6D, then file numbering typically continues from the current highest-numbered image on the media card. In addition, that numbering sequence continues even after you insert an empty formatted card. For example, although I had taken only 300 images with the 6D, when I inserted a media card from another Canon EOS camera, the next image file number on the 6D was 4521, the next number on the media card. Likewise, if a media card contains multiple folders with images in them, then the numbering sequence begins with the highest-numbered existing image in the folder that is being used.
However, if you insert a card that has a file number that is lower than the last highest file number taken on the 6D (stored in the camera’s internal memory), then the file numbering continues from the last highest file number recorded and stored in the 6D internal memory. In short, the camera uses the last highest number from either the card or the number stored in memory. So if you want pristine, continuous file numbering, then always insert a formatted card and do not insert media cards from other Canon bodies that have images stored on them.
An advantage of continuous file numbering is that it gives you unique file names on the computer. This helps you to avoid overwriting images with the same file name and file extension. However, glitches can occur, so good folder and image management is essential for peace of mind.
Auto reset
As the name implies, this option resets image file numbering every time you insert a media card, switch between cards in the camera, or create a new folder on a media card. When you use Auto reset, image file numbers reset to begin at 0001 if the card is freshly formatted.
Auto reset is handy for keeping images organized by shoot when you’re photographing different subjects or assignments on the same day. I create separate folders on the media card or cards and then save images from different shoots to individual folders. Because the file numbers reset in each folder, it’s easy to check each folder to see how many images I’ve taken for the assignment. Additionally, it is easier to keep the images separate when I download them to the computer.
However, the Auto reset option isn’t as straightforward as it seems. If you insert a media card with existing images stored on it, the camera uses the highest existing image number and continues numbering from there. So if you want Auto reset to reset to 0001, be sure to format the media card in the camera before shooting with it. In short, it pays to start a shooting day with an adequate supply of freshly formatted media cards and not swap them between cameras. This way, Auto reset and other file numbering methods will work best for you.
Manual reset
If you choose the Manual reset option, the 6D automatically creates a new folder and begins numbering images at 0001. By its name, it seems that you could force file numbering to reset for a fresh start. However, that’s true only if the default 100EOS6D folder is empty. When you select Manual reset, the next image number is set to 0001. But if the 100EOS6D folder has images in it, when you choose Manual reset, the camera creates a new folder, 101EOS6D, and starts image numbering at 0001 in that folder. This is also true for media cards that have multiple folders with images in each folder.
When is Manual reset handy? I use it anytime I want to quickly create a new folder and begin shooting at image number 0001. For example, if I’m shooting a wedding and a member of the wedding party asks me to photograph his family during a break, I can select Manual reset and know that the family shots will be kept in a folder separate from the wedding image folder. Of course, I have to remember to switch back to the wedding folder when I go back to shooting the wedding.
After you choose Manual reset, the 6D returns to the file numbering option that was in effect before the numbering was manually reset, either Continuous or Auto reset. Also, the new folder created is numbered sequentially based on the current highest folder number on the media card.
Changing the file numbering option on the 6D is straightforward, as long as you remember its limitations and how each option works. First, on the Setup menu 1 tab ( ![]() ), highlight File numbering and then press the Set button (
), highlight File numbering and then press the Set button ( ![]() ). The camera displays the three file numbering options. Highlight the option you want and then press the Set button (
). The camera displays the three file numbering options. Highlight the option you want and then press the Set button ( ![]() ).
).
The option remains in effect until you change it, except for Manual reset, which creates a new folder if there are images in the current folder or in any other folders. If there are no images, then image numbers in the current folder begin with 0001. In both instances, the camera then returns to the previously selected file numbering option.
Changing Setup Options
There is a laundry list of setup options on the 6D that can make your life easier, and make shooting more enjoyable and efficient. You may have already implemented these settings, but in case you missed some, I outline how to change the general setup options and the image and movie playback options in the following sections.
Changing general setup options
Within general options, I include options that you typically set only once, although there are some you may revisit for specific shooting scenarios.
There are fewer menus and options available in the Basic Zone shooting modes.
To change general setup options, press the Menu button ( ![]() ), turn the Main dial (
), turn the Main dial ( ![]() ) to choose a menu, and then follow the instructions in Tables 2.2 through 2.10.
) to choose a menu, and then follow the instructions in Tables 2.2 through 2.10.
Table 2.2 Shooting Menu 1 Options
|
Turn Quick Control Dial to Select Menu Option |
Press Set Button to Display Menu Sub-options |
Turn Quick Control Dial to Select Sub-option and Press Set Button |
|
Beep |
Enable, Disable |
Choose Disable for shooting scenarios where noise is intrusive or unwanted. |
|
Release shutter without card |
Enable (ON), Disable (OFF) |
Choose Disable to prevent inadvertently shooting when no card is inserted. The Enable setting is only useful when gathering Dust Delete Data. |
|
Image review |
Off, 2 sec., 4 sec., 8 sec., and Hold |
Longer review durations of 4 or 8 seconds have a negligible impact on battery life except during travel, when battery power may be at a premium. I use 4 seconds unless I’m reviewing images with a client or subject; then I choose 8 seconds. |
Table 2.3 Shooting Menu 3 Options
|
Turn Quick Control Dial to Select Menu Option |
Press Set Button to Display Menu Sub-options |
Turn Quick Control Dial to Select Sub-option and Press Set Button |
|
Auto Lighting Optimizer |
Disable, Low, Standard, or High. Disable during man expo. (manual exposure) |
Enabling this option automatically corrects images that are too dark and images with low contrast at the level you choose. Using this option can mask the effects of exposure modification such as Auto Exposure Bracketing and exposure compensation. By default, Auto Lighting Optimizer is disabled during manual exposure, but you can press the Info button ( |
|
Color space |
sRGB, Adobe RGB |
Sets the color space to the smaller sRGB color space or to the larger Adobe RGB color space. See Chapter 5 for more information on these options. |
Table 2.4 Live View Shooting Menu 1 Options
|
Turn Quick Control Dial to Select Menu Option |
Press Set Button to Display Menu Sub-options |
Turn Quick Control Dial to Select Sub-option and Press Set Button |
|
Grid display |
Off, 3×3, 6×4, 3×3+diag |
Choosing 3×3 or 6×4 overlays a grid on the Live View screen to aid in squaring up horizontal and vertical lines in the scene. The 3×3+diag option adds an X-shape on top of the 3×3 grid to aid in composition. |
|
Exposure simulation |
Enable, During Depth of Field preview, Disable |
Choosing Enable displays the Live View image on the LCD monitor as close to the same brightness that the final image will have, including the effect of exposure compensation. Choosing During Depth of Field preview displays the image as close to the actual image brightness only when you press the depth-of-field preview button. Disabling this option displays the Live View image at standard brightness. |
Table 2.5 Playback Menu 2 Options
|
Turn Quick Control Dial to Select Menu Option |
Press Set Button to Display Menu Sub-options |
Turn Quick Control Dial to Select Sub-option and Press Set Button |
|
Rating |
OFF, 1 star, 2 stars, 3 stars, 4 stars, 5 stars |
Use the Quick Control dial ( |
Table 2.6 Playback Menu 3 Options
|
Turn Quick Control Dial to Select Menu Option |
Press Set Button to Display Menu Sub-options |
Turn Quick Control Dial to Select Sub-option and Press Set Button |
|
Highlight alert |
Disable, Enable |
Choosing Enable causes areas of overexposure in the preview image to blink, alerting you to reshoot using negative exposure compensation if the blown highlights are in a critical area of the image. |
|
AF point disp. (display) |
Disable, Enable |
Choosing Enable displays the autofocus (AF) point used to set focus in red. |
|
Histogram display |
Brightness, RGB |
Choosing Brightness displays a histogram showing the distribution and gradation of tones through the image, alerting you if exposure modification is necessary. Choosing RGB displays a histogram showing the distribution of color in the Red, Green, and Blue color channels, enabling you to evaluate the color saturation and gradation. |
Table 2.7 Setup Menu 1 Options
|
Turn Quick Control Dial to Select Menu Option |
Press Set Button to Display Menu Sub-options |
Turn Quick Control Dial to Select Sub-option and Press Set Button |
|
Auto rotate |
On for the LCD panel and computer, On for the computer only, Off |
Choose the On option to rotate vertical images automatically to the correct orientation on the LCD or computer monitor, or only on the computer monitor. If you choose either of the first two options, the preview image on the LCD monitor is displayed at a reduced size. Choose Off for no rotation on the camera or computer. |
|
Format |
Turn the Quick Control dial ( |
Table 2.8 Setup Menu 2 Options
|
Turn Quick Control Dial to Select Menu Option |
Press Set Button to Display Menu Sub-options |
Turn Quick Control Dial to Select Sub-option and Press Set Button |
|
Auto power off |
1 min., 2 min., 4 min., 8 min., 15 min., 30 min., Disable |
Choose an option to determine the amount of time before the 6D turns off automatically. Shorter durations conserve battery power. Just press the shutter button halfway to turn on the camera again. |
|
LCD brightness |
Manual (seven brightness levels) |
Watch both the preview image and the grayscale chart as you turn the Quick Control dial ( |
Registering Batteries
While it’s great that several of the Canon EOS cameras use the LP-E6 battery, this also means that you may have batteries of varying age on hand. Now you can register the battery pack and monitor its condition.
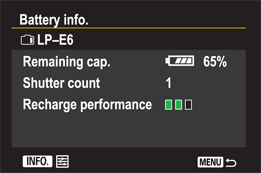
The battery information available on the Setup menu 3 tab ( ![]() ) includes the following:
) includes the following:
• Remaining capacity. This includes a graphic indicator of remaining battery charge as well as the approximate percentage in 1 percent increments.
• Shutter count. The number of shots taken with the current charge for the battery is displayed. The count resets with each charge. Only still images, not movies, are counted.
• Recharge performance. This is arguably the most helpful if you’re using a mix of old and newer batteries because you can see if the battery performance is degrading, and by how much. Three green bars indicate good performance. Two green bars indicate a slight degradation. One red bar indicates that it’s time to replace the battery.
You can register up to six battery packs. Even if a “Use this battery?” message appears, you can use the battery for shooting. The message indicates there may be miscommunication or no communication of battery information between the battery and the camera.
Here’s how to register a battery on the camera:
1. On the Setup menu 4 tab (![]() ) highlight Battery info., and then press the Set button (
) highlight Battery info., and then press the Set button (![]() ). The Battery info. screen appears.
). The Battery info. screen appears.
2. Press the Info button (![]() ). If this and no other battery have been registered, the current battery appears grayed out. If another battery has been registered, then it appears at the top of the list with its last status displayed.
). If this and no other battery have been registered, the current battery appears grayed out. If another battery has been registered, then it appears at the top of the list with its last status displayed.
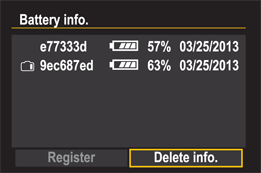
3. Highlight Register, and then press the Set button (![]() ). A message appears confirming battery registration.
). A message appears confirming battery registration.
4. Choose OK, and then press the Set button (![]() ).
).
You can also write the battery registration number on a label and paste the label to the end of the battery pack for quick reference to the registration number.
The camera also has a small internal battery for the camera’s clock with a life span of approximately 5 years. Replacement of this battery must be done at a service center.
Table 2.9 Setup Menu 3 Options
|
Turn Quick Control Dial to Select Menu Option |
Press Set Button to Display Menu Sub-options |
Turn Quick Control Dial to Select Sub-option and Press Set Button |
|
The Info button ( |
Displays Camera settings, Electronic level, Shooting functions |
Choose an option to determine which screen is displayed by pressing the Info button ( Choose Electronic level to display a level on the LCD monitor to keep the camera level with the scene. The level displays roll and pitch so you can check horizontal and vertical tilt in 1-degree increments. Shooting functions displays a summary of exposure and camera settings where you can activate the screen to change settings. This is also known as the Quick Control screen. Any one, two, or all three of the Info button ( |
Table 2.10 Setup Menu 4 Options
|
Turn Quick Control Dial to Select Menu Option |
Press Set Button to Display Menu Sub-options |
Turn Quick Control Dial to Select Sub-option and Press Set Button |
|
Copyright information |
Display copyright info., Enter author’s name, Enter copyright details, Delete copyright information |
Choose an option to enter your name, copyright information, and display or delete existing copyright details. |
Adding Copyright Information
Copyright identifies your ownership of images. On the 6D, you can append your copyright information to the metadata that is embedded with each image that you shoot.
While including your copyright is a great first step in identifying ownership of the images you make, the process is not complete until you register your images with the United States Copyright Office. For more information, visit www.copyright.gov.
To include your copyright follow these steps:
1. On the Setup menu 4 tab (![]() ), highlight Copyright information, and then press the Set button (
), highlight Copyright information, and then press the Set button (![]() ). The Copyright information screen appears.
). The Copyright information screen appears.
2. Highlight the option you want, such as Enter author’s name or Enter copyright details, and then press the Set button (![]() ). A screen appears where you can enter the name or details.
). A screen appears where you can enter the name or details.
3. Press the Quick Control button (![]() ) to activate the keyboard portion of the screen, and then turn the Quick Control dial (
) to activate the keyboard portion of the screen, and then turn the Quick Control dial (![]() ) or tilt the Multi-controller (
) or tilt the Multi-controller (![]() ) to move the cursor to the letter you want to enter.
) to move the cursor to the letter you want to enter.
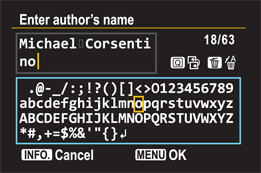
4. Press the Set button (![]() ) to insert the letter in the top portion of the screen. To delete a character, press the Erase button (
) to insert the letter in the top portion of the screen. To delete a character, press the Erase button ( ![]() ). You can enter up to 63 characters, numbers, and symbols in the text area.
). You can enter up to 63 characters, numbers, and symbols in the text area.
5. Press the Menu button (![]() ) to return to the previous screen where you can choose to enter copyright details or the author name, whichever you didn’t choose in Step 2. You can cancel this option by pressing the Info button (
) to return to the previous screen where you can choose to enter copyright details or the author name, whichever you didn’t choose in Step 2. You can cancel this option by pressing the Info button ( ![]() ).
).
Changing playback options
Viewing images and movies immediately after capture is the best way to know if the exposure, focus, color, composition, and other factors are on track. In addition, with still-image capture, it’s great to compare the images to see which are best. The 6D enables 4-up and 9-up image comparison.
To view images or movies on the 6D, just press the Playback button ( ![]() ) to display the most recent image or movie. If you’re in Single image display, then basic shooting information appears in a ribbon above the image. If you’ve turned on the Highlight alert and AF-point display options, the preview image shows these as well, with localized areas of overexposure displayed as blinking highlights.
) to display the most recent image or movie. If you’re in Single image display, then basic shooting information appears in a ribbon above the image. If you’ve turned on the Highlight alert and AF-point display options, the preview image shows these as well, with localized areas of overexposure displayed as blinking highlights.
To move through images and movies on the media card, turn the Quick Control dial ( ![]() ) counterclockwise to view the next most recent image or movie, or clockwise to view the first.
) counterclockwise to view the next most recent image or movie, or clockwise to view the first.
You can change the playback display by pressing the Info button ( ![]() ) once to cycle through each of these four image-playback displays:
) once to cycle through each of these four image-playback displays:
• Single image. The image fills the LCD monitor; no shooting information is overlaid. If you’re showing subjects or friends the images you’ve captured, this display option provides a clean, uncluttered view of the image.
• Single image with basic shooting information. This display gives the largest preview image and provides the shutter speed, aperture, folder number, file number, and media type.
• Shooting information display. This display includes a summary of exposure and camera settings along with a histogram of either Brightness or RGB, depending on what you selected on the Playback menu 3 tab ( ![]() ). The image preview is reduced in size to accommodate the additional information. With this display, you can check the tonal distribution and bias and verify key camera settings.
). The image preview is reduced in size to accommodate the additional information. With this display, you can check the tonal distribution and bias and verify key camera settings.
• Histogram. This display option shows the three RGB color channel histograms and a Brightness histogram. It includes basic shooting information, the metering mode, the white balance setting, the file size, the image recording quality, and the current image number relative to the total number of shots on the media card.
Magnifying images
To check focus and specific details within the image, you can magnify the preview image during playback by pressing the Magnify button ( ![]() ). Then turn the Main dial (
). Then turn the Main dial ( ![]() ) clockwise to magnify the image to 10X. You can then tilt the Multi-controller (
) clockwise to magnify the image to 10X. You can then tilt the Multi-controller ( ![]() ) to move around the magnified image. Press the Magnify (
) to move around the magnified image. Press the Magnify ( ![]() ) or Playback (
) or Playback ( ![]() ) button to reduce the image magnification. Only still images can be magnified.
) button to reduce the image magnification. Only still images can be magnified.
You also have the option of setting the starting magnification and the starting magnification point on the Playback menu 3 tab ( ![]() ). You can choose 1X (no magnification) so that magnification starts from the single-image display with no magnification. You can also choose 2, 4, 8, or 10X magnification from the center of the image. Another option is Actual size (from selected point). This option starts at 100 percent from the AF point that achieved focus, or from the center if manual focusing was used. Finally, you can choose Same as last magnification (from center), which recalls and uses the last magnification starting from the center of the image.
). You can choose 1X (no magnification) so that magnification starts from the single-image display with no magnification. You can also choose 2, 4, 8, or 10X magnification from the center of the image. Another option is Actual size (from selected point). This option starts at 100 percent from the AF point that achieved focus, or from the center if manual focusing was used. Finally, you can choose Same as last magnification (from center), which recalls and uses the last magnification starting from the center of the image.
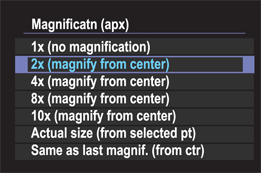
2.12 The magnification options.
Live View images shot with FlexiZone AF – Single ( ![]() ) or Face Detection Live mode (
) or Face Detection Live mode ( ![]() ) are magnified from the center of the image.
) are magnified from the center of the image.
Using Quick Control to adjust image playback
The Quick Control button ( ![]() ) is very handy during shooting: you can quickly access the Quick Control screen where you can change key camera settings. Now you can access the most common controls that you may use during image playback as well.
) is very handy during shooting: you can quickly access the Quick Control screen where you can change key camera settings. Now you can access the most common controls that you may use during image playback as well.
The functions you can change are displayed on the right side of the image preview. The functions include Protect images, Rotate, Rate, RAW|JPEG, RAW image processing, Resize (JPEG image), Highlight alert, AF point display, Image jump, and Wi-Fi function. Only some of these functions are available for movies.
To display the options, press the Quick Control button ( ![]() ) during image playback. Tilt the Multi-controller (
) during image playback. Tilt the Multi-controller ( ![]() ) to select a function, and then turn the Quick Control dial (
) to select a function, and then turn the Quick Control dial ( ![]() ) to change the setting.
) to change the setting.
2.13 The Quick Control display during image playback.
To check whether the lines in the image are straight and to check composition, you can display a grid during playback. On the Playback menu 3 tab ( ![]() ), highlight Playback grid, press the Set button (
), highlight Playback grid, press the Set button ( ![]() ), choose the grid you want, and then press the Set button (
), choose the grid you want, and then press the Set button ( ![]() ) again.
) again.
Searching for images and movies
When you need to find an image or movie (or a series of images or movies) quickly, you can either display four or nine images as an index to move through multiple images quickly or you can jump through images by a specified number of images at a time, and by date, folder, movies, or stills (still images).
Here’s how to use both options:
• Display as an index. To display images as an index, press the Playback button ( ![]() ). Then press the Magnify button (
). Then press the Magnify button ( ![]() ) and turn the Main dial (
) and turn the Main dial ( ![]() ) counterclockwise until a four-image or a nine-image display appears. Then turn the Quick Control dial (
) counterclockwise until a four-image or a nine-image display appears. Then turn the Quick Control dial ( ![]() ) to select a single image. Press the Set button (
) to select a single image. Press the Set button ( ![]() ) to display only that image.
) to display only that image.
• Jump through images. Select the Playback menu 2 tab ( ![]() ), select Image jump w/
), select Image jump w/![]() , and then press the Set button (
, and then press the Set button ( ![]() ). On the Image jump w/
). On the Image jump w/![]() screen, turn the Quick Control dial (
screen, turn the Quick Control dial ( ![]() ) to select the method for jumping — 1 image, 10 images, 100 images, Date, Folder, Movies, Stills, or Rating — and then press the Set button (
) to select the method for jumping — 1 image, 10 images, 100 images, Date, Folder, Movies, Stills, or Rating — and then press the Set button ( ![]() ). Press the Playback button (
). Press the Playback button ( ![]() ) to begin image playback, and then turn the Main dial (
) to begin image playback, and then turn the Main dial ( ![]() ) to display the jump scroll bar and to jump by the method you selected. If you chose Date, you can turn the Main dial (
) to display the jump scroll bar and to jump by the method you selected. If you chose Date, you can turn the Main dial ( ![]() ) to display the date. If you chose Folder, you can select the folder in which to view images.
) to display the date. If you chose Folder, you can select the folder in which to view images.
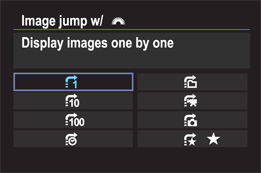
2.14 The Image jump screen.
Erasing and Protecting Images and Movies
Deleting unwanted images and movies frees up space on a media card when you need it, but only delete images and movies you’re sure you don’t want to keep. You can also protect images to avoid accidentally deleting them.
Erasing images and movies
With the 6D’s large, high-resolution LCD monitor, you can evaluate images faster and more accurately than ever before. This makes it easier to decide whether an image is a keeper. The 6D offers three ways to delete images: removing one image at a time, deleting all images in a folder, or deleting all images on the media card.
If you want to permanently erase a single image, just navigate to the image you want to delete during image playback, press the Erase button ( ![]() ), highlight Erase, and then press the Set button (
), highlight Erase, and then press the Set button ( ![]() ). To select and erase multiple images at a time, follow these steps (as you go through these, you can optionally choose to erase all images on the card or in a specific folder):
). To select and erase multiple images at a time, follow these steps (as you go through these, you can optionally choose to erase all images on the card or in a specific folder):
1. On the Playback menu 1 tab (![]() ), highlight Erase images, and then press the Set button (
), highlight Erase images, and then press the Set button (![]() ). The Erase images screen appears.
). The Erase images screen appears.
2. Highlight Select and erase images, and then press the Set button (![]() ). The Image playback screen appears. Check marks can be assigned to images you want to delete at the top left of the screen. (See Step 3 for details.)
). The Image playback screen appears. Check marks can be assigned to images you want to delete at the top left of the screen. (See Step 3 for details.)
3. Press the Set button (![]() ) to add a check mark to the current image, or turn the Quick Control dial (
) to add a check mark to the current image, or turn the Quick Control dial (![]() ) to move to the image you want to delete, and then press the Set button (
) to move to the image you want to delete, and then press the Set button (![]() ). Continue selecting all the images you want to mark for deletion. A check mark appears on images marked for deletion. You cannot add a check mark to images with protection applied.
). Continue selecting all the images you want to mark for deletion. A check mark appears on images marked for deletion. You cannot add a check mark to images with protection applied.
4. Press the Erase button (![]() ). The Erase Images screen appears.
). The Erase Images screen appears.
5. Turn the Quick Control dial (![]() ) to highlight OK, and then press the Set button (
) to highlight OK, and then press the Set button (![]() ). The marked images are erased, and the Erase Images screen appears.
). The marked images are erased, and the Erase Images screen appears.
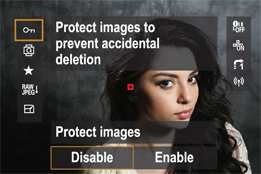
Protecting images and movies
Applying protection to images and movies helps prevent them from being accidentally erased on the media cards, much like setting a document on the computer to read-only status. Protected images can’t be deleted using the Erase options detailed previously. In addition, when you download a protected image, you’re asked to confirm that you want to move or copy read-only files, which indicates that the images have protection applied.
Protected images are erased when you format the media card, and they are replaced if you copy over them as you transfer images from one media card to another.
You can apply protection to an image by following these steps:
1. On the Playback menu 1 tab (![]() ), highlight Protect images, and then press the Set button (
), highlight Protect images, and then press the Set button (![]() ). The Protect images screen appears. Here you can choose to select images individually, or to protect all images in the folder or on the media card. Also, this is the menu to return to if you want to remove protection.
). The Protect images screen appears. Here you can choose to select images individually, or to protect all images in the folder or on the media card. Also, this is the menu to return to if you want to remove protection.
2. Highlight Select images, and then press the Set button (![]() ). The last captured image appears on the LCD monitor. A small key icon and the word Set appear at the lower right of the image.
). The last captured image appears on the LCD monitor. A small key icon and the word Set appear at the lower right of the image.
3. Press the Set button (![]() ) to protect the displayed image, or turn the Quick Control dial (
) to protect the displayed image, or turn the Quick Control dial (![]() ) to move to the image you want to protect. The Image protect mode icon (
) to move to the image you want to protect. The Image protect mode icon ( ![]() ) appears at the top of the image to show that it is protected.
) appears at the top of the image to show that it is protected.
4. To protect additional images, turn the Quick Control dial (![]() ) to scroll to the image you want to protect, and then press the Set button (
) to scroll to the image you want to protect, and then press the Set button (![]() ).
).