
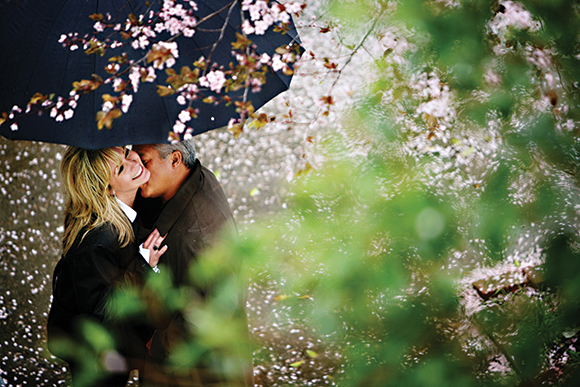
4.3 AI Servo focusing mode helped track this couple’s movements so I could obtain a more consistent, in-focus shot. Exposure: ISO 100, f/5.6, 1/200 second with a Canon 70-200mm f/2.8L IS USM.
Chapter 4: Getting Sharp Focus
For any photographer upgrading from the Canon EOS 5D Mark II to the Canon EOS 6D, one of the top items on the wish list is an upgraded autofocus system. That upgrade has arrived with the 6D. The all-new 11-point autofocus system is fast, accurate, and robust. The 6D’s centered cross-type autofocus (AF) point has a first-of-its-kind –3 EV (Exposure Values) sensitivity, giving it the best low-light focusing performance available in a full-frame dSLR as of this writing. This is sure to be a huge boon for night and event shooters.
Canon’s engineering team designed an autofocus system that is simple to use, versatile, and customizable. Custom Functions are easily accessible from one menu tab, and include clear descriptions of what they do. This chapter will help you understand the autofocus system’s features and capabilities.

Achieving tack-sharp focus is a basic requirement for most successful images. Exposure: ISO 100, f/11, 1/125 second with a Canon 28-70mm f/2.8L USM.
Understanding the Autofocus System
It’s important to know that sharp focus ultimately involves three factors: the resolving power of the lens, the resolution of the sensor, and the resolution of the printer or monitor. Printing is beyond the scope of this book, and I assume that you’re using high-quality lenses. That leaves one remaining factor: the sensor and internal autofocus system. While the 6D’s focusing system is not as robust and does not include as many bells and whistles as those in Canon’s higher-end models, when it comes to focusing, the 6D delivers. Its new 11-point autofocus system facilitates accurate focusing for both still and moving subjects. The 6D is particularly adept at focusing in low-light situations due to the –3 EV sensitivity of its center AF point. As of this writing, this is one stop lower than any full-frame dSLR on the market.
By understanding how these focus points work, you can use them to get the best performance from the autofocus system. The result is that when you combine the new autofocus system with a high-quality lens, you get tack-sharp focus.
Cross-type sensors
On an elementary level, for an autofocus system to focus, it has to align vertical and horizontal lines in the scene so that they are in phase, or perfectly aligned. That’s where cross-type sensors come into play. To understand cross-type sensors, it helps to go back to the first autofocus systems. Early systems used a pair of single-line autofocus sensors positioned horizontally in the center of the viewfinder. Light coming in from the lens was separated into two beams striking the autofocus sensors. Based on where the beam struck the sensors, the camera could tell if the focus was accurate. In addition, if the focus wasn’t accurate, then this early system could quickly bring into focus vertical lines in the scene — lines that ran perpendicular to the sensors. However, it was much harder for it to bring horizontal lines into focus — lines that ran parallel to the sensors themselves.
As autofocus systems evolved, another pair of sensors was added and positioned at a 90-degree angle to the existing sensors. This created the first cross-type sensor, and it appeared in the shape of a cross. Although the sensors were still only in the center of the viewfinder, focus accuracy improved because if the horizontal sensors couldn’t establish focus, the vertical sensors most likely could.
High- and standard-precision sensors
Today, Canon uses a variety of cross-type, high-precision, and standard-precision autofocus sensors. When high-precision autofocus sensors are used with wide-aperture lenses, they offer two to three times greater autofocus accuracy than standard-precision sensors. Additionally, engineers discovered that the farther apart the sensors were, the finer the focus could be adjusted. However, there is a physical limit to how far apart the sensors can be, and that limit is the widest lens aperture that the photographer uses.
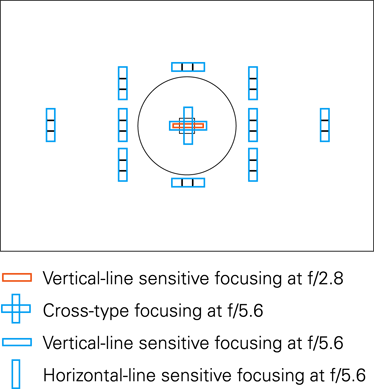
4.1 The Canon EOS 6D AF points.
That explains why every sensor requires a lens of a certain aperture or wider to operate correctly. (The autofocus sensor requires either a certain aperture or aperture and extender combination.) The spacing of standard-precision sensors requires an f/5.6 or faster lens. However, because the high-precision sensors are spaced further apart, an f/2.8 or faster maximum aperture lens is required to create a large enough beam of light for these sensors. If you use an f/5.6 maximum aperture lens, then the high-precision f/2.8 sensors do not function and the camera typically uses standard-precision sensors instead.
The 6D includes one cross-type AF point at f/5.6, which is located in the center of the viewfinder along with a high-precision vertical line-sensitive focus point at f/2.8. Additional focus points include two standard precision horizontal-line sensitive focusing points at f/5.6 and eight standard precision vertical-line sensitive focusing points. These sensors operate at f/5.6 when an f/5.6 or faster maximum aperture lens is used. The cross-type and vertical-line sensitive autofocus sensor points in the center of the viewfinder provide the highest degree of sensitivity in both horizontal and vertical orientation with f/2.8 lenses. I rely on this sensor most often, pressing the shutter release halfway to lock focus and then recomposing when necessary.
Maximum aperture is the widest aperture of a lens. The maximum aperture varies by lens. Many wide-angle and normal focal-length lenses have faster maximum apertures of f/2.8 or wider. Some telephoto lenses have f/2.8 maximum apertures, while others have f/4 or f/5.6.
If you’ve spent any time with the camera thus far, you know that the autofocus system is intuitive and responsive.
I discuss several powerful ways to customize the focusing system in Chapter 6. In the rest of this chapter, I cover working with the autofocus system in its default settings.
Setting Up and Using Autofocus
For those of you who have worked with earlier Canon dSLR models, the 6D’s autofocus system will be familiar territory. It is, in many ways, more straightforward and simpler to use the autofocus system because it has only 11 AF points, no focus area groups, and only one cross-point autofocus sensor. However, there are still three autofocus modes and powerful customization options for AI Servo focusing mode ( ![]() ), as covered in Chapter 6.
), as covered in Chapter 6.
This section guides you through choosing the autofocus mode, and selecting an AF point manually.
Choosing an autofocus mode and point
Creative Zone exposure modes allow you to select your preferred autofocus mode and AF points manually. In Basic Zone exposure modes, autofocus functions are set automatically. Three autofocus modes are available when you use any of the Creative Zone exposure modes. Each is designed to help you achieve sharp focus based on the type of subject you are photographing. Here is a summary of the autofocus modes and when to use them:
• One-shot autofocus mode (![]() ). This mode is designed for photographing stationary subjects. Choose this mode when you are shooting landscapes, macro photography, portraits, architecture, and interiors. Unless you are shooting sports or action photography, One-shot autofocus (
). This mode is designed for photographing stationary subjects. Choose this mode when you are shooting landscapes, macro photography, portraits, architecture, and interiors. Unless you are shooting sports or action photography, One-shot autofocus ( ![]() ) is a good mode for everyday shooting. In this mode, the camera doesn’t allow you to make the image until focus is achieved. In One-shot autofocus mode (
) is a good mode for everyday shooting. In this mode, the camera doesn’t allow you to make the image until focus is achieved. In One-shot autofocus mode ( ![]() ) the exposure is also set when you focus.
) the exposure is also set when you focus.
• AI Servo focusing mode (![]() ). This mode is designed for photographing action subjects, and it is typically used with Continuous drive mode (
). This mode is designed for photographing action subjects, and it is typically used with Continuous drive mode ( ![]() ). You can customize a variety of options in AI Servo focusing mode (
). You can customize a variety of options in AI Servo focusing mode ( ![]() ), and they are detailed in Chapter 6. In AI Servo focusing mode (
), and they are detailed in Chapter 6. In AI Servo focusing mode ( ![]() ), you can select an AF point to focus on the subject initially. The camera subsequently follows the subject movement and maintains focus as long as the subject stays within the array of AF points. To start tracking, half-press the shutter button, and the camera will maintain focus on the subject as it moves. The focus and the exposure are set at the moment the image is made. Be sure to take many pictures because not all of them will be in focus as the camera will not have time to predict subject movement correctly or establish sharp focus, or the focus will not be where you want it to be in the scene or on the subject.
), you can select an AF point to focus on the subject initially. The camera subsequently follows the subject movement and maintains focus as long as the subject stays within the array of AF points. To start tracking, half-press the shutter button, and the camera will maintain focus on the subject as it moves. The focus and the exposure are set at the moment the image is made. Be sure to take many pictures because not all of them will be in focus as the camera will not have time to predict subject movement correctly or establish sharp focus, or the focus will not be where you want it to be in the scene or on the subject.
• AI focus mode (![]() ). This mode is designed for photographing still subjects that may begin moving. AI focus mode (
). This mode is designed for photographing still subjects that may begin moving. AI focus mode ( ![]() ) starts out in One-shot autofocus mode (
) starts out in One-shot autofocus mode ( ![]() ), but then switches to AI Servo focusing mode (
), but then switches to AI Servo focusing mode ( ![]() ) automatically if the subject begins moving. When focus is established, a soft beep sounds, but the focus confirmation light in the viewfinder does not light up. The beeper sounds only if you have turned it on in the Shooting menu 1 tab (
) automatically if the subject begins moving. When focus is established, a soft beep sounds, but the focus confirmation light in the viewfinder does not light up. The beeper sounds only if you have turned it on in the Shooting menu 1 tab ( ![]() ). This is a good mode to use when photographing wildlife, children, athletes, or anything that alternates between a stationary position and motion. The disadvantage to this focus mode is that if you focus, and then move the camera to recompose the shot, the camera may incorrectly detect the camera movement as subject movement and switch to AI Servo focusing mode (
). This is a good mode to use when photographing wildlife, children, athletes, or anything that alternates between a stationary position and motion. The disadvantage to this focus mode is that if you focus, and then move the camera to recompose the shot, the camera may incorrectly detect the camera movement as subject movement and switch to AI Servo focusing mode ( ![]() ), and that can cause soft focus. Alternately, if the subject begins moving, AI focus mode (
), and that can cause soft focus. Alternately, if the subject begins moving, AI focus mode ( ![]() ) may be slower to respond and track subject focus than AI Servo focusing mode (
) may be slower to respond and track subject focus than AI Servo focusing mode ( ![]() ).
).
If you routinely focus and then keep the shutter button pressed halfway, you should know that this shortens battery life. To maximize power, anticipate the shot and press the shutter button halfway just before making the picture.
To select a focus mode, ensure that the camera is set to one of the Creative Zone exposure modes. The camera chooses focus modes and AF points automatically in the Basic Zone exposure modes.
With the lens switch set to autofocus, press the Autofocus mode button ( ![]() ) below the LCD panel, and then turn the Main dial (
) below the LCD panel, and then turn the Main dial ( ![]() ) to select the autofocus mode you want. Each mode includes text displayed on the LCD panel indicating your choice.
) to select the autofocus mode you want. Each mode includes text displayed on the LCD panel indicating your choice.
If you often switch between One-shot autofocus ( ![]() ) and AI Servo focusing (
) and AI Servo focusing ( ![]() ) modes, consider using Custom Controls, C.Fn III, on the Custom Functions menu tab (
) modes, consider using Custom Controls, C.Fn III, on the Custom Functions menu tab ( ![]() ) to set a camera control. For example, you can set the Depth-of-Field Preview button (
) to set a camera control. For example, you can set the Depth-of-Field Preview button ( ![]() ) to switch between autofocus modes.
) to switch between autofocus modes.
Learning how to control the focus and to have the focus where you want it in a scene or on a subject is often an “aha” moment for photographers who’ve let the camera do it all for them up until that point. For example, in a portrait, the subject’s eye closest to the camera should have the sharp focus. However, if you let the camera automatically choose the AF point, it focuses on the part of the subject that is closest to the lens — typically the subject’s nose. Therefore, selecting the AF point manually is the best way to get sharp focus precisely where you want it, particularly for still and slow-moving subjects.
For action shooting, AI Servo focusing ( ![]() ) is the mode of choice. In this mode, you can select the AF point that starts subject focus and focus tracking manually, but that AF point may not be the one that ultimately establishes focus.
) is the mode of choice. In this mode, you can select the AF point that starts subject focus and focus tracking manually, but that AF point may not be the one that ultimately establishes focus.
To select a single AF point manually, set the Mode dial to any of the Creative Zone exposure modes: Bulb ( ![]() ), Manual (
), Manual ( ![]() ), Aperture-priority AE (
), Aperture-priority AE ( ![]() ), Shutter-priority AE (
), Shutter-priority AE ( ![]() ), Program AE (
), Program AE ( ![]() ). Then, press the AF-point Selection button (
). Then, press the AF-point Selection button ( ![]() ), and use the Multi-controller (
), and use the Multi-controller ( ![]() ) to select the AF point you want.
) to select the AF point you want.
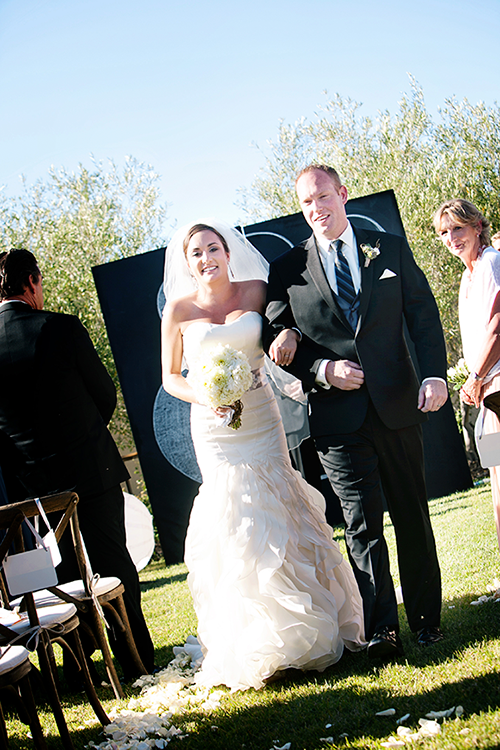
4.2 For this engagement image, I used One-shot autofocus mode and selected the AF point manually to focus on the woman’s eye. Exposure: ISO 200, f/2.8, 1/50 second with a Canon 70-200mm f/2.8L IS USM.
Alternatively, with the center AF point selected, turn the Main dial ( ![]() ) to move horizontally through the left and right AF points. Turn the Quick Control dial (
) to move horizontally through the left and right AF points. Turn the Quick Control dial ( ![]() ) to move vertically between the middle, top, and bottom AF points. Press the Set button (
) to move vertically between the middle, top, and bottom AF points. Press the Set button ( ![]() ) once to move to the center AF point quickly. Pressing the Set button (
) once to move to the center AF point quickly. Pressing the Set button ( ![]() ) twice activates all AF points and automatic autofocus selection. Once the center AF point is active, press the Set button (
) twice activates all AF points and automatic autofocus selection. Once the center AF point is active, press the Set button ( ![]() ) to switch the autofocus between the automatic autofocus selection (all AF points are active) and the center AF point (manual AF selection).
) to switch the autofocus between the automatic autofocus selection (all AF points are active) and the center AF point (manual AF selection).
After pressing the AF-point Selection button ( ![]() ), the LCD screen and viewfinder display the following:
), the LCD screen and viewfinder display the following:
• If the center AF point has been selected manually, center AF manual selection ( ![]() )
)
• If an AF point other than the center position has been selected manually, AF off center manual selection ( ![]() )
)
• If all focus points are selected, indicating automatic focus point selection is active, Automatic AF-point selection mode ( ![]() )
)
Finally, press the shutter button halfway to focus using the AF point, and then press it completely to make the picture. The autofocus confirmation light in the viewfinder is lit continuously when focus is achieved.
Focusing on action
If you shoot action, whether it’s sports, events, or wildlife, then you know that not all movement is created equal, and a single tracking and focusing system does not work for every subject. Canon engineers have equipped the 6D with a powerful set of tools to help control focus tracking. Therefore, the 6D offers many options when it comes to focusing on moving subjects using AI Servo focusing mode ( ![]() ).
).
4.3 AI Servo focusing mode helped track this couple’s movements so I could obtain a more consistent, in-focus shot. Exposure: ISO 100, f/5.6, 1/200 second with a Canon 70-200mm f/2.8L IS USM.
You can determine and fine-tune the tracking sensitivity, set the tracking for subjects that change speed and start and stop, and control shutter release priority for first and second shots during continuous shooting ( ![]() ).
).
Chapter 6 clarifies the Custom Functions, gets you acquainted with each of these settings, and describes how and when you use them.
Improving Autofocus Accuracy and Performance
Autofocus speed depends on factors such as the size and design of the lens, the speed of the lens-focusing motor, the speed of the camera’s autofocus sensor, the amount of light in the scene, and the level of subject contrast.
Given these variables, here are some tips for getting the best autofocus performance and focus:
• Light. In low-light scenes, the autofocus performance depends in part on the lens speed and design. The faster the lens, the faster the autofocus performance. If there is enough light for the lens to focus without an AF-assist beam, lenses with a rear-focus optical design, such as the EF 85mm f/1.8 USM, focus faster than lenses that move their entire optical system, such as the EF 85mm f/1.2L II USM. Regardless, the lower the light, the longer it takes to focus.
• Contrast. Low-contrast subjects and subjects in low light slow down focusing speed and can cause autofocus failure. With a passive autofocus system, autofocusing depends on the sensitivity of the autofocus sensor. Autofocusing performance is always faster in bright light than in low light, and this is true in both the One-shot autofocus ( ![]() ) and AI Servo focusing (
) and AI Servo focusing ( ![]() ) modes. In low light, consider using an accessory EX Speedlite’s AF-assist beam as a focusing aid.
) modes. In low light, consider using an accessory EX Speedlite’s AF-assist beam as a focusing aid.
• Focal length. The longer the lens, the longer the time required to focus because the range of defocus is greater on telephoto lenses than on normal or wide-angle lenses. To improve the focus speed, manually set the lens in the general focusing range, and then use autofocus.
• AF-point selection. Selecting one AF point manually provides faster autofocus performance than using automatic AF-point selection because the camera does not have to determine and select the AF point(s) to use first.
• Subject contrast. Focusing on low-contrast subjects is slower than focusing on subjects with higher contrast. If the camera cannot focus, shift the camera position to an area of the subject that has higher contrast.
• EF Extenders. EF Extenders reduce the effective aperture of the lens being extended by anywhere from one to two stops depending on the extender being used. This will in turn reduce the speed of the lens-focusing drive.
• Wide-angle lenses and small apertures. Sharpness can be degraded by diffraction when you use small apertures with wide-angle or wide-angle zoom lenses. Diffraction happens when light waves pass around the edges of an object and enter the shadow area of the subject, softening fine detail. To avoid diffraction, avoid using apertures smaller than f/16 with wide-angle prime (single-focal-length) and zoom lenses.