Chapter 11
Facilitating Backup and Recovery
In This Chapter
![]() Knowing data integrity threats
Knowing data integrity threats
![]() Protecting and backing up files
Protecting and backing up files
![]() Viewing backup information
Viewing backup information
![]() Understanding and maintaining archives
Understanding and maintaining archives
![]() Recovering your database
Recovering your database
Forget the Boy Scouts. DBAs need to be prepared for anything. In addition to handling the database’s security, DBAs must protect the data. All kinds of threats are out there waiting to destroy or damage your information. A database can experience loss and corruption from hardware crashes, software bugs, failed processes, and, of course, human error. Depending on the severity of the issue, failure to protect the data can cause you a bit of pain and suffering at times. That’s not hyperbole: A lack of data integrity (or no data integrity at all!) can lead to several problems, including the loss of business revenue or even the loss of your job.
To safeguard your information (and to stay employed as a DBA), you need a backup and recovery plan. However, there’s no singular button you can push to make everything okay. Rather, creating a backup and recovery strategy that addresses threats and minimizes data loss and corruption involves many steps and tools, as we explain in this chapter.
Understanding Threats to Your Database
Before you can create guidelines to lower the risk of data loss and corruption or take the steps to recover your information quickly, you have to understand what you’re up against. A good backup and recovery plan can help guard against the following threats.
Instance failure
Instance failure occurs when Oracle, as a running program, crashes. The good news here is Oracle has provided a recovery mechanism and can automatically recover from instance failure. All you have to do is restart the database instance. However, you might want to investigate what caused the instance failure so you can prevent it from happening again.
Losing files
Losing files within the Oracle code tree can result in your database crashing. The code tree has the files that you install when you put Oracle on your system, including the database files, the patch sets and patches you apply, and any other tools required to make your application run.
Make sure the code tree is part of the OS backup; it’s an often-overlooked portion of a solid backup and recovery strategy. Sometimes the loss of a file in the Oracle code tree can be restored quickly out of the OS backup instead of doing an entire reinstallation.
 Keep all the Oracle installation software handy in case you need to reinstall it. Keeping it handy means having a hard copy of it ready to go rather than storing it on the network. In the event of a disaster, you may not have access to those network resources. Don’t rely on being able to download it from the Oracle website. That could take hours depending on how busy the site is.
Dropped objects
Objects in the database are dropped by humans. Problems occur when someone drops an object that she either didn’t mean to drop or that she later decides she wants back.
 Unless DBAs are involved with application design, many times they’re simply told what and when to remove something from the database. Always take a Data Pump export of that object before you drop it. (See Chapter 8 for more on Data Pump.)
Media failure
Media failure occurs when a file or log required for the database to operate is lost, including
![]() Data files, which store the bulk of your data. Data files typically have an extension of .dbf.
Data files, which store the bulk of your data. Data files typically have an extension of .dbf.
![]() Control files, which store information about how your database is configured. For example, are you in ARCHIVELOG mode? How many data files are you allowed to have? You can find control files by checking the initialization parameter control_files. Typically, these files have an extension of .ctl or .con.
Control files, which store information about how your database is configured. For example, are you in ARCHIVELOG mode? How many data files are you allowed to have? You can find control files by checking the initialization parameter control_files. Typically, these files have an extension of .ctl or .con.
![]() Parameter files, such as PFILE or SPFILE. If your database uses an SPFILE, check the initialization parameter for spfile. Otherwise, by default, the file is in $ORACLE_HOME/dbs for Linux/UNIX or $ORACLE_HOME/database for Windows.
Parameter files, such as PFILE or SPFILE. If your database uses an SPFILE, check the initialization parameter for spfile. Otherwise, by default, the file is in $ORACLE_HOME/dbs for Linux/UNIX or $ORACLE_HOME/database for Windows.
![]() Archive logs, which are created when you turn on archiving in the database. You can find the logs by checking the initialization parameter log_archive_dest_n (with n being a number from 1–10). Else, look in at the parameter db_recovery_file_dest to find them in the Fast Recovery Area. Typically, archive logs have an extension of .arc.
Archive logs, which are created when you turn on archiving in the database. You can find the logs by checking the initialization parameter log_archive_dest_n (with n being a number from 1–10). Else, look in at the parameter db_recovery_file_dest to find them in the Fast Recovery Area. Typically, archive logs have an extension of .arc.
We show you methods to recover these file types (which we also discuss in Chapter 2) in the “Recovering Your Oracle Database” section, later in this chapter.
Corruption
Corruption is one of the most elusive and difficult types of failure to deal with. Figuring out why it occurred is often a considerable challenge. When things are corrupted, rows become unreadable in the database and the rows can report errors.
Corruption can be
![]() Physical: Actual sectors on the disk are physically damaged.
Physical: Actual sectors on the disk are physically damaged.
![]() Logical: Not physical damage, but data somehow went missing or is unreadable.
Logical: Not physical damage, but data somehow went missing or is unreadable.
![]() Your data: The data itself is just wrong. For example, all your last_names were updated to be the same as the first names.
Your data: The data itself is just wrong. For example, all your last_names were updated to be the same as the first names.
![]() In the data dictionary: This is corruption in the metadata that Oracle uses to manage the database.
In the data dictionary: This is corruption in the metadata that Oracle uses to manage the database.
You can use RMAN, Block Media Recovery, and Data Pump to help recover from corruption problems. Fortunately, this type of failure is rare.
User error
User error isn’t actually a type of failure, but it’s probably the most common cause for recoveries. We mention it because you can protect against user error (even your own in case you’re fallible).
Proper training, including training your users, can help reduce the chances of user error.
Finding Files with Recovery Manager
Recovery Manager (RMAN, as we lovingly refer to it) is Oracle’s backup and recovery solution to protect the files in your database. It can recover from things like lost rows or lost objects, but its primary purpose is to restore and recover lost files.
 RMAN is Oracle’s replacement to Enterprise Backup Utility (EBU) from Oracle 7. RMAN first reared its head in Oracle 8.0.x, but it was not well received in its earliest versions. It was difficult to configure and use. RMAN came of age with the release of Oracle 9.x. Further improvements in 10g and 11g have led it to become almost the de facto standard now for backup of Oracle files. This trend has continued in 12c. The commands are more concise and meaningful than in previous versions of RMAN. Repeated operations and options can be preconfigured instead of being coded into every script. It’s fast, efficient, and reliable. Most of all, it’s easy to learn and implement.
Starting RMAN
You have a number of ways to launch RMAN:
![]() Launch the tool and then log in.
Launch the tool and then log in.
![]() Launch the tool and login all at once.
Launch the tool and login all at once.
![]() Launch the tool and have all the output go to a log file. This option is typically used when running RMAN as a scheduled task.
Launch the tool and have all the output go to a log file. This option is typically used when running RMAN as a scheduled task.
Here is an example of probably the simplest way to get RMAN going:
1. Set your ORACLE_SID from the OS command line:
Windows:
<set ORACLE_SID=dev12c>
Linux/UNIX:
<. oraenv>
<dev12c>
This example uses dev12c for the ORACLE_SID. There will be no output for setting your ORACLE_SID.
2. Launch RMAN:
<rman>
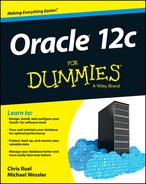
RMAN launches, as shown in Figure 11-1.
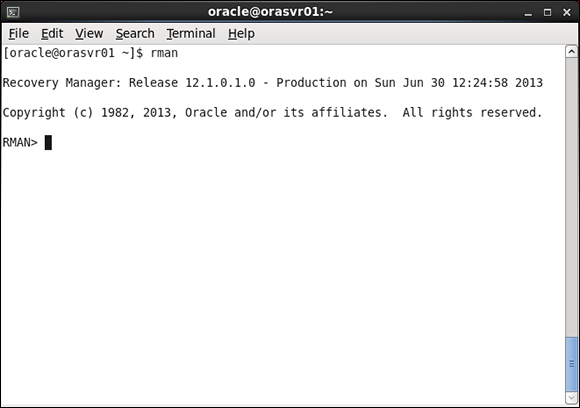
Figure 11-1: Use Recovery Manager to back up and recover files.
3. Connect to the database you want to back up:
RMAN> connect target /
You see something like this:
connected to target database: DEV12C (DBID=3615982967)
RMAN>
You have to connect to RMAN as SYSDBA. However, don’t specify it. It is included by default.
Configuring RMAN
You can preconfigure some parameters for RMAN. These parameters are primarily for options that you want to use for all your backups and recoveries. They can be overridden inside your scripts for one-off operations.
1. Launch RMAN.
2. View a list of these parameters by typing the following:
<show all;>
You see this:
using target database control file instead of recovery catalog
RMAN configuration parameters for database with db_unique_name DEV12C are:
CONFIGURE RETENTION POLICY TO REDUNDANCY 1; # default
CONFIGURE BACKUP OPTIMIZATION OFF; # default
CONFIGURE DEFAULT DEVICE TYPE TO DISK; # default
CONFIGURE CONTROLFILE AUTOBACKUP OFF; # default
CONFIGURE CONTROLFILE AUTOBACKUP FORMAT FOR DEVICE TYPE DISK TO '%F'; # default
CONFIGURE DEVICE TYPE DISK PARALLELISM 1 BACKUP TYPE TO BACKUPSET; # default
CONFIGURE DATAFILE BACKUP COPIES FOR DEVICE TYPE DISK TO 1; # default
CONFIGURE ARCHIVELOG BACKUP COPIES FOR DEVICE TYPE DISK TO 1; # default
CONFIGURE MAXSETSIZE TO UNLIMITED; # default
CONFIGURE ENCRYPTION FOR DATABASE OFF; # default
CONFIGURE ENCRYPTION ALGORITHM 'AES128'; # default
CONFIGURE COMPRESSION ALGORITHM 'BASIC' AS OF RELEASE 'DEFAULT' OPTIMIZE FOR LOAD TRUE ; # default
CONFIGURE RMAN OUTPUT TO KEEP FOR 7 DAYS; # default
CONFIGURE ARCHIVELOG DELETION POLICY TO NONE; # default
CONFIGURE SNAPSHOT CONTROLFILE NAME TO '/u01/app/oracle/product/12.1.0/dbhome_1/dbs/snapcf_dev12c.f'; # default
Sometimes you want to see only one parameter. If so, just choose one parameter name and type this:
<show retention policy;>
You see this:
RMAN configuration parameters for database with db_unique_name DEV12C are:
CONFIGURE RETENTION POLICY TO REDUNDANCY 1; # default
To change a parameter, copy what you see from the SHOW command and change the value accordingly. For example, type
<CONFIGURE RETENTION POLICY TO recovery window of 3 days;>
And you see this:
new RMAN configuration parameters:
CONFIGURE RETENTION POLICY TO RECOVERY WINDOW OF 3 DAYS;
new RMAN configuration parameters are successfully stored
Take a closer look at some of the configuration parameters:
![]() Retention Policy: Configuring a retention policy tells RMAN how long you want to keep your backup information. For example, if you reuse your backup tapes every two weeks, you can set your retention policy to expire those backups after 14 days. That way, you can purge them from RMAN to avoid cluttering the catalog of backup information that RMAN stores. Retention policies can be set two ways:
Retention Policy: Configuring a retention policy tells RMAN how long you want to keep your backup information. For example, if you reuse your backup tapes every two weeks, you can set your retention policy to expire those backups after 14 days. That way, you can purge them from RMAN to avoid cluttering the catalog of backup information that RMAN stores. Retention policies can be set two ways:
• Recovery Window specifies that after so many days the backup information will expire.
• Redundancy tells RMAN that after you get so many backups of your files, they will expire. For example, if you set redundancy to 3, the first one becomes obsolete after you take the fourth backup.
![]() Backup Optimization: If you turn on backup optimization and a backup fails halfway through, RMAN picks up where it left off when you restart the backup. If this option is turned off, RMAN starts from the beginning.
Backup Optimization: If you turn on backup optimization and a backup fails halfway through, RMAN picks up where it left off when you restart the backup. If this option is turned off, RMAN starts from the beginning.
![]() Default Device Type: You can have RMAN back up files to disk or tape. This parameter configures what the default method is when the option is omitted from the backup command.
Default Device Type: You can have RMAN back up files to disk or tape. This parameter configures what the default method is when the option is omitted from the backup command.
![]() Control File Autobackup: You can configure RMAN to take a backup of the control file and the spfile every time a backup runs. Also, if the database is in archive log mode, it will take a backup of the control file any time the database file structure changes, such as renaming or adding a data file.
Control File Autobackup: You can configure RMAN to take a backup of the control file and the spfile every time a backup runs. Also, if the database is in archive log mode, it will take a backup of the control file any time the database file structure changes, such as renaming or adding a data file.
![]() Control File Autobackup Format: This feature tells RMAN the name and location you would like control file auto backups to take on.
Control File Autobackup Format: This feature tells RMAN the name and location you would like control file auto backups to take on.
![]() Parallelism: On a machine with many backup devices, such as tapes or disks as well as multiple CPUs, you can set this parameter to use more resources in hopes of speeding up the backup. You can experiment with this to find the optimal setting.
Parallelism: On a machine with many backup devices, such as tapes or disks as well as multiple CPUs, you can set this parameter to use more resources in hopes of speeding up the backup. You can experiment with this to find the optimal setting.
![]() Data File Backup Copies: This parameter tells RMAN how many copies to make when backing up files. The more you have the safer you are from losing a backup file. However, backups will take longer and require more space.
Data File Backup Copies: This parameter tells RMAN how many copies to make when backing up files. The more you have the safer you are from losing a backup file. However, backups will take longer and require more space.
![]() Archive Log Backup Copies: This parameter is similar to data file backup copies, but it applies to archive logs.
Archive Log Backup Copies: This parameter is similar to data file backup copies, but it applies to archive logs.
![]() MAXSETSIZE: Use this parameter when backing up to tape to make sure that the backup files don’t span multiple tapes. This way, losing one tape won’t nullify an entire backup. Typically, this parameter is left to unlimited when you’re backing up to disk.
MAXSETSIZE: Use this parameter when backing up to tape to make sure that the backup files don’t span multiple tapes. This way, losing one tape won’t nullify an entire backup. Typically, this parameter is left to unlimited when you’re backing up to disk.
![]() Encryption for Database: Typically, the backup files created will contain the character strings of data that reside in your data files. A clever hacker can extract this data and perhaps make sense out of it. By turning on this parameter, all the data in the backup file will be garbled.
Encryption for Database: Typically, the backup files created will contain the character strings of data that reside in your data files. A clever hacker can extract this data and perhaps make sense out of it. By turning on this parameter, all the data in the backup file will be garbled.
![]() Encryption Algorithm: You can choose the level of encryption in Oracle. The higher the encryption level, the longer it can take to back up the database. Here are your choices:
Encryption Algorithm: You can choose the level of encryption in Oracle. The higher the encryption level, the longer it can take to back up the database. Here are your choices:
• AES128 AES 128-bit key
• AES192 AES 192-bit key
• AES256 AES 256-bit key
![]() Compression Algorithm: As of Oracle version 11g, you can choose the compression algorithm that RMAN uses to compress backups. You can choose between these two:
Compression Algorithm: As of Oracle version 11g, you can choose the compression algorithm that RMAN uses to compress backups. You can choose between these two:
• High compression (BZIP2)
• CPU efficiency (ZLIB)
![]() Snapshot Control File Name: Tell RMAN where to put the control file and what to name it when a snapshot of the control file is taken.
Snapshot Control File Name: Tell RMAN where to put the control file and what to name it when a snapshot of the control file is taken.
RMAN catalog
When setting up your RMAN environment, consider the recovery catalog. A recovery catalog is a repository for all your RMAN configuration parameters, backup operations, and metadata. The catalog can store backup information indefinitely.
Selecting a catalog mode
RMAN provides two options for storing backup data:
![]() NOCATALOG mode stores backup data only in the control file for each individual database. This is the default.
NOCATALOG mode stores backup data only in the control file for each individual database. This is the default.
![]() CATALOG mode stores backup data in both the control file and the catalog.
CATALOG mode stores backup data in both the control file and the catalog.
Storing backup data in only the control file has some limitations:
![]()
 By default, Oracle stores seven days of backup data in the control file. The database parameter control file_record_keep_time can change the length of time. Still, it isn’t recommended that you use your control file for long backup retention periods. It causes control file growth, and if you ever lose your control files, you’ve lost all your recovery information. It’s doesn’t make recovery impossible, but it’s a real pain.
![]() Limits the type of reporting you can do on your backups. You can query only one database at a time, after which you have to manually aggregate all the reports for multiple databases together.
Limits the type of reporting you can do on your backups. You can query only one database at a time, after which you have to manually aggregate all the reports for multiple databases together.
Consider using a catalog if
![]() You have a lot of databases to back up.
You have a lot of databases to back up.
![]() All the databases you back up are different versions of Oracle.
All the databases you back up are different versions of Oracle.
![]() You want to save your backups more than 60 days.
You want to save your backups more than 60 days.
![]() You know what kind of reporting you want to do.
You know what kind of reporting you want to do.
![]() You can afford the resources it requires to keep and maintain a catalog database.
You can afford the resources it requires to keep and maintain a catalog database.
Suppose that at the end of every week you want a report that sums up all the backup information for 50 databases ranging from Oracle 8i to 12c. You want that report to include things such as elapsed time, average piece size, compression info, and backup type. A recovery catalog can easily generate that report.
The recovery catalog has a set of views you can query, with SQL, to get backup information. Getting historical backup information for multiple databases is next to impossible to do without a recovery catalog because all the backup information is stored separately in each database.
If you have only one or two databases to back up and want simple reports and short retention policy, perhaps the recovery catalog is overkill. After all, it has to go into its own database, be backed up, and be maintained just like any other application. However, Oracle helps by providing a limited use license for having an RMAN recovery catalog. That means you don’t have to have an Oracle database license for the catalog on a separate machine as long as you use the catalog only for RMAN.
Creating the catalog
If you decide to create a catalog, it’s easy. Follow these steps for a Linux environment (they’ll be almost identical for Windows):
1. Create a tablespace to hold the RMAN data by typing in SQL*Plus:
<create tablespace rman_data datafile
'/u01/app/oracle/oradata/dev12c/rman_data01.dbf' size 100M
autoextend on next 100M maxsize 2G;>
You see this:
Tablespace created.
2. Type the following to create the catalog owner:
<create user rmancat identified by rmancat
default tablespace rman_data
quota unlimited on rman_data;>
You see this:
User created.
3. Grant appropriate privileges:
<grant connect, recovery_catalog_owner to rmancat;>
You see this:
Grant succeeded.
4. From a terminal window, log in to the recovery catalog with the owner and create the catalog:
<rman catalog rmancat@rcvcat>
You see output like this:
Recovery Manager: Release 12.1.0.1.0 - Production on Sun Jun 30 10:13:59 2013
Copyright (c) 1982, 2013, Oracle and/or its affiliates. All rights reserved.
recovery catalog database Password:
connected to recovery catalog database
5. When you’re connected to the catalog database, create the catalog repository:
<create catalog;>
You see this:
recovery catalog created
6. Type the following to connect to both the target database and the catalog:
<rman target / catalog rmancat@rcvcat >
Every time you back up a database, you need to connect to both the target and the catalog.
You see this:
Recovery Manager: Release 12.1.0.1.0 - Production on Sun Jun 30 10:17:30 2013
Copyright (c) 1982, 2013, Oracle and/or its affiliates. All rights reserved.
connected to target database: DEV12C (DBID=3615982967)
recovery catalog database Password:
connected to recovery catalog database
Don’t specify the password on the command line when you launch RMAN. It is not a secure way to log in, because it can expose your password to other people on the system.
7. Connect to both the target and the catalog and type this:
<register database;>
Register any database that you will back up within the recovery catalog.
You see this:
database registered in recovery catalog
starting full resync of recovery catalog
full resync complete
Everything else in RMAN functions exactly the same whether or not you use a catalog.
Backup File Types with RMAN
You can create backups with RMAN in two ways:
![]() Backup sets are a special type of RMAN file.
Backup sets are a special type of RMAN file.
![]() Copies are block-for-block replicas of the files you’re backing up. Although they’re made within RMAN via the COPY command, the end result is the same as if you used an OS command.
Copies are block-for-block replicas of the files you’re backing up. Although they’re made within RMAN via the COPY command, the end result is the same as if you used an OS command.
Table 8-1 lists some key points of both.
Table 8-1 Backup Sets versus Copies
|
Backup Sets |
Copies |
|
Must be restored with RMAN before use |
Block-for-block exact images of source file |
|
Can be any part of an incremental strategy |
Don’t have to be restored to be used |
|
Can be compressed during the backup |
Can’t be compressed during the backup |
|
Can be streamed to multiple devices for parallelism (including tape) |
Can be rolled forward by applying incremental backups of source files |
|
Can be into multiple, more manageable pieces |
Can’t be split into multiple pieces |
|
Can contain more than one data file |
Can be only the first level (0) of an incremental strategy |
|
Can be encrypted |
Can’t be streamed directly to tape or to multiple devices |
We tend to use backup sets. Being able to compress and stream directly to tape while at the same time encrypting is a very good quality. However, using copies can significantly reduce recovery time because they don’t have to be restored. They can be used from disk in place. All you have to do is roll them forward with whatever archive log files were generated between when the copy was made and when the failure occurred.
Backing up with backup sets
RMAN makes backing up your database a breeze. The examples in this section are hot backups to the Fast Recovery Area.
A hot backup is simply a backup while the database is running. You can do it at any time, but you should usually pick a time when there is less activity. That way, the hot backup won’t compete for resources.
Of course, figuring out what needs to be backed up is one of the first steps. You need to know what files are out there and whether they’ve been backed up.
1. Launch RMAN as described in the “Finding Files with Recovery Manager” section.
These examples don’t use a recovery catalog because it is discussed earlier in this chapter. Just remember to connect to it if you choose to use one. After you connect, the commands to do all the various types of backups remain the same whether you’re connected to a catalog or not.
2. Set your database to automatically back up the control file and spfile:
RMAN> show CONTROLFILE AUTOBACKUP;
3. If you see something like this, skip to Step 5:
RMAN configuration parameters for database with db_unique_name DEV12C are:
CONFIGURE CONTROLFILE AUTOBACKUP ON;
If your response reads as follows, go to Step 4.
CONFIGURE CONTROLFILE AUTOBACKUP OFF;
4. Type the following:
CONFIGURE CONTROLFILE AUTOBACKUP ON;
You should see this:
new RMAN configuration parameters:
CONFIGURE CONTROLFILE AUTOBACKUP ON;
new RMAN configuration parameters are successfully stored
5. Get a list of the data files in your database:
<report schema;>
You should see something like Figure 11-2.
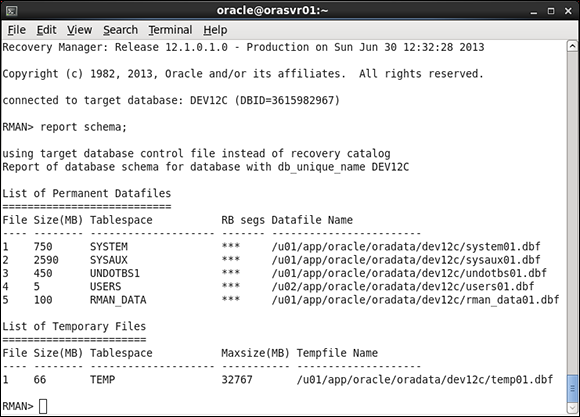
Figure 11-2: Running the RMAN REPORT command.
Backing up the database or tablespaces
You can back up the database and tablespaces in several ways:
![]() Back up the whole database.
Back up the whole database.
![]() Back up one or more tablespaces.
Back up one or more tablespaces.
![]() Back up one or more data files.
Back up one or more data files.
To back up the whole database, type the following:
<backup database;>
The output should look something like this:
Starting backup at 30-JUN-2013 10:45:10
using target database control file instead of recovery catalog
allocated channel: ORA_DISK_1
channel ORA_DISK_1: SID=48 device type=DISK
channel ORA_DISK_1: starting full datafile backup set
channel ORA_DISK_1: specifying datafile(s) in backup set
input datafile file number=00002 name=/u01/app/oracle/oradata/dev12c/sysaux01.dbf
input datafile file number=00001 name=/u01/app/oracle/oradata/dev12c/system01.dbf
input datafile file number=00003 name=/u01/app/oracle/oradata/dev12c/undotbs01.dbf
input datafile file number=00005 name=/u01/app/oracle/oradata/dev12c/rman_data01.dbf
input datafile file number=00004 name=/u01/app/oracle/oradata/dev12c/users01.dbf
channel ORA_DISK_1: starting piece 1 at 30-JUN-2013 10:45:12
channel ORA_DISK_1: finished piece 1 at 30-JUN-2013 10:48:18
piece handle=/u01/app/oracle/fast_recovery_area/DEV12C/backupset/2013_06_30/o1_mf_nnndf_TAG20130630T104511_8x0k3rlq_.bkp tag=TAG20130630T104511 comment=NONE
channel ORA_DISK_1: backup set complete, elapsed time: 00:03:06
Finished backup at 30-JUN-2013 10:48:18
Starting Control File and SPFILE Autobackup at 30-JUN-2013 10:48:18
piece handle=/u01/app/oracle/fast_recovery_area/DEV12C/autobackup/2013_06_30/ o1_mf_s_819456498_8x0k9lql_.bkp comment=NONE
Finished Control File and SPFILE Autobackup at 30-JUN-2013 10:48:19
To back up just one tablespace, type the following:
<backup tablespace users;>
To back up two tablespaces at the same time, type the following:
<backup tablespace system, users;>
Naming your backups
You can give your backup a name. It’s called a tag. We name backups because it is easy to see which is which when looking at a list. A tag can be an alphanumeric string up to 30 characters.
Type the following to back up your database and give it a name (database_full_backup in this case):
<backup database tag=database_full_backup;>
Compressing your backups
As of Oracle 10g, you can compress your backups as they run. Compression usually shows a significant reduction in space usage.
As of Oracle 11g, you can change your compression algorithm (discussed earlier in the chapter) to help tune backup compression. Doing so can save time or resources.
Our experience shows that any kind of compression can make the backup take two to three times as long. To find out what works best for you, try different compressions and note the times.
Take a compressed backup of your entire database with this code:
<backup as compressed backupset database tag=compressed_full_bak;>
Incremental backups
You may want to consider an incremental backup, which copies only some of the blocks based on when the last incremental was done and what blocks have changed. Incremental backups come in three levels (0 and 1 differential and 1 cumulative) published in Oracle 12c:
![]() Differential copies only blocks that have changed since the last incremental backup of any type. For example, if you do a level-1 differential on Monday and a level-1 differential on Tuesday, the Tuesday backup gets only the blocks changed since the level 1 on Monday.
Differential copies only blocks that have changed since the last incremental backup of any type. For example, if you do a level-1 differential on Monday and a level-1 differential on Tuesday, the Tuesday backup gets only the blocks changed since the level 1 on Monday.
![]() Cumulative gets all blocks that were changed since the last level-0 backup, even if several level-1 differentials were taken since then.
Cumulative gets all blocks that were changed since the last level-0 backup, even if several level-1 differentials were taken since then.
Incremental backups conserve time and space when you’re designing a backup strategy. You might consider an incremental strategy if your database is extremely large and takes hours to go through a full backup.
Because backups incur overhead on the system, if at all possible, don’t run them when users are trying to access data. If your database is getting large and the backup has run for five hours and is cutting into core business hours, look at an incremental approach to your backups and/or increasing backup job parallelism.
These are typical solutions that use incremental backups:
![]() You schedule your full weekly backup for Sunday at 3:00 a.m. This backup takes five hours to complete during the least amount of user activity on the system. Your database is 400GB, and even though you compress the backup it still takes 50GB of space.
You schedule your full weekly backup for Sunday at 3:00 a.m. This backup takes five hours to complete during the least amount of user activity on the system. Your database is 400GB, and even though you compress the backup it still takes 50GB of space.
![]() You schedule a differential level-1 backup to run daily at 3:00 a.m., Monday through Saturday. This backup takes only 15 minutes and is 2GB in size after compression.
You schedule a differential level-1 backup to run daily at 3:00 a.m., Monday through Saturday. This backup takes only 15 minutes and is 2GB in size after compression.
If your database is small, if it doesn’t take long to back up, and if the backup doesn’t interfere with your operations, consider doing full backups every day to reduce the complexity of your backup strategy. Keep things simple when you can.
Block change tracking
Block change tracking just tracks what blocks have changed; when it comes time to do an incremental backup, you can get the blocks that you need instead of reading every single one. This technique speeds up incremental backups tremendously.
Check to see whether your database has block change tracking enabled:
<select *
from v$block_change_tracking;>
If it does not, enable block change tracking:
<alter database enable block change tracking
Using file <specify a file name here>;>
Put the file with the rest of your data files and name it something like block_change_tracking.dbf. This feature has little overhead. The block change tracking file is, on average, 1/30,000 the size of the data blocks to be tracked. You can have a very large database before worrying about this file taking up much space.
To do the weekly level-0 backup on Sunday, type the following:
<backup incremental level 0 as compressed backupset database tag=weekly_level_0;>
To do the daily level-1 backup, type the following:
<backup incremental level 1 as compressed backupset database tag=daily_level_1;>
Do the daily backup every day besides Sunday if you’re doing a weekly level 0 on Sunday. If you’re doing a monthly level 0 (for example, on the first of the month), run the daily level 1 every other day of the month. Basically, if you’re doing a level 0 on a given day, there’s no need to do a level 1.
To make sure you start your incremental backup strategy correctly, specify a level 0. If you do not, RMAN will do a full backup, which won’t record the necessary information to do incremental backups from there forward.
Making copies
If you want to incorporate copies into your backup strategy, the commands are slightly different than with backup sets.
Copies are block or block images of the files in your database. Their main advantage is that they don’t have to be restored and can immediately be ready for action (making for quick database failure recovery). However, don’t forget that they come at the cost of speed and space.
Make a copy of your entire database:
<backup as copy database;>
Many commands discussed in the backup sets sections are also available with copies.
Make a copy of just one tablespace:
<backup as copy tablespace users;>
Make a backup of your tablespace users and give it a tag (users_copy in this example):
<backup as copy tablespace users tag=users_copy;>
You can use copies as the level 0 of an incremental strategy. However, copies can be only for the level-0 portion of the incremental strategy.
To make a level-0 copy for the first stage of an incremental backup strategy, type the following:
<backup incremental level 0 as copy database tag=level0_copy;>
Viewing Backup Information
Use the LIST command to see what backups you have stored. You can list the following:
![]() All your backups
All your backups
![]() Backups for certain tablespaces
Backups for certain tablespaces
![]() Backups of certain data files as well as archive logs and copies
Backups of certain data files as well as archive logs and copies
You have different outputs to choose from:
![]() See a short listing called a summary.
See a short listing called a summary.
![]() See a fully detailed listing with the VERBOSE option.
See a fully detailed listing with the VERBOSE option.
The LIST command is very powerful. Use it to show small bits of information about your backups, or all the information stored about your backups. Try some of the following examples to get a feel for how the command works:
![]() To see a summary list of the backups that contain the tablespace users, type this:
To see a summary list of the backups that contain the tablespace users, type this:
< list backup of tablespace users summary;>
![]() To see a summary of all your backups, type this:
To see a summary of all your backups, type this:
<list backup summary;>
![]() To see a verbose list of all your backups with the tag database_full_backup, type this:
To see a verbose list of all your backups with the tag database_full_backup, type this:
<list backup tag=database_full_backup;>
The LIST command is a little different if you want to see copies: You use the COPY keyword.
![]() To see copies of your database, type this:
To see copies of your database, type this:
<list copy of database;>
![]() To see what data files copies you have for tablespace users, type this:
To see what data files copies you have for tablespace users, type this:
<list copy of tablespace users;>
You can find a lot of information in a VERBOSE listing. Figure 11-3 shows what the output may look like if you list the backups of the tablespace users.
Figure 11-3: List backup sets of the USERS tablespace with the VERBOSE option.
If you take a closer look at Figure 11-3, you discover the following:
![]() BS Key is a backup set key. Every backup must have a backup set key, an ever-increasing unique identifier for each backup.
BS Key is a backup set key. Every backup must have a backup set key, an ever-increasing unique identifier for each backup.
![]() Type tells you more about what type of backup was taken, such as a full or an incremental backup.
Type tells you more about what type of backup was taken, such as a full or an incremental backup.
![]() LV is short for level. When you’re doing incremental backups, they can have multiple levels.
LV is short for level. When you’re doing incremental backups, they can have multiple levels.
![]() Size is the size for that particular backup.
Size is the size for that particular backup.
![]() Device Type indicates disk or tape for each backup set.
Device Type indicates disk or tape for each backup set.
![]() Elapsed Time is how long the backup set took to run.
Elapsed Time is how long the backup set took to run.
![]() Completion Time pretty much explains itself.
Completion Time pretty much explains itself.
![]() BP Key is the backup piece key. If you break the backup into multiple pieces, each piece gets a unique identifier.
BP Key is the backup piece key. If you break the backup into multiple pieces, each piece gets a unique identifier.
![]() Status tells you if a backup is available for RMAN to immediately use. You can make a backup unavailable if you remove the backup files (for example, if you take the tape out of the drive and put in storage).
Status tells you if a backup is available for RMAN to immediately use. You can make a backup unavailable if you remove the backup files (for example, if you take the tape out of the drive and put in storage).
![]() Compressed tells whether or not the backup was compressed.
Compressed tells whether or not the backup was compressed.
![]() Tag is your backup’s name.
Tag is your backup’s name.
![]() Piece Name is the actual file that is created to store the backup.
Piece Name is the actual file that is created to store the backup.
Putting It in the Archives
Archiving is the database’s ability to track all data changes. You can turn archiving on or off.
Chapter 2 discusses the processes and files associated with archiving and asserts that running in archive mode has processing and storage overhead. Is this going to slow your database? Well, it depends on the following:
![]() If you have a database with very few changes and is mostly read, archiving barely has an impact.
If you have a database with very few changes and is mostly read, archiving barely has an impact.
![]() If you have a database under a constant barrage of data changes and batch loads, you might feel it a little.
If you have a database under a constant barrage of data changes and batch loads, you might feel it a little.
Luckily, Oracle has designed archiving to cause minimal overhead. In the end, the price is worth the peace of mind you have of having a 24/7 operation with darn-near-guaranteed zero data loss.
Turning archiving on and off
With archiving off, you can take backups of the database only when it’s closed (also called consistent backups). You do so by shutting down that database and starting it in mount mode. As a result, no changes are allowed to the data. This method allows you to take a consistent copy of the data as it exists at that point in time. If you ever have to restore this backup, your database will look exactly as it did when the backup was taken . . . even if it was a year ago.
You might begin to see some inconveniences if you turn archiving off:
![]() Inconveniences are unacceptable if your database requires 24/7 availability. You can’t just shut it down and disallow changes for as long as your backup takes.
Inconveniences are unacceptable if your database requires 24/7 availability. You can’t just shut it down and disallow changes for as long as your backup takes.
![]() Even if you do consistent backups every day, what happens to the changes that occur between backups? They’re lost if you have to restore from a previous backup.
Even if you do consistent backups every day, what happens to the changes that occur between backups? They’re lost if you have to restore from a previous backup.
With archiving turned on, you get the following benefits:
![]() All data changes are tracked.
All data changes are tracked.
![]() You can do backups with the database open and available to all users.
You can do backups with the database open and available to all users.
![]() If you ever have to restore a backup that was taken the night before, you can apply the archives that were tracked up until the point of failure.
If you ever have to restore a backup that was taken the night before, you can apply the archives that were tracked up until the point of failure.
In reality, archiving is a must for almost all live production databases. It’s rare that you can afford to take the database offline for significant periods of time or afford to lose data in the event that a backup has to be restored.
Archive logs
Besides the impact of the archiving process, you have to consider what to do with all the archive log files being created. Again, your database size and number of changes determine how much archive data you will create.
You have two choices for where to store the archive logs:
![]() Fast Recovery Area: If you store the archive logs here, Oracle neatly organizes them by database and date. This solution results in less work and fewer parameters to configure.
Fast Recovery Area: If you store the archive logs here, Oracle neatly organizes them by database and date. This solution results in less work and fewer parameters to configure.
![]() LOG_ARCHIVE_DEST_n initialization parameter: This is actually 30 parameters. The n represents a number from 1 to 30. That’s right: You can store up to 30 copies of your archive logs (but doing so would be overkill). DBAs commonly have two, maybe three copies. Here’s an example of how you might set the LOG_ARCHIVE_DEST_1 parameter in your spfile:
LOG_ARCHIVE_DEST_n initialization parameter: This is actually 30 parameters. The n represents a number from 1 to 30. That’s right: You can store up to 30 copies of your archive logs (but doing so would be overkill). DBAs commonly have two, maybe three copies. Here’s an example of how you might set the LOG_ARCHIVE_DEST_1 parameter in your spfile:
alter system set log_archive_dest_1='LOCATION=/u01/oradata/dev12c/archive';
The bottom line is that you need to monitor the creation, storage, and backup of the archive logs. It’s a fact of DBA life.
The good news is you need to keep the archive logs only for recovery between backups. Does that mean if you back up every night, you can trash all archive logs created prior to that backup? No. Do not trash them every day. We can’t tell you how long to keep them, but consider the following situation:
It’s Wednesday. You’re taking a full backup of your database every night and running in archive log mode. After the backup is complete, you delete all the archive logs created prior to that backup. At noon, you have a catastrophic disk failure and must restore backups from the previous night (Tuesday). You discover that the backup tape from the previous night had coffee spilled on it (tsk tsk) and is no longer good.
See where we’re going with this?
![]() You have to go back to the backup tape from two nights ago (Monday).
You have to go back to the backup tape from two nights ago (Monday).
![]() You restore that backup and find that you can’t roll forward to the time that your disk failed today because you trashed all the archive logs after each nightly backup.
You restore that backup and find that you can’t roll forward to the time that your disk failed today because you trashed all the archive logs after each nightly backup.
Again, we recommend not only keeping archive logs for some time but also including them as part of your backup.
With no other requirements, we tend to keep archive logs for at least 30 days. This system gives us plenty of time to go back in the event that daily or even weekly backups incur some sort of unfortunate mishap.
Look at it this way: If you back up archive logs, you can remove them from the system to conserve space. Another reason to keep archive log backups: It allows you to restore your database to periods from long ago.
Take this instance: We have a client who, in June, wanted a copy of the client’s database restored to December 31 at 11:59:59 p.m. of the prior year. We knew, from client conversations, that these operations were possible. Therefore we keep all backups and all archive logs on tape and offsite indefinitely. We requested the files (from querying the recovery catalog) and retrieved them from long-term storage. We ended up restoring the database to a new server to avoid interfering with the client’s current production database. Everyone lived happily ever after.
Enabling archiving
If you haven’t already done so, enabling archiving is a simple process. However, keep these things in mind:
![]() You have to shut down and restart the database.
You have to shut down and restart the database.
![]() You must have enough space to store your archive logs.
You must have enough space to store your archive logs.
Before you turn on archiving, decide where to store the archive log files. Use the Fast Recovery Area (briefly mentioned in Chapter 4). We show you how to do it here from the command line.
The database-creation steps in Chapter 4 give you the option to enable archiving. If you haven’t read Chapter 4 or recently created a database, we go through it here. Furthermore, in that chapter, we use the GUI Database Configuration Assistant (DBCA). Here we do it from the command line.
Enabling the Fast Recovery Area
Follow along to enable the Fast Recovery Area:
1. Open a command prompt to your operating system.
2. Log in to SQL*Plus as SYSDBA:
<sqlplus / as sysdba>
3. Configure how much space you want to dedicate to your Fast Recovery Area:
<alter system set db_recovery_file_dest_size = 100G;>
This example dedicates 100GB. You should see this:
System altered.
4. Choose the destination:
<alter system set db_recovery_file_dest=
'/u01/app/oracle/fast_recovery_area';>
You should see this:
System altered.
Now Oracle automatically creates your archive logs under the Fast Recovery Area. The archive process creates a folder for your database and the subfolder for the date the archives were created. It organizes them very nicely.
If you want to see how much of your Fast Recovery Area is used, log in to SQL*Plus and query the view V$FLASH_RECOVERY_AREA_USAGE. It’s sort of a misnomer. Oracle still hasn’t changed the name of this view from FLASH to FAST even though they made the change in the documentation two versions ago.
After determining where you want to keep the archive logs, you can turn on archiving. These steps walk you through the process:
1. Open a command prompt to your operating system.
2. Log in to SQL*Plus as SYSDBA:
<sqlplus / as sysdba>
3. Shut down the database:
<shutdown immediate>
You see this:
Database closed.
Database dismounted.
ORACLE instance shut down.
4. Start the database in mount mode:
<startup mount>
You see something like this:
ORACLE instance started.
Total System Global Area 1336176640 bytes
Fixed Size 2287480 bytes
Variable Size 1258293384 bytes
Database Buffers 67108864 bytes
Redo Buffers 8486912 bytes
Database mounted.
5. Issue the command to enable archive mode:
<alter database archivelog;>
You should see this:
Database altered.
6. Open the database:
<alter database open;>
You should see this:
Database altered.
Now your database is in archive log mode, and archive log files should show up in your Fast Recovery Area.
If you’re impatient and want to see them now, type the following:
<alter system archive log current;>
You see this:
System altered.
If you navigate to your Fast Recovery Area, you should see one of your archive logs under a subdirectory with today’s date.
Maintaining the Archives
Archive logs are a fundamental part of your backup and recovery strategy. However, they can take up a lot of space and need to be backed up. Luckily, backing up your archive logs is no more difficult than backing up anything else in your database. Furthermore, RMAN has some features to help you reclaim that space the archives occupy.
Make a backup of all your archive logs with this:
<backup archivelog all tag=archive_bak;>
This command backs up all the archive logs in your archive destination, which can be a tall order depending on how often you issue this command.
Back up your archive logs at least once per day. Keep your archive logs for up to 30 days.
Instead of backing up all archive logs every time, you might try backing up only the ones created since the last backup. To do so, type this:
<backup archivelog all not backed up tag=archive_bak;>
You could issue that command every day as part of your backup strategy. You could even do it several times a day just to be sure you get all of your archive logs backed up as often as possible. When the archive logs are backed up, you may not want them in the archive destination; they take up space after all.
RMAN offers a convenient command to clean up any successfully backed-up archives. If you want to back up all your archive logs and then delete the files that were backed up, type this:
<backup archivelog all delete input tag=archive_bak;>
We favor the “delete input” clause of the command as part of an archive log backup strategy:
![]() It allows you to back up any archive logs that exist in your archive destination while at the same time freeing up space.
It allows you to back up any archive logs that exist in your archive destination while at the same time freeing up space.
![]() RMAN deletes the archive logs only if the backup was successful.
RMAN deletes the archive logs only if the backup was successful.
![]() You don’t have to worry about coming up with a time formula that will back up the archives every so often. Because it deletes the ones it successfully backs up, you can specify “all” every time, ensuring that none are missed.
You don’t have to worry about coming up with a time formula that will back up the archives every so often. Because it deletes the ones it successfully backs up, you can specify “all” every time, ensuring that none are missed.
Run an archive log backup command every time you do any database backup. That way, you have everything you need to recover if there’s a failure.
Recovering Your Oracle Database
Many types of failures can befall your database. Oracle Recovery Manager is a tool that can help you get back on your feet after many of these failures. Sometimes it is the only option, sometimes it is the best approach of several, and sometimes it isn’t the right approach at all. This section focuses on the times RMAN shines and helps you bring a dead or damaged database back to life.
RMAN can really help with two types of failures:
![]() Media failure: Loss of files
Media failure: Loss of files
![]() User error: Mistakes that lead to damaged databases or data
User error: Mistakes that lead to damaged databases or data
Whether RMAN can always help you when it comes to user error depends on what type of problem has been created. For example, if a user accidentally removes a file or a tablespace, RMAN can help very easily. However, if a user accidentally drops a table or corrupts data, RMAN can help, but it might not be the quickest approach. If a user drops a table, it might be quicker to retrieve it from the database Recyclebin or Flashback Database.
However, if the user has purged the Recyclebin or the Flashback Database isn’t configured, Recovery Manager is your only choice.
RMAN can do two types of recoveries:
![]() Complete: All files are brought back to the time the database failed. No data is lost.
Complete: All files are brought back to the time the database failed. No data is lost.
![]() Incomplete: The database is recovered but stopped short of a full recovery. There may be data loss. Sometimes this is what you want. For example, if a user drops a table at 10:13 a.m. sharp, you do an incomplete recovery to 10:12 a.m. to get the database back before the drop occurs.
Incomplete: The database is recovered but stopped short of a full recovery. There may be data loss. Sometimes this is what you want. For example, if a user drops a table at 10:13 a.m. sharp, you do an incomplete recovery to 10:12 a.m. to get the database back before the drop occurs.
Complete recovery is what usually happens. However, be prepared for anything.
Verifying the problem
Finding out what went wrong with your database isn’t always an easy task. Sometimes you get lucky (if you want to use the term lucky in the face of a broken database). For example, maybe you know what happened:
![]() A system administrator told you a disk croaked.
A system administrator told you a disk croaked.
![]() A user told you they dropped a table.
A user told you they dropped a table.
![]() You caused the error and you know what happened and why.
You caused the error and you know what happened and why.
These might not be the problem, however. Sometimes you’re presented with sneaky problems, in which case you take on the role of a detective. Say you start the database or access the data while the database is still open and get an error similar to this one:
ORA-01157: cannot identify/lock data file 4 - see DBWR trace file
ORA-01110: data file 4: '/u01/app/oracle/oradata/dev12c/users01.dbf'
You look for the file in the location that it gives. Lo and behold, it is gone (or maybe the whole disk is gone). You had more than one file on that disk. Why is Oracle telling you only that it can’t find one of your files? Because when you start the database, Oracle reads the data file list in the control file. As soon as it can’t find one in the list, it stops opening and presents the error. Or, if the database is already open, Oracle tells you only about the error that you’re experiencing as a result of your specific action. Unfortunately, this is a little misleading; you might restore and recover the file only to find another error just like it for a different data file.
You can do a couple of things when you see the error:
![]() Query the dynamic performance view V$RECOVER_FILE to see a list of all files that Oracle is having trouble with, the error, and the file number(s) in question. Take that file number and plug it into the view V$DATAFILE to get a list of the filenames that need recovery.
Query the dynamic performance view V$RECOVER_FILE to see a list of all files that Oracle is having trouble with, the error, and the file number(s) in question. Take that file number and plug it into the view V$DATAFILE to get a list of the filenames that need recovery.
![]() Oracle has a fancy tool called the Data Recovery Advisor. This tool won’t work in all situations. It works when you have missing media, such as loss of files.
Oracle has a fancy tool called the Data Recovery Advisor. This tool won’t work in all situations. It works when you have missing media, such as loss of files.
Complete recovery
Complete recovery (as opposed to incomplete recovery) is always what you want to shoot for. It means you recover every block and every transaction that was ever committed into the database. You let Oracle take over and do the recovery until the end of all the backup files and archive logs; don’t manually intervene and stop it before it’s finished.
Complete recovery: One or more data files
If you see the “unable to identify/lock datafile” error, you need to do a couple of things:
![]() Know the extent of the damage. This knowledge helps so you only have to do one recovery instead of two.
Know the extent of the damage. This knowledge helps so you only have to do one recovery instead of two.
![]() Determine whether the lost file is required for the instance to run (or if it is an application data file). Required data files are SYSTEM, SYSAUX, and UNDO. This is important for reducing your overall mean time to recovery (MTTR). Oracle crashes only if you lose a required data file.
Determine whether the lost file is required for the instance to run (or if it is an application data file). Required data files are SYSTEM, SYSAUX, and UNDO. This is important for reducing your overall mean time to recovery (MTTR). Oracle crashes only if you lose a required data file.
If you determine that the lost files aren’t important to basic operation, you can open the database (if it even went down) before you begin recovery. That allows at least partial data access to some users. You may prefer that users remain out of the system until you’re done.
What’s the first thing to do if Oracle 12c crashes? Go to the Data Recovery Advisor (DRA). For the DRA to work, the database has to, at the very least, be in NOMOUNT state. The database can’t be completely shut down. The DRA can also be run with the database open, minimizing downtime.
In the following exercise, the USERS tablespace data file was lost while the database was running. Because that data file is not a required data file (system, sysaux, undo), you can do the recovery without even shutting down the database.
1. Log in to your target with RMAN.
2. Type this:
<list failure;>
You see something like this:
List of Database Failures
=========================
Failure ID Priority Status Time Detected Summary
---------- -------- --------- -------------------- -------
722 HIGH OPEN 30-JUN-2013 11:25:20 One or more non-system datafiles are missing
A non-system (critical) file is missing. What to do?
3. Ask the DRA what to do:
<advise failure;>
You see something like this:
Database Role: PRIMARY
List of Database Failures
=========================
Failure ID Priority Status Time Detected Summary
---------- -------- --------- -------------------- -------
722 HIGH OPEN 30-JUN-2013 11:25:20 One or more non-system datafiles are missing
analyzing automatic repair options; this may take some time
allocated channel: ORA_DISK_1
channel ORA_DISK_1: SID=56 device type=DISK
analyzing automatic repair options complete
Mandatory Manual Actions
========================
no manual actions available
Optional Manual Actions
=======================
1. If file /u01/app/oracle/oradata/dev12c/users01.dbf was unintentionally renamed or moved, restore it
Automated Repair Options
========================
Option Repair Description
------ ------------------
1 Restore and recover datafile 4
Strategy: The repair includes complete media recovery with no data loss
Repair script: /u01/app/oracle/diag/rdbms/dev12c/dev12c/hm/reco_3875560744.hm
Get a load of that! Not only does the DRA tell you exactly what you need to do, but it also provides a script so you don’t have to write a single line of code. If you open that script, it looks something like this:
# restore and recover datafile
sql 'alter database datafile 4 offline';
restore ( datafile 4 );
recover datafile 4;
sql 'alter database datafile 4 online';
4. Type the following to have the DRA fix the problem:
<repair failure;>
You see something like this:
RMAN> repair failure;
Strategy: The repair includes complete media recovery with no data loss
Repair script: /u01/app/oracle/diag/rdbms/dev12c/dev12c/hm/reco_3875560744.hm
contents of repair script:
# restore and recover datafile
sql 'alter database datafile 4 offline';
restore ( datafile 4 );
recover datafile 4;
sql 'alter database datafile 4 online';
Do you really want to execute the above repair (enter YES or NO)? YES
repair failure complete
At the very end of an Advisor-based recovery, if the database was closed, it asks whether you want to open the database. Most of the time you will choose Yes. You might choose No if you want to spend more time going over what happened before you release the database back to the users.
If we had to nitpick about the DRA, here is what we’d say:
![]() The DRA doesn’t say you can take data files offline and then open the database for everyone else if the database is closed. It tells you that the files can be offline and recovered if the database is already open. At least it told you that they were non-system files.
The DRA doesn’t say you can take data files offline and then open the database for everyone else if the database is closed. It tells you that the files can be offline and recovered if the database is already open. At least it told you that they were non-system files.
![]() If you have to restore the files to a new location, the DRA can’t take over and do the whole recovery for you. Say you lost a disk and it ain’t coming back. The DRA isn’t smart enough to choose a new location for you and incorporate that into a repair script. It tells you what’s wrong and what it suggests doing, which may help get you going in the right direction, but it falls short after that.
If you have to restore the files to a new location, the DRA can’t take over and do the whole recovery for you. Say you lost a disk and it ain’t coming back. The DRA isn’t smart enough to choose a new location for you and incorporate that into a repair script. It tells you what’s wrong and what it suggests doing, which may help get you going in the right direction, but it falls short after that.
Be realistic. How can you expect it to have every situation indexed for all types of systems and environments?
Complete recovery: One or more control files
What if you manage to lose all your control files and your database crashes?
Control files are critical system files.
DRA to the rescue:
1. Log in to RMAN.
2. List failure.
3. Advise failure.
4. Repair failure.
If you’re lost, go to the earlier “Complete recovery: One or more data files” section for the full steps.
But wait a minute . . . Why didn’t these steps open the database? Recovery from losing all your control files is a little more involved than standard data file recovery. (We suppose the DRA doesn’t want to continue with the recovery without you getting a chance to check things out.)
Complete recovery without the DRA
We don’t want you to rest on your laurels too much, so we’re showing you a recovery without the DRA. The DRA won’t help you in every situation. What if the file you need to restore has to go somewhere else? The DRA won’t know where to put it.
Plus, it’s good to understand how to recover without the DRA. You might find yourself in a non-12c database someday. The following method works all the way back to the dawn of Recovery Manager (as far as we know).
This example has you losing a data file but being unable to put it back in the same place. (By you, we mean RMAN.) You have to tell RMAN where to put the file; then RMAN will restore it to the proper location.
![]() You lost a disk with a data file on it.
You lost a disk with a data file on it.
![]() The disk won’t be replaced, and you have to restore the data file elsewhere.
The disk won’t be replaced, and you have to restore the data file elsewhere.
![]() You tell RMAN where to put the data file.
You tell RMAN where to put the data file.
![]() You tell RMAN to restore the data file.
You tell RMAN to restore the data file.
![]() You tell RMAN to recover the data file.
You tell RMAN to recover the data file.
![]() If the database was closed, you open it. If the database was open, you online the data file.
If the database was closed, you open it. If the database was open, you online the data file.
This example using Oracle on Linux starts with the database closed; you open it and then fix the error. To create this error, we simply renamed the users01.dbf data file while the database was down.
1. Start the database and read this error:
ORA-01157: cannot identify/lock data file 4 - see DBWR trace file
ORA-01110: data file 4: '/u01/app/oracle/oradata/dev12c/users01.dbf'
2. See if that is the only missing file:
<select * from v$recover_file;>
3. Determine whether this is the only file affected and whether it is a critical file.
You also determine that it must be restored to a different disk.
4. Launch RMAN and take the data file offline:
<alter database datafile 4 offline;>
You see this:
using target database control file instead of recovery catalog
Statement processed
5. Open the database:
<alter database open;>
6. Tell RMAN to restore to the correct location:
<run {
set newname for datafile 4 to '/u02/app/oracle/oradata/dev12c/users01.dbf';
restore tablespace users;
switch datafile all;
recover tablespace users;
}>
In this case, it is disk u02, a different location. The output indicates that the file is being restored and recovered in the new location:
executing command: SET NEWNAME
Starting restore at 30-JUN-2013 11:48:46
using target database control file instead of recovery catalog
channel ORA_DISK_1: SID=7 device type=DISK
channel ORA_DISK_1: restoring datafile 00004
input datafile copy RECID=12 STAMP=819457925 file name=/u01/app/oracle/ fast_recovery_area/DEV12C/datafile/o1_mf_users_8x0lp5mo_.dbf
destination for restore of datafile 00004: /u02/app/oracle/oradata/dev12c/users01.dbf
channel ORA_DISK_1: copied datafile copy of datafile 00004
output file name=/u02/app/oracle/oradata/dev12c/users01.dbf RECID=13 STAMP=819460128
Finished restore at 30-JUN-2013 11:48:49
datafile 4 switched to datafile copy
Starting recover at 30-JUN-2013 11:48:49
using channel ORA_DISK_1
starting media recovery
...output snipped...
media recovery complete, elapsed time: 00:00:01
Finished recover at 30-JUN-2013 11:48:52
7. When the recovery finishes, alter the tablespace to put it back online:
<alter tablespace users online;>
Quite a few more steps without the DRA, isn’t it? Either way, it’s not too difficult. If you haven’t already, make sure you set up a test database and practice these and other scenarios. You’ll be a recovery expert in no time at all.
Incomplete recovery
Incomplete recovery is usually a very unfortunate position to be in. Typically, it means you will be losing data (hence incomplete). Also, the DRA cannot help at all in this situation. In an incomplete recovery scenario, the database has not actually failed. Someone has done something to put the database in a state that requires you to go back in time.
Here’s a situation where incomplete recovery may apply:
It is Sunday morning. You have taken a backup of your database last night. You are in archive log mode.
At 1:00 p.m., Barry tells you he accidentally dropped a major table out of the accounting schema around 11:45 a.m. Not only did he drop it, but he purged it from the Recyclebin because he “knew it was the right one.” It wasn’t. Assuming you have no other way to retrieve the table from a logical backup or re-create it, you decide incomplete recovery is your only choice. You will take the database down to restore the backup from last night. Then you will roll the database forward to 11:44 a.m. and open it.
Any transactions that occurred between 11:45 and 1:00 p.m. will be lost and have to be manually re-entered.
A key piece of information is that Barry told you he dropped the table at 11:45 a.m.
Spend a few minutes doing some research to verify that the reported time is truthful. If you roll forward too far, the table will be dropped again during the recovery process, and you will have to start over.
Here are the steps to incomplete recovery:
1. Shut down the database.
2. Start up the database in mount mode.
3. Set the time for the restore to work from.
4. Restore the database.
5. Recover the database.
6. Open the database with RESETLOGS.
The control files won’t match the data files. You have to re-sync the control files with the data files.
7. Open a prompt to your OS command line.
8. Log in to your database with RMAN:
<rman target /
9. Put the database in mount mode:
<shutdown immediate>
<startup mount>
10. Use the following RMAN command to recover your database to the appropriate time (11:44 a.m. in this case):
RMAN> run {
set until time =
"to_date('30-JUN-2013:11:44:00','DD-MON-YYYY:HH24:MI:SS')";
restore database;
recover database;
sql "alter database open resetlogs";
}
When the command completes, you should see something like this:
executing command: SET until clause
Starting restore at 30-JUN-2013 11:58:52
allocated channel: ORA_DISK_1
channel ORA_DISK_1: SID=20 device type=DISK
…output snipped…
Finished recover at 30-JUN-2013 12:02:56
sql statement: alter database open resetlogs
11. Make sure the table you were trying to recover has indeed been recovered.
There’s nothing more embarrassing than telling everybody you recovered data only to have someone else discover that the data still isn’t there. If you discover it isn’t there, do the recovery again, going back a little farther in time.
After any type of recovery, take a fresh, full backup immediately — just in case. We recommend it as a best practice — especially for a RESETLOGS recovery.
Recovering your database with copies
Copies allow for superfast recovery and fewer technical recoveries when you’ve lost a disk and the file has to go to a different location.
Some DBAs would argue that it’s incorrect to use the copy in the place you backed it up. Good DBAs subscribe to the mantra “Everything has its place; everything in its place.” However, times are changing. For example, the popularity of large storage area networks (SANs), where all your files go to the same place, is growing. DBAs don’t have as much responsibility to organize, separate, stripe, and label data, nor do they have as much time. The SAN does all the protection and striping for you. Furthermore, Oracle has even released, in essence, its own volume manager: Automatic Storage Management (ASM). ASM can help you:
![]() Relax your regimented file and naming conventions.
Relax your regimented file and naming conventions.
![]() Find more time to make better use of the features that Oracle has to protect and manage data.
Find more time to make better use of the features that Oracle has to protect and manage data.
You get a call from a user who is getting the following error:
SQL> select *
2 from emp;
from emp
*
ERROR at line 2:
ORA-01116: error in opening database file 4
ORA-01110: data file 4: '/u02/app/oracle/oradata/dev12c/users01.dbf'
ORA-27041: unable to open file
Linux-x86_64 Error: 2: No such file or directory
Additional information: 3
After some investigation, you see that someone has removed the data file from the USERS tablespace. This tablespace is critical and must be recovered immediately. You decide to recover with RMAN using a COPY of the data file.
1. Log in to your target with RMAN.
2. Make sure you have a copy of your USERS tablespace data file:
<list copy of tablespace users;>
You should see something like this:
List of Datafile Copies
=======================
Key File S Completion Time Ckp SCN Ckp Time
------- ---- - -------------------- ---------- --------------------
19 4 A 30-JUN-2013 12:11:31 2365031 30-JUN-2013 12:11:30
Name: /u01/app/oracle/fast_recovery_area/DEV12C/datafile/o1_mf_users_8x0p5lyh_.dbf
Tag: LEVEL0_COPY
12 4 A 30-JUN-2013 11:12:05 2356203 30-JUN-2013 11:12:05
Name: /u01/app/oracle/fast_recovery_area/DEV12C/datafile/o1_mf_users_8x0lp5mo_.dbf
Tag: LEVEL0_COPY
7 4 A 30-JUN-2013 11:08:20 2355686 30-JUN-2013 11:08:20
Name: /u01/app/oracle/fast_recovery_area/DEV12C/datafile/o1_mf_users_8x0lh47j_.dbf
Tag: USERS_COPY
6 4 A 30-JUN-2013 11:08:08 2355658 30-JUN-2013 11:08:08
Name: /u01/app/oracle/fast_recovery_area/DEV12C/datafile/o1_mf_users_8x0lgrkr_.dbf
Tag: TAG20130630T110808
5 4 A 30-JUN-2013 11:08:04 2355632 30-JUN-2013 11:08:03
Name: /u01/app/oracle/fast_recovery_area/DEV12C/datafile/o1_mf_users_8x0lgmrf_.dbf
Tag: TAG20130630T110430
3. Take the tablespace offline (because the database is open):
< sql "alter tablespace users offline";>
You see this:
sql statement: alter tablespace users offline
4. Switch to the copy:
<switch tablespace users to copy;>
You see something like this:
datafile 4 switched to datafile copy "/u01/app/oracle/fast_recovery_area/DEV12C/datafile/o1_mf_users_8x0p5lyh_.dbf"
5. Recover the copy that was taken earlier:
<recover tablespace users;>
You see something like this:
Starting recover at 30-JUN-2013 12:21:52
allocated channel: ORA_DISK_1
channel ORA_DISK_1: SID=48 device type=DISK
starting media recovery
media recovery complete, elapsed time: 00:00:00
Finished recover at 30-JUN-2013 12:21:53
6. Alter the tablespace to put it back online:
<alter tablespace users online;>
You see this:
Statement processed
All done! Do you see how quick that was without having to restore the file? Of course, you have to come to terms with it being in your Fast Recovery Area. If that really bugs you, you can do one of the following:
![]() You can rename the file and move it later when you have a maintenance window.
You can rename the file and move it later when you have a maintenance window.
![]() When you take the copy, you can copy the file to an auxiliary area outside your Fast Recovery Area (where you don’t mind it being) in case you have to use it.
When you take the copy, you can copy the file to an auxiliary area outside your Fast Recovery Area (where you don’t mind it being) in case you have to use it.