Chapter 15
Using High-Availability Options
In This Chapter
![]() Using Real Application Clusters (RAC)
Using Real Application Clusters (RAC)
![]() Understanding Data Guard
Understanding Data Guard
A high-availability architecture combines hardware and software solutions to help reduce the impact of outages during planned and unplanned downtime. Your data’s availability is of utmost importance. However, the level of availability varies by business. Some can deal with a little downtime here and there with minor business interruptions. A minute of downtime for others can cost tens of thousands of dollars. Luckily, Oracle helps you harden against the forces out there that want to make your database unavailable. Hardening your database means protecting it against unplanned downtime. Unplanned downtime can be caused by hardware failure or events like fires, floods, user errors, etc.
 Implementing a high-availability architecture may not be cost effective for everyone. It can be expensive in terms of hardware and software licenses. However, if downtime costs you thousands of dollars in short intervals, look at some of Oracle’s high-availability options.
This chapter is about a couple of Oracle features that you can configure for high availability. Each feature has its strengths and weaknesses. You sometimes can combine features to get the best result. And because licensing Oracle options seems to change constantly and varies from site to site and version to version, we’re deferring any questions about the licensing of these features to your friendly Oracle sales rep.
Lastly, entire books and weeklong classes deal with these technologies. We give an overview within this chapter. Unfortunately, we can’t prepare you for an enterprise installation and configuration of these options. Consider this a guide with tools that help you investigate.
Gathering Real Application Clusters
If you’ve visited Oracle’s websites in the last 12 years, you’ve seen the marketing byline: “Unbreakable.” That tag line refers to the feature Real Application Clusters (RAC). Of course, a lot of elements are involved, but RAC has the spotlight.
RAC is Oracle’s database clustering solution. In a sense, it works on the theory that there is strength in numbers. RAC lets you have parallel database instance operating environments. These instances cooperate to share work and back each other up in case one of them fails. RAC can help with both planned and unplanned outages. It allows you to shift your processing from server to server with little to no interruption to your end users and applications.
Determining whether RAC is right for you is a big decision. Implementing RAC requires lots of resources and money. However, sometimes spending a little more up front can save you later.
Consider what RAC can offer:
![]() Scalability: The technology is based on computers and resources that team up as one. With RAC, you can purchase and license hardware as you need it. Furthermore, you can plug in the new hardware as you go without taking down your database. If you’ve exceeded your computing capabilities for the server, seamlessly add one to your configuration.
Scalability: The technology is based on computers and resources that team up as one. With RAC, you can purchase and license hardware as you need it. Furthermore, you can plug in the new hardware as you go without taking down your database. If you’ve exceeded your computing capabilities for the server, seamlessly add one to your configuration.
![]() Uptime: RAC can harden your computing environment against planned and unplanned downtime. You can transparently remove portions of the application for planned downtime (such as maintenance, patches, and upgrades) with little to no interruption to end users. Furthermore, if one of your environment’s computing resources fails, RAC automatically transfers application connections to other resources in the framework.
Uptime: RAC can harden your computing environment against planned and unplanned downtime. You can transparently remove portions of the application for planned downtime (such as maintenance, patches, and upgrades) with little to no interruption to end users. Furthermore, if one of your environment’s computing resources fails, RAC automatically transfers application connections to other resources in the framework.
![]() Performance: Some might argue with this point, but you have to carefully define RAC’s performance capabilities:
Performance: Some might argue with this point, but you have to carefully define RAC’s performance capabilities:
 • Because RAC is a complicated environment, your application has to be designed to best take advantage. If you ignore this fact, RAC can actually hurt performance. Keep that in mind.
• RAC can offer performance benefits when it comes to the divide-and-conquer methodology. You can split large jobs across computers. If you know an underpowered machine is limiting your company, reconfiguring the job to run on multiple machines can offer great benefits. It’s called parallel processing, and it’s part of RAC fundamentals. RAC is a scaling out (horizontal) solution. This means you add nodes to the cluster rather than having one server replaced with another more powerful server, or scaling up (vertical).
 RAC versus OPS
RAC, which has been around for many years, was previously known as the parallel server option. Before we get flamed about when RAC was RAC, we’re perfectly happy to admit that before the RAC moniker, Oracle Parallel Server (OPS) was far from the capabilities that RAC has to offer. Oracle significantly hardened the architecture, making it more accessible and easier to set up. Oracle also focused on the components of the environment that minimize downtime. So, you could say that RAC is a new breed of OPS that far surpasses prior capabilities in usability and performance.
Exploring RAC Architecture
RAC works through a complex organization of hardware and software configurations. Mostly throughout this book we talk of Oracle databases as a single set of files (the database) and a single set of memory and process components (the instance) that work together for you to access and maintain your data. That is the most typical configuration for an Oracle installation. In this configuration, the database files can be mounted and accessed by only one machine and one Oracle instance at a time.
With RAC, those files are sharable so many machines and instances can access the same files. You can have (depending on certification and versions) 100 database instances accessing the same shared database. Just like you might have two DBAs in your office:
![]() One can vacation while the other works (read: high availability).
One can vacation while the other works (read: high availability).
![]() Both can work together on a large project to split the workload and meet an aggressive timeline (read: performance).
Both can work together on a large project to split the workload and meet an aggressive timeline (read: performance).
![]() Add a third person to meet workload requirements as the Oracle responsibilities grow (read: scalability).
Add a third person to meet workload requirements as the Oracle responsibilities grow (read: scalability).
Many components are required in a RAC setup. To get a general idea of what the architecture looks like, see Figure 15-1.
Hardware considerations for RAC
RAC has some special hardware requirements that single instance or non-RAC database don’t have.
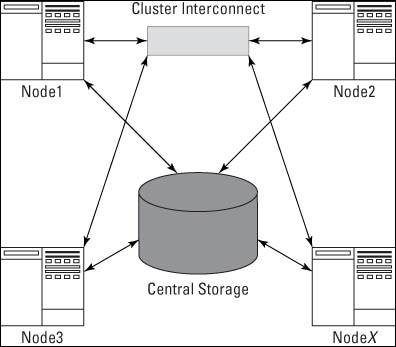
Figure 15-1: This common RAC architecture shows some of the major required components.
Nodes
A node is a server that runs an Oracle instance. A true RAC configuration has at least two nodes.
The number of nodes in your RAC configuration depends on hardware and software limitations. According to Oracle’s documentation and support websites, Oracle software itself can support upwards of 100 nodes, but other forces may limit you to fewer.
If you’re getting into lots of nodes (more than eight), check with all your hardware and software vendors to see what your limit is.
Add nodes as you scale your cluster. You can add and remove them with minimal or no service interruption to your application. This ensures high availability. Typically, each node will have its own installation of the Oracle software.
You can have one central, shared software directory for each node to use. However, a configuration like this limits your high-availability capabilities.
For example, one advantage to installing the Oracle software on each node is the ability to individually patch the nodes by taking them down one at a time. This rolling patch avoids a complete application outage. You can’t apply all patches this way. Check with patch documentation to be sure. On the other hand, one central installation requires you to shut down the entire cluster to apply the patch.
 Each node should have its own Oracle software code tree if you want high availability.
Central storage
The following are some RAC configuration central storage requirements:
![]() All your database files, control files, redo logs, archive logs, and spfile should be on shared storage. This way, each of the nodes has access to all the required files for data access, recovery, and configuration.
All your database files, control files, redo logs, archive logs, and spfile should be on shared storage. This way, each of the nodes has access to all the required files for data access, recovery, and configuration.
![]() Attach the central storage to each node in the form of some high-speed media. Lots of high-speed connections (fiber channel or iSCSI, for example) are available from different storage vendors. Make sure the storage and attachments are approved for Oracle RAC before making your decisions. (For example, NFS mounting drives to each server isn’t typically a certified configuration.) You can use almost any shared storage configuration with decent education and testing results.
Attach the central storage to each node in the form of some high-speed media. Lots of high-speed connections (fiber channel or iSCSI, for example) are available from different storage vendors. Make sure the storage and attachments are approved for Oracle RAC before making your decisions. (For example, NFS mounting drives to each server isn’t typically a certified configuration.) You can use almost any shared storage configuration with decent education and testing results.
![]() When choosing a storage vendor, consider your applications’ performance needs. Your disk subsystem should be able to scale as easily as your RAC nodes. As you add nodes, you may need to add physical disks to support the increased demand on the storage subsystem. You should be able to do this with little or no downtime.
When choosing a storage vendor, consider your applications’ performance needs. Your disk subsystem should be able to scale as easily as your RAC nodes. As you add nodes, you may need to add physical disks to support the increased demand on the storage subsystem. You should be able to do this with little or no downtime.
![]() The disk on the shared storage subsystem must be configured for shared access. You may have up to four choices for this:
The disk on the shared storage subsystem must be configured for shared access. You may have up to four choices for this:
• Raw file system (unformatted disks)
• Oracle Cluster File System (OCFS) (available on Windows and Linux only)
• Oracle Automatic Storage Management (ASM) (an Oracle-supplied volume manager of sorts for database-related files)
• Third-party solution (such as Veritas)
You may have to combine options. For example, you might use Oracle ASM for your database files, but you might want something other than ASM for RMAN backup files.
Cluster interconnect
The cluster interconnect is a dedicated piece of hardware that manages all the inter-instance communication. A lot of communication across instances occurs in a RAC configuration: maintaining consistency, sharing lock information, and transferring data blocks.
Oracle uses Cache Fusion for managing data transfer between nodes. Cache Fusion requires an extremely reliable, private, high-speed network connecting all the nodes.
Cache Fusion is a critical component for getting RAC to perform well. The interconnect needs to be gigabit speeds or better.
When you have cluster communication performance issues, the interconnect’s ability to provide the required bandwidth is questioned. It’s a necessary expense to set up an RAC environment appropriately. Would you spend thousands of dollars on a race car and then put street tires on it?
Network interfaces
Make sure you have the right network interfaces on the server for proper communication. This includes multiple network interface cards:
![]() One for the public or user connections to the machine
One for the public or user connections to the machine
![]() One for the private interconnect for the cluster to share information across the nodes
One for the private interconnect for the cluster to share information across the nodes
At the very least, a RAC configuration should have two network interface cards:
![]() One for the private network for cluster interconnect traffic
One for the private network for cluster interconnect traffic
![]() One for the public network
One for the public network
The public network is the connection for all cluster connections, from your applications and end users (including you and the sys admin).
Software considerations for RAC
Before you set up RAC, investigate the software it needs to run smoothly. Consider the following areas of software.
Operating system
Though nearly all popular OSs run an RAC installation, you need to
![]() Verify that the OS is certified.
Verify that the OS is certified.
![]() Make sure the right release and patchsets are confirmed as RAC certified.
Make sure the right release and patchsets are confirmed as RAC certified.
![]() Ensure that your Oracle version is certified with your OS configuration.
Ensure that your Oracle version is certified with your OS configuration.
The Oracles Support website (http://myoraclesupport.com) provides a matrix to help you identify certified combinations.
Furthermore, an uncertified OS may be certified later. It can be complicated at first, but getting this right to start with helps you a long way down the line.
Clustering software
Arguably, clustering software is the most important piece of software. Without clustering software, there is no cluster.
The software tracks cluster members such as databases, instances, listeners, and nodes. Lots of other cluster components run on each of the nodes and require maintenance for the clusterware to work properly. The clustering software tracks these components and facilitates internode communication and health.
Depending on your experience level with different types of clustering software, you might choose one over the other. Oracle provides clustering software in the form of Oracle Grid Infrastructure. Since Oracle 10g, Oracle Clusterware is available for almost all the major operating systems. Grid Infrastructure is the preferred software to use for clustering Oracle databases.
Prior to Oracle 11gR2, Grid Infrastructure was referred to as Oracle Clusterware.
If you go with third-party clustering software, make sure it’s certified by Oracle for RAC. Veritas and Sun Cluster are examples of certified third-party clustering software. However, make sure they’re certified for your OS.
Oracle database
The Oracle database software is nothing special when it comes to RAC. You don’t need to download any special components or anything else to make an Oracle database RAC ready. RAC is built into the database software. When you go to install Oracle RDBMS on a cluster, it recognizes that a cluster exists and asks whether you would like to do a cluster install. It’s as simple as that.
Optional software
You might want to use some optional pieces of software:
![]() Oracle Agent: If you manage your database with Oracle Grid Control, you need to install an agent on the cluster. Like the database software, the agent recognizes that it’s being installed on a cluster and configures itself appropriately.
Oracle Agent: If you manage your database with Oracle Grid Control, you need to install an agent on the cluster. Like the database software, the agent recognizes that it’s being installed on a cluster and configures itself appropriately.
![]() Oracle ASM: This is the preferred storage mechanism for Oracle database files in a RAC database. As of Oracle 11gR2, it is integrated with the Grid Infrastructure software stack. It is required for the Oracle Grid Infrastructure OCR and Voting disks, which are used for cluster node management and consistency. For database files, you can continue to use other shared file systems, such as raw or NFS.
Oracle ASM: This is the preferred storage mechanism for Oracle database files in a RAC database. As of Oracle 11gR2, it is integrated with the Grid Infrastructure software stack. It is required for the Oracle Grid Infrastructure OCR and Voting disks, which are used for cluster node management and consistency. For database files, you can continue to use other shared file systems, such as raw or NFS.
Preparing for a RAC Install
Each OS has its own configuration for an RAC install. It’s virtually impossible to cover everything here.
However, we can offer a few pieces of advice:
![]() Thoroughly read the Oracle Grid Infrastructure installation and deployment guide for your specific OS. What applies on one OS may not fly on another.
Thoroughly read the Oracle Grid Infrastructure installation and deployment guide for your specific OS. What applies on one OS may not fly on another.
![]() Be consistent across all nodes when naming users, groups, group IDs, and user IDs. Make sure the same user owns all the Oracle software components.
Be consistent across all nodes when naming users, groups, group IDs, and user IDs. Make sure the same user owns all the Oracle software components.
For example, on Linux, oracle is typically an account that owns the Oracle software installation. Create this user exactly the same way as you go to all the nodes. Linux has at least two OS groups for Oracle (dba and oinstall). These must be identical. For the users and groups, this goes for the group ID (gid) and user ID (uid) as well. The gid and uid maintain permissions at the OS level. If they’re not identical across nodes, permissions won’t be maintained correctly, and the cluster won’t function.
![]() Set up the hosts file correctly. This goes for all RAC installations. The clustering software uses the hosts file to install the software and maintain communications. The domain name server, or DNS, doesn’t substitute for this. You can add the host configuration to the DNS if you want, but make sure the hosts file is properly configured.
Set up the hosts file correctly. This goes for all RAC installations. The clustering software uses the hosts file to install the software and maintain communications. The domain name server, or DNS, doesn’t substitute for this. You can add the host configuration to the DNS if you want, but make sure the hosts file is properly configured.
Here’s an example of what a two-node RAC host file may look like:
127.0.0.1 localhost.localdomain localhost
192.168.100.11 node1-priv.perptech.com node1-priv # node1 private
192.168.100.12 node2-priv.perptech.com node2-priv # node2 private
192.168.200.11 node1.perptech.com node1 # node1 public
192.168.200.12 node2.perptech.com node2 # node2 public
192.168.200.21 node1-vip.perptech.com node1-vip # node1 virtual
192.168.200.22 node2-vip.perptech.com node2-vip # node2 virtual
• Each cluster node connects to another through a private high-speed network (cluster interconnect).
• The public IP used for all user communication to the nodes isn’t related to the interconnect.
• Each cluster node also has a virtual IP address that binds to the public NIC. If a node fails, the failed node’s IP address can be reassigned to another node so applications can keep accessing the database through the same IP address. As of Oracle 11gR2, this is done using a new cluster networking component called a SCAN. SCAN stands for single-client-access-name. Three VIPs are assigned on the network to a scan name (typically the name of your cluster), and that one SCAN name is then used for all communication. The three VIPs can float across the nodes to provide constant connectivity and failover capabilities.
![]() When using Oracle Grid Infrastructure, install it in a directory that’s not a subset of your Oracle base. For example:
When using Oracle Grid Infrastructure, install it in a directory that’s not a subset of your Oracle base. For example:
ORACLE_BASE=/u01/app/oracle
ORA_CRS_HOME=/u01/app/grid
You must set many permissions under the Grid Infrastructure home for special root access. You don’t want those settings to interfere with the database software installation.
![]() When using Oracle Grid Infrastructure, correctly set the permissions for the underlying storage devices that are used for the ASM disk groups. If you don’t get the permissions right, you can’t complete the installation or a node reboot may either cause the clustering services to not rejoin the cluster or the node to continually reboot itself.
When using Oracle Grid Infrastructure, correctly set the permissions for the underlying storage devices that are used for the ASM disk groups. If you don’t get the permissions right, you can’t complete the installation or a node reboot may either cause the clustering services to not rejoin the cluster or the node to continually reboot itself.
![]() Configure the nodes in your cluster to be able to use the following:
Configure the nodes in your cluster to be able to use the following:
• rsh or ssh (ssh is recommend if you’re on 10gR1 or greater.)
• rcp or scp (scp is recommend if you’re on 10gR1 or greater.)
• User equivalence for nonpassword authentication
The communication and copying features are for software installation and patching. They aren’t required for RAC to work after the fact if opening these things is against company security policies.
Tools for managing a RAC installation
Oracle supplies several tools for managing a RAC installation. Some of the tools are RAC specific, but others are also for non-RAC databases. All the tools for both RAC and non-RAC databases become cluster aware when you launch them in the presence of a clustered environment. This means that they will see the cluster and all the nodes in it.
Cluster awareness is extremely handy because a lot of the things you do in one node have to be done across many of the nodes. Cluster-aware tools help you accomplish those tasks more easily.
Oracle Universal Installer for Grid Infrastructure
If you choose Oracle Grid Infrastructure as your clustering software, right off the bat the Oracle Universal Installer (OUI) makes the software stack installation easy.
As long as you meet the following two criteria, the OUI begins by installing the software from one node, and then it replicates across the entire cluster:
![]() Correctly configure the hosts file across all the nodes.
Correctly configure the hosts file across all the nodes.
![]() Enable user-equivalence, ssh/rsh, and scp/rcp for the Oracle user across all your nodes.
Enable user-equivalence, ssh/rsh, and scp/rcp for the Oracle user across all your nodes.
This way, you have to install the software only once. (You still have to run a couple of configuration scripts on the remaining nodes after the initial install on the primary node.)
Furthermore, if you ever want to add a node to the cluster, with OUI you can use the primary node to clone the software across the network to the new node.
Oracle Universal Installer for other software
After you configure the cluster, the OUI is cluster aware for all installs thereafter. That means every time you go to install Oracle software, it asks you to choose the nodes you want to do the install on. This option is very nice when you do your database and agent installations. Furthermore, all patchsets that you apply also give you the option of pushing out to all the nodes.
Of course, if you’re patching in a rolling method, you can apply it one node at a time (hence, roll from one node to the next).
Database Configuration Assistant (DBCA)
You use the Database Configuration Assistant (DBCA) to create a database in Chapter 4. When the DBCA is launched from a node in a cluster, it too is automatically cluster aware. It begins the database creation and configuration by asking on what nodes you want to perform operations. To create a four-instance cluster across four nodes, you have to log on to only one of the servers and do it all from the DBCA. This huge timesaver automatically sets all the special initialization parameters for each node in each instance.
Network Configuration Assistant (NETCA)
When it comes to managing listeners and tnsnames files, NETCA is also cluster aware. If you need to add a listener or tnsnames entry, any action taken on one node is automatically propagated with appropriate settings across all the nodes. Configuring all the listener.ora and tnsnames.ora files across a multimode cluster would take a week by hand.
Server Control (srvctl)
Server Control is probably your day-to-day main command-line tool for managing your RAC environment.
To see an abbreviated list of all the things you can do with this tool, open a command-line prompt on your OS and type this:
<srvctl>
You see something like this:
Usage: srvctl <command> <object> [<options>]
command: enable|disable|start|stop|relocate|status|add|remove|modify|getenv|setenv|unsetenv|config
objects: database|instance|service|nodeapps|asm|listener
For detailed help on each command and object and its options use:
srvctl <command> <object> -h
The server control utility lets you manage nearly all the resources across the entire cluster from one session. Say you’re logged in to node1 and want to shut down the instance prod31 on node3 for the database prod3. This is what you’d type:
<srvctl stop instance –d prod3 –i prod31>
You should see this:
That’s right: You see nothing if it works correctly. If you get errors, research appropriately.
You can use Server Control to do the following and any combination therein:
![]() Stop all instances of a database.
Stop all instances of a database.
![]() Stop two of five instances for a database.
Stop two of five instances for a database.
![]() Start all instances.
Start all instances.
![]() Stop one or all listeners.
Stop one or all listeners.
You can easily script Server Control into operating scripts. That’s one of its big benefits. Tools such as SQL*Plus and the listener control utility (which require an execution on each node for multinode operations and multiline inputs) make for more complex scripts. With Server Control, everything is contained in one line for whatever operation you want to accomplish.
Cluster Control (crsctl)
Cluster Control is another command-line tool that controls the cluster-specific resources. It can start and stop the cluster components on individual nodes.
Type this to launch Cluster Control and get a list of the command options:
<crsctl>
You see something like this:
Usage: crsctl check crs - checks the viability of the Oracle Clusterware
crsctl check cssd
- checks the viability of Cluster Synchronization Services
crsctl check crsd - checks the viability of Cluster Ready Services
crsctl check evmd - checks the viability of Event Manager
crsctl check cluster [-node <nodename>]
- checks the viability of CSS across nodes
crsctl set css <parameter> <value> - sets a parameter override
...output snipped...
crsctl query crs activeversion - lists the Oracle Clusterware operating
If necessary any of these commands can be run with additional tracing by adding a 'trace' argument at the very front.
Example: crsctl trace check css
We cut a large portion of the output because this tool has a lot of options.
Patching the OS is one situation when Cluster Control is useful. These commands (which affect the operating state of the Grid Infrastructure) must be run as root. Commands that just report on the state of the Grid Infrastructure can be run as non-root users:
1. Stop all the cluster resources on that particular node with Server Control.
2. Stop the cluster-specific components:
<crsctl stop crs>
You see this:
Stopping resources.
Successfully stopped CRS resources
Stopping CSSD.
Shutting down CSS daemon.
Shutdown request successfully issued.
You might be required to reboot the node once or twice during the OS maintenance; you don’t want the cluster to restart.
3. Prevent the cluster services on this node from restarting:
<crsctl disable crs>
4. Do all the reboot you want.
You don’t have to worry about the cluster services interfering.
5. Re-enable the cluster services:
<crsctl enable crs>
6. Restart the cluster services:
<crsctl start crs>
All the cluster resources start, including the database-related resources on the node.
Oracle Interface Configuration Tool (OIFCFG)
If you need to change the cluster (changing server name or IP addresses, for instance), you must use the Oracle Interface Configuration Tool (OIFCFG) to reconfigure those changes in the internal cluster configuration.
Avoid making these types of changes. Put some thought into your network naming and IP choice ahead of time.
Oracle RAC application for high availability
RAC helps with high availability by providing redundancy in your environment — specifically, redundant Oracle instances. One instance in a multi-instance environment can be removed for OS, hardware, or Oracle software maintenance without disrupting the application.
Extended RAC
New developments are happening in a movement called Extended RAC. This RAC solution can protect against total site loss while providing all the other RAC features. As network transmission speeds increase over time, some people think that RAC is possible with instances in remote locations.
This configuration requires high-speed SAN mirroring and a network transmission media called dark fiber. Dark fiber is a private, direct connection between two remote sites that can handle multiple network transmissions at once over the same cable by using varying light frequencies.
At press time, Extended RAC appears to have distance limitations. The further apart the sites, the higher the latency. Latency turns into cluster performance degradation. We’ve been unable to find any definitive documentation on the distance limits. Degradation appears to factor heavily into your type of connection. Some sites use repeaters to extend even further.
In the meantime, if you need a remote site configured for disaster recovery, you may want to consider Data Guard. It can offer a lot of the features that Extended RAC does but at a fraction of the cost with no real distance limits.
However, make sure your expectations meet what RAC can deliver:
![]() RAC doesn’t cover all points of failure. It definitely helps harden against node failure and instance failure. Unfortunately, it can’t help with SAN, interconnect, or user error.
RAC doesn’t cover all points of failure. It definitely helps harden against node failure and instance failure. Unfortunately, it can’t help with SAN, interconnect, or user error.
![]() RAC isn’t typically considered a disaster-protection solution. If your entire site is compromised by wind, fire, or water, RAC is going with it.
RAC isn’t typically considered a disaster-protection solution. If your entire site is compromised by wind, fire, or water, RAC is going with it.
Understanding Oracle Data Guard
Data Guard is Oracle’s true disaster protection technology. In it, you have a minimum of two databases:
![]() A database called a primary
A database called a primary
![]() A database called a standby
A database called a standby
The two databases are connected by a network that ships all transactions from the primary and then applies them to the standby. In essence, you have one active database and one database in constant recovery.
Data Guard has options for multiple standby sites as well as an active-active configuration. By active-active, we mean both/all sites are up, running, and accessible. This is opposed to sites that have one active location and the others must be started up when they are needed. See Figure 15-2 for a general architectural layout.
Data Guard architecture
Start a description with the primary database is easy because it differs very little from any other database you might have. The only difference is what it does with its archived redo logs.
The primary database writes one set of archive redo logs to a Flash Recovery Area or a local disk. However, you may configure one or more other destinations in a Data Guard environment.
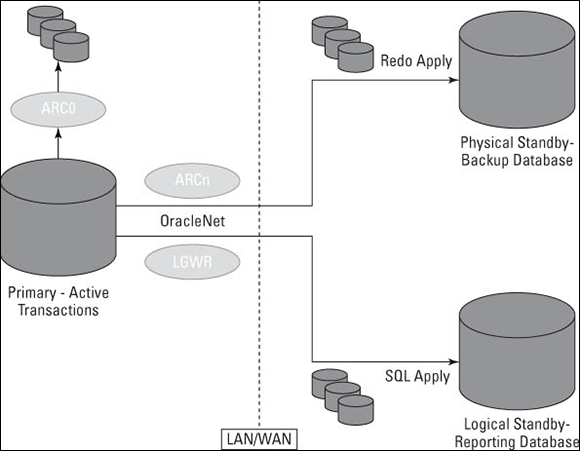
Figure 15-2: This Data Guard architecture has one physical and one logical standby database.
The LOG_ARCHIVE_DEST_n parameter may look like this for the configuration in Figure 15-2:
LOG_ARCHIVE_DEST_10='LOCATION=USE_DB_RECOVERY_FILE_DEST'
LOG_ARCHIVE_DEST_1='SERVICE=PHYSDBY1 ARCH'
LOG_ARCHIVE_DEST_2='SERVICE=LOGSDBY1 LGWR'
![]() LOG_ARCHIVE_DEST_10 is configured to send archive redo logs to the local Flash Recovery Area. One local destination is required for all archive log mode databases.
LOG_ARCHIVE_DEST_10 is configured to send archive redo logs to the local Flash Recovery Area. One local destination is required for all archive log mode databases.
![]() LOG_ARCHIVE_DEST_1 is configured to ship the archive logs via the archiver process (discussed in Chapter 2) to a remote site PHYSDBY1. The service name for this remote site has an entry in the tnsnames.ora file on the primary server.
LOG_ARCHIVE_DEST_1 is configured to ship the archive logs via the archiver process (discussed in Chapter 2) to a remote site PHYSDBY1. The service name for this remote site has an entry in the tnsnames.ora file on the primary server.
![]() LOG_ARCHIVE_DEST_2 is configured to ship the archive logs via the LGWR process to a remote site named LOGSDBY1. The service name for this remote site has an entry in the tnsnames.ora file on the primary server as well.
LOG_ARCHIVE_DEST_2 is configured to ship the archive logs via the LGWR process to a remote site named LOGSDBY1. The service name for this remote site has an entry in the tnsnames.ora file on the primary server as well.
Why the difference in ARCn versus LGWR shipping methods? That has something to do with protection modes. A Data Guard environment has three protection modes, as described in the following sections.
Maximum availability
The maximum availability protection mode compromises between performance and data availability. It works by using the LGWR to simultaneously write to redo logs on both the primary and standby sites. The performance degradation comes in the form of processes having to wait for redo log entries to be written at multiple locations. Sessions issuing commits have to wait until all necessary information has been recorded in at least one standby database redo log. If one session hangs due to its inability to write redo information, the rest of the database keeps moving forward.
Maximum protection
The maximum protection mode is similar to maximum availability except that if a session can’t verify that redo is written on the remote site, the primary database shuts down.
Configure at least two standby sites for maximum protection mode. That way, one standby site becoming unavailable won’t disrupt service to the entire application.
This mode verifies that no data loss will occur in the event of a disaster at the cost of performance.
Maximum performance
The maximum performance protection mode detaches the log shipping process from the primary database by passing it to the archive log process (ARCn). By doing this, all operations on the primary site can continue without waiting for redo entries to be written to redo logs or redo shipping. This is opposed to log shipping modes that use the log writer to transfer transactions. Using the log writer can slow the processing of the transaction because it can be affected by the network availability or performance.
Maximum performance provides the highest level of performance on the primary site at the expense of data divergence. Data divergence occurs when the two sites’ data starts to get out of sync. Archive redo data isn’t shipped until an entire archive redo log is full. In a worst case scenario, an entire site loss could result in the loss of an entire archive redo log’s worth of data.
Physical standby database
A physical standby database is a block-for-block copy of the primary site. It is built off a backup of the primary site and is maintained by shipping and applying archive logs to the standby site in the same way the transactions were committed on the primary site.
Physical standby databases can’t be open for changes. You can stop recovery on the physical standby site and open it for read-only transactions. During this time, the standby site falls behind the primary site in terms of synchronicity. All the transactions are saved until the standby site’s recovery is reactivated after reporting operations are done.
If you want a standby site available for reporting operations, consider setting up dual standby sites. That way, one can stay in recovery mode, and you perhaps can open the other for reporting operations during the day and then close it at night for catch-up. That way if you ever need to have a standby site activated, you won’t have to wait for it to catch up first.
Here’s a high-level overview of the steps to configure a physical standby database. In this example, the primary site name is prod_a and the standby site name is prod_b:
1. Set various initialization parameters in the primary database to prepare it for redo log shipping:
instance_name (different on each site)
instance_name = prod_a
db_name (same on each site)
db_name = prod
remote_archive_enable (enables sending of logs to remote site)
remote_archive_enable = true
log_archive_dest_1, 2
log_archive_dest_1 = 'LOCATION=/u01/arch/prod'
log_Archive_dest_2 = 'SERVICE=prod_b.world ARCH'
log_archive_format (tells primary how to name local and standby logs)
log_archive_format = arch_%S.arc
standby_file_management (makes adding data files easier)
standby_file_management = true
fal_client (tells primary where to re-ship “lost” archive logs)
fal_client = 'prod_b.world'
Regarding Steps 1 and 6: Set all the parameters on both sites to facilitate failover/switchover operations.
2. Create a standby copy of your primary control file by logging in to SQL*Plus on the primary and typing the following:
<alter database create standby controlfile as
'/u01/app/stdby_control.ctl';>
You should see this:
Database altered.
3. Move this copy to the standby site and put it in the directory of your choice.
4. Modify the initialization parameters on the prod_b instance to point to the new control file.
You can rename it however you want.
5. Restore a backup of your primary site to the standby site.
You can do this with RMAN or traditional hot/cold backup methods. To simplify things, put the files in the same locations on the standby site as the primary. If you can’t do that, you have to rename the files after you mount the database, or you need to use the following initialization parameters on the standby site so the instance can convert the locations. Say the files were in /u01/app/oracle/oradata/prod on the primary and /disk1/app/oracle/oradata/prod on the standby:
DB_FILE_NAME_CONVERT = '/u01/', '/disk1/'
Oracle finds all instances of /u01 in your data filename and replaces them with /u02.
6. Set the initialization parameters on the standby site:
instance_name (different on each site)
instance_name = prod_b
db_name (same on each site)
db_name = prod
remote_archive_enable (enables receiving of logs on remote site)
remote_archive_enable = true
standby_archive_dest (tells standby database where to find logs)
standby_archive_dest = /disk1/arch/prod
log_archive_format (tells standby how to interpret log names, set same as primary)
log_archive_format = arch_%S.arc
standby_file_management (makes adding data files easier)
standby_file_management = true
fal_server (tells standby where to search for “lost” archive logs)
fal_server = 'prod_a.world'
7. Mount the standby database:
<alter database mount standby database;>
You should see this:
Database altered.
8. Start recovery on the standby database:
<recover managed standby database disconnect;>
You see this:
Media recovery complete.
9. Log out of the standby site.
Let the recovery run in the background.
Logical standby database
A logical standby database works by copying your primary site with a backup. Then a process called SQL Apply takes the archive logs from the primary site and extracts the SQL statements from them to apply them to the logical standby database. During this time, the logical standby database is up and open. It’s like having the best of both worlds. People can have updated data with the primary site for reporting purposes.
Because the standby database will be up and open, you must protect the data from being modified by anyone other than the SQL Apply services. If the data is modified outside of this procedure, the standby database will diverge from the primary. If you ever need to switch over to it for disaster recovery purposes, it won’t match the primary.
To prevent replicated objects in the standby site from being modified, issue the following command in the standby environment:
ALTER DATABASE GUARD STANDBY;
Another unique feature of a logical standby database: the ability to replicate only certain objects. By default, all objects are replicated. However, you can force SQL Apply processes to skip certain objects. In addition, you can configure those skipped objects to allow modifications to them.
Performing switchover and failover operations
You can switch processing to your standby site two ways:
![]() Switchover is a planned switch that can occur if you want to do maintenance on the primary site that requires it to be unavailable. This operation may require a few minutes of downtime in the application, but if you have to do maintenance that lasts for an hour or more, the downtime could be worthwhile. This operation is called a graceful switchover because it turns the primary site into your standby and your standby site into your primary. Also, you can easily switch back to the original primary site without having to re-create it from scratch.
Switchover is a planned switch that can occur if you want to do maintenance on the primary site that requires it to be unavailable. This operation may require a few minutes of downtime in the application, but if you have to do maintenance that lasts for an hour or more, the downtime could be worthwhile. This operation is called a graceful switchover because it turns the primary site into your standby and your standby site into your primary. Also, you can easily switch back to the original primary site without having to re-create it from scratch.
![]() Failover occurs when the primary site has been compromised in some way. Perhaps it was a total site loss, or maybe you discovered physical corruption in a data file. Not always, but usually after a failover, you have to either completely re-create the primary site or recover it from a backup and re-instate it. You usually perform a failover only when you’ve determined that fixing the primary site will take long enough that you prefer not to have an application outage for the entire time.
Failover occurs when the primary site has been compromised in some way. Perhaps it was a total site loss, or maybe you discovered physical corruption in a data file. Not always, but usually after a failover, you have to either completely re-create the primary site or recover it from a backup and re-instate it. You usually perform a failover only when you’ve determined that fixing the primary site will take long enough that you prefer not to have an application outage for the entire time.
To perform a switchover, follow these steps:
1. On the current primary, log in to SQL*Plus and type the following:
<alter database commit to switchover to physical standby;>
You should see this:
Database altered.
2. Shut down the primary database:
<shutdown immediate>
You should see this:
Database closed.
Database dismounted.
ORACLE instance shut down.
3. Start the primary database in nomount mode:
<startup nomount>
You should see something like this:
ORACLE instance started.
Total System Global Area 789172224 bytes
Fixed Size 2148552 bytes
Variable Size 578815800 bytes
Database Buffers 201326592 bytes
Redo Buffers 6881280 bytes
4. Mount the database as a standby:
<alter database mount standby database;>
You should see this:
Database altered.
5. Start recovery:
<recover managed standby database disconnect;>
You see this:
Media recovery complete.
6. Log in to SQL*Plus on the current standby and type the following:
<alter database commit to switchover to physical primary;>
You should see this:
Database altered.
7. Shut down the standby database:
<shutdown immediate>
You should see this:
Database closed.
Database dismounted.
ORACLE instance shut down.
8. Make sure all appropriate initialization parameters are set for this database to behave properly as a primary.
9. Start it normally:
<startup>
You should see something like this:
ORACLE instance started.
Total System Global Area 789172224 bytes
Fixed Size 2148552 bytes
Variable Size 578815800 bytes
Database Buffers 201326592 bytes
Redo Buffers 6881280 bytes
Database mounted.
Database opened.
10. Make sure the users and applications can connect to and use the new primary instance.