Chapter 14
Advanced Features
In This Chapter
![]() Flashing back
Flashing back
![]() Retaining, compressing, and archiving data
Retaining, compressing, and archiving data
![]() Replaying the database
Replaying the database
![]() Understanding multitenant and pluggable databases
Understanding multitenant and pluggable databases
Oracle RDBMS is an extremely large software package. What makes Oracle one of the best database platforms out there is its rich feature content. This chapter details features that you don’t use on most Oracle enterprises from day to day. Regardless, most DBAs who are new to the sport probably won’t start here; these features are for more advanced administration. We categorize some features as “advanced” because they’re used less frequently and sometimes require a little extra knowledge to configure and use than the day-to-day features.
Also, though not the case with all features in this chapter, advanced components sometimes require extra licensing. We point out where that’s the case — after all, you don’t want to be caught with your pants down in an Oracle audit only to feel we’ve misled you. With that said, if you’re unsure about licensing, you can always call your friendly local Oracle sales rep to ask questions. Furthermore, there are also companies out there that can help you do your own audit to identify the features you use.
In this chapter, we cover just few of the advanced features that we find particularly interesting. There are probably a hundred additional features we would have liked to include, but we weren’t allowed to make this chapter hundreds of pages long. We hope you find our choices useful.
Flashing Back
Have you ever wanted a time machine? No such thing exists. Or does it? The Oracle time machine known as Flashback lets you rewind, fast forward, and recover from situations with ease. Flashback can sound intimidating, but the feature is simple. The following sections cover several types of Flashback:
![]() Flashback Query
Flashback Query
![]() Flashback Table
Flashback Table
![]() Flashback Database
Flashback Database
Flashing your query back
A feature called Flashback Query is one of the simplest and easiest to use variations of the Oracle Flashback technology. Simply put, it allows you to query a table at a point in the past. This means that, despite any updates, inserts, and deletes that may have happened, you see the table as it existed at the point in time you choose.
Here’s a quick demo with the example schema, HR:
1. Log in to SQL*Plus as the HR user.
2. Look at the data in your departments table.
3. Restrict the query to both minimize output and make the demo more obvious. Type the following:
<select department_id, department_name
from departments where manager_id is null;>
You should see something like this:
DEPARTMENT_ID DEPARTMENT_NAME
------------- ------------------------------
120 Treasury
130 Corporate Tax
140 Control And Credit
150 Shareholder Services
160 Benefits
170 Manufacturing
180 Construction
190 Contracting
200 Operations
210 IT Support
220 NOC
230 IT Helpdesk
240 Government Sales
250 Retail Sales
260 Recruiting
270 Payroll
16 rows selected.
4. Modify the table by removing the rows selected in the preceding output. To remove the rows, type
<delete from departments
where manager_id is null;>
You should see this:
16 rows deleted.
5. Commit your changes by typing
<commit;>
You should see this:
Commit complete.
6. Run the original query again.
You should see this:
no rows selected
The next step is where you use the magic of Flashback Query. Think of the time before the delete occurred. In this example case, it was five minutes ago.
7. Type something similar to the following to see the data as it existed five minutes ago:
<select department_id, department_name
from departments
AS OF TIMESTAMP SYSDATE – 1/288
where manager_id is null;>
You see the rows as they existed in Step 2. The key is the AS OF TIMESTAMP clause. For the target of the timestamp, you can see that the example uses math on the SYSDATE function. SYSDATE represents the current time, right now. Subtracting 1 from SYSDATE means yesterday. The example subtracts the fraction 1/288, which means five minutes, from SYSDATE. To get that fraction, the example uses the following formula:
24 (hours in a days) × 60 (minutes in an hour) = 1440 (minutes) in a day
So, 5 over 1440 is equal to 1 over 288.
You can also use an explicit timestamp instead of a SYSDATE function. For example:
select department_id, department_name
from departments
AS OF TIMESTAMP TO_DATE('16-AUG-2013 20:04:00','DD-MON-YYYY HH24:MI:SS')
where manager_id is null;
Here’s a neat trick. Suppose you accidentally deleted those rows and want to insert them back into your table. You can use Flashback Query to do such a thing. This is going to be much faster than doing an RMAN recovery to a point in time.
To insert your deleted rows back into your table, type
< insert into departments
select *
from departments
AS OF TIMESTAMP TO_DATE('16-AUG-2013 20:04:00','DD-MON-YYYY HH24:MI:SS')
where manager_id is null;>
You should see this:
16 rows created.
Query the table and, when you’re satisfied, commit your changes.
 You can only flash back as far as your setting for the instance parameter undo_retention. By default, this parameter is set to 15 minutes (900 seconds). If the time you wish to go back to is further than your undo_retention, you may not be able to see your data and will receive an error instead.
 Before you take the previous tip and set your undo_retention to reflect a month’s worth of time, consider that this will cause your UNDO tablespace to grow because it has to store images of your old data. You should carefully balance a realistic undo_retention setting with space consumption.
Flashing your table back
Very similar to Flashback Query is Flashback Table. In fact, both are built on the same underlying technology. Flashback Table is capable of flashing back row changes or the entire table if it was accidentally dropped.
Keep the following requirements in mind:
![]() Just like in the previous section, the UNDO_RETENTION parameter is going to control how far back you can flash the table.
Just like in the previous section, the UNDO_RETENTION parameter is going to control how far back you can flash the table.
![]() You need to use a feature called row movement that must be enabled on any table you want to flash back rows. (The upcoming steps show you how to enable row movement.)
You need to use a feature called row movement that must be enabled on any table you want to flash back rows. (The upcoming steps show you how to enable row movement.)
![]() If you want to be able to flash back a table from a drop, you need to have your parameter RECYCLEBIN set to ON. This parameter is turned on by default, but note that if it has been turned off it requires a database bounce to turn it back on.
If you want to be able to flash back a table from a drop, you need to have your parameter RECYCLEBIN set to ON. This parameter is turned on by default, but note that if it has been turned off it requires a database bounce to turn it back on.
Consider the earlier example where we accidentally deleted some rows from our table. They were very easy to recover because identifying them wasn’t difficult. However, suppose you want to recover from an accidental update. Updates are harder to recover from with Flashback Query. You can do it, but you may be able to make it easier on yourself by flashing back the entire table.
Flashback Table works on the entire table, not just certain rows, so make sure that bringing the entire table back in time is not going to cause other problems.
To use Flashback Table, follow these steps:
1. You must have row movement enabled; to enable it, type
<alter table departments enable row movement;>
You should see this:
Table altered.
As a side note, you don’t have to enable row movement before you change your data. You can do it after the fact.
2. See what your data looks like by typing
<select department_name, manager_id
from departments
where manager_id is not null;>
You should see something like this:
DEPARTMENT_NAME MANAGER_ID
------------------------------ ----------
Administration 200
Marketing 201
Purchasing 114
Human Resources 203
Shipping 121
IT 103
Public Relations 204
Sales 145
Executive 100
Finance 108
Accounting 205
11 rows selected.
To “mess up” the data, type the following:
< update departments
set manager_id = 205
where manager_id is not null;
commit;>
You shoud see something like this:
11 rows updated.
Commit complete.
3. Look at your data again by typing
<select department_name, manager_id
from departments
where manager_id is not null;>
You should see something like this:
DEPARTMENT_NAME MANAGER_ID
------------------------------ ----------
Administration 205
Marketing 205
Purchasing 205
Human Resources 205
Shipping 205
IT 205
Public Relations 205
Sales 205
Executive 205
Finance 205
Accounting 205
11 rows selected.
4. To flashback all the changes on the rows, type
<flashback table departments
to timestamp TO_DATE('16-AUG-2013 20:40:00','DD-MON-YYYY HH24:MI:SS'),>
You should see something like this:
Flashback complete.
5. Check your data again by typing
<select department_name, manager_id
from departments
where manager_id is not null;>
You should see something like this:
DEPARTMENT_NAME MANAGER_ID
------------------------------ ----------
Administration 200
Marketing 201
Purchasing 114
Human Resources 203
Shipping 121
IT 103
Public Relations 204
Sales 145
Executive 100
Finance 108
Accounting 205
11 rows selected.
The data is back where it was at the timestamp specified.
The next exercise helps you if you accidentally dropped your table. It utilizes the feature we mentioned above called the Recyclebin. It functions much like the Recycle Bin on a Windows desktop. You can restore an object to what it looked like before it was dropped.
For this next example, you start by making a copy of the employees table to work with. The reason you’re making a copy is that in the demo schema provided with the database there is a lot of referential integrity, which prevents you from dropping tables in the first place (one of the many reasons referential integrity is such a good idea!).
1. To make a copy of your employees table, type
<create table emp as select * from employees;>
You see something like this:
Table created.
2. “Accidentally” drop the new emp table by typing
<drop table emp>;
You see something like this:
Table dropped.
3. Query your Recyclebin to see what you can recover — type
< select object_name, original_name, operation, droptime
from user_recyclebin;>
You see something like this:
OBJECT_NAME ORIGINAL_NAME OPERATION DROPTIME
------------------------------ --------------- --------- ------------------
BIN$5BtB5dF6GmXgQ1ABqMC8yg==$0 EMP DROP 2013-08- 16:21:02:12
Notice the funny name starting with BIN$. With the Recyclebin turned on, what’s actually happening during a drop is the object is being renamed. You can still query the original table by using this name! This might be useful if you want to restore just a few rows rather than the entire table. You can query those rows or do a “create table as select” to store them in a new table altogether.
4. To undrop your table, type
< flashback table emp to before drop;>
You see this:
Flashback complete.
You can now query your table again.
Although flashing back the table to before a drop does put back all privileges and indexes, the indexes keep the BIN$ name. We aren’t sure why Oracle does this. You can give your indexes back the original name with a rename command if you want.
Flashing your database back
You could argue that moving the database forward and back with Oracle Recovery Manager with good backups is possible. However, restoring a large database to a previous point is time-consuming and tedious. Also, if you don’t go back far enough, you have to start over from the beginning.
You might want to flash back the database for these reasons:
![]() Repeated testing scenarios: Say you have an application that you’re testing in your development environment. Every time you run the application, it changes your data. You want to reset the data to its original values before the next test. Flashback is an excellent tool for this.
Repeated testing scenarios: Say you have an application that you’re testing in your development environment. Every time you run the application, it changes your data. You want to reset the data to its original values before the next test. Flashback is an excellent tool for this.
![]() Logical Data Corruption: Perhaps someone accidentally ran the wrong program in your production environment; you need to return to a point before the mistake occurred. You could do this with a data recovery, but Flashback is quicker and easier.
Logical Data Corruption: Perhaps someone accidentally ran the wrong program in your production environment; you need to return to a point before the mistake occurred. You could do this with a data recovery, but Flashback is quicker and easier.
![]() Deployment procedures: Perhaps you’re releasing a new version of your code that updates all sorts of objects in your production schema with both DDL and DML. You can easily roll it back if the application isn’t working properly in target performance parameters.
Deployment procedures: Perhaps you’re releasing a new version of your code that updates all sorts of objects in your production schema with both DDL and DML. You can easily roll it back if the application isn’t working properly in target performance parameters.
Flashback Database works by recording extra information that allows you to roll back transactions without doing a full database recovery. Not only that, but it works very quickly. The Flashback Database has these quick features, among others:
![]() You can open the database in read only mode to see whether you went back far enough.
You can open the database in read only mode to see whether you went back far enough.
![]() Not far enough? Quickly roll back farther.
Not far enough? Quickly roll back farther.
![]() Too far? Roll forward again.
Too far? Roll forward again.
You can perform all these tasks with simple commands inside SQL*Plus or Oracle Enterprise Manager. To do them with RMAN, you’re talking multiple full restores and lots of time in between.
Configuring and enabling Flashback Database
Flashback Database works differently than the Flashback features we explore earlier in the chapter. With Flashback Database, Oracle stores a file called a flashback log. Flashback logs have the data to roll back blocks to a previous time. Flashback logs are stored in the flash_recovery_area. Chapter 11 shows how to configure the Flash Recovery Area.
Two variables come into play here:
![]() How far back do you want to go?
How far back do you want to go?
![]() How much data is changed in your database within that time period?
How much data is changed in your database within that time period?
The farther back you go and the more changes you have, the more flashback logs you generate. Be sure you have enough space to store those logs, or you won’t be flashing anywhere.
If you’re considering implementing Flashback Database, you may need to enlarge the parameter db_recovery_file_dest_size. How much you enlarge it depends on the two variables: how far back and how much data? If you want a good starting point, use this formula:
New Flash Recovery Area Size = Current Flash Recovery Area Size + Total Database Size × 0.3
In essence, you’re trying to reserve roughly 30 percent of your total database size in the Flash Recovery Area for flashback logs.
From then on, you can monitor how much space the flashback logs are consuming. We show you how to do that shortly.
After you configure the Flash Recovery Area, turn on the Flashback feature in the database by following these steps:
1. Consider how far back you want to be able to flash back.
The default value is 24 hours (or 1,440 minutes). Say you want to be able to flash back up to 48 hours.
2. Configure how far back you want to go with the parameter db_flashback_retention_target; to do so, log in to SQL as SYSDBA and type
<alter system set db_flashback_retention_target =2880;>
In this example, the time is set for 2,880 minutes (48 hours).
You should see the following for any amount of time you choose.
System altered.
3. Shut down your database and restart it in mount mode.
4. Put the database in flashback mode by typing this:
<alter database flashback on;>
You should see this:
Database altered.
5. Open the database by typing this:
<alter database open;>
You should see this:
Database altered.
Now that the database is in flashback mode, you can flash back to any time within your Flashback window.
Rolling your database back
When the database must be flashed back, don’t worry. The process is relatively easy.
Flashing back a database removes any change that occurred after the point in time chosen to return. Don’t take this consideration lightly.
To see how far back you can go, type this:
< select oldest_flashback_time
from v$flashback_database_log;>
You should see something like this:
OLDEST_FLASHBACK_TIM
--------------------
14-AUG-2013 06:34:03
db_flashback_retention_target should be about the limit of that time frame. You may find it to be longer if space isn’t a concern and the database hasn’t yet purged old flashback logs.
Say a user accidentally dropped the HR schema from your database about an hour ago.
1. Shut down your database.
2. Restart it in mount mode.
3. Type the following, where 1 is the number of hours you want to flash back:
< flashback database to timestamp sysdate - 1/24;>
You should see this:
Flashback complete.
4. Check the flashback before making it permanent:
< alter database open read only;>
You should see this:
Database altered.
5. If you’re satisfied with the result, go to Step 6. If you’re not satisfied with the time, skip to Step 9.
6. Shut down the database.
7. Start the database in mount mode.
8. Open the database with Resetlogs:
< alter database open resetlogs;>
You should see this:
Database altered.
9. Restart the database in mount mode.
10. Type the following:
<recover database;>
You should see this:
Media recovery complete.
11. Start your database in mount mode.
If you want to flash back to a timestamp, go to Step 12. If you want to flash back to a previously created restore point, go to Step 13.
For more on restore points, see the nearby “Using restore points” sidebar.
12. Type the following:
<flashback database to timestamp
to_timestamp('14-AUG-2013 13:00:00','DD-MON-YYYY HH24:MI:SS'),>
You should see this:
Flashback complete.
13. Type the following if you want to flash back to a restore point:
<flashback database to restore point pre_deploy_15AUG2013;>
You should see this:
Flashback complete.
Compressing Data for Purging, Retention, and Archiving
DBAs spend a lot of their time and effort compressing data for retention and archiving. Compression is the act of taking data in your database and applying processes that reduce its storage footprint. Because each year that goes by results in more and more data in your database, without specific processes in place, a database can quickly grow out of control, consuming all sorts of resources and hindering performance. As a first-class database, Oracle gives the DBA compression tools to make the jobs of removing data (purging) and keeping data (retention and archiving) quicker and more efficient.
Basic compression
Basic compression in the database has been around since Oracle 9i. It is called basic compression because it is very simple in what it does. However, it is also limited in its uses. Basic compression works much like using a zipping tool to compress a file on your operating system. In the database, objects can be compressed.
Using basic compression to reduce your table sizes can afford you efficiencies in using of space (obviously), CPU (table scanning), and memory (buffer cache usage). The greater efficiency means that tablespaces and backups take up less space. Backups run more quickly as well.
Be aware, though, that basic compression is primarily recommended for objects with a low frequency of DML. It is preferred that the objects are practically read only. We say practically because some data isn’t 100 percent black and white. For example, a person’s name rarely changes, so a list of employee names is practically read only. A change may occur once in a while, but, it so infrequently that compressing the data and incurring the overhead of a change is negligible. Think of it this way, if you want to edit a compressed file on your OS, what do you have to do first? You have to uncompress it. The same is true with Oracle basic compression. DML on compressed files suffers in terms of performance.
Here’s a compression example.
1. Log in to SQL*Plus as the user HR and make a copy of the demo table employees called emp by typing
<create table emp as select * from employees;>
2. Check the size of this table by typing
< select segment_name, bytes
from user_segments
where segment_name = 'EMP';>
You see something like this:
SEGMENT_NAME BYTES
-------------- --------------------
EMP 65,536
3. Insert rows into emp by running the following statement until you see “109568 rows created”:
< insert into emp select * from emp;>
4. Check the size of the emp table again by typing
< select segment_name, bytes
from user_segments
where segment_name = 'EMP';>
You see something like this:
SEGMENT_NAME BYTES
-------------- --------------------
EMP 18,874,368
5. Compress the rows by typing
<alter table emp move compress;>
You see this:
Table altered.
6. Check the size one more time by typing
< select segment_name, bytes
from user_segments
where segment_name = 'EMP';>
You see something like this:
SEGMENT_NAME BYTES
-------------- --------------------
EMP 9,437,184
As you can see, the table has reduced to about 50 percent of the original size. Depending on the type and organization of your data, you may see varying degrees of compression.
To see your tables compression details in the data dictionary, type
<select table_name, COMPRESSION, COMPRESS_FOR
from user_tables
where table_name = 'EMP';>
You see something like this:
TABLE_NAME COMPRESS COMPRESS_FOR
------------------------------ -------- ------------
EMP ENABLED BASIC
To remove compression from a table in case you need to update a lot of data, type
<alter table emp move nocompress;>
You see this:
Table altered.
Advanced compression
After reading the preceding section about basic compression, the primary thing to understand about advanced compression is it uses more highly developed compression algorithms and data access policies so that the overhead of issuing DML against your compressed objects is all but eliminated. Well, the other important thing you need to be aware of is that advanced compression is a licensed feature. Yes, that means you must pay extra for it. Your Oracle sales rep can help you figure out what it will cost. One thing you should consider, though, is the return on investment you can get from advanced compression. You’ll require less storage, and many operations will be improved. Calculating these returns will be an important part of your decision process.
Using advanced compression is very simple. If you followed the demo in the preceding section, you have an emp table in noncompressed format. You use that emp table in the following steps to apply advanced compression:
1. To compress your emp table with advanced compression, type
<alter table emp move compress for all operations;>
You see something like this:
Table altered.
2. To check the new size of your emp table, type
<select segment_name, bytes
from user_segments
where segment_name = 'EMP';>
You see something like this:
SEGMENT_NAME BYTES
-------------- --------------------
EMP 9,437,184
3. Check the compression details in the data dictionary by typing
<select table_name, COMPRESSION, COMPRESS_FOR
from user_tables
where table_name = 'EMP';>
You see something like this:
TABLE_NAME COMPRESS COMPRESS_FOR
------------------------------ -------- ------------
EMP ENABLED ADVANCED.
Your table is enabled for all operations including DML with minimal performance loss.
You may have noticed in the examples for both basic and advanced compression that we use the keyword MOVE in the commands. If you don’t use the keyword MOVE, the table is not compressed, but all future data inserted into the table will be compressed.
If you use the keyword MOVE and there are indexes on the table, those indexes will become corrupt. This corruption occurs because you’re changing the row location in the table when you proactively compress the data. To fix this problem, after a MOVE compression action, rebuild the indexes. This is one reason you may choose to compress the data for future operations now and then move it later when you can incur downtime to rebuild the indexes.
Flashback Data Archive
Flashback Data Archive is a database mechanism that allows you to periodically or indefinitely store all row versions in a table over its lifetime. You can then choose a time to view the data as it existed at a specific point in time.
Be aware that Flashback Data Archive is a licensed feature. The good news: It is included with advanced compression, which makes the advanced compression cost an even better value.
You don’t need to code complex triggers to move rows to history tables. You also don’t need to code complex application logic to retrieve the data. The archiving is completely transparent to developers and end users. Oracle has sometimes referred to this feature as Oracle Total Recall. (No, that’s not a reference to some cheesy 1990s movie.)
When you enable Flashback Data Archive, the row versions are automatically compressed to conserve space. You can also specify the retention period.
 You can’t do certain operations (such as DROP or TRUNCATE) on tables where you’ve enabled Flashback Data Archive. Furthermore, you can’t modify historical data; this ensures the validity and consistency of the archive data.
Flashback Data Archive is a totally online operation. No downtime is required to enable or use this feature. It’s enabled on a table-by-table basis. You can also group objects according to retention periods for easier management. Indexes aren’t maintained, but you can create your own index to facilitate searching.
After the specified retention period expires, data is automatically purged to conserve space. If space is a concern, you can set quotas to limit archive growth. Also, to best organize your Flashback data, create tablespaces to store Flashback data for specific retention periods.
If an archive quota is exceeded, new transactions are blocked. Keep an eye on space usage and periodically check the alert log for space warnings.
Here’s how you might use a Flashback Data Archive:
1. Create a tablespace that holds data for a one-year retention period:
<create tablespace fbda_1yr datafile
'/opt/oracle/oradata/dev12c/fdba_1yr_01.dbf' size 100M
Autoextend on next 100M maxsize 10g;>
The tablespace in this example is named for documentation purposes. You see this:
Tablespace created.
2. Create a Flashback Data Archive object in your tablespace with a one-year retention and a 10GB space limit:
<create flashback archive FBDA1
Tablespace fbda_1yr quota 10G retention 1 year;>
3. Enable Flashback data archiving on the table to keep row history:
<alter table emp flashback archive FBDA1;>
You see this:
Table altered.
4. Query the table to see what it looked like:
<select *
From emp
As of timestamp sysdate – 180;>
In this case, you’re searching for emp 6 months prior. You see the row images as they existed 180 days ago.
You can’t drop, truncate, or modify any historical rows in this table as long as Flashback Data Archive is enabled.
To remove the Flashback Data Archive status, deleting all historical data, type this:
<alter table EMP no flashback archive;>
You see this:
Table altered.
Oracle Database Replay
The Oracle Database Replay feature evolved as a solution for the need to be able to do realistic application testing. Before Database Replay, if you wanted to test any kind of changes against performance or workload, you had to buy a third-party tool or do massive amounts of coding to fake a workload. In most cases, neither method was truly representative of your real workload. Also, making changes to a production environment without testing them can be risky.
Database Replay is one more tool in your shed to cover all the bases.
In essence, Database Replay allows you to record your workload in real time and then play it back. Furthermore, you could play it against
![]() Another database
Another database
![]() A different version of Oracle
A different version of Oracle
![]() A different OS
A different OS
Database Replay captures the workload at below the SQL level. The workload is stored in binary files. You can then transfer these files to a test environment, run the workload, analyze problems, fix problems, and test again. The same workload is repeatable. In conjunction with a tool like Flashback Database, you can repeatedly test changes in quick succession. Ultimately, it helps reduce the chances of something breaking when environments are changed.
Database Replay provides a mechanism to help with these kinds of situations:
![]() Testing
Testing
![]() Configuration changes
Configuration changes
![]() Upgrades
Upgrades
![]() Downgrades
Downgrades
![]() Application changes
Application changes
![]() Debugging
Debugging
![]() Storage, network, and interconnect changes
Storage, network, and interconnect changes
![]() Platform changes
Platform changes
![]() OS changes
OS changes
![]() Conversion to Real Application Clusters (RAC)
Conversion to Real Application Clusters (RAC)
Using Database Replay
Here’s how to use Database Replay:
1. Log in to SQL*Plus as a user with the SYSDBA privilege.
Oracle requires a directory in which to write the replay files.
2. Create a directory to a location on the OS with plenty of space:
<create or replace directory capture_dir as
'/u01/app/oracle/admin/devcdb/capture';>
You see this:
Directory created.
3. Start a capture:
<exec dbms_workload_capture.start_capture ('CAPTURE_DEMO','CAPTURE_DIR'),>
This example uses the name CAPTURE_DEMO.
Ideally, you restart the database before the capture begins so that you can avoid catching any transactions in the middle. Of course, doing so isn’t always an option when dealing with a production system.
You see this:
PL/SQL procedure successfully completed.
4. Execute your workload.
If it’s just normal application behavior, let it run for the amount of time you want.
5. When the workload is complete or your time target has passed, stop the capture process:
<exec dbms_workload_capture.finish_capture;>
You see this:
PL/SQL procedure successfully completed.
According to Oracle documentation, capturing a workload can add up to 4.5 percent of processing overhead to the system as well as 64K of memory overhead for each session. Futhermore, if space runs out in the capture directory, the capture will stop. All the captured data up to that point will still be useful.
The idea is we will use our capture to “replay” the workload. In our experience, the workload is usually replayed against a different database, such as a test environment. However, this is not always the case.
If your database environment is one where lengthy maintenance windows can occur (such as over a weekend), you might find yourself doing these things:
![]() Enabling Flashback Database
Enabling Flashback Database
![]() Creating a restore point on Friday morning
Creating a restore point on Friday morning
![]() Starting a workload capture for four hours from 8 a.m. to noon
Starting a workload capture for four hours from 8 a.m. to noon
![]() Restricting the system and creating another restore point after the employees go home on Friday evening
Restricting the system and creating another restore point after the employees go home on Friday evening
![]() Restoring the database to the restore point Friday morning
Restoring the database to the restore point Friday morning
![]() Deploying database or application changes
Deploying database or application changes
![]() Replaying your workload to test the changes
Replaying your workload to test the changes
![]() Flashing back the workload to Friday evening
Flashing back the workload to Friday evening
![]() Deploying database or application changes to take effect when the workers come back Monday morning
Deploying database or application changes to take effect when the workers come back Monday morning
Replaying the workload
Follow these steps to replay the workload:
1. Create a directory for the replay capture files:
<create or replace directory capture_dir as
'/u01/app/oracle/admin/devcdb/capture';>
You see this:
Directory created.
This example assumes the replay is taking place on another database. If it’s on the same database, there is no need to create a directory and move the capture files because they will already be in the correct location.
2. Move the files from the capture directory on the source system to the directory on the replay system.
3. Begin the replay process on the database:
<exec dbms_workload_replay.process_capture ('CAPTURE_DIR'),>
You see this:
PL/SQL procedure successfully completed.
4. Initialize a replay session called REPLAY_DEMO:
<exec dbms_workload_replay.initialize_replay
('REPLAY_DEMO_4','CAPTURE_DIR'),>
You see this:
PL/SQL procedure successfully completed.
5. Tell Oracle to prepare the replay files:
<exec dbms_workload_replay.prepare_replay ;>
You see this:
PL/SQL procedure successfully completed.
Start replay clients, which are processes that execute and manage the workload. These processes are launched from the OS’s command line.
6. The following example starts a replay client with oracle as the password:
<wrc system/oracle>
You see this:
Workload Replay Client: Release 12.1.0.1.0 - Production on Fri Aug 16 22:24:44 2013
Copyright (c) 1982, 2013, Oracle and/or its affiliates. All rights reserved.
Wait for the replay to start (22:24:44)
7. Tell the database to start the replay:
<exec dbms_workload_replay.start_replay;>
You see this:
PL/SQL procedure successfully completed.
8. Check on the status while the replay runs:
<select id, name, status, duration_secs
from dba_workload_replays;>
Basically, you’re querying the DBA_WORKLOAD_REPLAYS table. You see this (or something like it):
ID NAME STATUS DURATION_SECS
---------- -------------------- ----------- -------------
10 REPLAY_DEMO IN PROGRESS 369
When everything is done, you should clean up the replay metadata.
1. Capture ID info on the source system:
<select id, name
from dba_workload_captures;>
You might see something like this:
ID NAME
---------- -----------------------------------
4 CAPTURE_DEMO
2. Delete the capture information:
<exec dbms_workload_capture.delete_capture_info(4);>
You see this:
PL/SQL procedure successfully completed.
3. Find the replay id on the replay system:
<select id, name
from dba_workload_replays;>
You might see something like this:
ID NAME
---------- -----------------------------------
10 REPLAY_DEMO
4. Delete the replay information:
<exec dbms_workload_capture.delete_replay_info(10);>
Multitenant Architecture and Pluggable Databases
One of the most talked about new features of Oracle 12c is multitenant databases. They have also come to be known as pluggable databases. If you haven’t heard about the cloud, you must have been living under a rock for the past several years. As you know by now, the c in 12c stands for cloud. Serving up computing resources and applications in the cloud is all the rage these days. Doing so reduces capital expenditures for corporations and has immediate tax benefits as well. Therefore, companies have a lot of incentive to take advantage of cloud computing.
One of the technologies that has really taken off with the cloud computing revolution is virtualization. Using virtual machines carved out of larger physical machines and leveraging fractional licensing further reduces costs for corporations. Oracle multitenant databases were developed to help companies take advantage of all these technologies and cost savings.
The Multitenant option of Oracle 12c is licensed. As usual, check with your Oracle sales rep for costs. Again, though, make sure you’re aware of the return on investment that this feature can bring you.
You need to be aware of the new types of databases that are now part of a multitenant architecture:
![]() Container Database (CDB): The primary database that contains multiple plugged-in databases. Many operations can be performed at the container level to reduce management costs. A database is created as either a CDB or a non-CDB.
Container Database (CDB): The primary database that contains multiple plugged-in databases. Many operations can be performed at the container level to reduce management costs. A database is created as either a CDB or a non-CDB.
![]() Pluggable Database (PDB): A set of schemas, objects, and non-schema objects that can be plugged and unplugged from a container database. The PDB appears to OracleNet and end users as a database in and of itself but is actually managed within a container that may have many PDBs.
Pluggable Database (PDB): A set of schemas, objects, and non-schema objects that can be plugged and unplugged from a container database. The PDB appears to OracleNet and end users as a database in and of itself but is actually managed within a container that may have many PDBs.
![]() Seed Database (Seed PDB): A default PDB that the system uses as a template to quickly provision other user-created PDBs. Internally, it’s called PDB$SEED.
Seed Database (Seed PDB): A default PDB that the system uses as a template to quickly provision other user-created PDBs. Internally, it’s called PDB$SEED.
The Multitenant option helps you accomplish the following:
![]() High consolidation density: Many databases can share memory and background processes.
High consolidation density: Many databases can share memory and background processes.
![]() Provisioning: A database can be unplugged from one environment and plugged into another or cloned with SQL commands in just a few seconds. They can even be plugged across operating systems and chipsets.
Provisioning: A database can be unplugged from one environment and plugged into another or cloned with SQL commands in just a few seconds. They can even be plugged across operating systems and chipsets.
![]() Patching and upgrades: You can patch a database simply by unplugging from one unpatched container and plugging it into another patched container.
Patching and upgrades: You can patch a database simply by unplugging from one unpatched container and plugging it into another patched container.
![]() Manage many databases as one: You can do tasks such as backing up and patching on the primary container database instead of the individual pluggable databases.
Manage many databases as one: You can do tasks such as backing up and patching on the primary container database instead of the individual pluggable databases.
![]() Resource management: The Oracle Resource Manager feature can work at the pluggable database level for you to manage resource competition among the databases in your environment.
Resource management: The Oracle Resource Manager feature can work at the pluggable database level for you to manage resource competition among the databases in your environment.
One other thing worth mentioning is that a pluggable database is fully compatible with a non-CDB. In fact, Oracle has something it is calling the PDB/non-CDB compatibility guarantee, which states that anything you would do in a non-CDB would also work in a PDB. This compatibility guarantee is important when it comes to certifying things like third-party vendor products to work in a multitenant architecture.
Creating a multitenant database environment
When creating a database, you must designate it as a CDB or non-CDB for it to be able to support the multitenant architecture. The next set of examples walks you through the steps to create a container database with the DBCA. There is only one step that differentiates a CDB from a non-CDB when using the DBCA.
Following the advanced path of creating a database, the first thing you may notice is a check box for Create As Container Database on Step 4 of 13, as shown in Figure 14-1.
You also can choose the number of PDBs created at this time. We choose only one because we plan to show you how to add more at a later time. You can also choose to create an empty container database with no pluggable databases at the onset. The rest of the steps are pretty much the same as when you create a non-CDB.
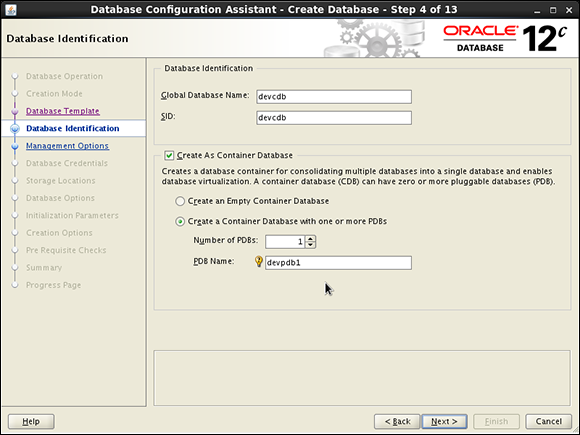
Figure 14-1: Filling in the information for creating a CDB.
Navigating a multitenant architecture
A big difference with working in a multitenant architecture is how you connect to your databases. Because there is only one SGA and one set of background processes, simply connecting to an instance like you have been taught for non-CDBs does not apply in quite the same way. You’re going to want to be aware of some key new commands and data dictionary views.
First of all, how do you connect to the CDB and or PDBs? You connect to the CDB the same way you used to do in the past. You can set your ORACLE_SID and connect with SQL*Plus or RMAN as SYSDBA. Connecting to the pluggable databases is where things differ. You can connect to a PDB in two ways:
![]() You can connect to the CDB and then alter your session to set your environment to a PDB.
You can connect to the CDB and then alter your session to set your environment to a PDB.
![]() You can set up Oracle Net to route you to a PDB through a service name by using the TNSNAMES.ORA file.
You can set up Oracle Net to route you to a PDB through a service name by using the TNSNAMES.ORA file.
To connect to a PDB through the CDB on Linux, follow these steps:
1. Open a terminal for a user with the required privileges to connect to the database through SQL*Plus.
2. Set your environment to the CDB using the oraenv tool by typing
<. oraenv>
You see something like this:
[oracle@orasvr01 ~]$ . oraenv
ORACLE_SID = [oracle] ? devcdb
The Oracle base remains unchanged with value /u01/app/oracle
3. Connect to the CDB just like you would any non-CDB by typing
<sqlplus / as sysdba>
You something like this:
SQL*Plus: Release 12.1.0.1.0 Production on Fri Aug 16 23:34:59 2013
Copyright (c) 1982, 2013, Oracle. All rights reserved.
Connected to:
Oracle Database 12c Enterprise Edition Release 12.1.0.1.0 - 64bit Production
With the Partitioning, OLAP, Advanced Analytics and Real Application Testing options
4. To see where in the multitenant architecture you’re connected, type the new 12c command:
<show con_name>
You see something like this:
CON_NAME
------------------------------
CDB$ROOT
5. Get a list of your PDBs by querying one of the new data dictionary views for supporting a multitenant environment by typing
<select name, open_mode
from v$pdbs;>
Alternatively, you can use this shortcut to get the same output:
SQL> show pdbs
You see something like this:
NAME OPEN_MODE
---------- ----------
PDB$SEED READ ONLY
DEVPDB1 READ WRITE
Note that the PDB$SEED is visible in read only mode. It is rare that you would ever need to connect to this database — it is used primarily internally for optimization purposes when creating PDBs.
6. To connect to your PDB DEVPDB1 from within your CBD, type:
< alter session set container=devpdb1;>
You see something like this:
Session altered.
7. To show that you are now in the PDB container, type
<show con_name>
You see something like this:
CON_NAME
------------------------------
DEVPDB1
As we mention earlier, the other way to connect to your containers is directly through Oracle Net. This method supports the guarantee that the multitenant environment will be entirely compatible with non-CDB environments.
1. Make sure that the databases are listed with the listener on the server. To do this, log in to the OS as the oracle software owner and type
<lsnrctl status>
You see something like this:
Service "devcdb" has 1 instance(s).
Instance "devcdb", status READY, has 1 handler(s) for this service...
Service "devpdb1" has 1 instance(s).
Instance "devcdb", status READY, has 1 handler(s) for this service...
This output shows that the CDB and PDB have service registered with the listener.
2. Make sure there are TNS entries on the clients from which you want to connect.
For example, you should have entries modeled after this example:
DEVPDB1 =
(DESCRIPTION =
(ADDRESS = (PROTOCOL = TCP)(HOST = orasvr01)(PORT = 1521))
(CONNECT_DATA =
(SERVER = DEDICATED)
(SERVICE_NAME = devpdb1)
)
)
3. After you confirm the preceding configurations, you can connect from your Oracle SQL*Plus client by typing
<sqlplus system@devpdb1>
You see something like this:
Last Successful login time: Fri Feb 01 2013 09:48:20 -04:00
Connected to:
Oracle Database 12c Enterprise Edition Release 12.1.0.1.0 - 64bit Production
With the Partitioning, OLAP, Advanced Analytics and Real Application Testing options
SQL>
Starting and stopping pluggable databases
Because the instance architecture of pluggable databases is entirely different from a non-container database, one would imagine that managing their state of readiness is also different. Well, it’s true. We start by looking at the CDB itself.
The first thing to remember is that because the CDB maintains the instance for which all PDBs share, that instance must be up and open for people to be able to connect to the PDBs. Starting and stopping the CDB is not different from non-CDBs.
The next thing to remember is that when you start a CDB, all of its associated PDBs are left in MOUNT state, which means that, by default, they are not opened with the CDB. As of this writing, 12cR1 doesn’t offer an option to change this behavior. However, 12c does provide a new type of trigger that will fire if it detects a CDB opening and will then open specified PDBs. See the Oracle documentation for further information on setting this up.
After starting and opening a CDB, you can open any corresponding PDBs like so:
SQL> alter pluggable database devpdb1 open;
Pluggable database altered.
Or:
SQL> alter pluggable database all open;
Pluggable database altered.
To close PDBs, you can essentially do the opposite of the preceding commands:
SQL> alter pluggable database devpdb1 close;
Pluggable database altered.
Or:
SQL> alter pluggable database all close;
Pluggable database altered.
As we mention earlier, you can use the V$PDBS data dictionary view to get information on the readiness of the PDBs.
Creating new PDBs
You can create new PDBs with traditional SQL or with the DBCA. You may note that when launching the DBCA now, a new option appears on the main screen: Manage Pluggable Databases. When you select this option, the DBCA walks you through many different activities that you can exercise against a PDB, such as
![]() Create
Create
![]() Unplug
Unplug
![]() Delete
Delete
![]() Configure
Configure
Because earlier steps show you how to do some of the CDB activity in the DBCA, the next two activities walk you through how to create a new PDB by using SQL from the SQL*Plus. We could say that it’s up to you to choose which method you choose. However, using SQL offers one important benefit. To use the DBCA, you must be on the server itself to launch the tool from OS that houses the CDB. Using SQL from SQL*Plus, you can manage the PDBs from anywhere on the network with simple SQL commands that you are familiar with. You can also set up privileges to allow some user communities to have a level of self-service access for provisioning PDB environments.
Create a new PDB by using the seed on Linux
This method copies the files for the seed to a new location and associates the copied files with the new PDB, which we will call DEVPDB2. Although you have many options for creating PDBs, this example is one of the simplest ways to get up and running. Consult Oracle documentation for different options. Using this method leaves you with a “virgin” PDB with no customizations.
1. Log in to your CDB using SQL*Plus as SYSDBA. To make sure you’re in the correct location, type
<show con_name>
You should see something like this:
CON_NAME
------------------------------
CDB$ROOT
The out-of-the box file location for PDBs is in a subdirectory under the oradata directory for the CDB. For this example, we follow that approach.
2. Create a subdirectory for the new PDB under the CDB file location from the OS oracle software owner by typing
<mkdir /u01/app/oracle/oradata/devcdb/devpdb2>
If this command succeeds, you get no output. You can list the new directory by typing
<ls –l /u01/app/oracle/oradata/devcdb |grep devpdb2>
You should see something like this:
drwxr-xr-x. 2 oracle oinstall 4096 Aug 17 01:56 devpdb2
3. Back in SQL*Plus as SYSDBA, create pluggable database command by typing
<CREATE PLUGGABLE DATABASE devpdb2 ADMIN USER pdb2dba identified by "oracle"
DEFAULT TABLESPACE USERS
DATAFILE '/u01/app/oracle/oradata/devcdb/devpdb2/users01.dbf'
SIZE 250M AUTOEXTEND ON
FILE_NAME_CONVERT=(
'/u01/app/oracle/oradata/devcdb/pdbseed/',
'/u01/app/oracle/oradata/devcdb/devpdb2/'),>
You should see this:
Pluggable database created.
The new PDB is left in a mount state.
4. Show the new PDB and open it by typing
<show pdbs>
<alter pluggable database devpdb2 open;>
You should see this:
CON_ID CON_NAME OPEN MODE RESTRICTED
------- ------------------------------ ---------- ----------
2 PDB$SEED READ ONLY NO
3 DEVPDB1 READ WRITE NO
4 DEVPDB2 MOUNTED
Pluggable database altered.
5. Verify the status by typing
<show pdbs>
You should see this:
CON_ID CON_NAME OPEN MODE RESTRICTED
------ ------------------------------ ---------- ----------
2 PDB$SEED READ ONLY NO
3 DEVPDB1 READ WRITE NO
4 DEVPDB2 READ WRITE NO
Create a new PDB by cloning an existing PDB on Linux
This method copies the files for the new PDB from the existing DEVPDB1 to a new location. We call the new PDB DEVPDB3. Again, you have many options for creating PDBs, but this example is one of the simplest ways to get up and running. Consult Oracle documentation for different options. Using this method leaves you with a PDB with all customizations of the source PDB.
DEVPDB1 has been customized with a unique tablespace MY_DATA, within which there is a table HR.EMP. These customizations carry over to the new DEVPDB3.
1. Log in to your CDB using SQL*Plus as SYSDBA. To make sure you’re in the correct location, type
<show con_name>
You should see something like this:
CON_NAME
------------------------------
CDB$ROOT
The out-of-the box file location for PDBs is in a subdirectory under the oradata directory for the CDB. For this example, we follow that approach.
2. Create a subdirectory for the new PDB under the CDB file location from the OS oracle software owner by typing
<mkdir /u01/app/oracle/oradata/devcdb/devpdb3>
If this command succeeds, you get no output. You can list the new directory by typing
<ls –l /u01/app/oracle/oradata/devcdb |grep devpdb3>
You should see something like this:
drwxr-xr-x. 2 oracle oinstall 4096 Aug 17 02:18 devpdb3
3. The source PDB needs to be put into read only mode. Do this by typing
<alter pluggable database devpdb1 close immediate;>
You should see this:
Pluggable database altered.
Then type
< alter pluggable database devpdb1 open read only;>
You should see this:
Pluggable database altered.
4. Run the clone command by typing
< CREATE PLUGGABLE DATABASE devpdb3 FROM devpdb1
FILE_NAME_CONVERT=(
'/u01/app/oracle/oradata/devcdb/devpdb1/',
'/u01/app/oracle/oradata/devcdb/devpdb3/'),>
You should see this:
Pluggable database created.
The new PDB is left in a mount state.
5. Show all the PDBs and their status by typing
<show pdbs>
You should see this:
CON_ID CON_NAME OPEN MODE RESTRICTED
------ ------------------------------ ---------- ----------
2 PDB$SEED READ ONLY NO
3 DEVPDB1 READ ONLY NO
4 DEVPDB2 READ WRITE NO
5 DEVPDB3 MOUNTED
6. Open the source DEVPDB1 read write and open the new DEVPDB3 by typing
<alter pluggable database devpdb1 close immediate;>
<alter pluggable database devpdb1 open;>
<alter pluggable database devpdb3 open;>
You see something like this for each command:
Pluggable database altered.
7. Show the new status of the PDBs by typing
<show pdbs>
You should see this:
CON_ID CON_NAME OPEN MODE RESTRICTED
------ ------------------------------ ---------- ----------
2 PDB$SEED READ ONLY NO
3 DEVPDB1 READ WRITE NO
4 DEVPDB2 READ WRITE NO
5 DEVPDB3 READ WRITE NO
The final check is to see that the custom tablespace and table are in the new PDB.
8. Connect to the container database. One way to do this is through the root CDB by typing
< alter session set container = devpdb3;>
You see this:
Session altered.
You can double-check your container by typing
<show con_name>
You see this:
CON_NAME
--------------
DEVPDB3
9. Check your tablespaces by typing
<select tablespace_name, file_name
from dba_data_files;>
You should see something like this:
TABLESPACE_NAME FILE_NAME
--------------- -----------------------------------------------------------
SYSTEM /u01/app/oracle/oradata/devcdb/devpdb3/system01.dbf
SYSAUX /u01/app/oracle/oradata/devcdb/devpdb3/sysaux01.dbf
USERS /u01/app/oracle/oradata/devcdb/devpdb3/SAMPLE_SCHEMA_ users01.dbf
EXAMPLE /u01/app/oracle/oradata/devcdb/devpdb3/example01.dbf
MY_DATA /u01/app/oracle/oradata/devcdb/devpdb3/my_data01.dbf
10. Check the HR.EMP table by typing
< select owner, table_name, tablespace_name
from dba_tables
where owner = 'HR'
and table_name = 'EMP';>
You see something like this:
OWNER TABLE_NAME TABLESPACE_NAME
--------------- ------------------------------ ---------------
HR EMP MY_DATA
Unplugging and plugging in your PDBs
The activity we cover here focuses on the actual pluggable part of the PDBs. You may want to move your PDBs around for a number of reasons. For example:
![]() Upgrades
Upgrades
![]() Patching
Patching
![]() Relocation to a different CDB
Relocation to a different CDB
![]() Testing
Testing
![]() The sky’s the limit!
The sky’s the limit!
Unplugging your PDB
A PDB is unplugged by connecting to the root CDB and issuing the ALTER PLUGGABLE DATABASE statement to specify an XML file that will contain metadata about the PDB after it is unplugged. The XML file contains the required information to enable a CREATE PLUGGABLE DATABASE statement on a target CDB to plug in the PDB.
1. Log in to your CDB using SQL*Plus as SYSDBA. To make sure you’re in the correct location, type
<show con_name>
You should see something like this:
CON_NAME
------------------------------
CDB$ROOT
2. Get a list of your PDBs by typing
<show pdbs>
You should see this:
CON_ID CON_NAME OPEN MODE RESTRICTED
------ ------------------------------ ---------- ----------
2 PDB$SEED READ ONLY NO
3 DEVPDB1 READ WRITE NO
4 DEVPDB2 READ WRITE NO
5 DEVPDB3 READ WRITE NO
Next you need to unplug DEVPDB3.
3. Close DEVPDB3 by typing
<alter pluggable database devpdb3 close immediate;>
You should see this:
Pluggable database altered.
4. Run the ALTER PLUGGABLE DATABASE statement with the UNPLUG INTO clause and specify the PDB to unplug and the name and location of the PDB’s XML metadata file by typing
<ALTER PLUGGABLE DATABASE devpdb3 UNPLUG INTO '/home/oracle/devpdb3.xml';>
You should see this:
Pluggable database altered.
Plugging in your PDB
Before you plug in a PDB, you must meet some requirements:
![]() The CDB must have the same endianness.
The CDB must have the same endianness.
![]() The CDB must have the same set of options installed.
The CDB must have the same set of options installed.
![]() The source CDB and the target CDB must have compatible character sets and national character sets.
The source CDB and the target CDB must have compatible character sets and national character sets.
For simplicity purposes, we show you how to unplug and replug the DEVPDB3 database into the same CDB root database:
1. Log in to your CDB using SQL*Plus as SYSDBA.
To make sure you are in the correct location, type
<show con_name>
You should see something like this:
CON_NAME
------------------------------
CDB$ROOT
Next you need to drop the existing DEVPDB3 database.
2. To drop DEVPDB3 in a manner that preserves the data files (because they’re needed to plug in database), type
<drop pluggable database devpdb3 keep datafiles;>
You should see this:
Pluggable database dropped.
3. Run the DBMS_PDB.CHECK_PLUG_COMPATIBILITY function to determine whether the unplugged PDB is compatible with the CDB. Type
SET SERVEROUTPUT ON
DECLARE
compatible CONSTANT VARCHAR2(3) :=
CASE DBMS_PDB.CHECK_PLUG_COMPATIBILITY(
pdb_descr_file => '/home/oracle/devpdb3.xml')
WHEN TRUE THEN 'YES'
ELSE 'NO'
END;
BEGIN
DBMS_OUTPUT.PUT_LINE(compatible);
END;
/
If all requirements are met, you see this:
YES
4. Check the existing PDBs by typing
<show pdbs>
You should see something like this:
CON_ID CON_NAME OPEN MODE RESTRICTED
------ ------------------------------ ---------- ----------
2 PDB$SEED READ ONLY NO
3 DEVPDB1 READ WRITE NO
4 DEVPDB2 READ WRITE NO
5. Plug in the database using the metadata file by typing
<create pluggable database DEVPDB3 using
'/home/oracle/devpdb3.xml' NOCOPY TEMPFILE REUSE;>
You should see this:
Pluggable database created.
6. Check the status of your PDBs again by typing
<show pdbs>
You should see something like this:
CON_ID CON_NAME OPEN MODE RESTRICTED
------ ------------------------------ ---------- ----------
2 PDB$SEED READ ONLY NO
3 DEVPDB1 READ WRITE NO
4 DEVPDB2 READ WRITE NO
5 DEVPDB3 MOUNTED
7. Open your newly plugged in PDB by typing
<alter pluggable database devpdb3 open;>
You should see this:
Pluggable database altered.
..................Content has been hidden....................
You can't read the all page of ebook, please click here login for view all page.