
Appendix A
Installing Oracle 12c on Linux
In This Appendix
![]() Setting up the operating system
Setting up the operating system
![]() Installing the Oracle software
Installing the Oracle software
To get you started, this appendix shows you how to install the Oracle 12c software on Linux, which is a readily available, free operating system. This chapter gives you the necessary steps to install Oracle on the many flavors of Linux, as well as some Unix systems. The examples in this appendix use Oracle Enterprise Linux 6 (OEL6.4).
 This Oracle installation can test most of the features discussed in this book, with the exception of Oracle clustering covered in Chapter 15. We recommend having at least 2GB of memory and 10GB of free hard disk space.
Setting Up the Operating System
Linux environments have some stringent installation prerequisites. This appendix goes over the basic prerequisites as specified in the documentation set Oracle Database Quick Installation Guide for 12c Release 1 (12.1) for Linux x86.
To view this documentation set, follow these steps:
1. Go to http://docs.oracle.com.
2. Click Oracle Database documentation, 12c Release 1 (12.1).
3. Click the + next to the Installing and Upgrading folder.
4. Click Linux Installation Guides.
The Quick Installation Guide for Linux x86, on the right, is the document you want.
The next section assumes you can complete the required tasks logged in as the user root.
Checking your operating system version
Oracle is certified to run on only particular versions of Linux. If you have trouble with your database and need Oracle support, those support folks may insist that you be on a certified version of Linux before they help you. Furthermore, running on a certified version of Oracle with the necessary set of patches eliminates many frustrating problems that can bring your installation to a halt.
Oracle can be a little tough to install, but if you carefully follow the directions and meet the prerequisites, the installation usually runs well. Because the prerequisites change from release to release, always review the Oracle documentation first to prevent headaches.
Here are the supported versions of Linux for Oracle 12c:
![]() Oracle Enterprise Linux 5
Oracle Enterprise Linux 5
![]() Oracle Enterprise Linux 6
Oracle Enterprise Linux 6
![]() Red Hat Enterprise Linux 5
Red Hat Enterprise Linux 5
![]() Red Hat Enterprise Linux 6
Red Hat Enterprise Linux 6
![]() SUSE Enterprise Linux 11
SUSE Enterprise Linux 11
To see what version of Linux you’re on, follow these steps:
1. Open a command prompt on your OS.
2. Type
<cat /proc/version>
You should see something like this:
Linux version 2.6.39-400.17.2.el6uek.x86_64
(gcc version 4.4.7 20120313 (Red Hat 4.4.7-3) (GCC) ) #1 SMP
3. Type
<cat /etc/oracle-release>
You should see something like this, which shows you whether you’re running a version on which Oracle 12c is certified:
Oracle Linux Server release 6.4
Checking your kernel version
The kernel is essentially the core operating version of Linux OS. It’s kind of akin to a Service Pack in Windows. For Oracle to be certified, you also need to be on a certified kernel version.
Oracle Linux 6 with the Unbreakable Enterprise kernel’s required kernel version is 2.6.39 or later. To see your kernel version, type
<uname –r>
You should see something like this:
2.6.39-400.17.2.el6uek.x86_64
If you don’t like command line interface for these checks, you can choose System⇒About This Computer (via the Gnome GUI desktop) to find your kernel release information and memory, processor, and disk specifics on one screen.
Checking your OS packages
Packages are modular pieces of the OS that you can install to activate certain features. For Oracle to run on Linux, it requires particular packages. These packages vary from release to release of Oracle, so reviewing the Oracle documentation specific to the version you are attempting to install is critical.
Both Oracle Linux 6 and Red Hat Enterprise Linux 6 require the following packages (or later versions) be installed:
![]() binutils-2.20.51.0.2-5.11.el6 (x86_64)
binutils-2.20.51.0.2-5.11.el6 (x86_64)
![]() compat-libcap1-1.10-1 (x86_64)
compat-libcap1-1.10-1 (x86_64)
![]() compat-libstdc++-33-3.2.3-69.el6 (x86_64 and i686)
compat-libstdc++-33-3.2.3-69.el6 (x86_64 and i686)
![]() gcc-4.4.4-13.el6 (x86_64)
gcc-4.4.4-13.el6 (x86_64)
![]() gcc-c++-4.4.4-13.el6 (x86_64)
gcc-c++-4.4.4-13.el6 (x86_64)
![]() glibc-2.12-1.7.el6 (x86_64 and i686)
glibc-2.12-1.7.el6 (x86_64 and i686)
![]() glibc-devel-2.12-1.7.el6 (x86_64 and i686)
glibc-devel-2.12-1.7.el6 (x86_64 and i686)
![]() ksh
ksh
![]() libgcc-4.4.4-13.el6 (x86_64 and i686)
libgcc-4.4.4-13.el6 (x86_64 and i686)
![]() libstdc++-4.4.4-13.el6 (x86_6464 and i686)
libstdc++-4.4.4-13.el6 (x86_6464 and i686)
![]() libstdc++-devel-4.4.4-13.el6 (x86_64 and i686)
libstdc++-devel-4.4.4-13.el6 (x86_64 and i686)
![]() libaio-0.3.107-10.el6 (x86_64 and i686)
libaio-0.3.107-10.el6 (x86_64 and i686)
![]() libaio-devel-0.3.107-10.el6 (x86_64 and i686)
libaio-devel-0.3.107-10.el6 (x86_64 and i686)
![]() libXext-1.1 (x86_64 and i686)
libXext-1.1 (x86_64 and i686)
![]() libXtst-1.0.99.2 (x86_64 and i686)
libXtst-1.0.99.2 (x86_64 and i686)
![]() libX11-1.3 (x86_64 and i686)
libX11-1.3 (x86_64 and i686)
![]() libXau-1.0.5 (x86_64 and i686)
libXau-1.0.5 (x86_64 and i686)
![]() libxcb-1.5 (x86_64 and i686)
libxcb-1.5 (x86_64 and i686)
![]() libXi-1.3 (x86_64 and i686)
libXi-1.3 (x86_64 and i686)
![]() sysstat-9.0.4-11.el6 (x86_64)
sysstat-9.0.4-11.el6 (x86_64)
To see whether a required package is installed, use RedHat Package Manager (rpm). For example, to check the make package, type
rpm –q make
You should see something like this:
make-3.81-20.el6.x86_64
If you find some packages not installed or that don’t meet the required version, get them from the Linux distribution installation media or the appropriate Linux vendor’s download site.
Creating Linux OS groups and users
Linux best practices entail creating specific groups and users to install, own, and maintain the Oracle software.
Oracle requires two OS groups for the software:
![]() dba controls what users can do on the database server using OS authentication.
dba controls what users can do on the database server using OS authentication.
![]() oinstall controls which users are allowed to modify the Oracle software. Software modification includes installs, upgrades, and patching.
oinstall controls which users are allowed to modify the Oracle software. Software modification includes installs, upgrades, and patching.
To perform the commands that follow, log in to the Linux computer as a Linux super user (root).
To create the groups, type
<groupadd dba><enter>
<groupadd oinstall><enter>
These commands have no output if the groups add successfully. If errors occur, review the details and fix as appropriate.
 Do not add any users to Linux groups unless they’re approved database administrators (DBAs). Members of these groups can see almost any data they want or damage the database and Oracle installation.
Creating the Oracle Software Owner
On a Linux installation of Oracle, best practice is to create a special user to own the Oracle software. Although you can name the user whatever you want, the best practice is to typically call that user oracle or some name with ora in it (such as ora12c):
useradd –c "Oracle Software Owner" –d /home/oracle –m –g oinstall
–s /usr/bin/ksh –G dba oracle
This command creates
![]() A user called oracle
A user called oracle
![]() With the primary group oinstall
With the primary group oinstall
![]() In a secondary group dba
In a secondary group dba
![]() With a home directory /home/oracle
With a home directory /home/oracle
![]() With korn shell as the default shell
With korn shell as the default shell
After you create this user, change its password to something that you will remember, but not something too easy (such as “oracle”).
To change the password for the user oracle, type
<password oracle>
It prompts you for the new password.
Configuring the Linux Kernel Parameters
The Linux OS has a set of kernel parameters that control how memory and processes function on the system. Installing Oracle typically involves adjusting these parameters. The parameters are found in the /etc directory in the sysctl.conf file.
Edit the sysctl.conf file (make a backup first!) and modify the following parameters to have the specified values:
fs.aio-max-nr = 1048576
fs.file-max = 6815744
kernel.shmall = 2097152
kernel.shmmax = 536870912
kernel.shmmni = 4096
kernel.sem = 250 32000 100 128
net.ipv4.ip_local_port_range = 9000 65500
net.core.rmem_default = 262144
net.core.rmem_max = 4194304
net.core.wmem_default = 262144
net.core.wmem_max = 1048586
If one of the parameters doesn’t exist, add it just as it looks here. To make the changes take effect, type the following command:
/sbin/sysctl –p
Creating the ORACLE_BASE directory
The ORACLE_BASE directory serves as the starting point for all your Oracle installation files. Choosing this directory carefully is important. Ideally, it will be on its own drive or mount point.
A typical ORACLE_BASE might be /u01/app/oracle.
1. Create the ORACLE_BASE directory:
mkdir /u01/app/oracle
2. Change the ownership of the directory so that the owner is oracle, and the group is oinstall:
chown -R oracle:oinstall /u01/app/oracle
3. Change the permissions on the directory:
chmod -R 775 /u01/app/oracle
Now the owner can read, write, and execute; all other users can read and execute recursively.
Configuring the Oracle user environment
When you create the user oracle, the user has the korn shell. The korn shell is controlled by a .profile file in the user’s home directory.
To set up the user’s (oracle) environment, follow these steps:
1. Log in to an OS terminal window as the user oracle.
You are in the home directory /home/oracle.
2. Edit the .profile file and add the following lines.
export PATH=/usr/kerberos/sbin:/usr/kerberos/bin:
/usr/local/sbin:/usr/local/bin:/sbin:/bin:/usr/sbin:/usr/bin:.
export ORACLE_BASE=/u01/app/oracle
export ORACLE_HOME=/u01/app/oracle/product/12.1.0
export ORACLE_SID=dev12c
export LD_LIBRARY_PATH=$ORACLE_HOME/lib
export PATH=$ORACLE_HOME/bin:$PATH
If the file already exists, make sure to add the lines to the bottom of the file.
3. Save and exit the .profile file.
4. Run the following command to make the changes take effect:
<. .profile>
There is no output.
5. See whether the changes worked:
<env |grep ORA>
You should see something like this:
ORACLE_SID=dev12c
ORACLE_BASE=/u01/app/oracle
ORACLE_HOME=/u01/app/oracle/product/12.1.0
Congratulations! You’re ready to install the software.
Installing the Oracle 12c database software
The following steps walk you through a quick start installation of the Oracle 12c database software. The steps at this point are almost identical across all operating systems, so your skills will translate very easily from OS to OS.
1. Download the software from the Oracle website at
www.oracle.com/technetwork/database/enterprise-edition/downloads/index.html
Be sure to read and understand the license agreement and then click Accept to continue the download.
You can order the software from the Oracle store, but we recommend downloading it because it’s free for development use and the same thing you would get from the store. You can always burn it to DVD later.
2. Copy the files to the database server’s hard drive.
3. Create a directory to hold the software.
Choose something like one of these:
• /u01/app/oracle/stage
• /u01/app/oracle/software/stage
Unzip your downloaded files into the directory you created. After unzipping, you should see a folder named database.
4. Open a terminal window and go to the software directory.
5. Type cd to change directory to the database directory and execute the runInstaller program:
<./runInstaller>
It might take a minute or two, depending on your machine speed. You’re welcomed by the screen shown in Figure A-1.
6. (Optional) Enter your e-mail and Oracle Support information to allow automated notifications from Oracle and set up the configuration manager. Then click Next to continue.
This option establishes a link between your system and Oracle Support. Although there are many benefits to this, some companies or government agencies are barred from doing this.
7. (Optional) Download software updates.
You can provide your Oracle Support credentials to download the latest security patches and bug fixes.
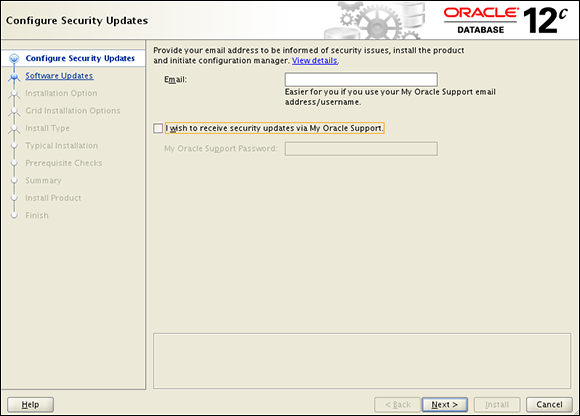
Figure A-1: The Oracle Universal Installer screen welcomes you.
Downloading the updates ensures you have all the features in this book.
8. Select Install Database Software Only and then click Next.
You can create a starter database with your installation or just install the Oracle software binaries. We recommend not creating a starter database when you first install the software.
Getting the software installed is a big enough milestone. After you make sure the software installed correctly, go to Chapter 4 and create the database yourself. This gives you more control and the opportunity to understand the database creation process. If you let the installer do it, many of the steps are behind the scenes.
9. Determine the type of database installation you want to perform.
You may choose between a simple, single instance database installation or the more complex (and capable) Real Application Cluster (RAC) database installations. For simplicity with your first 12c install, select the single instance option.
10. Select the product language to install.
Verify English is selected (our assumption) and then click Next.
11. Identify the database edition you want to install.
Three versions of Oracle database software are available, each targeted (and priced) for different corporate audiences. For your company, you want to carefully determine which installation version meets your business needs and license restrictions. Because this is just a development database for you to learn on, select Enterprise Edition so you’ll have the complete set of options available.
12. Enter the ORACLE_BASE and ORACLE_HOME directory information.
If your environment variables properly configured before running the installer, the values will populate for you. Otherwise, you may manually enter your ORACLE_BASE and ORACLE_HOME full Linux path names.
13. Identify the oraInventory directory and oraInventory group owner and then click Next.
The oraInventory directory stores metadata about the Oracle software you installed. This is valuable information when doing future installations or applying patches to ensure you don’t encounter software conflicts.
14. Select privileged operating system groups and then click Next.
This screen determines the group file permissions for various administrative tasks. As you gain more experience and your environment grows, you may fine-tune these parameters. For your first Oracle install, the defaults of group dba are fine for all options except database operator, which is group oper. (See Figure A-2.) Oper is optional and many people do not use it.
The installer will quickly run pre-installation checks to ensure your install will be successful. Assuming no problems were identified, the installer automatically advances to the next screen after the prerequisite checks are completed.
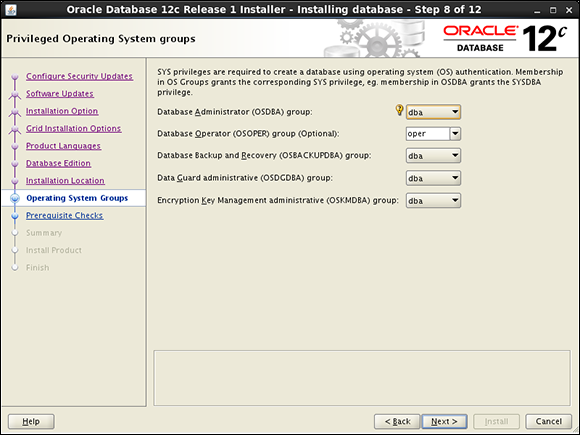
Figure A-2: Select group dba for all options except database operator, which is group oper.
15. Review the summary screen to confirm the install options selected and then click Install.
This is your last chance to verify your installation locations and parameters before the installation.
The total time to install depends on the speed of the machine, network, options selected, and of course if problems are encountered. Be patient if a step seems to stall for a few minutes. For a small install on a fast machine with no network latency, the install can be as fast as 10 minutes.
16. If problems occur, diagnose and correct the issue, and then select Retry to continue.
Assuming the installation didn’t encounter any errors, or you were able to fix the errors that did occur, you should now be at a screen stating the installation was successful.
17. Click Close.
You should have a fully functioning database software code tree.
Note you have not built any databases yet; see how to do that in Chapter 4.