Chapter 13
The Pi Meets LEGO
In This Chapter
![]() Meeting the LEGO MINDSTORMS EV3 Intelligent Brick
Meeting the LEGO MINDSTORMS EV3 Intelligent Brick
![]() Sending messages to the brick using Bluetooth
Sending messages to the brick using Bluetooth
![]() Having the brick send messages back to the Raspberry Pi
Having the brick send messages back to the Raspberry Pi
![]() Finding out about infrared remote-control codes
Finding out about infrared remote-control codes
![]() Making a Raspberry Pi–powered infrared transmitter
Making a Raspberry Pi–powered infrared transmitter
![]() Using the infrared transmitter to make a Tug-of-War LEGO Robot
Using the infrared transmitter to make a Tug-of-War LEGO Robot
LEGO has been a popular toy since its invention in 1949, but it has never been more popular than it is today. This is due, in part, to the LEGO company’s continual development and ability to reinvent itself, just like the toys it makes. LEGO Technic has always been a great way to learn the basics of mechanical engineering, and lately, the MINDSTORMS series of robotic construction has propelled it successfully into the new century. In this part, we look at some of the ways you can enhance the latest MINDSTORMS set, the EV3, by using the Raspberry Pi. In this chapter specifically, we explore how the Raspberry Pi can communicate with the EV3 control brick.
Exploring the MINDSTORMS Range
The LEGO MINDSTORMS EV3 Intelligent Brick is the fourth incarnation of the robot-building concept, and, in keeping with the improvements in technology, it’s the most sophisticated yet. Although the mechanical (plastic) parts are compatible with earlier versions, the electronic control brick and the sensors and motors it uses have limited compatibility.
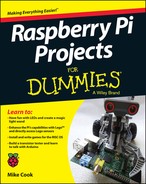
The first system, called LEGO MINDSTORMS Robotics Invention System, was launched in 1999. It was followed by the NXT in 2006 and the NXT 2.0 in 2009. Those two systems differ only in the parts supplied with the sets and the software used on the control bricks. The control bricks themselves are identical. Finally, the EV3 launched in 2013 using a much more powerful processor with more memory and limited compatibility with previous systems. The EV3 can be used with all the sensors of the NXT system, but nothing of the original Robotics Invention System. These three controllers are shown in Figure 13-1. For the purposes of this book, the original MINDSTORMS brick is obsolete, so we concentrate on the EV3 system.
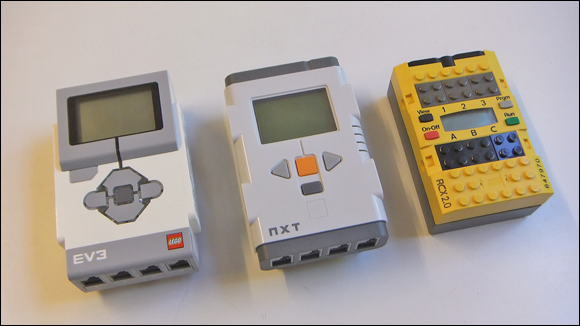
Figure 13-1: The three generations of LEGO control bricks.
Programming the control brick has always involved using some sort of graphics-based language, with increasing sophistication through the LEGO generations. The languages are based on the LabView graphical programming language used widely in industry for software-based instrumentation. If you are new to the EV3 system, we suggest that you take time to get familiar with the basic operation of it using the supplied software before exploring the extensions that the Raspberry Pi makes possible.
Hackers have also developed several alternative text-based programming languages for the bricks. However, the EV3 system offers, for the first time, the ability for third-party systems to interact with the control brick instead of overriding or replacing the native brick software. In this chapter, we explore some of the ways you can use your Raspberry Pi with an unmodified EV3 system.
 There are four basic ways to access the LEGO MINDSTORMS EV3 Intelligent Brick:
- Wi-Fi
- USB
- Bluetooth
- Infrared (IR)
Wi-Fi and USB are interchangeable and are used for downloading programs to the control brick and uploading data from it. Wi-Fi requires the separate purchase of a specific Wi-Fi dongle.
When it comes to interacting with the Raspberry Pi, Bluetooth and IR are the best ways to control or interact with a robot remotely. They allow much more sophisticated programs to be written than would otherwise be possible simply by using the brick’s graphical language alone. They also open up the possibility of using hardware attached to the Pi to control the LEGO system.
Up to eight EV3 control bricks can communicate with each other by exchanging messages over Bluetooth. However, this mechanism can also be used to allow the Raspberry Pi to send and receive messages from the EV3 brick. These messages can be programmed to trigger actions or to get data back from the robot’s sensors. These messages can be controlled by a program running on the Raspberry Pi; in this chapter, we show you how to use Python to do this.
The EV3 set comes with a small handheld IR remote control that is capable of sending some commands to the IR sensor. The remote control can transmit on four different “channels” and can be picked up by the IR sensor. This is a dual-purpose sensor — it’s also capable of detecting the distance to an object by detecting IR reflection off the object. The Raspberry Pi can be made to generate IR messages and send them to the control brick from its own programs.
In the following sections, we cover Bluetooth and IR messages in greater detail.
Bluetooth messages
The EV3’s language has a messaging block to send and receive messages. Most of the flow control blocks in the LEGO language can use the reception of a message to trigger the execution of a section of a program. So, it would be very useful if you could send and receive these messages with the Raspberry Pi. You need two things to do this:
- A Bluetooth interface on your Raspberry Pi
- Some knowledge of the message structure in order to make sense of the messages
We cover these requirements in the following sections.
Bluetooth Pi
The simplest way to give your Raspberry Pi Bluetooth capability is to fit it with a Bluetooth USB dongle. It should be fitted directly to one of the Pi’s USB sockets and not to a USB hub.
You can get a variety of different types of USB dongles, but the vast majority use really only two chipsets. Unfortunately, only one of these chipsets will work with the Raspberry Pi and, surprisingly, it’s the cheaper one! To find a list of the increasingly large range of recommended devices, check out www.elinux.org/RPi_USB_Bluetooth_adapters.
To see what type of dongle you have, plug in the dongle, boot up the Raspberry Pi, and log in. From the command line, type the following:
lsusb
You see a list of devices attached to the USB ports. One of them should read something like this:
Cambridge Silicon Radio, Ltd Bluetooth Dongle
 If yours is a Broadcom or any other manufacturer, try to get a Cambridge one because, as of this writing, the others may not work properly. That said, the Linux software in the Raspberry Pi is constantly evolving, so try what you have first, and if you have trouble, then get a Cambridge chip set.
To get started using your Bluetooth dongle, follow these steps:
Install the necessary software by typing the following from a command line:
sudo apt-get update
sudo apt-get upgrade
sudo apt-get install bluetooth bluez-utils blueman
sudo apt-get install python-serialThe first line gets a list of the latest packages, the second line installs them, and the third line installs the Bluetooth-specific applications.
Reboot the system and type lsusb again, just to make sure things are working.
Occasionally, a dongle won’t power up, so check to make sure it’s working before you proceed.
Type startx to get into the desktop.
You should see a Bluetooth icon in the bar at the bottom-right of the screen. If you don’t, look for it under the Preferences menu.
Click the Bluetooth icon.
The Bluetooth Devices dialog box appears (see Figure 13-2). You may see several unknown devices listed in the dialog box. Don’t worry about them — they aren’t real, but we haven’t found a way of getting rid of them permanently.
Turn on your EV3 brick and make sure the Bluetooth is enabled and visible.
Don’t select the iPhone option. See the instructions that came with the EV3 brick if you don’t know how to change the Bluetooth settings.
In the Bluetooth Devices dialog box, click Search in the toolbar at the top.
After a short time, the EV3 brick appears.
- Click the brick to highlight it and then click Setup in the toolbar.
Choose the pairing option with a custom pass key, type 1234, and click Continue or Forward.
The LEGO brick makes a sound and asks you to confirm the keys.
Select the check box and press the middle button.
The brick and the Raspberry Pi should now be paired. You won’t have to do this again.
While you’re at it, pair up your computer or laptop and Raspberry Pi as well.
It’s a very convenient way of swapping files between the two systems.
Right-click the EV3 entry in the Bluetooth Devices dialog box and select Connect to Serial Port.
You should get the following message:
Serial port connected to /dev/rfcomm0This last step has to be done each time you boot up your Pi or when you leave the desktop and return to it.

Figure 13-2: The Bluetooth Devices dialog box.
Now you can treat the Bluetooth dongle just like any other serial port in any programs you write.
The anatomy of a message
Before you can send and receive messages, you have to know the format they use. At the time of this writing, LEGO hasn’t published the message specification, so we did a little snooping to see what it was. By looking at the messaging blocks in the EV3 language, you can see that each message box has a name and contents. The contents can be Boolean, text, or a number, so the message must contain both the contents or payload and the message box name. The results of the investigation are shown in Figure 13-3.
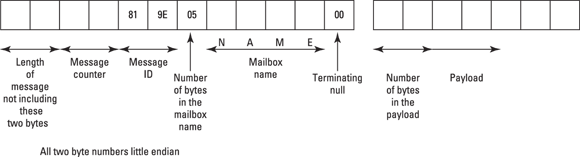
Figure 13-3: The anatomy of a message.
The message starts with two bytes that give the number of bytes in the rest of the message. This, like all other two-byte numbers in this system, are in the little endian format, which means that the least significant byte of the two-byte number is first and the most significant byte is second.
 If the numbers are arranged the other way round, that’s called big endian. Much metaphorical blood has been spilled by proponents of the two systems as to which is fundamentally better. We’re in the big endian camp ourselves, but there you go.
The next two bytes are a message counter. When the bricks are talking amongst themselves, the message counter doesn’t appear to change. The same goes for the next two bytes, the message ID. Then there is a single byte that gives the number of bytes in the mailbox name. The name then follows as a null terminated string. Note that the number of bytes includes the null. Finally, the next two bytes give the number of bytes in the payload, followed by the payload or message itself.
Sending a message
In principle, it’s very easy to send a message to the EV3 brick. Just put together a character list that matches the format we just described and then send it character by character to the serial port. Take a look at that in practice with Listing 13-1, which sends four text messages to a mailbox called “Brick.”
Listing 13-1: Composing and Sending a Text Message
#!/usr/bin/env python
# Compose a message for Lego Bluetooth
# and send it - Mike Cook
import serial
import time
EV3 = serial.Serial('/dev/rfcomm0')
print "sending EV3 a Bluetooth message"
def main():
for t in range(0,4) :
m = messageG("Brick","See Me "+str(t))
print "sending :- ", "See Me "+str(t)
messageSend(m)
time.sleep(2.0)
EV3.close()
# end of main
# Function definitions
def messageSend(message):
if EV3.isOpen() == True :
for n in range(0, 2 + ord(message[0]) + (ord(message[1]) * 256 )):
EV3.write(message[n])
def messageG(boxName,message): # generate a text message
length = len(boxName) + len(message) + 10
btMessage = [ chr(0) for temp in range (0,length)] # initial blank
btMessage[2] = chr(1)
# message ID
btMessage[4] = chr(0x81)
btMessage[5] = chr(0x9E)
btMessage[6] = chr(len(boxName) + 1)
btMessage[7:7+len(boxName)] = boxName
payloadPointer = 8 + len(boxName)
btMessage[payloadPointer] = chr((len(message) + 1) & 0xff)
btMessage[payloadPointer + 1] = chr((len(message) + 1) >> 8)
btMessage[payloadPointer + 2:len(message)] = message
endPoint = payloadPointer + len(message) + 1
btMessage[0] = chr((endPoint & 0xff))
btMessage[1] = chr(endPoint >> 8)
return btMessage
if __name__ == '__main__':
main()
The first thing this code does is open the Bluetooth serial port to the LEGO brick. Then the main function composes four messages reading “See Me” with a number appended. It generates a text message using the messageG function, which first calculates the length of the message and initializes a blank message containing all null characters. Then the message counter is set to 1 and the message ID numbers are set. Then the sixth element in the list is set to the length of the box name plus one (to accommodate the null at the end) and the box name is inserted in the list from the seventh position.
Next, a variable called payloadPointer is calculated to give the position of the last part of the message. This is an intermediate value and makes the calculations that follow a little easer to write down. Then the length of the message string is placed in the two bytes, giving the number of bytes in the payload, and the text is inserted in the message just like the box name was.
Finally, the endpoint of the message is calculated and the first two bytes of the message, giving the overall message length, are set. The complete message is then returned from this function. All that remains to be done is to send the message with the messageSend function, which writes the bytes one by one to the serial port. Note that this function used the first two bytes of the message to see how many bytes to send.
In order to test this, you need to put a simple program on the LEGO brick. This program is shown in Figure 13-4.
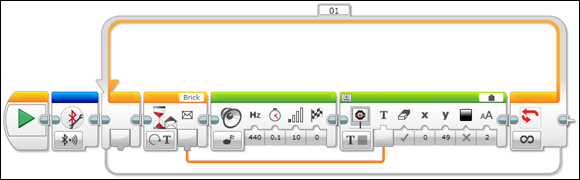
Figure 13-4: LEGO code for receiving messages.
This program first turns on the Bluetooth system. Then, when a message is updated, it makes a brief sound and displays the message. Run the code on the LEGO brick first, followed by the Raspberry Pi python program, and you’ll see the message displayed on the LEGO brick.
The payloads for the two types of message are very similar. A logical message has a simple one-byte payload of a zero for False or a one for True. A numeric message is just four bytes that make up a floating point number. Even if the number is an integer, it’s always encoded as a floating point number. In order to send these other types of messages, we’ve written a function to generate them, shown in Listing 13-2. (You won’t need these two other types of messages in the project later in this chapter, but if you ever need them, this is how it’s done.) This code is very similar to the generate message function messageG in the previous program, but it takes in a text string that determines what sort of message is generated.
Listing 13-2: Function for Generating All Three Message Types
import struct
def messageGuin(boxName,message, messageType): # generate any message
mType = False
if messageType == "text" :
length = len(boxName) + len(message) + 10
mType = True
if messageType == "logic" :
length = len(boxName) + 12
mType = True
if messageType == "number" :
length = len(boxName) + 16
mType = True
if mType : # only go on if message type is valid
btMessage = [ chr(0) for temp in range (0,length)] # initial blank
btMessage[2] = chr(1)
# message ID
btMessage[4] = chr(0x81)
btMessage[5] = chr(0x9E)
btMessage[6] = chr(len(boxName) + 1)
btMessage[7:7+len(boxName)] = boxName
payloadPointer = 8 + len(boxName)
if messageType == "text" :
btMessage[payloadPointer] = chr((len(message) + 1) & 0xff)
btMessage[payloadPointer + 1] = chr((len(message) + 1) >> 8)
btMessage[payloadPointer + 2:len(message)] = message
endPoint = payloadPointer + len(message) + 1
if messageType == "logic" :
btMessage[payloadPointer] = chr(2)
btMessage[payloadPointer + 1] = chr(0)
if message == True :
btMessage[payloadPointer + 2] = chr(1)
endPoint = payloadPointer + 2
if messageType == "number" :
btMessage[payloadPointer] = chr(4)
btMessage[payloadPointer + 1] = chr(0)
btMessage[payloadPointer + 2:] = struct.pack('f',message)
endPoint = payloadPointer + 4
btMessage[0] = chr((endPoint & 0xff))
btMessage[1] = chr(endPoint >> 8)
return btMessage
else :
print "Message type is not one of text, logic or number"
return "error"
First, the message type is checked and the appropriate length of blank message is generated. Then the function proceeds as before until it comes to generating the payload, where again different payloads are generated depending on the message type. (We go into more detail about these other message types in the next section.)
Receiving a message
Receiving a message is quite simple: You have to read the bytes in from the serial port. The number of bytes you have to read is given in the first two bytes you get. You have to wait until the serial port has at least two bytes in the buffer, read them, and then you know how many more you have to read.
The more complex part is in decoding what you read, which involves splitting up the message into the two pieces of information it contains (known as parsing): mailbox name and payload.
One important thing to realize is that you can’t tell from looking at the payload what sort of message it is. That means you have to know in advance what sort of message you’re expecting. One way to get around this problem is to arrange things so that certain mailbox names always send the same sort of data payload. Assigning mailbox names that match the data names makes this more clear, although it isn’t required.
In the next example, we use the mailbox names Text, Logic, and Number to deliver data of the same type as the name. If you look at Figure 13-5, you see the LEGO EV3 code to send three types of messages, one after the other, each having a different data type. You need to run this on your LEGO brick.
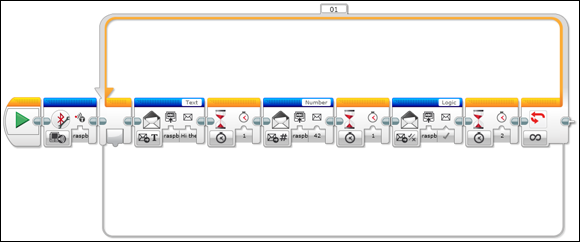
Figure 13-5: LEGO code for sending messages.
Note that you need the computer connected to the brick in order to get the drop-down menu to show the message sender’s name. You can’t see all of this name on the screen when you make the brick’s program.
The messages are continuously sent and the data is the same each time it’s sent. In order to receive this on your Raspberry Pi, you need to run the code in Listing 13-3.
Listing 13-3: Simple Message Receive
#!/usr/bin/env python
# Simple receive of message by Mike Cook
import serial
import time
import struct
EV3 = serial.Serial('/dev/rfcomm0')
EV3.flushInput()
print "Receiving EV3 Bluetooth messages"
box = "Mail Box"
def main():
while 1:
rx = readMessage()
decodeMessage(rx)
EV3.close()
# Function definitions
def readMessage():
global box
while EV3.inWaiting() <2 :# hold until message starts to arrive
continue
inMessage = EV3.read(2)
messageBytes = ord(inMessage[0]) + ( ord(inMessage[1]) *256 )
while EV3.inWaiting() < (messageBytes ):
continue
inMessage = inMessage + EV3.read(messageBytes )
box = inMessage[7 : 7 + ord(inMessage[6])-1]
payloadPointer = 9 + ord(inMessage[6])
message = inMessage[payloadPointer:]
return message
def decodeMessage(payload) :
print "Message from box",box,"is a",
if box == "Text" :
print "text message saying",
print payload
if box == "Logic" :
print "logic message of",
logic = False
if ord(payload[0]) == 1 :
logic = True
print logic
if box == "Number" :
print "number with a value of",
val = struct.unpack('f',payload)
value = val[0] # to convert from a tuple
print value
print
if __name__ == '__main__':
main()
The main function repeatedly reads messages and decodes them. The readMessage function reads in the bytes from the serial port and extracts the mailbox name, which is used to set a global variable called box. It also extracts the payload and returns it to the calling program. Then the decodeMessage function uses the global variable box to decide how to decode the payload. It also prints out the mailbox name and value of the payload it received.
The readMessage function works just like the reverse of the generate message function we saw in Listing 13-1. Bytes from the message are read into a string called inMessage, and then the mailbox’s name string and payload string are extracted from that. The decodeMessage function then handles the payload string according to its type. A text message is simply printed out, whereas a logic message sets a Boolean variable called logic, initially to False. If it finds a one in the payload string, it changes the variable to True.
The numeric message is a little more complex to cope with. As we mention before, it’s in a floating point format. In order to convert it into a number, you have to use the struct functions. The struct.unpack function converts the string given in the second parameter to a number type given in the first parameter. Just to throw a curveball into the mix, this function returns a tuple, even if the string contains only one value. Therefore, the next line extracts a single floating point variable called value from the tuple.
If you run this code, you should see the messages being sent back from the LEGO brick. Here’s an interesting experiment to do: Change the LEGO code to send not the number 42 but the number 42.1. You may be surprised to see that the number being read back on the Raspberry Pi is not 42.1, but 42.0999984741. This is to be expected. Many beginners are shocked to discover that floating point numbers are only an approximation. This can sometimes be masked by rounding when you print out the number, but it’s worth remembering that if you want anything to be absolutely accurate, stick to integer-type variables.
Armed with this information, you can now pass information between the brick and the Raspberry Pi. You can use this to gather data or control what your LEGO creation does. In the next chapter, you see a full-blown application of control using message passing.
Infrared messages
The other way of getting information to the LEGO brick is by using infrared. Unlike the Bluetooth system, however, IR is one-way. That is, you can send messages into the brick, but the brick can’t send information out.
The IR sensor can receive key presses generated from the handheld remote that comes as part of the EV3 set. There are five push buttons and one four-position slider. The slider sets the channel it transmits on and has four positions. At the time of this writing, LEGO had not published the protocol for this remote controller, so we had to do a bit of playing around with sensors and an oscilloscope to reveal how it works.
The IR beam is modulated (turned on and off rapidly) at a rate of 38 KHz. This is a common frequency for many TV remote control systems, although other frequencies from 32 KHz to 42 KHz are used as well. This modulation allows the amplifier at the receiving end to reject signals that are not modulated and, therefore, not get swamped by interfering IR light from daylight or artificial light. This technique of modulation gives the remote control a good range.
The LEGO system works entirely on bursts of six IR pulses, and the data is encoded by the length of the gap after each burst. For example, all messages begin with a start bit that consists of a burst of six pulses of IR followed by a gap equivalent to 39 pulses. Similarly, a logic one is six pulses followed by a 21-pulse gap, and a logic zero is six pulses followed by a 10-pulse gap. At the end is a stop bit, which is the same as the start bit. If a button is held down, the codes repeat every 80 milliseconds (mS). This is summed up in Figure 13-6.

Figure 13-6: Infrared code format.
By using a good oscilloscope, we were able to map what was being produced by each push button. We discovered that changing the channel slider switch changes only a few of the bits in the code being sent. The horizontal bar button on the EV3 remote produced a continuous stream of codes until it was pressed again, whereas each of the other buttons produced one repeating code value when it was pressed and another when it was released. All the release codes were the same for all the buttons in that channel.
Armed with this information, we can duplicate what the remote controller produces directly from the Raspberry Pi, thus allowing programmatic control of the production of the codes. To do this, you need to build a small IR transmitter board and install and customize a software package.
The Raspberry Pi infrared transmitter
Peering into the smoked plastic cover of the EV3 remote controller shows two infrared LEDs offset by about 45 degrees, as well as a small green LED that comes on when it’s sending. Infrared LEDs take more current than visible ones, and the forward voltage drop is so low that you can happily power two LEDs in series from 5V.
We designed a simple circuit using one of the general-purpose input/output (GPIO) pins to switch a transistor to allow the LEDs to turn on and off. The schematic is shown in Figure 13-7. When the GPIO pin is low, the transistor is off and no current flows through the LEDs. When the GPIO pin is high, current flows into the base of the transistor, turning it on. This means that current can flow from the collector to the emitter of the transistor, allowing the three LEDs all to turn on.
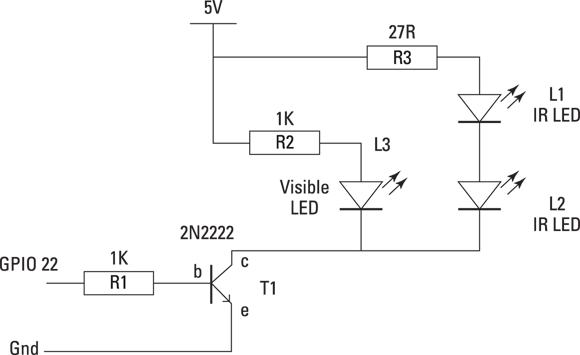
Figure 13-7: A schematic of the IR sender board.
The resistor in series with each LED is important. It limits the current flowing to a safe level. Note that R3, the resistor controlling the IR LEDs, is much smaller than you normally see. This is because IR LEDs can take much more current than visible ones. We made the R2 resistor quite high so the LED is not very bright. Feel free to drop this to 220R if you want the visible LED brighter.
Here are the parts you need for this circuit (the component’s reference number shown on the diagrams is in parentheses):
- Two 1K resistors (R1–R2)
- One 27R resistor (R3)
- One 2N2222 transistor or similar NPN transistor (T1)
- Two 5mm IR LEDs (L1–L2)
- One 2mm red LED (L3)
- One 11-x-5-hole stripboard with strips running horizontally
We built this on a small piece of stripboard. The physical construction is shown in Figure 13-8. There are four breaks in the copper strips on the reverse side. Three you can break at a hole, but the fourth should be a break between the holes. You can do this with a scalpel or sharp hobby knife. Make two cuts as close as possible together and then peel the copper away between the cuts.
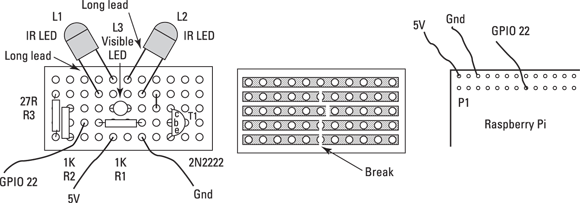
Figure 13-8: The physical layout of the IR sender.
The three wires — 5V, Gnd, and GPIO 22 — were connected to the Raspberry Pi’s GPIO plug through individual flying leads with pin header sockets on both ends, although you can use any form of breakout board or connector to make this connection. A photograph of the final board is shown in Figure 13-9.
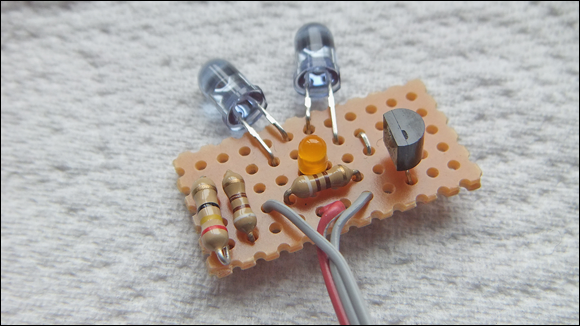
Figure 13-9: The final IR sender board.
Installing the Linux infrared remote control
Next, you have to install the Linux infrared remote control (LIRC) package that will generate IR codes according to a configuration file. The LIRC has been developed for people who want to control electronic consumer products, but the vast collection of ready-defined protocols didn’t include the EV3 brick, so we had to design a custom file. The LIRC package has been designed to both transmit and receive IR communications, but here you’re concerned only with sending, so you don’t have to bother with the receiving side.
First, you have to get the package onto your machine. This is easily done by typing the following:
sudo apt-get install lirc
Then when this is installed, you have to add the following two lines to the /etc/modules file:
lirc_dev
lirc_rpi gpio_in_pin=23 gpio_out_pin=22
Note that you can do this from the desktop if you navigate to the etc directory and choose the Open Window as Root option. Then modify the /etc/lirc/hardware.conf file to read like Listing 13-4.
Listing 13-4: The Contents of /etc/lirc/hardware.conf
# /etc/lirc/hardware.conf
#
# Arguments which will be used when launching lircd
LIRCD_ARGS="--uinput"
#Don't start lircmd even if there seems to be a good config file
#START_LIRCMD=false
#Don't start irexec, even if a good config file seems to exist.
#START_IREXEC=false
#Try to load appropriate kernel modules
LOAD_MODULES=true
# Run "lircd --driver=help" for a list of supported drivers.
DRIVER="default"
# usually /dev/lirc0 is the correct setting for systems using udev
DEVICE="/dev/lirc0"
MODULES="lirc_rpi"
# Default configuration files for your hardware if any
LIRCD_CONF=""
LIRCMD_CONF=""
Finally, you have to change the /etc/lirc/lircd.conf to be like Listing 13-5.
Listing 13-5: The Contents of /etc/lirc/lircd.conf
begin remote
name Lego_EV3
bits 16
flags SPACE_ENC
eps 30
aeps 100
# see text for note on frequency
frequency 38000
header 158 1026
one 158 552
zero 158 263
ptrail 158
gap 1206
begin codes
# EV3 remote codes
beacon1 0x4006
beacon2 0x5004
beacon3 0x6002
beacon4 0x7000
release1 0x010E
key1c1 0x8117
key2c1 0x8124
key3c1 0x8142
key4c1 0x818E
release2 0x110F
key1c2 0x9116
key2c2 0x9125
key3c2 0x9143
key4c2 0x918F
release3 0x210C
key1c3 0xA115
key2c3 0xA126
key3c3 0xA140
key4c3 0xA18C
release4 0x310D
key1c4 0xB114
key2c4 0xB127
key3c4 0xB141
key4c4 0xB18D
end codes
end remote
This last file controls the code and the format of the IR being sent. There are lots of other ways of using IR to send messages, and LIRC can cope with most of them. The first part defines the sort of code to produce with a flag saying that it’s space encoded (that is, the space after the burst of pulses defines what the data will be). The header, one, and zero are the format of the data, with the time being defined in terms of microseconds. So, a one is a 158 uS burst of IR followed by 552uS of gap, or nothing. This relates to the number of pulses in the data format.
To get LIRC to accept the new control codes in this file, type the following in at the command line:
sudo /etc/init.d/lirc stop
sudo /etc/init.d/lirc start
The frequency of the modulation is defined in the file, but when we tried it, we got a frequency of 45.2 KHz despite setting it to 38 KHz. We had to put in a frequency of 32,000 in order to get the 38 KHz out. It turns out that there was an issue in the kernel on the Raspberry Pi, and it caused the timing to be wrong. However, it was corrected at about the same time we found the trouble. To check what version of kernel you have, type the following at the command line:
uname -rv
If the answer is any earlier than
3.12.18+ #677 PREEMPT Mon Apr 28 22:45:00 BST 2014
you should update your kernel by typing the following and checking again:
sudo apt-get update
sudo rpi-update
The error in the kernel affects not only the frequency but also the accuracy of the gaps. However, the transmitter still seemed to work with the uncorrected gaps.
The names we gave to each key are based on the number that is detected by the EV3 brick. So, key1c3 is short for key 1 on channel 3. The code for a key release is the word release followed by the channel number, and the four beacon modes are defined by the word beacon followed by the channel number. Feel free to change these names if something else makes more sense to you. For example, the release key is detected as zero in the LEGO brick, so you might want to label those keys K0c. Similarly, the beacon message is seen as the key 9 by the brick. However, you might want to label the keys after the keys on the remote like redTop, blueBottom, and so on.
Driving the infrared codes
IR codes are produced from the command line, so if you want to use these codes from some language, you should do it by calling the operating system. A simple example of this is shown in Listing 13-6. This simply sends out a beacon signal on channel 4.
Listing 13-6: Infrared Beacon
#!/usr/bin/env python
'''
Sending IR Beacon message - by Mike Cook
'''
import time
import os
print "Sending Beacon message"
while 1 :
os.system("irsend SEND_ONCE Lego_EV3 beacon4")
time.sleep(0.08) # time between repeats
You see that the os.system call takes a string with the irsend parameters in it. Don’t be tempted to use the send continuous commands — they don’t work by simply repeating the command as you may expect. Instead, substitute other repeat codes in place of the commands.
In order to test this, you need a very simple LEGO model, as shown in Figure 13-10. This is basically just the IR sensor mounted on a motor. If you put into the brick the program shown in Figure 13-11, the sensor turns to face the emitter board. It’s quite an eerie sensation — it feels like the robot is alive. Test out this model using the supplied IR remote if you have any trouble.
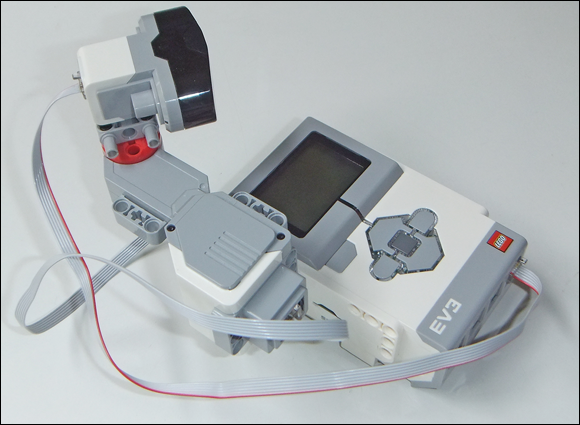
Figure 13-10: The LEGO model for the tracker.
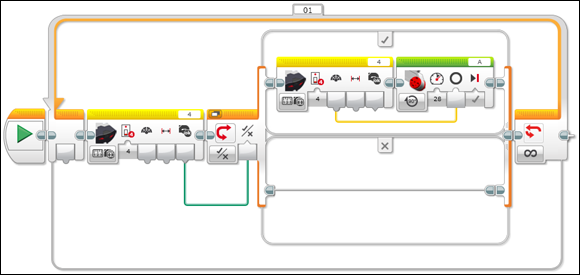
Figure 13-11: The LEGO program for the tracker.
If that goes well, you can test out the other keys with the code in Listing 13-7, which simply cycles through the key presses. Note that it shows how you can change what the program sends by building up a command string.
The key names are held in a list called button, and the channel to use is held in a variable called ch. These two strings are concatenated to a fixed string to make up the command. To see this on the brick, put the program in Figure 13-12 into the LEGO controller.
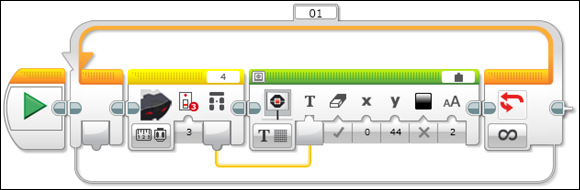
Figure 13-12: A LEGO program for testing the key codes.
Now it’s time to do something fun with this setup.
Listing 13-7: Key Test Program
#!/usr/bin/env python
'''
IR test IR2
testing config file at
/etc/lirc/lircd.conf
Tests buttons
'''
import time
import os
os.system("sudo /etc/init.d/lirc stop")
os.system("sudo /etc/init.d/lirc start")
ch = "c3" # channel
button = [ "key1", "key2", "key3", "key4"]
while 1 :
for b in range(0,4) :
os.system("irsend SEND_ONCE Lego_EV3 " +button[b]+ch)
print"sent ",button[b]+ch
time.sleep(0.8)
os.system("irsend SEND_ONCE Lego_EV3 release"+ch)
time.sleep(1.5)
Creating a Tug-of-War LEGO Robot
The Tug-of-War LEGO Robot is a fun way to incorporate a program on the Raspberry Pi with action on a LEGO system. Basically, it’s a two-player reaction game, with the score being kept by a LEGO robot.
Here’s how it works: The robot is placed on top of a long thin box on a line drawn halfway across. The Raspberry Pi puts up the word Ready on the screen. After a random interval, this changes to Go and a noise is generated. The first player to react by pressing a keyboard key wins, and the LEGO robot moves a small distance in the losing player’s direction. If a player presses a key before the sound, he has jumped the gun and the other player gets the robot to move for her. Eventually, the robot falls off the box and indicates the winner. (The box should be only a few inches high to prevent any damage to the robot. If you aren’t willing to risk any sort of a fall for your robot, you can just tape a winning line on a table and place the robot on that instead.)
We leave it up to you which robot to use. There are plenty of simple two-motor robots you can build. If you’re stuck for a design, use the TRACK3R robot from your computer’s LEGO software. The box to click is called EV3 Getting Started, and it’s located at the bottom right of the main page. There is no need to add all the tools — you just want the basic movement.
All that is required of the robot is that it be able to move in a straight line backward and forward in response to the IR remote key press. Then program it with the very simple program shown in Figure 13-13.
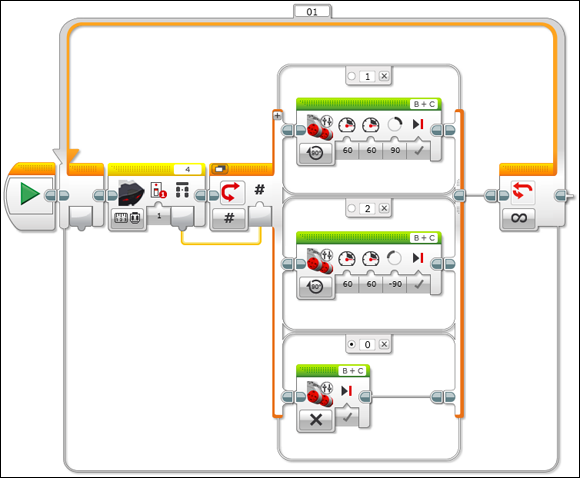
Figure 13-13: The LEGO program for the Tug-of-War Robot.
You can change how far the robot moves in response to each key press very easily by changing the number of degrees of movement. This affects the length of time a game runs and depends on the physical size of the space you have to run it in. You can also build in a handicap system by making the robot move more in one direction than the other. This is useful in a kids-versus-adults situation.
We put an extra condition to stop the motors when the release key was detected. This shouldn’t have been necessary, but we found that, without it, the motors sometimes hunted a little (made continuous small movements left and right) when they were supposed to have stopped. Test it out with the handheld remote before going on to controlling it with the Raspberry Pi.
Next, you have to program the Raspberry Pi to play the game and control the robot. Before you start, you have to make sure you have a directory called sounds in the same directory as this code, and that it contains an .ogg sound file called gun. Despite the name, the file can be any short, sharp sound. The code to play the game is shown in Listing 13-8
and is written in Python with Pygame.
Listing 13-8: The Tug-of-War Raspberry Pi Code
#!/usr/bin/env python
'''
Lego-powered Tug-of-War
Reaction Time Game By Mike Cook
'''
import time
import random
import os, pygame, sys
pygame.init() # initialize graphics interface
pygame.mixer.quit()
pygame.mixer.init(frequency=22050, size=-16, channels=2, buffer=512)
goSound = pygame.mixer.Sound("sounds/gun.ogg")
os.environ['SDL_VIDEO_WINDOW_POS'] = 'center'
pygame.display.set_caption("Lego Tug of War Reaction Game")
pygame.event.set_allowed(None)
pygame.event.set_allowed([pygame.KEYDOWN,pygame.QUIT])
cBackground =(0,255,255)
cText = (255,0,0)
textHeight = 38
font = pygame.font.Font(None, textHeight)
screenWidth = 350
screenHeight = 160
screen = pygame.display.set_mode([screenWidth,screenHeight],0)
random.seed()
player1 = False # keyboard inputs
player2 = False
space = False
def main():
global player1, player2, screen
print "Tug of War"
draw_screen()
while True : # play the game
updateWords(" ")
while space == False :
checkForEvent()
updateWords("Ready")
player1 = False
player2 = False
go = time.time() + 1.5 + ( random.random() * 5 )
while go > time.time() :
checkForEvent()
# check for jump the gun
if player1 == True or player2 == True :
player1 = not(player1)
player2 = not(player2)
updateWords("Jumped the gun")
time.sleep(2)
else :
updateWords("Go")
goSound.play()
while player1 == False and player2 == False and space == True:
checkForEvent()
if space == True :
if player1 == True :
updateWords("Player 1 wins")
winner = "key1c1"
else :
updateWords("Player 2 wins")
winner = "key2c1"
os.system("irsend SEND_ONCE Lego_EV3 "+winner)
time.sleep(0.08)
os.system("irsend SEND_ONCE Lego_EV3 release1")
time.sleep(2.0)
checkForEvent() # remove losing player's key
else :
updateWords("Game ends")
time.sleep(2)
def draw_screen():
screen.fill(cBackground) # blank screen
drawWords("Q - Player 1",10,2)
drawWords("P - Player 2",10,30)
drawWords("Space - New Game",10,60)
updateWords("Ready")
def updateWords(words) :
pygame.draw.rect(screen,cBackground, (0,100,screenWidth,textHeight), 0)
drawWords(words,120,100)
pygame.display.update()
def drawWords(words,x,y) :
textSurface = pygame.Surface((len(words) * (textHeight / 2),textHeight))
textRect = textSurface.get_rect()
textRect.left = x
textRect.top = y
pygame.draw.rect(screen,cBackground, (x,y,len(words) * (textHeight
/2),textHeight), 0)
textSurface = font.render(words, True, cText, cBackground )
screen.blit(textSurface, textRect)
#pygame house keeping
def terminate(): # close down the program
print "Closing down please wait"
pygame.quit() # close pygame
sys.exit()
def checkForEvent(): # see if we need to quit
global player1, player2, space
event = pygame.event.poll()
if event.type == pygame.KEYDOWN :
if event.key == pygame.K_q :
player1 = True
if event.key == pygame.K_p :
player2 = True
if event.key == pygame.K_SPACE :
space = not(space)
if event.type == pygame.QUIT :
terminate()
if __name__ == '__main__':
main()
The main function is where all the action is, with the other functions supplying support. Keyboard presses generate Pygame events, and there are three you’re looking for here. The two players’ reaction keys — P and Q — are placed at opposite ends of the keyboard for maximum separation, and the spacebar is for stopping and starting the game. Before looking at the main function, take a quick look around at the others.
The draw_screen, drawWords, and updateWords functions are all concerned with writing text into the Pygame window. The checkForEvent function sets logic variables whenever one of the target keys is pressed and monitors for a click in the close box of the window. If one is detected, the terminate function is called and the program ends.
The main function is basically one big loop that starts by blanking out any message from any previous game and then pauses until the spacebar is pressed. This controls whether a round of the game will be played. If it is, the window displays the word Ready and the players ready themselves to be the first to react. The heart of the game is the following line:
go = time.time() + 1.5 + ( random.random() * 5 )
This sets up a random delay for a minimum of 1.5 seconds and a maximum of 6.5 seconds into the future. The random.random function returns a floating point value so the time isn’t restricted to whole numbers of seconds. If you want to change the range of the delays, change the number 5 to something bigger or smaller.
A while loop holds until this time has expired, checking all the time that no player has pressed early. If a player has pressed early, the other player is declared the winner. Otherwise, the word Go appears on the screen and the sound is generated. When the first player to react is detected, a message saying who has won is placed in the window and the IR signal is sent to move the LEGO robot. The losing player probably also reacted, so another call to checkForEvent is made to remove that key from the events buffer. If it isn’t removed, the losing player will be accused of jumping the gun in the next round.
Going on from Here
You can do plenty more with this game if you want! For a start, there is a small bug that shows itself if both players jump the gun: The first to do so is declared the winner. You could conclude that the second player deserves to lose, or you could change that situation to one you prefer.
Another change you may like to make is to add more sounds to the game, like cheers and applause to mark one player winning. Or you may want to keep track of how many rounds one player has won over the other and declare a winner in the program’s window instead of having the robot fall off a box. You could even make the robot do something when one player has won, like perform a victory dance or fire off a red or blue ball, depending on who has won.
You can do many other things with the IR message capability. When the Raspberry Pi can command the IR control, you have many exciting possibilities. For example, how about making a joystick input on the GPIO pins of the Pi and having that control the IR keys? Or why not make a graphics console where you have access to all the keys on all the channels on one screen? You can even write a sequencer so you can send the IR commands in a long but repeating sequence.
In the next chapter, we look at incorporating what we know about Bluetooth messages to create a unique project.