Chapter 16
Introducing RISC OS
In This Chapter
![]() Getting RISC OS up and running on your Raspberry Pi
Getting RISC OS up and running on your Raspberry Pi
![]() Finding your way around the desktop
Finding your way around the desktop
![]() Getting RISC OS online
Getting RISC OS online
![]() Discovering the amazing preloaded applications that come with RISC OS
Discovering the amazing preloaded applications that come with RISC OS
One of the great things about the Raspberry Pi is that it’s so easy to change the operating system: Just change the SD card! Several different operating systems are available, but most of them are just another flavor of Linux. However, RISC OS is unique, forged in the depths of time from almost the start of personal computing in the 1980s and developed into the most advanced operating system of the 1990s. Many of the things you take for granted on a Linux, Windows, or Macintosh desktop first appeared in RISC OS and inspired the two personal computing giants. So, take a step back into the past and the future and explore the operating system made by the inventors of the ARM chip. And be prepared for a blisteringly fast Raspberry Pi!
Knowing What Makes RISC OS Unique
The biggest difference between Linux and RISC OS is under the hood. Linux is a preemptive multitasking system, whereas RISC OS is a cooperative multitasking system.
When the Linux operating system decides what bit of code, or thread, is going to run, it also determines how long that code will run for. It doesn’t matter if that code isn’t quite in a state to pause. The rug is pulled out from underneath it, and control is passed back to Linux. The code has no control over this, nor does the programmer. There are things you can do about allocating thread priorities, but at the end of the day, the rug will be pulled.
RISC OS, on the other hand, has a cooperative approach. Control is passed over to the next thread, or program, in the list of tasks, and this thread continues to run until the code tells the operating system it’s ready to be swapped out and the next task can be run. From our perspective, this is a much more civilized way of going about things and gives the programmer the choice over how much time to use before letting other tasks have a turn. So, if you want or need all the processing power, you can have it, which makes the operating system much more responsive.
Although the preemptive nature of Linux is fine in a multiuser system, in a single-user system like so many Raspberry Pis run in, it’s just a bit too “Big Brother” for our liking. Debates run very passionately about this point, and a lot depends on whether you like the protection given by preemptive multitasking or you think it’s treating you like a child who needs supervision.
Preparing for Action: Getting RISC OS
The simplest way of getting RISC OS is to buy it on an SD card. You can get it from www.riscosopen.org/content/sales
along with some other RISC OS goodies.
However, if you have a spare SD card, making your own is simple: First, download the latest RISC OS image at www.raspberrypi.org/downloads. Unlike the gigantic Linux distributions, RISC OS weighs in at a very trim 113MB (zipped). Unzipped, it inflates to 2GB. Next, you have to get it onto an SD card. You can use any size SD card you like as long as it’s at least 2GB. Note however, that anything over 2GB is no advantage because this is the maximum you can use. This might sound like a restriction, but 2GB is almost infinite in the world of RISC OS.
Installing RISC OS is the same as installing any other operating system on the Raspberry Pi. There are lots of methods — the one that’s best for you depends on the computer you have available. Your best bet is to go to www.elinux.org/RPi_Easy_SD_Card_Setup
and choose the option that suits you. Alternatively, www.pilearn.com/Pages/Page1001.html
gives you a step-by-step guide for using the Mac to set up an SD card, with links to information for a PC. (A word of warning: On that page, you find instructions for using a Raspberry Pi for making a card, but we haven’t been able to get those instructions to work.)
If you need to set the over scan parameters in the config.txt file to make the desktop fit your TV, use the same number for the left over scan as you do for the right over scan. Similarly use the same number for the top over scan as you do for the bottom over scan. Version 12a (the latest one as of this writing) has a small bug that gives you an offset mouse pointer if you use asymmetric stretches side to side or up and down.
The mouse
The mouse is somewhat unusual. It has three buttons:
- Left (select) button: The select button is used for the normal operation of dragging and double-clicking to run or open a file like all the other operating systems.
- Right (adjust) button: The adjust button normally performs some sort of variation on the select button operations. For example, dragging a window with the adjust button doesn’t bring it to the front; you can drag a window behind another one with the adjust button. With the adjust button, you can select several files at once. Clicking the adjust button adds an icon to the group selected. It also deselects selected files without deselecting all of them.
- Middle (menu) button: The menu button brings up a drop-down menu. The menu that’s brought up is dependent on where the pointer is when the middle button is clicked; it’s known as context sensitive. The middle button is the biggest hurdle for a newcomer to get over; other operating systems don’t reinforce the menu button mindset so beginners can trip up over this. When in doubt, try the menu button.
 RISC OS is best used with a mouse equipped with a center scroll knob that doubles as a button. If you don’t have this kind of mouse, there is a program you can install that simulates the middle mouse button when you press the Windows key on the keyboard. It’s in the
 Utilities folder and is called !WinMenu.
The keyboard
A wide variety of keyboards can be used with the Raspberry Pi, and not all of them are the standard PC type. When you first power up RISC OS, the system is set for the default British keyboard, which isn’t too dissimilar from the U.S. keyboard — the only real difference is that Shift+3 gives you £ instead of #. (You can change this later if you want.)
It’s best if your keyboard has a row of function keys from F1 to F12. These are used a lot more on RISC OS than on other systems. Many keyboards don’t have that many function keys, but the keys F12 and F10 are important in RISC OS. F10 is the break key. F12 is involved in a lot of tasks: By itself, pressing F12 takes you into the command-line mode; Pressing Ctrl+F12 brings up a task window; and pressing Ctrl+Shift+F12 shuts down the system (although you can do this from the desktop if you prefer).
The network
The network connection used to be disabled by default, but on the latest release (which as of this writing was version 12a), the network connection is enabled. It requires a network to be connected into the Ethernet socket; unfortunately, there is no support for a wireless interface (as of this writing).
The network connection is described as “Ethernet over USB,” but it’s actually the Ethernet socket. In our setup, we connected the Ethernet port to a Mac laptop. Then we opened System Preferences, clicked Sharing, and enabled Internet Sharing to share our Wi-Fi connection with our Thunderbolt Ethernet. This will also work on non-Thunderbolt-enabled systems. You can do the same sort of thing with a PC or have a direct cable connection to your router if you prefer.
All Systems Go: Starting Up RISC OS
Insert the RISC OS SD card into your Raspberry Pi and power up the Pi. Unlike with Linux, you’ll be at the desktop in about 15 seconds — be prepared for that kind of speed up! The first time only, you get a progress bar as the fonts are scanned, and then a web browser window from NetSurf pops up with a “Welcome to RISC OS” page held in an internal file.
Now just look at the window. Along the bottom runs what is called the icon bar, a familiar thing on desktops (but remember that RISC OS had them first!). On the left are icons concerned with storage; on the right are icons indicating which programs are running. At startup, there are just two icons, and those are always there: One is an icon of a monitor and is used to set the monitor resolution; the other is a raspberry (in the old days, it was an acorn), which is used to control the system. A left click brings up a task window showing how much memory is allocated to each task. You can drag the red bars and change the allocated memory.
Scroll to the bottom of the window. The sixth line from the bottom says “RAM disc.” Click and drag out a red bar to something like 400K. As you release the mouse button, a new icon appears on the left side saying “RAM.” This is a temporary fast storage area that uses some of the system’s memory to look like a mass storage device. Anything put in it will disappear when the Pi is switched off, but it saves wear and tear on the SD memory (and in the old days was much faster than a floppy disk).
If you click the raspberry with the center button, a menu appears. One of the choices is to shut down. This is what you do before turning off the power. In sharp contrast to Linux, it’s almost instantaneous. You see a window inviting you to restart, but you can just turn off the power knowing that all the files have been closed correctly.
Taking a look around
Click the Apps icon on the left of the icon bar. A window with some very basic applications in it appears. Double-click !SciCalc, and the icon of a calculator appear on the right side of the icon bar. Left-click that icon to see the calculator. On the top right of the calculator frame, you see a square. Click that square to see the calculator’s other functions.
The anatomy of a window is shown in Figure 16-1. It has the close icon as a cross, as you may expect. However, there are some other things that you may not expect. For example, there is an Iconise button, which will turn the whole window into a small icon you can drag around the desktop, useful for quickly clearing some space on the desktop. You also have a Back button. Unlike most other operating systems (in which anywhere you click a window, it comes bounding up to the front like an overeager puppy), a RISC OS window only comes to the front when you click its title bar. The Back button puts it firmly in its place.

Figure 16-1: The Calculator window and its parts.
Try clicking the Back button and then drag the window by its title bar but hold down the right mouse button. The window gets dragged as you would expect, but when you encounter another window, it’s dragged behind that. It looks odd if you aren’t used to it.
Now move your mouse over the calculator window and press the middle mouse button. You see a drop-down menu. Move to the bottom entry, Help, and left-click. A document window appears, telling you all about the workings of the calculator. You can explore other options in this menu as well. For example, the View option allows you to toggle between the compact and expanded view of the calculator; the Edit option allows you to copy the calculator’s results to the clipboard.
Point at the calculator icon on the bottom icon bar and click the middle mouse button again. This time a menu pops up, and the top entry is Info. This is consistent in all applications; Info tells you a bit about the program. (You can also access the Help here exactly as you could with the application window menu.)
The Choices entry brings up another window (shown in Figure 16-2). The choices are self-explanatory, but look at the icon to the right of where it says Base Decimal. This is a drop-down list icon. Click it for a list of available number bases. Note that there are radio buttons for choosing from a number of options and check boxes for selecting many options.

Figure 16-2: Calculator options.
Double-click the !Help icon in the Apps window. Now every time you hover your pointer over some aspect of the window, a pop-up contextual help message appears. This is very useful when you’re first learning RISC OS. You’ll know when you’ve learned the basics because this pop-up help message becomes really annoying.
This is the basic way of interacting with a RISC OS application. You may get a bit muddled at first because you’re used to another OS, but it quickly becomes second nature.
Making your own space
In this section, you create some folders of your own. This will illustrate the unique way RISC OS has of handling saving.
At the bottom left of the icon bar, you see the icon of an SD card. This is the SD card from which you’re running RISC OS. Left-click the icon and you see the basic root window of the filing system. Its path name is displayed as the window’s title: SDFS::RISCOSpi.$. SDFS stands for “SD card filing system”; RISCOSpi is the name of the SD card; $ is the top level. Note the double colons (::) separate the filing system type from the name of the volume it’s currently using. The dot (.) is used to separate folders.
Unlike in Linux, there is no root user, super user, or any other form of user — there is just you. If you double-click the Apps folder, you open the same window you did when you clicked Apps in the icon bar. In fact, they’re one and the same thing, except the one from the icon bar is protected (you can’t add or delete anything from it). The Apps folder you opened from the root window has the path name in the window’s title.
It’s time to make some space for your own work. Middle-click the root window and scroll down to New Directory. Move to the right and in the text box, type the name of your new directory folder. We used the name Mike, but you probably want to pick something a bit more personal. When you’ve finished, press Return or click OK, and that directory will appear in the root window. Double-click it to open your blank window and keep it open while you work through the next section.
Saving and loading by dragging and dropping
Saving and loading files are the operations that may be most different from all the other computer desktops that came after RISC OS. Most computers use a mini filing system list to identify files. Some systems allow you to load a file by dragging its icon onto the application icon, but RISC OS takes this a whole step further.
Follow these steps for saving a file:
In the Apps window, double-click !Edit.
The !Edit icon appears on the icon bar.
Left-click the !Edit icon.
A blank text window pops up.
Click inside the window.
You see the red “focus” cursor.
Type a few words.
The title bar will say <untitled> *. The asterisk informs you that the file’s contents have not been saved. You’re now going to save the file in your own folder that you created in the preceding section.
Click the menu button and choose Save or press F3.
A window appears like the one you saw when you created your folder, except this window has a default name already in it.
- Press the backspace key until you clear the default name and type Text_test but do not press the Return key.
Drag the text file icon above the name Text_test and drop the icon into your folder.
A text icon appears and your text window has the file’s path name in it.
Type a few more characters.
You see the asterisk (*) in the title bar again, indicating you have unsaved data. Updating your file now is very easy.
Click the menu button, choose Save, and click OK.
The filename has the full path name of the file in it, without an asterisk.
If you want to create a new file with the updates you’ve made, just add characters to the filename. If you want to save the file somewhere else, simply drag and drop the icon in the save box into the folder you want to keep it in.These actions are summarized in Figure 16-3.

Figure 16-3: Saving a file.
Here’s a unique trick: Type in and save another text file. Then drag that file’s icon into the text window of the first file. Bingo! The contents of the new file are added to the old file! You can imagine how easy this makes adding standard paragraphs to things you type. Many applications work like this — merging data directly into a file you’re working on by drag and drop. Some applications do this with images or other types of data. Of course, the addition has to make sense — for example, dragging a JPG image into a text file won’t work (well, other than dumping the bytes of that file and looking at it as a text file, which you might want to do).
Focusing on file types
Most operating systems identify the type of file by an explicit extension to the filename. Typically, a text file would have the extension .txt. In RISC OS, things are slightly different. Here’s how:
- Each file has a type, but the file type is hidden inside the file.
- The file type determines what sort of icon is shown for the file.
- The file type is a three-digit hexadecimal number, but many file types are enumerated — that is, they have an associated word with the file type.
If you menu-click the Text_test file you created in the preceding section, and move your pointer onto File “Text_test” and then move it down to Set Type and then move it along to the text box, you see the file type shown as “Text.” Press the backspace key here and type the word BASIC and press Return. Immediately, you see the icon change. It’s the same file, but now the computer treats it differently if you click it. Don’t click it now; instead, go back and set the file type to FFF, and it’s a text icon again. The file type Text is represented by FFF; you can type either to set the file type.
You can reload the file into an edit window by dragging it onto the !Edit icon or by double-clicking it.
Handling Graphics with !Paint and !Draw
Two of the staples of any computer system, !Paint and !Draw have been in the RISC OS since the beginning. !Paint handles bitmap graphics; !Draw handles vector graphics. Although they may seem a bit clunky by today’s standards, they have the great advantage of being understood formats by most RISC OS applications. In fact, !Paint plays a vital part in the whole construction of the desktop world.
!Paint
A !Paint file is called a sprite file, and it can hold one or several images or sprites. The most common use for sprites is making desktop icons. There are a number of different types of sprites, mainly differentiated by the number of colors they contain. The majority of desktop icons have only 16 colors, reflecting their early origins, but you can have sprites with 2, 4, 16, 256, 32,000, and 16 million colors. The color selection window changes to reflect the color choice. The higher color depths are suitable for photographs, although a passable photograph can be rendered in 256 colors.
The drawing tools are as you would expect: single pixels (pencil), spray can, brushstrokes, camera (copy block), scissors (move block), hand (shift whole sprite), as well as a selection of solid and line shapes. One thing you may not find in other packages is the way the colors are applied — they can be simply set, or they can be the result of a logic operation between the working color and the color already in the background.
As a quick example, follow these steps:
Double-click the !Paint icon in the Resources apps window.
The !Paint icon appears on the icon bar.
- Open the Diversions folder.
- Hold down the Shift key and double-click the !Patience icon.
Drag the !Sprites22 file onto the !Paint icon in the icon bar.
You see a window with two sprites: a large sprite and a small sprite. The larger one is only 34 pixels square, and the smaller one is 18 pixels square.
Double-click the larger sprite.
You see a colors palette and the sprite along with the paint tools.
Menu-click this sprite and select the zoom option. Repeatedly click the up arrow next to the first box to get an enlarged view.
These windows are shown in Figure 16-4.

Figure 16-4: The !Patience sprite icon.
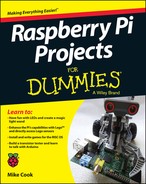
Create your own sprite by left-clicking the !Paint icon on the icon bar. The Create New Sprite window appears with an invitation to set the parameters, including the size. The window defaults to a sprite the size of the whole screen, but you can use the arrows or type directly in the boxes to get any size you want. The sprite shown in Figure 16-5 is a high-resolution sprite we made to show the effects of various logic operations on filled circles. Notice how the color selection is controlled by three sliders. It has the option of control by RGB (that is additive color — red, green, and blue). It can also use the subtractive color model of CMYK (cyan, magenta, yellow, and black) or the HSV (hue, saturation, and value) color space.
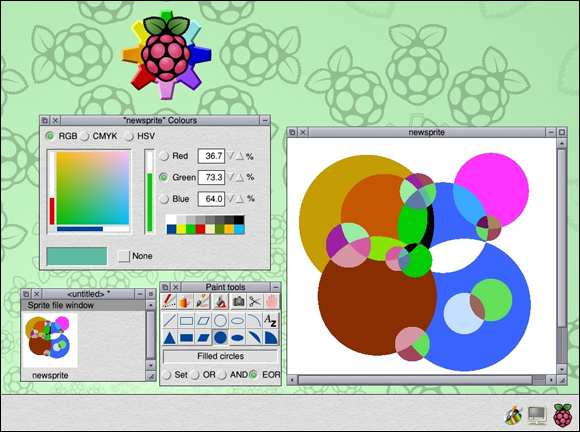
Figure 16-5: A high color resolution sprite.
!Draw
Whereas !Paint uses individual pixels, !Draw is a vector drawing tool. Here a drawing is made up of lines, and all that’s stored are the parameters of those lines. This makes !Draw files very small compared with the larger bitmaps. !Draw files are very good with splines (curves), allowing you to enter a spline by clicking and dragging. Then you can edit the control points of the curve by first selecting the curve with a right-click to show all the control points. Then you can drag the control points around again with the right (adjust) mouse button.
Producing a good vector drawing takes some skill, but one of !Draw’s major uses is collating sprite, text, and line drawings. To add a text file or sprite image, simply drag the icon into the drawing or save the object by dragging the save box into the !Draw window. They can then be manipulated and composed.
There are some comprehensive online tutorials on these packages. For how to use the basic tools in !Draw, check out www.riscos.com/support/users/userguide6/draw/chap02.htm. For some interesting ways to design patterns, look at http://homepages.nildram.co.uk/~riscos/tutorial/pattern_tut. And for a rundown of the tools you get in !Paint, check out www.riscos.com/support/users/userguide6/paint/chap02.htm.
Connecting to the Outside World
If your network is not configured, double-click the !Configure icon on the desktop. A folder with lots of applications in it opens. You should notice something strange: These applications don’t start with an exclamation point — they’re presented differently.
To configure your network connection, follow these steps:
Single-click the Network icon.
The Network Configuration window appears.
Click the Internet icon.
The Internet Configuration window appears.
Click the Enable TCP box and then click the Interfaces icon.
The Interfaces window appears.
Click the Ethernet over USB check box and then click the Configure button next to it.
The USB 0:Ethernet over USB window appears.
- Click the Via DHCP radio button and click Set.
Click Save in the Network Configuration window and agree to the restart request.
If you couldn’t before, you should now be able to browse the web using !NetSurf.
When we tested this out, an entire web page loaded in about 5 seconds, whereas the best that Midori could do under Linux, loading the same page, was 15 seconds.
When you’re online, there are a number of interesting things you can download. !Store is already installed on the desktop; it takes you to a source of applications, both paid for and free. There are a number of utilities and games worth looking at. Open the application details window and click an application for a description of it. Some names used can be quite cryptic or require a knowledge of RISC OS history in order for it to make sense. For example, Hatari is an Atari emulator, whereas Rise of the Triad is a first person shoot-’em-up game, a bit like Doom. For Rise of the Tria, you need !UnixHome to be run first; you can find it at www.riscos.info/packages/SupportDetails.html.
When you download something, make sure that you have a window open where you want to store the application so you can drag it in.
Most online software comes in a compressed format. The format of choice is called Spark. Double-clicking the file opens the archive just like a normal window. You can run many applications directly from this compressed archive window. However, if the application needs to write anything back to the application’s folder, this will fail, so it’s best to drag the icons you need out of the archive into your own folder before you run them.
Identifying the Resources That Are Already Installed
Many resources come already installed on the SD image, many of which would’ve cost you quite a bit of money when RISC OS was in its heyday. The highlight of these resources is the Programmers Reference Manual (PRM), in the Documents.Books folder. This five-volume set cost more than a hundred bucks in the ’90s, but here you get them as a set of PDFs for free. The books cover all the operating system calls for all sections of the machine; they aren’t exactly light reading, but they do contain all sorts of vital information. (Although you can get PDF readers for the Raspberry Pi, you may want to transfer the PDFs to your computer because there you’ll be able to search the PDFs much more efficiently.)
Many authors have released their work under Creative Commons licenses. We recommend you look at PipeDream, a fully integrated office suite of word processor, database, spreadsheet, and charting package all in the same window. The application itself is in the Apps folder, and a full set of tutorials is in the Documents folder.
Check out the high-quality vector graphics examples in the Documents.Images folder and the games in the Diversions folder. These aren’t the most exciting things you’ll ever see, but the Tetris clone !Blocks is as addictive as it ever was, and !Meteors was retro when the OS was new. Perhaps the oddest diversion is !Madness — it slowly nudges all the open windows around the screen and is meant as a demonstration of interapplication messaging. (Just make sure you read the Help file to find out how to stop it before running.) Finally, we have to mention !SignalBox, a graphically spectacular simulation of the Exeter West train station, shown in Figure 16-6.
Figure 16-6: !Signal Box, a graphical simulation.
The Utilities folder contains !ChangeFSI, which is a great way to convert images between JPG and sprite formats. However, it isn’t just limited to JPGs — it also handles a wide variety of input graphics file formats (see the Formats file, located inside the application, inside the Documents folder). The application is also capable of a number of image processing functions like histogram equalization, gamma correction, and sharpening.
 Shift+click to open an application.
 The FSI part of the name !ChangeFSI comes from the Floyd-Stenberg method of dithering, a way of showing high-resolution images on a lower-resolution screen by using an error diffusion technique.
There are many other delights to explore in the RISC OS distribution. You may not understand them all — we don’t ourselves — but over time you can get to know them. People who explore all that RISC OS has to offer tend to grow to love this operating system.