Chapter 1
Getting to Know the Raspberry Pi
In This Chapter
![]() Getting a Raspberry Pi
Getting a Raspberry Pi
![]() Finding out what’s possible with your Raspberry Pi
Finding out what’s possible with your Raspberry Pi
![]() Connecting your Raspberry Pi
Connecting your Raspberry Pi
![]() Setting up your operating system
Setting up your operating system
![]() Troubleshooting any problems
Troubleshooting any problems
You probably wouldn’t have picked up this book if you hadn’t already heard about the amazing, low-cost computer for everyone, the Raspberry Pi. Besides being inexpensive, what’s made the Raspberry Pi so appealing is that it’s pretty easy to use. You can even change it to do things its designers never dreamed of. Unlike most consumer electronics, tablets, and desktop computers, the Raspberry Pi is designed to let you investigate how it works and change how it operates by writing your own software programs.
This is all possible because the Raspberry Pi uses an inexpensive but powerful processor and a free operating system, which is based upon the popular Linux platform. In this chapter, we take a look at what you need to get going and show you how to set it up.
We also tell you where to get a Raspberry Pi and the accessories you need to run it. We explain how to set up the operating system, how to connect the hardware, and what to do if you run into any problems along the way. Before long, you’ll be able to make your Raspberry Pi say, “Hello, world!”
Getting a Raspberry Pi
If you’re interested in building projects with a Raspberry Pi, you probably already have one. But if you don’t yet have your own Raspberry Pi, this is the section for you! You’ll be glad to know that there are a few places you can pick one up quickly and cheaply.
The Raspberry Pi comes in several versions: Model A is shown in Figure 1-1, and Model B is shown in Figure 1-2. There are other versions of the Raspberry Pi, though — Chapter 4 has a full rundown. The Model A and Model B use the same kind of processor, but the Model A is cheaper and uses less power; it has a single USB port and connections for your screen and audio. Model B has everything Model A has, plus an additional USB port and an Ethernet port for connecting to a network, so it costs a little more. For the projects in this book, you’ll want to get a Model B.

Photograph courtesy of the Raspberry Pi Foundation
Figure 1-1: Raspberry Pi Model A.
Photograph courtesy of the Raspberry Pi Foundation
Figure 1-2: Raspberry Pi Model B.
 The newest model as of this writing is the Raspberry Pi 2 Model B, which replaced the Model B+, but we’ve kept all the projects in this book compatible with Model B and later.
The Raspberry Pi Foundation (which is technically a UK charity, not a business) created the Raspberry Pi. The Raspberry Pi Foundation licenses the manufacture of the Raspberry Pi to the biggest names in electronics in the UK, RS Components (www.rs-components.com) and Farnell, which supports Raspberry Pi under the brand name element14 (www.element14.com/community/community/raspberry-pi). If you’re buying a Raspberry Pi for personal or home use, Farnell’s outlet is CPC (order from http://cpc.farnell.com). In the United States, you can also buy from Newark (www.newark.com), which is a part of Farnell, and Adafruit (www.adafruit.com). These suppliers can provide you with everything you need to get your Raspberry Pi up and going, but you can only buy from them online.
If you simply can’t wait to get your hands on a Raspberry Pi, and you live in the UK, you can also walk in to any Maplin electronics shop, where they’re usually kept in stock. You’ll pay a bit more for the convenience of shopping in a store, but you can get personal advice from the salespeople, which can be pretty useful if you have questions. At the time of this writing, you can walk into a Radio Shack in the United States and buy a Raspberry Pi starter kit, but this may change because the company is restructuring.
You can also find the Raspberry Pi for sale on eBay. There are usually plenty of listings for just a Raspberry Pi or for bundles that include all the accessories you need in order to hook it up.
 If you decide to buy a Raspberry Pi on eBay, be sure to purchase from a reputable seller with plenty of good feedback. There are knock-offs out there, and they can’t be guaranteed to be manufactured to the same standards as the real thing. We tend to think the cost savings isn’t worth the risk of buying from eBay.
Discovering What You Can and Can’t Do with a Raspberry Pi
This book shows you how to get going with Raspberry Pi projects. After you’ve done some, you’ll have a pretty good idea of what’s possible. But when you want to go a bit further with your ideas, it’s good to know what you can realistically expect to achieve.
The first thing you see when you get up and running is a text-based prompt on the screen. You can do a lot of things just with text, but most people prefer to launch the familiar graphical user interface (GUI), the desktop environment you’re used to on any other computer. The operating system supports all the things you’d want to do in a desktop system, including playing games, browsing the web, word processing, using spreadsheets, editing photos, and playing audio and video.
But that’s not where the Raspberry Pi really shines. The great things you can do with the Pi come into play when you write your own programs and hook it up to electronics or other objects in the real world using the general-purpose input/output (GPIO) connector. Your Pi is well suited for this because these kinds of things don’t usually require the beefy processor in your desktop or laptop. Using your Pi for things you may not do with your usual computer is what makes it really fun — and that’s what this book is all about!
The Raspberry Pi uses a Broadcom BCM2835 central processing unit (CPU) and a VideoCore IV graphics processing unit (GPU) and shares the onboard memory between them. Either 256MB or 512MB of onboard memory is available. The CPU is an impressive piece of technology that enables fairly complex computing power at an extremely low price. The trade-off is that the Pi is not nearly as powerful as the full-fledged CPU in desktop and laptop computers — it’s a bit slower, roughly comparable to the capabilities of mainstream computers in the ’90s. You shouldn’t plan to do high-performance computing or run heavily graphics-intensive applications like gams or 3D modeling software — the Pi will run these, but they may be unusably slow.
You probably won’t be replacing your main computer with a Pi, but you can do a lot of experimentation with it that you may not try with your desktop or laptop, and you can easily connect your Raspberry Pi to sensors and motors in the real world, which we show you how to do in the projects in this book. And if you make any big mistakes that damage your Pi, it doesn’t cost a lot to get another one and start experimenting again!
Getting Familiar with Your Raspberry Pi
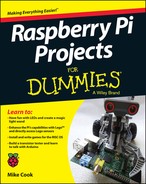
The Raspberry Pi is about the size of a credit card and has all the components that you need onboard so that you can connect it to a TV or display and start using it. These connections are shown in Figure 1-3.

Figure 1-3: Identifying the parts of the Raspberry Pi (in this case, the Model B).
Going clockwise around the board from the top left, you’ll find the following connections:
- General-purpose input/output (GPIO) connector: This is a port for getting electrical signals into and out of your Raspberry Pi, such as for reading sensors and controlling motors. It’s composed of two parallel rows of pins and is labeled P1 (for “Plug 1”). Different models of Raspberry Pi use these pins slightly differently due to the way the pins are routed on the board.
- Composite video output: This jack is used for connecting your Raspberry Pi to a composite video (standard TV) connection using an RCA cable.
- Audio output: This is a black 3.5mm jack on the upper right of the board.
- USB port(s): These ports allow you to connect USB accessories (such as a keyboard and mouse and external storage devices) to your board. The Model A has only one USB port to reduce costs. The Model B has two USB ports.
- Ethernet port (Model B only): This port is for connecting your Raspberry Pi to an Ethernet network and for accessing the Internet.
- Camera serial interface (CSI) connector: This slim black connector between the Ethernet jack and the HDMI output is for connecting a small camera such as a webcam. CSI connectors are available from the Raspberry Pi store.
- HDMI output: This port is used for sending digital video to a computer monitor. The HDMI output also can route your audio, so you may not need to use the audio output port.
- Power input: On the lower-left side is the micro USB power socket. The power is provided via a micro USB power supply that plugs into this port.
- Display serial interface (DSI) connector: In the middle of the left side of the board is a slim connector for connecting high-speed displays. It’s used for connecting a small LCD panel directly to your Raspberry Pi. You can use it for touch-based input as well!
Selecting Your Accessories
You probably have some of the important accessories lying around the house already, which was exactly what its creators had in mind. You can just use old stuff that’s gathering dust — you don’t have to buy anything, which keeps the cost down. You don’t have to get all the accessories shown in Figure 1-4 to complete the projects in this book. But at a bare minimum, you’ll need a display and a keyboard to get things going. Here’s what you see in Figure 1-4:
Monitor: The Raspberry Pi’s onboard HDMI output allows you to connect a high-definition feed to just about any modern computer display. If your display has an HDMI input, all you need is a cable between the two.
If your monitor doesn’t have an HDMI input, it probably supports DVI, which has a larger, wider connector. You can buy adapters that convert from HDMI to DVI that will allow you to use your DVI monitor. You can also use a VGA monitor (the VGA input contains three rows of holes), though these aren’t officially supported. If you want to use VGA, make sure to get an adapter that is specifically meant to work with a Raspberry Pi.
 If you don’t want to use a computer display and you have an old TV, you can use it as a display. Your Raspberry Pi has an RCA connection, which allows you to use a composite video signal to a TV with a composite video input. The picture won’t be as sharp as with a display, and text can be hard to read, so we recommend using a monitor if you can.
- Ethernet cable: Some of the projects in this book require connecting your Raspberry Pi to a network. For these projects, you’ll need an Ethernet cable.
- Case: You can use your Raspberry Pi as is, right out of the box. It’s pretty durable, but accidents happen, so lots of people have fun making cool cases to protect the circuit board from spills and dust. Some cases are even enhanced with glowing LEDs. The designer of the Raspberry Pi logo, Paul Beech, has designed some cool cases — check out
http://shop.pimoroni.comto find them. - Mouse: Any USB mouse will work fine. The Model A only has one USB port, so if you’re using a Model A, you’ll need to use a USB hub so that you can plug in both your mouse and your keyboard. You can also plug your mouse into your keyboard, if the keyboard has an extra USB port on it.
- Keyboard: There is a USB port on the Raspberry Pi circuit board, so you can plug in a USB keyboard. If you have an older keyboard with a round (PS/2) connector, you can use it, but you’ll need a small adapter plug to convert between PS/2 and USB.
- SD card: Your Raspberry Pi doesn’t have a hard drive, so you’ll need to use some kind of external storage. An onboard SD card slot is provided for this purpose. When you plug in an SD card, your Raspberry Pi treats it just like a hard drive. SD cards are pretty cheap, so go for one with at least 8GB or 16GB of storage. SD cards have class numbers to indicate how fast they can read and write data. We recommend you get a Class 6 SD card or better.
- USB hub: If you’re using a Model A Raspberry Pi, you may need a USB hub to connect your keyboard and mouse (see the preceding bullet). If you’re using a Model B, you don’t need a USB hub, but you’ll probably want extra USB inputs into your Pi, because your keyboard and mouse will take up the two USB ports. Make sure to get a USB hub that has its own power source — the Raspberry Pi can provide only limited power output via USB.
- USB memory stick (not shown): Memory sticks (also called memory keys or flash drives) can provide a great deal of extra storage that is fast and reliable. They’re also handy for moving files from another computer or laptop to your Raspberry Pi.
- SD card writer (not shown): The Linux operating system for your Raspberry Pi is stored on an SD card. You can buy SD cards with the operating system already loaded, but you’ll probably want to write your own at some point, so you need to make sure your computer has an SD card slot. Most desktops and laptops have one these days, but if yours doesn’t, you should get an SD card writer. It plugs into your USB port and allows your computer to see what’s on the card and write files to it.
- Speakers (not shown): Your Raspberry Pi has a 3.5mm audio jack so you can plug in headphones or external speakers. If you’re using the HDMI connection and HDMI monitor as a display, the audio is sent over that cable to your screen.
- Micro USB power supply (not shown): Your Raspberry Pi gets its power via the micro USB connector on the side. You can use just about any power charger that fits this port, but it needs to supply 700 milliamperes (mA) of current (check the specifications printed on the side of the charger). Most good mobile phone chargers will work fine, as long as they supply 5V 700mA (3.5 watts). We recommend a Raspberry Pi–compatible power adapter, which should be available from the supplier of your Raspberry Pi.

Figure 1-4: Key accessories.
Setting Up Your Operating System
To do anything useful with your Raspberry Pi, you need to have an operating system. The operating system provides the basic functions like the GUI, which most people know as the “desktop environment.” It also supports reading and writing files, runs general-purpose applications like your word processor and web browser, and runs the programs you write for your Raspberry Pi projects. Your Raspberry Pi uses the Linux operating system to do this.
Your operating system is stored on an SD card, not on a hard drive like most computers. When you turn on your Raspberry Pi, it reads the operating system that’s on the SD card. If your card isn’t inserted, the Raspberry Pi won’t be able to start up, so you need to get the operating system onto an SD card before you can do anything else.
Linux is a free operating system, unlike the ones used on Windows and Mac. It’s an open-source project, which means anyone can contribute to it — and thousands of people do. The Linux Foundation (www.linuxfoundation.org) coordinates these efforts and manages the standard Linux kernel (the core code that makes it work). All you have to do is download a copy of the operating system (see the nearby sidebar) and put it on your SD card.
You also can buy premade SD cards that already have the operating system written onto them. With one of these cards, all you have to do is insert your card and power up your Raspberry Pi. You can buy them from RS, element14, Amazon, eBay, or other online outlets. If you already have one, skip to the section on setting up your hardware, later in this chapter.
Flashing Your SD Card
Your operating system is made up of a bunch of files that are run from the SD card itself. However, when you write the operating system’s files to the SD card, they’re written in a special format that Linux can read. You can’t just copy them over as you would with other kinds of files. The Linux distribution you downloaded is in a special format called a disk image. And you flash the disk image to the SD card using a special little program. The program you need depends on whether you’re using Windows, Mac, or Linux.
Flashing an SD card in Windows
To create the image file in Windows, you use a special program called Image Writer for Windows. It’s free and pretty easy to use. Just follow these steps:
Insert your SD card into your computer’s SD card slot or, if you don’t have one, into your SD card reader.
Take note of which drive letter is assigned to your SD card.
Download the files at
www.sourceforge.net/projects/win32diskimager/files/latest/download. If you want more information about Image Writer for Windows, go to www.launchpad.net/win32-image-writer.Double-click the file to extract it, click Extract All Files to unzip the archive into a folder, and then open the folder.
Note: If the filename of the file you downloaded ends with
.exe, when you double-click the file, an installation wizard may run.You should see the list of extracted files. Make sure that you aren’t looking at the zipped files.
- Click the file
Win32DiskImager.exeto open it. Click the folder icon to the right of the long white box and navigate to the Linux
.imgfile you just unzipped; double-click to select it.This will put the file path into the long white box for you.
From the Device menu, select the drive letter that your SD card has been assigned.
Be absolutely sure you’ve got the correct drive selected — the one that contains your SD card. Whatever drive you’ve chosen in the device menu will be completely erased!- After you’ve double-checked that you’ve selected the right drive, click the Write button to create the image file on your SD card.
Flashing an SD card on a Mac
On a Mac, you can use a simple script called RasPiWrite to do the work of flashing your image file to your SD card. First, you create a folder that RasPiWrite can use while it’s flashing your SD card. Then you use the script to create your image file. You do some of this by typing commands on the command line, using the Terminal program, which is found in your Applications/Utilities folder.
You need your system password to be able to flash the SD card. Just follow these steps:
- In your
Documentsfolder, create a folder calledSD Card Prep; in theSD Card Prepfolder, create a folder calledRasPiWrite. - Go to
https://github.com/exaviorn/RasPiWriteto download the zip file of RasPiWrite. - Double-click the file you downloaded and open the resulting folder.
- Drag the files in this folder to the
RasPiWritefolder you created in Step 1. - Drag the zip file of your Linux distribution into your
RasPiWritefolder. - Open the Terminal application, located in
Applications/Utilities, and type cd and then a space. Use the Finder to locate the
SD Card Prepfolder you created in Step 1; make sure you can see both the Finder window and the Terminal window, and then drag the RasPiWrite folder into the Terminal window.This places that path name of that folder into the command line for you. (It’s easier than typing it all out.)
Press Return.
This switches you to the folder containing RasPiWrite.
Type ls and press Return.
The list command produces a list of files in the
RasPiWritefolder. You use it later to tellRasPiWritewhere to get the source files for your disk image.- Remove any external memory cards, USB sticks, or other pluggable storage device from your system so that you don’t accidentally erase them.
- Type sudo python raspiwrite.py to run RasPiWrite.
Enter your system password.
You see a progress report as your script creates the disk image. If all goes well, you should see a raspberry made of text characters.
- Insert your SD card into your Mac’s SD card slot or to an external SD card writer and press Return.
Follow the prompts to select the disk that corresponds to your SD card.
You can double-check to make sure you’ve selected the correct one by ensuring that the disk’s size (listed in the size column) corresponds to the size of your SD card. You don’t want to erase all the data on your main hard drive!You’ll be asked if you want to download a distribution; because you already did that, type N.
The program asks you to locate the disk image file.
Scroll back up to where you used the
lscommand and copy the filename of the distribution; then scroll back down and paste this filename at the prompt and press Return.The program extracts the image file and prepares it to upload onto your SD card. It then asks you to confirm that you’re about to erase your SD card. Be sure you’ve got the right SD card.
- Type accept to continue installing the image, and press Return.
The flash process can take a long time. You’ll see some dots on your screen as the process continues. Depending on your system, it can take 30 minutes or even up to an hour. You can use your computer for other things during this process, but if you lose power or restart, you’ll have to start all over again.
If you’re presented with a message immediately after typing accept, there’s a problem. Even though the message may say Transfer Complete, the immediate response means that the transfer hasn’t been accomplished. This sometimes happens if the image file isn’t located where you indicated it was or if the distribution contains just an image file rather than an image file within a folder of the same name. If it happens, create a folder with the same name as the image file, drag the image file into it, and try again.
Flashing an SD card in Linux
If you’re using Linux, the process of flashing an SD card for your Raspberry Pi is pretty straightforward. We assume you’re using Ubuntu, one of the most popular Linux distributions. If you’re using another distribution, the following steps will be very similar.
When you download the Raspbian Wheezy distribution, make sure you save it where you can find it, such as in the Documents directory. Then follow these steps to flash your SD card:
- Remove any external drives, USB keys, or other SD cards from your system and insert the SD card you would like to flash for your Raspberry Pi.
Open a Terminal window.
This is located in the Applications menu under Accessories.
Type sudo fdisk –l (the last character of this command is the letter l, not the number 1).
This starts the fixed disk program, a tool you can use to manage, erase, and separate disk drives into different logical partitions. It also shows you which drives are available on your system.
Locate your SD card in the device list.
The list gives details about each of the drives on your system, including the size of each device in bytes and other details such as the number of heads, sectors, cylinders, and so on. Find the device that most closely matches the size of your SD card in bytes. For example, an 8GB SD card will be listed as about 8,068MB. Take note of the name of that disk’s directory. For example, on our system, the SD card is located in the directory:
/dev/sdg.Use the
cdcommand (“change directory”) to navigate to the directory where you saved your Raspbian Wheezy distribution.For example, if it’s in the
Documentsdirectory, type cd Documents and press Enter.- Display the name of your Raspbian Wheezy image file by typing ls *.img.
To write the Raspbian Wheezy image to the SD card, use the
ddcommand.Here’s what we would type on our system:
sudo dd if=mydistribution.img of=/dev/sdc bs=2MYou need to substitute the name of your distribution file where it says
mydistribution.img. Substitute the directory where your SD card is located where it says/dev/sdc. The sudocommand stands for “super user do” and tells Linux that you’re issuing theddcommand as the administrator of the system. The operating system assumes you know exactly what you’re doing, and there are no protections for making any grave mistakes. Theddcommand is short for “data description,” but some people have joked that it stands for “destroy disk” or “delete data,” because if you aren’t careful, it can erase your system’s hard drive. When these two commands are combined, you can imagine the consequences of making a mistake. So, be sure you’ve typed everything precisely!Press Enter to start flashing the image file your SD card.
It should take about two or three minutes to do this operation. You won’t see a progress update, but you may see the light next to your SD card slot flickering. When it’s finished, you’ll be advised how much data was copied and how long the operation took to complete. Pat yourself on the back. You’re ready to fire up your Raspberry Pi!
Connecting Your Hardware
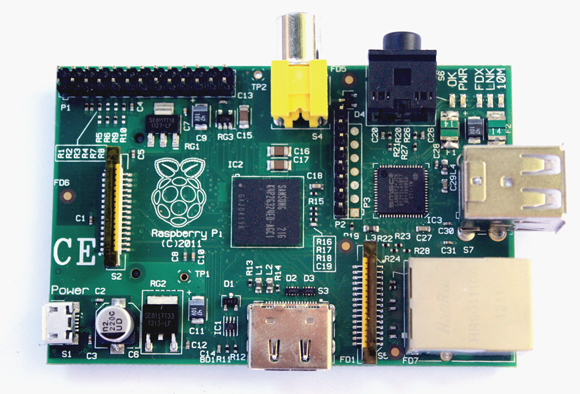
When you’ve got the essential accessories and the operating system, you can set up your hardware. This is simply a matter of connecting the right bits together. Figure 1-5 shows you how things are connected using a Raspberry Pi Model B.
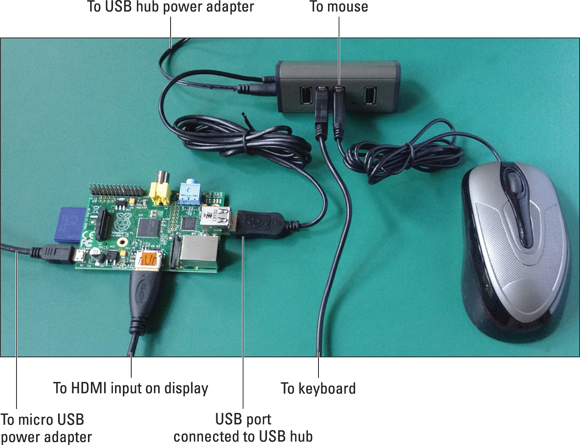
Figure 1-5: Hooking up all the hardware.
Follow these steps to set up your hardware:
Locate the SD card slot on the bottom of your Raspberry Pi and insert the newly flashed SD card snugly, with the label facing down.
The card will stick out from the side of the circuit board a little bit.
Connect your computer monitor or TV to your Raspberry Pi.
If you’re using a monitor or TV with an HDMI connection, just connect the two with an HDMI cable. If your monitor has a DVI connection instead, insert the HDMI cable into an HDMI-to-DVI adapter and then plug it into your monitor. If you’re using a TV without an HDMI connection, connect a yellow RCA connector cable to the round RCA jack on the top of your Raspberry Pi and plug the other end into your TV’s composite video input.
You may need to manually select which input your monitor or TV is using. Check the manual if you aren’t sure how to do this. Also, make sure the power to your display is switched on.Connect your USB hub into one of the two USB sockets on the right side of your Raspberry Pi.
If you’re using a Raspberry Pi Model A, there will be only one socket. Your hub should have a power adapter — plug it into an electrical socket.
Plug your keyboard and mouse into the USB hub.
If you’re using a keyboard or a mouse with an older PS/2-style connector, you’ll need a PS/2-to-USB adapter. You can also connect them directly to your Raspberry Pi’s remaining USB socket, but it’s a good idea to use the hub, which has more available power.
Connect your audio.
If you’re using an HDMI monitor with audio, the audio will go through your HDMI cable. If you’re using external speakers or a TV, your audio output is the black 3.5mm socket on the top-right edge of your Raspberry Pi. Connect your speaker cable there.
Connect to your network.
If you’re using a Model A, you can skip this step. There is no network connection available for it.
If you’re using a Model B, connect an Ethernet cable to your Ethernet socket on the right side of the board. When your operating systems starts up, it will automatically connect to your home router, as long as it supports Dynamic Host Configuration Protocol (DHCP). (Most home routers do.) If you have trouble connecting to the network, see your Internet service provider’s instructions for setting up new devices using DHCP on your home router. In rare cases, DHCP may be switched off.
Connect your micro USB power supply to your power socket on the bottom-left corner of your board.
Some power supplies have standard-size USB ports. You connect a USB–to–micro USB adapter cable from the standard USB output on these power adaptors to the micro USB input on your Raspberry Pi. There is no power switch. To cycle the power, you remove the adapter plug and put it back in, which is a little awkward. If you have an extension lead with a switch, you can connect your power adapter and use the switch on the lead to cycle to turn the power on and off more easily.
Don’t connect your Raspberry Pi to your computer’s USB port via a USB–to–micro USB adapter cable. Your computer’s USB port isn’t designed to deliver enough power for your Raspberry Pi, via the USB port.
When you power up your Raspberry Pi you should briefly see a rainbow-colored screen, which confirms that the hardware itself is working. Then the Linux operating system on your SD card will start to run and you’ll see an avalanche of text on your screen as all the various parts of the system are started. It can be pretty fun to watch. This will take a little time to complete. When it’s finished, you’ll be able to move on to setting up the system in the next section.
You’ll also see a little status light on the board next to the audio jack. The PWR light should be on. When your Raspberry Pi accesses the SD card to load the operating system, you’ll see the ACT light activated.
If you’re using an earlier Revision 1.0 board, the ACT light is labeled OK.
The FDX light indicates that you have a good Ethernet connection. The LNK light will flash whenever there is network traffic on the wire. The 100 light indicates a high-speed (100 Mbit) Ethernet connection.
Setting Up with Raspi-config
Raspi-config is a little program that automatically loads to help you to get your Raspberry Pi ready to run, the first time you start up. It gives you a list of the basic system options in case you want to change them. After it’s set up the first time, it won’t run again unless you launch it manually. You use the keyboard arrows to move up and down the menu of options and the left and right arrows to select options. Pressing Enter confirms your selection.
The options in the menu change from time to time. You may encounter an older version of the software with different menu items, but here’s a rundown of what they are and what they do (as of this writing):
Expand Filesystem: When you flash your SD card with your operating system, it makes an exact copy (an “image”) of the Linux distribution files, and the formatting of the disk itself is likely to be smaller than the actual available space on your card. The image files don’t take up much space, and if you have a large SD card, it will look like your SD card has much less capacity than it actually does.
To overcome this problem, it’s very important to use this option to expand your root file system to use all the available space on the card. Otherwise, you could run out of room! When you press Enter with this option, it runs immediately. The next time you start your Raspberry Pi, the command will resize your file system to use all the available room. This can take a few minutes; the screen won’t respond until it’s done. After it’s finished, all the space will be available to you.
- Change User Password: Lets you set the password for the default user of your Raspberry Pi, which is the user pi. You don’t need to change this. If you do, make sure not to forget it because there’s no way to get it back from the system!
- Enable Boot to Desktop/Scratch: You can use this option to make your Raspberry Pi go straight into the graphical operating system at startup. Otherwise, you have to start it manually (see the next section).
- Internationalization Options: This option takes you to a submenu where you can configure several options depending on where you’re located:
- Change locale: Allows you to change your language and character set. Leave this option alone if you want to use your Raspberry Pi in English.
- Change timezone: Tells your Raspberry Pi where you’re located. Afterward, it detects the time from your Internet connection.
- Configure_keyboard: Allows you to select your keyboard model and layout. When you press Enter, a long list of keyboards will be displayed. If nothing seems to be happening, be patient. It can take a few seconds for the list of keyboards to show up. Choose the one you want to use and then select the keyboard layout you want to use (for example, UK).
- Enable Camera: If you’ve purchased an optional Camera Module, this menu allows you to set it up to work with your Raspberry Pi.
- Add to Rastrack: Racktrack allows you to add your Raspberry Pi to the global map of users around the world. You can see all the other tracked Raspberry Pis on their website at
http://rastrack.co.uk. - Overclock: Overclocking is a way of speeding up the CPU to perform calculations faster than the manufacturer intended. The clock speed is the heartbeat that determines how many instructions your CPU processes per second. Manufacturers build in a bit of leeway to ensure that they can guarantee the speed that your CPU is rated to. If you overclock your CPU, your Raspberry Pi will run faster, but its lifespan may be reduced, and it’s likely to run a bit hotter. If you change this setting and your Raspberry Pi no longer works, hold down the Shift key when you power up to return your Raspberry Pi to disable overclocking.
- Advanced Options: Advanced Options contains several settings that are a bit more involved, so we don’t use them in this book. But they are good to know. The options are as follows:
- Overscan: Allows you to ensure that the picture is centered on your monitor and uses the available room correctly. If you have a black border around your image that you don’t want, disable this option. Otherwise, you can leave it alone.
- Hostname: Allows you to set the name of your Raspberry Pi network. You probably won’t need to modify this.
- Memory Split: Your onboard memory is shared between the CPU and the GPU. Depending on what you’re doing with your Raspberry Pi, your programs may use one or the other more intensively. For example graphics and gaming programs make more intensive demands on the GPU, so you can increase your Raspberry Pi’s performance by giving more memory to the GPU. Raspbian Wheezy uses 64MB to the GPU by default, and for most purposes this will be fine. You can experiment with this setting to see what setting works best for you.
- SSH: Secure Shell (SSH) is a secure way of communicating between computers using an encrypted connection, so that you can control one computer from another one. Unless you’re familiar with this feature, you can ignore this option.
- I2C: A communication protocol used by some external devices and sensors. This option allows you to enable or disable the I2C module so you can use these devices.
- Serial: Allows you to enable or disable messages from the system on the serial interface. You most likely won’t need to change this unless you’re doing some kind of debugging.
- Audio: Allows you to select whether audio is sent via the onboard 3.5mm audio jack or via the HDMI port. It’s set to auto by default, which means your audio will be routed via HDMI only when an HDMI screen is connected.
- Update: From time to time, you may have to update Raspi-config. You’ll need an Internet connection to do this, but if you’re using a recently download distribution, you should be up to date.
- About raspi-config: This just describes what the Raspi-config tool does.
When you’re finished making your selections, press the right arrow key twice to get to the Finish option and press Enter. You may have to reboot your Raspberry Pi, depending on the options you’ve selected.
If you want to use Raspi-config later, you can start it by typing sudo raspi-config.
Starting Up the Desktop Environment
When you’ve finished configuring your Raspberry Pi with Raspi-config, you’re ready to start up. After you switch on your power, you may have to enter your username and password, depending on your settings. For Raspbian Wheezy, the username is pi and the password is raspberry. Make sure you type these in lowercase.
After you log in, you’ll see the command prompt:
pi@raspberrypi ~ $
This means you’re up and running and you’ve logged into the operating system. Give yourself a cheer!
It doesn’t like the graphical operating system you’re used to with a desktop computer, but the command line is the direct connection to your Raspberry Pi’s capabilities. You can execute all the main system commands and even do programming using only the command line interface. In a sense, the graphical environment is just a way of prettying up the command line and make it easier to use.
To get pretty, you launch the GUI, LXDE, by entering its startup command on the command line. To fire it up, type startx. It will take a moment or two to start up, and the screen will go blank for a bit. After startup, you should see the LXDE and a lovely red raspberry logo on the desktop wallpaper, as shown in Figure 1-6.
Figure 1-6: Starting up the desktop environment.
When you’ve got the desktop working, you can move on to learning about the programming tools in Chapter 3 or dive straight into the projects, if you’re familiar with programming.
We recommend you peruse through Chapter 2 to make sure your workbench is set up for building the projects in this book. You’ll need a few tools to get going on many of them, and it’s a good idea to set up your workspace before you begin.
Troubleshooting Your Raspberry Pi
Things don’t always go according to plan. Here are some common problems and how you can try to solve them:
- No lights on your Raspberry Pi: This can happen if you forgot to connect the micro USB power connector or if the power supply isn’t capable of supplying your Raspberry Pi with enough power. Check that it’s rated to at least 5V 700mA (3.5 watts).
- Only the red light comes on: Your Raspberry Pi has power, but it can’t read the operating system on your SD card. First, make sure your SD card is firmly inserted. Then check that you’ve correctly created the disk image. If that doesn’t work, you can try testing your SD card on another Raspberry Pi to see if you get the same problem. If all else fails, try using a pre-imaged SD card.
- No output on the monitor: Check your monitor connection and your monitor’s power connection. Make sure that your monitor is turned on. (Sounds silly, but we’ve all done this at least once!) Then check that your monitor is using the correct input source. Use a button on the front of the monitor to cycle through them or use the monitor’s remote control.
Inconsistent behavior or hang-ups: Your Raspberry Pi uses power at different amounts depending on what it’s doing. Make sure you have a good power supply and that it isn’t overtaxed.
 If you have a lot of peripherals connected to your Raspberry Pi, they may be demanding power as well. If your power supply is right at the limit of its capabilities and your processor needs extra power for computing-intensive tasks, it could exceed what’s available and cause your Raspberry Pi to hang. This is particularly common if you try to power your Raspberry Pi from a USB socket.
If these tips don’t fix the problems you’re experiencing, your next port of call should be the user forums at the Raspberry Pi Foundation (www.raspberrypi.org/forums). The user community there is extremely knowledgeable and very helpful, particularly for beginners. Your problem may already have been solved in the discussions there. If not, post your problem, describing exactly the trouble you’re having. More often than not, you’ll get an answer within a few hours. Making it easy to experiment with your Raspberry Pi is what the user community is all about!