Chapter 4
The Raspberry Family
In This Chapter
![]() Understanding the evolution of the Raspberry Pi
Understanding the evolution of the Raspberry Pi
![]() Exploring the options of the general-purpose input/output (GPIO) port
Exploring the options of the general-purpose input/output (GPIO) port
![]() Discovering the secrets of the revision number held in your Pi
Discovering the secrets of the revision number held in your Pi
![]() Finding the impact of your Raspberry Pi model on projects in this book
Finding the impact of your Raspberry Pi model on projects in this book
In the beginning was the Raspberry Pi, and all was good. Then the Pi begat the revision 2 with more memory, which begat the Model A, which begat … well, you get the idea. With all this begating, we want to introduce you to what the Raspberry family looks like and how what you have may affect the projects you want to do. In this chapter, we show you how to understand the differences in the versions of Raspberry Pi that have been produced. By looking at the memory, GPIO, and video and processor variations that have been produced, you can see how the Raspberry Pi has improved over the years.
In the Beginning: Looking at the Evolution of the Raspberry Pi
The original Raspberry Pi, like so many firsts, did not need a qualifier to its name, but it had one. It was known as the Raspberry Pi Model B. The second version was known as the Model A. It’s impossible for end-users to complete their own upgrades, so the two versions are separate models.
The Model A has no Ethernet socket, only one USB connector, and typically less memory; as a consequence, it’s about $10 cheaper than the Model B. Also, the Model A consumes about one-third less power than the Model B, which can be important for battery-powered standalone applications.
The Raspberry Pi Foundation, the creator of the Raspberry Pi, is a registered charity with the aim of promoting computer literacy. They worked for many years developing prototypes before they released anything. The original Raspberry Pi 1 Model B set the benchmark for what a Raspberry Pi was, and it’s great credit to the developers that each new variant on the Raspberry Pi had improvements but did not break the compatibility with the previous models.
One confusing aspect of the Raspberry Pi is that changes and improvements to the Pi were not always accompanied by a change in name, so users are never quite sure what they’re buying. We want to try to clear that confusion: There have only been three basic named versions of the Raspberry Pi to date — the original (or 1), the plus (+), and the 2. Given that there is a Model A and a Model B variant for each model, that means there are six named types of Raspberry Pi (see Table 4-1).
Table 4-1: Named Types of Raspberry Pi
|
Name |
Release Date |
Memory |
Notes |
|
Raspberry Pi 1 Model B |
February 19, 2012 |
256MB |
The original Raspberry Pi. |
|
Raspberry Pi 1 Model B Revision 2 |
September 5, 2012 |
512MB |
Changes in the thermal fuses on the USB. Addition of unpopulated connector P5 for accessing more GPIO pins. Three changes to the GPIO pins on connector P1. |
|
Raspberry Pi 1 Model A |
February 4, 2013 |
256MB |
The first cut-down version of the Raspberry Pi. |
|
Raspberry Pi 1 Model B+ |
July 14, 2014 |
512MB |
More I/O pins than previous models and a micro SD card. |
|
Raspberry Pi 1 Model A+ |
November 10, 2014 |
256MB |
Same number of I/O pins as the B+. |
|
Raspberry Pi 2 Model B+ |
February 2, 2015 |
1GB |
The first version with a quad-core processor. |
|
Raspberry Pi 2 Model A+ |
Not expected until sometime in 2016 |
Not known as of this writing |
Cut-down quad-core Raspberry Pi. |
Deciding Which Raspberry Pi to Buy
Only immediately after the launch of a new version of the Raspberry Pi do you have any choice in what to buy. With backward compatibility and no change in price, there is little demand for older models. So your only real choice is whether to get a Model A or a Model B. In most cases, this is a no-brainer — the Model B is the obvious choice. You should only buy a Model A if you have some specific reason for doing so (for example, the cost, smaller form factor, or lower power consumption).
Memory
The memory chip used on every Raspberry Pi 1 was in an unusual form factor in the field of computers. It was the so-called chip-on-chip system — the processor chip had contacts on both sides (one set on the base to connect to the printed circuit board, and another set on the top for the memory chip). The memory chip was then soldered directly onto the processor chip to give a very compact design, only 1mm thick. This technique is more usually found in smartphones where space is at a premium. With the Raspberry Pi, it had the unfortunate effect of limiting the amount of memory that could be fitted, because this sort of memory chip was only available in a few memory sizes, with 512MB being the biggest.
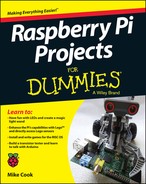
The latest Raspberry Pi 2 versions have discontinued that trend and allowed a larger memory chip to be fitted. The Raspberry Pi 1 Model B+ and the Raspberry Pi 2 Model B+ look almost identical from the top, but on the underside you can clearly see the separate memory (the large black block), as shown in Figure 4-1 and Figure 4-2.
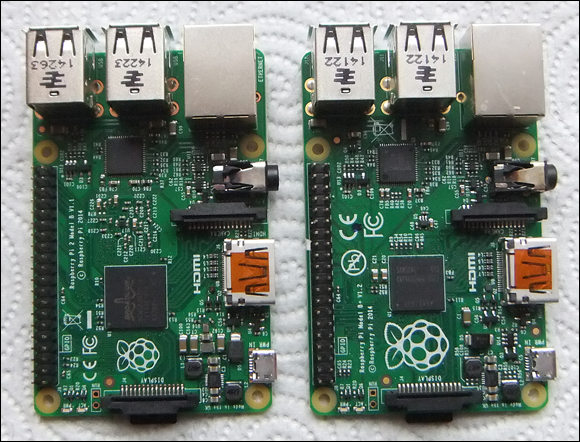
Figure 4-1: Raspberry Pi 1 Model B+ (left) and Raspberry Pi 2 Model B+ (right), top view.
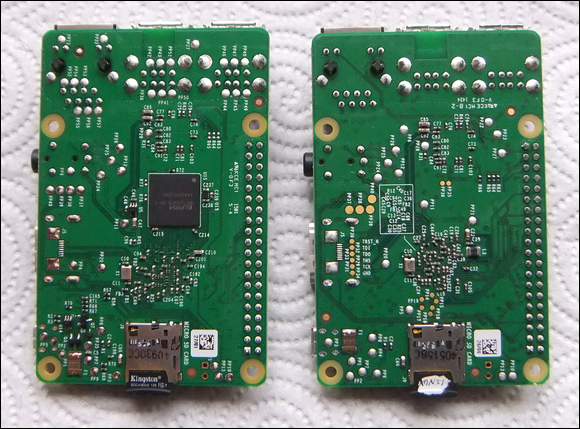
Figure 4-2: Raspberry Pi 1 Model B+ (left) and Raspberry Pi 2 Model B+ (right), bottom view.
General-purpose input/output (GPIO)
The plus models have 40-pin dual-row header pins to allow access to the general-purpose input/output (GPIO) port pins. Some of these pins are needed to turn the processor into a computer system by accessing the SD card and Ethernet and USB peripherals; others of the spare pins are brought out for the user. The GPIO pins carry logic signals that the computer can control or read and are how you can get the Raspberry Pi to switch outputs and sense inputs. Not all these pins are GPIO pins; there are several instances of 5V, 3V3, and ground. The pre-plus models had only a 26-pin connector and fewer pins were brought out. Figure 4-3 shows the pin out of this connector.
Figure 4-3: The GPIO connector pin out.
With the exception of the original Issue 1 of the Raspberry Pi, the GPIO pins have remained on the same physical pin of the connector through subsequent revisions.
 Each GPIO pin can be switched inside the processor to perform a different specialist function. This has led to some people designating these pins to these functions, and then labeling the remaining pins as GPIO from 0 upward. In our opinion, this is stupid because it adds an extra, pointless, totally artificial layer of obfuscation that you have to wade through. Another form of confusion arises when some people label these pins with the physical pin number on the connector. So, for example, they refer to pin 3 in the software and that gets translated internally to GPIO 2. That’s a little more understandable, but it’s no substitute for referring to GPIO pins as what they are in the processor.
Video
All models of the Raspberry Pi have high-definition multimedia interface (HDMI) video as a standard output. If you have a monitor that takes a VGA connector, you’ll have to get an HDMI-to-VGA adaptor. If you have a normal TV, you can connect the Raspberry Pi to it using the RCA connector.
 This RCA connector seemed to have disappeared in the plus models and the Issue 2, but it’s still there. It’s hidden in what looks like the audio jack, in a TRRS (Tip, Ring, Ring, Sleeve) system. Not all TRRS leads are wired the same, so you have to check if the wiring is compatible with the Raspberry Pi. Go to
 www.raspberrypi-spy.co.uk/2014/07/raspberry-pi-model-b-3-5mm-audiovideo-jack
for details.
Processor
There is a big leap in the performance of the Raspberry Pi when going to the Raspberry Pi 2 from the Raspberry Pi 1. This is because of a change in the processor chip. The Raspberry Pi 1 used a processor with an ARM6 core; the Raspberry Pi 2 uses a processor with an ARM7 core. The difference between these two processors, as far as performance is concerned, is mainly due to the efficiency with which high-level language instructions, like the C language, can be translated into the machine code instructions the processor actually performs. This performance difference is further boosted by the fact there are four cores in the Raspberry Pi 2 processor, potentially allowing it to run four independent processors at the same time. In addition, the ARM6 was run at a 700 MHz clock speed, and the ARM7 runs at 900 MHz.
The processor in the Raspberry Pi 2 also has a larger level-2 cache. This is an area of very fast on-chip memory where machine code instructions are queued up waiting to be processed. Instructions are transferred to the on-chip memory from the slower off-chip memory in bursts, which are more efficient than single memory accesses, which can speed up processing, in some cases considerably.
The bottom line: The Raspberry Pi 2 runs faster than the Raspberry Pi 1. How much faster depends on many factors, but faster by one and a half to six times is the sort of range you’re looking at. This definitely elevates the Raspberry Pi into a useable replacement for a desktop machine.
When the Raspberry Pi 2 was launched, a lot was made about the backward compatibility, but this didn’t apply to any code that accessed the GPIO pins — all that kind of code stopped working. The reason was that in the new architecture, all the peripherals — including the GPIO — were located at different addresses in the processor’s memory map. Fortunately, most users access these peripherals through one of a number of libraries, so when the library you used was updated, the original programs worked again. However, because most libraries are maintained by individuals, some of the libraries didn’t get updated. The situation is very fluid, so check to make sure that any library you want to use has been updated for the Raspberry Pi 2. If it has, it should work with both models of Raspberry Pi.
Figuring Out Which Raspberry Pi You Have
You may not know exactly which Raspberry Pi you have. You can easily see if you have a 26-way or a 40-way GPIO connector, but how can your program tell which pins are available?
 In Linux, everything is a file, so there is a way of finding out exactly what you have. Just go to a command-line prompt and type the following:
cat /proc/cpuinfo
On a Raspberry Pi 1 system, you see the following:
Processor: 0model name : ARMv6-compatible processor rev 7 (v6l)Features : swp half thumb fastmult vfp edsp java tlsCPU implementer : 0x41CPU architecture : 7CPU variant : 0x0CPU part : 0xb76CPU revision : 7Hardware : BCM2708Revision : 0010Serial : 00000000a5fb87e8
The interesting thing is the revision number, which tells you a lot about your Raspberry Pi. Table 4-2 tells you what the revision number means. The words in parentheses are the factories where the Raspberry Pi boards were made.
Table 4-2: Raspberry Pi Revision Numbers
|
Revision Number |
Raspberry Pi Version |
|
0002 |
Model B Revision 1.0 |
|
0003 |
Model B Revision 1.0 + Fuses mod and D14 removed |
|
0004 |
Model B Revision 2.0 256MB (Sony) |
|
0005 |
Model B Revision 2.0 256MB (Qisda) |
|
0006 |
Model B Revision 2.0 256MB (Egoman) |
|
0007 |
Model A Revision 2.0 256MB (Egoman) |
|
0008 |
Model A Revision 2.0 256MB (Sony) |
|
0009 |
Model A Revision 2.0 256MB (Qisda) |
|
000d |
Model B Revision 2.0 512MB (Egoman) |
|
000e |
Model B Revision 2.0 512MB (Sony) |
|
000f |
Model B Revision 2.0 512MB (Qisda) |
|
0010 |
Model B+ Revision 2.0 512MB (Sony) |
|
0011 |
Computer Module (Sony) |
|
0012 |
Model A+ Revision 2.0 256MB (Sony) |
You may notice that revision 0011 is the Computer Module, a Raspberry Pi with a very different form factor. This is a Pi built on a small printed circuit board (PCB) with all the connections brought out on PCB edge connectors. This then plugs into a base board of your own design and is meant for industrial or commercial applications. There is also a blank breakout board to do your development on.
If you look at the CPU info on the Raspberry Pi 2 system, you see four processor blocks in much the same format as the Raspberry Pi 1 — one for each core. The last three entries look like this:
Hardware : BCM2709Revision : a01041Serial: 000000001664c635
The revision number is in an entirely different format with different groups of bits having specific meanings. A collection of bytes is known as a word, and the processor in the Raspberry Pi uses words that are four bytes or 32 bits long. Bit 23 in the revision word tells you if the revision number is in the old format or the new. For a new format revision number, this bit will be a 1. The interpretation of the revision number under the new format is given by splitting the word up into bytes in this manner:
SRRR MMMM PPPP TTTT TTTT VVVV
Where
Sis one bit giving the revision scheme (0 = old, 1 = new).RRRis three bits indicating the RAM size (0 = 256MB, 1 = 512MB, 2 = 1,024MB)MMMMis four bits giving the manufacturer (0 = Sony, 1 = Egoman, 2 = Embest, 3 = Unknown, 4 = Embest).PPPPis four bits giving the processor (0 = 2835, 1 = 2836).TTTT TTTTis eight bits giving the type (0 = A, 1 = B, 2 = A+, 3 = B+, 4 = Pi 2 B, 5 = Alpha, 6 = Computer Module).VVVVis the four-bit version or revision (0–15).
So, the hex number a01041 in the preceding readout gives the following bit pattern when you write it out in binary:
1010 0000 0001 0000 0100 0001SRRR MMMM PPPP TTTT TTTT VVVV
For a quick hexadecimal-to-binary converter and a conversion table, check out www.binaryhexconverter.com/hex-to-binary-converter
or search the web for “convert hexadecimal to binary.”
So, breaking this down:
Sis 1, which means it’s the new revision scheme.Ris 010, which is 2 in binary, and that means the RAM is 1,024MB.Mis 0000, which is 0 in binary, and that means the manufacturer is Sony.Pis 0001, which is 1 in binary, which means the processor is 2836.- T is 0000 0100, which is 4 in binary, which means it’s a Raspberry Pi 2 Model B.
- V is 0001, which is 1 in binary, which means it’s version 1.
For information on how to read binary, check out www.dummies.com/how-to/content/digital-electronics-binary-basics.html.
There is a warranty bit that gets set if you attempt to overclock the system. This is to prevent people from overclocking the Raspberry Pi, breaking it, and then claiming it was faulty. This warranty bit is bit 24, but when the Raspberry Pi 2 was introduced, the faster clock and higher voltage required for the processor’s core was automatically setting this bit, so the warranty bit has been changed to bit 25 for the Raspberry Pi 2. If you’re buying a Raspberry Pi secondhand, check this bit before parting with your cash.
For all the projects in this book, you can use any of the versions of the Raspberry Pi. Newer models will run faster, but this shouldn’t have much of an impact because physical computing is heavily involved with human interaction. If you find that something runs too fast, a simple small sleep command will throttle back the speed.
On the upside, faster speed is useful if you’re using graphics programs like Gimp to prepare graphics for your programs. And a quad-core machine holds out the possibility of running several programs simultaneously at full speed.