Chapter 7
Editing Photos on the Raspberry Pi with GIMP
In This Chapter
![]() Installing GIMP
Installing GIMP
![]() Understanding the GIMP screen layout
Understanding the GIMP screen layout
![]() Resizing, cropping, rotating, and flipping your photos
Resizing, cropping, rotating, and flipping your photos
![]() Adjusting the colors and fixing imperfections
Adjusting the colors and fixing imperfections
![]() Converting images between different formats
Converting images between different formats
We live in probably the best documented era in our history. Not only do we write about our daily lives in blogs and Facebook, but many people also carry a camera everywhere they go, built in to their phone or tablet device. More serious photographers might have a dedicated digital camera. Whatever you use, and whatever you do with your day, photography is a great way to record your life and express yourself creatively.
The Raspberry Pi can play a part in this hobby, enabling you to edit your photos to improve the composition and quality. The photos generated by digital cameras are quite large files, however, so a Raspberry Pi with just 256MB of memory struggles to process them, and often became impractically slow or crashed when we tried it. The 512MB edition of the Pi, which you have if you bought a Model B after October 15, 2012, delivers much better performance, although you still need to be patient at times.
In this chapter, we introduce you to GIMP, one of the most popular image editing packages and give you some tips for editing your photos with it. You learn how to resize, crop, rotate, and flip your photos. We also tell you how to change colors and fix any imperfections, such as dust or unwanted details, in your shots.
Some of the skills here are valuable for other projects in this book. In particular, resizing images so they’re smaller cuts the amount of memory they require and makes it easier to use them in other programs including LibreOffice (see Chapter 6) and Scratch (see Chapter 10).
Installing and Starting GIMP
The program we’re going to use is the GNU Image Manipulation Program, known as GIMP for short. It’s a highly sophisticated tool, and it’s available for free download not just on Linux, but for Windows and Mac computers as well.
To install GIMP on your Raspberry Pi, enter the following at the shell:
sudo apt-get install gimp
If you experience any difficulties, consult Chapter 5 for advice on installing software.
After installation is complete, you can start GIMP from the Graphics category in your Programs menu in the desktop environment (see Chapter 4).
Understanding the GIMP Screen Layout
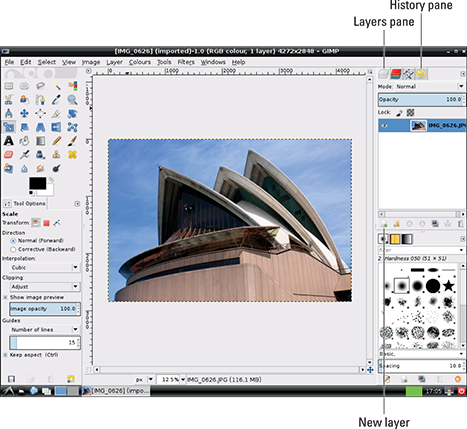
Figure 7-1 shows the screen layout of GIMP. When it first opens, the large area in the middle is empty, with a picture of Wilber, the GIMP mascot, in the background. We’ve used the File menu in the top left to open a photo for editing, which you can see in the center pane.
Across the top of the screen is a bar with menus for File, Edit, Select, View, Image, Layer, Colours, Tools, Filters, Windows, and Help. You can browse these menus to get an idea of what the program can do, and to find options quickly if you don’t know what icons they use on the toolbar.
On the left is a pane that contains icons for the different tools at the top and the tool options at the bottom. When you roll the cursor over a tool’s icon, a tooltip pops up to tell you what it does. When you click a tool to select it, the options at the bottom of the pane change depending on the tool you’re using. For example, if you’re using the paintbrush, the options cover properties such as opacity and the brush type.
The pane on the right is also divided into two halves. The top half has tabs for Layers, Channels, Paths, and History. Of these, the Layers and History tabs (indicated in Figure 7-1) are most important for new users because they enable you to edit your photos safely.

©1995–2012 Spencer Kimball, Peter Mattis, and the GIMP Development Team
Figure 7-1: GIMP enables you to edit photos on your Raspberry Pi.
The History tab enables you to retrace your steps if you make changes you don’t like.
Layers are used for adding new elements to an image without disturbing whatever is underneath. For example, if you wanted to add text to an image, you would do that in a new layer on top of the old one. If you change your mind, you can just remove the layer and the picture underneath is unchanged. The text tool (which has an A as its icon) automatically adds text in a new layer when you use it. If you intend to use the drawing tools, add a layer for each part of the drawing by clicking the New Layer button under this pane (indicated in Figure 7-1). New layers appear on top of older layers, but you can change the order of layers by dragging them in the pane on the right. Those near the top of the screen in this pane appear nearer the foreground in the image. To hide a layer temporarily, click the eye next to it in the pane.
The bottom half of the right pane is for brushes, patterns, and gradients. The brushes are used when you’re drawing or painting on the image. The patterns and gradients are used for the Fill tool, which fills in a part of the image with a particular color or pattern. In this chapter, we won’t cover the drawing tools because there’s a significant lag when using them on the Raspberry Pi, which makes it hard to draw intuitively or precisely.
You can change the width of the left and right panes, as we have in Figure 7-1, to make it easier to see all the tabs. Put your mouse cursor at the edge of the pane adjoining the central image area. When the cursor turns into a two-headed arrow, click and drag left or right to resize the pane.
Resizing an Image in GIMP
One of the most useful things you can do on your Raspberry Pi is to resize an image. All computer images are made up of pixels, which are tiny colored dots. Sean’s camera produces images that are 4,272 pixels wide and 2,848 pixels high. High-quality images like that are great for printing photos, but if you just want to use pictures onscreen, quality comes at a price. That level of detail requires a large file size, and big files can significantly slow down your Raspberry Pi. Often, you can use a lower quality image without noticeably affecting the end result, assuming your finished result will only be displayed on the screen.
Here’s how you can resize an image using GIMP:
- Click to open the Image menu at the top of the screen and click Scale Image.
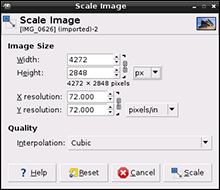
A window like Figure 7-2 opens.
- In the Width box, enter the width you would like your final image to be in pixels. Press Enter when you’ve finished entering your width.
If you wanted to put a holiday snap on your website, you probably wouldn’t want it to be more than 500 pixels wide. If you want to use a photo as a Scratch background (see Chapter 10), the ideal size is 480 by 360 pixels.
When you enter a new value for the Width, the Height is updated automatically, so the image stays in proportion and doesn’t become stretched. You can also enter a value for the Height and have the Width calculated automatically. If you want to be able to adjust the Width and Height independently, click the chain to the right of their boxes to break it.
- Alternatively, instead of using absolute values for the width and height, you can resize your image to a certain percentage. Click the Units drop-down list box (it says px) and choose Percent.
The values in the Width and Height box will then be percentages. For example, you would enter 50% to shrink the image by half. The size of the image in pixels is shown under the Height box.
- When you’ve set your size, click the Scale button.

©1995–2012 Spencer Kimball, Peter Mattis, and the GIMP Development Team
Figure 7-2: The scale options in GIMP.
Cropping Your Photo
If your photo has excessive space around an edge, or you’d like to change the composition of the picture, you can cut off the sides, or crop it. To do that, follow these steps:
- Click the icon that looks like an art knife or press Shift+C to choose the crop tool.
- Click your image in the top left of the area you’d like to keep, hold down the mouse button, and drag your mouse down and to the right.
When you release the mouse button, a box appears on the image, as you can see in Figure 7-3.
The inside of the box shows which bits of your image will be kept. Anything outside the box is cut off when you crop the image. You don’t have to get the position or size of the box right first time because it’s easy to adjust.
- Click one of the corners and drag the mouse to change the size and shape of the box. You can also click and drag along one of the edges inside the box to adjust the width or height.
- To reposition the box, click and drag in its center.
- To crop the image, click inside the box or press the Enter key.

©1995–2012 Spencer Kimball, Peter Mattis, and the GIMP Development Team
Figure 7-3: Cropping a photo in GIMP.
Rotating and Flipping Your Photo
If you rotate your camera sideways to take a picture, you might need to rotate the resulting image too. The easiest way to do this is to click the Image menu, and then use the rotation options in the Transform submenu there. You can rotate clockwise or anticlockwise (counterclockwise) after anticlockwise by 90 degrees, rotate the image by 180 degrees, and flip it horizontally or vertically.
If you have a photo that’s slightly wonky, you can manually adjust it in GIMP. Click the Rotate tool (or use Shift+R) and you can enter an angle for rotation, or click and drag the image to rotate it. To change the pivot point about which the picture rotates, click the circle in the middle of the image and drag it.
Adjusting the Colors
In common with other image editing programs, GIMP has options for adjusting the colors in a photo. You can find all these options in the Colours menu at the top of the screen. If your picture has a tint of color you don’t want, or if you would like to add a tint, use the Colour Balance settings to alter the amount of red, green, and blue in the image. The Brightness and Contrast settings can help to bring out detail in shadows, or to give the image more impact.
There are also options in this menu (further down, under Auto) to automatically adjust the colors using six different methods. These can give strange and undesirable results, but you can always undo them with Ctrl+Z if you don’t like them. The Normalize option can be a quick fix for images that look a bit wishy-washy, and the White Balance option can fix pictures that don’t already have strong black and white areas.
Fixing Imperfections
On Sean’s holiday to Australia, he found a beautiful unspoiled beach in Darwin. He took a picture of it: a lone tree in the foreground, the shimmering sea, and wisps of cloud in a light blue sky. When he got home, he noticed that some idiot had left a crushed beer can in the foreground.
Thankfully, in GIMP, you can use a handy tool called the Clone tool to make little details like this vanish. It enables you to use part of the image as a pattern that you spray over another part of the image. In Sean’s case, he can use a clean piece of beach as the pattern and spray it on top of the litter. Hey, presto! The rubbish vanishes.
Here’s how you use the Clone tool:
- Zoom in to your image using the menu underneath it. Use the scrollbars at the side of the image pane to position your image so you have a clear view of the imperfection.
- Click the Clone tool, which looks like a rubber stamp, or press the C key.
- Move your cursor to an unspoiled part of the image you would like to use as the pattern, or clone source. This needs to be somewhere as plain as possible, more of a texture than a shape, with no obvious prominent details or lines. Sky, grass, or sand is perfect. Hold down the Ctrl key and click the mouse button.
A crosshair icon appears on your image at that spot.
- In the tool options, at the bottom of the left pane, check the brush that is being used. Click the shape (a circle by default) if you want to change it.
For best results, use a brush with a fading edge, rather than a solid edge. You can change the size of the brush in this pane too by clicking the Size box and typing your preferred value. The bigger the brush you use, the bigger your pattern will be.
- Move your cursor to the imperfection in the image and click the mouse button. This copies an area the size of your brush from your clone source to the place where you clicked.
If you’ve done it right, the imperfection should appear to vanish. If you see unwanted picture details included in the pattern, either reduce the size of your brush, or move your clone source. Repeat this step until the imperfection is gone.
- Adjust the magnification at the bottom of the image pane to view your image at 100%.
Check whether you can see any evidence of your handiwork. If so, you might need to try another clone source or brush size. Otherwise, it’s worked!
Converting Images between Different Formats
There are several different file formats that can be used for images, but not all programs can open all files. If you want to use a picture as a background in Scratch (see Chapter 10), for example, you need to use .jpg files, which usually deliver the best quality for photos, or .png or .gif files, which are optimal for illustrations.
The default format used by GIMP is .xcf, which stores additional information about your editing session along with your picture, but this format isn’t widely used in other programs.
You can use GIMP to save your picture in a more widely used format, or to convert a picture between different file formats. First, open the image through the File menu, and then use the File menu to Export. The Export window looks similar to the Save window, but you can click Select File Type (By Extension) at the bottom and choose the file format you’d like to convert the image into.
Finding Out More about GIMP
There’s much more you can do with GIMP, and you can find detailed documentation on its website. To access it, click Help at the top of the screen, open the GIMP Online menu and click User Manual Web Site. Alternatively, in any browser, go to http://docs.gimp.org/2.8/en/.

 GIMP can be used in such a way that each pane of tools or content is a separate window onscreen, but we find it easier to arrange everything in a single window, especially when we’re using a smaller screen. If your layout looks different from the one shown in Figure
  Resizing an image reduces its quality. This would be noticeable if you tried to create a high-quality print of it later. Don’t overwrite your existing image with a resized version. Instead, save your resized image by choosing Save As from the File menu at the top of the screen and giving it a different filename.