
CHAPTER 2
Learning Essential Moves
Navigate the Apple Watch Interface
Apple Watch enables you to navigate quickly among its main screens by using the Digital Crown, the side button, and the touch screen. You can turn the Digital Crown clockwise and counterclockwise; click, double-click, or triple-click it; or press and hold it. You can click, double-click, or press and hold the side button. The touch screen registers swipes in all directions, taps on icons, and the force-touch movement for accessing secondary features.
Navigate the Apple Watch Interface

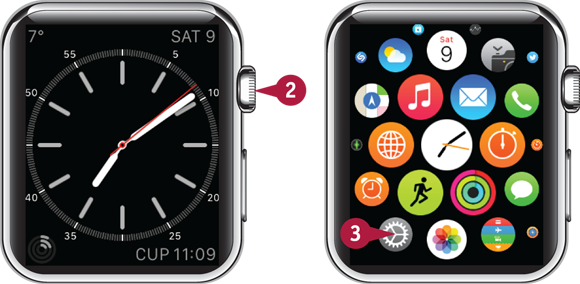
![]() Lift your wrist to wake Apple Watch.
Lift your wrist to wake Apple Watch.
The watch face appears.
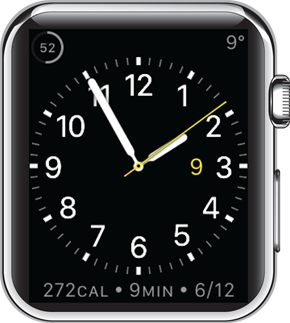
![]() The watch face shows the time.
The watch face shows the time.
![]() The complications display extra information, such as the temperature and the day and date.
The complications display extra information, such as the temperature and the day and date.
![]() Click the Digital Crown once.
Click the Digital Crown once.
The Home screen appears, showing the apps as a cluster.
![]() The Time icon (
The Time icon (![]() ) appears in the middle.
) appears in the middle.
![]() Tap and slide your finger.
Tap and slide your finger.

The app cluster moves in the direction you move your finger.
Icons grow smaller as they move to the edges of the screen.
![]() Tap Timer (
Tap Timer (![]() ).
).
The Timer app opens.
![]() Tap the Min box.
Tap the Min box.

![]() Turn the Digital Crown clockwise to set the number of minutes.
Turn the Digital Crown clockwise to set the number of minutes.
![]() Tap Start.
Tap Start.
The timer starts running.
![]() Double-click the Digital Crown.
Double-click the Digital Crown.
The watch face appears.
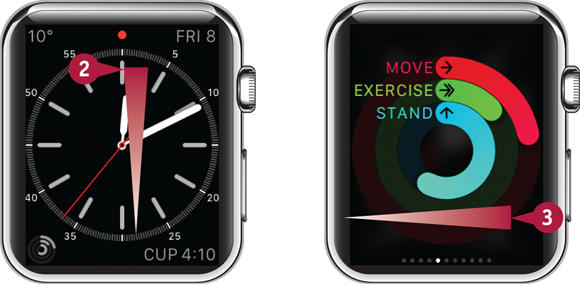
![]() The red dot indicates you have unread notifications.
The red dot indicates you have unread notifications.
![]() Swipe down.
Swipe down.
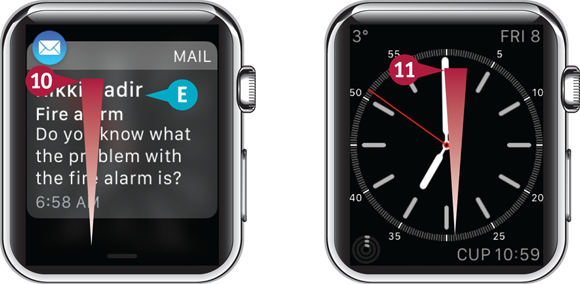
The Notifications screen appears.
![]() You can tap a notification to go to its app.
You can tap a notification to go to its app.
![]() Swipe up.
Swipe up.
The watch face appears again.
![]() Swipe up again.
Swipe up again.
The Glances screen appears.
![]() Swipe left.
Swipe left.
The next Glance appears, such as the Power Glance.
Note: You can choose which Glances appear and their order. See the section “Choose Glances and Their Order” in Chapter 3 for details.
You can swipe left or right to view other Glances.
![]() Swipe down.
Swipe down.

The watch face appears again.
![]() Double-click the Digital Crown.
Double-click the Digital Crown.
The Timer app appears.
![]() Tap Cancel.
Tap Cancel.
The Timer app cancels the timer.
![]() Click the Digital Crown.
Click the Digital Crown.
The watch face appears again.
Work with Glances
Apple Watch’s Glances display small chunks of useful information and provide access to apps. The default selection of Glances includes the Settings Glance, which shows Apple Watch’s status and enables you to turn on Airplane Mode, Do Not Disturb, and Silent Mode; the Now Playing Glance for controlling playback; the Heartbeat Glance; the Battery Glance; and Glances from key apps such as Activity, Calendar, Weather, and Stocks. To customize Glances, see the section “Choose Glances and Their Order” in Chapter 3.
Work with Glances
![]() Lift your wrist to wake Apple Watch.
Lift your wrist to wake Apple Watch.
The watch face appears.
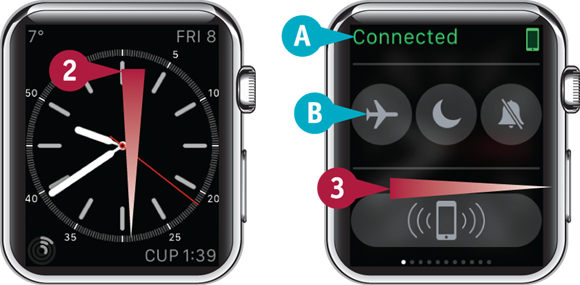
![]() Swipe up to display the Glances screen.
Swipe up to display the Glances screen.
Note: If you see a Glance other than the Settings Glance, swipe right until the Settings Glance appears.
![]() The Connected readout shows that Apple Watch is connected to iPhone.
The Connected readout shows that Apple Watch is connected to iPhone.
![]() You can tap to toggle Airplane Mode (
You can tap to toggle Airplane Mode (![]() or
or ![]() ), Do Not Disturb (
), Do Not Disturb (![]() or
or ![]() ), or Silent Mode (
), or Silent Mode (![]() or
or ![]() ) on or off.
) on or off.
Note: Turning on Airplane Mode disconnects Apple Watch from iPhone. On a flight, turn the cellular connection off on iPhone, but leave Wi-Fi and Bluetooth on so that you can use Apple Watch with iPhone.
![]() Swipe left.
Swipe left.
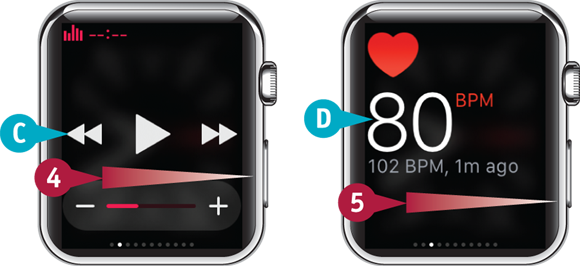
The Now Playing Glance appears.
![]() You can use the controls to manage playback on Apple Watch or iPhone.
You can use the controls to manage playback on Apple Watch or iPhone.
![]() Swipe left.
Swipe left.
The Heartbeat Glance appears.
![]() Your current heart rate appears.
Your current heart rate appears.
![]() Swipe left twice.
Swipe left twice.
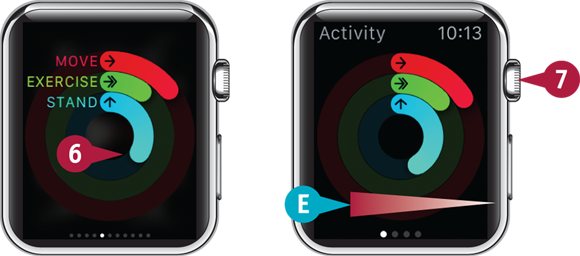
The Activity Glance appears, showing your progress toward the Move goal, Exercise goal, and Stand goal.
![]() Tap the Activity Glance.
Tap the Activity Glance.
The Activity app opens.
![]() You can swipe left to display the Move goal, the Exercise goal, and the Stand goal separately.
You can swipe left to display the Move goal, the Exercise goal, and the Stand goal separately.
![]() Click the Digital Crown.
Click the Digital Crown.
The watch face appears again.
Work with Notifications
The Notifications screen on Apple Watch enables you to keep up to date with the incoming information you deem important. You can tap a notification to go to the app that raised the notification, dismiss a notification that you no longer need, or dismiss all notifications to clear the slate.
Work with Notifications
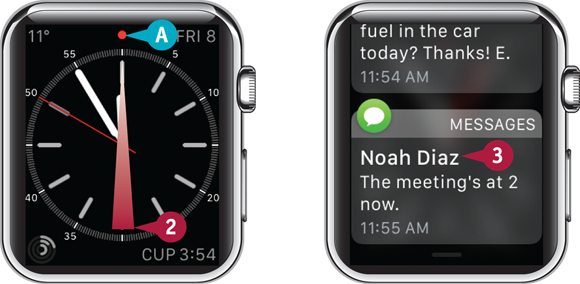
![]() Lift your wrist to wake Apple Watch.
Lift your wrist to wake Apple Watch.
The watch face appears.
![]() The red light indicates unread notifications.
The red light indicates unread notifications.
![]() Swipe down.
Swipe down.
The Notifications screen appears.
![]() Tap the notification you want to view.
Tap the notification you want to view.
The notification opens in the appropriate app — in this example, the Messages app.
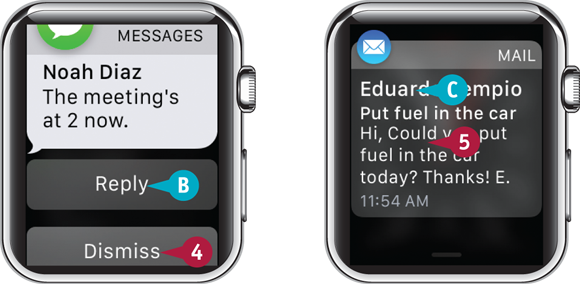
![]() You can tap Reply to reply to the message.
You can tap Reply to reply to the message.
![]() Tap Dismiss.
Tap Dismiss.
Apple Watch dismisses the message.
The Notifications screen appears again.
![]() You can tap another notification to view it in the appropriate app.
You can tap another notification to view it in the appropriate app.
![]() Force-touch the screen.
Force-touch the screen.
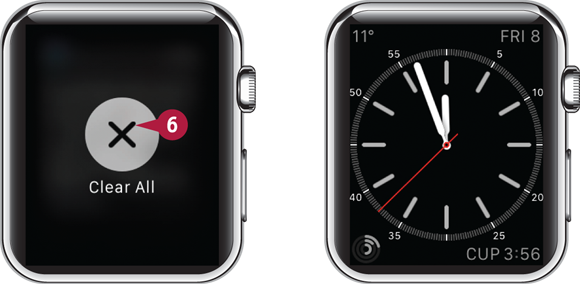
The Clear All button appears.
![]() Touch Clear All (
Touch Clear All (![]() ).
).
Apple Watch clears all the notifications.
The watch face appears again.
Locate the Paired iPhone
Apple Watch enables you to play a pinging noise on the paired iPhone to help you locate the iPhone. This capability is useful when you mislay iPhone. For this feature to work, Apple Watch and iPhone must be close enough to each other to communicate via Bluetooth or Wi-Fi.
Locate the Paired iPhone
![]() Lift your wrist to wake Apple Watch.
Lift your wrist to wake Apple Watch.
The watch face appears.
![]() Swipe up.
Swipe up.
The Glances screen appears, showing the Glance you used last.
![]() Swipe right one or more times until the Settings Glance appears.
Swipe right one or more times until the Settings Glance appears.
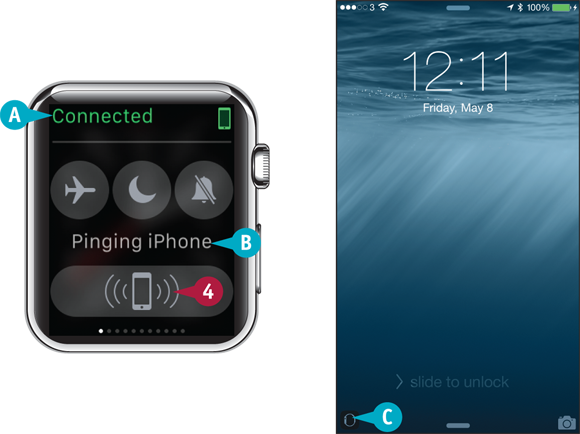
![]() The Connected readout indicates that Apple Watch is connected to iPhone via Bluetooth or Wi-Fi.
The Connected readout indicates that Apple Watch is connected to iPhone via Bluetooth or Wi-Fi.
![]() Tap Ping iPhone (
Tap Ping iPhone (![]() ).
).
![]() The Pinging iPhone readout appears.
The Pinging iPhone readout appears.
iPhone plays a pinging sound to help you locate it.
![]() The Apple Watch symbol (
The Apple Watch symbol (![]() ) appears on iPhone.
) appears on iPhone.
Lock Apple Watch
Apple Watch locks automatically when you remove it from your wrist to make sure that anyone with unauthorized cannot access your data or use Apple Watch for any purpose other than telling the time. You can also lock Apple Watch at any time when it is on your wrist. To unlock Apple Watch, you must enter the correct passcode.
Lock Apple Watch

![]() Lift your wrist to wake Apple Watch.
Lift your wrist to wake Apple Watch.
The watch face appears.
![]() Press and hold the side button.
Press and hold the side button.
The Power screen appears.
![]() Swipe Lock Device (
Swipe Lock Device (![]() ) to the right.
) to the right.

Apple Watch locks.
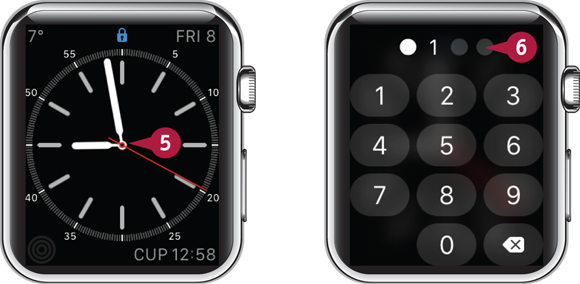
![]() The Lock icon (
The Lock icon (![]() ) appears at the top of the screen.
) appears at the top of the screen.
Note: When Apple Watch is locked, any notifications go to iPhone first.
![]() When you want to unlock Apple Watch, tap the screen.
When you want to unlock Apple Watch, tap the screen.
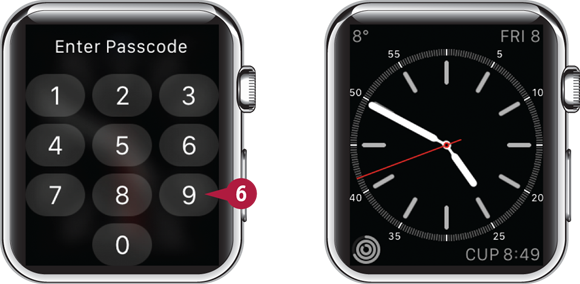
The Enter Passcode screen appears.

![]() Type your passcode.
Type your passcode.
Apple Watch unlocks.
The watch face appears.
Restart Apple Watch
Apple has designed Apple Watch and its software to keep running without problems for many days or weeks. But as with most computer hardware and software, you may sometimes need to restart Apple Watch in order to resolve problems or slowdowns.
Restarting Apple Watch closes all the apps that are running, so when you start using Apple Watch again, it should be running at full speed.
Restart Apple Watch
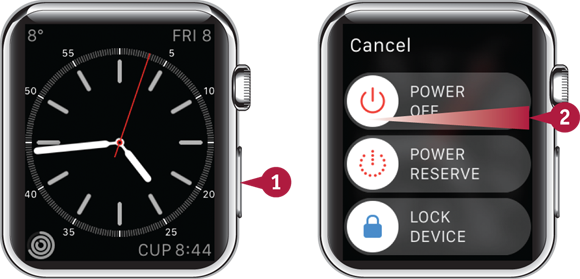
![]() Press and hold the side button.
Press and hold the side button.
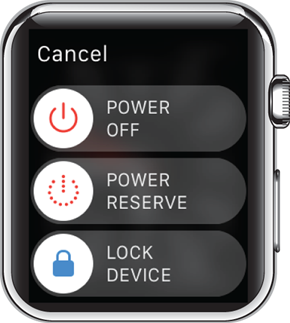
The Power screen appears.
![]() Tap Power Off (
Tap Power Off (![]() ) and slide it to the right.
) and slide it to the right.

Apple Watch powers off.
![]() Press and hold the side button.
Press and hold the side button.
The Apple logo appears on the screen.
![]() Release the side button.
Release the side button.
The watch face appears, locked.
![]() Tap the watch face.
Tap the watch face.
The Enter Passcode screen appears.
![]() Type your passcode.
Type your passcode.
Apple Watch unlocks, and you can resume using it normally.
Using Power Reserve Mode
Apple Watch includes Power Reserve Mode for conserving power when the battery is running low. Power Reserve Mode turns off all features except timekeeping, which it fulfills through a stripped-down digital display.
Apple Watch automatically turns on Power Reserve Mode when the battery level goes below 10 percent. You can also enable Power Reserve Mode manually at any point — for example, when you know you will not be able to charge Apple Watch for a day or two.
Using Power Reserve Mode

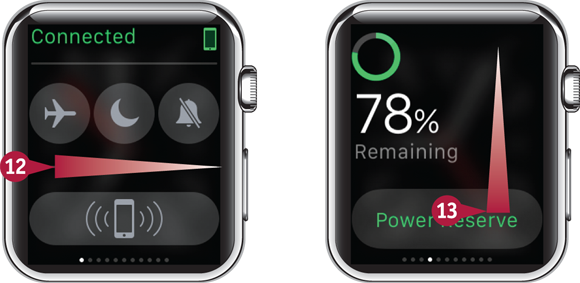
![]() Press and hold the side button.
Press and hold the side button.
The Power screen appears.
![]() Tap Power Reserve (
Tap Power Reserve (![]() ) and slide it to the right.
) and slide it to the right.
Apple Watch turns on Power Reserve Mode.
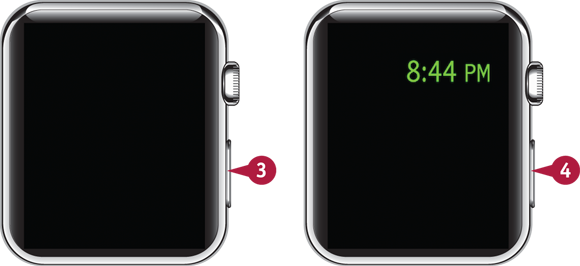
The screen goes blank.
![]() Click the side button.
Click the side button.
The time appears as a digital readout.
![]() When you want to turn off Power Reserve Mode, press and hold the side button.
When you want to turn off Power Reserve Mode, press and hold the side button.
Apple Watch restarts.
The watch face appears.
![]() Tap the watch face.
Tap the watch face.
The Enter Passcode screen appears.
![]() Type your passcode.
Type your passcode.
Apple Watch unlocks, and you can resume using it normally.
Configure Activate on Wrist Raise
To conserve precious battery power, Apple Watch turns its screen off as soon as possible after you finish using it. You can configure Apple Watch to activate the screen when you raise your wrist so that you can see the time. You can also configure Apple Watch to display the last app when you raise your wrist.
Whether the Activate on Wrist Raise feature is on or off, you can tap the screen to wake Apple Watch.
Configure Activate on Wrist Raise
![]() Lift your wrist to wake Apple Watch.
Lift your wrist to wake Apple Watch.
The watch face appears.
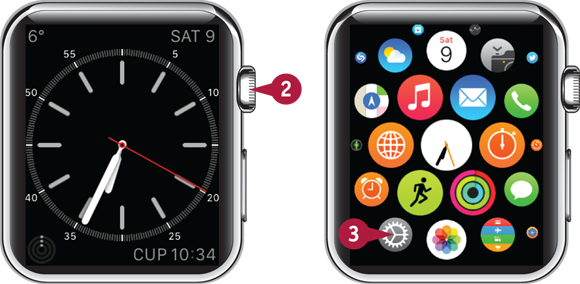
![]() Click the Digital Crown.
Click the Digital Crown.
The Home screen appears.
![]() Tap Settings (
Tap Settings (![]() ).
).

The Settings screen appears.
![]() Tap General (
Tap General (![]() ).
).
The General screen appears.
![]() Tap Activate on Wrist Raise.
Tap Activate on Wrist Raise.
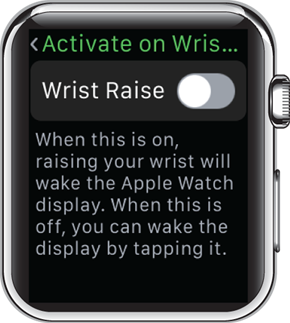
The Activate on Wrist Raise screen appears.
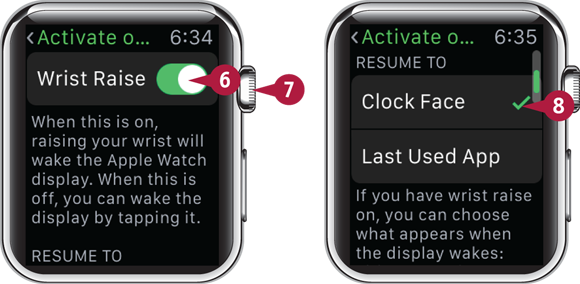
![]() Set the Wrist Raise switch to On (
Set the Wrist Raise switch to On (![]() changes to
changes to ![]() ) if you want to use Activate on Wrist Raise.
) if you want to use Activate on Wrist Raise.
Note: Turn Activate on Wrist Raise off if you need to conserve battery power.
![]() Turn the Digital Crown clockwise to scroll down the screen.
Turn the Digital Crown clockwise to scroll down the screen.
The Resume To section appears.
![]() Tap Clock Face or Last Used App, as appropriate.
Tap Clock Face or Last Used App, as appropriate.
Set the Clock Face Display Time Ahead
Apple has designed Apple Watch to keep time perfectly and to synchronize to within 50 milliseconds of the global time standard by using official time servers on the Internet. You do not need to adjust the time on Apple Watch.
However, if you want Apple Watch to display a time ahead of the real time — such as if you always run late and set your watch ahead to compensate — you can use the Set Clock Face Display Time Ahead feature to adjust the time shown.
Set the Clock Face Display Time Ahead
![]() Lift your wrist to wake Apple Watch.
Lift your wrist to wake Apple Watch.
The watch face appears.
![]() Click the Digital Crown.
Click the Digital Crown.
The Home screen appears.
![]() Tap Settings (
Tap Settings (![]() ).
).
The Settings screen appears.
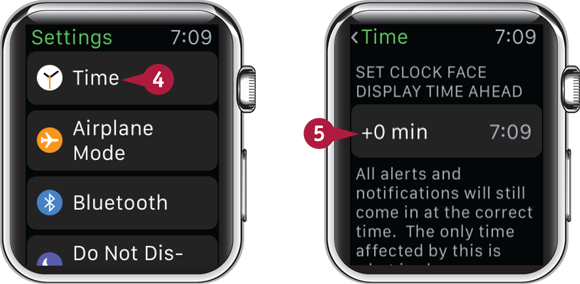
![]() Tap Time (
Tap Time (![]() ).
).
The Time screen appears.
![]() Tap the button under Set Clock Face Display Time Ahead.
Tap the button under Set Clock Face Display Time Ahead.

The Set Clock Face Display Time Ahead screen appears.
![]() Turn the Digital Crown to set the number of minutes.
Turn the Digital Crown to set the number of minutes.
![]() Tap Set.
Tap Set.
The Time screen appears.
![]() The number of minutes you set appears.
The number of minutes you set appears.
![]() The clock face display time appears.
The clock face display time appears.
Choose a Watch Face and Customize It
Apple Watch provides a selection of watch faces and enables you to switch quickly among them. You can choose between analog faces and digital faces, between simple faces and complex faces, and between impassive faces and lively faces.
You can access the face chooser by force-tapping the watch face; then browse the available faces and select the face you want to use. You can then customize the watch face’s looks and the information it contains.
Choose a Watch Face and Customize It
Choose a Watch Face
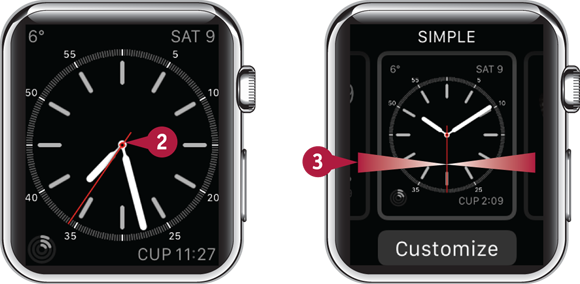
![]() Lift your wrist to wake Apple Watch.
Lift your wrist to wake Apple Watch.
The watch face appears.
![]() Force-touch the screen.
Force-touch the screen.
The face chooser appears.
![]() Swipe left or right.
Swipe left or right.

Another watch face appears.
![]() Swipe left or right again.
Swipe left or right again.
Another watch face appears.
![]() Swipe left or right again.
Swipe left or right again.
![]() When you find a face you want to use, tap the screen.
When you find a face you want to use, tap the screen.
The watch face appears, and you can decide whether to keep it.
Note: If you do not want to keep the face you chose, repeat steps 2 to 6 to select another face.
Customize Your Watch Face
![]() Lift your wrist to wake Apple Watch.
Lift your wrist to wake Apple Watch.
The watch face appears.
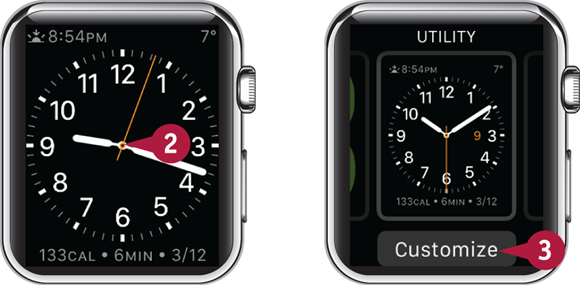
![]() Force-touch the screen.
Force-touch the screen.
The face chooser appears.
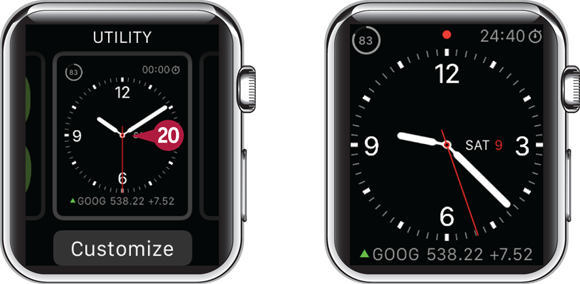
![]() Tap Customize.
Tap Customize.

The customization screen appears.
![]() The dots at the top indicate the number of customization screens. The white dot indicates the current screen.
The dots at the top indicate the number of customization screens. The white dot indicates the current screen.
![]() The green outline indicates the object currently selected for customization.
The green outline indicates the object currently selected for customization.
![]() Turn the Digital Crown clockwise or counterclockwise.
Turn the Digital Crown clockwise or counterclockwise.
The watch detail changes. In this example, the hour numbers gradually disappear, leaving only 3, 6, 9, and 12.
![]() Swipe left.
Swipe left.
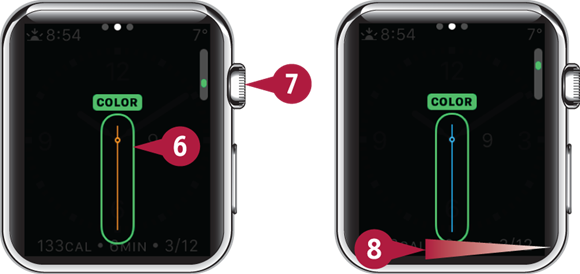
The second customization screen appears.
![]() Tap the item you want to customize.
Tap the item you want to customize.
Note: The customization options vary depending on the watch face. For the watch face shown here, you can customize only the color of the second hand.
![]() Turn the Digital Crown clockwise or counterclockwise.
Turn the Digital Crown clockwise or counterclockwise.
The selected item changes. In this example, the color changes.
![]() Swipe left.
Swipe left.
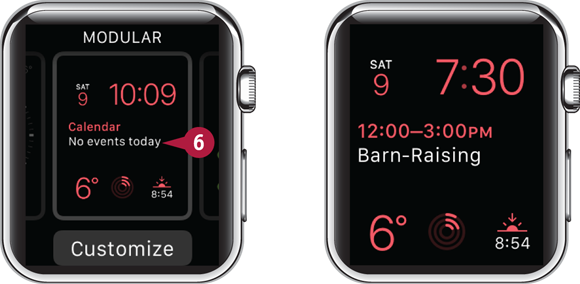
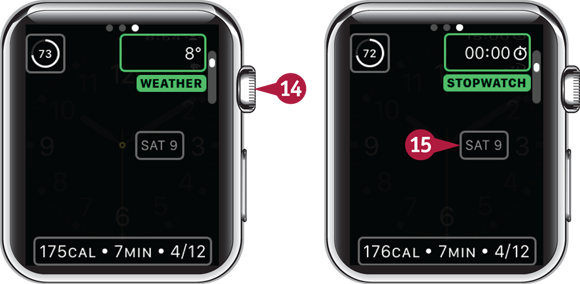
If the watch face you select includes complications, you can choose which complications to use. Depending on its position and shape, a complication may present its information in different ways. For example, the Lunar complication can display a picture of the moon’s current status or a textual description, such as “Waning Gibbous.”
If you do not want a complication to appear in one of the complication places, you can turn the complication off.
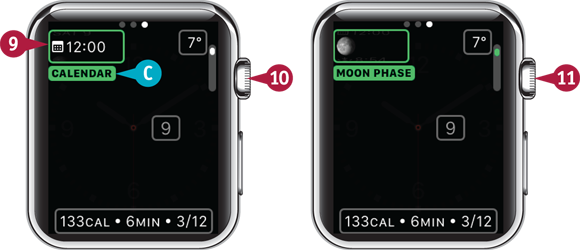
The screen for customizing the complications appears.
![]() Tap a complication.
Tap a complication.
A green border appears around the complication.
![]() The current complication’s name appears.
The current complication’s name appears.
![]() Turn the Digital Crown clockwise or counterclockwise.
Turn the Digital Crown clockwise or counterclockwise.
Another complication appears.
![]() Turn the Digital Crown further.
Turn the Digital Crown further.
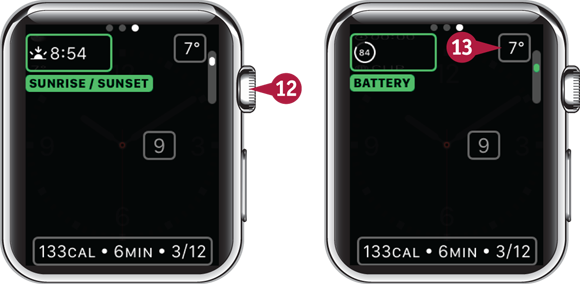
Another complication appears.
![]() Turn the Digital Crown further still.
Turn the Digital Crown further still.
Another complication appears.
![]() When you find the complication you want to use, tap the next complication.
When you find the complication you want to use, tap the next complication.
A green border appears around the complication.
![]() Turn the Digital Crown.
Turn the Digital Crown.
Another complication appears.
![]() When you find the complication you want, tap the date complication.
When you find the complication you want, tap the date complication.
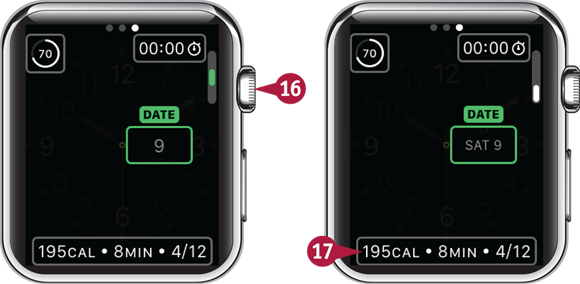
A green border appears around the date complication.
![]() Turn the Digital Crown.
Turn the Digital Crown.
The date format changes.
Note: Set the date complication to Off if you do not want the date to appear on the watch face.
![]() Tap another complication.
Tap another complication.
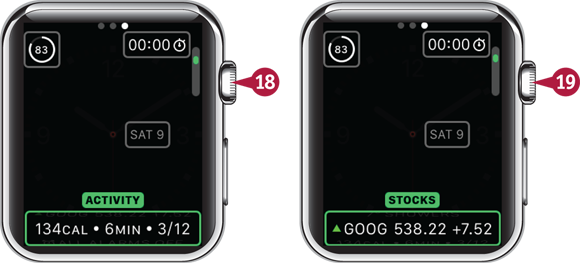
A green border appears around the complication.
![]() Turn the Digital Crown.
Turn the Digital Crown.
The next complication appears.
![]() When you find the complication you want, click the Digital Crown.
When you find the complication you want, click the Digital Crown.
The face chooser appears.
![]() Tap the watch face.
Tap the watch face.
The watch face appears, showing the complications and detail you selected.
Extend Apple Watch Runtime on the Battery
To get the most out of Apple Watch, you will likely want to squeeze as much runtime as possible out of the battery. The battery is supposed to give 18 hours of normal use, but this drops if you use demanding features such as making phone calls, tracking workouts, or playing back audio, so you will need to manage your power usage in order to be able to use Apple Watch all day.
Use a Dark Watch Face
To reduce power usage, use a watch face that is predominantly dark. The type of screen Apple Watch uses, organic light-emitting diode or OLED, can display black pixels more efficiently than lighted pixels. So the darker the watch face you choose, the more power-efficient it is. This sounds like a modest improvement, but if you check the time regularly, a dark watch face can net you some extra runtime.
Turn Down the Screen Brightness

The higher you set the screen brightness, the more power it requires. So dim the brightness as far as you can bear when you need to extend battery runtime. Click the Digital Crown to display the Home screen, tap Settings (![]() ), tap Brightness & Text Size (
), tap Brightness & Text Size (![]() ), tap the Brightness slider, and then turn the Digital Crown counterclockwise to dim the screen.
), tap the Brightness slider, and then turn the Digital Crown counterclockwise to dim the screen.
Avoid Power-Hungry Activities
When power is running low, avoid using Apple Watch for power-hungry activities such as making phone calls or playing music. When you need to find out what’s happening in your contact sphere, check your notifications quickly and deal with anything pressing, but refrain from browsing your other messages, e-mail messages, and apps such as the Activity app.
Turn Off Activate on Wrist Raise
The Activate on Wrist Raise feature is a neat way to display the watch face or the last app you were using, but you can save power by turning it off so that Apple Watch does not have to monitor your wrist movements so closely.
Click the Digital Crown to display the Home screen, tap Settings (![]() ), and then tap General (
), and then tap General (![]() ). Tap Activate on Wrist Raise and then set the Wrist Raise switch to Off (
). Tap Activate on Wrist Raise and then set the Wrist Raise switch to Off (![]() changes to
changes to ![]() ).
).
After turning off Activate on Wrist Raise, you will need to tap the screen or click the Digital Crown to turn the screen on.
Turn Off Notifications for Non-Vital Apps

Getting notifications on Apple Watch is a great way to stay up to date, but you should prune the list of apps that can give you notifications on Apple Watch to a sensible minimum. Doing so will not only help you avoid distractions but will cut down on power consumption because Apple Watch will not need to retrieve useless notifications, vibrate to get your attention, and display notifications to you.
Deal with Apple Watch Draining iPhone Battery Power
As of this writing, Apple Watch sometimes causes quick battery drain on the paired iPhone by communicating excessively with it. If this happens, you may need to reset Apple Watch.
First, press and hold the side button until the Power screen appears, and then swipe the Power Off button (![]() ) to the right to turn off Apple Watch. Next, press and hold the Digital Crown and the side button together until the Apple logo appears on the screen.
) to the right to turn off Apple Watch. Next, press and hold the Digital Crown and the side button together until the Apple logo appears on the screen.
Turn On Power Reserve Mode
When Apple Watch starts running low on battery power, or if all you need is to be able to tell the time, turn on Power Reserve Mode. For example, if you are unable to charge Apple Watch at night, and you do not need features such as a wake-up alarm or bedtime music, turn on Power Reserve Mode to reduce battery usage to a minimum.
To turn on Power Reserve Mode, press and hold the side button until the Power screen appears, and then swipe the Power Reserve button (![]() ) to the right. For more details on Power Reserve Mode, see the section “Using Power Reserve Mode” earlier in this chapter.
) to the right. For more details on Power Reserve Mode, see the section “Using Power Reserve Mode” earlier in this chapter.
Reset the Home Screen Layout
Apple Watch enables you to customize the layout of the Home screen to suit the apps you use most and the way you prefer to work. The section “Rearrange Your Apps” in Chapter 5 shows you how to customize the layout.
If you end up with an awkward layout, you may want to reset the Home screen to its default layout, as explained here, so that you can start customizing it again from scratch.
Reset the Home Screen Layout

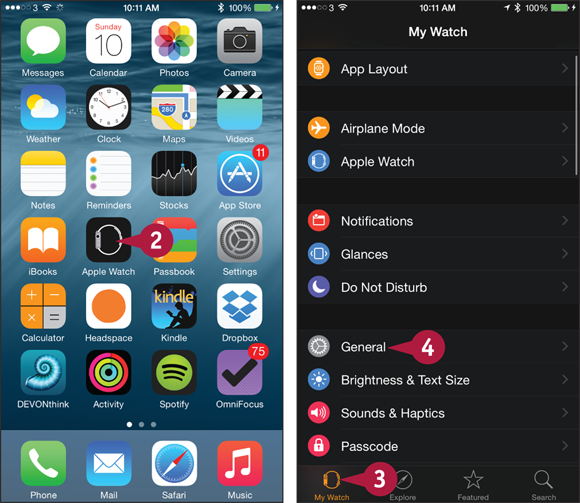
![]() On iPhone, press Home.
On iPhone, press Home.
The Home screen appears.
![]() Tap Apple Watch (
Tap Apple Watch (![]() ).
).
The Apple Watch app opens.
![]() Tap My Watch (
Tap My Watch (![]() ).
).
The My Watch screen appears.
![]() Tap General (
Tap General (![]() ).
).

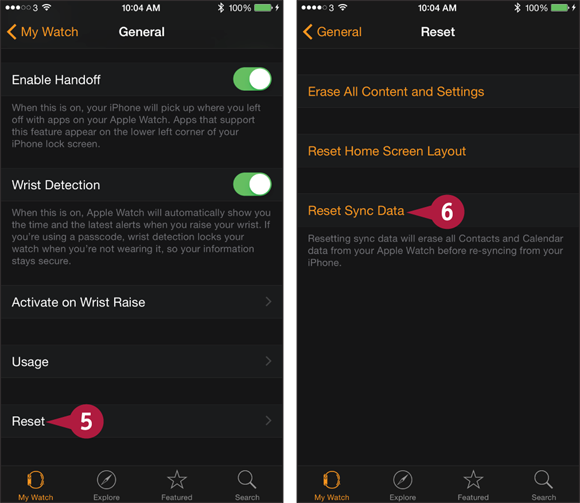
The General screen appears.
![]() Tap Reset.
Tap Reset.
The Reset screen appears.
![]() Tap Reset Home Screen Layout.
Tap Reset Home Screen Layout.
A confirmation dialog box appears.
![]() Tap Reset Home Screen.
Tap Reset Home Screen.
The icons on the Apple Watch Home screen return to their default positions.
Reset Sync Data
The Contacts app on Apple Watch automatically syncs contact data from iPhone. Similarly, the Calendar app on Apple Watch automatically syncs calendar data. Normally, this syncing takes place seamlessly in the background. But if sync problems occur, you can use the Apple Watch app on iPhone to reset the contact data and calendar data. The Contacts app and the Calendar app then sync the data again from scratch.
Reset Sync Data

![]() On iPhone, press Home.
On iPhone, press Home.
The Home screen appears.
![]() Tap Apple Watch (
Tap Apple Watch (![]() ).
).
The Apple Watch app opens.
![]() Tap My Watch (
Tap My Watch (![]() ).
).
The My Watch screen appears.
![]() Tap General (
Tap General (![]() ).
).
The General screen appears.
![]() Tap Reset.
Tap Reset.
The Reset screen appears.
![]() Tap Reset Sync Data.
Tap Reset Sync Data.
The Apple Watch app resets the sync data for your contacts and calendar.
Erase Apple Watch and Restore from Backup
If the settings on Apple Watch become corrupted, you may need to erase Apple Watch in order to recover from the problem. Erasing removes all the data and content from Apple Watch, but you can restore it easily from backup afterward. To erase Apple Watch, you use the Reset screen in the Apple Watch app on iPhone.
Erase Apple Watch and Restore from Backup
Reset Apple Watch from iPhone
![]() On iPhone, press Home.
On iPhone, press Home.
The Home screen appears.
![]() Tap Apple Watch (
Tap Apple Watch (![]() ).
).
The Apple Watch app opens.
![]() Tap My Watch (
Tap My Watch (![]() ).
).
The My Watch screen appears.
![]() Tap General (
Tap General (![]() ).
).

The General screen appears.
![]() Tap Reset.
Tap Reset.
The Reset screen appears.
![]() Tap Erase All Content and Settings.
Tap Erase All Content and Settings.
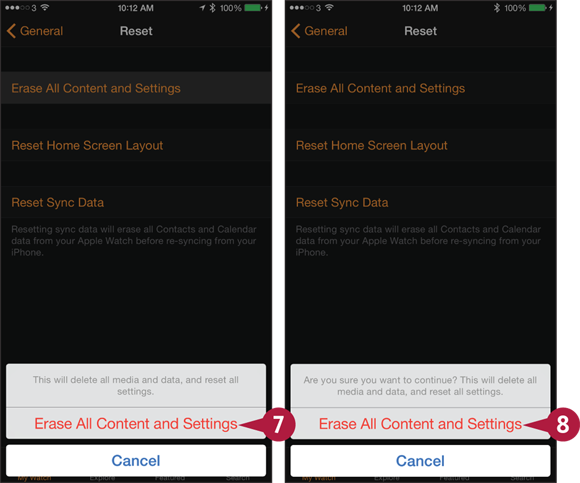
A confirmation dialog box opens, warning you that this will delete all media and data, and reset all settings.
![]() Tap Erase All Content and Settings.
Tap Erase All Content and Settings.
A second confirmation dialog box opens, repeating the warning.
![]() Tap Erase All Content and Settings.
Tap Erase All Content and Settings.

The dialog box closes.
The Apple Watch app causes Apple Watch to erase its data and reset its settings.
Apple Watch restarts.
A greeting screen, such as Good Morning, appears.
![]() Tap Start Pairing.
Tap Start Pairing.
If you cannot pair Apple Watch with iPhone by using the automated pairing routine, you can pair the two devices manually by using a straightforward routine that involves entering a pairing code on iPhone.
After Apple Watch is paired with iPhone, you can restore data to Apple Watch by selecting the appropriate backup, logging into your Apple account, and performing two-step verification on one of your trusted devices.
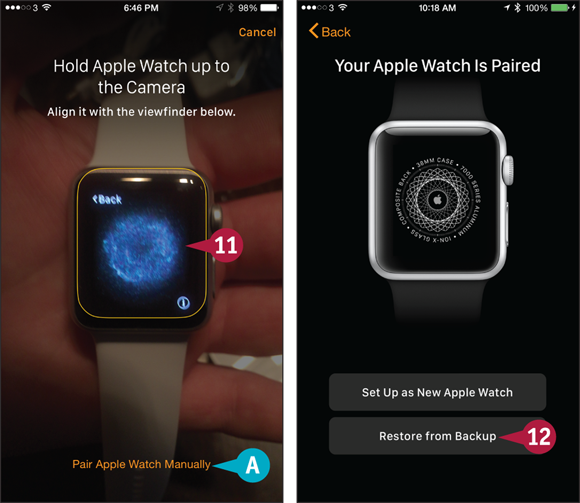
The Hold Apple Watch up to the Camera screen appears.
![]() On Apple Watch, tap Start Pairing.
On Apple Watch, tap Start Pairing.
Apple Watch displays a pattern on-screen.
![]() Move Apple Watch so that it appears in the outline on the Hold Apple Watch up to the Camera screen.
Move Apple Watch so that it appears in the outline on the Hold Apple Watch up to the Camera screen.
![]() You can tap Pair Apple Watch Manually to use manual pairing instead of automatic pairing.
You can tap Pair Apple Watch Manually to use manual pairing instead of automatic pairing.
The Your Apple Watch Is Paired screen appears.
![]() Tap Restore from Backup.
Tap Restore from Backup.
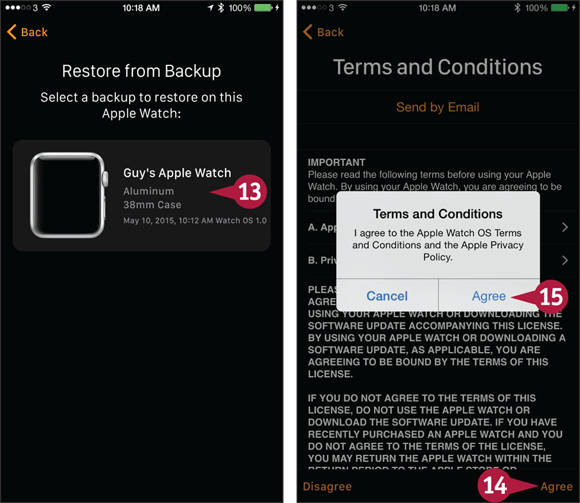
The Restore from Backup screen appears.
![]() Tap the backup you want to use.
Tap the backup you want to use.
The Terms and Conditions screen appears.
![]() Tap Agree.
Tap Agree.
The Terms and Conditions dialog box appears.
![]() Tap Agree.
Tap Agree.
The Apple ID screen appears.
![]() Tap Enter Password and type your password.
Tap Enter Password and type your password.
![]() Tap Next.
Tap Next.
The Two-Step Verification screen appears.
![]() In the Verify With list, tap the appropriate device.
In the Verify With list, tap the appropriate device.
![]() Tap Send.
Tap Send.

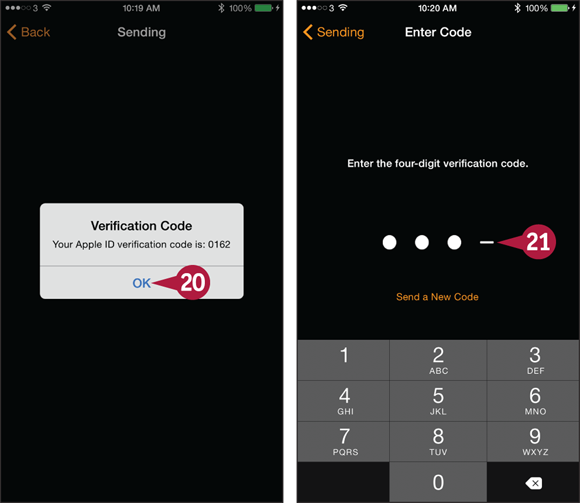
The Sending screen appears.
The Verification Code dialog box appears on the device you chose, showing a four-digit number for verifying your account.
Note: In this example, the iPhone is the device used for two-step verification. If you use a different device, the code appears on that device.
![]() Tap OK.
Tap OK.
The Enter Code screen appears.
![]() Type the verification code.
Type the verification code.
To protect Apple Watch from unauthorized access, you must create a passcode for it. You can create either a standard four-digit passcode or a long passcode containing as many digits as you are prepared to type each time you unlock Apple Watch.
You can choose whether to unlock Apple Watch automatically when you unlock iPhone. This feature is handy but somewhat reduces the security of Apple Watch.

The Location Services screen appears, explaining what Location Services does, whether it is enabled on iPhone, and how you can enable or disable it.
![]() Tap OK.
Tap OK.
The Siri screen appears, explaining what Siri does, whether it is enabled on iPhone, and how you can enable or disable it.
![]() Tap OK.
Tap OK.
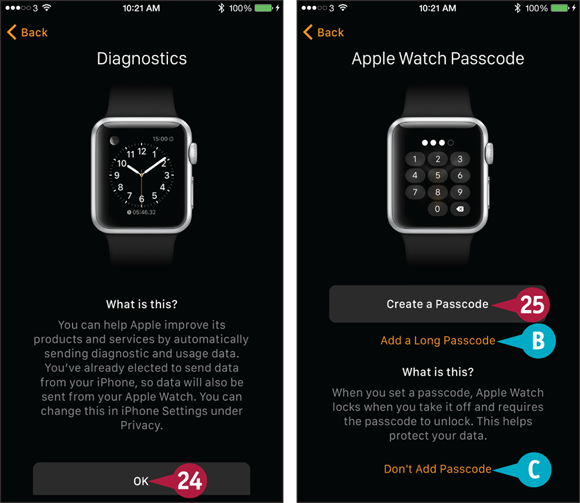
The Diagnostics screen appears, explaining the purpose of sending diagnostic and usage data to Apple, whether sending the data is enabled on iPhone, and how you can enable or disable it.
![]() Tap OK.
Tap OK.
The Apple Watch Passcode screen appears.
![]() Tap Create a Passcode and follow the prompts to create a passcode on Apple Watch.
Tap Create a Passcode and follow the prompts to create a passcode on Apple Watch.
![]() You can tap Add a Long Passcode to create a longer passcode. See the tip for advice.
You can tap Add a Long Passcode to create a longer passcode. See the tip for advice.
![]() You can tap Don’t Add Passcode to set up Apple Watch without a passcode. Do this only if you are setting up Apple Watch for demonstration purposes and it contains no sensitive data whatsoever.
You can tap Don’t Add Passcode to set up Apple Watch without a passcode. Do this only if you are setting up Apple Watch for demonstration purposes and it contains no sensitive data whatsoever.
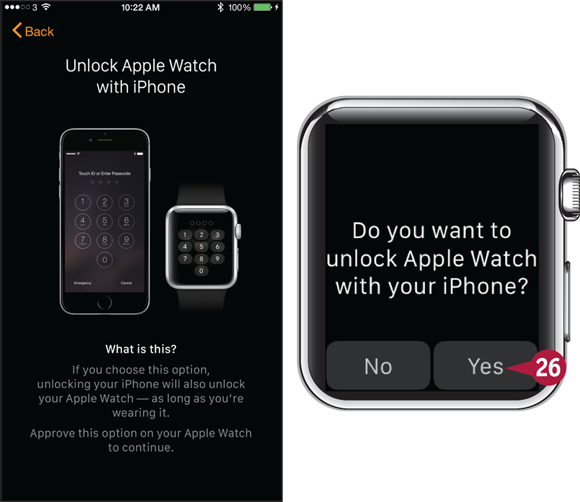
On iPhone, the Unlock Apple Watch with iPhone screen appears.
On Apple Watch, the Do You Want to Unlock Apple Watch with Your iPhone? screen appears.
![]() Tap Yes or No, as appropriate.
Tap Yes or No, as appropriate.

On iPhone, the Apple Watch Is Syncing screen appears while iPhone syncs data to Apple Watch.
![]() Press Home to exit the Apple Watch setup routine.
Press Home to exit the Apple Watch setup routine.
When sync finishes, Apple Watch displays the watch face, and you can start using Apple Watch as before.