You may think of the command line as a relic from the 1970s, with not much relevance to computing today. Not so! Although Linux has numerous GUI programs, they’re mostly just flashy front ends to underlying text-mode tools. By learning those command-line tools, you can unlock Linux’s true power, enabling you to get your work done more quickly. You’ll also be able to manage should the Linux GUI system fail entirely, or should you need to log in and administer the system remotely. Command-line tools can also be scripted, meaning that you can write a simple program that performs a task more quickly or more easily than could be achieved using the standard programs alone. For these reasons, most chapters in this book describe both the GUI and command-line methods of getting things done.
To begin command-line operations, you must know how to start one. With that task in hand, you must know how to run programs and how to get help. You should also be familiar with several labor-saving features of Linux command lines.
Starting a Command Line
A Linux command line, or shell as it’s more properly called, is a program. Just like any other program, the shell must be launched. You can start a shell in a GUI window called a terminal program, or you can log into the computer locally via a text-mode console. In addition, a shell is started when you log into the computer remotely using a text-mode login protocol. However, that particular method goes beyond the scope of this book.
The default shell in most Linux distributions is the Bourne Again Shell (Bash), which is based on an older shell called the Bourne Shell. Other shells are available. Most of these are similar to Bash in broad strokes, although some details differ. Each account specifies its own default shell, so individual users can change their shells if they like. (This is done with account management tools, such as usermod, which is described in Chapter 13, “Creating Users and Groups.”)
Other shells include tcsh, ksh, and zsh. Shell choice is a matter of personal preference. If you’re just starting out, it’s best to stick with Bash simply because it’s popular.
Launching a Terminal
Most Linux distributions allow you to install various GUI terminal programs. Typically, a desktop environment comes with its own terminal, so your terminal program choices also depend on the desktop environments that you install. Many terminal programs include the word terminal in their names, although some don’t, such as the KDE Plasma’s Konsole and generic XTerm.
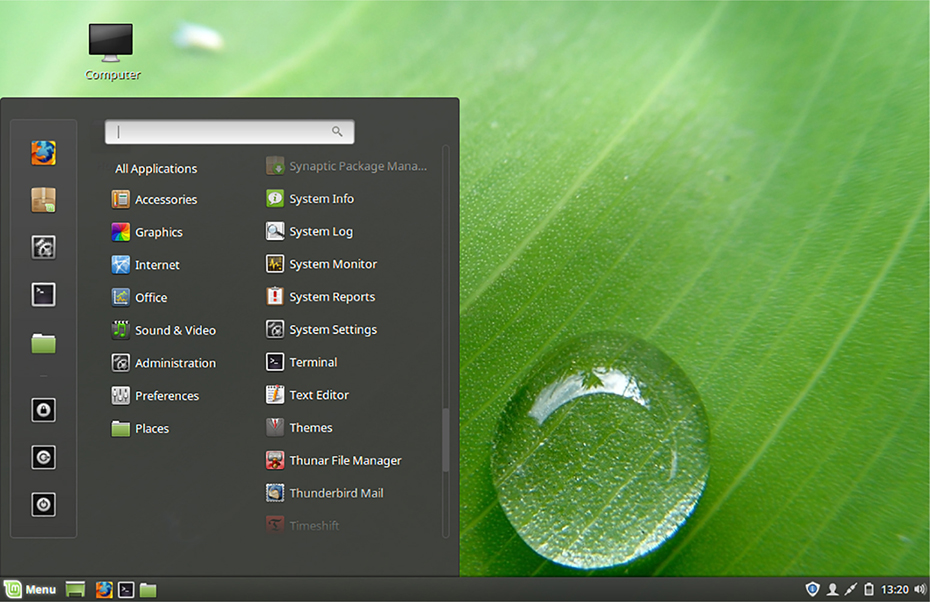
The details of how to launch a terminal program differ from one desktop environment to another. You can normally find an entry in your desktop environment’s menus, as outlined in Chapter 4, “Using Common Linux Programs.” For example, if you’re using Linux Mint’s Cinnamon desktop environment, you can find the available terminals on the lower panel or the menu Favorites panel, or by following this menu-driven procedure:
Click the Menu button, typically located at the lower-left corner of the screen.
Click Administration and use the scroll bar to view the various menu choices. You should see at least one terminal program in a display similar to Figure 5.1.
Click the Terminal icon, and the terminal program will launch.
Figure 5.1 Reaching a terminal via a menu on Cinnamon
Many desktop environments also provide a search method for terminal programs. For example, if you are using the GNOME desktop environment, follow this basic procedure:
Click Activities at the upper-left corner of the screen.
In the resulting search box, type term, as shown in Figure 5.2.
Click the Terminal icon whose program you want to use from the resulting list, and it will launch.
Figure 5.2 Reaching a terminal via a search on GNOME
The procedure to search for terminal programs can vary greatly among desktops.
Some distributions allow you to open a terminal application quickly by pressing Ctrl+Alt+T.
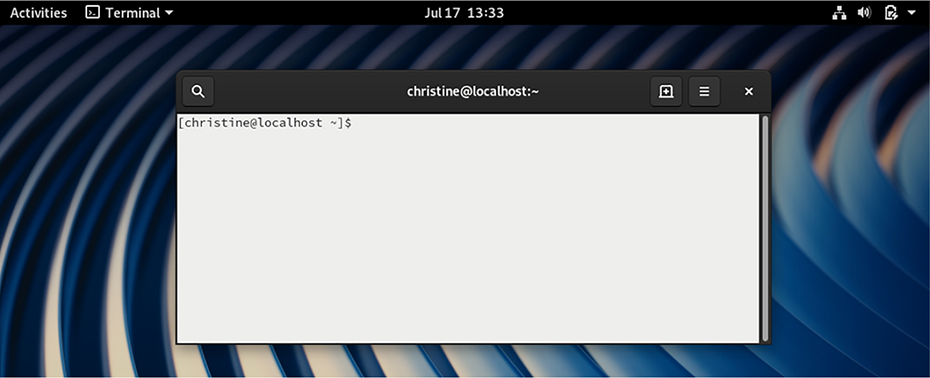
When launched, the GNOME Terminal program shows a prompt; in Figure 5.3, it is [christine@localhost ~]$. This example shows the default Fedora prompt, which includes your username, your computer’s hostname, your current directory (a tilde, ~, refers to your home directory), and a dollar sign ($). Some of these features are likely to change as you use the shell, as described in Chapter 7, “Managing Files.” If you’re using another distribution, the prompt is likely to differ in details, although most default prompts end in a dollar sign ($) or a greater-than symbol (>) for ordinary user shells.
Figure 5.3 GNOME’s Terminal program is typical and is dominated by a textual display area.
When you use the administrative account, root, the prompt normally ends in a hash mark (#). Chapter 12, “Understanding Basic Security,” describes the root account in more detail.
Most terminal programs provide common features of GUI programs—you can resize them, close them, select options from menus, and so on. Details depend on the program that you’re using, though. You may want to peruse the options available on your terminal program’s menus so that you can set the font to one you like, change the color scheme, and so on.
Most terminal programs support tabs, which are similar to the tabs in a web browser. In most cases, such as in a GNOME terminal, you can open a tab by clicking on the + box at the terminal’s upper right. Having multiple tabs open is handy because you can run multiple programs simultaneously, work easily in multiple directories, or run programs both as yourself and as root. Alternatively, you can run multiple terminal programs to achieve the same results.
When you’re done with a terminal, you can close it like other programs by clicking on the X in the upper-right corner. Alternatively, you can type exit and press Enter at its shell prompt.
Logging into a Text-Mode Console
At first glance, Linux looks like Windows or macOS in that it’s a GUI operating system. Scratch the surface, though, and you’ll find a purely text-mode interface waiting. Linux supports virtual terminals (VTs), which are virtual screens that can hold various types of information—textual or graphical. Most Linux distributions run with six or seven VTs. In CentOS and Red Hat, the first VT typically runs the GUI window system. Fedora Workstation provides a graphical login screen on VT 1—logging into this screen will start a GUI on VT 2. Many other distributions provide a graphical login screen on VT 1 and replace it with a GUI when the user logs in. Other distributions use VT 7 or VT 8 for their login screen and GUI, leaving VT 1 as a text-mode display.
You can switch between VTs by pressing Ctrl+Alt+Fn, where Fn is a function key. (When switching between text-mode VTs, Alt+Fn is sufficient.)
The notation Ctrl+Alt+Fn refers to pressing the Ctrl key and holding it; pressing the Alt key and holding it; and then pressing the desired function key and releasing all three keys at once. The function keys (F1 through F12) are located at the top of the keyboard. You pick the function key number that matches the terminal number you want to reach. For example, you’d use the Ctrl+Alt+F3 key combination to reach VT 3.
To reach and log into a text-mode console, follow these steps:
Press Ctrl+Alt+F3. You’ll see a text-mode prompt that looks something like the first few lines in Figure 5.4.
Type your username at this login prompt, and it will respond with a password prompt. In Figure 5.4, the username is christine.
At the password prompt, type in your password.
If your login attempt is successful, you’ll see a Bash prompt like the one shown in Figure 5.4.
When typing in your password at the password prompt for a virtual console terminal, nothing is displayed. Neither dots nor asterisks are displayed as they are when using a GUI login manager.
You can switch back and forth between your text-mode login and your GUI session by using Ctrl+Alt+Fn keystrokes. You can also initiate multiple text-mode logins and switch between them in the same way. This feature can be handy if you’re trying to debug a problem that’s related to the GUI.
When you’re done with your text-mode session, type exit to terminate it. You can also type logout to end your session.
Running Programs
After you’ve opened a terminal or logged in using a text-mode tool, you should know how to use the shell. The Bash shell includes a few built-in commands, but much of what you’ll do in a shell involves running other programs. As described in the following sections, you can run text-mode and GUI programs. Sometimes you may want to run a program in the background and retain use of the shell for other purposes, which can be convenient in many situations.
Understanding Text-Mode Program Syntax
You may think that some master programmer designed and created all the various commands, but that is not true. While a few do share common programmers, many command programs were written by different individuals, so you’ll find the way to use them varies as well.
Fortunately, many commands follow a basic syntax:
COMMAND-NAME [OPTION]... [ARGUMENT]...
In the command’s syntax structure:
COMMAND-NAME is the name of the command used to run the program.
[OPTION]s are additional items added to modify the command’s behavior. There are typically various OPTIONs (also called switches) you can add. The brackets ([]) indicate that OPTIONs are optional, and the three periods (...) show that you can use more than one OPTION.
[ARGUMENT] is an item you pass to the command to let the program know you want it to operate on that item. An argument can also be a subcommand. You can see that it too is optional due to the brackets, and you can pass multiple ARGUMENTs to the program.
If you want to use more than one command option, often you can squish them together. For example, to use the options -a and -b, you type -ab.
The who program displays which users are currently on the system:
In this book, commands you should type are in bold monospace font, and the program output is in standard monospace font.
However, you can modify what this command displays by adding the -b option to it. In this case, the program shows when the system was started:
$ who -b
         system boot  2020-07-16 16:16
An example of a command that accepts arguments is the cat command, whose name is short for concatenate. The cat command can quickly display a short text file on the screen. In this example, cat takes the filename MyFile.txt as an argument:
$ cat MyFile.txtThis is the contents of MyFile.txt.
Commands, arguments, and filenames are case-sensitive in the shell.
Be aware that the options (switches) are not standardized between the various programs. For example, when you use the -b switch with the cat program, it does not display information about system startup as the -b option does with the who command, but instead adds line numbers to any non-blank text file line:
$ cat -b MyFile.txt
     1  This is the contents of MyFile.txt.
You can learn about command usage details through the Linux man pages. The program to do this is called man, and you pass it the name of the command that you want to learn about as an argument, as in man cat to learn about the cat command.
The “Getting Help Using Man Pages” section later in this chapter describes the man page system and other documentation in more detail.
Unfortunately, several commands do not follow the basic standard command syntax. But all is not lost. The manual pages for the Linux system gives syntax structure for many programs. To find syntax structure for a particular command, view its man page and look in the Synopsis section.
The man command illustrates a feature of some text-mode programs: they can take over the entire terminal from which they’re launched. In the case of man, you can scroll up or down in the documentation by using arrow keys, Page Up, Page Down, and so on. Text editors, such as vi, emacs, and nano, use similar features.
Running Text-Mode Programs
Linux stores programs in several locations, including /bin, /usr/bin, and /usr/local/bin. (Programs that are used mainly by root appear in /sbin, /usr/sbin, and /usr/local/sbin as well.) If an executable program appears in one of these directories (which make up the path), you can run it simply by typing its name:
$ free total used free shared buffers cachedMem: 3798016 3759004 39012 0 24800 1117444-/+ buffers/cache: 2616760 1181256Swap: 6291452 0 6291452
This example command displays information on the computer’s use of memory. You needn’t be concerned with the details of this command’s output, though; just note that the free program displayed information in the same terminal in which it was launched. Chapter 9, “Exploring Processes and Process Data,” covers the free program in more detail.
You can learn what directories are included in the path—sometimes called the defined path—by typing the following command:
$ echo $PATH
The result will be a colon-delimited set of directory names, which the shell searches in sequence whenever you type a command that it doesn’t handle directly. The PATH is an environment variable. Environment variables are covered in more detail in Chapter 11, “Creating Scripts.”
You can run a program that is not in one of the PATH directories by typing the program’s directory location along with its name, as follows:
$ /home/christine/myprogram
When you run an executable program that is not located in the PATH, it is called invoking a command outside the defined path.
If you would like to determine how an executable program would be handled, you can use the type command as follows:
$ type freefree is /usr/bin/free
The result will show you the program’s directory location (which may be a different location than what is shown in the preceding example, depending on the Linux distribution). If the PATH environment variable contains the directory location, you need to enter only the program’s name to run it.
Running GUI Programs
You can run GUI programs from a terminal as well as text-based programs (however, this doesn’t work if you logged in using a text-mode VT). You must know the program’s filename to run it. The filename is usually related to the name you use to launch the program from a desktop’s menus, but it’s not always identical. For instance, the Firefox web browser’s filename is firefox, so that’s what you’d need to type to launch Firefox in this way.
Some GUI programs produce text-mode output that can be useful in tracking down the source of problems, so launching a program from a terminal window can be a good first step when debugging problems. You might also want to launch programs in this way because it can be quicker than tracking down programs in a desktop environment’s menus, or because a program doesn’t appear in the environment’s menus.
Running Programs in the Background
When you launch a GUI program from a terminal window, the GUI program opens its own window or windows. The terminal window remains open but will normally become unresponsive. If you want to type more commands in this window, you can do so by selecting it and pressing Ctrl+Z. This suspends the running program—that is, it’s sent to sleep. In its sleeping state, the GUI program won’t respond to input or do any work. However, you can now use the terminal window to type in commands.
After you have suspended a program, if you want both to run the GUI program and to use the terminal from which you launched it, you can type bg (short for background) in the terminal. Both programs will now be active.
If you only want to wake the sleeping GUI program, type fg. This command returns the sleeping GUI program to the foreground, enabling it, but once again this makes your terminal unresponsive. Note that, in this context, the terms background and foreground refer to the program’s relationship to the shell, not to the position of the program’s windows in a “stack” of windows on the screen.
Pressing Ctrl+Z also suspends most text-mode programs, enabling you to use the shell before returning to the program by typing fg.
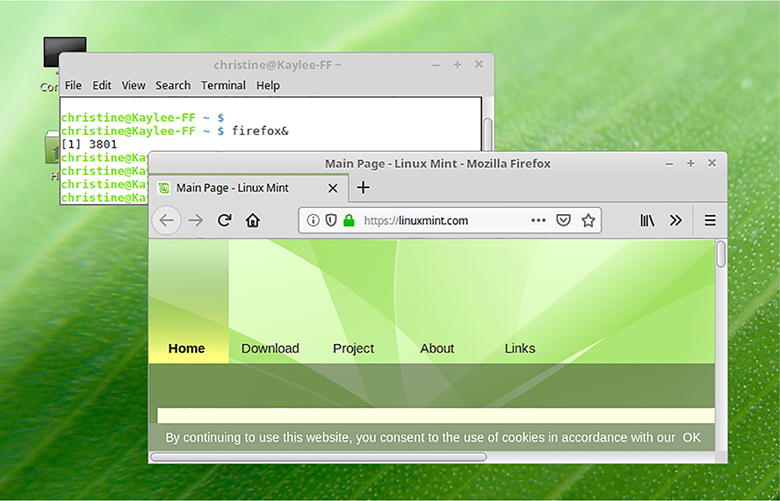
If you know before you launch it that you want to run a program in the background, you can do so by appending an ampersand (&) to the end of the command line, as in the following:
$ firefox&
As shown in Figure 5.5, this command launches the Firefox web browser in the background, enabling you to visit web pages and to continue to use the shell.
Figure 5.5 Launching Firefox in the background to allow use of both the web browser and the shell
This background feature is most useful for running GUI programs, but it’s sometimes used with text-mode programs too. A complex number-crunching program, for instance, might be designed to run for several minutes or hours and produce no output. You might therefore want to run it in the background and retain control of your shell. Be aware, however, that if you launch a program in the background and it produces output to the terminal, that output will continue to appear in your shell, possibly intruding on whatever else you’re trying to do with the shell.
Using Shell Features
Bash includes several features that make using it much easier. Some have already been described. Many others are beyond the scope of this book. Two, however, deserve attention: command completion and command history.
Using Command Completion
Command completion is the hero of everybody who hates typing: it’s a way to enter a long command or filename with a minimal number of keystrokes. To use command completion, you type part of a command or filename and then press the Tab key. If only one command on the path completes the command, Bash fills in the rest—and likewise when using command completion to refer to files.
If command completion is not working for you, the terminal program may have it configured to be turned off.
To illustrate the use of command completion, you can try it out with a few commands:
Launch a shell.
Type wh, then press the Tab key. The computer will probably beep or sound a tone. This indicates that your incomplete command could be completed by multiple commands, so you must type more characters. (In some configurations, the computer skips straight to the next step, as if you’d pressed Tab twice.)
Press the Tab key again. The shell displays a list of possible completions, such as whatis, whereis, and whoami.
Type oa, making your command so far whoa, and press the Tab key again. The computer will probably complete the command: whoami. (If it doesn’t, another program that completes the command may exist on your computer, so you may need to type another character or two.)
Press the Enter key. The computer runs whoami, which displays the name of the account you are currently using.
Sometimes command completion can complete a command only partially. For instance, typing gru and then pressing Tab is likely to add a single unique character, b. However, several commands begin with grub, so you must then add more characters yourself. (These commands deal with the Grand Unified Bootloader, GRUB, which helps Linux to boot.)
Some details of how command completion works vary from one distribution to another.
Command completion also works with files. For instance, you can type cat /etc/ser followed by the Tab key to have Bash complete the filename, and therefore the command, as cat /etc/services. (This command shows you the contents of a Linux configuration file.)
Using Command History
Bash remembers the recent commands that you’ve typed, and you can use this fact to save yourself some effort if you need to type a command that’s similar to one you’ve typed recently. In its most basic form, you can use the up arrow key to enter the previous command; pressing the up arrow repeatedly moves backward through earlier and earlier commands. Table 5.1 summarizes some other commonly used keystrokes that you can use in the command history—or even when editing new commands.
Table 5.1Bash editing and command history features
Keystroke
Effect
Up arrow
Retrieves the previous entry from the command history
Down arrow
Retrieves an earlier entry bypassed when using the up arrow
Left arrow
Moves the cursor left one character
Right arrow
Moves the cursor right one character
Ctrl+A
Moves the cursor to the start of the line
Ctrl+E
Moves the cursor to the end of the line
Delete key
Deletes the character under the cursor
Backspace key
Deletes the character to the left of the cursor
Ctrl+T
Swaps the character under the cursor with the one to the left of the cursor
Ctrl+X and then Ctrl+E
Launches a full-fledged editor on the current command line
Ctrl+R
Searches for a command. Type a few characters, and the shell will locate the latest command to include those characters. You can search for the next-most-recent command to include those characters by pressing Ctrl+R again.
Many of the Bash command-editing features are similar to those used by the emacs text editor.
As an example of command history in use, try this:
Type echo $PATH and press the Enter key to see the directories that make up your defined path.
Press the up arrow key. Your echo $PATH command should reappear.
Press the Backspace key five times to delete $PATH.
Type Hello World to make the new command echo Hello World, and then press Enter. You should now see the words Hello World displayed on your screen.
Press Ctrl+R. The Bash prompt will change. It now looks like this: (reverse-i-search)`':.
Type P (without pressing Enter). Your earlier echo $PATH command will appear.
Press Enter. The echo $PATH command should execute again, and your Bash shell prompt should return to normal.
The Ctrl+R search feature searches on anything you enter on a command line—a command name, a filename, or other command parameters.
Another history feature is the history command. Type history to view all of the commands in your history, or add a number (as in history 10) to view the most recent specified number of commands. Along with the commands, you’ll see a corresponding number. You can use this number to execute a command from your history. Just type !, follow it with the command number, and press Enter. The shell will display your chosen command, followed by the command’s results.
You should experiment with these features. Tab completion and command history are both powerful tools that can help you avoid a great deal of repetitive typing. Command history can also be a useful memory aid. For example, if you’ve forgotten the exact name of a file or command that you used recently, you might be able to retrieve it by searching on part of the name that you do remember.
Getting Help Using Man Pages
Sometimes you need help to remember what arguments or options a command can use, or the proper syntax needed when entering a command. The manual pages (also called man pages) can help. Manual pages describe not only programs, but also configuration files and other features of a Linux installation.
Before you consult them, though, you should understand their purpose, and therefore their capabilities and limitations. With that information in mind, you can begin searching for help in the man page system, including searching for man pages by section or by searching for keywords using the whatis or apropos utility. When you’re reading a man page, knowing its structure can help you quickly locate the information that you need.
Understanding the Purpose of Man Pages
Linux man pages can be an extremely helpful resource, but unlike the help systems in some OSs, Linux man pages are not supposed to be tutorial in nature. They’re intended as quick references to help somebody who’s already at least somewhat familiar with a command, configuration file, or other OS feature. They’re most useful when you need to know the options to use with a command, the name of an option in a configuration file, or similar details. If you need to learn a new program from scratch, other documentation is often a better choice.
Manual pages also vary greatly in quality; some are very good, but others are frustratingly terse, and occasionally even inaccurate. For the most part, the programmers who wrote the program in question write them.
The upcoming section “Finding Additional Documentation” describes how to locate documentation that is more tutorial than the man pages.
In this book, many Linux commands are described in a tutorial style. However, information is often omitted on obscure options, subtle program effects, and so on. In principle, man pages should cover such finer points. This makes man pages an excellent resource for learning more about the commands described in this book, should you need to go further.
Locating Man Pages by Section Number
In the simplest case, you can read a man page by typing man followed by the name of a command, configuration file, system call, or other keyword. Each man page falls into one of nine categories, as summarized in Table 5.2.
Miscellaneous (macro packages, conventions, and so on)
8
System administration commands (programs run mostly or exclusively by root)
9
Kernel routines
If you use keywords with man, be aware that they can lead to entries in multiple sections. In such instances, the man utility returns the entry in the section based on a search order typically specified by the SECTION setting in the /etc/man_db.conf or the /etc/manpath .config configuration file (depending on your distribution).
The precise man page search order defined by SECTION varies from one distribution to another, but section 1 is usually searched first, followed by section 8 and then the others.
You can override this default search behavior by passing a section number before the keyword. For instance, typing man passwd returns information from manual section 1 on the passwd command, but typing man 5 passwd returns information from manual section 5 on the /etc/passwd file format. Some man pages have entries in sections with variant numbers that include the suffix p, as in section 1p. These refer to the Portable Operating System Interface (POSIX) standard man pages, as opposed to the Linux man pages, which are, for the most part, written by the people who wrote the open source Linux programs that the man pages describe.
If you’re just starting out with Linux, chances are that you’ll be most interested in section 1, executable programs and commands, which is also usually the first section in the man page search order—although section 6, games, can also be interesting if you have the time to spare! As you move on to more advanced and administrative tasks, you’ll find sections 4, 5, and 8 important for device files, file formats, and programs run by root. Sections 2, 3, and 9, covering calls and kernel routines, are of most interest to programmers.
Get help on using and reading the man pages by typing man man at the command line.
Searching for a Man Page
One problem with man pages is that locating help on a topic can be hard unless you know the name of the command, system call, or file that you want to use. Fortunately, methods of searching the manual database exist and can help lead you to an appropriate man page:
Summary Search The whatis command searches summary information contained in man pages for the keyword you specify. The command returns a one-line summary for every matching man page. (This summary is the Name section, described shortly, in “Reading Man Pages.”) You can then use this information to locate and read the man page that you need. This command is most useful for locating all man pages on a topic. For instance, typing whatis passwd returns lines confirming the existence of the man page entries for passwd in various sections.
Thorough Search The apropos command performs a more thorough search, of both the Name and Description sections of man pages. The result looks much like the results of a whatis search, except that it’s likely to contain many more results. In fact, doing an apropos search on a very common keyword, such as the, is likely to return so many hits as to make the search useless. A search on a less common word is likely to be more useful. For instance, typing apropos passwd may return 16 entries on a system, including those for gpasswd, smbpasswd, and passwd—all various password utilities or tools involving password files.
The -k option to man is equivalent to apropros. Thus you can type either apropos
keyword or man -k
keyword.
If you receive a “nothing appropriate” response from either the whatis or the apropos command, typically you need to change the keyword that you are using. However, it may indicate that the man database has not been updated. This is typically true on a fresh Linux installation or after a new program is installed. You can update the man database manually by using super user privileges and typing the command makewhatis (on older Linux distributions) or mandb. (Using super user privileges is described in Chapter 12.)
Details of what man pages are available vary from one distribution to another. This will affect the results of both whatis and apropos searches.
Reading Man Pages
The convention for man pages is a concise style that employs several sections, each of which has a particular purpose. This organization can help you locate the information that you need—you might need information that you know is in a particular section, in which case you can quickly scan down to that section. Common sections include the following:
Name A man page begins with a statement of the command, call, or file that’s described, along with a few words of explanation. For instance, the man page for man (section 1) has a Name section that reads man — an interface to the on-line reference manuals.
Synopsis The synopsis provides a brief description of how a command is used. Optional parameters appear in square brackets, such as [-D]. An ellipsis (...) denotes an optional set of repeated elements, such as multiple filenames if a command takes one or more filenames as options. Some commands provide multiple synopsis lines, indicating that certain options are contingent on others.
Description The description is an English-language summary of what the command, file, or other element does. The description can vary from a short summary to many pages in length.
Options This section expands on the options outlined in the Synopsis section. Typically, each option appears in a list, with a one-paragraph explanation indented just below it.
Files This section lists files that are associated with the man page’s subject. These might be configuration files for a server or other program, related configuration files, files the page’s subject modifies, and so on.
See Also This section provides pointers to related information in the man system, typically with a section number appended. For instance, the man page for man refers to the man pages for apropos, whatis, and several other related tools.
Bugs Many man pages provide a Bugs section in which the author describes any known bugs or limitations, or states that no known bugs exist.
History Some man pages provide a summary of the program’s history, citing project start dates and major milestones between then and the current version. This history isn’t nearly as comprehensive as the changes file that comes with most programs’ source code.
Author Most man pages end with an Author section, which tells you how to contact the author of the program.
Specific manual pages may contain fewer, more, or different sections than these. For instance, the Synopsis section is typically omitted from man pages on configuration files. Manual pages with particularly verbose descriptions often split the Description section into several parts, each with its own title.
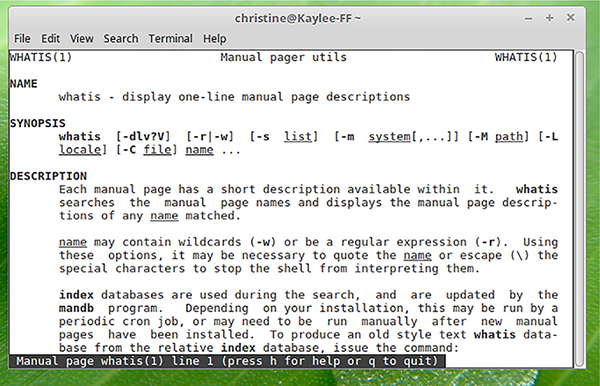
Figure 5.6 shows a typical man page in a terminal window. As you can see, section names appear in bold uppercase letters, making it easy to locate relevant sections as you page through the document.
Figure 5.6 The formatting of man pages helps you locate information quickly.
By default, man uses the less program to enable you to move back and forth in the document, and when you’re done, exit the man pages. The upcoming section, “Using less,” describes this program in detail.
Using less
Linux’s man system uses a program called less to display information. This program is a pager, which displays a text file one screen (that is, one page) at a time. You can move forward or backward through the file, move to a specific line, and search for information. Table 5.3 summarizes the most common ways of moving about a document using less.
An earlier pager was known as more, but less adds more features. This peculiar name is an example of geek humor.
Down arrow, Enter, Ctrl+N, E, Ctrl+E, j, or Ctrl+J
Moves down one line in the document
Up arrow, Y, Ctrl+Y, Ctrl+P, K, or Ctrl+K
Moves up one line in the document
xg, x<, or x Esc+<
Goes to line x in the document—for instance, typing 100g displays the document’s 100th line. If x is omitted, the default is 1.
xG, x>, or x Esc+>
Goes to line x in the document. If x is omitted, the default is the last line of the document.
xp or x%
Goes to the point x percent through the document—for instance, typing 50p goes to the document’s halfway point
/pattern
Searches forward for pattern in the document, starting at the current location. For instance, typing /BUGS searches for the string BUGS.
?pattern
Performs a backward search, locating instances of pattern before the current location
N or /
Repeats the previous search
Q, :Q, or ZZ
Quits from the less pager
The notation Esc+V refers to pressing the Esc key followed by the V key.
Table 5.3 presents a small fraction of the commands available in less. To learn more about less, you can read its man page:
Log into the computer in text mode or open a terminal window.
Type man less. This action opens the man page for the less pager.
Read the first screen of text. When you finish reading the last word at the bottom of the screen, press the spacebar key. This moves the display to the next page so that you can continue reading. (You could use the PageDown key or others noted in Table 5.3 instead of the spacebar if you prefer. Similar substitutions are possible in the subsequent steps.)
Press the up arrow key. This moves the display up a single line, which is useful if you need to reread just a few words from the end of the last page.
Press the down arrow key. As you might expect, this moves the display down by one line.
Press the Esc key followed by the V key. This moves the display back one page.
Press Shift+G to move to the end of the man page.
Press the G key (without using the Shift key) to move back to the start of the man page.
Type /OPTIONS to locate the Options section. Chances are that your first hits will be to references to this section, rather than to the Options section itself.
Repeatedly press the N key until you find the Options section.
Press the Q key to quit from less, and therefore from reading the man page.
Some implementations search in a case-sensitive manner, but others are case-insensitive. In step 9, try searching on /options in lowercase) to determine which is the situation with your implementation.
Of course, when you read man pages, you aren’t likely to use these exact options; you’ll use whatever features you need to use to find the content that interests you. The key is to familiarize yourself with a few important features so that you can make effective use of less to read man pages and other documents.
Although less is important for reading man pages, you can also use it to read other text-mode documents, such as README files that come with many programs or other plain-text documents. To use less in this way, type its name followed by the filename of the file that you want to read, as in less README to read a README document. You can use all of the actions summarized in Table 5.3 (or by less’s man page) on documents read in this way, just as you can on man pages.
Getting Help Using Info Pages
The man page system is typical on Unix-like OSs, including Linux, but it’s also quite old and is therefore limited. A newer documentation system, known as info pages, is also available. The next few pages describe how info pages fill gaps in the man page system and how to use info pages.
Understanding the Purpose of Info Pages
The basic design of man pages dates back decades, so it predates some important developments in managing information. Most notably, man pages are not hyperlinked. Although a See Also section is common in man pages, you can’t select one of these items to read the relevant man page directly; you must quit the man system and type a new man command to read the new page. This lack of hyperlinking also makes navigating through a large man page awkward. You can use text searches to locate information that you desire, but these often find the wrong text—or if you mistype a string, your search might fail completely.
The goal of info pages is to overcome these problems by supporting hyperlinking. Each info page is known as a node, and the info page system as a whole is an interrelated set of nodes, similar to the World Wide Web (WWW) of the Internet. An individual program’s documentation may be split up across multiple nodes, which can make each node easier to locate and search—but if you need to search for information and you’re not sure in which node it resides, you may need to search multiple nodes.
Nodes are organized on levels, which are similar to the levels of organization in a book. This book, for instance, has chapters and two levels of headings within each chapter. Similarly, the info page for a program is likely to have one main node, similar to a chapter, along with multiple nodes at a lower level, similar to chapter headings. Some programs’ info pages include further levels to help organize information.
In terms of writing style, info pages are similar to man pages—they are terse but comprehensive descriptions of their topics—intended for people who are already at least broadly familiar with the programs in question. If you’re just starting out with a program, other types of documentation (described later, in “Finding Additional Documentation”) may be a better choice.
The /usr/doc and /usr/share/doc directories, if available on your distribution, often contain a great deal of useful information. If you cannot find the information you are seeking in the man or info pages, look in these directories.
Broadly speaking, programs sponsored by the Free Software Foundation (FSF) use info pages in preference to man pages. Many FSF programs now ship with minimal man pages that point the user to the programs’ info pages. Non-FSF programmers have been slower to embrace info pages; many such programs don’t ship with info pages at all, and instead rely on traditional man pages. The info browser can read and display man pages, so using info exclusively can be an effective strategy for reading Linux’s standard documentation.
Reading Info Pages
The usual tool for reading info pages is called info. To use it, you type info followed by the topic, as in info info to learn about the info system itself. When you’re in the info system, you can use a number of keystrokes, summarized in Table 5.4, to move around a document.
Moves to the next node in a linked series of nodes on a single hierarchical level. This action may be required if the author intended several nodes to be read in a particular sequence.
P
Moves back in a series of nodes on a single hierarchical level. This can be handy if you’ve moved forward in such a series but find that you need to review earlier material.
U
Moves up one level in the node hierarchy
Arrow keys
Moves the cursor around the screen, enabling you to select node links or scroll the screen
Page Up, Page Down
These keys scroll up and down within a single node, respectively. (The standard info browser also implements many of the more arcane commands used by less and outlined in Table 5.3.)
Enter
Moves to a new node after you’ve selected it. Links are indicated by asterisks (*) to the left of their names.
L
Displays the last info page that you read. This action can move you up, down, or sideways in the info tree hierarchy.
T
Displays the top page for a topic. Typically, this is the page that you used to enter the system.
Q
Exits the info page system
As an example of info pages in use, try the following:
Log into the computer in text mode or open a terminal window.
Type info info. You should see the top node for the info documentation appear.
Read the main page, using the arrow keys or the PageDown key to view the entire page.
Using the arrow keys, select the link to the Expert Info node near the bottom of the main page.
Press the Enter key to view the Expert Info node.
Press the U key to browse up one level—back to the main node.
Browse to the Advanced node.
Press the N key to go on to the next node on the current level, which is the Expert Info node.
Press the Q key to exit from the info reader.
Finding Additional Documentation
Although man pages and info pages are both useful resources, other documentation is available too, and it is sometimes preferable. Generally speaking, help on Linux can come in three forms: additional documentation on your computer, additional documentation online, and help from experts.
Documentation categories can blur together. For instance, documentation might be available online but not on your computer until you install an appropriate package.
Locating Program Documentation on Your Computer
Most Linux programs ship with their own documentation, even aside from man or info pages. In fact, some programs have so much documentation that it’s installed as a separate package, typically with the word documentation or doc in the package name, such as samba-doc.
The most basic and traditional form of program documentation is a file called README, readme.txt, or something similar. Precisely what information this file contains varies greatly from one program to another. For some, the file is so terse that it’s nearly useless. For others, it is extremely helpful. These files are almost always plain-text files, so you can read them with less or with your favorite text editor.
README files often contain information on building the software package that doesn’t apply to program files provided with a distribution. Distribution maintainers seldom change such information in their README files, though.
If you downloaded the program as a source code file from the software package maintainer’s site, the README file typically appears in the build directory extracted from the compressed source code file. If you installed the program from a package file, though, the README file could be in any of several locations, depending on your distribution. The most likely places are as follows:
/usr/doc/packagename
/usr/share/doc/packagename
/usr/share/doc/packages/packagename
In the previous list, packagename is the software package’s name. The package name sometimes includes a version number, but more often it does not.
In addition to (or instead of) the README file, many programs provide other documentation files. These may include a file that documents the history of the program in fine detail, descriptions of compilation and installation procedures, information on configuration file formats, and so on. Check the source code’s build directory or the directory in which you found the README file for other files.
Some larger programs ship with extensive documentation in PostScript, Portable Document Format (PDF), Hypertext Markup Language (HTML), or other formats. Depending on the format and package, you might find a single file or a large collection of files. As with the README files, these files are well worth consulting, particularly if you want to learn how to use a package to its fullest.
Some programs rely on configuration files, typically located in the /etc/ directory, to control their behavior. Although the syntax in configuration files is often difficult to understand, many distributions provide default configuration files that include extensive comments. Details vary from one program to another, but comment lines often begin with hash marks (#). You may be able to learn enough about a program to adjust its configuration merely by reading the comments in its configuration file.
If you can’t find a README or similar file, you can employ various tools to help find documentation files. Many of these searching tools, such as grep and find, are covered in more detail in Chapter 8, “Searching, Extracting, and Archiving Data,” but here is a brief list:
You can use your distribution’s package management system (covered in detail in Chapter 9) to locate documentation. For instance, on an RPM-based system, you might type rpm -ql
apackage | grep doc to locate documentation for apackage. Using grep to search for the string doc in the file list is a good trick because documentation directories almost always contain the string doc.
The Linux find command can search your entire directory tree, or a subset of it, for files that match a specified criterion. To search for a file that includes a certain string in its name, for instance, you might type find /usr/share/doc -name "*
string*", where string is the keyword that you want to find in a filename. This command searches the /usr/share/doc directory tree, but you can search another directory tree instead. If you search a directory with lots of files and subdirectories, this command can take a long time to complete.
The whereis program searches for files in a restricted set of locations, such as standard binary file directories, library directories, and man page directories. This tool does not search user directories. The whereis utility is a quick way to find program executables and related files like documentation or configuration files. To use it, type whereis followed by the name of the command or file, as in whereis less to find the less binary and related documentation.
The Linux locate command searches a database of filenames that Linux maintains. It can therefore do its job much quicker than find can, but you can’t control the part of the computer that the system searches. Type locate followed by the string that you want to find, as in locate xterm to find any files related to the XTerm terminal program.
The locate database is typically updated every 24 hours. If you are working on a freshly installed distribution, or you are searching for newly installed package files, the updatedb command will need to be run using super user privileges in order to update the locate database manually before you use the locate command.
After you’ve located documentation files, you must know how to read them. The details, of course, depend on the documentation’s file format. You can use less to read many files. Most distributions configure less in such a way that it can interpret common file formats, such as HTML, and to automatically decompress files that are stored in compressed format to save disk space.
If you want to see a formatted text file, such as an HTML file, in a raw form, use the -L option to less, as in less -L file.html.
Table 5.5 summarizes common documentation file formats and the programs that you can use to read them. Which formats are used varies from one program to another.
Use gunzip, unxz, or bunzip2 to uncompress, or use less, which may be able to uncompress the file and read its underlying format.
.txt
Plain text
less or any text editor
.html or .htm
HTML
Any web browser
.odt
OpenDocument text
OpenOffice.org, LibreOffice, or many other word processors
.pdf
Portable Document Format (PDF)
Evince, Okular, Adobe Reader, xpdf
.tif, .png, .jpg
Graphics file formats
The GIMP, Eye of GNOME (eog)
Manually uncompressing a file with gunzip, unxz, or bunzip2 may require writing the uncompressed version to disk, so you may need to copy the file to your home directory. See Chapter 8 for more details.
Locating Program Documentation Online
In addition to the documentation that you find on your computer, you can locate documentation on the Internet. Most packages have associated Internet websites, which may be referred to in man pages, info pages, README files, or other documentation. Check these pages to look up documentation.
A few general Linux documentation resources are available on the Internet. The documentation offered by these sites, however, is often out-of-date. Typically, distributions have their own online sites providing up-to-date documentation. Helpful online documentation resources include the following:
The Linux Documentation Project, or LDP (tldp.org)
Be aware that items on the LDP site can be rather out-of-date. Be sure to check an item’s revision date before using it!
Many Linux distributions use community volunteers to write and/or improve their documentation. These volunteers’ practical experience adds to the accuracy and depth of the distribution’s documentation, which makes these sites valuable resources.
Consulting Experts
Whatever issue has you looking for documentation, chances are you’re not the first person to do so. In some cases, you can save a lot of time by asking another person for help. Some specific resources include the following:
Program Authors Many open source authors are happy to answer questions or provide limited support, particularly if a bug causes your problem. Bigger projects (including most Linux distributions) have many authors, and these projects often provide web forums or mailing lists to help users and developers communicate.
Web Forums and Mailing Lists These resources differ in format but serve similar purposes: they enable users to communicate with one another and share their expertise. Many distributions have dedicated web forums; try a web search on your distribution name and forum to find yours. Mailing lists are more common for individual programs. Search the program’s main website for information on mailing lists.
IRC Internet Relay Chat (IRC) is a tool for real-time text-mode communication among small groups of people. To use IRC, you need an IRC client program, such as Irssi (irssi.org), HexChat (hexchat.github.io/), or Smuxi (smuxi.im/). You can then join an IRC channel in which IRC users exchange messages in real time.
Paid Consultants Paying somebody a consulting fee can often be worthwhile to fix a thorny problem, particularly if you’re facing a “time is money” situation in which a delay in solving the problem will literally cost more money. A web search will turn up numerous Linux consulting firms.
Web Searches Web search engines index many Internet resources, including man pages, program documentation sites, web forums, and even IRC channel discussions. A web search can provide you with an answer from an expert without your needing to contact the expert directly.
Some Linux distributions, such as Red Hat Enterprise Linux and SUSE Enterprise Linux, come with support. If you’re using such a distribution, you may have already paid for consulting.
Careful use of these resources can help you with many Linux problems, whether those problems are simply a lack of knowledge on your part, a misconfiguration, a program bug, or some terrible disaster such as a software update that rendered your computer unbootable.
The problem today is that there’s often too much information available; sifting through the irrelevant (or just plain bad) information to find the helpful advice can be difficult. To overcome this challenge, being specific can be helpful. You can narrow a web search by adding relevant keywords to the problem that are uncommon. Words found in error messages can be helpful in this respect. If you post a problem to a web forum or send a bug report to a program author, be as specific as possible. Include information on the distribution you’re using, the version of the software, and specific details about what it’s doing. If the program displays error messages, quote them exactly. Such details will help experts zero in on the cause of the problem.
Exercise 5.1
Launch a GUI program, such as firefox, with and without a trailing ampersand (&). When you launch it without an ampersand, use Ctrl+Z to put it into the background and see how the program reacts to mouse clicks. Use fg to return it to the foreground, and then repeat the process but use bg to run the program in the background. See what happens in your terminal when you exit from the GUI program.
In a shell, type a single letter, such as m, and press the Tab key. What happens? What happens if you type a less common letter, such as z, and then press Tab?
Experiment with the command history. Use it to search on strings that are part of both command names and filenames that you’ve used. Use the arrow keys and editing features described in Table 5.1 to edit commands that you’ve used previously.
Read the man pages for the following items: man, less, whereis, find, and locate. View their Synopsis section to understand their command syntax. What have you learned about these commands that goes beyond the descriptions in this book?
Search /usr/share/doc for documentation on important programs that you use frequently, such as the GIMP, Firefox, or GNOME.
Check your distribution’s website, or perform a web search, to find a web forum that supports your distribution. Read some of the discussion threads to get a feel for some of the topics that come up.
Summary
Command lines are powerful tools in Linux; they’re the basis on which many of the friendlier GUI tools are built. They can be accessed without the help of a GUI, and they can be scripted. To use the text-mode tools described in other chapters of this book, you should be familiar with the basics of a Linux shell. These include knowing how to start a shell, how to run programs in a shell, and how to use a shell’s time-saving features.
Whether you need to learn more about a program to use it effectively, or solve a problem with a misbehaving program, getting help is often necessary. Linux provides several documentation resources for such situations. The first of these is the man page system, which documents most text-mode commands, configuration files, and system calls. The info page system is similar to the man page system, but info pages employ a more advanced hyperthreaded file format. If you need more tutorial information than the man or info pages provide, you can often obtain help in the form of extended official user manuals, web pages, and other documents, both on your computer and on the Internet. Finally, interacting with experts can help resolve a problem, so you can use numerous in-person and online resources to get the help you need.
Exam Essentials
Describe how to reach the command line. Most Linux distributions have default GUI terminal programs that allow you to reach the command line. Some distributions let you open a terminal application with the GUI by pressing Ctrl+Alt+T, whereas others have icons on their desktop or terminal application names within their menu system. To reach a virtual terminal, which is not within the desktop environment, press Ctrl+Alt+Fn (where Fn is a function key typically between F2 and F6), and log in to reach the command line. The command-line prompt is provided by the shell and often ends in a dollar sign ($) for regular users or a hash mark (#) for the root user.
Explain how to run programs at the command line. If an executable program resides in a PATH directory, you can run it by typing its name, along with any needed options or required arguments. And if the program is not located in a PATH directory, you must run it by entering its directory location as well as its name and any needed options or required arguments.
Outline using basic shell features. Command completion speeds your way through the typing of commands or filenames. To use command completion, you type part of a command or filename, and then press the Tab key. As long as there is only one file or command whose name begins with what you typed, the Bash shell fills in the rest. The Bash history feature reduces your time at the command line. You can recall the most recent command with the up arrow key, view all the commands saved with the history utility, and reissue any command stored there.
Detail getting help using the man pages. The manual (man) pages are rather terse documentation aimed for those who already know the item described. They summarize commands, configuration files, and other implemented features on a Linux system. By default, the less pager is used to display information within the man pages. You can perform thorough searches for keywords stored within the man pages using the apropos utility or its equivalent—man -k. Conducting a summary search is accomplished with the whatis command.
Summarize getting help using the info pages. The info pages are as brief as the man pages but use a series of nodes (pages) that are hyperlinked and organized on levels. You can get help on how to use the info pages and its browser by typing info info at the command line. Interestingly, the info browser will also allow you to read man pages.
Review Questions
You can find the answers in Appendix A.
What keystroke moves the cursor to the start of the line when typing a command in Bash?
Ctrl+A
Left arrow
Ctrl+T
Up arrow
Ctrl+E
How can you run a program in the background when launching it from a shell? (Choose all that apply.)
Launch the program by typing start
command, where command is the command that you want to run.
Launch the program by typing bg
command, where command is the command that you want to run.
Append an ampersand (&) to the end of the command line.
Launch the program normally, press Ctrl+Z in the shell, and then type bg in the shell.
Launch the program normally, press Ctrl+Z in the shell, and then type fg in the shell.
Which of the following commands is an improved version of more?
grep
html
cat
less
man
True or false: Pressing Alt+F3 in the GUI brings up a text-mode display that you can use to log into Linux.
True or false: You can force man to display a man page in a specific section of the manual by preceding the search name with the section number, as in man 5 passwd.
True or false: Info pages are a web-based documentation format.
True or false: Linux documentation in the /usr/share/doc directory tree is almost always in OpenDocument text format.
Type logout or ________ to end a text-mode terminal session.
end
bye
whoami
exit
man
Each document in an info page is known as a ________.
pager
site
node
link
level
The ________ command searches a database of filenames, enabling you to identify files quickly whose names match a term that you specify.

 You may think of the command line as a relic from the 1970s, with not much relevance to computing today. Not so! Although Linux has numerous GUI programs, they’re mostly just flashy front ends to underlying text-mode tools. By learning those command-line tools, you can unlock Linux’s true power, enabling you to get your work done more quickly. You’ll also be able to manage should the Linux GUI system fail entirely, or should you need to log in and administer the system remotely. Command-line tools can also be scripted, meaning that you can write a simple program that performs a task more quickly or more easily than could be achieved using the standard programs alone. For these reasons, most chapters in this book describe both the GUI and command-line methods of getting things done.