Linux is a multiuser OS, meaning that a single Linux computer can support many users, each with a unique account. With this capability comes the need to manage users’ accounts, and this chapter covers the procedures you’ll use to do so.
The chapter begins with information on how to create accounts. With the accounts created, you then need to know how to modify those accounts and, when necessary, delete them. Finally, groups are similar to accounts in many ways, so you’ll learn how to create and manage groups.
Creating New Accounts
In many environments, the task of adding accounts is quite common. Large businesses hire new employees, universities recruit new students, charitable organizations obtain fresh volunteers, and so on. Therefore, you must know how to create new accounts. But first, this section looks at the important issues of deciding how to use groups and selecting a good password. You’ll then learn how to create accounts using both GUI and text-mode tools.
Deciding on a Group Strategy
As described in Chapter 12, “Understanding Basic Security,” Linux groups are collections of users. You can use groups to control who can access particular files. As will be described in Chapter 14, “Setting Ownership and Permissions,” individuals can change the group affiliations and group permissions of their own files. Thus, the way you use groups can influence your computer’s overall security strategy. Two approaches are common:
User Groups Each user can have an associated group; for instance, the user luke can have a group called luke. This user can then set group ownership on his files to luke or set group permissions to whatever is desired, and the system administrator can add users to the luke group. Thereafter, members of the luke group may access files in this group by using the permissions determined by the user luke. This approach emphasizes controlling access to individual users’ files.
Project Groups In this method, you create groups based on work projects, departmental affiliations, or other real-world groupings of users. For instance, you might have a group called sales for users in the sales department. Members of this group who want to share files with other members of this group would assign group ownership and permissions appropriately and store files in an agreed-upon location. This approach works best when the computer is used by a large number of people who collaborate in easily defined groups.
These two approaches are not mutually exclusive; you can mix and match or create your own approach. You should also realize that users can be members of multiple groups. In fact, this is required for the user groups approach to work at all—otherwise, groups are redundant with accounts.
By default, some distributions employ a user groups strategy and others use a project groups strategy. In the latter case, most users are in a group called users or something similar by default.
If you use the project group approach, you should think about which group should be a new user’s primary group. This is the group that will be assigned group ownership of the user’s files by default.
Selecting a Good Password
When you create an account, you typically should create a password for it. Sometimes, the user can select the password when the account is created. At other times, you’ll need to select a password that the user will use initially. In such cases, instruct the user to change the password as soon as possible. In either case, it’s important to educate users about selecting a good password.
Be sure to follow the advice in this section yourself, especially for the root password if you use the root account!
Poor but common passwords include those based on the following:
The names of family members, friends, and pets
Favorite books, movies, television shows, or the characters in any of these
Telephone numbers, street addresses, or Social Security numbers
Any other meaningful personal information
Any single word that’s found in a dictionary (in any language)
Any simple keyboard or alphanumeric combination, such as qwerty or 123456
The best possible passwords are random collections of letters, digits, and punctuation. Unfortunately, such passwords are difficult to remember. A reasonable compromise is to build a password in two steps:
Choose a base that’s easy to remember but difficult to guess.
Modify that base in ways that increase the difficulty of guessing the password.
One approach to building a base is to use two or more unrelated words, such as bun and pen. You can then merge these two words (bunpen). Another approach, and one that’s arguably better than the first, is to use the first letters of a phrase that’s meaningful to the user. For instance, the first letters of “yesterday I went to the dentist” become yiwttd. In both cases, the base should not be a word in any language. As a general rule, the longer the password, the better.
Many distributions place lower limits on password length, such as six or eight characters.
With the base in hand, it’s time to modify it to create a password. The user should apply at least a couple of several possible modifications:
Adding Numbers or Punctuation One important change is to insert random numbers or punctuation in the base. This step might yield, for instance, bu3npe?n or y+i9wttd. As a general rule, add at least two symbols or numbers.
Mixing Case Linux uses case-sensitive passwords, so jumbling the case of letters can improve security. Applying this rule might produce Bu3nPE?n and y+i9WttD, for instance.
Reversing Order A change that’s very weak by itself but that can add to security when used in conjunction with the others is to reverse the order of some or all letters. You might apply this to just one word of a two-word base. This could yield Bu3nn?EP and DttW9i+y, for instance.
Growing the Haystack A would-be intruder’s task of discovering a password has been likened to finding a needle in a haystack. One way to make this task harder is to increase the size of the haystack. In password terms, this means making a password larger. You can do this by using larger words or phrases, of course, but this can make a password harder to remember and type. Even a size increase that simply repeats a single character can be helpful. Thus you might turn the passwords into Bu3nn?EPiiiiiiiiii or Dtt!!!!!!!!!!!W9i+y.
The National Institute of Standards and Technology (NIST) is a nonregulatory U.S. agency. They publish many commerce recommendations, including business computer security. NIST proposals are typically turned into procedures for companies and government organizations. In 2017, NIST issued new guidelines regarding secure passwords, and surprisingly long complicated passwords are no longer recommended. However, it may take a while before the new NIST password guidelines filter down into your day-to-day world, if ever.
Your best tool for getting users to pick good passwords is to educate them. Here are some insights to share with users:
Passwords can be guessed by malicious individuals who know them or even who target them and look up personal information on social media, web-based telephone directories, business profiles, and so on.
Although Linux salts and hashes its passwords internally, programs exist that feed entire dictionaries through Linux’s password salting/hashing algorithms for comparison to a Linux system’s passwords. If a match occurs, the password has been found.
User accounts might be used as a first step toward compromising the entire computer or as a launching point for attacks on other computers.
Users should never reveal their passwords to others, even people claiming to be system administrators. This is a common scam, because real system administrators don’t need users’ passwords.
The same password should not be used on multiple systems, because doing so quickly turns a compromised account on one computer into a compromised account on all of them.
Writing passwords down or emailing them are both risky practices. Writing a password on a sticky note stuck to the computer’s monitor is particularly foolish.
Telling your users these things will help them understand the reasons for your concern, and it’s likely to help motivate at least some of them to pick good passwords.
Don’t Use These Passwords!
If you do a web search on common passwords or a similar phrase, you’ll quickly discover websites that provide surveys showing the most typical and easily guessed passwords that security researchers have uncovered. Details vary from one survey to another, but typically common passwords include the following:
123456
password
12345678
qwerty
111111
sunshine
iloveyou
princess
football
password1
Such passwords are easily discovered by brute-force password-guessing programs and are included in collections of passwords distributed on the Internet. Using such a password is barely better than using no password at all. Do yourself a favor and create a better one!
Creating Accounts Using GUI Tools
Now that you have some idea of what type of group policy you want to use and how to create a good password, you can begin creating accounts. Some distributions allow you to accomplish this task, at least partially, via a GUI tool. Such tools vary from one Linux distribution to another. Important variations include how you access these tools and the tool names. On several distributions, using the desktop’s search utility, you can type user to find the appropriate account creation utility. On other distributions, you will need to navigate through the desktop menus to locate the correct tool. The utility’s name may be something similar to Users, User Accounts, or User and Groups Administration.
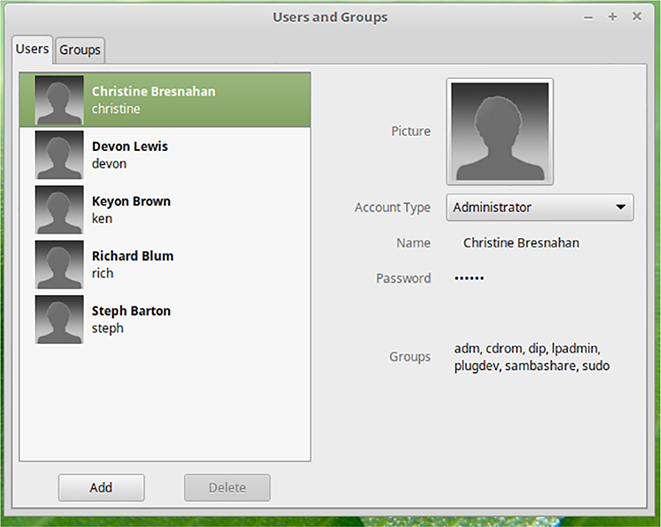
When you launch the Users and Groups Administration utility on Linux Mint, a dialog appears, prompting you to type your account’s password before you can proceed. If you have super user privileges, you’ll then see the utility screen in Figure 13.1.
As an example of a GUI user account management tool, Figure 13.1 shows Linux Mint’s User and Groups Administration utility. You can do a great deal more than add accounts with this particular utility. However, the focus here is on creating accounts.
Figure 13.1 The Linux Mint User and Groups Administration utility provides many options for creating and managing accounts.
To add a user with User and Group Administration, follow these steps:
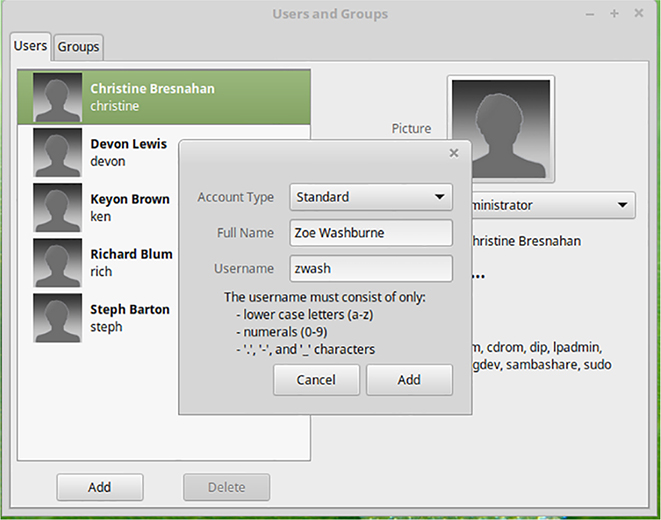
Click the Add button. The result is the dialog shown in Figure 13.2.
Type the user’s full name in the User’s Full Name field. This entry is stored in the comment field of /etc/passwd and may be displayed in various tools; for instance, it appears in some desktop environments when a user logs into the desktop.
Type the username in the Username field. This is what the user will type at Linux login prompts.
Click the Add button to finish creating the account.
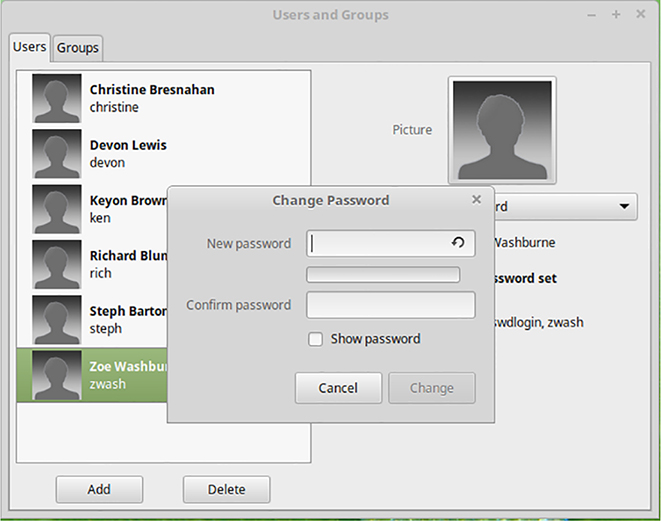
Click the username, and then click the words “no password set” in the account’s description to open the Change Password dialog shown in Figure 13.3.
Type the password twice, once in the Password field and again in the Confirm Password field.
When the utility considers the password strong enough, the Change button is available (not grayed out) for you to click in order to modify the password.
Figure 13.2 You can enter all the basic account information using this dialog.
The new account appear in the Users tab list. You can subsequently modify or delete it, as described later in this chapter.
Figure 13.3 Set the user account’s password using the Change Password dialog.
Creating Accounts from the Shell
With any distribution, you use the useradd utility to create an account from the command line. To use this utility, you type its name and the username that you want to associate with a new account. You may also include options between useradd and the username, as summarized in Table 13.1. The useradd command supports options in addition to those shown in Table 13.1; consult its man page for details.
Specifies the comment field for the user. (GUI tools generally describe this as the “full name.”)
--homehome-dir
-d
Specifies the account’s home directory. It defaults to /home/username.
--expiredateexpire-date
-e
Sets the date on which the account will be disabled, expressed in the form YYYY-MM-DD. The default is for an account that does not expire.
--inactiveinactive-days
-f
Sets the number of days after a password expires, after which the account becomes completely disabled. A value of -1 disables this feature and is the default.
--giddefault-group
-g
Sets the name or GID of the user’s default group. The default for this value is a new group named after the user.
--groupsgroup[,...]
-G
Sets the names or GIDs of groups to which the user belongs—more than one may be specified by separating them with commas.
--create-home
-m
When included with useradd, creates a home directory for the user. This option is typically enabled by default.
--skelskeleton-dir
-k
Normally, default user configuration files are copied from /etc/skel, but you may specify another template directory with this option, which is valid only in conjunction with -m.
None
-M
Forces the system not to automatically create a home directory.
--shellshell
-s
Sets the name of the user’s default login shell with this option. The default is /bin/bash.
--uidUID
-u
Creates an account with the specified user ID value (UID).
--non-unique
-o
Enables a single UID number to be reused; this option is passed when creating the second or subsequent account that reuses a UID.
--system
-r
Specifies the creation of a system account. useradd doesn’t create a home directory for system accounts, and it gives them UID values below 100.
--no-user-group
-N
Disables creation of a group for the user.
On Debian-based distributions, such as Ubuntu and Linux Mint, you can use a friendlier front end to the useradd utility by typing adduser. Be aware that on some distributions, such as Fedora, the adduser command, if available, is not a front end to the useradd utility but rather a link to it.
Some of these options aren’t readily accessible when you’re creating accounts using GUI tools, but the details differ from one GUI utility to another. In some cases, options can be set in a GUI utility after the account has been created but not when creating it.
A complete useradd command, including setting a few options, looks like this:
This example creates an account with a username hwash, a home directory, a comment field containing the user’s full name, and a UID of 1006. Notice in the preceding example that the sudo command was used to obtain super user privileges, a requirement to complete this command successfully.
You may want to specify a UID to keep these values synchronized across computers that share files with the Network File System (NFS), which identifies file ownership via UIDs.
When you create an account with useradd, it will be in a locked state—the user will not be able to log in. To unlock it, you must use the passwd command, as described next, in “Modifying Accounts.”
You can add a password with the useradd command’s -p option. However, for security reasons, this is not recommended. It is better to use the passwd command, as described later in this chapter.
Behind the scenes, useradd (or by extension its GUI front end) modifies the contents of the following files (described in detail in Chapter 12):
/etc/passwd
/etc/shadow
/etc/group
If you use --create-home or -m (or if this option is the default for your distribution), the program creates a home directory and copies files from /etc/skel to that location. Creating an account will also usually create a mail spool file in which the user’s incoming email will be stored. (This file may go unused on many desktop systems, but it can be important if you run mail server software on the computer.) You can see that useradd makes quite a few modifications to your computer’s files and directories in creating the account.
Modifying Accounts
As you’ve just learned, when creating an account you can specify many options that affect accounts, such as giving an account a specific UID number. Sometimes, though, it’s necessary to change account options after an account has been created. Fortunately, Linux provides both GUI and text-mode tools to help you do this. Before delving into operational details of these tools, though, you should understand when you might want to make changes to accounts and know how to check whether a user is currently logged in.
Deciding When to Modify Accounts
In an ideal world, you’ll create your accounts perfectly every time; however, sometimes this isn’t possible. You might lack information that’s necessary to create a flawlessly tuned account (such as the length of time an employee will be with a company), or your needs might change after the account has been created. Some common specific causes of account changes include (but are by no means limited to) the following:
Account expiration data may need to be updated. A contract employee might have their contract extended, for instance. Sometimes an expired account must be reenabled.
UID numbers may need to be synchronized with other computers in order to facilitate file sharing across computers or for other reasons.
Users’ home directories might change because you’ve added disk space and have to move some users’ home directories to a new location.
A user might forget a password. The system administrator can change the password for any account without knowing the original password, so system administrators frequently have to help users with faulty memories.
When working in a GUI, many of the preceding changes can be handled from the distribution’s GUI account management tool. When working in a text-mode shell, though, you’ll need to master a few different programs to handle this range of account modifications.
Checking for Logged-in Users
Be aware that some account changes could be disruptive if the user is logged in at the moment that you perform them. Changing the account’s username and home directory, in particular, are likely to cause problems. Therefore, you should make such account changes only when the user is logged out. Several tools can help you check who’s using the computer and thus avoid problems:
whoThis utility, described in Chapter 12, produces a list of users who are currently logged into the computer, along with some details of their login sessions, such as their terminal identifiers and login dates.
wThis command, also described in Chapter 12, is similar to who in broad strokes, but it provides different details. Most notably, it identifies the program that’s currently running in each session.
For a quick and simple list of who’s using the computer, most distributions offer the users command as well.
lastThis program produces a list of recent login sessions, including their starting and ending times, or a notice that the user is still logged in:
$ lastchristin pts/2 192.168.0.102 Tue Aug 20 11:46 still logged in[...]reboot system boot 4.10.0-38-generi Tue Aug 13 10:09 - 11:22 (01:12)ken tty4 Tue Aug 6 10:57 - 11:40 (00:43)devon tty3 Tue Aug 6 10:57 - 11:40 (00:43)steph tty2 Tue Aug 6 10:57 - 11:40 (00:43)rich pts/0 192.168.0.102 Tue Aug 6 10:56 - 11:40 (00:43)christin tty2 Tue Aug 6 10:34 - 10:57 (00:22)
One notable limitation of last is that it includes only text-mode logins. This makes its utility for identifying users who are currently using the computer rather limited, since such users are likely to be logged in using a GUI session.
The lastb command displays information similar to last, but it displays only failed login attempts and pulls its data from /var/log/btmp.
The last command displays data that is stored in the /var/log/wtmp file. You should be aware that some distributions do not create this file by default. See the last command’s man pages for more information.
Modifying Accounts Using GUI Tools
As with adding accounts, the procedure for modifying accounts using GUI tools varies from one tool to another. Most GUI tools provide similar options, although some are more complete than others. In this section, you’ll learn how to modify accounts using Linux Mint’s User and Group Administration utility.
To make such changes, after you have the User and Groups Administration utility open, click the account name and then click Item To Modify. An example is shown in Figure 13.4.
Figure 13.4 The User and Groups Administration utility enables you to edit a few account properties.
This dialog presents a few account properties. Each of the four items provides access to particular types of data:
Account Type The account type for the user Richard Blum is shown as Standard in Figure 13.4. A standard account, also called an unprivileged user account, was first described in Chapter 12. If you want this user to be able to acquire super user privileges when needed via the sudo command, select Administrator from the drop-down menu.
To use the sudo command, the administrator account will also need to be part of the sudo or wheel group, depending on your distribution. Adding accounts to groups is covered in the upcoming section “Managing Groups.”
Name As shown in Figure 13.4, you can adjust the account’s comment field (identified as Name). Name changes and, if your company wants job titles in this field, position advancements can be handled as well.
Password You can modify an account’s password by clicking the account’s Password field. A dialog appears, as shown earlier in Figure 13.3. The utility will not allow you to change the account’s password until it considers the password strong enough. If needed, you can have the utility set a strong password for you by clicking the circular arrow. In this case, you’ll need to check the Show Password box so that you can view the new setting.
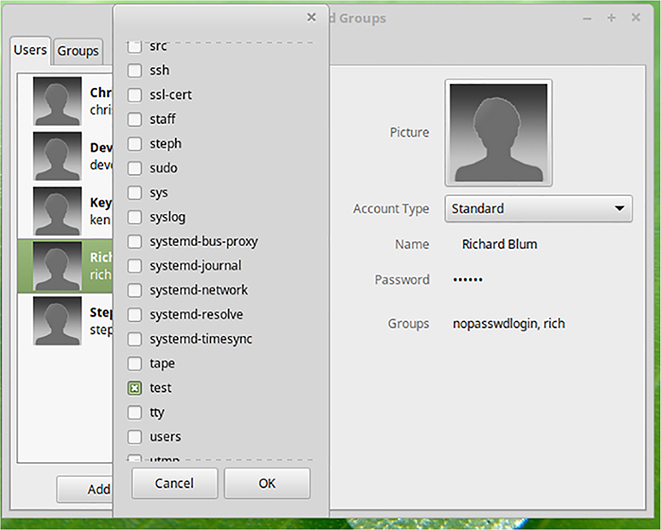
Groups To add this account to a new group, click the Groups setting. A dialog pops open, allowing to you to choose additional group memberships.
If you want to add the user to an entirely new group, you must first create the new group, as described in “Managing Groups.”
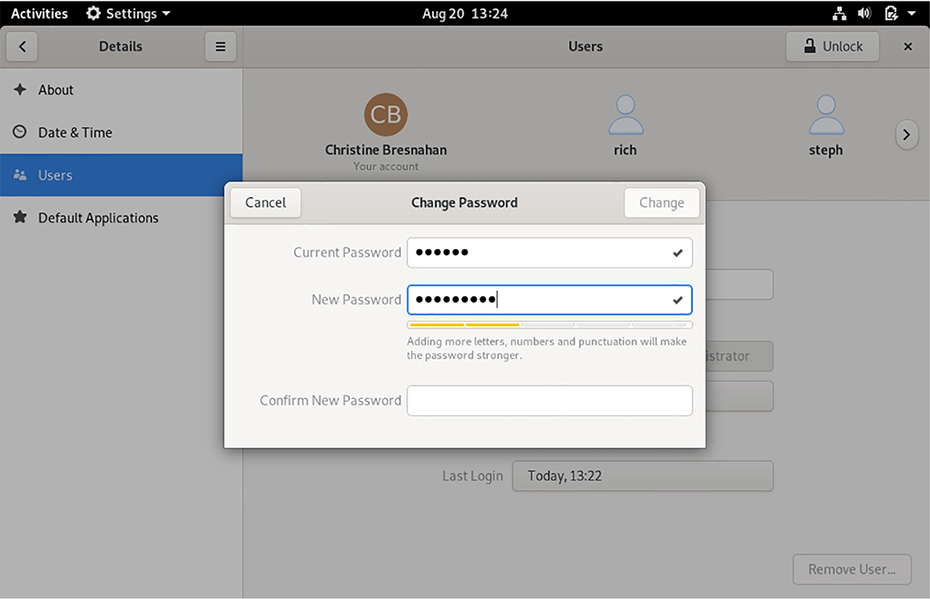
Users can change their own passwords by using GUI options in their desktop environments. For instance, on Fedora within the Users utility, a user’s account information automatically displays when the program is open. Click the password (displayed as a series of dots) to launch the Change Password screen, shown in Figure 13.5. Administrators can also use this tool to add and modify accounts.
Figure 13.5 The Users utility enables users to change their own passwords.
Modifying Accounts from the Shell
One of the most frequent account modifications is to change a user’s password, either as part of account creation or because a user has forgotten their password. You can make this change with the passwd program. Ordinary users can type passwd to change their own passwords, but not other user accounts’ passwords. Those with super user privileges, however, can pass a username to the command to change any account’s password:
$ sudo passwd hwashEnter new UNIX password:Retype new UNIX password:passwd: password updated successfully$
As a security measure, the password you type does not echo to the screen as you type it. If the passwords you type don’t match, the program refuses to accept your change and prompts you again for a fresh pair of passwords. The program also checks the password’s strength and may refuse to accept the new password or display a warning message if it deems the password to be too weak. Notice in the preceding example that the sudo command is used, indicating that the person changing the hwash account’s password has access to super user privileges, which are required to complete this command successfully.
In addition to setting passwords, the passwd utility enables you to adjust password expiration and aging options. Consult its man page for details.
You can handle most other account modifications by using the usermod program. This command works much like useradd, but instead of creating a new account, it modifies an existing one. Many usermod options are identical to useradd options. Table 13.2 summarizes the most important usermod options.
Used with --groups (-G), causes the specified groups to be added to (rather than replaced) the existing set of groups for the user.
--commentcomment
-c
Specifies the comment field for the user. (GUI tools generally describe this as the “full name.”)
--homehome-dir
-d
Specifies the account’s home directory. It defaults to /home/username.
--expiredateexpire-date
-e
Sets the date on which the account will be disabled, expressed in the form YYYY-MM-DD. The default is for an account that does not expire.
--inactiveinactive-days
-f
Sets the number of days after a password expires, after which the account becomes completely disabled. A value of -1 disables this feature and is the default.
--giddefault-group
-g
Sets the name or GID of the user’s default group. The default for this value is a new group named after the user.
--groupsgroup[,...]
-G
Sets the names or GIDs of groups to which the user belongs—more than one may be specified by separating them with commas.
--loginusername
-l
Changes the account’s username to the specified value.
--lock
-L
Locks the account’s password, preventing logins.
--move-home
-m
When this option is included with --home (-d), usermod moves the user’s existing home directory to the new location.
--shellshell
-s
Sets the name of the user’s default shell with this option.
--uidUID
-u
Changes the account’s UID number to the specified value.
--unlock
-U
Unlocks a locked account password.
For example, consider the following use of usermod:
$ sudo usermod -u 1072 -m -d /home2/hwash hwash
This command makes three changes to the hwash account:
It changes the UID value to 1072.
It changes the account’s home directory to /home2/hwash.
It moves the contents of the account’s original home directory to its new location.
You might issue a command like this one if you were migrating user accounts to an NFS server mounted at /home2. Such a change might require a new home directory location and a change in the UID value to match the one used on the NFS server.
Be careful when making changes to the UID value, because although usermod changes the UID values of files in common locations such as the user’s home directory and email files, it can miss user files in unusual locations.
If you need to make group changes that require adding new groups, consult the upcoming section, “Managing Groups,” for information on that topic.
Deleting Accounts
Deleting accounts can sometimes be as important as adding or modifying them. Unused accounts can be abused, either by their former owners or by others who might be able to break into an account if it has a weak password. Therefore, you should routinely delete unused accounts. Before you do so, though, you should understand what happens when you delete an account and decide precisely how to do it, lest you create problems by deleting an account in an inappropriate way. With that knowledge in hand, you can delete accounts by using either GUI or text-mode tools.
Avoiding Account Deletion Pitfalls
Deleting an account may sound simple enough, but a mistake can cause problems, either immediately or in the future. In addition to obvious issues such as accidentally deleting the wrong account, consider these two factors:
User File Preservation Users’ files might be extremely valuable, either to the users themselves or to the organization that owns the computer. You should check your company’s file retention policies when considering whether to delete the user’s home directory or do something else with it, such as move it into another user’s home directory and change permissions on the files it contains. The same is true of the user’s mail queue (normally stored in /var/spool/mail/username, where username is the account’s username).
Consider archiving a deleted account’s home directory to a long-term backup medium. This strategy will enable you to recover the files should they become valuable in the future.
UID and GID Reuse When an account is deleted, the account’s UID and GID become available for reuse. In many cases, these numbers will not be reused, since most Linux distributions assign these values based on the highest current value. If you delete any but the highest-numbered current user, the user’s old UID and GID numbers won’t be reused unless intervening accounts are also deleted. Nonetheless, if a UID is reused, any files previously owned by the old user will suddenly appear to be owned by the new user. This may not cause any problems, but it may cause confusion about who created the files. In some cases, it can even cause suspicion of wrongdoing by the new user (if the old files contain information the new user shouldn’t have, or if the files reside in directories to which the new user shouldn’t have access).
To avoid any chance of confusion or misbehavior claims falling on new users due to UID or GID reuse, you can use the find command (covered in detail in Chapter 8, “Searching, Extracting, and Archiving Data”) to locate all files with particular UID or GID values. You must use the -uid and -gid options, as shown here:
$ sudo find / -uid 1004
While you can issue this command without using super user privileges, it will return errors and may miss some files. Therefore, it’s best to use find in this manner with super user privileges.
Our previous example finds all files on the computer with a UID of 1004. (Searching on a GID works the same way but using the -gid option.) You can then reassign ownership of these files by using the chown command (covered in Chapter 14) or delete them. Ordinarily, you’d issue this command only after deleting or reassigning ownership of the user’s home directory, since that directory will probably contain far too many matching files.
Deleting Accounts Using GUI Tools
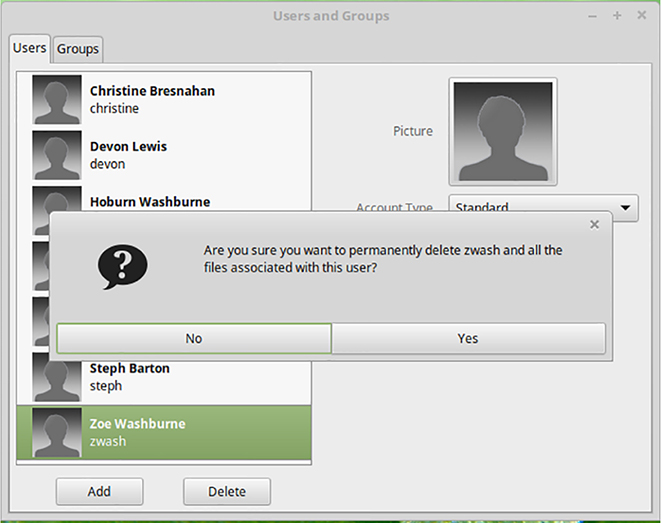
As with other account management tasks, using a GUI is fairly intuitive, but details vary from one distribution to another. As an example, to delete an account from Linux Mint’s User and Groups Administration utility, after you have the utility open, click the account and then click the Delete button. The result is a confirmation dialog similar to the one shown in Figure 13.6. If you’re certain of the action, click the Yes button. The account will be immediately deleted.
Figure 13.6 When you delete an account with a GUI utility, you are typically asked to confirm the action.
If the user is currently logged in, the utility will often complain about this fact. You’ll most likely still be able to delete the account, but the user won’t be logged out immediately.
Deleting Accounts from the Shell
The userdel command deletes accounts from a text-mode shell. In its simplest form, using super user privileges you pass it a username and nothing more:
$ sudo userdel hwash[sudo] password for christine:
The program doesn’t prompt you for confirmation; it just deletes the account. It does not, however, delete the user’s home directory by default. To have it do so, pass it the --remove (-r) option.
If the user is currently logged in, userdel notifies you of that fact and does nothing. You can pass it the --force (-f) option to delete the account even though it’s in use. To both force account deletion and remove the user’s files, you can pass both options:
$ sudo userdel -rf zwash[sudo] password for christine:userdel: user zwash is currently used by process 4800$
The program still complains about the user being “used by a process” (logged into the system), but it deletes the account and files just the same.
Managing Groups
In many respects, groups are comparable to accounts. They’re defined in similar files and managed with similar utilities. Groups are also tied to accounts in that accounts include group definitions. Until now, it has been assumed that you’ll be using standard groups or the groups that are defined as part of account creation. Sometimes, though, you need to create, delete, or modify groups for specific purposes, such as if you use a project group strategy. Just like account management, you can use either GUI or text-mode tools.
Managing Groups Using GUI Tools
Many GUI account maintenance tools, such as Linux Mint’s User and Groups Administration utility, provide group management tools that are similar to the user management tools described throughout this chapter. Referring back to Figure 13.1, you’ll see that the User and Groups Administration window includes both Users and Groups tabs. To manage groups, click the Groups tab. This produces a display resembling Figure 13.7.
Figure 13.7 The User and Groups Administration utility enables you to manage groups as well as users.
You can add, modify, and delete groups in a manner that’s comparable to adding, modifying, and deleting accounts, though the number of options available may be much smaller. Groups don’t have home directories, comment fields, login shells, and so on. You might, of course, want specific users to be members of your new group from the start. To do so, follow these steps:
Create a group by clicking the Add button on the Groups tab.
Specify the group name in the resulting dialog box.
Add the group by clicking OK.
Add group members by selecting the Users tab, selecting the account’s username, and clicking the current groups in the Groups field to open a dialog.
Select the new group name check box in the dialog to make that account a member, as shown in Figure 13.8, and click OK.
You don’t have to add the account to only one group at a time. You can click multiple groups in the dialog to add the account to several groups at once.
Alternatively, you can manage group membership by altering each user’s group membership individually, as described next in “Managing Groups from the Shell.”
Figure 13.8 You can add users to a group after creating the group.
The wheel Group
Linux distributions invariably provide several groups by default. One of these, wheel (on some distributions), is particularly important for system administration. Members of the wheel group are granted certain special administrative privileges, such as the right to use the sudo command. The group name comes from the slang term big wheel, which refers to an important person.
Not all distributions provide this particular group—for example, Linux Mint uses the sudo group to allow access to the sudo command. You can type grep wheel /etc/group to determine whether the wheel group exists on your distribution. If it does, see if membership in this group provides access to the sudo command by typing grep wheel /etc/sudoers and look for a result similar to %wheel ALL=(ALL) ALL.
Some distributions enable you to add your primary user account to the wheel group when you install the OS. Be aware that this phrasing is not used often; instead, the installer asks if you want to add the account to the “administrators group” or some similar term.
Managing Groups from the Shell
You can create groups from the shell by using the groupadd command, which works much like useradd for users but takes a smaller set of options, the most important of which appear in Table 13.3. Consult the program’s man pages for information on more obscure options.
Provide a specific GID. If you omit it, groupadd uses the next available GID.
--system
-r
Instruct groupadd to create a system group, which is one with a GID of less than 500 or 1,000, depending on the distribution. Nonsystem groups are normally used as user private groups.
--force
-f
Normally, if you try to create a group that already exists, groupadd returns an error message. This parameter suppresses that error message.
Using the groupadd command, including setting an option, looks like this:
# groupadd -g 1001 consultants
This example creates a group with a GID of 1001 and a group name of consultants. Notice in the preceding example that the # prompt is shown, indicating that the root account was used to obtain the super user privileges required to complete this command successfully.
After the group is added, new members can be added to the group. This requires the use of the usermod command and super user privileges, as follows:
# usermod -aG consultants rich## groups richrich: users consultants
The -aG options were used together to add the account, rich, to the new consultants group. If the -a option was not used, the rich account on some distributions would be removed from its current group memberships and belong only to the consultants group. Thus, it is wise to use -aG by default.
You can check an account’s primary group. Using super user privileges type id -gn username at the command line. The username’s primary group will display.
Another good habit is to check if the modification was successful by using the groups command. The groups command shows all the group memberships for the specified user account.
To modify the group itself, you can use the groupmod command. The --gid (-g) and --non-unique (-o) options from Table 13.3 can be used with this command, as well as --new-namename (-nname), which changes the group’s name.
Deleting groups from the shell involves use of the groupdel command, which takes a group name as a single option, as in groupdel consultants to delete the consultant group.
Summary
In a GUI environment, you can perform most common account maintenance tasks with GUI tools, which enable you to add, modify, and delete accounts by selecting options from menus and lists. Some operations, however, require you to use command-line tools, such as useradd, usermod, userdel, and passwd. (The groupadd, groupmod, and groupdel commands provide similar functionality for groups.) Even if you don’t need to use the more obscure features provided by the text-mode tools, they can be quicker to use than the GUI tools once you’re familiar with them.
Exam Essentials
List the various files involved in account creation and management. When an account is created on a Linux system, the /etc/passwd and /etc/shadow files get new records in them for the account. The /etc/group file also receives a new record for a newly created account, because by default a group is created with the same name as the account. These three files lose records when an account is deleted. By the same token, records in the files are changed when certain modifications are made to accounts.
When an account is created, a home directory is also produced, and files from the /etc/skel/ directory are copied into it. This home directory is typically named /home/username, but the name can be different based on the distribution’s account creation configuration.
Summarize the tools used for account creation and management. The tools used to create, modify, and delete accounts are useradd, usermod, and userdel, respectively. The passwd command also modifies or sets an account’s password.
Outline the utilities used for group creation and management. The utilities used to create, modify, and delete groups are groupadd, groupmod, and groupdel, respectively. The groups command allows you to view all the various group memberships for a particular account. The id -gn command shows a user’s current primary group.
Describe the commands used to determine logged-in users. Before modifying an account, it is a good idea to ensure the account user is not currently logged into the system. To learn who is currently online besides yourself, the who utility works, but the w command provides more information. The last program will display any users who are still logged on the system, as well as recent login sessions, including their starting and ending times.
Review Questions
You can find the answers in Appendix A.
What would a Linux system administrator type to remove the nemo account and its home directory?
userdel nemo
userdel -f nemo
userdel -r nemo
rm /home/nemo
rm -r /home/nemo
Of the following, which is the best password?
LinusTorvalds
uB2op%4q++7K9_z5A++
123456
password
peanutbuttersandwich
Describe the effect of the following command, assuming that it completes successfully:
# groupadd henry
It creates a new group called henry.
It adds the user henry to the current default group.
It imports group information from the file called henry.
It changes the user’s default group to henry.
It adds the group henry to the user’s list of groups.
True or false: User accounts have higher UID numbers than do system accounts.
True or false: Command-line users should normally use usermod to change their passwords.
True or false: After deleting an account, files formerly owned by the deleted account may remain on the computer.
You want to create an account for a new user, using the username thor and giving the user a UID of 2019. The command to do this is useradd _______.
-uid 2019 thor
-g 2019 thor
+uid 2019 thor
-u 2019 thor
2019 -u thor
You want to change the username of a user from carol to marvel without altering anything else about the account. To do so, you would type _______.
useradd -l marvel carol
usermod -l marvel carol
useradd -l carol marvel
usermod -l carol marvel
useradd --login carol marvel
To create a system group, you must pass _______ the option to groupadd.
-system
-s
--sys
--r
-r
Information on various groups, such as group name, GID, and group members, is stored in the ____________ file.

 Linux is a multiuser OS, meaning that a single Linux computer can support many users, each with a unique account. With this capability comes the need to manage users’ accounts, and this chapter covers the procedures you’ll use to do so.