
Chapter 4
Navigating the Organizer
IN THIS CHAPTER
![]() Organizing your photos on your computer
Organizing your photos on your computer
![]() Importing photos into the Organizer
Importing photos into the Organizer
![]() Exploring the Media Browser
Exploring the Media Browser
![]() Scanning photos and artwork
Scanning photos and artwork
![]() Acquiring photos from cellphones and tablets
Acquiring photos from cellphones and tablets
![]() Using Preferences
Using Preferences
Do you treasure your color-coded filing system and own a special sock drawer organizer? Or are you more inclined to hand your accountant a plastic grocery sack of statements and receipts to sort out for you when tax-filing season comes around?
We’re not here to judge. Whatever your organizational style, you’ll like the Elements Organizer. The Organizer gives you myriad ways to tag and rate your images, but it also provides tools that automate some of the work.
Before you get started with all the organizational tools, you need to import images into the Elements Organizer. That’s what this chapter is all about.
You have many ways to import a picture into Elements. We walk you through an easy method for importing images from cameras and card readers into the Organizer. We also help you import images from CDs, DVDs, a scanner, or your phone and tablet.
Organizing Photos and Media on a Hard Drive
Photos and media hog most of the available storage space on the average consumer’s computer. If you’re anything like us, you grab a ton of photos and videos with your digital camera, smartphone, and maybe a tablet, too. Even if you faithfully transfer images from all these different sources to your computer, you can end up with a real mess of photos — all with inscrutable filenames such as DS603_Azb42.jpg.
 If all the photos on your hard drive are organized into folders, you’ll have an easier time managing those photos in the Elements Organizer. We recommend that you organize your image files in folders before you start working with Elements.
How you label your folders is a personal choice. You may want to name the folders by year and use subfolders for organizing photos by events, locations, photo content, and so on. In Figure 4-1, you can see just one example of how you might organize your photos on a hard drive.
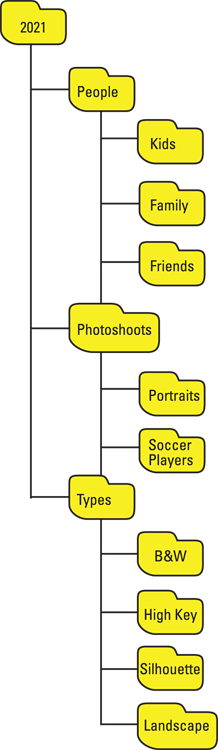
FIGURE 4-1: Organize photos and media in folders and subfolders on your hard drive.
After you organize your photos into folders, you can use the Organizer to import files from folders, as we explain later in the section “Adding files from folders and removable media.”
 If your image files gobble up too much space on your computer’s hard drive, we recommend storing all your photos on an external drive instead. Fortunately, the price of large-capacity drives is well within the reach of most people who own a computer, digital camera, or smartphone. Depending on how many photos you take (or image files you create), look for a 1TB to 4TB USB drive that attaches to your computer. Use the drive only for your photos, videos, and other media, and don’t copy other data files to it. When all your image and media files are in one place, keeping them organized on that drive becomes much easier.
Adding Images to the Organizer
To use the Elements Organizer, you need to import the images into the Organizer.
You have several options for downloading photos from your camera and other devices to your computer:
- Using AutoPlay Wizards for Windows and Assistants on the Mac
- Importing photos directly from Photos (formerly iPhoto) if you use a Mac
- Using the Photoshop Elements Downloader
The built-in downloaders from your operating system attempt to make your life easier, but in reality, it may be more difficult to struggle with a downloader application and later organize files in folders (as we recommend earlier in this chapter).
Perhaps the easiest method for transferring photos from a camera or card reader is to quit the operating system’s downloader application or any camera-specific applications and just stay with the tools that Photoshop Elements provides you.
The following sections introduce you to the tools available for adding images to the Organizer. If you’ve already organized images on your hard drive or other media into folders, the Get Files from Folders command can help. If images are still on your camera, the Elements Downloader enables you to download images from your camera into the folder where you want to keep the images, using whatever folder organization system you’ve created; the Elements Downloader also imports the images into the Organizer at the same time.
Adding files from folders and removable media
Most people have photos on their computer’s hard drive, as well as on removable media, such as CDs or maybe even a USB flash drive. Adding images from your hard drive to the Organizer is easy. If you have a source, such as a USB flash drive or a CD, you copy files from the source to the drive where you store photos. Or you can copy files into the Organizer directly from the removable media.
The following steps explain how to import images from your hard drive into the Organizer Media Browser:
-
Click the Import button in the top-left corner of the Organizer to open the drop-down list and choose From Files and Folders.
Alternatively, you can choose File ⇒ Get Photos and Videos ⇒ From Files and Folders.
The Get Photos and Videos from Files and Folders dialog box opens, as shown in Figure 4-2.
When you first click the Import button or choose File ⇒ Get Photos and Videos ⇒ From Files and Folders, the dialog box appears, showing you some information regarding importing photos. Click the Start Importing button or the Skip button to continue importing photos. After you click the Start Importing button, another dialog box appears, prompting you to use the Auto Tagging feature. For more on creating tags, see Chapter 5.
-
Browse your hard drive for the photos you want to add.
You can navigate your computer and any connected external drives or media devices in the left-hand pane. (For example, if you’ve connected a USB drive of photos or loaded a CD of images into your CD drive, you can navigate to those photos here.) The contents of the selected drive or folder appear in the middle pane of the dialog box.
If you’re importing photos directly from the external device, by default, the Get Photos and Videos from Files and Folders dialog box copies your media to your hard drive when you click the Get Media button. You can deselect the Copy Files on Import check box so that only thumbnail images will appear in the Media Browser. To edit a photo, you have to reconnect the CD or DVD to your computer. If you elect to copy the images, the photos are available for editing each time you start a new Elements session. You can keep photos and videos on external drives and don’t need to copy the images to your internal hard drive. Create a catalog specifically for a particular drive and open that catalog when you connect the drive. In this regard, you can have several external drives, each with its own catalog. For information on creating a new catalog, see Chapter 6. -
Select the files or a folder that you want to import.
You can import individual images, a single folder of photos, or a folder and all its subfolders.
- Click the Get Media button.

FIGURE 4-2: The Get Photos and Videos from Files and Folders dialog box.
When you add files to the Organizer, the image thumbnails are links to the files stored on your drive. They aren’t the complete image data.
If you want to import a single photo and you want to know the file attributes of the targeted photo, place the cursor over a photo and a tooltip displays file attribute information.
Downloading camera images with the Elements Downloader
Import photos from your camera to the Organizer as follows:
-
Insert a media card from a camera or attach a camera to your computer via a USB port.
We recommend using a media card instead of attaching your camera, in case the battery is low on your camera. (If the battery runs out, the import stops.) If you have a media card for your camera, take it out and insert it into a card reader that you attach to your computer via a USB port or a built-in card reader in your computer. - If you see an Autoplay Wizard on Windows or a dialog box for importing photos into Photos on the Mac, cancel out of the dialog box and let Elements control your import. Otherwise, skip to Step 3.
-
In Elements, open the Organizer workspace and choose Import ⇒ From Files and Folders. Or choose File ⇒ Get Photos From Camera or Card Reader.
The Elements Organizer – Photo Downloader opens, as shown in Figure 4-3.
- From the Get Photos From drop-down list at the top of the dialog box, choose your media card.
-
Click the Browse button (Choose on Mac) and locate the folder on your drive to which you want to copy the photos.
If you don’t click the Browse button and select a folder, all files copied to your hard drive are copied to the User Pictures folder. This is the default for Photoshop Elements. If you use an external hard drive to store your photos, you’ll want to copy photos to the external drive. When you select a folder, select the one that fits the overall folder organizational structure for your images so that your image files stay organized. You can also create a new folder and add files from your media to the new folder. Click Advanced Dialog in the lower-left corner. Another dialog box opens. Click Browse and create a new folder in the Browse dialog box.You can leave the rest of the settings at the defaults or rename the photos here. You can also take care of file renaming in the Organizer later. Don’t delete the photos from your card just in case you delete some photos in the Organizer and want to retrieve them. After you’re certain everything in Elements is to your liking, you can later delete photos by using your camera.
When renaming images, try to use a system that you easily comprehend. Use descriptive names such as family2.20, Spain3.19, photoshootKelley, and so on, including dates or other descriptors such as the kind of event or the people photographed.The Downloader has an Advanced dialog box that you access by clicking the Advanced Dialog button. In the Advanced settings, you can make choices for things like correcting for red eye, creating photo stacks, and editing photo data that we call metadata. (We explain metadata in Chapter 6.) Because you can handle all these tasks in Elements, just leave the Advanced settings at their defaults.
-
Import photos by clicking the Get Media button in the Photo Downloader dialog box.
Elements adds the photos to the Organizer, and you eventually see thumbnail images in the Organizer’s Media Browser after the upload completes. Give Elements some time to finish. If the Auto-Analyzer is on in your Preferences, Elements will run through facial recognition and add similar faces to different clusters. We address facial recognition in depth in Chapter 5.
When you import images in the Organizer, by default the images are auto analyzed for visual similarity in addition to the facial recognition analysis.

FIGURE 4-3: The Elements Organizer – Photo Downloader opens.
Importing additional photos from folders
Suppose you have your folders organized and photos copied to various folders. You take some more pictures of the same location and want to add these photos to a folder you already have labeled as a location name. To add pictures to a folder on your hard drive or external drive, follow these steps:
-
Copy photos from a CD or a media card, to your hard drive or external drive.
In this example, we want to copy photos to a folder we have labeled Bernadette.
-
In the Organizer, choose File ⇒ Get Photos and Videos ⇒ From Files and Folders.
The Get Photos and Videos from Files and Folders dialog box opens.
-
Select the folder on your hard drive where you copied the new photos.
In this case, we select the folder labeled Family.
-
Click the Get Media button.
The Getting Media dialog box appears, and the photos are added to the Organizer (see Figure 4-4).
-
Click OK in the Getting Media dialog box.
Photoshop Elements is smart enough to import only new images into the Organizer. Any images you previously imported from a given folder are listed in the Getting Media dialog box, and you’re informed that the old images will not be imported.

FIGURE 4-4: Folder names appear in the Import panel.
Navigating the Media Browser
When you add photos to the Organizer, the photos and any additional media appear as thumbnails in the central portion of the Organizer — known as the Media Browser.
After files are imported into the Organizer, you see just those photos you imported in the Media Browser. Similarly, when you click a folder in the Import panel, only the photos within the selected folder display in the Media Browser. To see all the photos in your catalog, click the All Media button at the top of the Media Browser.
The Import panel is the list of folders on the left. You can collapse the panel to provide more viewing area in the Media Browser. Just click the Hide Panel button in the lower-left corner of the Organizer workspace (see Figure 4-5).
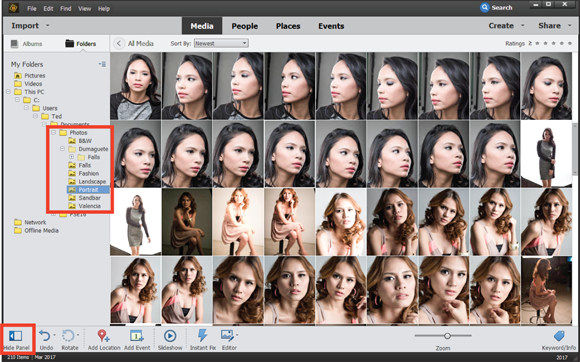
FIGURE 4-5: Photos are displayed in a Tree view in the Import panel. The Hide Panel appears in the lower-left corner of the window.
The Import panel offers two different views:
- List view: By default, you see the folder List view that shows all folders imported in alphabetical order. If you have photos in subfolders, the Folder List view doesn’t reflect the hierarchy for how your photos are organized on your hard drive.
-
Tree view: To see a different view in the Organizer, click the drop-down list and choose View as Tree, and you change the Import panel view to the hierarchy view, as shown in Figure 4-5.
If you have a touchscreen monitor or device, you can swipe photos to view them one at a time.
If you don’t see the details below the photos, or the photos don’t appear in grid view, press Ctrl+D (⌘ +D) to change the Media Browser view.
Using a Scanner
Scanners connect through the same ports as cameras and card readers — typically a USB port.
Even the lowest-end scanners provide 16-bit scans that help you get a little more data in the shadows and highlights. As with a digital camera, a scanner’s price is normally in proportion with its quality.
Understanding image requirements
All scanning software provides you with options for determining resolution and color mode before you start a new scan. Chapter 2 introduces you to choosing a resolution and color mode.
You should decide what output you intend to use and choose your resolution based on that output. Some considerations include the following:
- Scan the artwork or photo at the size and resolution for the final output. If you have a 3-x-5 photo (216 x 360 pixels) that needs to be half the size (108 x 180 pixels) on a web page, scan the original with a 50-percent reduction in size at 72 ppi (the desired resolution for images on the web).
- Size images with the scanner software. If you have a 4-x-6 photo that needs to be output for prepress and commercial printing at 8 x 12 inches, scan the photo at 4 x 6 inches at 600 ppi (a resolution that’s large enough to increase the image size to 200 percent and still have a 300 dpi [dots per inch] image, which is the desired resolution for a print).
- Scan properly for line art. Line art is 8-bit black and white only and should be used for scanning not only black-and-white artwork but also text. When you print line art on a laser printer or prepare files for commercial printing, the line-art resolution should match the device resolution. For example, printing to a 600 dpi laser printer requires 600 ppi for an 8-bit line-art image.
- Scan grayscale images in color. In some cases, it doesn’t matter, but with some images and scanners, you can get better results by scanning grayscale images in RGB (red, green, and blue) color and converting to grayscale, as we explain in Chapter 11.
- Scan in high-bit depths. If your scanner is capable of scanning in 16- or 32-bit, by all means scan at the higher bit depths to capture the most data. A higher bit depth gives you more latitude when editing photos.
Using scanner plug-ins (Windows)
Generally, when you install your scanner software, a stand-alone application and a plug-in are installed to control the scanning process. Plug-ins work inside other software programs, such as Photoshop Elements. When you’re using the plug-in, you can stay right in Elements to do all your scanning. Here’s how it works:
- After installing a new scanner and the accompanying software, open the Organizer.
-
Press Ctrl+K to open the Preferences dialog box.
The Preferences dialog box opens.
- Click Scanner in the left column and adjust the Scanner preferences, such as by choosing your scanner, setting the quality, and choosing a target destination for your scans.
When the Preferences dialog box displays your scanner, you know that the connection is properly set up and you’re ready to scan. Here’s how to complete your scan:
- In the Organizer, choose File ⇒ Get Photos ⇒ From Scanner (Windows).
-
In the Get Photos from Scanner dialog box that appears (as shown in Figure 4-6), make your choices and then click OK.
Here you can choose your scanner in the Scanner drop-down list, a location on your hard drive for saving the scanned images, a quality setting, and an option to automatically correct red eye.
Elements may churn a bit, but eventually your scanner software window appears atop the Organizer, as you can see in Figure 4-7. The window is the scanner software provided by your scanner manufacturer. (Your window will look different from Figure 4-7 unless you use the same scanner we use.)
-
Preview the scan.
Regardless of which software you use, you have similar options for creating a preview; selecting resolution, color mode, and image size; scaling; and other options. If you click the Preview button, you see a preview before scanning the photo(s).
- Adjust the options according to your output requirements and the recommendations made by your scanner manufacturer.
-
When everything is ready to go, click the Scan button.
The final image drops into an Elements image window.
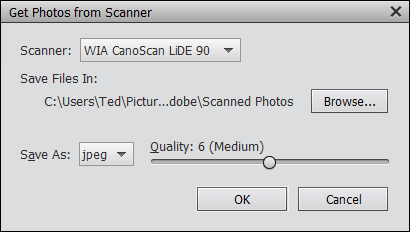
FIGURE 4-6: Make choices in the Get Photos from Scanner dialog box and click OK.
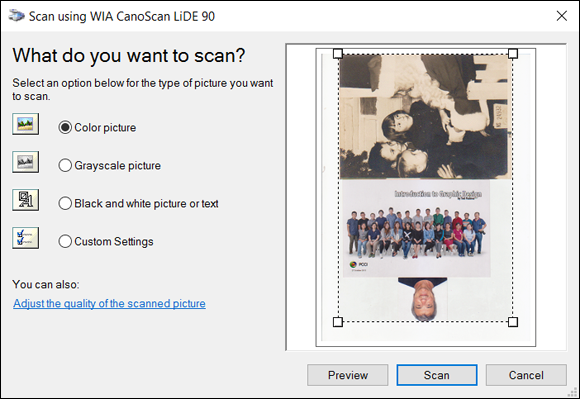
FIGURE 4-7: When you scan from within Elements, your scanner software window loads on top of the Elements workspace.
Scanning on the Mac
Photoshop Elements doesn’t support scanning on the Mac as it does for Windows. On the Mac, you have a few options:
- Scanner software: You can use your scanner software and open the resulting scan in the Elements Photo Editor.
- Image Capture: With Image Capture (found in your Applications folder), you can complete a scan and open the file directly in Elements. Image Capture provides options for saving scans as JPEG, TIFF, PNG, or PDF. Quite often, you’ll find best results when saving as PNG.
Scanning many photos at a time
If you have several photos to scan, you can lay them out on the scanner bed and perform a single scan to acquire all images in one pass. Arrange the photos to scan on the glass and set up all the options in the scanner window for your intended output. When you scan multiple images, they form a single scan, similar to what you see in Figure 4-7.
After you scan multiple images, Elements makes it easy for you to separate each image into its own image window, where you can save the images as separate files. In the Photo Editor, choose Image ⇒ Divide Scanned Photos to make Elements magically open each image in a separate window while your original scan remains intact. The images are neatly tucked away in the Photo Bin, where you can select them for editing, as shown in Figure 4-8. (For more information on using the Photo Editor and working with the Photo Bin, see Chapter 3.)
When scanning multiple images and using the Divide Scanned Photos command, be sure to keep your photos on the scanner bed aligned vertically, horizontally, and parallel to each other the best you can. Doing so enables Elements to do a better job of dividing and straightening your photos.
If you close one of the images that were divided, Elements prompts you to save the image. Only the scan was saved when you started the process. You still need to save the divided scans.
After dividing the images, choose File ⇒ Close All. Elements closes all files that have been saved and individually prompts you to save all unsaved images.

FIGURE 4-8: The scan is split.
Phoning in Your Images
You can acquire images from iPhones, iPods, iPads, Androids, and a variety of different handheld devices. As a matter of fact, you can do quite a bit with uploading, downloading, and preparing photos for handheld devices.
If you want to add images from a mobile device to the Organizer or open images in one of the editing modes, you need to copy files to your hard drive via a USB or Bluetooth connection or download an email attachment of the photos if your phone can use email.
Follow these steps after copying files to your hard drive:
-
Choose File ⇒ Get Photos and Video ⇒ From Files and Folders.
The Elements Organizer – Photo Downloader dialog box opens.
-
Locate the folder into which you copied the files and add them to your Organizer.
Or you can open them in one of the editing modes.
With an iPhone, iPod touch, or iPad, you can use the Photo Downloader to transfer media.
-
Hook up the device with a USB cable.
The Photo Downloader opens automatically. If the downloader doesn’t open automatically, you may have to open it manually.
- Click the Browse button, as shown in Figure 4-9, to open the Select Directory to Store Files window and select a destination folder.
- Click the Select Folder button to identify where the photos are saved.
- Click the Get Media button to download the photos to your computer.
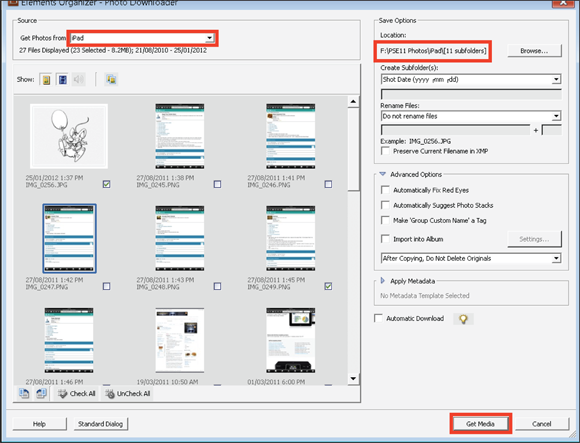
FIGURE 4-9: Get media from your phone to your computer.
To upload Elements creations and edited photos to your iPhone, iPad, or iPod touch, use Apple’s iTunes:
- In iTunes, choose File ⇒ Add Files to Library.
-
Select the images and videos from a folder on your hard drive that you want to upload to the device.
When uploading photos to an iPhone or iPad, use only the formats these devices support, such as JPEG, TIFF, GIF, and PNG. - Hook up the iPhone or iPad and then click the Photos and/or Videos tab at the top of the iTunes window.
-
Select the check box for each item you want to upload and then click the Sync button.
Your files are uploaded to your device while the sync is in progress.
You can bypass iTunes with the iPad by using the Camera Connection Kit (older iPads) or the Lightning Adapter (newer iPads), provided by Apple for $29.95. The kit supports only SD cards, but you can attach many different types of card readers to the USB port on the Camera Connection Kit and use other media cards. Copy files from the Organizer to the media card and use it as you would use an external media source to share photos back and forth between your computer and the iPad.
Setting Organizer Preferences
Throughout this book, we often refer to making some choices in the application Preferences. The Organizer and the Photo Editor have a set of preferences that you open by choosing Edit ⇒ Preferences (Windows) or Photoshop Elements Organizer ⇒ Preferences (Mac). Each set of preferences has several panels. When you click an item in the left pane, options for the respective item appear in the right pane. After making your choices, click OK, and the preferences remain for all subsequent sessions in the Organizer.
If your computer has only 8G or less of RAM, you may find Elements performing very slowly. One of the items that slows down a computer running Elements with less than 16G of RAM is Media-Analysis. By default, Face Recognition and Media-Analysis are turned on. To turn off the auto analysis operations, be in the Organizer and press Ctrl/⌘ +K to open the Organizer Preferences panel. Click Media-Analysis and deselect all the check boxes, as shown in Figure 4-10. Click OK, and the auto run operations of Media-Analysis will stop.
Many preference items are self-explanatory. When you need some detail on making a preference choice, refer to the Adobe Help file, which you can find by choosing Help ⇒ Elements Organizer Help.
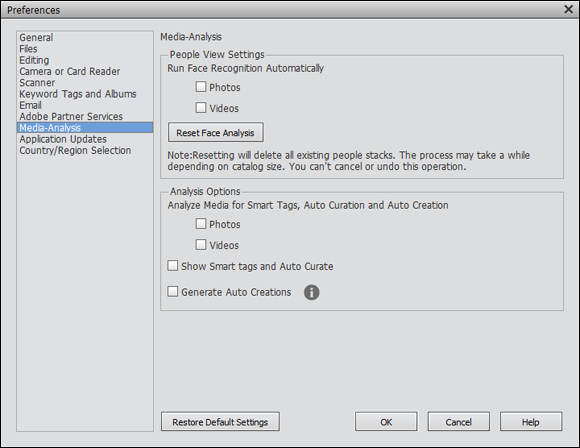
FIGURE 4-10: Open the Organizer’s Preferences and deselect all the Media-Analysis items.