
Chapter 13
Drawing and Painting
IN THIS CHAPTER
![]() Choosing colors and drawing with Pencil and Brush
Choosing colors and drawing with Pencil and Brush
![]() Filling and outlining your selections
Filling and outlining your selections
![]() Pouring color with the Paint Bucket tool
Pouring color with the Paint Bucket tool
![]() Creating gradients and patterns
Creating gradients and patterns
![]() Creating and editing shapes of all sorts
Creating and editing shapes of all sorts
Elements is such a deluxe, full-service image-editing program that it doesn’t stop at giving you tools to select, repair, organize, and share your images. It figures that you may need to add a swash of color, either freeform with a brush or pencil, or in the form of a geometric or organic shape. Don’t worry: This drawing and painting business isn’t just for those with innate artistic talent. In fact, Elements gives you plenty of preset brushes and shapes to choose from. If you can pick a tool and drag your mouse, you can draw and paint.
Choosing Color
Before you start drawing or painting, you may want to change your color to something other than the default color of black. If you read the earlier chapters in this book, you may have checked out the Elements Tools panel and noticed the two overlapping color swatches at the bottom of the panel. These two swatches represent two categories of color: foreground and background.
 Here’s a quick look at how they work with different tools:
- Foreground: When you add type, paint with the Brush tool, or create a shape, you’re using the foreground color.
- Background: On the background layer of an image, when you use the Eraser tool, or when you increase the size of your canvas, you’re revealing the background color.
- Foreground and background: When you drag with the Gradient tool, as long as your gradient is set to the default, you’re laying down a blend of color from the foreground to the background.
Elements gives you three ways to choose your foreground and background colors: the Color Picker, the color swatches, and the Eyedropper tool, which samples color in an image. In the following sections, we explore each one.
Working with the Color Picker
By default, Elements uses a black foreground color and a white background color. If you’re experimenting with color and want to go back to the default colors, press the D key. If you want to swap between foreground and background colors, press the X key. If you want any color other than black and white, click your desired swatch (either foreground or background) at the bottom of the Tools panel. This action transports you to the Color Picker, as shown in Figure 13-1.
Here are the steps to choose your color via the Color Picker:
-
Click either the foreground or background color swatch on the Tools panel.
The Color Picker appears.
- Drag the color slider (the white double-arrow icon) or click the color bar to get close to the general color you desire.
-
Choose the exact color you want by clicking in the large square, or color field, on the left.
The circle cursor targets your selected color. The two swatches in the upper-right corner of the dialog box represent your newly selected color and the original foreground or background color.
 The numeric values on the right side of the dialog box also change according to the color you selected. If you happen to know the values of your desired color, you can enter them in the text boxes. RGB (red, green, blue) values are based on brightness levels from 0 (black) to 255 (white). You can also enter HSB (hue, saturation, brightness) values or the hexadecimal formula for web colors.
 If a 3-D cube icon appears when choosing your color, it means your color is not web safe. Web-safe colors appear consistently in all browsers on all platforms. To get the closest web-safe color match, click the small swatch directly below the 3-D cube icon.
FIGURE 13-1: Choose your desired color from the Color Picker.
-
When you’re happy with your color, click OK.
 If you want to save your color for later use, do so by using the Color Swatches panel, described in the following section.
Dipping into the Color Swatches panel
Elements enables you to select a foreground or background color by selecting a color on the Color Swatches panel. The Color Swatches panel is a digital version of the artist’s paint palette. In addition to preset colors, you can mix and store your own colors for use now and later. You can have palettes for certain types of projects or images. For example, you may want a palette of skin tones for retouching portraits. Choose Window ⇒ Color Swatches to bring up the panel, as shown in Figure 13-2.
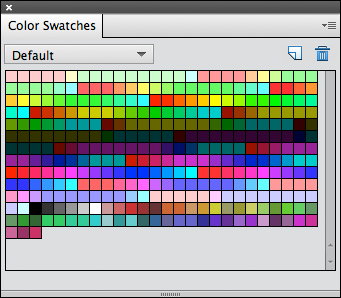
FIGURE 13-2: Choose and store colors in the Color Swatches panel.
To grab a color from the Color Swatches panel, click the color swatch you want. By the way, it doesn’t matter which tool you have. As soon as you move the tool over the panel, it temporarily converts to an eyedropper that samples the color and makes it your new foreground or background color.
Although the Color Swatches panel is a breeze to use, here are a few tips to help you along:
- Change the background color. Either first click the background swatch on the Tools panel or Ctrl-click (⌘ -click on the Mac) a swatch in the Color Swatches panel.
- Use preset colors. To load a particular preset swatch library, choose it from the drop-down list at the top of the Color Swatches panel. Elements offers libraries specific to web graphics, photo filters, and Windows and macOS systems.
- Add a color to the Color Swatches panel. Choose New Swatch from the panel menu. You can also simply click an empty portion of the panel. Name your swatch and click OK. Remember, it doesn’t matter whether you created the color by using the Color Picker or by sampling with the Eyedropper tool — adding the color for later use is done the same way.
- Save swatches. Choose Save Swatches from the panel menu in the upper-right corner of the panel. We recommend saving the swatch library in the default Color Swatches folder in the Presets folder. If by chance this folder doesn’t come up by default, just navigate to the Color Swatches folder by following this partial path:
Program FilesAdobePhotoshop Elements 2021PresetsColor Swatches(Windows) orApplicationsAdobe Photoshop Elements 2021/Support Files/Presets/color swatches(Mac). - Save swatches for Exchange. Choose this command from the panel menu to save your swatches for use in another Adobe program. Name the swatch set and save it in the same folder listed in the preceding bullet point.
-
Load swatches. If you want to load a custom library created by you or someone else, choose Load Swatches from the panel menu. In the dialog box, select your desired library from the Color Swatches folder. The new library is added to your current library.
You can also work with swatches by using the Preset Manager. For more on the Preset Manager, see Chapter 3.
- Delete swatches. To delete a swatch, drag it to the Trash icon at the top of the panel or Alt-click (Option-click on the Mac) the swatch.
- Change the panel’s appearance. Click the panel menu in the upper-right corner to choose Small or Large Thumbnail (swatch squares) or Small or Large List (swatch squares with a name).
- Replace your current swatch library with a different library. Choose Replace Swatches from the panel menu. Choose a library from the Color Swatches folder.
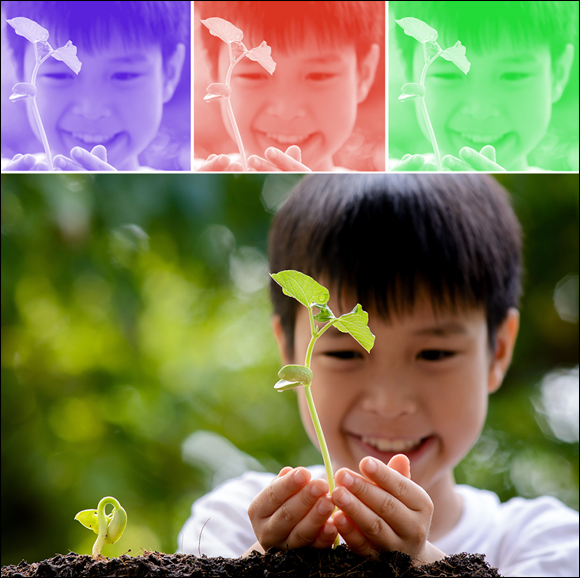
Sampling with the Eyedropper tool
Another way that Elements enables you to choose color is via the Eyedropper tool. The Eyedropper tool comes in handy when you want to sample an existing color in an image and use it for another element. For example, you may want your text to be the same color as the green background in the image shown in Figure 13-3. Grab the Eyedropper tool (or press I) and click a shade of green in the background. The tool samples the color and makes it your new foreground color. You can then create the type with your new foreground color.
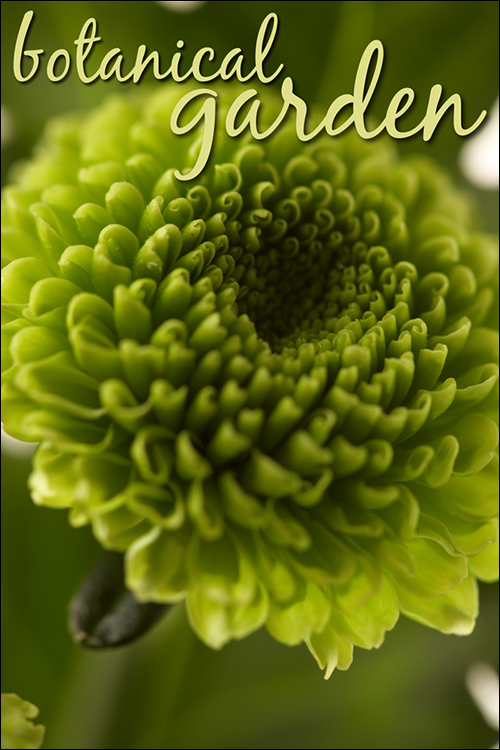
© Evgeny Litvinov/Shutterstock Image #22350313
FIGURE 13-3: The Eyedropper tool enables you to sample color from your image to use with other elements, such as type.
Here are a few things to remember when you’re using the Eyedropper tool:
- Sample a new foreground or background color. Obviously, you can select either the foreground or the background swatch on the Tools panel before you sample a color. But if the foreground color swatch is active, holding down the Alt (Option on the Mac) key samples a new background color, and vice versa.
- Choose a color from any open image. If you have multiple images open, you can even sample a color from an image that you’re not working on!
- Choose your sample size in the Tool Options. You can select the color of just the single pixel you click (Point Sample), or Elements can average the colors of the pixels in a 3-x-3- or 5-x-5-pixel area.
- Specify web colors. If you right-click your image to bring up the contextual menu, you have a hidden option: Copy Color as HTML. This option provides the web hexadecimal color formula for that sampled color and copies it to the Clipboard. You can then paste that formula into an HTML file or grab the Type tool and choose Edit ⇒ Paste to view the formula in your image.
- Choose to sample All Layers or just the Current Layer. If you have multiple layers in your image, you can choose to sample from all those layers or just your currently active layer.
- Toggle between the Eyedropper and other tools. Elements, multitasker that it is, enables you to temporarily access the Eyedropper tool when you’re using the Brush, Pencil, Color Replacement, Gradient, Paint Bucket, Cookie Cutter, or Shape tool. Simply press the Alt (Option on the Mac) key to access the Eyedropper tool. Release the Alt (Option on the Mac) key to go back to your original tool.
Getting Artsy with the Pencil and Brush Tools
If you want to find out how to paint and draw with a color you’ve chosen, you’ve come to the right place. The Pencil and Brush tools give you the power to put your creative abilities to work, and the following sections show you how.
When you use these two tools, you benefit immensely from the use of a pressure-sensitive digital drawing tablet. The awkwardness of trying to draw or paint with a mouse or trackpad disappears and leaves you with tools that behave much closer to their analog ancestors.
Drawing with the Pencil tool
Drawing with the Pencil tool creates hard edges. You can’t get the soft, feathery edges that you can with the Brush tool. In fact, the edges of a pencil stroke can’t even be anti-aliased. (For more on anti-aliasing, see the following section.) Keep in mind that if you draw anything other than vertical or horizontal lines, your lines will have some jaggies when they’re viewed up close. But hey, don’t diss the Pencil just yet. Those hard-edged strokes can be perfect for web graphics. What’s more, the Pencil tool can erase itself, and it’s great for digital sketches, as shown in Figure 13-4.
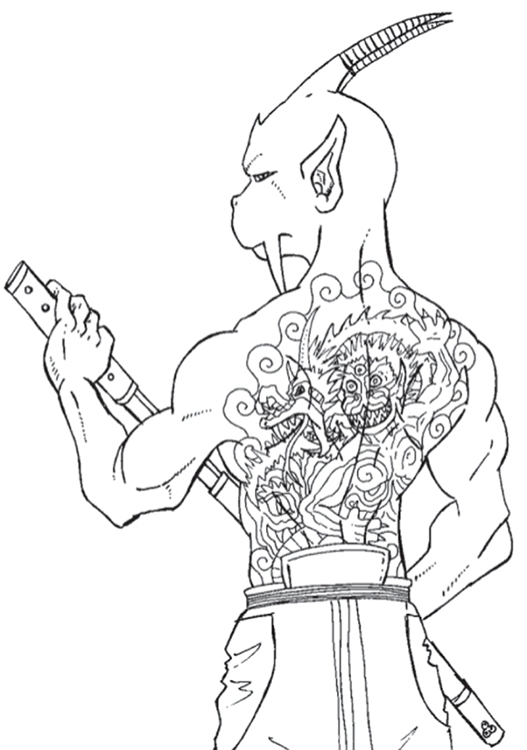
Illustration by Chris Blair
FIGURE 13-4: You can use the Pencil tool for digital drawings.
Follow these steps to become familiar with the Pencil tool:
-
Select the Pencil tool from the Tools panel.
You can also press the N key. By default, the Pencil tool’s brush tip is the 1-pixel brush. Yes, even though the Pencil tip is hard-edged, we still refer to it as a brush. In the next few steps, you customize the brush by setting various options.
- In the Options panel, click the arrow and select your desired brush from the Brush Preset Picker drop-down panel.
-
(Optional) To load another preset library, click the Brushes menu at the top of the panel.
You aren’t limited to the standard old brushes. Check out the Assorted and Special Effects brushes found in the Brush drop-down list at the top of the Brush Preset Picker panel, as shown in Figure 13-5. You’ll be surprised by the interesting brushes lurking on these panels. Use them to create stand-alone images or to enhance your photographic creations.Access the menu on the Brush Preset Picker panel to save, rename, or delete individual brushes and also save, load, and reset brush libraries. For more on these operations, see the following section.
- Choose your brush size, and optionally, if you want to change the size of that brush tip, drag the Size slider.
-
(Optional) If you want the background to show through your strokes, adjust the opacity by dragging the slider or entering an opacity percentage less than 100 percent.
The lower the percentage, the more the background images show through.
Your strokes must be on a separate layer above your images for you to be able to adjust the opacity and blend modes after you draw them. For more on layers, see Chapter 9. -
Select a blend mode.
Blend modes alter the way the color you’re applying interacts with the color on your canvas. You can find more about blend modes in Chapter 12.
-
(Optional) Select Auto Erase if you want to remove portions of your pencil strokes.
For example, say that your foreground color is black and your background color is white, and you apply some black strokes. With Auto Erase enabled, you apply white if you drag back over the black strokes. If you drag over the white background, you apply black.
-
Click and drag with the mouse to create your freeform lines.
To draw straight lines, click at a starting point, release the mouse button, and then Shift-click at a second point.
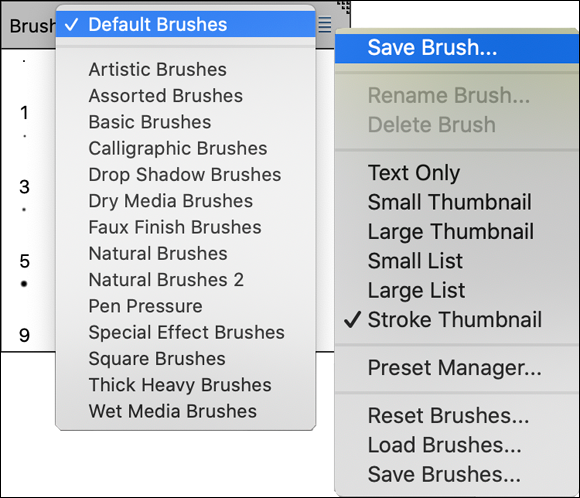
FIGURE 13-5: Choose from other brush libraries.
If you like the organic look of a pencil sketch, be sure to check out the Partial Sketch feature under Fun Edits in Guided mode. This edit allows you to selectively brush in a hand-sketched effect on your photo.
Painting with the Brush tool
The Brush tool creates soft-edged strokes. How soft those strokes are depends on which brush you use. By default, even the hardest brush has a slightly soft edge because it’s antialiased. Anti-aliasing creates a single row of partially filled pixels along the edges to produce the illusion of a smooth edge. You can also get even softer brushes, which use feathering. For details on feathering, see Chapter 8.
The Brush tool shares most of the options found in the Pencil tool, except that the Auto Erase feature isn’t available. Here’s the lowdown on the unique Brush options:
- Airbrush: Click the Airbrush button in the Options panel to apply the Airbrush mode. In this mode, the longer you hold down the mouse button, the more paint the Brush pumps out and the wider the airbrush effect spreads.
- Tablet Settings: If you’re using a pressure-sensitive digital drawing tablet, check the settings you want the tablet to control, including size, scatter, opacity, roundness, and hue jitter. The harder you press with the stylus, the greater the effect of these options.
- Brush Settings: These options, referred to as brush dynamics, change while you apply your stroke. See Figure 13-6 for an example of each one. These options include the following:
- Fade: The lower the value, the more quickly the stroke fades. However, 0 creates no fade.
- Hue Jitter: Vary the stroke between the foreground and background colors. The higher the value, the more frequent the variation.
- Scatter: The higher the value, the higher the number of brush marks and the farther apart they are.
- Spacing: The higher the number, the more space between marks.
- Hardness: The higher the value, the harder the brush.
- Roundness: A setting of 100 percent is totally circular. The lower the percentage, the more elliptical your brush becomes.
- Angle: If you create an oval brush by adjusting the roundness, this option controls the angle of that oval brush stroke. It’s so much easier to drag the points and the arrow on the diagram than to guesstimate values in the text boxes.
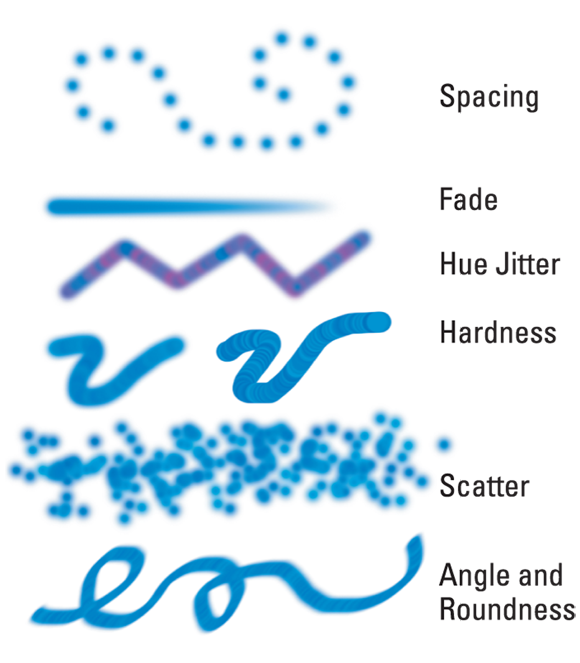
FIGURE 13-6: Change brush options to create a custom brush.
You can lock in these brush dynamics by selecting the Set This as a Default check box; this ensures that every brush you select adopts these settings.
As with the Pencil tool, you can load additional Brush libraries from the Brush drop-down list at the top of the Brush Preset Picker panel. Additional features for the Brush tool also appear in the menu on the Brush Preset Picker panel. Here’s a quick description of each:
- Save Brush: Allows you to save a custom brush as a preset. See the following section for details.
- Rename Brush: Don’t like your brush’s moniker? Change it with this option.
- Delete Brush: Don’t like your entire brush? Eliminate it with this option.
- The display options: Not a single command, but a set of commands that enable you to change the way your brush tips are displayed. The default view is Stroke Thumbnail, which displays the appearance of the stroke. These commands include Text Only, Small and Large Thumbnail, and Small and Large List.
- Reset Brushes: Reverts your current brush library to the default.
- Save Brushes: Saves custom brushes in a separate library.
- Load Brushes: Loads a preset or custom brush library.
You can also manage brush-tip libraries by using the Preset Manager. See Chapter 3 for information on using the Preset Manager.
Using the Impressionist Brush
The Impressionist Brush is designed to paint over your photos in a way that makes them look like fine art paintings. You can set various options that change the style of the brush strokes.
Here’s how to use this artistic brush:
-
Select the Impressionist Brush from the Tools panel.
It looks like a brush with a curlicue next to it. You can also press B to cycle through the brushes.
-
Set your brush options.
The Brushes presets (Size, Opacity, and Mode options) are identical to those found with the Brush tool, described in the section “Painting with the Brush tool,” earlier in this chapter. You can also find some unique options on the Advanced drop-down panel in the Tool Options:
- Style: This drop-down list contains various brush stroke styles, such as Dab and Tight Curl.
- Area: Controls the size of your brush stroke. The larger the value, the larger the area covered.
- Tolerance: Controls how similar color pixels have to be before they’re changed by the brush stroke.
-
Drag on your image and paint with your brush strokes, as shown in Figure 13-7.
The best way to get a feel for what this tool does is to open your favorite image, grab the tool, and take it for a test drive.
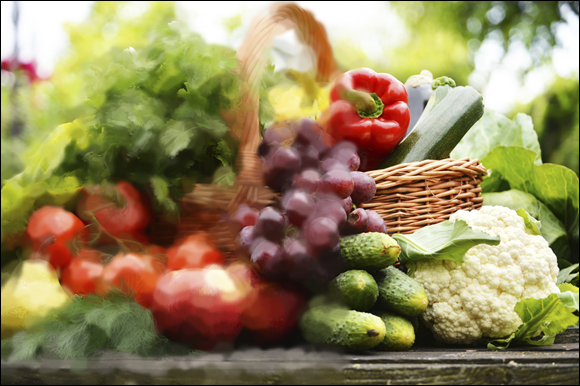
© monticello/Getty Images Image #452591071
FIGURE 13-7: The Impressionist Brush turns your photo into a painting.
Creating your own brush
If you customize any brush to the point that you’ve created your own special Franken-brush that you’d love to use again, feel free to save it as a preset that you can access in the future. To do so:
- Choose Save Brush from the panel menu on the Brush Preset Picker panel.
-
Name the brush and click OK.
Your new custom brush shows up at the bottom of the Brush Preset Picker drop-down panel.
There’s one additional way to create a brush. Elements allows you to create a brush from all or part of your image. The image can be a photograph or something you’ve painted or drawn.
Here’s how to create a brush from your image:
-
Select part of your image with any of the selection tools.
If you want to use the entire image or entire layer, deselect everything.
For more on selections, see Chapter 8.
-
Choose Edit ⇒ Define Brush or Edit ⇒ Define Brush from Selection.
You see one command or the other, depending on what you do in Step 1.
-
Name the brush and click OK.
The new brush shows up at the bottom of your Brush Preset Picker drop-down panel. Note: Your brush is only a grayscale version of your image. When you use the brush, it automatically applies the color you’ve selected as your foreground color, as shown in Figure 13-8.
© TinnaPong/Shutterstock Image #302479208
FIGURE 13-8: Create a custom brush from a portion of your image.
Be sure to check out the Pattern Brush feature under Fun Edits in Guided mode. What’s great about this edit is that when you check the Protect Subject option, your subject remains unscathed as you drag your brush freely around the photo, as shown in Figure 13-9.
FIGURE 13-9: The Pattern Brush enables you to brush graphics onto your image while keeping your subject pattern free.
Filling and Outlining Selections
At times, you may want to create an element on your canvas that can’t quite be created with a brush or pencil stroke. Maybe it’s a perfect circle or a five-point star. If you have a selection, you can fill or stroke that selection to create that element, rather than draw or paint it on. The Fill command adds a color or a pattern to the entire selection, whereas the Stroke command applies the color to only the edge of the selection border.
Fill ’er up
You won’t find a Fill tool on the Tools panel. Elements decided to avoid the overpopulated panel and placed the Fill and Stroke commands on the Edit menu.
Here are the simple steps to fill a selection:
-
Grab the selection tool of your choice and create your selection on a new layer.
Although you don’t have to create a new layer to make a selection to fill, we recommend doing so. That way, if you don’t like the filled selection, you can delete the layer, and your image or background below it remains safe. See Chapter 8 for more on selections and Chapter 9 for details on working with layers. -
Select either the foreground or background color and then choose a fill color.
See the section “Choosing Color,” earlier in this chapter, if you need a refresher.
-
Choose Edit ⇒ Fill Selection.
The Fill Layer dialog box, shown in Figure 13-10, appears.
If you want to bypass the Fill Layer dialog box (and the rest of these steps), you can use these handy keyboard shortcuts instead: - To fill the selection with the foreground color, press Alt+Backspace (Option+Delete on the Mac).
- To fill the selection with the background color, press Ctrl+Backspace (⌘ +Delete on the Mac).
-
Choose your desired fill from the Use drop-down list.
You can select whether to fill with the foreground or background color. You also can select Color, Pattern, Black, 50% Gray, or White. If you select Color, you’re transported to the Color Picker. If you choose Pattern, you must then choose a pattern from the Custom Pattern drop-down panel. For more on patterns, see the section “Working with Patterns,” later in this chapter.
If you don’t have an active selection border in your image, the command says Fill Layer and your entire layer is filled with your color or pattern.
You can also fill your selection using the Content-Aware option, which will fill your selection with pixels sampled from content nearby.
-
In the Blending area, specify whether to preserve transparency, which enables you to fill only the portions of the selection that contain pixels (the nontransparent areas).
Although you can also choose a blend mode (how the fill color interacts with colors below it) and opacity percentage, we urge you not to adjust your blend mode and opacity in the Fill Layer dialog box. Make those adjustments on your layer later by using the Layers panel commands, which give you more flexibility for editing. -
Click OK.
The color or pattern fills the selection.
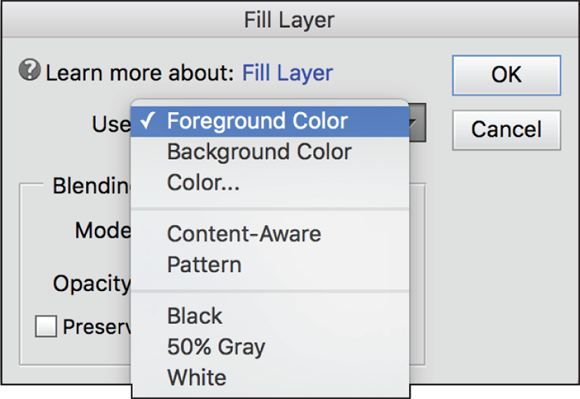
FIGURE 13-10: Fill your selection or layer with color or a pattern.
Outlining with the Stroke command
Stroking a selection enables you to create colored outlines, or borders, of selections or layers. You can put this border inside, outside, or centered on the selection border. Here are the steps to stroke a selection:
- Choose a foreground color and create a selection.
-
Choose Edit ⇒ Stroke (Outline) Selection.
The Stroke dialog box opens.
-
Select your desired settings.
Many settings are the same as those found in the Fill Layer dialog box, as we explain in the preceding section. Here’s a brief rundown of the options that are unique to strokes:
- Width: Enter a width of 1 to 250 pixels for the stroke.
- Location: Specify how Elements should apply the stroke: outside the selection, inside the selection, or centered on the selection border.
-
Click OK to apply the stroke.
We gave a 30-pixel centered stroke to our selection, as shown in Figure 13-11.

FIGURE 13-11: Stroke a selection to create a colored border.
Splashing on Color with the Paint Bucket Tool
The Paint Bucket tool is a longtime occupant of the Tools panel. This tool, whose icon looks just like a bucket, behaves like a combination of the Fill command and the Magic Wand tool. (See Chapter 8.) The Paint Bucket tool makes a selection based on similarly colored pixels and then immediately fills that selection with color or a pattern. Like the Magic Wand tool, this tool is most successful when you have a limited number of colors, as shown in Figure 13-12.
© Dancestrokes/Shutterstock Image #113921233
FIGURE 13-12: The Paint Bucket tool makes a selection and fills it at the same time.
To use the Paint Bucket tool, simply click inside the selection you want to fill. Before you click, however, specify your settings in the Tool options:
- Color: Choose between Paint (a fill of the foreground color) or a Pattern fill.
- Pattern: If you select Pattern, choose a preset pattern from the Pattern picker drop-down panel. For more details on patterns, see the section “Working with Patterns,” later in this chapter.
- Opacity: Adjust the opacity to make your fill more or less transparent.
- Tolerance: Choose a tolerance level that specifies how similar in color a pixel must be before it’s selected and then filled. The lower the value, the more similar the color must be. For more on tolerance, see the section on the Magic Wand in Chapter 8.
- Mode: Select a blending mode to change how your fill color interacts with the color below it.
- All Layers: This option selects and fills pixels within the selection in all layers that are within your tolerance level.
- Contiguous: If selected, this option selects and fills only pixels that are touching within your selection. If the option is deselected, pixels are selected and filled wherever they lie within your selection.
- Anti-aliasing: Choose this option to smooth the edges between the filled and unfilled areas.
Working with Multicolored Gradients
If one color isn’t enough for you, you’ll be pleased to know that Elements enables you to fill a selection or layer with a gradient. A gradient is a blend of two or more colors that gradually dissolve from one to another. Elements provides a whole slew of preset gradients, but creating your own custom gradient is also fun and easy.
Applying a preset gradient
Similar to colors, patterns, and brushes, gradients have a whole group of presets that you can apply to your selection and layers. You can also load other libraries of gradients from the Gradient panel menu.
Here’s how to apply a preset gradient:
-
Make the selection you want to fill with a gradient.
We recommend making the selection on a new layer so that you can edit the gradient later without harming the underlying image.If you don’t make a selection, the gradient is applied to the entire layer or background.
-
Select the Gradient tool from the Tools panel or press the G key.
It looks like a rectangle that goes from black on the left to white on the right.
-
In the Tool Options, click the down-pointing arrow on the Gradient Picker swatch.
The Gradient Picker drop-down panel appears.
-
Choose a preset gradient.
Remember that you can choose other preset libraries from the Gradient panel menu. Libraries, such as Color Harmonies and Metals, contain interesting presets.
-
Choose your desired gradient type by clicking one of the icons.
See Figure 13-13 for an example of each type.
- Choose from the following options in the Tool Options:
- Mode: Select a blending mode to change how the color of the gradient interacts with the colors below it.
- Opacity: Specify how opaque or transparent the gradient is.
- Reverse: Reverse the order in which the colors are applied.
- Transparency: Deselect this option to make Elements ignore any transparent areas in the gradient, making them opaque instead.
- Dither: Add noise, or random information, to produce a smoother gradient that prints with less banding (weird stripes caused by printing limitations).
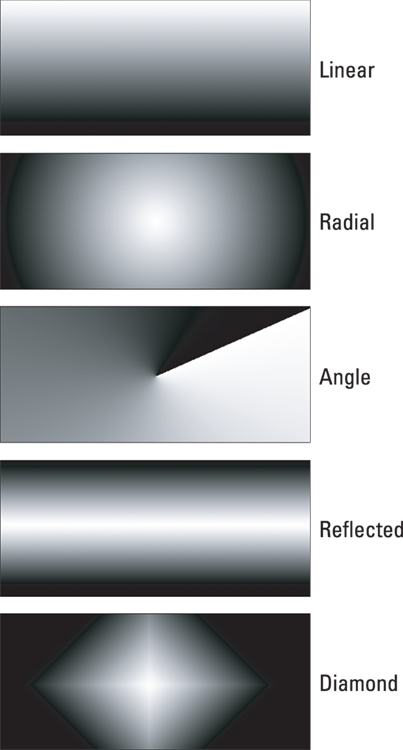
FIGURE 13-13: Choose one of five gradient types.
- Position your gradient cursor at your desired starting point within your selection or layer.
-
Drag in any direction to your desired end point for the gradient.
Longer drags result in a subtler transition between colors, whereas shorter drags result in a more abrupt transition. Hold down the Shift key to restrain the direction of the gradient to multiples of a 45-degree angle. -
Release the mouse button to apply the gradient.
We applied an Orange, Yellow radial gradient from the Color Harmonies 2 preset library to a selection of a sun in Figure 13-14. We selected the Reverse option and dragged from the center of the sun to the tip of the top ray.

FIGURE 13-14: We filled our sun selection with a radial Orange, Yellow gradient.
Customizing gradients
If you can’t find the exact gradient you need, you can easily create your own. The Gradient Editor lets you create your own custom gradient using as many colors as you want. After you create a custom gradient, you can save it as a preset to reuse in the future.
Follow these steps to create a custom gradient:
- Select the Gradient tool from the Tools panel.
-
Click the Edit button in the Tool Options.
The Gradient Editor dialog box opens, as shown in Figure 13-15.
-
Pick an existing preset to use as the basis for your new gradient.
If you want to choose a gradient from a different preset library, choose that library from the Preset drop-down list.
-
Choose your gradient type, either Solid or Noise, from the Type drop-down list.
A Noise gradient contains random colors. Interestingly, each time you create a Noise gradient, the result is different.
As soon as you start to edit the existing gradient, the name of the gradient changes to Custom.
- Choose your options for either a Solid or Noise gradient, depending on what you chose in Step 4:
- If you chose Solid, adjust the Smoothness percentage to determine how smoothly one color blends into another.
- If you chose Noise, you can choose which Color Model to use to set the color range. You can also adjust the Roughness, which affects how smoothly or abruptly the color transitions from one to another. Click Restrict Colors to avoid oversaturated colors. The Add Transparency option adds transparency to random colors. Click the Randomize button to randomly generate a new gradient. You can then skip to Step 13 to finish the gradient-making process.
-
If you’re creating a solid gradient, choose the first color of your gradient by double-clicking the left color stop under the gradient bar. (Refer to Figure 13-15.)
The triangle on top of the stop turns black to indicate that you’re working with the starting point of the gradient, and the Color Picker appears so that you can then choose your desired color.
In the Stops area, you can also single-click the left color stop and then click the Color swatch to access the Color Picker. If you click the Color down-pointing arrow, you access the Color Swatches drop-down list, where you can choose from various preset Swatch libraries from the top of the panel.
- Select the ending color by double-clicking the right color stop. Repeat the process in Step 6 to define the color.
-
Change the percentage of one color versus the other by moving the starting or ending point’s color stop to the left or right. Drag the midpoint slider (a diamond icon) to where the colors mix equally, 50/50.
You can also change the position of the midpoint by typing a value in the Location box.
- To add another color, click below the gradient bar at the position you want to add the color. Define a color in the same way you did in Steps 6 to 8.
- Repeat Step 9 to add colors.
-
To add transparency to your gradient, select an opacity stop (refer to Figure 13-15) and adjust the Opacity slider to specify the amount of transparency you desire.
By default, a gradient has colors that are 100-percent opaque. You can fade a gradient to transparency so that the portion of the image under the gradient shows through.
You can also add opacity stops in the same way you add color stops.
-
Adjust your color and opacity stops and their midpoint sliders to vary the percentages of each color.
You can also redefine any of the colors. To delete a color stop, drag it up or down off the gradient bar.
-
When you’re done, name your gradient and click the Add To Preset/Create a new gradient preset button.
Your gradient is added to the Presets menu.
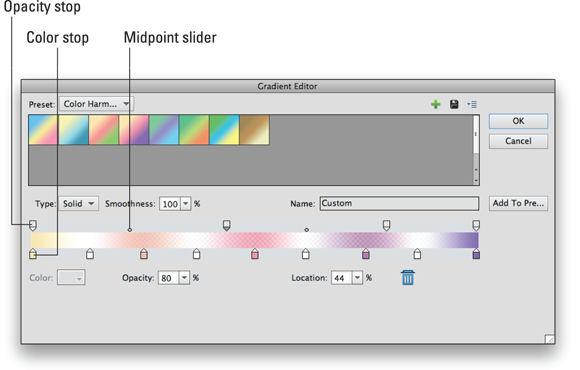
FIGURE 13-15: Use the Gradient Editor to edit and customize gradients.
After all that work, you may want to consider saving your gradients for later use. To save a gradient, click the Save button in the Gradient Editor dialog box. Save the current presets, with your new gradient, under the current library’s name or a new name altogether. You can later load that preset library. You can also manage your gradient presets with the Preset Manager, as we explain in Chapter 3.
Working with Patterns
If you’ve ever seen someone wearing leopard-print pants with an argyle sweater and a plaid blazer, you’re familiar with patterns. You can use patterns to occasionally fill selections or layers. (Don’t go overboard, though — patterns aren’t always pretty when used without restraint.) You can also stamp your image by using the Pattern Stamp tool. You can even retouch by using a pattern with the Healing Brush tool. Elements offers a lot of preset patterns to keep you happy. If you’re not happy with Elements’ selection, you can create your own, of course.
Applying a preset pattern
Although you can apply patterns by using many different tools, this chapter sticks with applying patterns as fills. To fill a layer or selection with a preset pattern, follow these steps:
-
Choose the layer or selection you want to fill with a pattern.
Again, we recommend making your selection on a new layer above your image for more flexible editing later on. - Choose Edit ⇒ Fill Selection or Fill Layer and choose Pattern from the Use drop-down list.
-
Click the down-pointing arrow and choose a pattern from the Custom Pattern drop-down panel, as shown in Figure 13-16.
If you don’t see a pattern to your liking, click the panel pop-up menu at the bottom of the submenu and choose another preset library.
-
Choose any other fill options you want to apply, such as Mode, Opacity, or Preserve Transparency.
For details on these options, see the section “Filling and Outlining Selections,” earlier in this chapter.
- Click OK to fill the layer or selection with the chosen pattern.
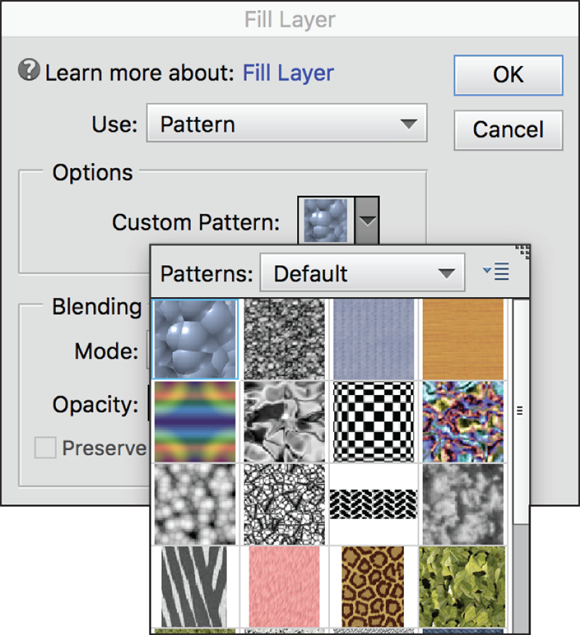
FIGURE 13-16: Fill your selection with one of the many Elements preset patterns.
Creating a new pattern
You may someday want to create your own pattern. Patterns can be easily created from any existing photo or painting you create in Elements. You can even scan your signature or logo, define it as a pattern, and use it with the Pattern Stamp tool to sign all your work.
To create your own pattern, follow these steps:
- Open the photographic, painted, or scanned image that contains the area you want to use as a pattern.
-
Use the Rectangular Marquee tool to select the area you want to convert into a pattern.
Make sure that your Feather option is set to 0, or the pattern command won’t be available.If you don’t make a selection, Elements uses your entire layer as a basis for the pattern.
-
Choose Edit ⇒ Define Pattern from Selection or Edit ⇒ Define Pattern, if you haven’t created a selection.
The Pattern Name dialog box appears.
-
Enter a name for your pattern.
Your new pattern now appears in every Pattern panel, wherever it may lurk in Elements.
In addition to filling your selection with a pattern, you can stamp on a pattern with the Pattern Stamp tool. Press S to select the Pattern Stamp tool. If you get the Clone Stamp tool, press S again. Choose your desired pattern from the Pattern Picker drop-down list and your desired brush tip from the Brush Preset Picker drop-down list. Select your brush size, opacity, and mode and then brush your pattern on your image. You can also select the Impressionist option to have your pattern appear more “painterly.”
Creating Shapes of All Sorts
In this section, we leave the land of pixels and head into uncharted territory — Vectorville. Before we discuss the ins and outs of creating shapes, here’s a little overview that explains the difference between pixels and vectors:
- Pixel images describe a shape in terms of a grid of pixels. When you increase the size of a pixel-based image, it loses quality and begins to look blocky, mushy, and otherwise nasty. For more details on resizing pixel-based images and the ramifications of doing so, see Chapter 2.
- Vectors describe a shape mathematically. The shapes comprise paths made up of lines, curves, and anchor points. Because vector shapes are math-based, you can resize them without any loss of quality whatsoever.
In Figure 13-17, you can see both types of images.

FIGURE 13-17: Elements images can be vector-based (top) or pixel-based (bottom).
When you create a shape in Elements, you’re creating a vector-based element. Shapes reside on a special kind of layer called, not surprisingly, a shape layer. Use shapes to create simple logos, web buttons, and other small spot illustrations.
Drawing a shape
Elements offers an assortment of shape tools for you to choose from. Follow these steps to draw a shape in your document:
-
Choose your desired shape tool from the Tools panel.
You can also press U to cycle through the shape tools. All the following tools have associated Geometry options, which are described in the section “Specifying Geometry options,” later in this chapter. Here are the available tools:
- Rectangle and Ellipse: As with their Marquee counterparts, you can hold down the Shift key while dragging to produce a square or circle; select the From Center option to draw the shape from the center outward.
- Rounded Rectangle: This tool works like the regular Rectangle but with the addition of a radius value used to round off the corners of the rectangle.
- Polygon: This tool creates a polygon with a specified number of sides, from 3 to 100.
- Star: This tool creates a polygon or star with a specified number of sides/vertices, from 3 to 100.
- Line: This tool draws a line with a width from 1 to 1,000 pixels. You can also add arrowheads at either end.
- Custom: Custom is the most varied shape tool. You have numerous preset custom shapes to choose from. As with any shape, hold down Shift to constrain proportions or select the From Center option to draw the shape from the center outward.
-
In the Tool Options, click the down-pointing arrow to access Geometry options.
By default, the option is set to Unconstrained. For detailed explanations on the various Geometry options, see the upcoming sections.
-
If you chose the Custom Shape tool in Step 1, click the Custom Shapes Preset picker down-pointing arrow to access the pop-up Shapes panel and choose your desired shape.
You can access more preset shape libraries via the pop-up menu at the top of the panel.
-
Choose your desired color from the Color drop-down list.
Click the color-wheel icon in the bottom-right corner to access the Color Picker for additional color choices.
-
Choose a style from the Style picker drop-down panel.
To jazz up the shape with bevels and other fancy edges, choose a style from the panel. For more on styles, see Chapter 12.
-
Drag in the document to draw the shape you defined.
The shape appears in the image window on its own shape layer. Check out the Layers panel to see this phenomenon. Figure 13-18 shows our shape, a Japanese hairstyle, from the Dressup preset library, which we add to in the following section.

FIGURE 13-18: Custom shapes run the gamut from the ordinary to the exotic, such as this hairstyle.
Drawing multiple shapes
After you create a shape layer, you can draw additional shapes on that layer. You can add, subtract, overlap, and intersect shapes in exactly the same way you do with selections. (See Chapter 8.) Just follow these steps:
-
Select your desired state button in the Tool Options.
You can choose from the following options:
- Create New Shape Layer: Creates your initial shape layer
- Add to Shape Area: Combines and joins two or more shapes
- Subtract from Shape Area: Subtracts one shape from another shape
- Intersect Shape Areas: Creates a shape from only the areas that overlap
- Exclude #verlapping Shape Areas: Creates a shape from only the areas that don’t overlap
-
Choose your desired shape tool and draw the next shape.
We completed the shape by adding the face, as shown in Figure 13-19.

FIGURE 13-19: Add to your shape layer.
Specifying Geometry options
Geometry options help define how your shapes look. Click the down-pointing arrow in the Tool Options to access the Geometry options described in the sections that follow.
Rectangle and Rounded Rectangle Geometry options
Here are the Geometry options for the Rectangle and Rounded Rectangle shapes:
- Unconstrained: Enables you to have free rein to draw a rectangle at any size or proportion.
- Square: Constrains the shape to a perfect square.
- Fixed Size: Lets you draw rectangles in fixed sizes, as specified by your width and height values.
- Proportional: Allows you to define a proportion for the rectangle. For example, specifying 2W and 1H makes a rectangle twice as wide as it is high.
- From Center: Enables you to draw from the center out.
- Snap: Aligns the shape to the pixels on your screen.
-
Radius: For Rounded Rectangles, applies the radius of a circle used to round off the corners. This option is found in the Tool Options itself, not in the Geometry Options pop-up menu.
Ellipse geometry options
The Ellipse shape has the same options that are available for rectangles, except for the Snap option. The only difference is that, instead of being able to create a perfect square, you can create a perfect circle with the Circle option.
Polygon Geometry options
The Geometry options for the Polygon shape are as follows:
- Sides: Specify the number of sides for your polygon.
- Smooth: Corners: Round off the corners.
Star Geometry options
The Geometry options for the Star shape are as follows:
- Sides: Specify the number of points for your star.
- Smooth: Corners: Round off the inner corners of indented sides or round off the corners.
- Smooth: Indents: Determine the amount that the sides indent inward.
Line Geometry options
The line’s Geometry settings include whether to put arrowheads at the start or end of the line. You can also adjust the width, length, and concavity settings to change the arrowhead shapes.
Custom Shape Geometry options
The Custom Shape options are similar to those you find for the other shapes, but with a couple unique options:
- Defined Proportions: Draws a shape based on the original proportions you used when you created it
- Defined Size: Draws a shape based on its original size when you created it
Editing shapes
You can edit shapes that you create by using a variety of tools and techniques. Here’s a list of the things you can do to modify your shapes:
- Select: Choose the Shape Selection tool to select one or more shapes in their layers. You can find this tool in the Tool Options along with the shapes tools.
- Move: Choose the Move tool (press V) to move the entire contents of the shape layer.
- Delete: Select a shape with the Shape Selection tool and press Delete to remove it.
- Transform Shape: Choose the Shape Selection tool and select your shape. Choose Image ⇒ Transform Shape and choose your desired transformation.
- Change the color: Double-click the thumbnail of the shape layer on the Layers panel. This action transports you to the Color Picker, where you can choose a new color.
- Clone a shape: Hold down the Alt (Option on the Mac) key and move the shape with the Move tool.
To convert your vector-based shape into a pixel-based shape, click the Simplify button in the Tool Options or choose Layer ⇒ Simplify Layer. You can’t edit a shape after you simplify it except to modify the pixels. But you can now apply filters to the layer. See Chapter 12 for more on fun with filters.