
Chapter 3
Exploring the Photo Editor
IN THIS CHAPTER
![]() Examining the Editor workspace
Examining the Editor workspace
![]() Using the Photo Bin
Using the Photo Bin
![]() Working in Quick mode and Guided mode
Working in Quick mode and Guided mode
![]() Launching Preferences
Launching Preferences
![]() Customizing the presets
Customizing the presets
Photoshop Elements has two workspaces: the Organizer, which we discuss in Chapter 4, and the Photo Editor, introduced in Chapter 1. You manage and arrange your photos in the Organizer, and you edit photos in the Photo Editor.
In this chapter, we continue our discussion of the Photo Editor so that you can refine your photo-editing skills. You discover the Photo Editor’s workspace in depth and how to access the Photo Editor’s three editing modes: Expert, Quick, and Guided.
Examining the Photo Editor
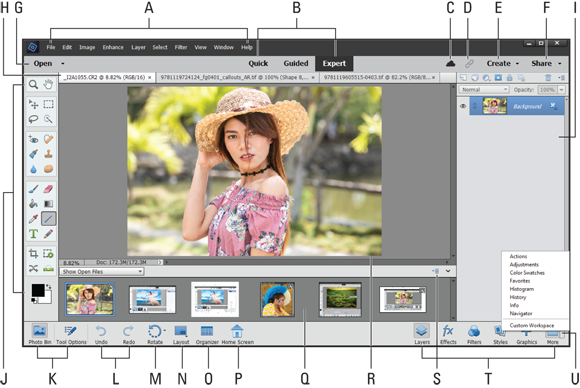
Before you begin editing photos, you’ll find it helpful to look over the Photo Editor and figure out how to move around the workspace. When the Photo Editor is in Expert mode, you find the following (as labeled in Figure 3-1):
(A) Menu bar: As does just about every other program you launch, Elements supports drop-down lists. The menus are logically constructed and identified to provide commands for working with your pictures (including many commands that you don’t find supported in tools and on panels). A quick glimpse at the menu names gives you a hint of what might be contained in a given menu list. Throughout this book, we point you to the menu bar whenever it’s helpful. Most of the menu commands you find in Elements 2021 are the same as those found in earlier versions of Elements.
(B) Photo Editor modes: The Photo Editor has three modes. The Expert mode is shown in Figure 3-1. You find an introduction to Quick mode in Chapter 1 and a more detailed look at Quick mode in Chapter 10. An introduction to Guided mode appears later in this chapter, in the “Finding Your Bearings in Guided Mode” section. Parts 3 and 4 cover all the different features of Expert mode, including making selections, creating composites from several images, drawing, adding text, and exploring creative flourishes with filters and effects.
(C) Creative Cloud Storage: Click this to open an information dialog box that shows your available storage space on the Adobe Creative Cloud Server.
(D) Share Link: After you save a file to Creative Cloud, you can get the URL link by clicking this button.
(E/F) Create and Share menus: When you open the Create menu and choose an option, you leave the current editing mode. For example, when in Expert mode, choose Create ⇒ Photo Collage, and all the options that were available in the Photo Editor temporarily disappear when the Creation Wizard opens. To return to the Photo Editor, complete the creation or cancel the wizard. The Share menu works similarly and offers options for sharing your images. (Chapter 16 focuses on the Share menu, and Chapter 17 guides you through the options on the Create menu.)
(I) Panel Bin: Figure 3-1 shows the Layers panel. You change panels by clicking the icons at the bottom of the Panel Bin. (The icons are described in item O.) Creations (things you make) are also contained in the Panel Bin when you click the Create button (item E).
(G) Open menu: When you have several files open in the Photo Editor, the Open menu is one way to switch among these files. To use this menu, click the down-pointing arrow adjacent to the Open button and, from the drop-down list, choose the image you want to move to the foreground. Note: The Open menu also offers you an option to create a new, blank file.
In Figure 3-1, several files are open, indicated by the tabs at the top of the image window. You can also place an open file in the foreground in the image window in these other ways:
- Click a tab at the top of the image window to move the image to the foreground (item F).
- Click a photo in the Photo Bin (see item H).
- Open the Window menu and choose a photo listed at the bottom of the menu.
(H) Photo tabs: Multiple photos opened in the Photo Editor appear in different tabs at the top of the window by default.
In technical-speak, this is a docked position, meaning that the photos are docked in the image window. You can click a tab and drag it down to undock the photo To undock photos you must change a preference setting in the General Preferences by checking Allow Floating Windows in Expert Mode. (See “Controlling the Editing Environment,” later in this chapter, for more on changing preferences.) Doing so makes the photo appear as a floating window. You might want to float windows when copying and pasting image data between two or more photos. You can also view all open files in a floating window without by choosing All Floating from the Layout pop-up menu (item N). To use this menu command, you must first enable the Preferences to allow floating windows.
(I) Panel Bin: Figure 3-1 shows the Layers panel. You change panels by clicking the icons at the bottom of the Panel Bin. (The icons are described in item O.) Creations (things you make) are also contained in the Panel Bin when you click the Create button (item E).
(J) Tools panel: Here you find the Photo Editor toolbox, where you click a tool and apply an edit to the photo. See “Selecting the tools” and “Selecting from the Tool Options,” later in this chapter.
(K) Photo Bin/Tool Options: Figure 3-1 shows the Photo Bin open. Click the Tool Options button, and a set of Tool Options replaces the Photo Bin. You can also open the Tool Options by clicking a tool in the Tools panel.
Tool Options enable you to specify how the selected tool works. For example, the Tool Options for the Brush tool, as shown in Figure 3-2, enable you to select from a few different brush styles, set the size of your brush, and much more. (You discover how the specific tools work in the relevant chapters later in this book. For example, you find out how the Brush tool works in Chapter 13, which covers drawing and painting.)
Each tool in the Tools panel supports various tool options. To return to the Photo Bin, click the Photo Bin button at the bottom left of the window.
(L) Undo/Redo: These commands are so useful that they have an extra-prominent place in the Photo Editor interface. (See Chapter 1 to find out about other tools that help you undo or redo your work.) Click the respective tool for Undo or Redo. You can also press Ctrl+Z (⌘ +Z on the Mac) for Undo and Ctrl+Y (⌘ +Y) for Redo.
(M) Rotate: Click the Rotate left tool to rotate counterclockwise 90 degrees. Click the down-pointing arrow on the Rotate tool and choose the Rotate Right tool to rotate a photo 90 degrees clockwise.
(N) Layout: When you have multiple photos open in the Photo Editor, the Layout pop-up menu enables you to choose how the photos display in the image window (such as rows, columns, as a grid, and so on). To return to the tabbed view, choose Default from the Layout pop-up menu.
(O) Organizer: Click the Organizer button to return to the Organizer, which we introduce in Chapter 4. Elements makes it very easy for you to toggle back and forth between the Organizer and the Photo Editor by clicking their respective buttons at the bottom of the windows.
(P) Home Screen: Opens the Elements Home Screen window.
(Q) Panel Bin icons: Click an icon at the bottom of the Panel Bin to display a different panel. Your choices are the following panels: Layers, Effects, Filters, Styles, Graphics, and More. These panels are docked in the Panel Bin by default and can’t be removed unless you choose Custom Workspace (item Q). We talk more about these panels in the later section “Playing with panels.”
(R) Image window: In this window, you view a photo you want to edit. Likewise, you can view multiple photos you want to edit.
(S) Photo Bin Options menu: Click this icon to open a pop-up menu of tasks, such as saving the Panel Bin Photos in an Album, printing selected photos in the Panel Bin, and showing a Grid in the Panel Bin.
(T) Panels: Click the icons to open the panels that include Layers, Effects, Filters, Styles, Graphics, and a category named More that’s a collection of other, different panels.
(U) More menu: To open additional panels, click the down-pointing arrow to open a pop-up menu of choices. The panels you open from the Panel Options menu appear as floating windows and can’t be docked in the Panel Bin.
Notice at the bottom of the pop-up menu you find Custom Workspace. When you click Custom Workspace, you can move panels around and dock or undock them in the Panel Bin.
The description of the Photo Editor workspace is brief in this chapter. Most of the options you have for using tools, panels, and menu commands are discussed in later chapters. For now, try to get a feel for what the Photo Editor provides and how to move among many of the Photo Editor features.
Photographer: Ted Padova
FIGURE 3-1: The Photo Editor workspace.
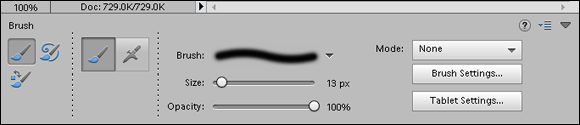
FIGURE 3-2: Tool Options provide more editing features for tools selected in the Tools panel.
Examining the image window
Not surprisingly, the image window’s tools and features are most useful when an image is open in the window. To open an image in the image window, shown in Figure 3-3, follow these steps:
-
Choose File ⇒ Open.
The standard Open dialog box appears; it works like any ordinary Open dialog box that you find in other applications.
 You can always click one or more photos in the Organizer and click the Editor button to open the selected photos in the Photo Editor.
 -
Navigate your hard drive (by using methods you know to open folders) and then select a picture.
If you haven’t yet downloaded digital camera images or acquired scanned photos and want an image to experiment with, you can use a sample image. Both your operating system and Photoshop Elements typically provide sample images:
- On your operating system, sample images are typically found in your Pictures folder, which is one of the default folders in both Windows and OS X installations.
- In Elements, you can store photos anywhere on your hard drive and access them in your Organizer.
-
Select a picture and click Open.
The photo opens in a new image window in Elements.
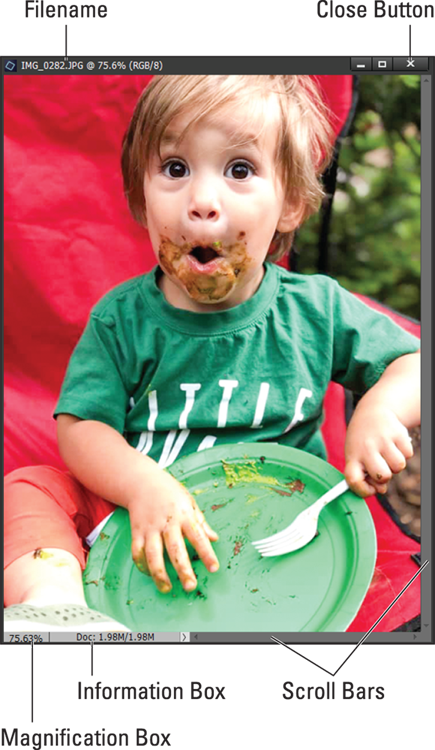
Photo: Courtany Jensen, Model: Hudson Jensen
FIGURE 3-3: The image window displays an open file undocked within the Elements workspace.
You can open as many image windows in Elements as your computer memory can handle. When each new file is opened, a thumbnail image is added to the Photo Bin at the bottom of the workspace (refer to Figure 3-1).
Notice that in Figure 3-1, filenames appear as tabs above the image window. Additionally, photo thumbnails appear in the Photo Bin. To bring a photo forward, click the filename in a tab or double-click a thumbnail in the Photo Bin. To close a photo, click the X adjacent to the filename or choose File ⇒ Close.
 To close a photo in the image window but keep it open in the Panel Bin, click the minimize button in the top-right corner (Windows) or top-left corner (Mac).
Here’s a look at important items in the image window, as shown in Figure 3-3:
- Filename: Appears above the image window for each file open in the Photo Editor.
- Close button: Click the X to the right of the filename to close the file. (On the Mac, click the red button in the upper-left corner.)
-
Scroll bars: These become active when you zoom in on an image. You can click the scroll arrows, move the scroll bar, or grab the Hand tool in the Tools panel and drag within the window to move the image.
For Mac users: If you don’t see scroll bars on your Finder windows, open the System Preferences by clicking the System Preferences icon on the Dock or choose System Preferences from the Apple Menu. In General Preferences, click Always in the Show Scroll Bars section. - Magnification box: See at a glance how much you’ve zoomed in or out.
-
Information box: You can choose what information this readout displays by choosing one of the options from the pop-up menu, which we discuss in more detail later in this section.
When you’re working on an image in Elements, you always want to know the physical image size, the image resolution, and the color mode. (Size is the physical size of the image. Image resolution is the number of pixels in your image. Color mode is a mode such as RGB for red, green and blue, grayscale for black and white, and so on.) Regardless of which menu option you select from the status bar, you can quickly glimpse these essential stats by clicking the Information box (not the right-pointing arrow but the box itself), which displays a pop-up menu like the one shown in Figure 3-4. -
Sizing the Window:
You can also resize the window by dragging any corner in or out when the image is undocked and not viewed as a tab.

FIGURE 3-4: Click the readout on the status bar to see file information.
To undock windows, press Ctrl/⌘ +K to open the Photo Editor Preferences. Click General in the Left pane and select the box where you see Allow Floating Documents in Expert Mode. You must be in Expert mode to view documents undocked.
Now that you’re familiar with the overall image window, we want to introduce you to the Information box’s pop-up menu, which enables you to choose what details appear in the Information box. Click the right-pointing arrow to open the menu, shown in Figure 3-5.

FIGURE 3-5: From the pop-up menu on the status bar, choose commands to show more information about your file.
Here’s the lowdown on the options you find on the pop-up menu:
- Document Sizes: Shows you the saved file size. For information on file sizes and resolutions, see Chapter 2.
- Document Profile: Shows you the color profile used with the file. Understanding color profiles is important when printing files. Turn to Chapter 15 for more information on using color profiles.
- Document Dimensions: When selected, this option shows you the physical size in your default unit of measure, such as inches.
- Current Selected Layer: When you click a layer in the Layers panel and choose Current Selected Layer, the layer name appears as the readout.
- Scratch Sizes: Displays the amount of memory on your hard drive that’s consumed by all documents open in Elements. For example, 20M/200M indicates that the open documents consume 20 megabytes and that a total of 200 megabytes is available for Elements to edit your images. When you add more content to a file, such as new layers, the first figure grows while the second figure remains static. If you find that Elements runs slowly, check your scratch sizes to see whether the complexity of your file is part of the problem. If so, you might clear some of your history (see Chapter 1) or merge a few layers (see Chapter 9) to free space.
-
Efficiency: Indicates how many operations you’re performing in RAM, as opposed to using your scratch disk (space on your hard drive). When the number is 100 percent, you’re working in RAM. When the number drops below 100 percent, you’re using the scratch disk.
If you continually work below 100 percent, it’s a good indication that you need to buy more RAM to increase your efficiency. If you have multiple applications open, quit all other programs to conserve RAM. - Timing: Indicates the time it took to complete the last operation.
- Current Tool: Shows the name of the tool selected from the Tools panel.
Why is the information in this pop-up menu important? Suppose you have a great photo you want to add to your Facebook account and you examine the photo to find the physical size of 8 x 10 inches at 300 pixels per inch (ppi). You also find that the saved file size is more than 20MB. At a quick glance, you know you want to resize or crop the photo to perhaps 4 x 6 inches at 72 ppi. (Doing so drops the file size from more than 20MB to around 365K.) Changing the resolution dramatically reduces the file size. We cover file sizes and changing the physical dimensions of your photos in Chapter 2. For now, realize that the pop-up menu shows you information that can be helpful when preparing files for print and display.
Don’t worry about trying to understand all these terms. The important thing to know is that you can visit the pop-up menu and change the items at will during your editing sessions.
Uncovering the contextual menus
Contextual menus are common to many programs, and Photoshop Elements is no exception. They’re those little menus that appear when you right-click, offering commands and tools related to whatever area or tool you right-clicked.
The contextual menus are your solution when you’re in doubt about where to find a command on a menu. You just right-click an item and a pop-up menu opens.
Because contextual menus provide commands related to the tool you’re using or the object or location you’re clicking, the menu commands change according to the tool or feature you’re using and where you click at the moment you open a contextual menu. For example, in Figure 3-6, you can see the contextual menu that appears after we create a selection marquee and right-click that marquee in the image window. Notice that the commands are all related to selections.
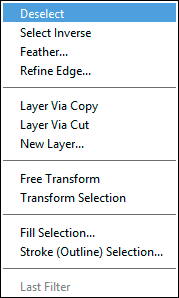
FIGURE 3-6: A contextual menu for selections.
Selecting the tools
More often than not, clicking a tool on the Tools panel is your first step in editing operations. (If you’re not familiar with the Tools panel, refer to Figure 3-8.) In panel hierarchy terms, you typically first click a tool on the Tools panel and then use another panel to fine-tune how the tool will work.
Sometimes when you select a tool in the Tools panel, you find additional tools in the Tool Options area. For example, you may click the Marquee Rectangle tool in order to access the Elliptical Marquee tool in the Tool Options, directly below the image window. The Quick Selection tool, the Selection Brush tool, the Refine Selection tool, and the Magic Wand tool, all shown in Figure 3-7, are all in the Tool Options. See the following section for more about the Tool Options area.
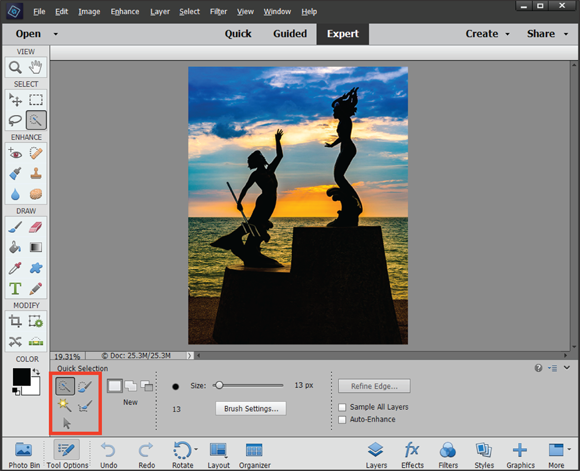
Photo: Ted Padova
FIGURE 3-7: Additional tools within a tool group are available in the Tool Options.
Keep in mind that if you don’t find a tool in the Tools panel, look in the Tool Options for additional tools within a tool group.
You can easily access tools in Elements by pressing shortcut keys on your keyboard. For a quick glance at the key that selects each tool in the Tools panel, look over Figure 3-8.
The following tips can help you find your way around the Tools panel with keyboard shortcuts:
- To select tools within a tool group by using keystrokes, press the respective key to access the tool. For example, press the L key to select the next tool — the Magnetic Lasso tool. Press L again and repeatedly press the shortcut key to step through all tools in a given group.
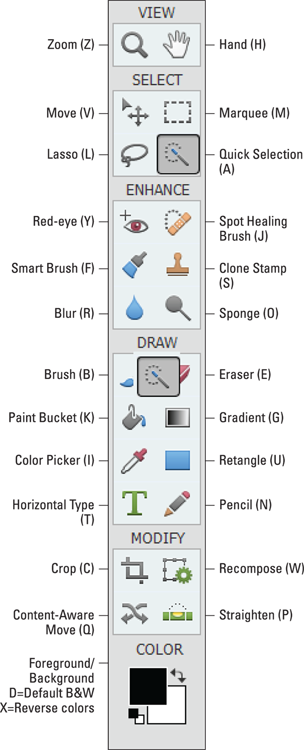
FIGURE 3-8: The Tools panel with keystroke equivalents to access a tool from the keyboard.
- Whether you have to press the Shift key to select tools is controlled by a preference setting. To change the default setting so that you don’t have to press Shift, choose Edit ⇒ Preferences ⇒ General or press Ctrl+K. (Choose Adobe Photoshop Elements Editor ⇒ Preferences ⇒ General or press ⌘ +K on the Mac.) Then, in General Preferences, deselect the Use Shift Key for Tool Switch check box.
- The shortcuts work for you at all times, except when you’re typing text with the cursor active inside a text block. Be certain to click the Tools panel to select a tool when you finish editing text or select the Commit green check mark to end using the Text tool.
The tools are varied, and you may find that you don’t use all the tools in the Tools panel in your workflow. Rather than describe the tool functions here, we address the tools in the rest of this book as they pertain to the respective Elements tasks.
Selecting from the Tool Options
When you click a tool on the Tools panel, the Tool Options box appears at the bottom of the workspace and offers you choices specific to the selected tool. (Refer to Figure 3-7, which shows the Quick Selection tool options.) In addition to providing you with choices for selecting tools within a tool group, you can adjust settings for a selected tool.
In Figure 3-7, you see choices for adjusting the Quick Selection tool, varying the size of the tooltip, and refining the selection.
You can find many of these fine-tuning adjustments in the Tool Options for most of the tools you select in the Tools panel.
Playing with panels
The panels are where you control features such as layers, effects, and more. In the Photo Editor, you open these panels in the Panel Bin:
-
Layers: The Layers panel displays all the layers you’ve added to a photo. We talk much more about layers in Chapter 9. For now, look at how the different panels are designed. In the Layers panel, you find various tools at the top-left corner and an icon with horizontal lines in the top-right corner (as shown in Figure 3-9).
You can select multiple layers and click the folder icon at the top of the Layers panel to create a new layer group. All the grouped layers are nested in a folder.
When you click the icon at the top right, a pop-up menu appears (see Figure 3-10), which shows menu items supporting the tasks you perform in the Layers panel.
- Effects: At the bottom of the Panel Bin, click the fx button to open the Effects panel. The Effects panel contains menus and tabs for applying a number of different effects to your pictures. You simply double-click the effect you want when you edit the photo. We cover applying effects in Chapter 12.
- Filters: Click Filters to open the panel where you can apply a number of different filter effects to the open image.
- Styles: Click Styles, and you find a drop-down menu listing numerous styles. Open a category and click a style to apply to an image. In some respects, this panel behaves similarly to Filters.
- Graphics: The Graphics panel contains several menus where you can choose among a huge assortment of graphic illustrations that can also be applied to your photos. For more information on using the Graphics panel, see Chapter 17.
-
More: Click the down-pointing arrow at the bottom of the Panel Bin to the right of the More button, and a pop-up menu opens, allowing you to choose additional panels. The Layers, Effects, Filters, Styles, Graphics, and Favorites panels are docked in the Panel Bin and can’t be removed.

FIGURE 3-9: The Layers panel with a Background and four layers.

FIGURE 3-10: The Layers panel pop-up menu.
The panels you open from the pop-up menu shown in Figure 3-11 open as floating panels. These are your options:
-
Actions: Actions enable you to automate a series of edits to your pictures. In Figure 3-11, you can see the Actions that are supported when you open the Text Effects presets. As with other panels, a pop-up menu is supported, and it offers Load, Replace, Reset, and Clear options so you can modify Actions.
Elements still doesn’t support recording your own series of editing steps and capturing the steps as an Action. However, most of the Actions that are created in Adobe Photoshop can be loaded in Elements.
You can find a number of free downloadable Actions on the Internet. Just search for Photoshop Actions and explore the many downloads available to you. - Adjustments: The Adjustments panel works only when you have an Adjustment layer. For details about using the Adjustments panel and Adjustment layers, see Chapter 9.
- Color Swatches: This panel displays color swatches you might use for coloring and painting that we cover in Chapter 13.
- Favorites: Opens the Favorites panel where you find a list of items you designated as a favorite edit.
- Histogram: Open this panel to display a histogram of the photo in the foreground. We talk more about histograms in Chapter 11.
- History: Choose this item to display the History panel. For more on using the History panel, see the section about retracing your steps in Chapter 1.
- Info: The Info panel provides readouts for different color values and physical dimensions of your photos.
- Navigator: The Navigator panel helps you zoom in and move around on a photo in the image window.
- Custom Workspace: When you choose Custom Workspace, you can dock and undock panels. This option enables you to configure a custom workspace to your liking.
-
- Create/Share panel: These panels also exist in the Organizer. Click Create at the top right of the Panel Bin to open the Create panel in the Photo Editor. In both the Photo Editor and the Organizer, the Create panel is used for making a number of creations such as calendars, photo books, greeting cards, photo collages, and more. The Share panel contains many options for sharing your photos. We talk more about making creations in Chapter 17, and we cover using the Share panel in Chapter 16.
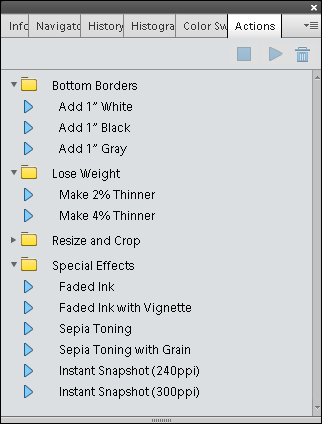
FIGURE 3-11: Actions panel opened in a group of floating windows.
When you open the additional panels as floating windows, the panels are docked in a common floating window. You can drag a panel out of the docked position and view it as a separate panel or move it to the docked panels.
When you open a panel in either the Organizer or the Photo Editor, you find other options available from tools, drop-down lists, and a menu you open by clicking the icon with horizontal lines in the top-right corner of the panel.
Using the Photo Bin
The Photo Bin displays thumbnail views of all your open images (see Figure 3-12). You can immediately see a small image of all the pictures you have open at one time, as shown earlier in Figure 3-1. You can also see thumbnail views of all the different views you create for a single picture. Find out all the details in the following sections.
If you want to rearrange the order of the thumbnails in the Photo Bin, you can click and drag any thumbnail to the left or right.

FIGURE 3-12: Open the Photo Bin Options pop-up menu to display various actions you can perform on pictures open in the Photo Bin.
Creating different views of an image
What? Different views of the same picture, you say? Yes, indeed. You might create a new view when you want to zoom in on an area for some precise editing and then want to switch back to a wider view. Here’s how you do it:
-
Click a thumbnail image in the Photo Bin.
You must have a photo open in the Photo Editor. The photo you double-click in the Photo Bin appears in the image window as the active document.
-
Choose View ⇒ New Window for <filename>.
Note that <filename> is the name of the file in the image window.
-
Zoom to the new view.
A new view appears for the active document, and you see another thumbnail image added to the Photo Bin.
To zoom quickly, click the Zoom tool in the Tools panel and then click a few times on the picture in the image window to zoom in to the photo.
Viewing filenames
By default, photos open and are displayed in the Photo Bin without the associated filenames. However, if you mouse over a photo in the Photo Bin, a tooltip opens that displays the name of the file. If you want the name of each file shown in the Photo Bin without having to mouse over the files, open a contextual menu on a photo in the Photo Bin and choose Show Filenames.
Using Photo Bin Actions
On the Photo Bin Actions menu, you find handy tasks that you can perform on photos open in the Photo Editor. Click the Photo Bin Options menu to display the menu commands, as shown in Figure 3-12.
Here’s what each Photo Bin Action does:
- Print Bin Files: Select the files in the Photo Bin that you want to print and then choose Print Bin Files. The selected files open in the Print dialog box, where you can make photo prints of the selected images.
- Save Bin as an Album: You can add photos to an existing album, or you can create a new album. You can do many wonderful things with Photo Albums.
- Show Grid: By default, no divider lines appear between photos in the Photo Bin. When you choose Show Grid, divider lines appear between the photos.
Finding Your Bearings in Guided Mode
Guided mode is a marvelous editing feature in Elements. To access Guided mode, click the Guided tab near the top of the Photo Editor workspace.
Guided Mode is like having a personal assistant to walk you through several steps in an editing process. When you click the Guided tab in the Photo Editor, you find several tabs at the top of the window (see Figure 3-13). These tabs represent various categories. Click a tab, and below the tabs you find individual editing solutions represented as thumbnail images with names of the Guided mode and a description of what the edit provides you with.
When you click an editing option, a panel opens on the right side of the window. In the panel is a sequence of steps. Follow the steps, and you end up with a result similar to the example shown in the panel.
 With each release of Photoshop Elements, new Guided Edits are introduced. In Elements 2021, three new Guided Edits appear in the program: Perfect Landscape, for perfecting landscape photos; Creative Duotone Effect, for creating two-color images; and Move and Scale, for moving or scaling (or both) an object in a photo. The new Move and Scale Guided Edit walks you through selecting an object and provides a choice for Moving or Duplicating the object. In Figure 3-14, you can see an object we selected, duplicated, and scaled.
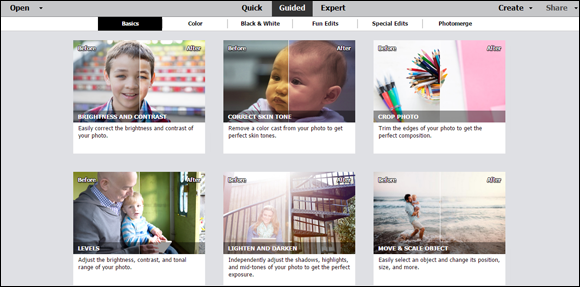
FIGURE 3-13: Click the Guided tab to open the Guided Photo Edit panel.
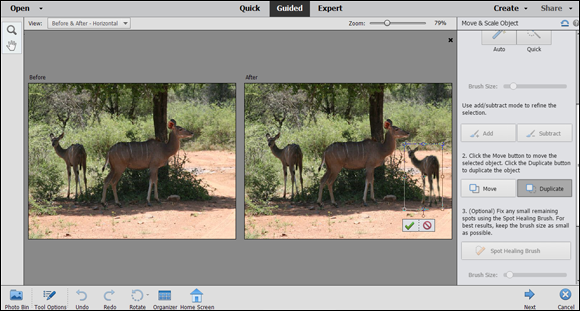
FIGURE 3-14: The Move and Scale Guided Edit permits you to move and scale an object, or duplicate as well as move and scale it.
The best way to discover what results you can achieve is to open photos and apply various edits using the Guided panel. Some of the more complicated options, such as creating Out of Bounds effects, offer you a link to online video tutorials to help you further simplify the process.
Some items, such as Picture Stack, require using multiple images. Load up the Photo Bin with photos and apply the effects to multiple images.
You have effects that can help improve images that might otherwise be uninteresting photos. Experiment with the Lomo effect (which is similar to cross-processing film), Old Fashioned Photo effect, Saturated Film effect, and Depth of Field effect. For a new creative experience, use the Puzzle effect that was introduced in Elements 12 or some of the Guided Edits that were added in Elements 13, such as the Noir effect.
Controlling the Editing Environment
Opening Elements for the first time is like moving into a new office. Before you begin work, you need to organize the office. At minimum, you need to set up the desk and computer before you can do anything. In Elements terms, the office organization consists of specifying preference settings. Preferences are settings that provide a means to customize your work in Elements and to fine-tune the program according to your personal work habits.
In the following sections, we explain the preference options that you most likely want to adjust. If you need more detail about a preference option than the following section provides, look at the help documents discussed in Chapter 1.
Elements has two Preferences dialog boxes: one in the Photo Editor workspace and another in the Organizer workspace. The following sections cover the Preferences dialog box that you open when in the Photo Editor, whether you’re using Windows or the Mac. See Chapter 4 for details about Organizer preferences.
Launching and navigating Preferences
The Photo Editor’s Preferences dialog box organizes all the options into several panes. By default, when you open the Preferences dialog box, you see the General pane.
To open the Preferences dialog box, choose Edit ⇒ Preferences ⇒ General (or Photoshop Elements Editor ⇒ Preferences ⇒ General on the Mac). Alternatively, press Ctrl+K (⌘ +K on the Mac). Using either method opens the Preferences dialog box to the General pane, as shown in Figure 3-15.
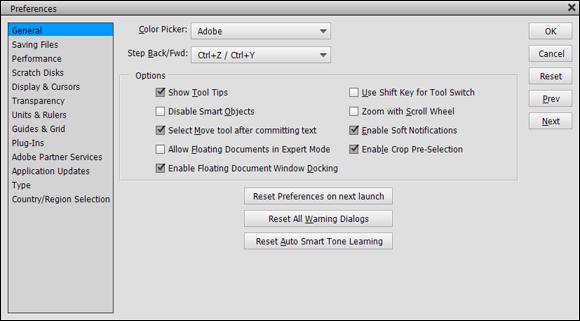
FIGURE 3-15: The General pane in the Preferences dialog box.
In Figure 3-15, you see items on both the left and right sides of the dialog box that are common to all preferences panes. Here’s a quick introduction to what these items are and how they work:
- Panes list: Elements lists all the different panes along the left side of the Preferences dialog box. Click an item in the list to make the respective pane open on the right side of the dialog box.
- OK: Click OK to accept any changes made in any pane and dismiss the Preferences dialog box.
- Cancel: Click Cancel to return to the same settings as when you opened a pane and to dismiss the dialog box.
- Reset Preferences on Next Launch: Clicking the Restore Default Settings button returns the dialog box to the same settings as when you opened the dialog box. The dialog box stays open for you to set new settings.
Of particular importance in the General tab are the items you see for Allow Floating Documents in Expert Mode and Enable Floating Document Window Docking. As we discuss earlier in this chapter (see “Examining the image window”), select these check boxes if you want to undock the document windows from the tabs.
Checking out all the Preferences panes
The settings in the Preferences dialog box are organized into different panes that reflect key categories of preferences. The following list briefly describes the types of settings you can adjust in each preferences pane:
- General preferences, as the name implies, apply to general settings you adjust for your editing environment.
- Saving Files preferences relate to options available for saving files. You can change the case of existing filenames; save a file with layers or flatten layers (as we explain in Chapter 9); save files with image previews that appear when you’re viewing files as icons on your desktop (Windows); and save with some compatibility options. On the Mac, the Finder generates thumbnails automatically, so you don’t need to specify thumbnails in a Save dialog box.
- Performance preferences: The pane where you find history states (explained in Chapter 1) and memory settings, such as allocating memory to Elements.
- Scratch Disks preferences: Below Performance, you find scratch disk options. (See the nearby sidebar “What’s a scratch disk?” for more on scratch disks.) You can monitor how your scratch preferences are working in the image window. See the earlier section, “Examining the image window,” for details.
- Display & Cursors preferences: Offer options for how certain tool cursors are displayed and how you view the Crop tool when you’re cropping images. Chapter 10 explains how cropping works.
- Transparency preferences: Require an understanding of how Elements represents transparency. Imagine painting a portrait on a piece of clear acetate. The area you paint is opaque, and the area surrounding the portrait is transparent. To display transparency in Elements, you need some method to represent transparent areas. (Chapter 8 has more details.) Open the Transparency preferences and make choices for how transparency appears in Elements.
- Units & Rulers preferences: Let you specify settings for ruler units, column guides, and document preset resolutions.
- Guides & Grid preferences: Offer options for gridline color, divisions, and subdivisions. A grid shows you nonprinting horizontal and vertical lines. You use a grid to align objects, type, and other elements. You can snap items to the gridlines to make aligning objects much easier. You can drag guides (sometimes called guidelines) from the ruler and position them between gridlines.
- Plug-Ins preferences: Include options for selecting an additional Plug-Ins folder. Plug-ins are third-party utilities that work with Elements. For example, you can find plug-ins that offer editing features not found in Elements, many different adjustments for brightness/contrast and color correction, and some nifty special effects. You can find many free plug-ins on the Internet by searching for Photoshop Elements Plug-Ins.
- Adobe Partner Services: Enable you to control whether Elements automatically checks for new services, clears the online stored data, and resets your account information for all services.
- Application Updates: Allow you to choose to automatically update Elements or receive a notification that an update is available.
- Type preferences: Provide options for setting text attributes. You have options for using different quotation marks, showing Asian characters, showing font names in English, and previewing font sizes.
- Country/Region Selection: Select your country or region from the drop-down menu.
Part of the fun of image editing is choosing brush tips, swatch colors, gradient colors, and patterns to create the look you want. To get you started, Elements provides you with a number of preset libraries that you can load and use when you want. For example, you can load a Brushes library to acquire different brush tips that you can use with the Brush tool and the Eraser tool. But you’re likely to want to customize the preset libraries at least a little bit, too.
You can change libraries individually in respective panels where the items are used. For example, you can change color swatch libraries on the Color Swatches panel or choose brush-tip libraries in the Tool Options. Another way you can change libraries is to use the Preset Manager dialog box, as shown in Figure 3-16.
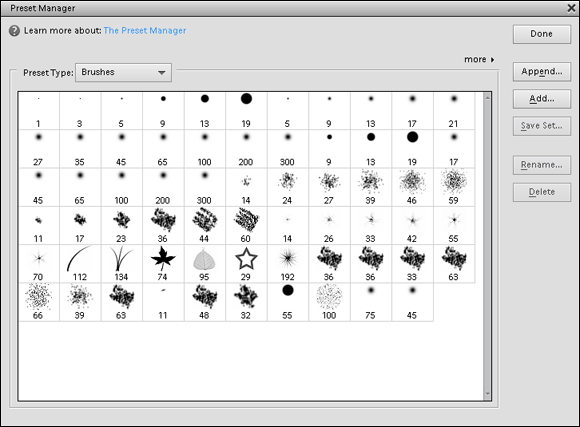
FIGURE 3-16: The Preset Manager dialog box provides a central area where you can change libraries.
We cover using the presets in Chapter 13, which is where you can find out how to use the many presets that Elements provides. The important thing to note here is that you can change the presets according to your editing needs.
To open the Preset Manager dialog box, choose Edit ⇒ Preset Manager. The available options in the dialog box are
- Learn More About: The Preset Manager: Click the blue Preset Manager hyperlinked text to open the Help document and find out more about managing presets.
- Done: Any changes you make in the Preset Manager are recorded and saved when you click Done.
- Preset Type: Open the drop-down list to choose from Brushes, Swatches, Gradients, Styles, Patterns, and Effects.
- Append: Click the Append button to append a library to the existing library open in the Preset Manager.
- Add: Click this button to open another library. Elements allows you to choose from several libraries for each preset type. When you choose Add, the open library closes as a new library opens. If you added a new item, such as a brush, it’s lost when you click Add unless you saved the new brush. For more on brushes, see Chapter 8.
- Save Set: You can save any changes you make in the Preset Manager as a new library. If you make a change, use this option so that you don’t disturb the original presets.
- Rename: Each item in a library has a unique name. If you want to rename an item, click the thumbnail in the Preview pane, click Rename, and then type a new name in the dialog box that appears.
- Delete: Click an item in the Preview window and click Delete to remove the item from the library.