
Chapter 6
Viewing and Finding Your Images
IN THIS CHAPTER
![]() Working with catalogs
Working with catalogs
![]() Switching to different views
Switching to different views
![]() Viewing Memories
Viewing Memories
![]() Searching for your photos
Searching for your photos
![]() Grouping your files in stacks
Grouping your files in stacks
Photo organization begins with adding images to a catalog. By default, the Organizer creates a new catalog for you (so you might not even notice the presence of your catalog without reading this book). As your catalog grows with the addition of more files, you’ll want to discover ways to search and use a given set of images for a project.
In this chapter, we begin by talking about catalogs and then look at how to view and organize your pictures in the Organizer and the Media Browser. We show how the many options help speed up your work in Photoshop Elements. Before tackling this chapter, get familiar with the Organizer. Chapter 4 offers a brief glimpse of the Organizer and looks at a few different views; Chapter 5 explains how to tag photos and create photo albums in the Organizer.
Cataloging Files
When you import files in the Organizer, all your files are saved automatically to a catalog. The files themselves aren’t really saved to the catalog; rather, links from the catalog to the individual files are saved. In Elements, links are like pointers that tell the catalog where to look for a file. When you add and delete files within the Organizer, the catalog is updated continually.
 After you import files in the Organizer, the Organizer maintains a link to the media. If you move the media on your hard drive, the link is broken. You need to reestablish the link by opening the file in the Photo Editor. The Find Offline Drives – Edit dialog box opens so that you can reconnect the file by browsing for its new location.
Your default catalog is titled My Catalog by the Organizer. As you add photos in the Organizer, your default catalog grows and may eventually store thousands of photos. At some point, you may want to create one or more additional catalogs to store photos. You may want to use one catalog for your family’s and friends’ photos and another for business or recreational activities. You may want to create separate catalogs for special purposes such as business, family, social networking, or other kinds of logical divisions. To further segregate images, you might create a number of different albums from a given catalog.
Using the Catalog Manager
Catalogs are created, deleted, and managed in the Catalog Manager. To access the Catalog Manager, choose File ⇒ Manage Catalogs. The Catalog Manager opens, as shown in Figure 6-1.

FIGURE 6-1: The Catalog Manager dialog box.
To keep your photos organized and your catalog files small, you can start a completely new catalog before you import photos. Follow these steps:
- Choose File ⇒ Manage Catalogs and click the New button in the Catalog Manager dialog box, as shown in Figure 6-1.
- When the New Catalog dialog box opens, type a name for the new catalog in the File Name text box.
-
(Optional) If you want to add the free music files that installed with Elements, select the Import Free Music into All New Catalogs check box.
 We recommend selecting the Import Free Music into All New Catalogs and Import Music Files check box. The Organizer ships with free music files that you can use in a variety of creations. See Chapter 17 for more on making creations.
 - Click OK to create the new catalog.
-
Choose File ⇒ Get Photos and Videos ⇒ From Files and Folders to add files to the new catalog. Alternately you can click the Import button above Albums and Folders in the left panel.
The Get Photos and Videos from Files and Folders dialog box opens.
-
Navigate your hard drive and select the photos you want to add. After you identify all the files, click Get Media.
The selected photos are added to your new collection of media contained in the catalog.
Working with catalogs
After you create different catalogs for your images, the following tips for working with catalogs will come in handy:
- Understanding how you want to organize your photos before creating your first catalog: Unfortunately, Elements doesn’t provide you with a command to split large catalogs into smaller ones. However, if you’ve created a large catalog and want to split it into two or more separate catalogs, you can manually add new photos to a new catalog and delete photos from the older catalog.
- Switching to a different catalog: When you need to open a different catalog file, choose File ⇒ Manage Catalogs and select the name of the catalog you want to open. Click Open at the bottom of the dialog box to open the selected catalog. The Organizer window changes to reflect files contained in that catalog.
- Fixing a corrupted catalog: Notice the Repair button in Figure 6-1. If you can’t see thumbnail previews of images or open them in one of the editing modes, your catalog file might be corrupted. Click the Repair button to try to fix the problem.
- Improving catalog performance: When catalogs get sluggish, you might need to optimize a catalog to gain better performance. You should regularly optimize your catalog (by clicking the Optimize button in the Catalog Manager) to keep your catalog operating at optimum performance.
Backing up your catalog
Computer users often learn the hard way about the importance of backing up a hard drive and the precious data they spent time creating and editing. We can save you that aggravation right now, before you spend any more time editing your photos in Elements.
We authors are so paranoid when we’re writing a book that we back up our chapters on multiple drives when we finish them. The standard rule is that if you spend sufficient time working on a project and it gets to the point where redoing your work would be a major aggravation, it’s time to back up files.
When organizing your files, adding keyword tags, creating albums, and creating stacks and version sets, you want to back up the catalog file in case it becomes corrupted. Fortunately, backing up catalogs is available to both Windows and Mac users. For optimum performance, backing up to a 1TB USB drive will serve you best.
Here’s how you can use Elements to create a backup of your catalog:
-
Choose File ⇒ Backup Catalog to open the Backup Catalog Wizard.
This wizard, shown in Figure 6-2, has two panes that Elements walks you through to painlessly create a backup of your files.
-
Select the source to back up.
The first pane in the Backup Catalog to Hard Drive Wizard offers two options:
-
 Catalog-only Backup: This item is new in Elements 2021. In contrast to this type of backup, a full backup backs up keywords, tags, places, events, and so on. It also includes backing up photos and videos. If you have a large catalog with many photos and videos, that backup will take a long time. If you don’t need to back up your photos and videos, you can choose this option instead, which backs up all data except the photos and videos. This option runs much faster than the full backup.
 - Full Backup: Use this choice when you want to back up everything, including your photos and videos.
- Incremental Backup: Select this radio button if you’ve already performed at least one backup and you want to update the backed-up files.
-
-
Click Next and select a target location for your backed-up files.
Active drives, external hard drives attached to your computer, or mounted network drives available to your computer appear in the Select Destination Drive list. Select a drive, and Elements automatically assesses the write speed and identifies a previous backup file if one was created.
The total size of the files to copy is reported in the wizard. This information is helpful so that you know whether more than one drive is needed to complete the backup (on Windows) or a backup drive has enough space to complete the backup. - If you intend to copy files to your hard drive or to another hard drive attached to your computer, click the Browse button and identify the path.
-
Click Save Backup.
The backup commences. Be certain to not interrupt the backup. It might take some time, so just let Elements work away until you’re notified that the backup is complete.

FIGURE 6-2: The wizard provides options for selecting the destination media for the backup.
Backing up photos and files
With files stored all over your hard drive, manually copying files to a second hard drive, CD, or DVD would take quite a bit of time. Fortunately, Elements makes finding files to back up a breeze.
Choose File ⇒ Copy/Move to Removable Drive and then, in the dialog box that opens, select the Copy Files check box and click Next. Select a hard drive, type a name for the backup folder, and click OK. Elements goes about copying all files shown in the Organizer to your backup source.
Mac users don’t have an option for backing up photos from the Organizer to CDs or DVDs. On the Mac, you can create a burn folder in the Finder, select all photos in the Organizer, and drag the selected files to the burn folder. Click the Burn button, and the files are copied to a CD or DVD.
Switching to a Different View
The Organizer provides you with several different viewing options. In Chapter 4, you find out about viewing files in the Media Browser and look at viewing recent imports and all files. You can also view files according to a timeline, certain media types such as those media types listed in the View ⇒ Media Types menu, and places and events. Here you find a quick tour of the View menu.
On the View menu, you have choices for sorting files that are displayed in the Media Browser. Some of the menu choices you have are
- Media Types: Choose View ⇒ Media Types and look over the submenu. You can eliminate video, audio, and PDF by selecting the respective items if you want to view just photos in the Media Browser. Likewise, you can eliminate photos and explore the other choices by selecting or deselecting the submenu items.
- Hidden Files: If files are hidden, you can view all files by choosing View ⇒ Hidden Files, and then you can choose (in the submenu) to view All Files, view Hidden Files, or (if files are in view) to hide Files.
- Details: By default, file details, such as file creation dates and star ratings, are hidden. You can show file details by choosing View ⇒ Details or pressing Ctrl+D/⌘ +D.
- File Names: By default, the filenames of the photos appearing in the Media Browser are hidden. You can show filenames by choosing View ⇒ File Names.
- Timeline: Choose View ⇒ Timeline, and a horizontal bar opens at the top of the Organizer. A slider appears on the bar that you can drag left and right to select a time when your photos were taken, as shown in Figure 6-3.

FIGURE 6-3: The Media Browser displaying a timeline.
Viewing Photos in Memories (Slideshow)
Elements offers essentially three different slideshow-type viewing options:
- In the Media Browser, you’ll notice a button called Slideshow (after the slideshow is created, it’s known as Memories) where Elements creates a video of selected photos in the Media Browser. You also find a Slideshow option in the Create panel. Both options are used to create animated videos of your cherished photos that you can export as a movie file and share with friends and family. We cover creating Memories videos in Chapter 17, where we discuss many different creation options.
- The other slideshow option you have is to view selected photos as a slideshow on your computer. Naturally, you find this option as a menu command in the View menu. However, the command you want is not called Slideshow. Elements provides you with a Full Screen command, which you use to view your pictures in Full Screen view as a slideshow.
Here’s how you create a slideshow using Full Screen view from the View menu:
-
Select photos in the Organizer and choose View ⇒ Full Screen (or press F11).
The first photo appears with a tools panel and two panels with various editing options. You can organize, edit, transform, tag, and add metadata to your photos while in Full Screen view. Click Organize and click Edit to open panels with editing options, as shown in Figure 6-4.
-
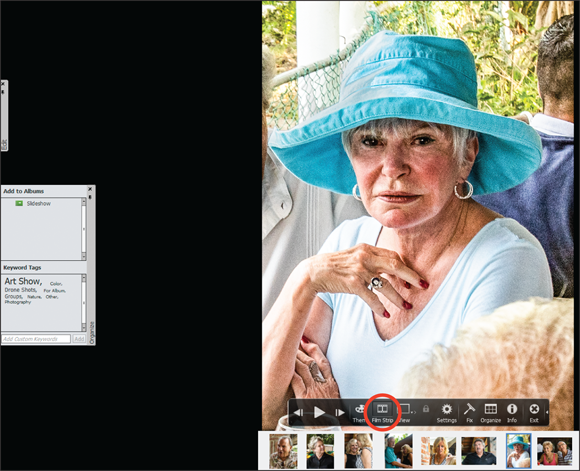
Click the Film Strip button on the lower-left side in the horizontal tools strip and click Organize to expand the panel (see Figure 6-5).
The Full Screen viewer appears, as shown in Figure 6-5. Your photos are displayed as thumbnails at the bottom of the window. Click a photo to jump to the respective image.
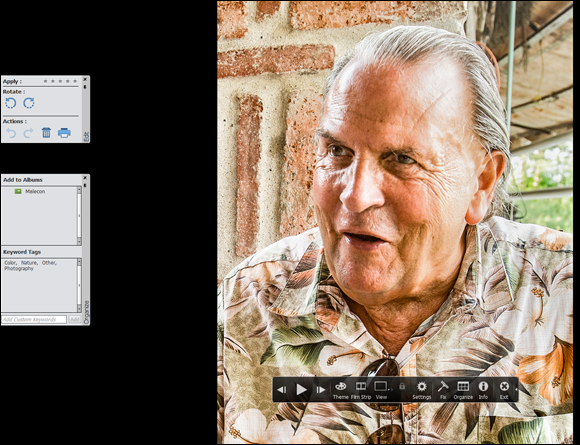
FIGURE 6-4: The first photo in Full Screen view opens with a number of tool and panel options.
Keep in mind that Elements provides you with view options when you use various menu commands in the View menu. When you view photos in Full Screen view, you don’t have any export or saving opportunities. Once again, to save a slideshow, turn to Chapter 16.
Photos: Ted Padova
FIGURE 6-5: Click Film Strip to see mini thumbnails of the photos in the slideshow.
Searching for Photos
When you’re looking for a photo but aren’t quite sure how you filed it away, the Elements search options are a great tool. You probably remember some detail that can help you find the photo or photos you’re looking for. In Elements, you’ll likely find a search tool that can look for that specific detail or details so that you locate your photo in no time.
Using Search
Before we explore the many options you have from menu commands on the Find menu, look at the Media Browser. At the top, you find the word Search and a magnifying glass.
When you click Search at the top of the Media Browser window, the interface changes to an overlay with a series of buttons along the left side of the window, as shown in Figure 6-6.
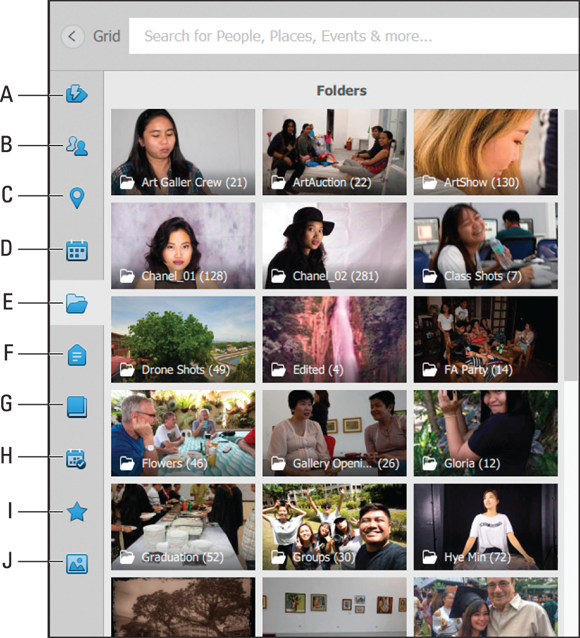
FIGURE 6-6: Click Search to display the Search overlay window.
Before we go too far, you should know that you can exit the overlay window at any time by clicking Grid in the upper-left corner or pressing the Esc key. You’re then returned to the normal Media Browser window.
You can explore the various options by mousing over the icons at the left side of the window, such as the Smart Tags (top), shown in Figure 6-6. The search options available to you include the following:
- Smart Tags: When you create a catalog and import photos, the photos are tagged with Smart tags, as you can see in Figure 6-6. Click one of the clusters, and the photos with the respective tags are displayed in the Media Browser.
- People: All the people you’ve tagged are shown in people clusters.
- Places: Photos you have tagged with locations are shown according to geographic location.
- Date: Search by the date when the photo was taken.
- Folders: You can restrict searching to photos from given folders in your catalog by clicking the Folders icon.
- Keywords: Any photos you’ve tagged with Keyword tags are shown.
- Albums: Click this icon and all the albums you’ve created are shown.
- Events: All events tagged with Event tags are shown.
- Ratings: You can search for photos you’ve tagged with star ratings.
- Media Types: Mouse over Media Types, and you find options for searching photos, audio files, videos, and projects.
When you click an item in any of the search categories, only those items with the respective tags are displayed in the Media Browser. To return to a full catalog view, click Grid at the upper-left side of the Media Browser window.
Searching for untagged items
You can tag files with a number of different criteria, as we explain in Chapter 5. When tags are added to images, you can sort files according to tag labels. We also cover sorting by tag labels in Chapter 5. For now, look at the Find menu and notice the Untagged Items command.
If you haven’t added tags to some items and want to show only the untagged files so that you can begin to add tags, choose Find ⇒ Untagged Items or press Ctrl+Shift+Q on Windows or ⌘ +Shift+Q. Elements displays all files without tags in the Media Browser so that you can easily see which photos need to be tagged.
Searching captions and notes
Captions and notes are added in the Information panel. When captions or notes are added to files, you can search for the caption name, contents of a note, or both. To search caption names and notes, follow these steps:
-
Make sure you have media added to the Organizer.
See Chapter 4 for details.
-
Add captions, notes, or both.
If you don’t have any files tagged with captions or notes, you need to add them in the Information panel. Open the Information panel and type captions and notes in the respective text boxes. (Chapter 5 tells you how to add your captions and notes.)
-
Choose Find ⇒ By Caption or Note.
The Find by Caption or Note dialog box opens, as shown in Figure 6-7.
-
In the Find Items with Caption or Note text box, type the words you want to locate and choose to match all or part of the word or words you typed.
Options in the dialog box are
- Match Only the Beginning of Words in Captions and Notes: Select this radio button when you know that your caption or note begins with words you type in the text box.
- Match Any Part of Any Word in Captions and Notes: Select this radio button if you’re not sure whether the text typed in the box is used at the beginning of a caption or note, or whether it’s contained within the caption name or note text.
-
Click OK.
The results appear in the Organizer.
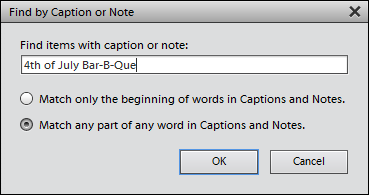
FIGURE 6-7: In the Find by Caption or Note dialog box, specify search criteria.
Searching by history
Searching history is searching for chronologically ordered information about operations performed on your media, such as printing, emailing, sharing, and so on. Elements keeps track of what you do with your photos when you perform a number of different tasks. You can search for files based on their file history by choosing Find ⇒ By History. Select the options you want on the By History submenu, and Elements reports files found on date searches that meet your history criteria.
Searching metadata
Metadata includes information about your images that’s supplied by digital cameras, as well as custom data you add to a file. Metadata contains descriptions of the image, such as your camera name, the camera settings you used to take a picture, copyright information, and much more.
Metadata also includes some of the information you add in Elements, such as keyword tags, albums, People tags, and so on. You can combine various metadata items in your search, such as keyword tags, camera make and model, f-stop, ISO setting, and so on. Searching for metadata might be particularly helpful when you have photos taken during an event by several family members and friends. In this example, you might want to isolate only those photos taken with a particular camera model.
To search metadata, follow these steps:
-
Choose Find ⇒ By Details (Metadata) in the Organizer.
The Find by Details (Metadata) dialog box, shown in Figure 6-8, opens.
-
Choose to search for one criterion or all your criteria by selecting a radio button.
The first two radio buttons in the dialog box offer choices for Boolean OR and Boolean AND. In other words, do you want to search for one item or another, or to search for one item and another. The results can be quite different depending on the criteria you identify in the menus below the radio buttons.
-
Choose an item from the first menu (we used People in Figure 6-8) and then choose to include or exclude the item. Next fill in the third column.
How you fill in the third column depends on your selections in the first two columns.
Items are listed as menus in horizontal rows. The third column can be a menu or a text box, as shown in Figure 6-8.
-
(Optional) To add criteria (in our example, we use two items for our search), click the plus (+) symbol.
Another row is added to the dialog box, and you select your choices, as explained in Step 3.
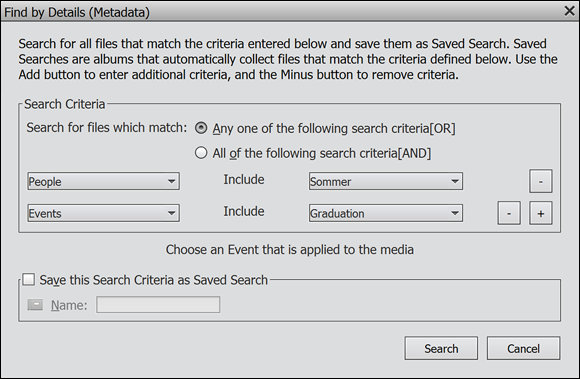
FIGURE 6-8: Choose Find ⇒ By Details (Metadata) in the Organizer to open the dialog box in which metadata are specified.
- If you want to save the Search attributes, check Save this Search Criteria as Saved Search.
-
After identifying your search criteria, click Search.
The media matching the criteria is shown in the Media Browser.
Searching similarities
We discuss tagging people in Chapter 5. When you have people tagged, you can easily click the People tab at the top of the Organizer and locate all the people you have tagged. Not all the search options are perfect. You may find that some photos are missed; however, the search features offer you a more than reasonable effort at finding the photos you want to use.
Searching visually similar photos
Elements also lets you search photos for visual similarities. You may have group shots, architecture, animal life, and so on and want to search for photos containing objects that are visually similar.
To search for photos with visual similarities, choose Find ⇒ By Visual Searches, Visually Similar Photos and Videos, Objects appearing in Photos, and Duplicate Photos.
Searching duplicates
You may have a number of photos that are duplicates or are very close to being duplicate images. You might want to locate duplicates or near-duplicate images and delete some from your catalog or stack the photos. (See “Stackin’ ’em up,” later in this chapter.) To find duplicate photos, choose Find ⇒ By Visual Searches menu and choose Duplicate Photos.
Photos that are visually similar appear in horizontal rows. Click Stack, and the photos are stacked.
If you want to delete photos, click a photo and then click the Remove from Catalog button at the bottom of the window.
Searching objects
You may want to stack or delete photos that contain similar objects, such as buildings, automobiles, trees, groups of people, and so on. To search for objects, follow these steps:
- Choose Find ⇒ By Visual Searches ⇒ Objects appearing in photo.
-
Double-click a photo containing the desired object.
A rectangle appears for selecting a photo that contains the object you want to search.
- Move the rectangle and resize it so that it surrounds the object you’re looking for, as shown in Figure 6-9.
-
Click the Search Object button.
Elements displays its search results.
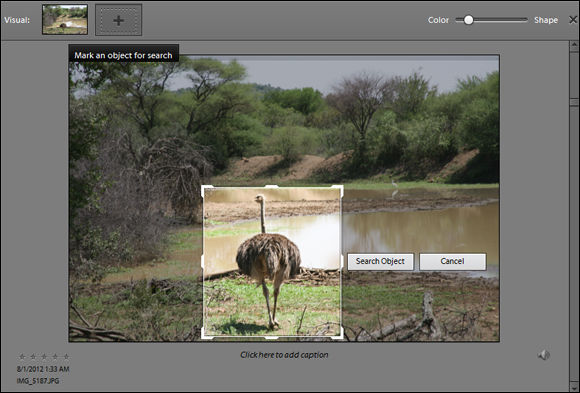
FIGURE 6-9: Mark the object you want to search and then click the Search Object button.
Grouping Files That Get in the Way
Elements offers a few ways to organize images that are getting in the way. You can hide files, stack files, or create versions, as we explain in the following sections.
Marking files as hidden
With a simple menu command, you can mark selected files in the Organizer as hidden. Select files you want to hide, and, from either the Edit menu or a contextual menu, choose Visibility ⇒ Mark as Hidden. To see the files you mark for hiding, return to the same Visibility menu and choose Show Hidden. Essentially, you remove the check mark for Show Hidden, which results in hiding the files hidden. To easily toggle between showing and hiding files marked for hiding, choose View ⇒ Hidden Files.
Stackin’ ’em up
Think of a stack of images as being like a stack of cards that are face up: You see only the front card, with all the other cards hidden under that top card. Stacks in the Organizer work the same way. You hide different images behind a foreground image. At any time, you can sort the images or display all images in the stack in the Organizer.
To create a stack, follow these steps:
-
In the Organizer, select several photos.
You can select any number of photos in the Media Browser, as shown in Figure 6-10. However, you can’t stack audio or movie files.
-
Choose Edit ⇒ Stack ⇒ Stack Selected Photos.
Elements stacks your photos. The first image you select remains in view in the Media Browser. In the upper-right area, an icon that looks like a stack of cards appears on the image thumbnail when you’ve stacked some images, as you can see in Figure 6-11.
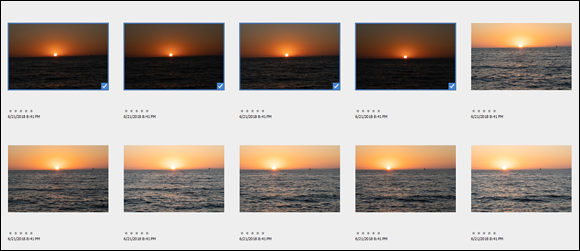
FIGURE 6-10: In the Media Browser, select a group of images you want to stack.
To unstack photos, do the following:
- Set the view to Detail view. Detail view displays detail information below the thumbnail images in the Media Browser. If you are not in Detail view, press Ctrl/⌘ +D or choose View ⇒ Details. You must be in Detail view to proceed.
-
Select Unstack Photos.
Right-click a group of stacked photos and choose Stack ⇒ Unstack Photos. Alternatively, you can choose Edit ⇒ Stack ⇒ Unstack Photos. If you want to unstack multiple stacks, again you must be in Detail view and then choose View ⇒ Expand All Stacks.
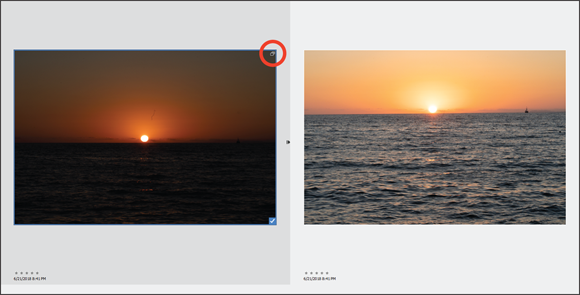
FIGURE 6-11: Set the View to Details, right-click a stack, and choose Stack ⇒ Unstack Photos.
After you stack a group of images, you can use the Stack submenu commands to manage the photos. Click a stack to select it and then choose Edit ⇒ Stack. The available submenu commands are as follows:
- Automatically Suggest Photo Stacks
- Stack Selected Photos
- Unstack Photos
- Expand Photos in Stack
- Collapse Photos in Stack
- Flatten Stack
- Remove Selected Photos from Stack
- Set as Top Photo
 When you flatten a stack, all photos except for the top photo are deleted from the catalog but not from your hard drive.
To view all stacks in the Media Browser in expanded form, choose View ⇒ Expand All Stacks. Using this command doesn’t require you to individually select stacks in the Media Browser before expanding them.
Creating versions
Versions are similar to stacks, but you create versions from only one file. You can edit an image and save both the edited version and the original as a version set. Also, you can make additional edits in either editing mode and save to a version set. To create a version set, follow these steps:
- Select an image by clicking it in the Media Browser.
-
Apply an edit.
For example, right in the Organizer, you can correct some brightness problems in your image. Click Instant Fix to open the Instant Fix panel and click one of the tools in the panel. See Chapter 10 for more details on using the Instant Fix tools or any other editing tool.
-
Save the edited file in a version set.
Choose File ⇒ Save. In the Save dialog box under Save Options, select Save in Version Set with Original.
If you don’t use Instant Fix and make an edit, you need to choose Save As and save your file in a Version Set. Don’t make an edit and click Save. It will overwrite your original file. -
View the items in the version set by clicking the image in the Media Browser and choosing Edit ⇒ Version Set ⇒ Expand Items in Version Set.
Elements automatically creates a version set for you when you apply the Instant Fix to the file. The Media Browser shows two thumbnail images — one representing the original image and the other representing the edited version.
- To open the original image in the Photo Editor, select the image in the Media Browser and then click the Editor button.
-
Edit the image in Expert mode.
You can choose from many different menu commands to edit the image. For example, suppose you want an image for printing and a lower-resolution image for posting on your Facebook page. Choose Image ⇒ Resize ⇒ Image Size, as we explain in Chapter 2, to resample an image.
- Save a version by choosing File ⇒ Save As.
-
In the Save Options area of the Save As dialog box, select the Include in the Organizer and Save in Version Set with Original check boxes.
Chapter 1 also explains the options for saving files.
-
Click Save.
The edits made in the Photo Editor are saved as another version in your version set.
After you create a version set, you find additional submenu commands that you can use to manage the version set. Choose Edit ⇒ Version Set or right-click a version set and then choose Version Set.