
Chapter 9
Working with Layers
IN THIS CHAPTER
![]() Using the Layers panel and the Layer menu
Using the Layers panel and the Layer menu
![]() Working with the Select menu
Working with the Select menu
![]() Creating new layers
Creating new layers
![]() Moving, merging, transforming, and flattening layers
Moving, merging, transforming, and flattening layers
![]() Adding layer masks
Adding layer masks
Using Elements without ever using layers would be like writing a book with a pen and paper pad: Sure, you could do it, but it wouldn’t be fun. An even bigger issue would occur when it came time to edit that book and make changes. Correction tape, correction fluid, and erasers would make that task downright tedious, not to mention messy. The benefit of using layers is that you have tremendous flexibility. You can make as many edits as you want for as long as you want, as long as you keep your composite image in layers. Layers make working in Elements a lot more productive. Don’t give a darn about productivity? Well, let’s just say that layers also make it a breeze for you to bring out your more artsy side.
This chapter explains the tools and techniques you need to start working with layers. After you give layers a try, you’ll wonder how you ever lived without them.
Getting to Know Layers
Think of layers as sheets of acetate or clear transparency film. You have drawings or photographs on individual sheets. What you place on each sheet doesn’t affect any of the other sheets. Any area on the sheet that doesn’t have an image on it is transparent. You can stack these sheets on top of each other to create a combined image, or composite (or collage, if you prefer). You can reshuffle the order of the sheets, add new sheets, and delete old sheets.
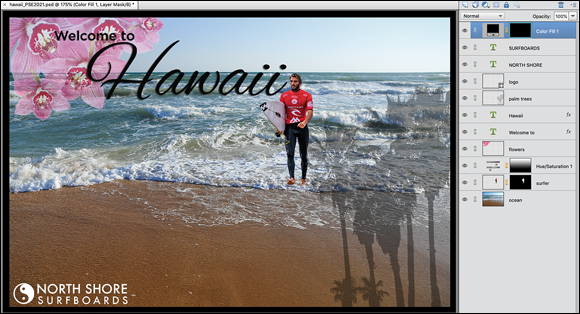
In Elements, layers are essentially digital versions of these clear acetate sheets. You can place elements, such as images, text, or shapes, on separate layers and create a composite, as shown in Figure 9-1. You can hide, add, delete, or rearrange layers. Because layers are digital, of course, they have added functionality. You can adjust how opaque or transparent the element on a layer is. You can also add special effects and change how the colors interact between layers.
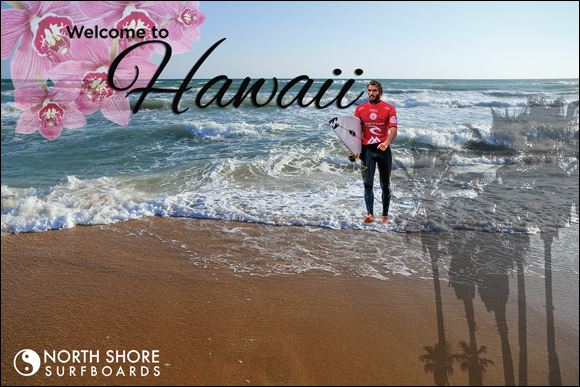
© homydesign/Shutterstock Image #334170533, mervas/Shutterstock Image #271812446, ArtFamily/Shutterstock Image #25608805, Alex_Rodionov/Shutterstock Image #301316285
FIGURE 9-1: Layers enable you to easily create composite images.
 To work with layers, you must be in the Photo Editor in Expert mode.
Converting a background to a layer
When you create a new file with background contents of white or a background color, scan an image into Elements, or open a stock photo or a file from a CD or your digital camera, you basically have a file with just a background. There are no layers yet.
An image contains at most one background, and you can’t do much to it besides paint on it and make basic adjustments. You can’t move the background or change its transparency or blend mode. How do you get around all these limitations? Convert your background into a layer by following these easy steps:
-
Choose Window ⇒ Layers to display the Layers panel.
The Layers panel is explained in detail in the following section.
-
Double-click Background on the Layers panel.
Or choose Layer ⇒ New ⇒ Layer From Background.
-
Name the layer or leave it at the default name of Layer 0.
You can also adjust the blend mode and opacity of the layer in the New Layer dialog box. Or you can do it via the Layers panel commands later.
You can also color-code your layers (but not your Background), which lets you better visually distinguish your layers within the Layers panel. If you decide to do it later, simply right-click (Control-click on the Mac) and choose a color from the contextual menu.
-
Click OK.
Elements converts your background into a layer, known also as an image layer.
When you create a new image with transparent background contents, the image doesn’t contain a background but instead is created with a single layer.
Anatomy of the Layers panel
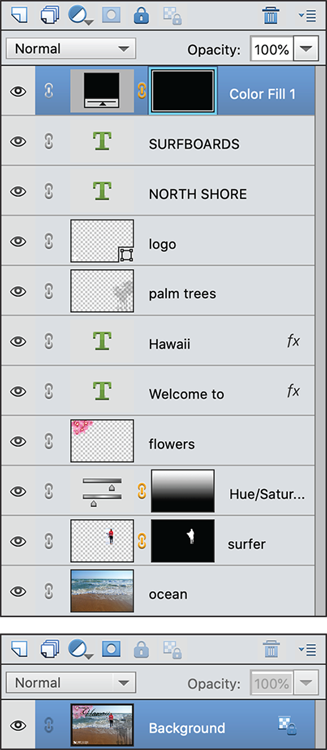
Elements keeps layers controlled with a panel named, not surprisingly, the Layers panel. To display the Layers panel, choose Window ⇒ Layers in the Photo Editor in Expert mode. (Figure 9-2 shows you what you can expect.)

FIGURE 9-2: The Layers panel controls layers in your image.
The order of the layers on the Layers panel represents the order in the image. We refer to this concept in the computer graphics world as the stacking order. The top layer on the panel is the top layer in your image, and so on. Depending on what you’re doing, you can work on a single layer or on multiple layers at one time. Here are some tips for working with the Layers panel:
- Select a layer. Click a layer name or its thumbnail. Elements highlights the active layer on the panel.
- Select multiple contiguous layers. Click your first layer and then Shift-click your last layer.
- Select multiple noncontiguous layers. Ctrl-click (⌘ -click on the Mac) your desired layers.
-
View and hide layers. To hide a layer, click the eye icon for that layer and the layer disappears. To redisplay the layer, click the blank space in the eye column. You can also hide all the layers except one by selecting your desired layer and Alt-clicking (Option-clicking on the Mac) the eye icon for that layer. Redisplay all layers by Alt-clicking (Option-clicking on the Mac) the eye icon again. Hiding all the layers except the one you want to edit can be helpful in allowing you to focus without the distraction of all the other imagery.
 Only layers that are visible are printed. This can be useful if you want to have several versions of an image (each on a separate layer) for a project within the same file.
 - Select the actual element (the nontransparent pixels) on the layer. Ctrl-click (⌘ -click on the Mac) the layer’s thumbnail (not the name) on the panel.
- Create a new blank layer. Click the Create a New Layer icon at the top of the panel.
- Create a new group. Elements enables you to better organize your layers by incorporating layer groups. Think of a layer group as the digital version of an analog manila folder. Select your desired files and drag them into a group folder. You can expand or collapse layer groups to see or hide their contents. When collapsed, layer groups are a nice way to avoid endless scrolling in a file with many layers. Layer groups also let you apply opacity settings, blend modes, and layer styles to a group of layers at a time.
-
To create a layer group, click the Create a New Group icon (the stacked layers icon) at the top of the Layers panel. You can also select New Group from the Layers panel pop-up menu or choose Layer ⇒ New ⇒ Group. The latter two methods prompt you for a group name in addition to a few other options (similar to regular layers). You can color-code your group and specify a blend mode and opacity setting. The default mode is Pass Through, which lets the blend modes applied to the individual layers remain intact (for more on blend modes, see Chapter 12). If you select any other mode, that mode overrides all the layers in the group. After you create your group, drag your layers into the group folder in the Layers panel. To collapse or expand the group, click the triangle icon to the left of the group icon. As with regular layers, you can select, duplicate, show, hide, lock, and rearrange layer groups.
A couple other tips:
- You can create a layer group from selected layers. Select the layers that you want to be in a group, and then select New Group from Layers from the Layers panel pop-up menu or choose Layer ⇒ New ⇒ Group from Layers. Name the group in the dialog box that appears and click OK.
- You can merge layer groups. Select the group and select Merge Group from the Layers panel pop-up menu or choose Layer ⇒ Merge Group. You can rename your group by double-clicking the group name in the Layers panel.
- Add a layer mask. Click the Add Layer Mask icon at the top of the panel. A layer mask enables you to selectively show and hide elements or adjustments on your layer, as well as creatively blend layers together. For more details, see “Adding Layer Masks,” later in this chapter.
- Create an Adjustment layer. Click the Create a New Fill or Adjustment Layer icon at the top of the panel. Adjustment layers are special layers that modify contrast and color in your image. You can also add fill layers — layers containing color, gradients, or patterns — by using this command. We give you more details on adjustment and fill layers in the section “Working with Different Layer Types,” later in this chapter.
- Duplicate an existing layer. Drag the layer to the Create a New Layer icon at the top of the panel.
-
Rearrange layers. To move a layer to another position in the stacking order, drag the layer up or down on the Layers panel. While you drag, you see a fist icon. Release the mouse button when a highlighted line appears where you want to insert the layer.
If your image has a background, it always remains the bottommost layer. If you need to move the background, convert it to a layer by double-clicking the name on the Layers panel. Enter a name for the layer and click OK. - Rename a layer. When you create a new layer, Elements provides default layer names (Layer 1, Layer 2, and so on). If you want to rename a layer, double-click the layer name on the Layers panel and enter the name directly on the Layers panel.
- Adjust the interaction between colors on layers and adjust the transparency of layers. You can use the blend modes and the opacity options at the top of the panel to mix the colors between layers and adjust the transparency of the layers, as shown in Figure 9-3. For more on blend modes, see Chapter 12.
© Andrey Nekrasov/ImageBROKER/Corbis #4264117116, Rocksweeper/Shutterstock Image #264273713
FIGURE 9-3: We created this effect by using blend modes and opacity options.
- Link layers. Sometimes you want your layers to stay grouped as a unit to make your editing tasks easier. If so, link your layers by selecting your desired layers in the panel and then clicking the Link/Unlink Layers icon on any one of the selected layers. To remove the link, click the Link/Unlink Layers icon again.
-
Lock layers. Select your desired layer or layers and then click one of the two lock icons at the top of the panel. The checkerboard square icon locks all transparent areas of your layers. This lock prevents you from painting or editing any transparent areas on the layers. The lock icon locks your entire layer and prevents it from being changed in any way, including moving or transforming the elements on the layer. You can, however, still make selections on the layer. To unlock the layer, simply click the icon again to toggle off the lock.
By default, the background is locked and can’t be unlocked until you convert it into a layer by choosing Layer ⇒ New ⇒ Layer from Background. - Delete a layer. Drag it to the Trash icon.
Using the Layer and Select menus
As with many features in Elements, you usually have more than one way to do something. This is especially true when it comes to working with layers. Besides the commands on the Layers panel, you have two layer menus — the Layer menu and the Select menu — both of which you can find on the main menu bar at the top of the application window (top of the screen on the Mac).
The Layer menu
Much of what you can do with the Layers panel icons you can also do by using the Layer menu on the menu bar and the Layers panel menu connected to the Layers panel. (Access the Layers panel menu by clicking the horizontally lined button in the upper-right corner of the Layers panel.) Commands, such as New, Duplicate, Delete, and Rename, are omnipresent throughout. But you find commands that are exclusive to the Layers panel, the main Layer menu, and the Layers panel menu, respectively. So if you can’t find what you’re looking for in one area, just go to another. Some commands require more explanation and are described in the sections that follow. However, here’s a quick description of most of the commands:
- Delete Linked Layers and Delete Hidden Layers: These commands delete only those layers that have been linked or those hidden from display on the Layers panel.
- Layer Style: These commands manage the styles, or special effects, you apply to your layers.
- Arrange: This enables you to shuffle your layer stacking order with options, such as Bring to Front and Send to Back. Reverse switches the order of your layers if you have two or more layers selected.
- Create Clipping Mask: In a clipping mask, the bottommost layer (or base layer) acts as a mask for the layers above it. The layers above “clip” to the opaque areas of the base layer and don’t show over the transparent areas of the base layer. Clipping masks work well when you want to fill a shape or type with different image layers.
- Type: The commands in the Type submenu control the display of type layers. For more on type, see Chapter 14.
- Rename Layer: This enables you to give a layer a new name. You can also simply double-click the name on the Layers panel.
- Simplify Layer: This converts a type layer, shape layer, or fill layer into a regular image layer. Briefly, a shape layer contains a vector object, and a fill layer contains a solid color, a gradient, or a pattern.
- Merge and Flatten: The various merge and flatten commands combine multiple layers into a single layer or, in the case of flattening, combine all your layers into a single background.
- Panel Options: You can select display options and choose to use a layer mask on your adjustment layers. Leave this option selected.
The Select menu
Although the Select menu’s main duties are to assist you in making and refining your selections, it offers a few handy layer commands. Here’s a quick introduction to each command:
- Select all layers. Want to quickly get everything in your file? Choose Select ⇒ All Layers.
- Deselect all layers. If you want to ensure that nothing is selected in your document, simply choose Select ⇒ Deselect Layers.
Working with Different Layer Types
Layer life exists beyond just converting an existing background into a layer, which we describe in the section “Getting to Know Layers,” earlier in this chapter. In fact, Elements offers five kinds of layers. You’ll probably spend most of your time creating image layers, but just so that you’re familiar with all types, the following sections describe each one.
Image layers
The image layer, usually just referred to as a layer, is the type of layer we’re referring to when we give the analogy of acetate sheets in the section “Getting to Know Layers,” earlier in this chapter. You can create blank layers and add images to them, or you can create layers from images themselves. You can have as many image layers as your computer’s memory allows.
The more layers you have, the larger your file size and the longer it takes to save and open your file.
Each layer in an image can be edited without affecting the other layers. You can move, paint, size, or apply a filter, for example, without disturbing a single pixel on any other layer or on the background, for that matter. And when an element is on a layer, you no longer have to make a selection to select it — just drag the element with the Move tool. If, however, you want only part of that layer, you need to make a selection. (See Chapter 8 for information on selections.)
Adjustment layers
An Adjustment layer is a special kind of layer used for modifying color and contrast; Figure 9-4 shows an example. The advantage of using Adjustment layers for your corrections, rather than applying them directly on the image layer, is that you can apply the corrections without permanently affecting the pixels. This means that Adjustment layers are totally nondestructive. And because the correction is on a layer, you can edit, or even delete, the adjustment at any time. Adjustment layers apply the correction only to all the layers below them without affecting any of the layers above them.
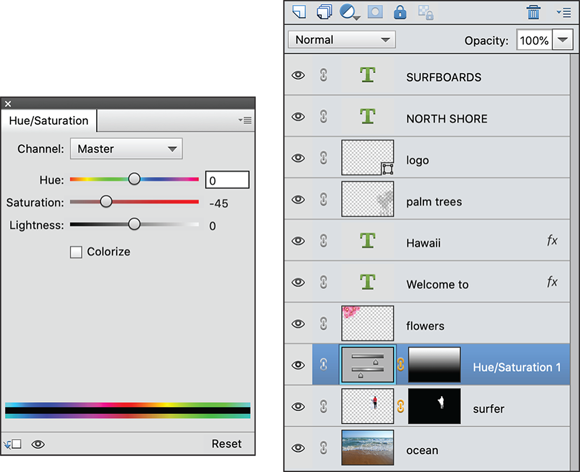
FIGURE 9-4: Adjustment layers correct color and contrast in your image.
 Another unique feature of Adjustment layers is that when you create one, you also create a layer mask on that layer at the same time. If you’re unfamiliar with layer masks, take a peek at the section “Adding Layer Masks,” later in this chapter. The layer mask allows you to selectively and even partially apply the adjustment to the layers below it by applying shades of gray — from white to black — on the mask. By default, the mask is completely white, which allows the adjustment to be fully applied to the layers. If you paint on a layer mask with black, the areas under those black areas don’t show the adjustment. If you paint with a shade of gray, those areas partially show the adjustment. Note: If you have an active selection border in your image before you add an Adjustment layer, the adjustment is applied only to that area within the selection border.
Elements has eight kinds of Adjustment layers, and you can use as many as you want. These are the same adjustments that you find on the Enhance ⇒ Adjust Lighting, Enhance ⇒ Adjust Color, and Filter ⇒ Adjustments submenus. For specifics on each adjustment, see Chapters 10 and 11. Here’s how to create an Adjustment layer:
-
Open an image that needs a little contrast or color adjustment.
You don’t need to convert your background into a layer to apply an Adjustment layer.
-
Click the Create New Fill or Adjustment Layer icon at the top of the Layers panel, and from the drop-down list, choose your desired adjustment.
The Adjustment layer icon and a thumbnail appear on the adjustment layer. The thumbnail represents the layer mask. And the dialog box specific to your adjustment appears in the Adjustments panel.
-
Make the necessary adjustments in the particular Adjustments panel.
To selectively allow only portions of your image to receive the adjustment, you can paint on the layer mask using the Brush or Pencil tool. Or you can make a selection and fill that selection with any shade of gray, from white to black. Another technique is to use the Gradient tool on the mask to create a gradual application of the adjustment, as shown in Figure 9-5.
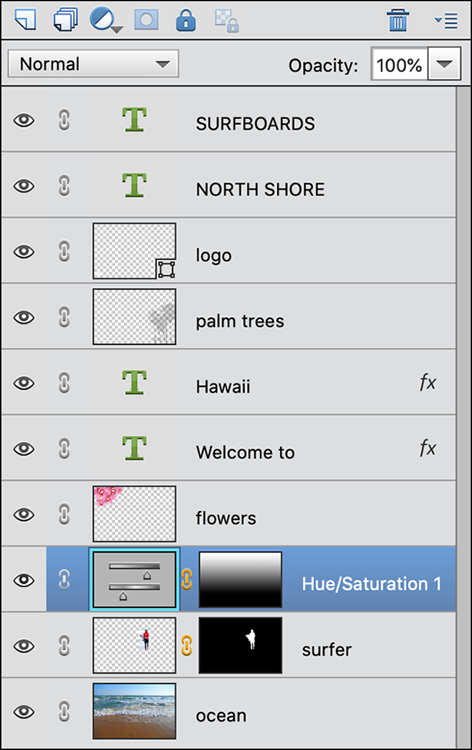
FIGURE 9-5: Layer masks control the amount of adjustment applied to your layers.
As with image layers, you can adjust the opacity and blend modes of an Adjustment layer. Reducing the opacity of an adjustment layer reduces the effect of the adjustment on the underlying layers.
Here are a few more tips on using adjustment layers:
- To view your image without the adjustment, click the eye icon in the left column of the Layers panel to hide the Adjustment layer.
- To delete the Adjustment layer, drag it to the Trash icon on the Layers panel.
- To edit an Adjustment layer, simply double-click the Adjustment layer on the Layers panel. In the Adjustments panel, make any desired edits. The only Adjustment layer that you can’t edit is the Invert adjustment. It’s either on or off.
- To use the adjustment panel controls, click an icon (shown in Figure 9-4 at the bottom of the Hue/Saturation window). From left to right, here’s what the icons do:
- Have the Adjustment layer clip to the layer below. (It will affect only the layer directly beneath it, not all the underlying layers in the stack.)
- Toggle the Adjustment layer on and off.
- Reset the Adjustment layer settings back to the default.
Fill layers
A fill layer lets you add a layer of solid color, a gradient, or a pattern. Like adjustment layers, fill layers also include layer masks. You can edit, rearrange, duplicate, delete, and merge fill layers similarly to adjustment layers. You can blend fill layers with other layers by using the opacity and blend mode options on the Layers panel. Finally, you can restrict the fill layer to just a portion of your image by either making a selection first or painting on the mask later.
Follow these steps to create a fill layer:
-
Open an image.
Use an image that will look good with a frame or border of some kind. Remember that if you don’t have a selection, the fill layer covers your whole image.
-
Click the Create New Fill or Adjustment Layer icon on the Layers panel. From the drop-down list, choose a fill of a solid color, gradient, or pattern.
The dialog box specific to your type of fill appears.
- Specify your options, depending on the fill type you chose in Step 2:
- Solid Color: Choose your desired color from the Color Picker. See Chapter 13 for details on choosing colors and also gradients and patterns.
- Gradient: Click the down-pointing arrow to choose a preset gradient from the drop-down panel, or click the gradient preview to display the Gradient Editor and create your own gradient.
- Pattern: Select a pattern from the drop-down panel. Enter a value to scale your pattern, if you want. Click Snap to Origin to make the origin of the pattern the same as the origin of the document. Select the Link with Layer option to specify that the pattern moves with the fill layer if you move that layer.
-
Click OK.
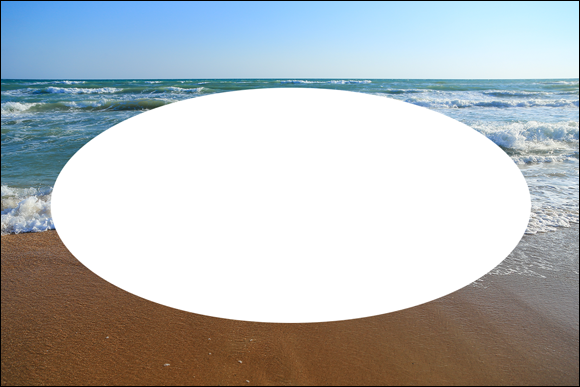
The fill layer appears on the Layers panel, as shown in Figure 9-6. Notice the layer mask that was created on the fill layer. We filled our entire layer mask with black, with just the exception of the outside edge to create a frame around our image.
© homydesign/Shutterstock Image #334170533, mervas/Shutterstock Image #271812446, ArtFamily/Shutterstock Image #25608805, Alex_Rodionov/Shutterstock Image #301316285
FIGURE 9-6: Add a frame or border with a fill layer.
Shape layers
If you haven’t made your way to Chapter 13 yet, you may be surprised to discover that Elements also lets you draw shapes with seven different drawing tools. These shapes have the bonus of being vector-based. This means that the shapes are defined by mathematical equations, which consist of points and paths, instead of pixels. The advantage of vector-based objects is that you can freely resize these objects without causing degradation. In addition, they’re always printed with smooth edges, not with the jaggies you’re familiar with seeing in pixel-based elements.
To create a shape layer, grab a shape tool from the Tools panel and drag it on your canvas. When you create a shape, it resides on its own, unique shape layer, as shown by the yin-and-yang logo in the bottom-left corner of Figure 9-6. As with other types of layers, you can adjust the blend modes and opacity of a shape layer. You can also edit, move, and transform the actual shapes. However, to apply filters, you must first simplify the shape layer by choosing Layer ⇒ Simplify Layer. This process converts the vector paths to pixels.
Type layers
To add words to your images (refer to Figure 9-6), click your canvas with the Type tool selected and just type. It’s really as easy as that. Well, you can specify options, such as a font family and size, in the Tool Options, but when you click the Commit button on the image window, you create a type layer. On the Layers panel, the type layer displays a T icon. For details on working with type, check out Chapter 14.
Tackling Layer Basics
Image layers are the heart and soul of the layering world. You can create multiple image layers within a single image. Even more fun is creating a composite from several different images. Add people you like; take out people you don’t. Pluck people out of boring photo studios and put them in exotic locales. The creative possibilities are endless. In the following sections, we cover all the various ways to create image layers.
Creating a new layer from scratch
If you’re creating a new, blank file, you can select the Transparent option for your background contents. Your new file is created with a transparent layer and is ready to go. If you have an existing file and want to create a new, blank layer, here are the ways to do so:
- Click the Create a New Layer icon at the top of the Layers panel.
- Choose New Layer from the Layers panel menu.
- Choose Layer ⇒ New ⇒ Layer.
If you create a layer by using either of the menu commands, you’re presented with a dialog box with options. In that dialog box, you can name your layer and specify options for creating a clipping mask, color coding, blending, and adjusting opacity. Provide a name for your layer and click OK. You can always adjust the other options directly on the Layers panel later.
You can also use the Copy and Paste commands without even creating a blank layer first. When you copy and paste a selection without a blank layer, Elements automatically creates a new layer from the pasted selection. A better method of copying and pasting between multiple images, however, is to use the drag-and-drop method, which we describe in the section “Dragging and dropping layers,” later in this chapter.
The Copy Merged command on the Edit menu creates a merged copy of all visible layers within the selection.
After you create your layer, you can put selections or other elements on that layer by doing one or more of the following:
- Paint: Grab a painting tool, such as the Brush or Pencil, and paint on the layer.
- Copy a selection: Make a selection on another layer or on the background within the same document, or from another image entirely, and then choose Edit ⇒ Copy. Select your new, blank layer on the Layers panel and then choose Edit ⇒ Paste.
- Cut a selection: Make a selection on another layer or on the background within the same document, or from another image, and then choose Edit ⇒ Cut. Select your new, blank layer and then choose Edit ⇒ Paste. Be aware that this action removes that selection from its original location and leaves a transparent hole, as shown in Figure 9-7.
© Alex_Rodionov/Shutterstock Image #301316285
FIGURE 9-7: When you cut a selection from a layer, take note of the resulting hole in the original location.
If you cut a selection from a Background instead of an image layer, the space isn’t a transparent hole; it’s filled with the background color.
Using Layer via Copy and Layer via Cut
Another way to create a layer is to use the Layer via Copy and Layer via Cut commands on the Layer menu’s New submenu. Make a selection on a layer or background and choose Layer ⇒ New ⇒ Layer via Copy or Layer via Cut. Elements automatically creates a new layer and puts the copied or cut selection on the layer. Remember that if you use the Layer via Cut command, your selection is deleted from its original location layer, and you’re left with a transparent hole when cutting from an image layer. If you use the background for the source, your background color fills the space. A reminder: You can use these two commands only within the same image. You can’t use them among multiple images.
Duplicating layers
Duplicating layers can be helpful if you want to protect your original image while experimenting with a technique. If you don’t like the results, you can always delete the duplicate layer. No harm, no foul.
To duplicate an existing layer, select it on the Layers panel and do one of four things:
- Drag the layer to the Create a New Layer icon at the top of the panel. Elements creates a duplicate layer with Copy appended to the name of the layer.
- Choose Duplicate Layer from the Layers panel menu.
- Choose Layer ⇒ Duplicate Layer.
- Choose Layer ⇒ New ⇒ Layer via Copy. (Make sure you don’t have an active selection when choosing this command.)
If you use the menu methods, with the exception of Layer ⇒ New ⇒ Layer via Copy, a dialog box appears, asking you to name your layer and specify other options. Provide a name for your layer and click OK. You can specify the other options later if you want.
Dragging and dropping layers
The most efficient way to copy and paste layers between multiple images is to use the drag-and-drop method. Why? Because it bypasses your Clipboard, which is the temporary storage area on your computer for copied data. Storing data, especially large files, can bog down your system. By keeping your Clipboard clear of data, your system operates more efficiently.
If you already copied data and it’s lounging on your Clipboard, choose Edit ⇒ Clear ⇒ Clipboard Contents to empty your Clipboard.
Here’s how to drag and drop layers from one file to another:
- In your first (or source) file, select your desired layer in the Layers panel.
- Grab the Move tool (the four-headed arrow) from the Tools panel.
-
Drag and drop the layer onto your second (or destination) file.
The dropped layer pops in as a new layer above the active layer in the image. You don’t need to have a selection border to copy the entire layer. But if you want to copy just a portion of the layer, make your selection before you drag and drop with the Move tool. If you want the selected element to be centered on the destination file, press the Shift key while you drag and drop.
If you have several elements (that aren’t touching each other) on one layer and you want to select only one of the elements to drag and drop, use the Lasso tool to make a crude selection around the object without touching any of the other elements. Then press the Ctrl (⌘ on the Mac) key and press the up-arrow key once. The element then becomes perfectly selected. You can now drag and drop with the Move tool.
Using the Paste into Selection command
The Paste into Selection command lets you put an image on a separate layer while also inserting that image into a selection border. For example, in Figure 9-8, we use this command to make it appear as though our surfer is in the water.
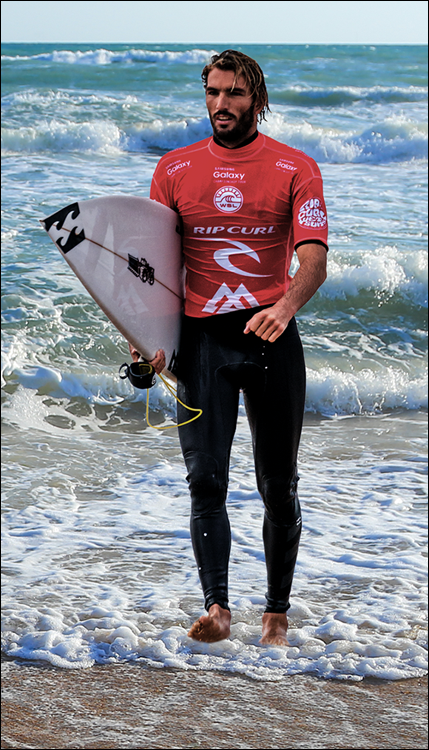
© Alex_Rodionov/Shutterstock Image #301316285, homydesign/Shutterstock Image #334170533
FIGURE 9-8: Use the Paste into Selection command to make one element appear as though it’s coming out of another element.
You can do the same by following these steps:
-
Create a new blank layer and then make your desired selection on the layer in your destination image.
In our figure, we selected the area in the water where the surfer would be positioned.
-
Select the image that will fill that selection.
We selected a surfer from another image.
-
Choose Edit ⇒ Copy.
Return to the destination image blank layer and choose Edit ⇒ Paste into Selection.
The pasted selection is visible only inside the selection border. Position your pasted selection as desired and then choose Select ⇒ Deselect. In our example, the surfer shows only inside the selected area. Parts of his feet were positioned outside the selection border to make him appear as if he is really in the water.
Moving a Layer’s Content
Moving the content of a layer is a piece of cake: Grab the Move tool from the Tools panel, select your layer on the Layers panel, and drag the element on the canvas to your desired location. You can also move the layer in 1-pixel increments by using the keyboard arrow keys. Press Shift with the arrows to move in 10-pixel increments. Note: If you hold down the Alt (Option on the Mac) key while moving your element, you make a duplicate of that element.
The Auto Select Layer option in the Tool Options enables you to switch to a layer when you click any part of that layer’s content with the Move tool. But be careful if you have a lot of overlapping layers because this technique can sometimes be more trouble than it’s worth.
The Move tool has additional settings found in Tool Options. Here’s the lowdown:
- Show Bounding Box: This option surrounds the contents of your layer with a dotted box that has handles, enabling you to easily transform your layer. Find details in the following section.
- Show Highlight on Rollover: Hover your mouse anywhere over the canvas to make an outline appear around the element on your layer. Click the highlighted layer to select it and then move it.
- Arrange submenu: This menu enables you to change your selected layer’s position in the stacking order.
- Link Layers: This option, which resides not in the Tool Options, but in the Layers panel, connects the layers to make it easier to move (or transform) multiple layers simultaneously. Select a layer and then Ctrl-click (⌘ -click on the Mac) to select more layers. Click the Link Layers icon (chain).
- Align submenu: Align your selected layers on the left, center, right, top, middle, and bottom. As with linking, select your first layer and then Shift-click to select more layers. Ctrl-click (⌘ -click on the Mac) to select nonconsecutive layers. Choose an alignment option.
- Distribute submenu: Use this menu to evenly space your selected layers on the left, center, right, top, middle, and bottom. As with aligning, select your first layer and then Shift-click to select more layers. Ctrl-click (⌘ -click on the Mac) to select nonconsecutive layers. Choose your desired distribution option.
Transforming Layers
When working with layers, you may need to scale or rotate some of your images. You can do so easily by applying the Transform and Free Transform commands. The methods to transform layers and selections are identical.
Here’s how to transform a layer:
-
Select your desired layer.
You can also apply a transformation to multiple layers simultaneously by linking the layers first.
-
Choose Image ⇒ Transform ⇒ Free Transform.
A bounding box surrounds the contents of your layer.
- Adjust (or transform) the bounding box.
- Size the contents: Drag a corner handle.
- Constrain the proportions: Press Shift while dragging.
- Rotate the contents: Move the mouse cursor just outside a corner handle until it turns into a curved arrow, and then drag. Or choose Image ⇒ Rotate.
-
Distort, skew, or apply perspective to the contents: Right-click and choose the desired command from the context menu. You can also click the rotate, scale, and skew icons in the Tool Options, as well as enter your transform values numerically in the fields.
If you want to apply just a single transformation, you can also choose the individual Distort, Skew, and Perspective commands from the Image ⇒ Transform menu.
-
When your layer is transformed to your liking, double-click inside the bounding box.
 Try to perform all your transformations in one execution. Each time you transform pixels, you put your image through the interpolation process (analyzing the colors of the original pixels and “manufacturing” new ones). Done to the extreme, this process can degrade the quality of your image. This is why it’s prudent to use the Free Transform command rather than individual commands — so that all transformations can be executed in one fell swoop.
When the Move tool is active, you can transform a layer without choosing a command. Select the Show Bounding Box option in the Tool Options. This option surrounds the layer or selection with a box that has handles. Drag the handles to transform the layer or selection.
Adding Layer Masks
One of the best creative tools Elements has to offer is layer masks. Masking is essentially just another way of making a selection. Instead of making a selection with a single selection outline — either it is selected or it isn’t — masks enable you to define your selection with up to 256 levels of gray (from white to black). You can therefore have varying levels of a selection.
Here’s how it works. First, think of a layer mask as a sheet of acetate that hovers over your layer. To add it to a layer, click the layer mask icon (dark rectangle with a light circle) at the top of the Layers panel. Then, with any of the painting tools (Brush tool, Gradient tool, and others), you apply black, white, or any shade of gray onto the layer mask. Where the mask is white, the image on the underlying layer is selected and shows. Where the mask is black, the image is unselected and is hidden. And where the mask is gray, the image is partially selected; therefore, it partially shows. The lighter the gray, the more the image shows. By default, the mask starts out completely white so that everything is selected and shows.
Here are some things you can do with layer masks:
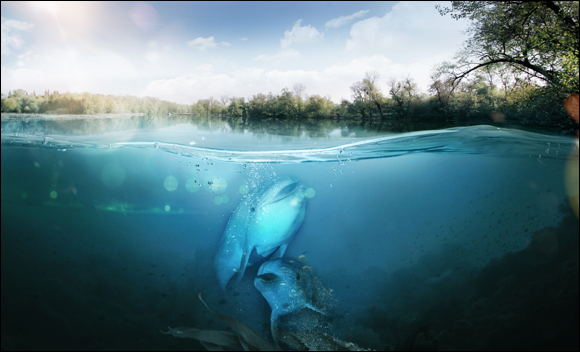
- Creatively blend one layer into another. If you want one image to gradually dissolve into another, using a layer mask is the way to go. Try using the Gradient tool with the black-to-white gradient selected to create a soft dissolve. You can use layer masks to blend images together in a realistic manner, as shown in Figure 9-9, where we combined a goldfish and a sudsy brew. In the figure, you can see where we painted with black to completely hide the original background of the fish image. We painted with light gray on the fish to make it appear as if it is truly “swimming” in the golden liquid. In other words, some of the liquid of the underlying glass of beer image shows through to the fish layer.
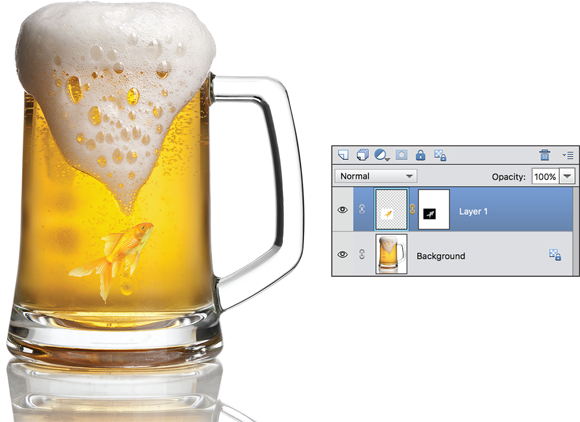
© Tischenko Irina/Shutterstock Image #58458289, flubydest/Getty Images Image #183341783
FIGURE 9-9: Add a layer mask to blend one layer into another.
- Adjust your layer mask to selectively show and hide the effects of the adjustment layer. See the earlier section, “Adjustment layers.”
-
Apply a filter to your layer mask to create an interesting special effect. One of the best aspects of layer masks is that you can endlessly edit them. Unlike just making a feathered selection, you can keep adjusting how much of your current layer or underlying images show. Or you can adjust how gradually one image blends into another: Simply change the areas of white, black, and gray on the layer mask by painting with any of the painting tools. Just make sure you select the layer mask and not the image. When you select the layer mask thumbnail in the Layers panel, you see the appearance of an outline around the thumbnail. You can’t add a layer mask to a background. You must convert the background into a layer first.
If you’re just not up to tackling a layer mask, you’ll want to check out the Double Exposure Guided Edit. You’ll find it under Guided ⇒ Fun Edits ⇒ Double Exposure. This great edit enables you to easily merge two photos and also apply various preset effects.
Here are some other things to keep in mind when you use layer masks:
- To load the mask as a selection outline, simply Ctrl-click (⌘ -click on the Mac) the layer mask thumbnail in the Layers panel.
- To temporarily hide a mask, Shift-click the layer mask thumbnail in the Layers panel. Repeat to show the mask.
- To view the mask without viewing the image, Alt-click (Option-click on the Mac) the Layer Mask thumbnail in the Layers panel. This trick can be helpful when editing a layer mask.
- To unlink a layer from its layer mask, click the link icon in the Layers panel. Click again to reestablish the link. By default, Elements links a layer mask to the contents of the layer. This link enables them to move together.
- To delete a layer mask, drag its thumbnail to the Trash icon in the Layers panel.
- To apply a layer mask, drag the mask thumbnail to the Trash icon in the Layers panel and be sure to click Apply in the dialog box. When you apply a layer mask, you fuse the mask to the layer so editing is no longer possible.
Note: Many of the preceding commands are also available in the Layer ⇒ Layer Mask submenu.
Flattening and Merging Layers
Layers are fun and fantastic, but they can quickly chew up your computer’s RAM and bloat your file size. And sometimes, to be honest, having too many layers can start to make your file tedious to manage, thereby making you less productive. Whenever possible, you should merge your layers to save memory and space. Merging combines visible, linked, or adjacent layers into a single layer (not a Background). The intersection of all transparent areas is retained.
In addition, if you need to import your file into another program, certain programs don’t support files with layers. Therefore, you may need to flatten your file before importing it. Flattening an image combines all visible layers into a Background, including type, shape, fill, and adjustment layers. You’re prompted as to whether you want to discard hidden layers, and any transparent areas are filled with white. We recommend, however, that before you flatten your image, you make a copy of the file with all its layers intact and save it as a native Photoshop file. That way, if you ever need to make any edits, you have the added flexibility of having your layers.
By the way, the only file formats that support layers are native Photoshop (.psd); Tagged Image File Format, or TIFF (.tif); and Portable Document Format, or PDF (.pdf) (called Photoshop PDF in PSE). If you save your file in any other format, Elements automatically flattens your layers into a background. See Chapter 3 for details on these file types.
Flattening layers
To flatten an image, follow these steps:
-
Make certain that all layers you want to retain are visible.
If you have any hidden layers, Elements asks whether you want to discard those hidden layers.
It’s always good insurance to save a copy of an image with layers while flattening another copy. You just never know — you may need to make edits at a later date. -
Choose Flatten Image from the Layers panel menu or the Layer menu.
All your layers are combined into a single background, as shown in Figure 9-10.
If you mistakenly flatten your image, choose Edit ⇒ Undo or use your Undo History panel. (If you’re not familiar with the History panel, see Chapter 1 for details.)
© homydesign/Shutterstock Image #334170533, mervas/Shutterstock Image #271812446, ArtFamily/Shutterstock Image #25608805, Alex_Rodionov/Shutterstock Image #301316285
FIGURE 9-10: Flattening combines all your layers into a single background.
Merging layers
Unlike flattening layers, where all layers get combined into a single Background, you can choose to merge just a few layers. Also, remember, when you do choose to merge all your layers, they combine into a single layer versus a Background.
You can merge your layers in a few ways. Here’s how:
- Select only those layers you want to merge. Choose Merge Layers from the Layers panel menu or the Layer menu.
- Display only those layers you want to merge. Click the eye icon on the Layers panel to hide those layers you don’t want to merge. Choose Merge Visible from the Layers panel menu or the Layer menu.
- Arrange the layers you want to merge so that they’re adjacent on the Layers panel. Select the topmost layer of that group and choose Merge Down from the Layers panel menu or the Layer menu. Merge Down merges your active layer with the layer directly below it.