CHAPTER 10
Securing TCP/IP
The CompTIA Network+ certification exam expects you to know how to
• 1.5 Explain common ports and protocols, their application, and encrypted alternatives
• 4.1 Explain common security concepts
• 4.3 Given a scenario, apply network hardening techniques
To achieve these goals, you must be able to
• Discuss the standard methods for securing TCP/IP networks
• Compare TCP/IP security standards
• Implement secure TCP/IP applications
TCP/IP wasn’t designed with any real security in mind. Oh sure, you can put usernames and passwords on FTP, Telnet, and other TCP/IP applications, but everything else is basically wide open. Every device with a public IP address on the Internet is constantly bombarded with malicious packets trying to gain some level of access to precious data. Even data moving between two hosts is relatively easily intercepted and read. Bad guys make millions by stealing data in any of hundreds of thousands of different ways, and TCP/IP in its original form is all but powerless to stop them.
Happily, TCP/IP has a tremendous amount of flexibility. Over time, this has enabled developers to bolt on substantial security for pretty much anything you want to send in an IP packet. This chapter takes you on a tour of the many ways smart people have built on top of TCP/IP to protect data from those who wish to do evil things to or with it. First, we’ll look at security concepts, and then we’ll turn to specific standards and protocols. The chapter wraps with a discussion of secure TCP/IP applications.
Historical/Conceptual
Making TCP/IP Secure
While we’ll take a closer look at risk management and security concepts in later chapters, it will be easier to understand how we secure TCP/IP connections if you know a little about the following five important concepts:
• Encryption means to scramble, mix up, or change data in such a way that bad guys can’t read it. Of course, this scrambled-up data must also be easily descrambled by the person receiving the data.
• Integrity is the process that guarantees that the data received is the same as originally sent. Integrity is designed to cover situations in which someone intercepts your data on-the-fly and makes changes.
• Nonrepudiation means that a person cannot deny he or she took a specific action. Mike sends a message; that message can be traced back specifically to Mike.
• Authentication means to verify that whoever is trying to access the data is the person you want accessing that data. The most classic form of authentication is the username and password combination, but there are plenty more ways to authenticate.
• Authorization defines what an authenticated person can do with that data. Different operating systems and applications provide different schemes for authorization, but the classic scheme for Windows is to assign permissions to a user account. An administrator, for example, can do a lot more after being authenticated than a limited user can do.
Encryption, integrity, nonrepudiation, authentication, and authorization may be separate issues, but they play a big role in modern TCP/IP security practices. For example, you shouldn’t send a credit card number or password over the Internet without encrypting it to keep the bad guys from reading it. Similarly, if you send someone the “secret decoder ring” she needs to unscramble the encryption, she’ll need a way to confirm that the decoder ring actually came from you. When it comes to TCP/IP security, protocols combine encryption, integrity, nonrepudiation (sometimes), authentication, and authorization to create complete security solutions in a way that makes sense for their specific purpose.
Encryption
All data on your network is nothing more than ones and zeroes. Identifying what type of data the strings of ones and zeroes in a packet represent usually is easy. A packet of data on the Internet often comes with a port number encapsulated in the segment or datagram, for example, so a bad guy quickly knows what type of data he’s reading.
All data starts as cleartext, which roughly means the data hasn’t been encrypted yet. If you want to take some data and make figuring out what it means difficult for other people, you need a cipher. A cipher is a general term for a way to encrypt data. An algorithm is the mathematical formula that underlies the cipher. In cryptography, any data you pass through a cipher—even if it is already encrypted—is called the plaintext. When you run plaintext through a cipher algorithm using a key, you get the encrypted ciphertext (Figure 10-1).
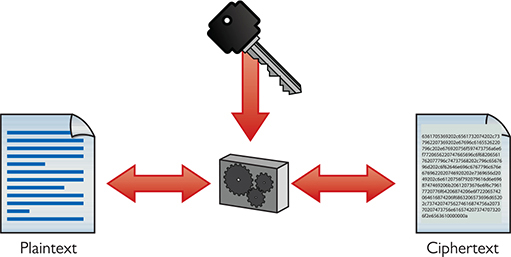
Figure 10-1 Encryption process

NOTE Outside of encryption, the term “plain text” means something you could open and read in Notepad. Even though they are cleartext, binary files (such as a .jpg or .exe) will look like gibberish in Notepad because they’re designed for computers—not for us.
Substitution
One of the earliest forms of cryptography used substitution, swapping letters of the alphabet for other letters of the alphabet. How early? Julius Caesar used substitution to secure communication during his military campaigns; thus this kind of encryption is often called a Caesar cipher. Here’s how it works.
See if you can crack the following code:
WKH TXLFN EURZQ IRA MXPSV RYHU WKH ODCB GRJ
This is a classic example of the Caesar cipher. You just take the letters of the alphabet and transpose them:
![]()
Caesar ciphers are very easy to crack by using word patterns, frequency analysis, or brute force. The code “WKH” shows up twice, which means it’s the same word (word patterns). The letters W and H show up fairly often too. Certain letters of the alphabet are used more than others, so a code-breaker can use that to help decrypt the code (frequency analysis). Assuming that you know this is a Caesar cipher, a computer can quickly go through every different code possibility and determine the answer (brute force). Incredibly, even though it’s not as obvious, binary code also suffers from the same problem.
So let’s solve the code:
W=T; K=H; H=E; first word: The
T=Q; X=U; L=I; F=C; N=K; second word: quick
E=B; U=R; R=O; Z=W; Q=N; third word: brown
Get it yet? The full text is “The quick brown fox jumps over the lazy dog.” Use this simple Caesar cipher to amaze your friends and family, and baffle your instructors!
Substitution is used in modern computing encryption, although in a much more sophisticated way than in a Caesar cipher. Let’s go on.
XOR
Let’s say you have a string of ones and zeroes that looks like this:
01001101010010010100101101000101
This string may not mean much to you, but if it is part of an HTTP segment, a Web browser instantly knows that this is Unicode—that is, numbers representing letters and other characters—and converts it into text:
![]()
So let’s create a cipher to encrypt this cleartext. All binary encryption requires some interesting binary math. You could do something really simple such as add 1 to every value (and ignore carrying the 1):
0 + 1 = 1 and 1 + 1 = 0 10110010101101101011010010111010
No big deal; that just reversed the values. Any decent hacker would see the pattern and break this code in about three seconds. Let’s try something harder to break by bringing in a second value (a key) of any eight binary numbers (let’s use 10101010 for this example) and doing some math with every sequence of eight binary values using this algorithm:

This calculation (also called an operation) is known as a bitwise XOR (eXclusive OR). Line up the key against the first eight values in the cleartext:
![]()
Then do the next eight binary values:
![]()
Then the next eight:
![]()
Then the final eight:
![]()
If you want to decrypt the data, you need to know the algorithm and the key. This is a very simple example of how to encrypt binary data. At first glance, you might say this is good encryption, but the math is simple, and a simple XOR is easy for someone to decrypt.
NOTE As a bitwise operation, XOR operates on each pair of corresponding bits. At this level, letters and numbers are all just binary ones and zeroes—XOR works on any data you can throw at it.
In computing, you need to make a cipher hard for anyone to break, yet make it accessible to the people you want to read the data. Luckily, computers do more complex algorithms very quickly (it’s just math), and you can use longer keys to make the code much harder to crack.
Over the years, cryptographers have developed hundreds of different complete algorithms for encrypting binary data. Only a few of these were (or still are) commonly used in TCP/IP networks. The math behind all of these complete algorithms is incredibly complex and way beyond the scope of the CompTIA Network+ exam, but all of them have two items in common: a complex algorithm underlying the cipher and a key or keys used to encrypt and decrypt the text.
Any encryption that uses the same key for both encryption and decryption is called symmetric-key encryption or a symmetric-key algorithm. If you want someone to decrypt what you encrypt, you have to make sure they have some tool that can handle the algorithm and you have to give them the key. Any encryption that uses different keys for encryption and decryption is called asymmetric-key encryption or an asymmetric-key algorithm. Let’s look at symmetric-key encryption first, and then turn to asymmetric-key encryption.
Symmetric-Key Encryption
Symmetric-key algorithms are either block ciphers or stream ciphers. Block ciphers, which encrypt data in single “chunks” of a certain length at a time, are the most common. Let’s say you want to encrypt a 100,000-byte Microsoft Word document. An approach that uses a block cipher would take the file, split it into 128-bit chunks, and encrypt each one separately (Figure 10-2).
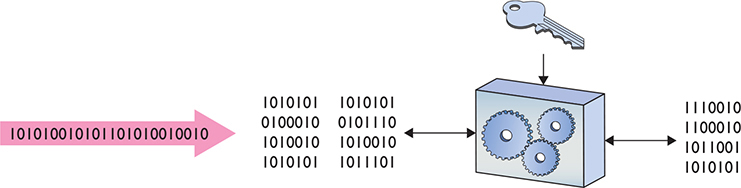
Figure 10-2 Block cipher
Advanced Encryption Standard (AES), the most-common block cipher, uses a 128-bit block size and 128-, 192-, or 256-bit key size. AES is incredibly secure, practically uncrackable (for now at least), and so fast even applications that traditionally used stream ciphers are switching to AES.
The alternative to a block cipher is the much quicker stream cipher, which takes a single bit at a time and encrypts on-the-fly (Figure 10-3). Stream ciphers used to be very popular for data that comes in long streams (such as with older wireless networks or cell phones), but they’ve been largely displaced by block ciphers (with the help of faster hardware) and are rare in the wild.
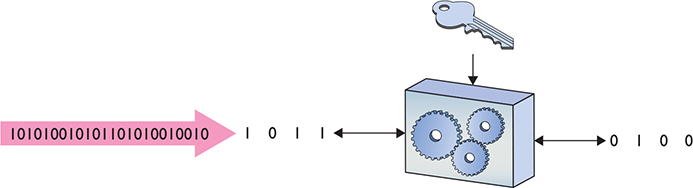
Figure 10-3 Stream cipher
Asymmetric-Key Cryptography
Symmetric-key encryption has one serious weakness: anyone who gets a hold of the key can encrypt or decrypt data with it. The nature of symmetric-key encryption forces us to send the key to the other person in one way or another, making it a challenge to use symmetric-key encryption safely by itself.
As a result, folks have been strongly motivated to create a way for the encryptor to send a symmetric key to the decryptor without fear of interception (Figure 10-4). The answer is to bundle the symmetric key up inside another encrypted message via an asymmetric-key algorithm that uses two different keys—one to encrypt and one to decrypt.
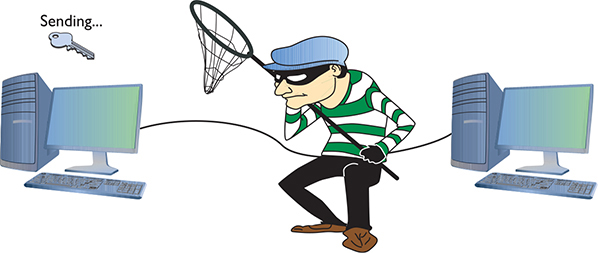
Figure 10-4 How do we safely deliver the key?
Here’s how public-key cryptography—the primary asymmetric implementation—works. Imagine two people, Bob and Alice, want to exchange Alice’s symmetric key (Figure 10-5).
Figure 10-5 Bob and Alice, wanting to share a symmetric key
Before Alice can send her symmetric key to Bob, Bob first generates two keys. Bob keeps one of these keys (the private key) on his computer, and sends the other key (the public key) to Alice (Figure 10-6). These two keys—called a key pair—are generated at the same time and are designed to work together. Data encrypted with the public key, for example, must be decrypted with the private key, and vice versa.
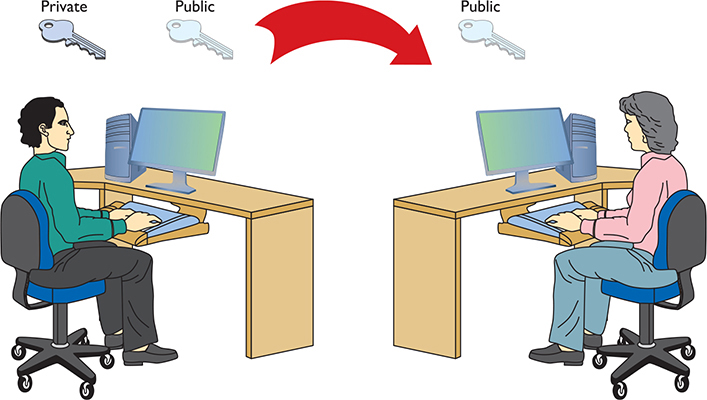
Figure 10-6 Sending a public key
Alice encrypts her symmetric key with Bob’s public key, enabling her to send it to Bob securely for him to decrypt with his private key. Now that Bob and Alice have the same symmetric key, they can establish a connection and exchange encrypted data using symmetric encryption.
NOTE Some asymmetric cryptographic algorithms you will see these days are RSA (for its creators—Rivest, Shamir, and Adleman), DSA (Digital Signature Algorithm), and ECDSA (Elliptic Curve DSA).
Encryption and the OSI Model
The process of encryption varies dramatically depending on what you want to encrypt. To make life a bit easier, let’s look at how you encrypt using the OSI seven-layer model:
• Layer 1 Encryption is not common at this layer, until you get to some of the bigger WAN technologies, like SONET.
• Layer 2 Encryption is not common at this layer.
• Layer 3 Only one common protocol encrypts at Layer 3: IPsec. IPsec is typically implemented via software that encrypts the IP packet. A new outer packet completely encapsulates and encrypts the inner packet.
• Layer 4 Neither TCP nor UDP offers any encryption methods, so nothing happens security-wise at Layer 4.
• Layers 5, 6, and 7 Important encryption standards (such as TLS used in e-commerce) happen within these layers, but they don’t fit cleanly into the OSI model.
Integrity
It’s important to know that you receive the same data that was sent. It’s not too terribly hard for bad luck and bad players to maul data, however, so several tools ensure data has the integrity needed. The one of greatest interest for CompTIA certifications is the hash function.
Hash
In computer security, a hash (or more accurately, a cryptographic hash function) is a mathematical function that you run on a string of binary digits of any length that results in a value of some fixed length (often called a checksum or a message digest). No matter how long or how short the input, the hash’s message digest will always be the same length (usually around 100 to 500 bits long, depending on the type of hash used).
A cryptographic hash function is a one-way function. One-way means the hash is irreversible in that you cannot recreate the original data from the hash, even if you know the hashing algorithm and the checksum. A cryptographic hash function should also have a unique message digest for any two different input streams (Figure 10-7).
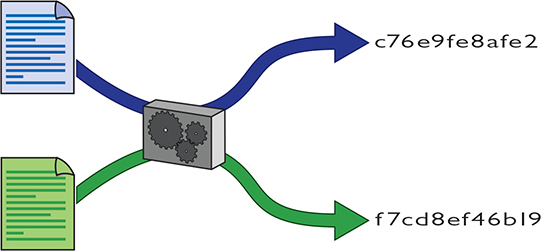
Figure 10-7 A hash at work
Cryptographic hash functions have a huge number of uses, but a common one is for verifying file integrity. If you download a file from a reputable source, there are two main threats to its integrity: accidental damage caused by networking/storage issues, and tampering by an attack that has compromised the site or your connection.
When the download provider hashes the contents of the file—called file hashing—and publishes the resulting message digest, you can hash the copy downloaded and compare the digests to verify the file on your system is most likely identical (Figure 10-8). This provides the best protection from accidental damage; an attacker capable of altering the file downloaded might also be able to alter the message digest published on the site. You can increase confidence in its integrity by verifying the digest with more than one reputable source.
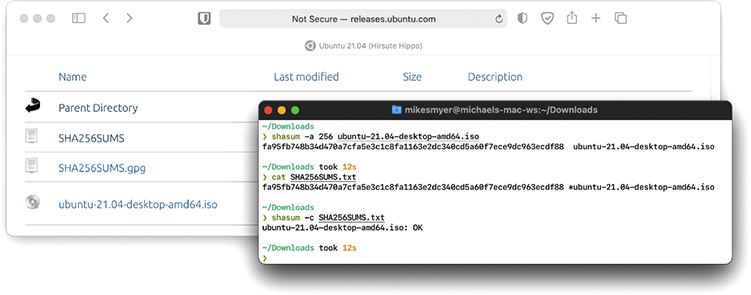
Figure 10-8 Using hashes to verify a downloaded file
Operating systems and applications store hashes of passwords. It’s not a good idea to store plaintext passwords, and encrypting a password always leaves a chance that a bad actor can find the key and decrypt it. When a user creates a password, the operating system hashes the password and only stores the hash. From then on, when anyone provides a password, the operating system just hashes the value entered and compares the hash to the stored hash. If they match, the password is correct.
The main way to recover (or crack) a hashed password is to guess a password, hash it, and see if the hash matches. Attackers speed this up by saving each guess and hash and looking up hashes they find to see if they already know the answer. Modern password hashing builds on lessons learned when hackers compromise online services with zillions of users and start cracking password hashes. In particular, the industry is trending toward hash algorithms designed to slow down cracking.
NOTE Operating systems (especially old ones, or ones using legacy compatibility settings) may use hashes that are much easier to reverse.
Hash Algorithms
There have been quite a few different hash algorithms over the years. The first commonly used hash algorithm was called Message-Digest Algorithm version 5—best known as MD5. MD5 was introduced in 1991, creating a 128-bit message digest.
These days, Secure Hash Algorithm (SHA) is the primary family of cryptographic hash functions. It includes SHA-1, SHA-2, and SHA-3. SHA-1 produces a 160-bit message digest. SHA-2 has six variants:
• SHA-224 SHA-2 with a 224-bit message digest
• SHA-256 SHA-2 with a 256-bit message digest
• SHA-384 SHA-2 with a 384-bit message digest
• SHA-512 SHA-2 with a 512-bit message digest
• SHA-512/224 SHA-2 with a 512-bit message digest truncated to 224 bits
• SHA-512/256 SHA-2 with a 512-bit message digest truncated to 256 bits
One thing to keep in mind about cryptographic functions is that we err on the side of caution. Once someone demonstrates a practical attack against an algorithm, recommendations shift quickly to newer functions with improved security. Still, existing uses of the old functions can linger for a long time. As the result of a number of attacks, MD5 and SHA-1 have both ended up on this list of hash functions that are no longer recommended as safe. Don’t use them in the real world.
Try This!
NOTE There have been many popular hash functions over the years, and this part of the industry can change rapidly once a problem with a widely deployed hash is identified. In simpler uses like verifying file integrity, you’re more likely to encounter older hashes.
SHA-2 is the most popular set of cryptographic hash functions used and SHA-2 continues to resist any attacks. The SHA-256 variant is used all over the place, such as in TLS, SSH, IPsec, even Bitcoin!
Yet it’s never a bad idea to keep making hashes more robust. To that end, the U.S. National Institute of Standards (NIST) adopted a new family of hash algorithms called SHA-3. Like SHA-2, SHA-3 comes in six variants, each with a different message digest length. SHA-3 variants include SHA3-224, SHA3-256, SHA3-384, SHA3-512, SHAKE128, and SHAKE256. SHA-3 is not widely used yet.
Nonrepudiation
Nonrepudiation, as mentioned earlier, simply means that a person cannot deny (repudiate) that he or she took a specific action. Sometimes nonrepudiation isn’t an important property in a system—or may even undermine your goals—and other times it’s critical. For example, nonrepudiation isn’t a good fit for a system that manages anonymous employee complaints. On the other hand, the property of nonrepudiation can create confidence in exactly who made every change in a system that manages purchase orders or patient records.
In network security, nonrepudiation is typically enabled by a combination of encryption and hashing called a digital signature. Digital signatures—much like the signatures put on contracts and other legal documents—play a role in bringing nonrepudiation to IT contexts where older approaches like physical signatures aren’t practical. Let’s take a closer look at how they work.
Digital Signatures
To create a digital signature, the sender hashes a message (or part of one) and then encrypts the hash with their private key. The receiver decrypts the signature with the sender’s public key and computes the hash of the message itself. If the hash the receiver computes matches the one inside the digital signature, all is well. The sender can’t deny sending the signed message (at least, not without claiming someone stole their private key), because the computed hash matches the hash decrypted with their public key—the signature could only have been encrypted with the sender’s private key.
Digital signatures have multiple uses—for example, most modern operating systems use digital signatures to verify installed programs came from their registered developers. Figure 10-9 shows information about the digital signature for Firefox on Windows including who signed it, when it was signed, and how. Digital signatures also play an important role in how a browser makes basic decisions about which Web sites are secure.

Figure 10-9 Information about the digital signature on a copy of Firefox
PKI
Imagine you develop a breakthrough open source app that enables whistleblowers and journalists worldwide to communicate securely, and host it on GitHub. When you click on a message notifying you of a newly posted user issue, there’s a small chance the link isn’t from GitHub. It might be from an enemy you’ve made—one who would love nothing more than to compromise your app, figure out who told the world about their bad behavior, and destroy your reputation in the process. Every time you visit GitHub, your reputation and the safety of your users depends on ensuring you’re securely connected to GitHub’s official servers.
To address this need, the industry came up with the idea of certificates. A certificate is a standardized type of file that includes a public key, some information about the certificate, and the digital signature of a trusted third party—a person or a company that vouches for the identity of whoever requested the certificate. The information about the certificate includes goodies like the exact date and time, who is issuing it, who they’re issuing it to, when it will expire, and so on. Let’s see how this looks on GitHub.
Go to https://github.com and click Sign In (you don’t even need a GitHub account to do this). In the background, several actions take place (all before the secure Web page loads). First, the Web server automatically sends a copy of its certificate. Built into that certificate is the Web server’s public key and a signature from the third party that asserts that they issued this certificate to GitHub.
Modern Web browsers generally help out with the first step of ensuring you ended up in the right place: they’ll show some kind of indicator or warning if the page isn’t secure, the certificate is expired, or the details otherwise don’t add up. Once you clear this hurdle, you can confirm you’re on a secure page by looking for the lock icon at the bottom of the screen or in the address bar (Figure 10-10) or by checking the address bar to ensure the URL starts with https:// (instead of http://). You might need to click, double-click, or tap into the bar to access the full URL. While you’re here, you should verify the URL itself—especially if you opened the page from a link elsewhere. There’s always a chance you’re really on a look-alike site hosted by the bad guys—and bad guys can apply for certificates, too!
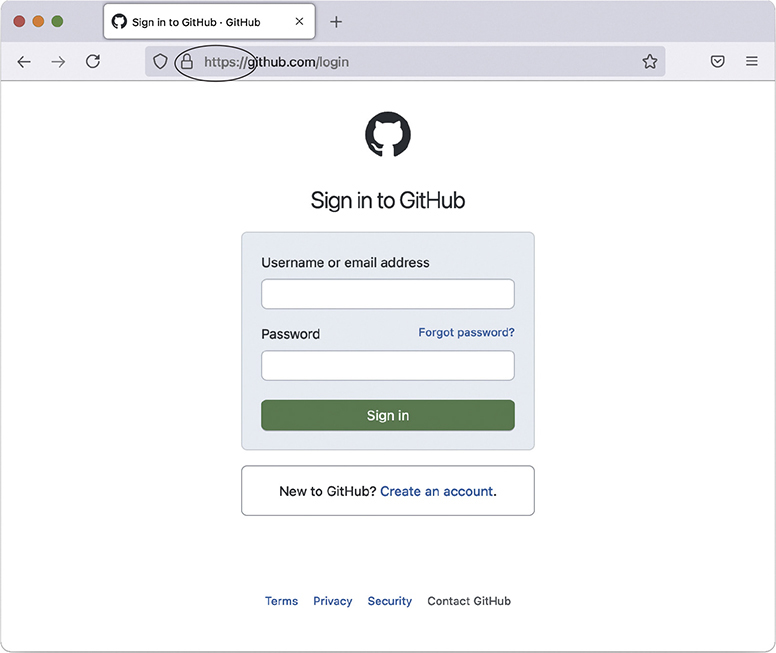
Figure 10-10 Secure Web page
Now look at the certificate for the current session. Different Web browsers have different ways to access this. Try clicking the little lock icon in the address bar (or anywhere else you found it), as this usually works. Figure 10-11 shows the certificate for this session.
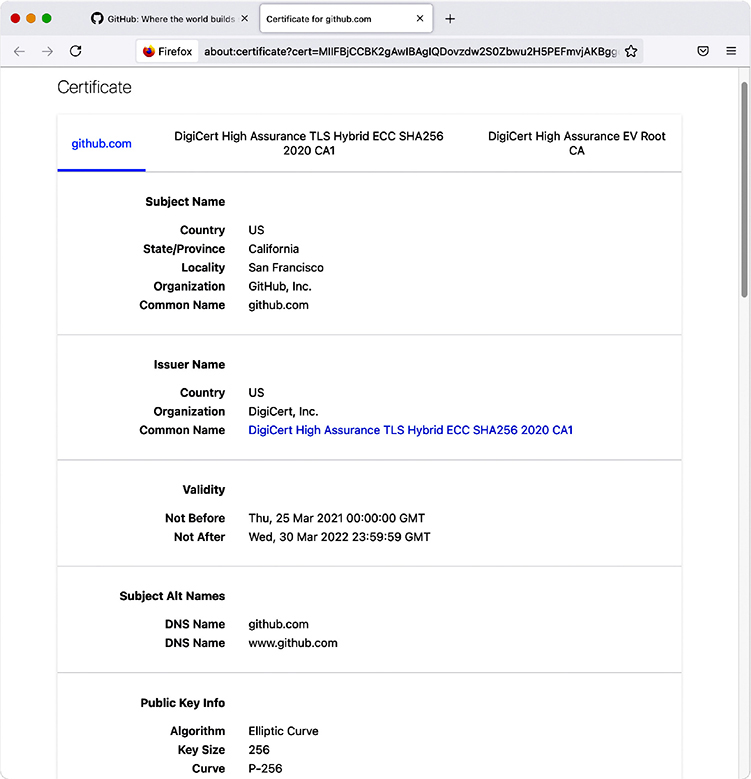
Figure 10-11 GitHub site certificate
A company called DigiCert issued this certificate. That’s great, but how does your computer check all this? DigiCert is a certificate authority (CA). Every Web browser keeps a list of CA certificates that it checks against when it receives a digital certificate. Figure 10-12 shows the CA certificates stored on my system.
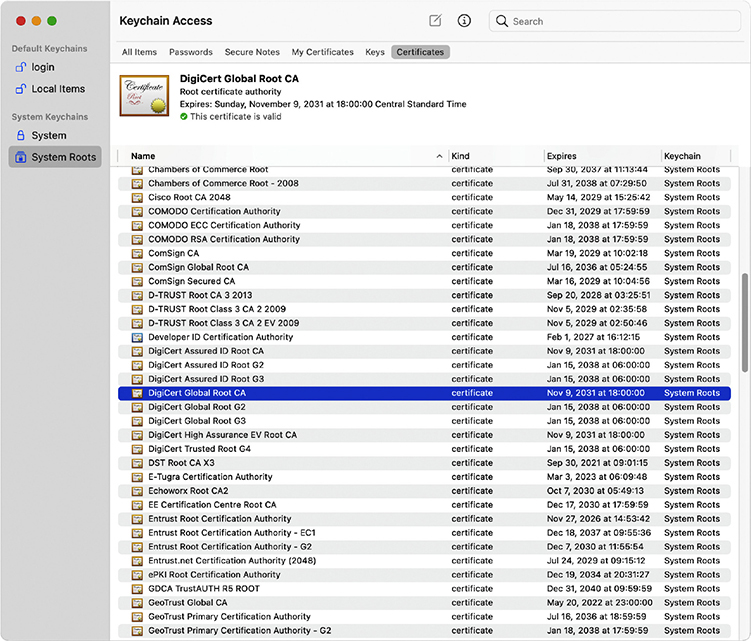
Figure 10-12 Certificate authority certificates on a system
NOTE Becoming a root certificate authority with enough respect to have Web browsers install your certificate is very difficult!
When an organization wants to create a secure Web site, the organization buys a certificate signed by a certificate authority, such as DigiCert. DigiCert acts as the root, and the new Web site’s certificate contains DigiCert’s signature. In most situations, DigiCert doesn’t directly sign these certificates with its root certificate—it keeps that under lock and key (we hope). Instead, they’ll use an intermediate certificate, which they’ve signed with their own root certificate, to sign the buyer’s certificate. This creates a tree of certificate authorization, with the root certificate authorities at the top and issued certificates at the bottom.
You can also have additional intermediate certificate authorities, although these are not as heavily used. A CA that directly issues certificates to organizations or devices is also sometimes called an issuing certificate authority. Together, this hierarchy is called a public-key infrastructure (PKI) (Figure 10-13).
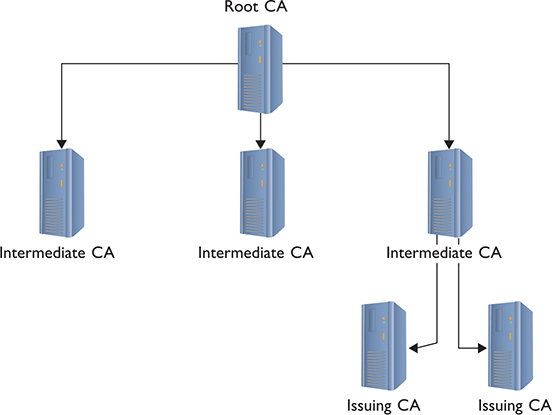
Figure 10-13 PKI tree
You don’t have to use PKI to use certificates. First, you can create and self-sign your own certificates. These are perfectly fine for lower-security situations (such as e-mail among friends), but don’t expect anyone to buy products on a Web site or send highly sensitive e-mail without a signed certificate from a well-known certificate authority like Sectigo, DigiCert, or Let’s Encrypt. Digital certificates and asymmetric cryptography are closely linked because digital certificates verify the ownership of public keys.
Test Specific
Authentication
As mentioned at the beginning of this chapter, authentication is the process of positively identifying users trying to access data. The first exposure to authentication for most users is local authentication, coming across a login screen prompting you to enter a username and password, to log into a Windows or macOS computer. But there are many other ways to authenticate, especially when networking is added into the mix. A network technician should understand not only how different authentication methods control usernames and passwords, but also some of the authentication standards used in today’s TCP/IP networks.
Passwords create as many problems as they solve—especially the problems of how to store, transfer, and verify passwords securely. Because of these problems, passwords get compromised all the time. And because passwords are always getting compromised, some systems require a second form of authentication. Some second forms of authentication include items you carry (like a smart card) or something physical that uniquely identifies you (such as your retinal patterns or fingerprints—biometrics).
Multifactor authentication (MFA) means using two or more distinctly different methods for authentication. (When only two authentication methods are used, you’ll see the term two-factor authentication.) These methods fall into one of three categories. The CompTIA Network+ N10-008 exam objectives do not list specific factors, but it’s a good idea to be able to recognize examples of all of them:
• Something you know
• Something you have
• Something you are
Something you know (a knowledge factor) is a username, a password, a passphrase, or a personal identification number (PIN). Something you have (a possession factor) is an object, like a key fob you scan to get into your gym at night. Something you are (an inherent or inherence factor) indicates some distinguishing, unique characteristic, like the biometrics just mentioned.
Authentication protocols can also use other characteristics to provide additional levels of security, what CompTIA calls attributes (in the CompTIA Security+ SY0-601 exam objectives). There are three:
Somewhere you are (a location attribute) requires you to be in a space to authenticate. You might have to be at the computer in a specific office, for example.
Something you do (an action attribute) is a little vague, but CompTIA used to include it in the objectives. Using a pattern to log into a smartphone, for example, is an action. (But it’s also something you know.) Other examples are how you walk or write your signature.
Some when you are (a temporal attribute) factors into various authentication criteria. You could restrict access to a certain time of day, for example.
Authorization
At a high level, networking exists to enable one computer to request something from another computer. A Web client, for example, might ask for a Web page. A computer far away might ask another computer for access to a private network. Whatever the scenario, you should carefully assign levels of access to your resources. This is authorization and an essential part of network hardening techniques. To help define how to assign levels of access, you use an access control list.

EXAM TIP Network access control (NAC) defines a newer series of protection applications that combine the features of what traditionally was done by separate applications. There is no perfect single definition for NAC. There are, however, certain functions that a NAC application often does. A NAC application usually prevents computers lacking anti-malware and patches from accessing the network. NACs also create policies (their own policies, not Windows policies) that define what individual systems can do on the network, including network access, segregation of portions of the network, etc.
An access control list (ACL) is a clearly defined list of permissions that specifies what an authenticated user may perform on a shared resource. Over the years the way to assign access to resources has changed dramatically. To help you to understand these changes, the security industry likes to use the idea of ACL access models. There are three types of ACL access models: mandatory, discretionary, and role based.
In a mandatory access control (MAC) security model, every resource is assigned a label that defines its security level. If the user lacks that security level, he or she does not get access. The MAC security model is the oldest and least common of the three.
Discretionary access control (DAC) is based on the idea that a resource has an owner who may at his or her discretion assign access to that resource. DAC is considered much more flexible than MAC.
Role-based access control (RBAC) is the most popular model used in file sharing. RBAC defines a user’s access to a resource based on the roles the user plays in the network environment. This leads to the idea of creating groups. A group in most networks is nothing more than a name that has clearly defined access to different resources. User accounts are placed into various groups.
Keep in mind that these three types of access control are models. Every TCP/IP application and operating system has its own set of rules that sometimes follows one of these models, but in many cases does not. But do make sure you understand these three models for the CompTIA Network+ exam!
TCP/IP Security Standards
Now that you have a conceptual understanding of encryption, integrity, nonrepudiation, authentication, and authorization, it’s time to see how the TCP/IP folks have put it all together to create standards so you can secure just about anything in TCP/IP networks.
TCP/IP security standards are a rather strange mess. Some are authentication standards, some are encryption standards, and some are so unique to a single application that I’m not even going to talk about them in this section and instead will wait until the “Secure TCP/IP Applications” discussion at the end of this chapter. There’s a reason for all this confusion: TCP/IP was never really designed for security. As you read through this section, you’ll discover that almost all of these standards either predate the whole Internet, are slapped-together standards that have some serious issues, or, in the case of the most recent standards, are designed to combine a bunch of old, confusing standards. So hang tight—it’s going to be a bumpy ride!
User Authentication Standards
Authentication standards are some of the oldest standards used in TCP/IP. Many are so old they predate the Internet itself. Once upon a time, nobody had fiber-optic, cable, or DSL connections to their ISPs. For the most part, if you wanted to connect to the Internet you had a choice: go to the computer center or use dial-up.
Dial-up, using telephone lines for the most part, predates the Internet, but the nerds of their day didn’t want just anybody dialing into their computers. To prevent unauthorized access, they developed some excellent authentication methods that TCP/IP adopted for itself. A number of authentication methods were used back in those early days, but, for the most part, TCP/IP authentication started with something called Point-to-Point Protocol.
PPP
Point-to-Point Protocol (PPP) enables two devices to connect, authenticate with a username and password, and negotiate the network protocol the two devices will use (Figure 10-14). Today that network protocol is almost always TCP/IP.
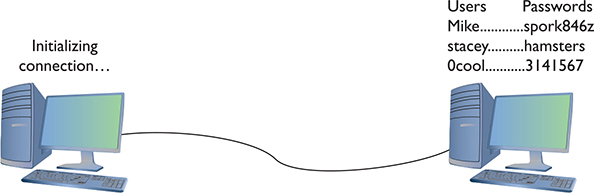
Figure 10-14 A point-to-point connection
PPP came with two methods of user authentication, the process of authenticating a username and password. The original way—called Password Authentication Protocol (PAP)—simply transmits the username and password over the connection in plaintext. Unfortunately, that means anyone who can tap the connection can learn the username and password (Figure 10-15).
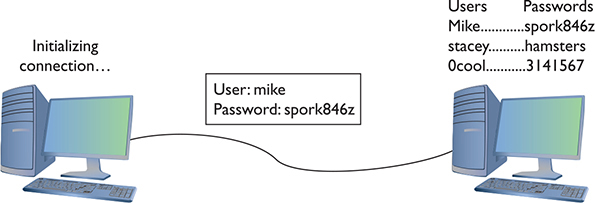
Figure 10-15 PAP in action
Fortunately, PPP also includes the safer Challenge Handshake Authentication Protocol (CHAP) to provide a more secure authentication routine. CHAP relies on hashes based on a shared secret, usually a password that both ends of the connection know. When the initiator of the connection makes the initial connection request, the authenticator creates some form of challenge message. The initiator then makes a hash using the password and sends that to the authenticator. The authenticator, in turn, compares that value to its own hash calculation based on the password. If they match, the initiator is authenticated (Figure 10-16).
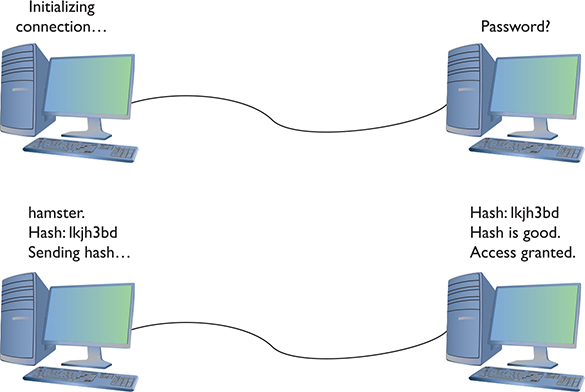
Figure 10-1 CHAP in action
Once the connection is up and running, CHAP keeps working by periodically repeating the entire authentication process. This prevents man-in-the-middle attacks, where a third party inserts an independent connection, intercepts traffic, reads or alters it, and then forwards it on without either the sender or recipient being aware of the intrusion.
CHAP works nicely because it never sends the actual password over the link. The CHAP standard leaves a number of issues undefined, however, like “If the hash doesn’t match, what do I do?” The boom in dial-up connections to the Internet in the 1990s led Microsoft to invent a more detailed version of CHAP called MS-CHAP. The current version of MS-CHAP is called MS-CHAPv2. MS-CHAPv2 is still the most common authentication method for the few using dial-up connections. Dial-up is still used and even the latest operating systems support it. Figure 10-17 shows the dial-up connection options for Windows 10.
Figure 10-17 MS-CHAP is alive and well.
EXAM TIP If you get a question on PAP, CHAP, and MS-CHAP on the CompTIA Network+ exam, remember that MS-CHAPv2 offers the most security.
AAA
PPP does a great job of handling authentication for point-to-point connections, but it has some limitations. The biggest problem is that, in many cases, a network might have more than one point for an initiator to enter. PPP assumes that the authenticator at the endpoint has all the username and password information, but that’s not necessarily true. In traditional modem communication, for example, an ISP has a large bank of modems to support a number of users. When a user dials in, the modem bank provides the first available connection, but that means that any modem in the bank has to support any of the users. You can’t put the database containing all usernames and passwords on every modem (Figure 10-18).
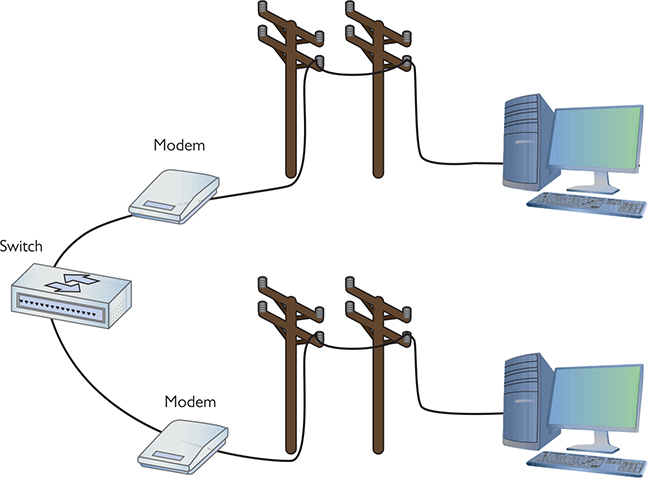
Figure 10-18 Where do you put the usernames and passwords?
In this use case, you need a central database of usernames and passwords. That’s simple enough, but it creates another problem—anyone accessing the network can see the passwords unless the data is somehow protected and encrypted (Figure 10-19). PPP is good at the endpoints, but once the data gets on the network, it’s unencrypted.
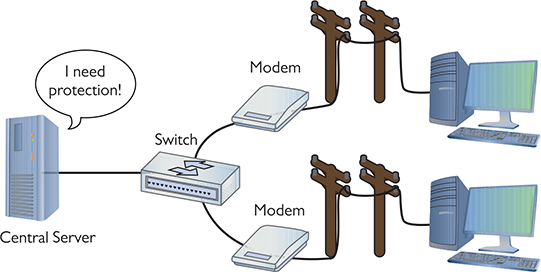
Figure 10-19 Central servers are vulnerable to attack.
Thus, the folks overseeing central databases full of usernames and passwords needed to come up with standards to follow to protect that data. They first agreed upon a philosophy called Authentication, Authorization, and Accounting (AAA). AAA is designed for the idea of port authentication—the concept of allowing remote users authentication to a particular point of entry (a port) to another network.
• Authentication A computer that is trying to connect to the network must present some form of credential for access to the network. This credential most commonly starts with identification via a username and password, which is then checked against a credentials database. If the credentials match up, the user is authenticated. Username and password are common for identification, but the credential might also be a security token such as a smart card, fingerprint, or digital certificate. It might even be a combination of some of these. The authentication gives the computer the right to access the network.
• Authorization Once authenticated, the computer determines what it can or cannot do on the network. It might only be allowed to use a certain amount of bandwidth. It might be limited to working only certain times of day or might be limited to using only a certain set of applications.
• Accounting The authenticating server should log events, such as logins, session action, user bandwidth usage, and so on.
Once the idea of AAA took shape, those smart Internet folks developed two standards: RADIUS and TACACS+. Both standards offer authentication, authorization, and accounting.
RADIUS Remote Authentication Dial-In User Service (RADIUS) is the better known of the two AAA standards and, as its name implies, was created to support ISPs with hundreds if not thousands of modems in hundreds of computers to connect to a single central database. While originally designed for dial-up connections, RADIUS still works hard in a huge number of different types of networks, both wired and wireless, and I’m sure there are a few ancient dial-up networks still working somewhere as well. RADIUS consists of three devices: the RADIUS server that has access to a database of usernames and passwords, a number of network access servers (NASs) that control the modems or wireless access points, and a group of systems that in some way connect to the network (Figure 10-20).
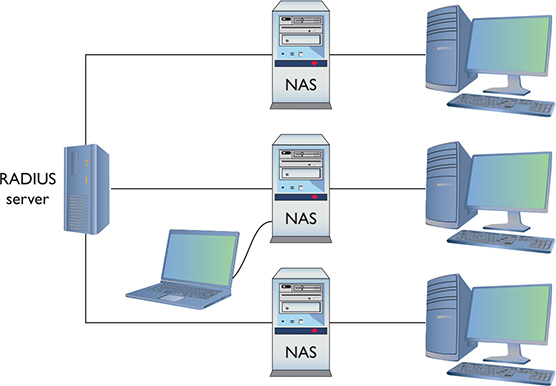
Figure 10-20 RADIUS setup
EXAM TIP NAS stands for either network access server or network attached storage. The latter is a type of dedicated file server used in many networks. Make sure you read the question to see which NAS it’s looking for!
To use RADIUS, you need a RADIUS server. A popular choice for Microsoft environments is Internet Authentication Service (IAS), which comes built in with most versions of Microsoft Windows Server operating systems. For the UNIX/Linux crowd, the popular (yet, in my opinion, hard to set up) FreeRADIUS is the best choice.
A single RADIUS server can support multiple NASs and provide a complete PPP connection from the requesting system, through the NAS, all the way to the RADIUS server. Like any PPP connection, the RADIUS server supports PAP, CHAP, and MS-CHAP. Even if you use PAP, RADIUS hashes the password so at no time is the username/password exposed. Newer versions of RADIUS support even more authentication methods, as you will soon see. RADIUS performs this authentication on either UDP port 1812 or port 1645. (RADIUS also uses UDP ports 1813 and 1646 for accounting.)
TACACS+ Routers and switches need administration. In a simple network, you can access the administration screen for each router and switch by entering a username and password for each device. When a network becomes complex, with many routers and switches, logging into each device separately starts to become administratively messy. The answer is to make a single server store the ACL for all the devices in the network. To make this secure, you need to follow the AAA principles.
Terminal Access Controller Access Control System Plus (TACACS+) is a protocol developed by Cisco to support AAA in a network with many routers and switches. TACACS+ is very similar to RADIUS in function, but uses TCP port 49 by default and separates authorization, authentication, and accounting into different parts. TACACS+ uses PAP, CHAP, and MD5 hashes, but can also use Kerberos as part of the authentication scheme.
Kerberos
Almost all the authentication schemes discussed up to this point are based on PPP or at least take the idea of PPP and expand upon it. Of course, every rule needs an exception, and Kerberos is the exception here.
Kerberos is an authentication protocol for TCP/IP networks with many clients all connected to a single authenticating server—no point-to-point here! Kerberos is an authentication protocol that has no connection to PPP. Kerberos works nicely in a network, so nicely that Microsoft adopted it as the authentication protocol for all Windows networks using a domain controller.
Microsoft Windows domains rely on Kerberos for authentication. A Windows domain is a group of computers that defers all authentication to a domain controller, a special computer running some version of Windows Server (with the appropriate role installed). The Windows domain controller stores a list of all usernames and password hashes in Active Directory. When you log on at a computer that is a member of a Windows domain, your username and password hash go directly to the domain controller, which uses Kerberos for authentication.
NOTE Kerberos uses UDP or TCP port 88 by default.
The Kerberos Key Distribution Center (KDC) service supplies both session tickets and session keys in an Active Directory domain. In Windows Server environments, the KDC is installed on the domain controller (Figure 10-21). KDC relies on two components: the Authentication Server and the Ticket-Granting Service.
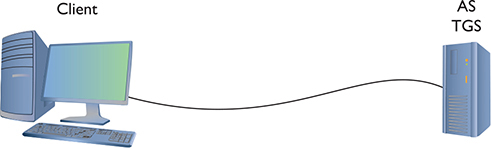
Figure 10-21 Windows Kerberos setup
When a client logs onto the domain, it sends a request that includes a hash of the username and password to the Authentication Server. The Authentication Server (AS) compares the results of that hash to its own hash (as it also stores the username and password hash) and, if they match, sends a Ticket-Granting Ticket (TGT) and a timestamp (Figure 10-22). The ticket has a default lifespan in Windows of ten hours. The client is now authenticated but not yet authorized.
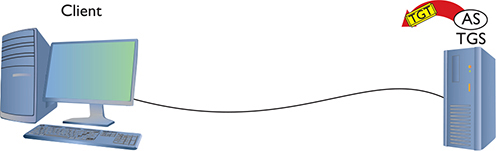
Figure 10-22 AS sending a TGT back to client
NOTE The TGT is sometimes referred to as Ticket to Get Tickets.
The client then sends the timestamped TGT to the Ticket-Granting Service (TGS) for authorization. The TGS sends a timestamped service ticket (also called a token or access token) back to the client (Figure 10-23).
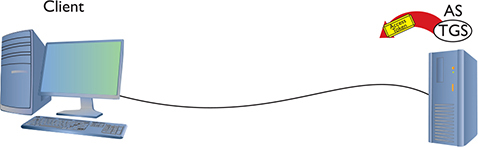
Figure 10-23 TGS sending token to client
NOTE You’ll see TGS referred to as the Ticket-Granting Server in a lot of documentation. Microsoft uses Service, which is what we’re following here.
This token is the key that the client uses to access any single resource on the entire domain. The access token contains the security identifier (SID) for the user’s account, plus SIDs for the groups of which the user is a member. This is where authorization takes place.
The token authorizes the user to access resources without reauthenticating. Any time the client attempts to access a folder, printer, or service anywhere in the domain, the server sharing that resource uses the token to see exactly what access the client may have to that resource. If the client tries to access some other feature under Windows, such as retrieve e-mail via Microsoft Exchange Server, it won’t need to log in again. The ability to log in only one time and use the same token to access any resource (that you’re allowed to access) on an entire network is called single sign-on (SSO).
Timestamping is important for Kerberos because it forces the client to request a new token every eight hours. This prevents third parties from intercepting the tokens and attempting to crack them. Kerberos tokens can be cracked, but it’s doubtful this can be done in under eight hours.
Kerberos is very popular but has some serious weaknesses. First, if the KDC goes down, no one has access. That’s why Microsoft and other operating systems that use Kerberos always stress the importance of maintaining a backup KDC. In Windows, it is standard practice to have at least two domain controllers. Second, timestamping requires that all the clients and servers are synchronized, typically within two minutes. This is fairly easy to do in a wired network (such as a Windows domain or even a bunch of connected switches or routers using TACACS+).
NOTE Wireless networks make extensive use of authentication protocols. Chapter 14 explores the varieties of the Extensible Authentication Protocol (EAP) and the 802.1X standard.
The book goes further into authentication and authorization in due time, but this section provided the basics of the popular authentication and authorization protocols and standards. You have more protocols to learn, but all of them are rather specialized for specific uses and thus are covered at various places throughout the book.
Encryption Standards
The Internet had authentication long before it had encryption. As a result, almost all encryption came out as a knee-jerk reaction to somebody realizing that a TCP/IP application wasn’t secure. For years, there were new secure versions of just about every protocol in existence. New “secure” versions of all the classics—HTTP, FTP, SMTP, and even POP—started to appear. They worked, but there were still hundreds of not-yet-secured protocols and the specter of redoing all of them was daunting. Fortunately, some new, all-purpose encryption protocols were developed that enable a client to connect to a server in a secure way while still using the corresponding older, unsecure protocols—and it all started because of Telnet.
SSH
The broad adoption of the Internet by the early 1990s motivated programmers to start securing their applications. Telnet had a big problem. It was incredibly useful and popular, but it was a completely unsecure protocol. Telnet credentials were (and are) sent in plaintext, an obvious vulnerability.
NOTE SSH servers listen and respond on TCP port 22.
Telnet needed to be fixed. As the story goes, Tatu Ylonen of the Helsinki University of Technology, reacting to an attack that intercepted Telnet usernames and passwords on his network, invented a new secure protocol replacement for Telnet called Secure Shell (SSH). You’ve already seen SSH in action (in Chapter 8) as a secure version of Telnet, but now that you know more about security, let’s look at a scenario where you implement network device hardening via SSH.
SSH servers can use a number of public-key algorithms such as RSA or ECDSA, to name a couple. The first time a client tries to log into an SSH server, the server sends its public key to the client (Figure 10-24).

Figure 10-24 PuTTY getting an ECDSA key
After the client receives this key, it creates a session ID, encrypts it using the public key, and sends it back to the server. The server decrypts this session ID and uses it in all data transfers going forward. Only the client and the server know this session ID. Next, the client and server negotiate the type of encryption to use for the session, generally AES. The negotiation for the cipher is automatic and invisible to the user.
This handshake process makes a very safe connection, but the combination doesn’t tell the server who is using the client. All SSH servers, therefore, need to authenticate (usually with usernames and passwords) the client (Figure 10-25). Once a user logs in, he or she has access to the system.
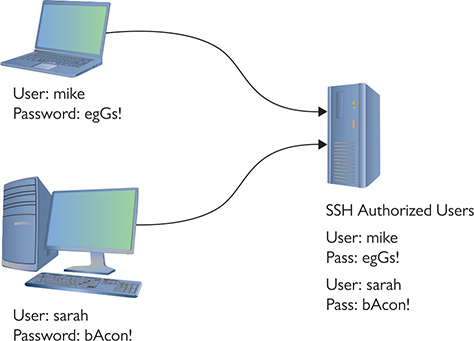
Figure 10-25 Users on an SSH server
In addition to using a password for authentication, SSH also can use public keys to identify clients. This opens up some interesting possibilities such as noninteractive logins. You can also turn off password login altogether, hardening your server even further. To use public/private keys for authentication, you must first generate a pair of keys with a tool such as ssh-keygen or PuTTYgen (Figure 10-26). The public key is then copied to the server, and the private key is kept safe on the client.

Figure 10-26 Generated RSA keys in PuTTY Key Generator
When you connect to the server, your client generates a signature using its private key and sends it to the server. The server then checks the signature with its copy of the public key, and if everything checks out, you will be authenticated with the server.
If SSH stopped here as a secure replacement for Telnet, that would be fantastic, but SSH has another trick up its sleeve: the capability to act as a tunnel for any TCP/IP application. Let’s see what tunnels are and how they work.
Tunneling
Simply, an SSH tunnel is an encrypted link between SSH processes on two separate computers. Once an SSH link between a server and a client is established, anything you enter into the client application is encrypted, sent to the server, decrypted, and then acted upon (Figure 10-27).
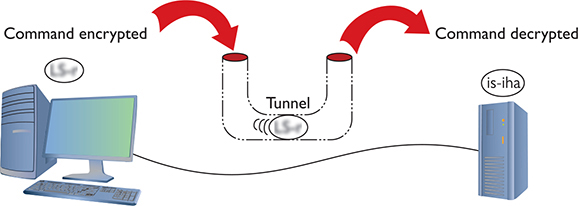
Figure 10-27 SSH in action
The nature of SSH is such that it took very little to extend the idea of SSH to accept input from any source, even another program (Figure 10-28). As long as the program can redirect to the SSH client and then the SSH server can redirect to the server application, anything can go through an SSH connection encrypted. This is an SSH tunnel.
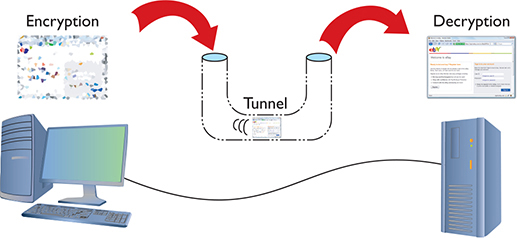
Figure 10-28 Encrypting a Web client
SSH tunnels are useful tools and fairly easy to set up. Equally, all of the popular SSH clients and servers are designed to go into tunnel mode, usually with no more than a few extra flags when connecting (Figure 10-29).
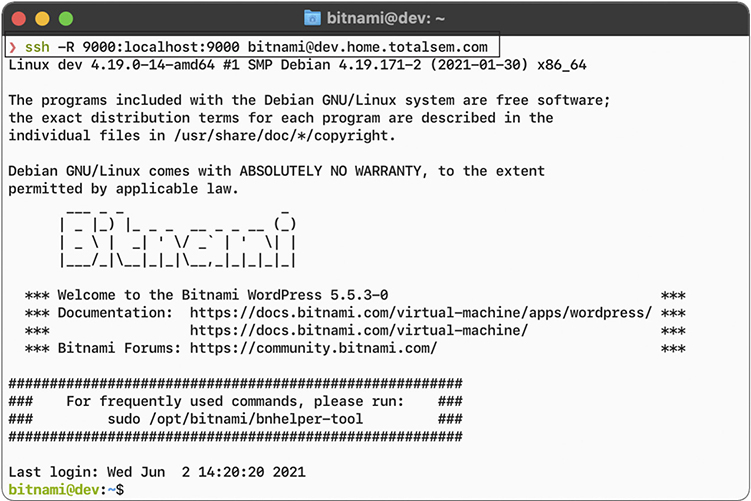
Figure 10-29 Creating a tunnel for port 9000 over SSH
Many tunneling protocols and standards are used in TCP/IP. SSH is one of the simplest types of tunnels, so it’s a great first exposure to tunneling. As the book progresses, you’ll see more tunneling protocols, and you’ll get the basics of tunneling. For now, make sure you understand that a tunnel is an encrypted connection between two endpoints. Any packet that enters the encrypted tunnel, including a packet with unencrypted data, is automatically encrypted, goes through the tunnel, and is decrypted on the other endpoint.
SSH may be popular, but it’s not the only option for encryption. All of the other encryption standards are built into combined authentication/encryption standards, as covered in the next section.
Combining Authentication and Encryption
The rest of the popular authentication and encryption standards include both authentication and encryption in a single standard. Lumping together authentication and encryption into the same standard does not make it weaker than the standards already discussed. These are some of the most popular standards on the Internet today, because they offer excellent security.
SSL/TLS
The introduction and rapid growth of e-commerce on the World Wide Web in the mid-1990s made it painfully obvious that some form of authentication and encryption was needed. Netscape Corporation took the first shot at a new standard. At the time, the dominant Web browser was Netscape Navigator. Netscape created a standard called Secure Sockets Layer (SSL). SSL requires a server with a certificate. When a client requests access to an SSL-secured server, the server sends to the client a copy of the certificate (Figure 10-30). The SSL client checks this certificate (all Web browsers come with an exhaustive list of CA root certificates preloaded), and if the certificate checks out, the server is authenticated and the client negotiates a symmetric-key cipher for use in the session. The session is now in a very secure encrypted tunnel between the SSL server and the SSL client.
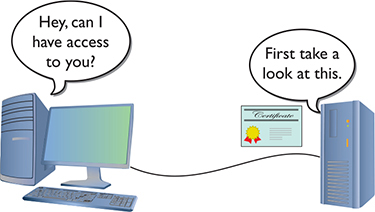
Figure 10-30 Fetching the server’s certificate
The Transport Layer Security (TLS) protocol was designed as an upgrade to SSL. TLS is very similar to SSL, working in almost the same way. TLS is more robust and flexible and works with just about any TCP application. SSL is limited to HTTP, FTP, SMTP, and a few older TCP applications. TLS has no such restrictions and is used in securing Voice over IP (VoIP) and virtual private networks (VPNs), but it is still most heavily used in securing Web pages. Every Web browser today uses TLS for HTTPS-secured Web sites, and EAP-TLS (discussed in Chapter 14) is common for more-secure wireless networks.
NOTE SSL/TLS also supports mutual authentication, but this is relatively rare.
IPsec
Every authentication and encryption protocol and standard you’ve learned about so far works above the Network layer of the OSI seven-layer model. Internet Protocol Security (IPsec) is an authentication and encryption protocol suite that works at the Network layer.
NOTE The Internet Engineering Task Force (IETF) oversees the IPsec protocol suite, managing updates and revisions. One of those specifications regards the acronym for the protocol suite, calling it IPsec with a lowercase “s” rather than IPS or IPSec (the form CompTIA prefers). Go figure.
IPsec works in two different modes: Transport mode and Tunnel mode. In Transport mode, only the actual payload of the IP packet is encrypted: the destination and source IP addresses and other IP header information are still readable. In Tunnel mode, the entire IP packet is encrypted and is encapsulated inside another IP packet at an endpoint. The mode you use depends on the application (Figure 10-31).
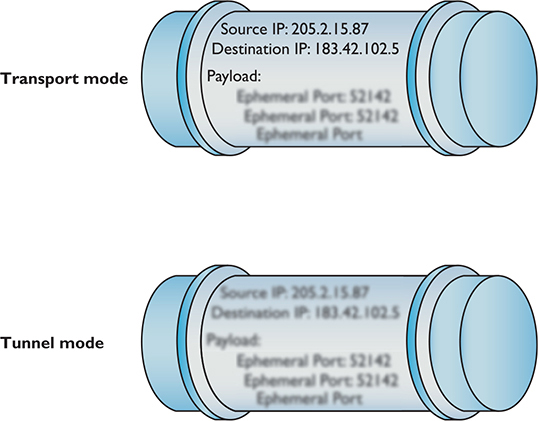
Figure 10-31 IPsec’s two modes
IPsec provides authentication, integrity, and confidentiality through two protocols, AH and ESP. Authentication Header (AH) handles authentication and data integrity, but provides no encryption. Encapsulating Security Payload (ESP) encrypts the TCP segment, thus providing confidentiality as well as integrity and authentication. Because ESP can do everything that AH can do, plus provide encryption, ESP is the primary protocol used in IPsec for authentication, integrity, and confidentiality. AH has almost never been used.
IPsec is an incredibly powerful authentication/encryption protocol suite for creating secure tunnels between two computers. (See the discussion of VPNs in Chapter 13 for the scoop.)
Secure TCP/IP Applications
I’ve covered quite a few TCP/IP security standards and protocols thus far in the chapter, but I really haven’t put anything to work yet. Now is the time to talk about actual applications that use these tools to make secure connections. As mentioned earlier, this is in no way a complete list, as there are thousands of secure TCP applications; I’ll stick to ones you will see on the CompTIA Network+ exam. Even within that group, I’ve saved discussion of some of the applications for other chapters that deal more directly with certain security aspects (such as remote connections).
HTTPS
You’ve already seen Hypertext Transfer Protocol Secure (HTTPS), but let’s do a quick review. HTTPS URLs start with https:// and most browsers also show a small lock icon somewhere around their address bar. HTTPS uses TLS for the actual authentication and encryption process. In most cases, all of this works very well, but what do you do when HTTPS has trouble?
Since you won’t get an HTTPS connection without a good certificate exchange, the most common problems are caused by bad certificates. When a certificate comes in from an HTTPS Web site, your computer checks the expiration date to verify the certificate is still valid and checks the Web site’s URL to make sure it’s the same as the site you are on. If either of these is not correct, you get an error such as the one shown in Figure 10-32.
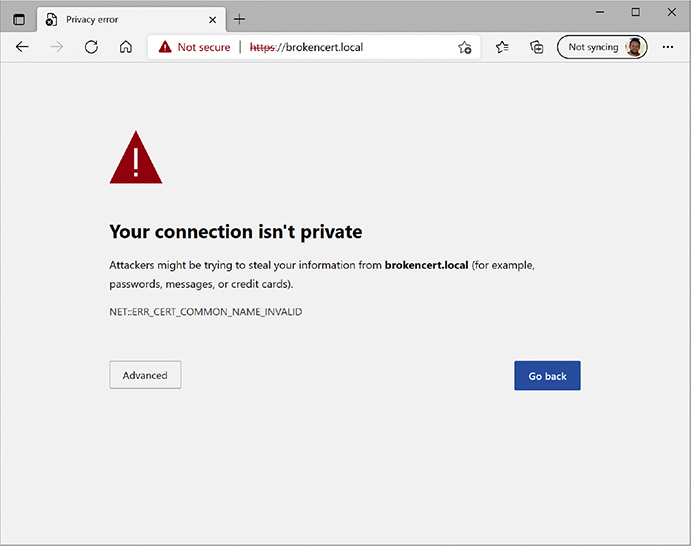
Figure 10-32 Certificate problem
If you get one of these errors, you need to decide what to do. Legitimate certificates do expire (this even happened on my own Web site once) and sometimes the URLs on the certificates are not exactly the same as the site using them. When in doubt, stop. On the other hand, if the risk is low (for example, you’re not entering a credit card number or other sensitive information) and you know and trust the site, proceeding is safe in most cases. If there’s a clear way to contact the site’s operators, send a quick message to let them know their certificate has expired!
Invalid certificates aren’t the only potential problems. After this basic check, the browser checks to see if the certificate has been revoked. Root authorities, like Sectigo, generate Certificate Revocation Lists (CRLs) that a Web browser can check against. Certificates are revoked for a number of reasons, but most of the time the reasons are serious, such as a compromised private key.
If you get a revoked certificate error, it’s better to stay away from the site until the site’s operators fix the problem.
Securing E-Mail Protocols
The traditional TCP/IP mail protocols Secure Mail Transfer Protocol (SMTP) for sending e-mail and Post Office Protocol (POP) or Internet Message Access Protocol (IMAP) for retrieving e-mail offered no effective security. Traffic of all sorts travels in cleartext that bad guys can easily intercept. Several techniques enable e-mail traffic to be wrapped within TLS to provide security.
The Simple Mail Transport Protocol Secure (SMTPS) uses TCP port 587 to wrap SMTP communication within TLS. SMTPS is not an extension of SMTP or a propriety protocol. Note that CompTIA refers to SMTPS as SMTP TLS.
The Post Office Protocol 3 over SSL (POP3S) extension adds a TLS wrap to POP3 e-mail retrieval. POP3S uses port 995. The Internet Message Access Protocol over SSL (IMAPS) works similarly, with a TLS wrap for encryption. IMAPS uses port 993.
NOTE The STARTTLS protocol command tells an e-mail server that an e-mail client wants to run over a secure connection, such as TLS. It’s not on the exam, but functions as a tool commonly used to secure e-mail communication.
SCP
The Secure Copy Protocol (SCP) enables secure data transfers between two hosts and thus might have replaced FTP. SCP works well but lacks features such as a directory listing. SCP still exists, especially with the well-known UNIX scp command-line utility, but the developers of the popular OpenSSH project encourage users to switch to other secure file-transfer protocols such as SFTP.
SFTP
The IETF designed the SSH File Transfer Protocol (SFTP) to bring secure, full-featured FTP-style file transfer and management to SSH. Although SFTP and FTP have similar names and perform the same job of transferring files, the way in which they do that job differs greatly.
EXAM TIP You’ll hear some techs refer to SSH FTP as Secure FTP. That’s not technically correct, but it’s common. If you see Secure FTP on the CompTIA Network+ exam, think SSH FTP and you’ll be fine.
SFTP is not FTP over SSH—it’s an entirely separate protocol designed as an extension of the SSH-2 protocol. It offers secure file transfers, resumption of interrupted file transfers, deletion of files on the server, and more. SFTP uses TCP port 22.
NOTE SFTP is often incorrectly equated with FTPS, which is FTP using TLS to add security. They’re very different animals! Just note that you’ll find both running out there in the wild.
SNMP
The Simple Network Management Protocol (SNMP) is a great way to query the state of network devices—as long as they are SNMP-capable. SNMP can report whatever device-specific information the device provides—such as CPU usage, network utilization, or even detailed firewall hits.
SNMP uses agents (special client programs) to collect network information from a Management Information Base (MIB), SNMP’s version of a server. To use SNMP, you need SNMP-capable devices and some tool to query them. One tool is Zabbix (www.zabbix.com), shown in Figure 10-33. Zabbix, like most good monitoring tools, enables you to query an SNMP-capable device for hundreds of different types of information.
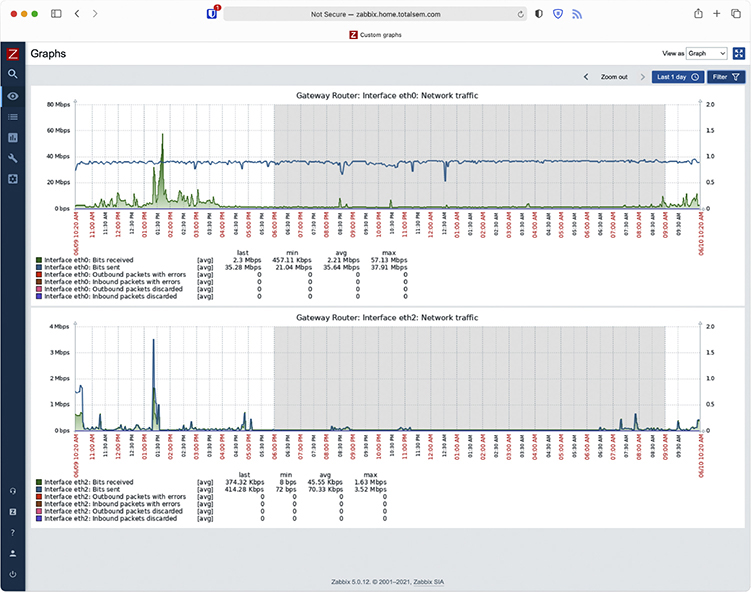
Figure 10-33 Zabbix at work
SNMP is a useful tool for network administrators, but the first version, SNMPv1, sent all data, including the passwords, unencrypted over the network. SNMPv2c still lacked encryption and was rather challenging to use. SNMPv3 is the standard version used today and combines solid, fairly easy-to-use authentication and encryption.
NOTE SNMP runs on UDP ports 161 and 162. Chapter 20 revisits SNMP.
LDAP
Programs use the Lightweight Directory Access Protocol (LDAP) to query and change a database used by the network. These databases track aspects of networks, such as users logged into the network, currently active DHCP clients, or the location of all the printers in the local network.
One of the most complex and also most used databases is Active Directory, the power behind single sign-on and network information (where’s the closest printer to me?). Every Windows domain controller stores a copy of the Active Directory database. LDAP can talk to Active Directory and other directory service providers to query and modify items.
You will probably never use LDAP manually. Your domain controllers will use it automatically and transparently in the background to keep your databases in good order. LDAP uses TCP and UDP ports 389 by default.
The now-deprecated secure version of LDAP, Lightweight Directory Access Protocol over SLL (LDAPS), used TCP port 636. You’ll see it on the CompTIA Network+ exam, but LDAP version 3 made it obsolete.
NTP
As you’ll recall from Chapter 8, the Network Time Protocol (NTP) does one thing: it gives you the current time. NTP is an old protocol and isn’t in and of itself much of a security risk unless you’re using some timestamping protocol like Kerberos. Make sure all of your computers have access to an NTP server so users don’t run into problems when logging in. NTP uses UDP port 123.
Chapter Review
Questions
1. Any encryption that uses the same key for encryption and decryption is called?
A. Encoded key
B. Symmetric key
C. Single key
D. Synthetic key
2. A(n) _______________ cipher encrypts the plaintext one bit at a time.
A. block
B. forwarding
C. stream
D. asymmetric
3. In a PKI encryption method, which key encrypts the data?
A. Public
B. Private
C. Both
D. Depends on who sends the data
4. The process of verifying with a high degree of confidence that the sender is who the receiver thinks he or she should be is called _______________.
A. PKI
B. authentication
C. locking
D. nonrepudiation
5. A hash function is by definition a _______________.
A. complex function
B. PKI function
C. one-way function
D. systematic function
6. Which of the following is a hash function?
A. SHA-256
B. RC4
C. AES
D. BMX
7. In order to have a PKI you must have a(n) _______________.
A. Web server
B. Web of trust
C. root authority
D. unsigned certificate
8. Which type of access control requires a label to define its sensitivity?
A. MAC
B. DAC
C. RBAC
D. VAC
9. If you see some traffic running on UDP ports 1812 and 1813, what AAA standard is running?
A. PPP
B. RADIUS
C. MS-CHAP
D. TACACS+
10. Which authentication standard is highly time sensitive?
A. PAP
B. RADIUS
C. 802.1X
D. Kerberos
Answers
1. B. Symmetric-key encryption uses the same key.
2. C. A stream cipher encrypts one bit at a time.
3. A. You send someone a public key that he or she, in turn, encrypts. The private key decrypts it.
4. D. This is the definition of nonrepudiation.
5. C. Hash functions must be one-way. They should be complex, but complexity is not a requirement.
6. A. Of the choices listed, only SHA-256 is a hash function.
7. C. A public-key infrastructure (PKI) must have a root authority.
8. A. Mandatory access control must use a label to define sensitivity.
9. B. RADIUS uses UDP ports 1812 and 1813.
10. D. All Kerberos tickets are timestamped.