Microsoft Windows OS Security Administration
Once controls are planned to maximize the C-I-A triad properties, you can implement them. The steps to implement each control depend upon the type and goal. Security administrators most commonly implement technical controls. Personnel from other departments typically implement administrative and physical controls. You implement most technical controls by installing software, updating software, or modifying settings. In this section, you’ll learn about the most common tools security administrators use to create objects and change security settings.
Firewall Administration
You can maintain Windows Firewall settings for in the Windows Firewall with Advanced Security Microsoft Management Console (MMC) snap-in. This new utility combines Windows Firewall settings with Internet Protocol Security (IPSec) settings. You can manage both groups of settings using a single utility.
FIGURE 10-2 shows the Windows Firewall with Advanced Security MMC snap-in.
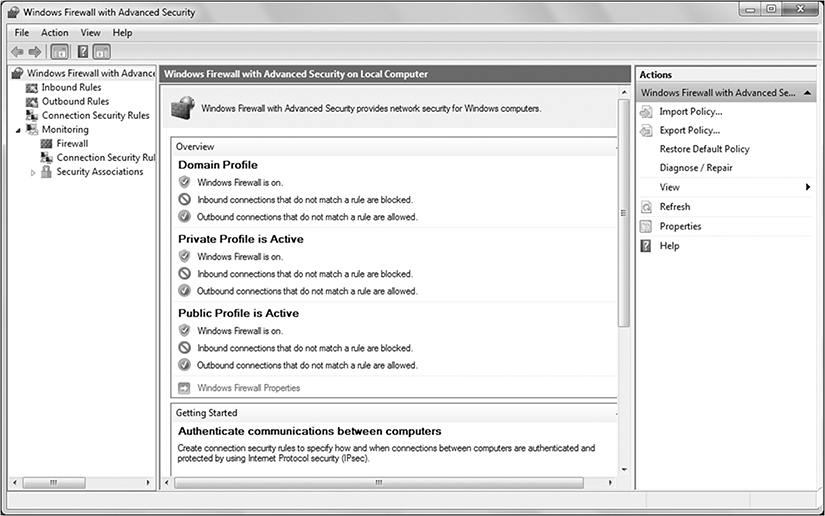
FIGURE 10-2
Windows Firewall with Advanced Security MMC snap-in.
Courtesy of Microsoft Corporation.
The Windows Firewall with Advanced Security snap-in allows you to maintain four main types of information:
Inbound rules—Rules to filter inbound network traffic using program, port, predefined, or custom criteria.
Outbound rules—Rules to filter outbound network traffic. The available criteria are the same as for inbound rules.
Connection security rules—IPSec rules for establishing connections between computers.
Monitoring—Access to firewall performance information for firewall rule analysis.
Performance Monitor
The Windows Performance Monitor enables you to view real-time performance data or data from a log file. The Performance Monitor can identify potential problems threatening data availability. Data Collector Sets can configure and collect performance data based on specifications for analysis and reporting. You can view detailed information about hardware resources and system resources that the OS and running programs use. You can also start and stop services, stop processes, and analyze process locking activity.
FIGURE 10-3 shows the Windows Performance Monitor.

FIGURE 10-3
Windows Performance Monitor.
Courtesy of Microsoft Corporation.
Backup Administration
A valid backup is a crucial part of an organization’s ability to recover from losing data. One of the most visible recurring tasks you will have as a security administrator is to create frequent backups of your organization’s data. You can use either Microsoft backup utilities or third-party programs. Either way, you should frequently create fresh backup copies of the data your organization cannot afford to lose.
Windows Workstation Backups
Microsoft has included an updated Backup and Restore utility starting with Windows 7. The utility has been upgraded from its Vista predecessor to make backing up and restoring Windows workstations simple. The Windows Backup and Restore Wizard asks you to provide answers to three main questions to initially configure your backup scope and schedule. FIGURE 10-4 shows the Windows Backup and Restore utility in action.

FIGURE 10-4
Windows Backup and Restore for Windows 7.
Courtesy of Microsoft Corporation.
Windows Server Backups
The Microsoft Windows Server Backup utility must be installed on computers running the Windows Server OS. Once installed, you can use it to schedule and create backups for your servers. Since Windows servers perform different functions, they often have different backup needs. The Microsoft Windows Server Backup utility addresses the many different server backup needs (FIGURE 10-5). It may take a little more effort to configure than a simple workstation backup. The basic steps are similar to setting up a workstation backup—you just have more options available to you.
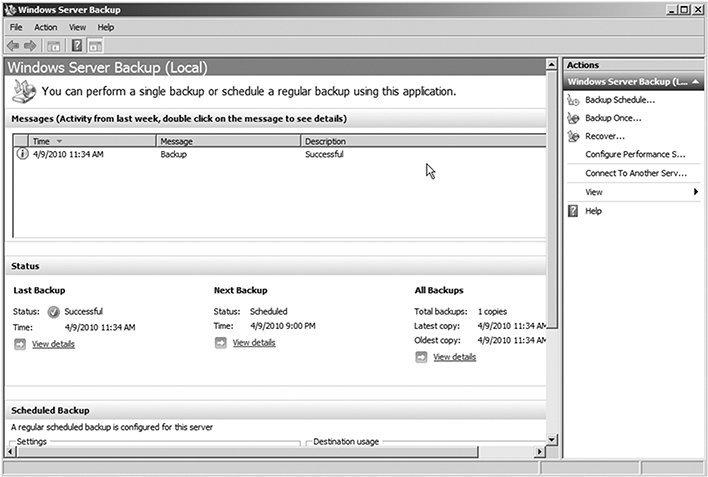
FIGURE 10-5
Windows Server Backup.
Courtesy of Microsoft Corporation.
OS Service Pack Administration
Microsoft developed the Microsoft Baseline Security Analyzer (MBSA) utility. This utility evaluates computers in accord with Microsoft security recommendations. MBSA checks to ensure the OS and current Microsoft software are up to date. The latest version of MBSA, version 2.3, supports Windows Server 2008 R2, Windows Server 2012, Windows 7, and Windows 8, as well as several previous Windows versions. Notice that MBSA does not support the latest versions of Windows. The MBSA utility is a legacy security utility, but does still have some value. While it will not find some of the latest vulnerabilities, it does provide a general level of confidence that basic security concerns have been addressed. MBSA can still be one of the tools in your security toolbox. You can find MBSA version 2.3 at https://www.techspot.com/downloads/3886-microsoft-baseline-security-analyzer.html.

FIGURE 10-6
MBSA GUI.
Courtesy of Microsoft Corporation.
Group Policy Administration
You can define GPOs at the local level or in AD. Defining GPOs in AD gives you the ability to centralize security rules and control how Windows applies each rule. You create AD GPOs on a domain controller, and Windows automatically replicates the GPOs to other domain controllers. This feature reduces the workload of administrators. Using Group Policy in AD relieves the need to define security rules on multiple computers one at a time.
AD GPOs are created on the domain controller using the Group Policy Management Console (GPMC) (FIGURE 10-7). Although there are multiple ways to create GPOs, the most common method is to create GPOs under the desired domain in the GPMC. Once a new AD GPO is created, link it with an entity to activate it.

FIGURE 10-7
Group Policy Management Console.
Courtesy of Microsoft Corporation.
DACL Administration
Windows uses an object’s DACL to determine if it should grant access a subject has requested. Any object you want to protect must have a DACL for Windows to control access to the object. Objects without a DACL defined are accessible by any subject—any process, any user. An object’s DACL is a collection of individual ACLs and can be modified in the object’s Properties dialog box (FIGURE 10-8).

FIGURE 10-8
Object Properties Security dialog box.
Courtesy of Microsoft Corporation.
The Security page of the object Properties dialog box allows you to view and modify the security permissions for the selected object. On the Security page, the Group or User Names area lists the users and groups for which each access control entry (ACE) is defined. Recall that each entry in an ACL is an ACE. The Permissions for Users area shows the current permissions for the selected user or group.
The Advanced page provides access to individual object permissions, as opposed to predefined groups of permissions in the general Security page (FIGURE 10-9). The Advanced page lists each individual permission for the selected user or group.

FIGURE 10-9
DACL advanced security settings.
Courtesy of Microsoft Corporation.
Encryption Administration
Windows supports three main methods to encrypt stored data: Encrypting File System (EFS), BitLocker, and BitLocker To Go. Other methods are available within applications. Additional solutions are available from other vendors. Consider your encryption needs and evaluate each method based on its specific capabilities. The best choice of encryption methods is the one that best meets your needs. If you choose one of the default Windows encryption methods, all you have to do is enable your selected encryption option.
Enabling EFS
You enable EFS for objects using the object’s Properties dialog box. Open Windows Explorer and navigate to the file or folder. To encrypt the object, open the context menu by right-clicking the object, and then select Properties. From the Properties dialog box, choose the Advanced button. In the Advanced Attributes dialog box, select the Encrypt Contents To Secure Data checkbox, choose OK, then choose OK again to close the Properties dialog box. The object is now stored as an encrypted object. No further action from the user is necessary. FIGURE 10-10 shows the Properties and Advanced Attributes dialog boxes.

FIGURE 10-10
Object Properties—Advanced Attributes.
Courtesy of Microsoft Corporation.
Enabling BitLocker or BitLocker To Go
Enabling BitLocker or BitLocker To Go is just as easy as EFS. The main difference between the two is that BitLocker To Go encrypts removable media. To enable either BitLocker version, open Windows Explorer and navigate to Computer. Open the context menu of the selected volume by right-clicking on the desired volume, and select Turn On BitLocker or Turn On BitLocker To Go. FIGURE 10-11 shows the BitLocker option on the object’s context menu.

FIGURE 10-11
Enabling BitLocker.
Courtesy of Microsoft Corporation.
Alternatively, you can launch the BitLocker management tool to view and manage BitLocker for all volumes. Open the Windows Control Panel, select System and Security, and select BitLocker Drive Encryption. The BitLocker management tool displays all volumes, along with an option to turn BitLocker on or off for each volume. FIGURE 10-12 shows the BitLocker management tool.

FIGURE 10-12
BitLocker management tool.
Courtesy of Microsoft Corporation.
After enabling BitLocker, Windows asks you to pick an authentication method and to determine where to save a recovery key. Once you provide the required information, Windows handles the rest and encrypts your data when you store it on the disk.
Anti-Malware Software Administration
The key to keeping computers malware free is to identify all known malware on each computer, remove it, and diligently keep the computers from getting infected with new malware. The most important step in the process is making the commitment to pursue a malware-free environment. There are many anti-malware software options and your specific scan, update, and removal procedures will depend on your software.
The key steps in staying malware free are:
Require antivirus and anti-spyware software for every computer before you allow it to connect to your network.
Ensure that all anti-malware software is current and all data are up to date.
Scan each computer at least weekly to search for malware.
Ensure anti-malware shield software runs on every computer that connects to your network.