CHAPTER 9
Editing Aesthetics
Editing is an invisible art. When it is done well, it is hardly noticed—yet almost every visual message in television and film has been edited.
If we define editing as the process of selecting and ordering shots, we can identify two kinds of video editing: editing done during a program’s production and editing done after the program has been videotaped. This latter type of editing is called postproduction editing.
Television directors have always had the ability to choose and order the shots within a program. Until the advent of postproduction editing, these decisions were made live, as the program was being taped or broadcast. The signals from several television cameras were simultaneously fed into a video switcher, and their pictures were displayed on monitors in a control room. The director would look at the monitors and call for the shots desired. This type of production is still widely done. Shot selections in most live news broadcasts, sports telecasts, and discussion programs are still made by a director in a control room who calls the shots as the program unfolds.
Video editing in postproduction eliminates the need for making editing decisions while a live program is in progress. Production personnel can concentrate on recording the information they need for the program, without worrying about the arrangement of the shots until after they have finished shooting the program. In addition, whereas video switching is often tied to events in one locale, postproduction editing allows gathering material for a program from different locations over a longer time.
Postproduction editing, simply referred to as editing from here on, is extensively used in video production. Many programs that look live—such as interviews and variety shows—have been edited in postproduction, long after the initial material was taped.
Editing is the process of arranging individual shots or sequences into an appropriate order. The appropriate order is determined by the information the editor wants to communicate and the impact the editor wants to achieve with the material. The process of editing includes making a series of aesthetic judgments, through which the editor decides how the piece should look, and performing a series of technical operations to carry out the editing decisions. This chapter focuses on the aesthetic elements involved in editing.
ROLE OF
THE EDITOR
The video editor is potentially one of the most creative members of the production team. No single-camera production shot with postproduction editing in mind would ever appear on a television screen without the services of a competent video editor. However, the importance of the editor to the production team depends on both the role and the amount of creative freedom given to that editor. In video production, two broad categories of editors are typically found: the autonomous creative editor, who makes the principal editing decisions, and the subordinate technical editor, who carries out editing decisions made by someone else.
The Creative Editor
The autonomous creative editor is an individual with significant responsibility for making and executing editing decisions. The creative editor must understand both the aesthetic principles of editing as well as how to operate the video editing equipment. Working in a variety of production situations, the creative editor may be given a brief story outline and a dozen cassettes of field tapes or a set of video files on a computer hard drive from which to edit a story segment that conforms to the general conventions of the program. Here, the editor has an incredible amount of creative freedom. Decisions about the use of music, sound effects, sound bites, shot sequences, and even the structure of the segment may be left to the editor’s discretion. However, the segment or program producer or director usually retains veto power.
At the other end of the spectrum, the creative editor may edit material for a program that was shot from a full script. In this situation, the editor’s role is to make the raw material conform to the script. Even within this process, the editor has considerable creative freedom. The editor works with multiple takes, from similar or different angles, of a number of individual shots. Although the basic structure and dialogue of the scene are given in the script, the editor can significantly influence the shape and impact of the scene by selecting the particular shots and takes that work best.
The Technical Editor
The subordinate technical editor is usually (but not always) primarily a technician or engineer who is thoroughly familiar with the operation of the hardware and software in the editing system. The technical editor executes editing decisions made by someone else.
Many video production companies do not own production equipment of their own, choosing instead to rent or lease production equipment and facilities from companies that specialize in providing these services. This is often the case with video editing equipment. Because editing systems vary in complexity and flexibility from one facility to the next, and because of the variety of nonlinear editing software programs now in use, when a suite of video editing equipment is rented at a postproduction facility, an editor is usually provided from the staff of the postproduction facility to operate the system in an efficient, cost-effective manner. Creative control of editing decisions is retained by the producer or director of the program, and the technical editor performs the edits as they have been determined by the individuals with creative control over the program.
It would be grossly unfair to say that technical editors understand only the technical process of editing and not the aesthetics of editing. In reality, most technical editors know what edits together well and what does not. The principal difference between creative and technical editors lies in the location of creative control over editing decisions. The autonomous creative editor has such control, whereas the subordinate technical editor usually does not. However, most good subordinate technical editors make suggestions about the aesthetics of the edit and, for that reason, they too are partners in the creative editing process.
In many production situations, one individual performs both of these editing functions. Indeed, in many small video production companies and in video production units located in educational institutions, corporations, cable television, and sometimes even broadcast television, one person may produce, direct, and shoot the entire production as well as edit it! Therefore, it is extremely important to understand both the aesthetic and the technical aspects of video editing, and how to plan and execute a production reflecting both of these areas of concern.
The Editor as Graphic Artist
and Sound Designer
In addition to the technical and aesthetic elements of editing, today’s video editors are increasingly being called on to integrate significant graphic design elements into the programs they edit. Modern digital nonlinear editing systems not only allow audio and video to be edited quickly and efficiently but also allow for easier integration of graphics and special effects than the tape-based systems they are replacing.
The same can be said for audio. Not only do modern digital nonlinear editing systems contain powerful audio editing and sweetening tools but many systems also contain software that can be used to compose music and create sound effects tracks.
Increasingly, editing, graphics, and effects software are installed on the same computer system, and one person has the responsibility of performing editing, graphics, and effects tasks. The technical editors of old are being replaced quickly by more creative editing personnel, who are as familiar with graphic and sound design as they are with video picture editing.
TYPES
OF EDITING
There are two general techniques, or styles, of editing. One is continuity editing; the other is dynamic, or complexity, editing. In truth, editing is seldom solely one technique or the other. In most cases, it is a combination of the two. So it might be useful to think of these two editing styles as points at either end of a continuum. (See Figure 9.1.) Some programs are edited with a style that more heavily draws on the principles of continuity editing, and others lean more heavily in the direction of dynamic editing. In any event, these two terms provide a useful place to begin talking about different types of editing.
Continuity Editing
The goal of continuity editing is to move the action along smoothly without any discontinuous jumps in time or place. It is easier to perform continuity editing of visual sequences if the material has been shot with postproduction editing in mind. (You may want to review the guidelines for shooting to edit in Chapter 6.)
However, even if the field tape has not been shot according to the rules, there are a number of guidelines that the editor can follow to achieve continuity in editing. Four of the more important guidelines are discussed here.
FIGURE 9.1 Continuity
Establish and Maintain Screen Position
Establishing Shots. The use of the establishing shot is an important feature of continuity editing because it identifies the location and the position of the people in the shot in relation to their environment. Once a scene has been set up through an establishing shot, many of the other principles of continuity editing follow logically.
Cut In and Cut Out. By their nature, establishing shots tend to be medium or long shots. These shots often do not have the dynamism or energy of the close-up shot. Once a scene has been established, it is standard editing technique to then cut in to a close-up of some detail of that scene. The interview that begins with an over-the-shoulder 2-shot of the interviewer and subject is frequently followed by a cut-in to the close-up of the subject. In a demonstration of a product or machine, the establishing shot may present a shot of the object and the person with the object. The cutin presents important details not visible in the longer shot.
Conversely, once the cut-in establishes the important detail, it is frequently necessary to cut out again to the wider shot, particularly if action is about to take place. A shot sequence utilizing the techniques of the establishing shot, cut-in, and cut-out is shown in Figure 9.2.
When cutting in to a tighter shot from a wide shot, objects and people should maintain their same relative place in the frame. Someone who is on the right side of the frame in the wide shot should remain on that side of the frame, or in the neutral center of the frame, when you cut into a medium close-up. The cut-in should not cause the person to flip to the other side of the frame (see Figure 9.3).
Jump Cuts. Jump cuts violate the conventions of continuity editing because they destroy the invisible, or seamless, quality of the editing. A jump cut occurs when something is removed from the middle of a shot and the two remaining end pieces are joined together. If the size and position of the subject are not exactly the same, the cut from the beginning shot to the end shot will cause the subject to appear to jump in the frame. Look at the two sequences of images in Figure 9.4. In the first sequence a woman walks toward her friend, sits down at the table, and drinks from her cup of coffee. All of the essential action of the event is represented in the shot (approach, sit down, drink). If the middle part of the shot where the woman sits down at the table to join her friend is removed, and the first and last parts of the shot are joined together (approach, drink), the woman on the right-hand side of the frame will instantly jump from her standing position next to the table to a sitting position at the table with the coffee cup raised in her hand. This is an extreme example of a jump cut.
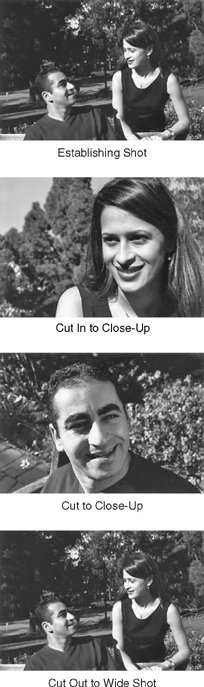
FIGURE 9.2 Establishing Shot, Cut-In, and Cut-Out Sequence
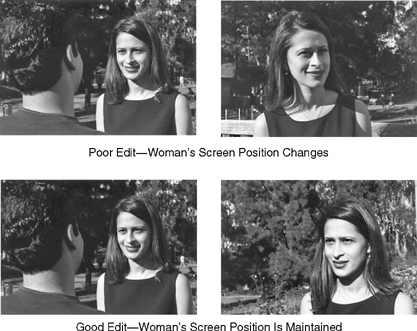

FIGURE 9.4 Jump-Cut Sequence
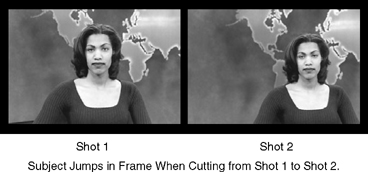
Another type of jump cut occurs when you make a cut from one shot to another that is similar in terms of angle of view and camera position. When the two shots are joined together, the effect is of a jump or change in the screen position of the people and objects in the shots (see Figure 9.5).
Avoid jump cuts because they are visible and obtrusive. They look like editing mistakes because they violate the spatial continuity of the subject in the frame. When the subject jumps or moves from one part of the frame to another without any motivation, continuity is lost.
Use Eyelines to Establish the
Direction of View and Position
of the Target Object
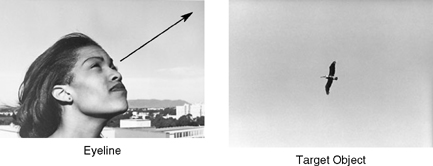
An eyeline is simply a line created by your eyes when you look at a target object. If you look up into the sky at a bird, the bird is the target object and the eyeline is the imaginary line between your eyes and the bird. Look down at your feet and a similar eyeline is created between your eyes and their target.
Eyelines and the position of the target object are very important in creating continuity. A close-up of someone looking up, followed by a close-up of a bird, makes sense (see Figure 9.6 on page 312). The same close-up of a person looking up, followed by a shot of the subject’s feet, does not.
Eyelines are formed between people when they talk, and they can be used to create continuity when the conversation is edited. This type of continuity editing is facilitated if the original material has been shot utilizing complementary angles. A simple scene with two people illustrates the point, which can be applied to interviews as well. Assume that an establishing shot has been recorded. The first sequence in Figure 9.7 shows the establishing shot as the editor sees it on tape. Close-up details of each of the people in the shot have been recorded using complementary angles—one looks to the right side of the screen, the other looks to the left side of the screen. When the establishing shot and two close-ups are edited together, the shot sequence reveals the two people talking to each other.
Violating the rule of complementary angles produces a discontinuous, if not comedic, effect. In the second sequence of shots in Figure 9.7, the characters are facing the same angle on camera in their MCU shots. These two shots cannot be edited to make it look like the two people are talking to each other because the people in the shots are not in the target positions created by their eyelines.
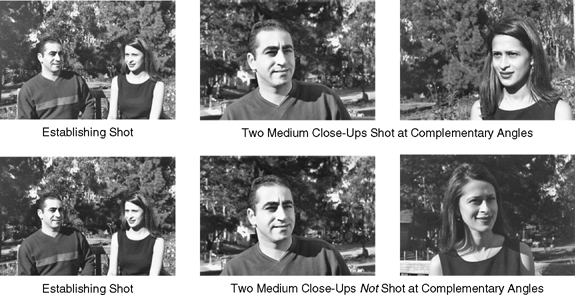
FIGURE 9.7 Complementary Angles
Maintain Continuity in the
Direction of Action
Perhaps nothing is more important to maintaining the continuity of action than maintaining directional continuity. Characters or objects moving in one shot should continue to move in the same general direction in a subsequent shot. Directional continuity will be apparent in the raw footage if the videographer has paid attention to the 180-degree rule and the principal action axis when shooting the original field tapes (see Chapter 6).
Mismatches in directional continuity are most apparent when a strong horizontal movement in one direction is immediately followed by another movement in the opposite direction, as in the example in Figure 9.8. In the first shot, action moves from left to right in the frame. In the second shot, the screen position of the subject is reversed, and the woman now appears to be moving from the right side of the frame to the left. If the editor needs to use discontinuous shots, they should be bridged by a neutral shot in which the action moves directly toward or away from the camera. The second shot sequence in Figure 9.8 illustrates how a neutral shot can be used to bridge a discontinuous shot sequence.
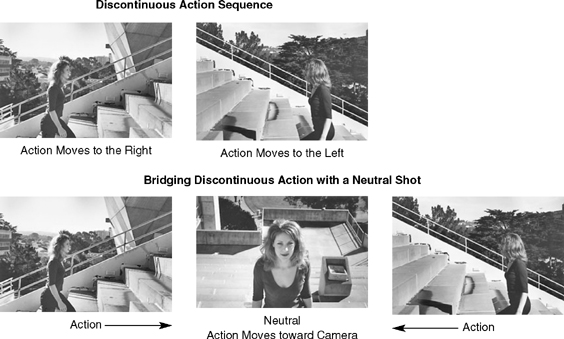
FIGURE 9.8 Bridging Discontinuous Action with a Neutral Shot
It is also worth noting that a neutral shot can be used to correct problems when the principal action axis is crossed even if there is not strong screen action. For example, if you have juxtaposed two shots of the same person in an interview looking to the right of the screen in the first shot and to the left of the screen in the second shot, a cutaway to a neutral shot will effectively bridge the jump cut between the two interview shots.
Use Shot Content
to Motivate Cuts
In continuity editing, each edit or cut is usually motivated. That is, there should be a reason for making an edit. The two principal motivators of cuts are dialogue and action.
Cutting on Dialogue. Much editing is motivated by what is said. For example, a question demands an answer, and each line of dialogue in a dramatic scene must be met with another. In these situations, the editor’s task is to cut the material together so that what is said makes sense and so that the visual and aural sequence flows smoothly. The rhythm of the editing should match the rhythm of what is being said in the scene. To do this, edits are usually made at the natural breaks in the dialogue.
Cutting on Action. The other great motivation for a cut is action. Indeed, one of the cardinal rules of cutting is to cut on action. Look at the sequence in Figure 9.9. This sequence contains two shots of a chef whipping ingredients in a bowl. Shot 1 is a long shot of the chef and bowl; Shot 2 is a close-up of the bowl. The best time to cut to the close-up of the bowl is when the chef begins to whip the ingredients. The editor needs to match the edit point carefully on the two shots. Because the action is repeated in both shots, it must be edited in such a way that no duplication of action is visible. The sequence should look as if it is happening in real time.

FIGURE 9.9 Cutting on Action
As this example demonstrates, it is easier to cut on action if the editor has several shots repeating the action from different angles. A good field producer makes certain that this material has been shot.
Other Continuity Issues
Beyond the issues of continuity related to placement of the subjects in the frame, the editor should pay attention to several other continuity problems as well.
Lighting Continuity. Field video production is characterized by shooting at different locations on different days and at different times of day. Unlike studio video production, where tight control of lighting can be achieved, light values in field video production tend to vary from location to location and by time of day.
Sometimes changes in the quality of light from shot to shot will make sense in the context of the story being told; other times such changes will make the action seem discontinuous. For example, outdoor material shot on a foggy day with soft, diffuse light will not cut together well with material shot at the same location on a sunny day. If you have to make a continuous sequence of shots recorded under differing lighting conditions, care needs to be taken so that shots with widely varying light values are not juxtaposed.
Sound Continuity. As is the case with light, sound conditions vary from location to location as well. Although this may be an advantage in differentiating one locale from another, it can also present a problem, particularly where the voice tracks are concerned. The sound quality of interview material should be consistent, and a good editor will use plenty of room tone or background sound to smooth cuts from one sound bite to another.
Continuity of Narration, Dialogue, and Music. Consistency in the delivery of dialogue or music is important to maintain the viewer’s sense of a continuous flow of events. Keep the tone of voice and volume consistent with the action on the screen. When shooting, keep microphones at regular distances from subjects so as to maintain the talent’s presence throughout the scene.
Background Audio. Natural sound (in field production) or music (in both studio and field production) are the most common background sounds. Pay special attention to changes of sounds between scenes. If the location remains the same but shots or scenes were shot at different times, are the background sounds the same? A slight difference may cause the viewer to become confused. Also, be aware of sound perspective. Do the sounds match the visuals? Is the close-up of the motorcycle matched with the loud sound of its engine? Does the soft sound of the engine match the long shot of the motorcycle?
Audio Levels. Make sure that audio levels are properly set during the shooting and are properly maintained during the editing process.
Performance Continuity. Make sure performers have similar gestures, positions, and expressions from shot to shot. This is particularly applicable to single-camera production in which there may be a need to repeat an action in successive “takes” of the shot or scene.
Continuity of Settings and Properties. Dramatic scenes are typically shot in studios with built sets, or on location in actual settings. In either case a variety of props (properties) may be used to decorate the set. Pay particular attention to the location of set pieces and properties to maintain continuity from shot to shot.
Physical Appearance of the Subjects. Attention also needs to be paid to the general physical appearance of the principal subjects in order to ensure that their appearance does not change radically within the program or segment. Audiences readily accept that a subject’s clothing may be different in interview shots and in B-roll footage shot on location. However, if some other aspect of the subject’s appearance changes radically, it may confuse your viewers.
For example, consider a subject photographed with a full head of hair in an interview, who then appears with his head shaved bald in B-roll footage recorded some time after the interview. If the subject’s appearance changes radically, it may have to be explained in the script, particularly if the change is so dramatic that viewers will not easily recognize the “before” and “after” subject as the same person!
DYNAMIC
EDITING
Dynamic editing differs from continuity editing in two important ways. It tends to be a bit more complex in structure, and it frequently utilizes visual material to create an impact rather than simply to convey literal meaning. Dynamic editing, then, is more affective than continuity editing. This is not to say that continuity editing must be listless or boring or that dynamic editing cannot be used to convey a literal message. The differences between the two are often differences of degree rather than of substance.
Editing to Maximize Impact
Dynamic editing attempts to maximize a scene’s impact rather than simply to link together individual shots into an understandable sequence. The selection of shots for use in dynamic editing, therefore, is somewhat different than in continuity editing. Dynamic shot selection frequently includes shots that exaggerate or intensify the event rather than simply reproduce it. Extremely tight shots or shots from peculiar angles are frequently incorporated into dynamic shot sequences to intensify a scene’s impact.
Manipulating the Time Line
Dynamic editing frequently is discontinuous in time. That is, rather than concentrating on one action as it moves forward in time (a technique typical of continuity editing), dynamic editing can use parallel cutting—cutting between two actions occurring at the same time in different locations or between events happening at different times. The dynamic editor might intercut frames of past or future events to create the effect of a flashback or a flashforward.
Editing Rhythm
Continuity editing is usually motivated by the rhythm of the event (either the action of the participants or the dialogue of the characters); dynamic editing is more likely to depend on an external factor for its motivation and consequent rhythm. Two common techniques include editing to music and timed cuts.
In its most common form, editing to music involves editing together a series of related or unrelated images according to some rhythmic or melodic element in a piece of music. In the most clichéd type of editing to music, the editing matches a regular rhythmic beat and does not deviate from it. Editing that uses various musical components—the melody or a strong musical crescendo, for example—to motivate the edits is more energetic and interesting.
A timed cut is one in which shot length is determined by time rather than content. You can edit together a sequence of shots that are each two seconds in length, or you can use shot length like a music measure to compose a sequence with a rhythm based on the length of the shots.
The Rule of Six
Although this discussion of editing began with a description of how to achieve continuity of the subject in time and space, editing that is “correct” as far as continuity is concerned may not be good editing unless other factors are considered as well. Veteran film editor Walter Murch suggests that six elements should be considered to evaluate each edit made:
1. Emotion. Does the edit make the audience feel what you want them to feel at that moment?
2. Story. Does the edit advance the story in a meaningful way? Does the edit help your audience understand the story, or does it confuse them and/or complicate the story?
3. Rhythm. Does the edit occur at the point that is rhythmically correct in terms of the edited shot sequence? When you review the edit, does it feel right?
4. Center of Interest. Does the edit respect the visual center of interest of shots that precede and follow it? Is the viewer’s eye readily led to the center of interest in successive shots, or is the viewer forced to search for the center of interest?
5. and 6. Two- and Three-Dimensional Screen Space and Continuity. Does the placement of subjects in the frame and in relation to other subjects and the environment in the shot respect the conventions of visual continuity? Are the spatial relationships between characters understandable in the shot sequence?1
TRANSITIONS
AND EFFECTS
Transitions
For those video producers with simple linear videotape editing systems, the cut is the only visual transition possible from shot to shot. The most frequently used transition in video and film, the cut is an instantaneous change from one shot to another. It approximates the effect achieved by blinking, without leaving a blank or black space between shots.
For the producer with access to a nonlinear editing system, a number of other transitions are available.
A fade is a gradual transition from black to an image or from an image to black. Fades are usually used at the beginning and end of a program; thus, we have the terms fade in and fade out. However, fades are also used within a program. A fade signals a break in continuity of the visual message. Fades are used to insulate the program material from a commercial, to signal to the audience that an event or episode has ended, that time has passed, and so on.
The dissolve is similar to the fade except it involves two visual sources. One gradually fades out as the other fades in, and the two sources overlap during the transition. The effect is one image changing into an-other. Dissolves, once widely used to signal passage of time, now are more often used to show the relationship between images, particularly structurally related images. A dissolve from a photograph of a young man to another photograph of the same man in old age not only clearly shows the passage of time but also represents the metamorphosis of one image into another.
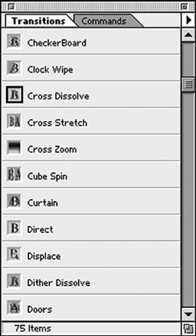
A wipe is a transition in which one screen image is replaced by another. The second image cuts a hard- or soft-edged pattern into the frame as the transition takes place. In nonlinear editing systems, wipe patterns are selected from the transitions menu. All nonlinear editing system transition menus contain a standard array of wipe patterns: circles, squares, diagonals, diamonds, and so on.
Digital Video Effects (DVE)
Once extremely popular in television commercials but seldom used in news or dramatic productions, wipes have now largely been replaced by digital video effects. Digital video effects are made possible by digital processing equipment, which digitizes and processes the video signal. Common digital effects include page push and page pull (the picture appears to be pushed or pulled off the screen by another), page turn (this looks like the page of a book or magazine turning), and a host of three-dimensional effects that transform the image into a sphere, the side of a cube, and so on.
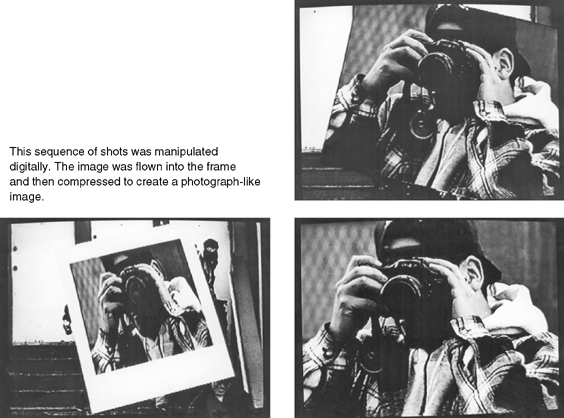
Other common digital video effects include image compression and expansion, which result from stretching or squeezing the horizontal and vertical dimensions of the picture. Through image compression, a full-frame image can be reduced to any size and positioned anywhere in the frame. Similarly, through expansion, a reduced image located in a section of the frame can increase in size until it fills the frame (see Figure 9.10 on page 320).
Digital video effects are often used as transitions. Once, only state-of-the-art production houses and television studios had the sophisticated video switchers with the processing equipment necessary for these effects. Today these special effects are available in cost-effective digital nonlinear video systems. (See Figure 9.11 on page 321.)
Filters
Nonlinear editing systems typically contain a wide array of filters that can be used to change the quality of the image. Typical filters include ones that will blur or sharpen the image, as well as filters that can be used to adjust the color of the image.
Color and Brightness Effects
Color and brightness values of recorded images can also be manipulated during editing. Hue, saturation, and brightness can be adjusted to correct the color values of video recorded in the field and to make it consistent with the other shots in a program, or color and brightness values can be purposefully distorted to achieve a particular effect. Color images can be converted into black-and-white images by eliminating all of the color information in the video signal, or the range of color values present in normal video can be replaced with one particular value—for example, sepia, blue, or any other color—to achieve the desired effect.
Layers
Dramatic visual effects can also be achieved by building shots consisting of multiple layers of video. In its simplest form, layering is used to add titles over background images. In this case there are two layers of video: the title and the background video. More complex images can be constructed by reducing the size of one or more images and inserting them over background video to achieve a picture-in-picture effect. Motion can typically be introduced to any of the layers as well to create even more dramatic effects.
Motion Effects
The speed at which shots are replayed can be manipulated during the editing process. Although all field video is recorded at normal speed, during editing the playback speed can be increased or decreased. In linear editing systems, this is accomplished by VCRs capable of slow- or fast-motion playback; in nonlinear editing systems, motion effects software is used to control the speed of the images. Slow-motion effects are the most common, with the action taking on a smooth, almost dream-like quality. Accelerated-motion effects can be created by increasing the playback speed of source materials.
SOUND IN EDITING
Sound is one of the most important components of video editing. From a technical standpoint, control over sound is essential to avoid distortion and make a clear recording. From an aesthetic standpoint, sound plays an important role in influencing the mood and pace of the edited piece and, subsequently, the audience’s response to the program. Control of sound during the editing process involves a number of different steps, including sound selection, sequencing, layering, and processing.
Sound Selection
The most basic decision to be made about sound while editing is deciding which sound segments to include and which not to include. The editor must first choose from the material available on the unedited videotapes and then must decide what material needs to be added. Additional material may include narration, music, or sound effects.
Sound Sequencing
Once the principal sound segments have been selected, the editor must put them into the proper sequence. No matter what the purpose of the segment is, some kind of order is needed. In an instructional or dramatic program, the presentation of the basic material may follow a rigid structure that is geared to maximizing the learning or dramatic impact of the program. In an experimental production, sound sequence may be determined by other concerns. In all three types of productions, however, basic decisions need to be made about the order of presentation.
In addition to determining the sequence of the sound segments, the editor must also determine the kinds of transitions that will be used between them. When editing voice, the most common transition is a straight cut. When one audio segment ends, the next one begins, leaving a natural pause between segments. In other kinds of audio sequences, segues or crossfades may be used.
A segue (pronounced “SEG-way”) from one sound to another is a transition in which the first sound gradually fades out. When the sound has faded out completely, the next sound is gradually faded in. There is a slight space between the two sounds but no overlap. In a crossfade, the first sound fades out but the second sound fades in before the first one fades out completely. This results in a slight overlap of the two sounds.
An edit that simultaneously affects both audio and video is known as a straight edit or a straight cut. Sometimes it is called a both edit—that is, both audio and video are edited at the same time. Most dialogue and interview editing is of this type. An on-camera SOT introduction from the field news reporter that is immediately followed by an SOT statement from a county official under arrest for corruption is an example of a both edit. One picture and its corresponding sound are immediately replaced by another picture and its corresponding sound.
Another sound-editing technique is the split edit. In the split edit, an edit is made first on sound (or picture) and then is followed by the edit to the corresponding picture (or sound). Two separate edits—one on audio the other on picture—are made, and one follows the other in time.
Consider a sequence in which an on-camera field news reporter, standing outside the local federal building, announces that a noisy protest by tax resisters is going on inside. Instead of cutting from the reporter to the video and audio of the protesters inside, the editor can first cut in the sound of the protesters under the shot of the newscaster giving the introduction. Then the editor can follow with the video of the demonstrators after the introduction is complete. In an interior scene in which a distraught father is waiting for word from the police about the condition of his missing daughter, we see the father glancing nervously out the window. An audio-only edit can introduce the sound of the police car approaching at high speed, followed by a video edit to the patrol car itself, with the sound in sync as it grinds to a halt in front of the house.
Sound Layering
The sound portion of a program can include several sound sources heard simultaneously. When voice-over narration is used, the voice is usually heard over both a picture and some kind of background sound. A more complex example of sound layering might include a voice-over, natural sound, and music simultaneously in the same shot. The editor, therefore, not only must select the appropriate sound sources but also must layer or mix them together appropriately.
The relative strength of each of the sounds layered together is usually determined by its importance in the scene or sequence. The editor must correctly mix them so that their relative volume matches their importance. A voice-over should not be overwhelmed by the natural sound or music that is supposed to be in the background. However, in a highly dramatic scene, the music may well come to the foreground as it overwhelms the background and other sounds in the scene.
Sound layering, then, involves determining which sounds should be heard in the foreground, in the background, or in between. It also involves achieving the proper layering effect through volume manipulation when mixing the sound in the editing process.
Sound Processing
Sound quality is also frequently manipulated during the editing process. Audio filters and graphic equalizers are widely employed either to correct a problem in the field audio or to manipulate an audio source to achieve a particular effect. The editor must consider all the available sound sources and determine whether manipulation of the sound quality is needed. If there are inconsistencies in the quality of the voice recordings on various field tapes, an equalizer should be used to achieve maximum consistency.
“DON’T WORRY, WE’LL
FIX IT IN POST”
Producers who work in the field know that their project won’ be done until it passes through the postproduction stage. This has given rise to a phrase that probably has been uttered at least once during the production phase of most programs when something goes wrong: “Don’ worry, we’ll fix it in post.” While not every problem can be fixed in postproduction, many can be fixed, particularly given the image-editing tools that most nonlinear editing systems now contain. A few of the most common postproduction fixes are discussed below.
Fixing Color and Brightness Problems
In studio production, a video engineer is in charge of camera shading and ensures that each of the cameras is producing an image with similar color and brightness values. The nature of field production requires a program to be recorded shot by shot, in different locations with different lighting conditions, over an extended period of time, and often with different cameras and crews.
Professional nonlinear editing systems contain waveform and vectorscope monitors that allow the editor to correctly adjust brightness and color. This can be a slow process, as each shot may have to be individually color corrected. However, even severe white balance problems can often be fixed with the software that is available today.
Fixing Eyeline Problems
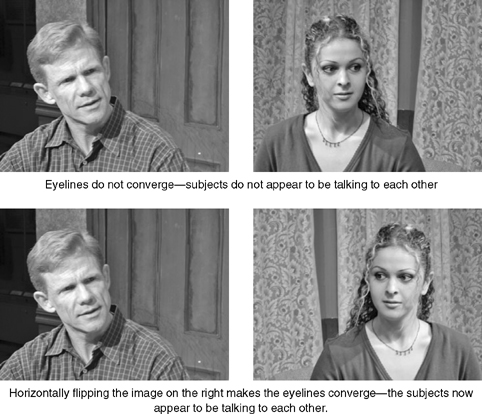
Often in postproduction the editor will have a problem matching eyelines or motion vectors. Perhaps a person is looking to the left side of the screen, when the sequence calls for the person to look to the right. Assuming that there is no written material visible in the shot, it is a rather simple procedure to use the digital video editing tools to flip the shot with the offending eyeline or motion vector. (See Figure 9.12.) Of course, if there is writing in the shot, the writing will be backward in the flipped shot. This is the reason that many field producers ask their subjects not to wear hats or shirts with written material on them.
Reframing a Shot
Novice camera operators sometimes make framing errors when shooting field material. One of the most common problems is framing an interview subject too loosely, when a tighter shot would be more appropriate.
Shots that are too wide can be tightened up by zooming in on them using the zoom tool in the nonlinear editing software program. Images can also be repositioned in the frame. For example, if the subject is framed too loosely and is centered in the frame, you could zoom in and move the image slightly to the left or right to achieve a different framing effect. However, remember that zooming in on the image while editing may affect the quality of the image—zoom in too far and the image may begin to pix-elate and lose sharpness.
Changing the Direction and
Speed of a Pan, Zoom, or Tilt
Most nonlinear editing programs allow the editor to control the direction and speed at which each clip is played back. A pan, zoom, or tilt that is too fast can be brought under control by changing the playback speed of the clip. A clip that looks bad played back at normal speed (100 percent) might look much better at 70 percent or 80 percent of normal speed. Remember, of course, that when you slow down the playback speed of the shot, it takes longer to play it back, so you have actually lengthened the shot. It may be necessary to trim it back to its original length to fit it back into the time line.
Sometimes the direction of a tilt, pan, or zoom needs to be changed. Imagine a shot of the exterior of an office building that begins with a close-up of the entrance, and then slowly zooms out and tilts up to the top of the building. As the last shot in a sequence, this might work fine, but if your script calls for an opening shot that is going to be followed by an interior shot of the lobby of the building, you would probably be better off if the shot started at the top of the building, and then slowly tilted down and zoomed in, ending on the close-up of the entrance.
Fixing this in postproduction is relatively simple. Once the clip has been imported into the nonlinear editing system, the editor can manipulate the direction of the clip. It can be played back from beginning to end, or from the end to the beginning. Reversing the direction will produce the shot that is needed for the sequence.
EDITING VOICE-DRIVEN
PIECES
Many projects that are shot single-camera style and are edited together in postproduction are interview-based, voice-driven pieces. News stories, documentaries, and magazine features are all examples of this kind of program material. In these productions, the story is principally told through the voice track, which is supported by the other production elements that the editor has at his or her disposal, including B-roll video, natural sound, music, graphics, and appropriate transitions and video effects.
Editing the Voice Tracks
Once all of the field footage has been logged, the editor can begin to piece together the story he or she is working on. A good strategy is to highlight critical sound bites in the typed transcriptions of video interviews and to begin to fashion a script out of them.
Narration may need to be used to link together these sound bites. In the final program, narration may be delivered by an onscreen narrator, or the narrator may be off camera. In the latter example, when the narrator is heard but not seen, this is called a voice-over (VO).
Interviews can be edited in a similar fashion. The person who has been interviewed can be shown onscreen, in which case we refer to this as sound on tape (SOT). Or, the sound can be used without showing the person in the interview setting by cutting away to appropriate B-roll footage. This also is an example of voice-over.
In any case, once the sound bites and narration that are going to be used in the project are identified, they should all be imported into the nonlinear editing system. Using the script as a guide, drag each of the voice elements, in sequence, into an appropriate audio track. You don’ need to be too concerned at this point about editing everything precisely and cleanly; just lay it out in the time line so you can get a sense of how the story flows.
It’s also a good idea to think about keeping each sound bite relatively short. Novice editors frequently put very long sound bites and narration tracks into the time line. In most situations it’s better to break up long sound bites into shorter ones (e.g., three 10-second bites instead of one 30-second bite). This helps pick up the pace of the program. The shorter, individual bites can be linked with narration, if necessary, or you can cut to someone else’s sound bite and then come back to your first subject.
Once you are satisfied with the general layout of the voice track, you can go back into the time line and trim each clip precisely. Make sure you don’ cut your subject off at the beginning or end of the clip. Also, do your best to make your subject sound good. If there are a lot of “ums,” “ahs,” and pauses in the interview, edit them out. Of course each time you do this, you will create a jump cut in the video. If there are only a few jump cuts, and depending on the type of program you are editing, you may choose to insert a fast dissolve at the jump-cut edit points. This will smooth out the jump cut and at the same time give the viewer a clear indication that the shot has been edited. However, if you have a lot of jump cuts, you most likely will want to cut away to B-roll video footage.
Identifying the Interviewee
You should also think about how you will identify the on-camera interviewee to your audience. Two common techniques are to introduce the interviewee with VO narration that identifies the subject, e.g., “Ron Chery is a student at Half Moon Bay High School,” or to use a lower-third keyed title with the subject’s name and affiliation, e.g., “Ron Chery, HMBHS Student.”
In short pieces it is almost always preferable to use the keyed title instead of the VO introduction, because the VO takes up valuable story time, and the key does not. If the subject’s name is keyed, a couple things need to be kept in mind. First, the key needs to be onscreen long enough for the audience to read it easily, and the shot that is keyed over it consequently needs to be long enough to cover the key. In general, keyed name identifiers need to be onscreen five to eight seconds to be read comfortably by the viewer, so the interview shot will need to be at least that long, if not a few seconds longer, to allow some room at the head of the shot before the key is introduced, and at the end of the shot after the key is removed. In addition, the shot needs to be composed so that the key doesn’ interfere with the background video. It’s not good practice to insert a key over a CU of the interviewee. Doing so puts the lower-third keyed titles directly over the subject’s mouth. This is distracting at best. It’s better to use a loosely framed medium close-up of the subject as the background for a lower-third key. This puts the keyed title over the subject’s chest, rather than over his or her face. (See Figure 13.4.)
B-Roll Video
The terms A-roll and B-roll were inherited from the days when news stories for television were produced using 16mm film. In the early days of television, there was no method of electronically recording the video signal, so field production was done using film. It was not until the mid-1970s that portable ENG systems were developed, making film obsolete as the field production recording medium for television.
Until that time, however, news stories for local and national television stations were produced using 16mm film as the recording medium. Interviews were recorded onto 16mm film with a magnetic stripe running along one edge of the film. The picture was recorded in the central part of the strip of film, and the audio was recorded in the mag stripe at the edge of the film. When the news story was run on the newscast, two special film projectors called telecine were used to convert the 24-frame-per-second film projection standard to the 30-frame-per-second video standard. The interview footage, called the A-roll, was run in one projector, and additional, edited footage of the visuals for the story, called the B-roll, was run in the other projector. Both film projectors appeared as separate sources on the video switcher, and the technical director, who responds to the commands of the program director, switched from one projector to the other to edit the A-roll and B-roll footage together in real time, on the air, as the news story was being broadcast live.
Today, the term A-roll has largely disappeared from use. But we still use the term B-roll to describe visual, cutaway video footage that is used to cover voice-over or narration.
Many field producers working on news-, documentary-, and magazine-format projects prefer to shoot their interview material first, and then shoot B-roll footage. The reason for this is simple. The function of B-roll is to provide visual support for the story. By listening to what is said in the interview, field producers can get a good idea of the B-roll footage that is needed. If the interview subject is a teenage girl and she says, “Every afternoon when I come home from school I like to paint my toenails,” the alert field producer will see that a sequence of shots should be recorded showing her coming home from school, and then painting her toenails.
As an editor, the only B-roll material you will have to work with is what the field production crew has provided for you. Once again, the importance of good logging becomes apparent. With a complete transcription of the interviews, and a detailed log of all the field footage that has been shot, you can begin to make connections between the interview sound bites and the available B-roll footage.
When using B-roll footage, try to think in terms of editing together meaningful shot sequences, rather than simply cutting away to a single shot and then cutting back to the on-camera interview. Apply the principles of continuity editing to your B-roll sequences, so each sequence tells a little story that complements what is being said in the interview.
STORYTELLING
It is important to note that producers of television news pieces, television magazine features, and documentaries almost universally refer to the video pieces they produce as “stories.” It is also important to note that while dramatic programs are almost always produced with a full script that accompanies the production from preproduction through postproduction, news stories, magazine features, and documentaries are almost never fully scripted. There may be an outline script that identifies the main points to be made in the piece, along with a list of individuals to be interviewed. Or the structure of the story may be conveyed from the producer to the editor in a brief conversation, with little or no written guidance provided at all. In these situations the editor has a significant amount of responsibility and creative freedom to structure the field material into a compelling story that will capture and hold the viewer’s attention. And in approaching such material, the editor can be guided by three of the main conventional elements of any story: structure, characters, and conflict.
Story Structure
In their simplest form, most stories have three main structural points: a beginning, a middle, and an end. This concept of story structure dates back to the Greek philosopher Aristotle, who wrote in the Poetics:
Now a whole is that which has a beginning, middle, and end. A beginning is that which is not itself necessarily after anything else, and which has naturally something else after it; an end is that which is naturally after something itself either as its necessary or usual consequent, and with nothing else after it; and a middle, that which is by nature after one thing and also has another after it.
The Lead or Hook. For the video editor, the challenge is often trying to figure out how to begin a story, and how to end it. Most editors try to find an interesting introduction to the story. Print journalists frequently talk about writing a lead to the story, a compelling first sentence that succinctly tells what the story is about. Video editors look for a similar way into a story, and frequently use the term hook to describe the interesting beginning of a story that catches the viewer’s attention and makes the viewer want to watch the story to find out what happens. The hook may be a statement or question delivered in VO by the narrator, or it may be an interesting sound bite from one of the interviewees featured in the story. In either case, the hook provides information in a way that provokes the viewer’s interest in the piece.
While all stories have a beginning, the narrative does not necessarily have to begin at the beginning of the story. That is, you can begin the story in the middle of things (in media res is the Latin phrase that is used to describe this technique), and then go back to an earlier point in time in order to bring the viewer up-to-date with what is happening.
The Narrative in the Middle. Once the main story idea has been introduced, the middle or body of the story provides the important details of the story. They may be presented principally through narration, or through the use of interviewees who function as the “characters” in the story.
In either case, the editor of short-form video pieces like news and magazine features should keep a couple of things in mind. Magazine features tend to be short (three to five minutes), and news stories are shorter still, often a minute and a half or less. In order to tell a story in such a short amount of time, the story must be relatively compact. Complex stories are hard to tell in a short amount of time. Simple stories are easier to tell, and for that reason most news and magazine features are kept relatively simple. As we discussed in Chapter 2, you should be able to state the essence of the story in one simple sentence. If you can’, you may have difficulty making your story conform to the strict time limits that television imposes.
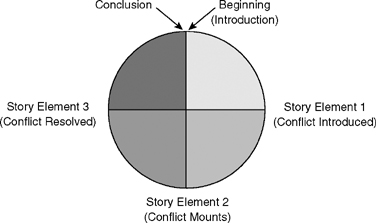
A simple visual device to help you track the complexity and development of your story is the story wheel. (See Figure 9.13.) Each of the spokes of the wheel corresponds to one significant element of the story. Most short news and magazine feature stories have two or three spokes—any more than that and you won’ be able to tell the story within the allotted time.
The End. Once the story has been told, it needs to be brought to some kind of reasonable conclusion. If the story began with a question, the end of the story might restate the question and answer it. If the story started with an assertion, the close might support or contradict that assertion, depending on the point of view presented in the story. And if the story has been structured around some kind of conflict, then the end of the story might provide a resolution of the conflict, or explain why there is no resolution if the conflict hasn’ been resolved. News producers refer to the ending statement in a story as the closer.2
Visual Elements. Story structure also can be thought of in visual terms. Stories often begin and end with significant attention to visual detail. An edited montage of shots might provide a high-energy introduction, and a beauty shot of a striking visual element that seems to summarize the story and provide a final coda (coda is the Italian word for “tail” for it might conclude the story). (See Figure 9.14.) In the old-style Hollywood western, the clichéd ending typically shows the hero riding off into the sunset. Beauty shot and coda are combined into one shot.

FIGURE 9.14 Beauty Shot
Characters
“Videographers speak of A-roll and B-roll, but I focus on shooting C-roll—character roll.”
—Dr. Bob Arnot, NBC Correspondent and Independent Documentary Producer.
Good stories always revolve around interesting characters. It is no different for news, magazine, and documentary television programs. Characters are important because they humanize a story—they present the issues in a way that viewers can empathize with.
It is important to try to let the people in the story tell the story. While narration is useful in providing expository detail and transitions from one story element to another, the characters within the story provide a unique first-person narrative of the events or issues that the story is exploring. And while narration is effective in presenting information in a concise manner, characters in the story can present an emotional response that narration cannot.
Many television and video productions are cast in ways that bear great similarity to casting in dramatic programs. At a public screening of Surfing for Life, a video documentary broadcast nationally on PBS that chronicles the lives of nine geriatric surfers (now in their sixties, seventies, eighties, and nineties), San Francisco Bay Area independent producer David Brown described how he interviewed over 200 people before deciding on the six that he would use in his documentary. (Go to www.surfingforlife.com for more information about this program.)
Similarly, for news and magazine stories, a producer may have the main story elements in mind, and then do research to find appropriate characters to tell the story. A story about new advances in the treatment of cancer in children can’ be effectively told without showing the impact of cancer on children. Families that have tragic or triumphant stories to tell about childhood cancer will have to be identified and interviewed, and the editor will have to find the most compelling sound bites to help tell the story.
Conflict and Change
The concepts of conflict and change are central to many news, magazine, and documentary productions. A conflict is a situation in which there is a clash between people, between people and organizations, or between points of view. Most compelling stories have some kind of conflict at their core. The task of the editor is to create interest and suspense around the central conflict, to show how the conflict is resolved (if there is a resolution), and to show how the individuals in the story have been affected or changed by this conflict.
An editor can add visual counterpoint to the conflict by juxtaposing statements that express opposing points of view in consecutive shots. This oppositional counterpoint can be enhanced if the footage has been shot with the interviewees on opposite sides of the frame. For example, all those on one side of the issue might be framed on the left side of the frame looking slightly to screen right; all those on the other side of the issue might be framed on screen right looking slightly to screen left. When the sound bites are edited together, the interviewees will literally be on different sides of the screen, representing their differences in position on the central issue.