CHAPTER 6
Lenses and
Visualization
PART ONE
LENSES
Chapter 3 concentrated on the role the camera plays in producing an electronic image. This chapter will look at the function of the lens and the way manipulation of the camera and lens functions as a part of the process of visualization. We are concerned here with the technical elements of lens operation and manipulation as well as with the aesthetic impact that results from that manipulation. Video is not only an electronic phenomenon that produces an electronic signal, it is also an artistic or aesthetic phenomenon that produces images that audiences respond to. Any discussion of lenses, therefore, should contain a discussion of these complementary components.
LENSES:FUNCTIONS
AND TYPES
The lens is the camera’s eye. What it sees and how it sees it form the basis of the visual element of video. The camera lens gathers light that is reflected off the scene being recorded and directs an image onto the pickup device within the camera.
Focal Length
Camera lenses are often described by their focal length, which is defined as the distance from the optical center of the lens to the point where the image is in focus (the surface of the CCD). When we talk about lenses, we usually describe them in terms of how long or short they are. Long and short refer both to the focal length of the lenses and to their relative physical length, since long-focal-length lenses are actually longer than short-focal-length lenses.

FIGURE 6.1 Lens Focal Length and Angle of View
The focal length of the lens determines the angle of view of a scene that the lens will reproduce. Short-focal-length lenses have a wide angle of view (they show you a wide expanse of a scene) and therefore are referred to as wide-angle lenses. Long-focal-length lenses have a narrow angle of view; they magnify a scene by making distant objects appear large and close, and they are often referred to as narrow-angle lenses or, more commonly, telephoto lenses (see Figure 6.1). The focal length of the lens also affects depth of field. We will talk about this a little later in this chapter.
Types of Lenses
Two basic types of lenses are found on video cameras: zoom lenses and fixed-focal-length lenses. Camcorders typically come equipped with a zoom lens.
Zoom Lens. A zoom lens is a lens that has a variable focal length. That is, by making an adjustment on the lens, you can vary the focal length, thereby changing the magnifying power of the lens. By adjusting the zoom control, you can zoom in (make an object appear larger and closer) or zoom out (make the object seem to decrease in size or move farther away). (See Figure 6.2.)
The focal length of a lens is generally measured in millimeters (mm). At the wide-angle setting, the zoom lens on most camcorders has a focal length of 8 to 10mm or less. The focal length of the lens when it is zoomed in—that is, when it is in its narrow angle or telephoto setting—depends on the zoom ratio, or zoom range, of the lens. For example, a zoom lens with a wide-angle focal length of 8mm and a zoom ratio of 10:1 has an effective focal length of 80mm (10 × 8mm) when it is zoomed in all the way. However, a lens with the same wide-angle focal length of 8mm but a zoom range of 20:1 has an effective focal length of 160mm (20 × 8mm) when it is zoomed in all the way. This provides greater magnification than the 10:1 lens; small objects appear larger and objects that are far away appear closer when they are shot with the 20:1 lens zoomed all the way in to its 160mm narrow-angle position.

A zoom lens with a zoom ratio of 20:1 or higher is particularly useful for outdoor shooting. Distant objects can be magnified simply by zooming in to them. Similarly, a lens with a 10:1 ratio may be suitable for indoor shooting. Because the optical system in the 10:1 lens is less complex than the 20:1 lens, it requires less light. And because the camera is always held relatively close to the subject indoors, the 10:1 lens provides adequate magnification.
Most high-quality video field production cameras are equipped with zoom lenses with a minimum zoom ratio between 10:1 and 15:1, and lenses with zoom ratios of 20:1 and 30:1 are readily available for most professional cameras and camcorders. Even consumer-quality camcorders are typically equipped with lenses with a zoom ratio of 20:1 or 30:1. And professional cameras used for covering sports events where the cameras are often located some distance from the action may be equipped with lenses that approach a zoom ratio of 100:1.
Optical Zoom and Digital Zoom. Professional-quality cameras use optical zoom lenses in which image magnification is achieved by the action of the internal optical elements of the lens. As the lens is zoomed in or out, a series of glass elements move within the lens, causing the image to appear to be larger (closer) or smaller (farther away).
Consumer-quality camcorders are typically equipped with a digital zoom lens feature in addition to the traditional optical zoom lens. When the digital zoom is engaged, the image produced by the camcorder is magnified electronically. Dramatic magnification effects of 100:1 to 500:1 and above may be achieved with a digital zoom. However, the image may begin to pixillate as the digital magnification increases, reducing the quality of the image (see Figure 6.3).
Fixed-Focal-Length Lens. The other basic type of lens is the fixed-focal-length lens. This kind of lens, which is found on most still-photography cameras, does not have a zoom control. If you want to make an object appear larger or smaller by changing from a close-up to a wide-angle shot, you must either change the lens or physically move the camera closer to or farther away from the object being photographed.

FIGURE 6.3 Optical versus Digital Zoom
A number of different kinds of fixed-focal-length lenses are available for use in special situations. Extreme wide-angle lenses, or fish-eye lenses, produce a 180-degree angle of view of a scene as well as extremely dramatic distortion of objects (or faces) positioned close to the lens. Special periscope lenses, or snorkel lenses, allow the camera operator to move the camera lens around small objects and are used extensively to photograph products for television commercials. Surveillance cameras are typically equipped with a fixed-focal-length lens, as are lipstick cameras—very small cameras, usually less than two inches long. Lipstick cameras are used in a variety of special applications like auto racing (mounted behind the driver), baseball (attached to the catcher’s helmet or buried in the infield), and so on.
Macro Lever. A macro lever is a device that converts the lens to a macro lens, which allows you to take extreme close-up shots of very small objects. In the normal zoom lens mode, most lenses are not capable of focusing on objects closer than two or three feet from the end of the lens. When the macro lens switch is activated, you can focus the camera on objects that are only inches away from the lens and magnify their size so that they fill the video frame. A macro lens is extremely useful if you plan to shoot a large number of small objects.
Range Extenders. Range extenders that double the magnifying power of the lens (2× extenders) are built into many ENG/EFP camcorder zoom lenses. If they aren’t built in, they may be available as an attachment to be screwed onto the front of the lens. Remember, however, that if you use an extender, you double the magnification of the lens throughout the entire zoom range. The focal-length range of a lens with a zoom range from 8mm to 160mm becomes a range from 16mm to 320mm when a 2× extender is engaged. Thus, not only is the narrow-angle shot twice as narrow (320mm versus 160mm), but the wide-angle shot becomes narrower as well (16mm versus 8mm).
Lens Mounts
The lens is attached to a professional ENG/EFP camcorder with a bayonet mount. The lens is inserted into the lens mount opening in the camera head and turned until it locks into place. Because different cameras use image sensors of different sizes (typically ¼ʺ, ⅓ʺ, ½ʺ, or ⅔ʺ CCDs), bayonet mounts and lenses are designed in different formats. On most consumer-level camcorders, the lens is integrated with the camera housing and is not designed to be removed or interchanged with another lens.
ZOOM LENS
COMPONENTS
How a Zoom Lens Works
A zoom lens is a variable-focal-length lens. The focal length of the lens can be changed by adjusting the zoom control, which moves the internal elements of the lens. The advantage to a zoom lens is that it combines the benefits of a short-focal-length lens and a long-focal-length lens. By adjusting the zoom control, you effectively change the lens from a wide to a narrow angle of view. This is accomplished in a smooth, continuous action and produces the sensation of zooming in or out, continuously magnifying or decreasing the size of the image. The ability to change the angle of view without moving the camera or changing lenses makes the zoom lens extremely versatile, and for that reason it is widely used in video production.
If you look at the zoom lens on a portable video camera, you can see its three major components: the focus ring, the zoom ring, and the aperture control. Each of these components plays a major role in controlling the quality of the image delivered to the camera’s image sensor (see Figure 6.4).
The Focus Ring
Manual Focus. The focus ring is at the far end of the lens. The focus ring on all professional cameras is operated manually. By turning the focus ring clockwise or counterclockwise, you can focus the image that the lens is capturing. An image is in focus when the important parts of the image are seen in sharp detail, and out of focus when they are seen as fuzzy and unclear. The correct focus depends on what it is you are trying to communicate. This is what dictates which part of the picture is most important and must be kept in focus. If you are shooting an interview, you usually want the person who is talking to be seen in focus. If you are shooting a sporting event, you usually want the large area of action to be in focus. You can tell whether something is in focus or not simply by looking at the image in the viewfinder of the camera to see if the focus is sharp, and by adjusting the focus ring if it is not.

FIGURE 6.4 Lens Focus, Zoom, and Aperture Rings
Automatic Focus. Most consumer-grade camcorders, however, are equipped with automatic focus (auto-focus) mechanisms. These auto-focus systems work by emitting a beam of infrared (invisible) light or ultrasound (inaudible sound). The beam bounces off the object being videotaped and travels back to the camcorder, which calculates the distance from the camcorder to the object. A servomechanism then automatically adjusts the focus ring for correct focus.
Although use of auto-focus lenses often carries the stigma associated with nonprofessional camera work, these lenses can be helpful, particularly for inexperienced camera operators. Auto-focus guarantees sharp focus in shooting situations that may be difficult for novice camera operators. For example, the continuously emitted focusing beam keeps the subject in focus, even if it or the camera moves, or if the lens is zoomed in or out. In extremely low-light conditions, when it is difficult to see the image on the camera viewfinder, auto-focus often provides more reliable focus than manual focus.
These benefits notwithstanding, some serious disadvantages are associated with the use of auto-focus lenses. Most auto-focus devices tend to focus on large objects located centrally in the frame. This is fine if you are shooting Grandpa as he tells ribald stories at the dinner table. However, if your subject is small or not centrally located in the frame, the lens will probably focus on some other part of the picture. If there are two similar-sized objects at different distances from the camera and both are positioned in the center of the frame, the auto-focus device will not know which one to focus on. If the auto-focus device is ultrasonic and the object you want to focus on is behind a glass window, the ultrasonic beam will be reflected back from the glass and will focus on the window rather than on the object behind it.
For these and other reasons, a lens that allows you to focus automatically and manually is preferable to one that works only in the auto-focus mode. Manual focus gives the camera operator more control over the lens, and in situations in which it is important to focus on only part of the picture, manual focus is essential.
The Zoom Ring
The middle part of the lens contains the zoom ring, which can usually be controlled either manually or automatically. When the control is manual, you turn the zoom ring by hand to zoom in or out. Manual control gives you very good control over the zoom speed. You can go as fast or as slow as you want.
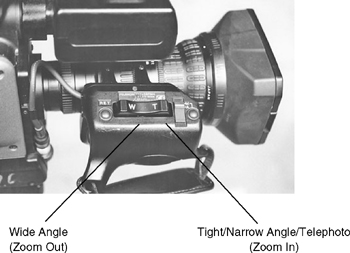
Automatic zoom lens controls are motor driven. A small motor drives the lens elements when you activate it. Some automatic zoom lens controls have one or two preset speeds that allow you to set the speed selector switch for a fast or slow zoom. Depending on the preset speed setting, you automatically zoom in or out at a fast or slow speed when you push the button that activates the zoom lens. More sophisticated automatic zoom lenses have continuous variable-speed motors hooked up to the lens. With these devices, a control switch is mounted on the zoom lens itself. The control has a zoom in position at one end and a zoom out position at the other end. The ends of this control are often respectively labeled “T,” to indicate the tight, telephoto, zoomed-in position, and “W,” for the wide, zoomed-out position (see Figure 6.5). The lens zooms in or out when you depress the appropriate side of the control. In addition, the zoom speed is controlled by the amount of pressure put on the control—the zoom speed increases with increased pressure and decreases with decreased pressure. This guarantees extremely smooth zooming over the whole zoom range of the lens.
The Aperture Ring
The aperture ring is mounted at the end of the lens next to the camera. The aperture ring controls the size of the iris opening of the lens. The iris of the lens works like the iris of your eye. In low-light situations, the iris needs to be opened up to allow more light to hit the image sensor. In bright situations, the iris needs to be closed, or shut down, to reduce the amount of light hitting the sensor. (See Figure 6.6.)
Technically speaking, the aperture ring controls the size of the f-stop of the lens. F-stops are a standard calibration of the size of the aperture opening. F-stop numbers are printed on the lens itself, and usually vary from about 1.4 to 22 (see Figure 6.6). Small f-stop numbers correspond to large aperture openings. Therefore, a lens that is set at f-l.4 (a small f-stop number) is one in which the aperture is open very wide. A lens that is set at f-22 (a large f-stop number) is one in which the aperture is extremely small. This inverse relationship is one that you should memorize. Though this may seem confusing at first, the relationship between f-stop numbers and aperture size should become clear as soon as you take your camera in hand and work with it for a few minutes.
Typical f-stop settings on a lens are f-l.4, f-2, f-2.8, f-4, f-5.6, f-8, f-11, f-16, f-22, and closed. The f-stop settings on most high-quality lenses vary continuously from one f-stop to the next. It is not necessary to set the aperture precisely at one of the f-stops. You may set it at any position on or between f-stops because the aperture size varies continuously as the aperture ring is turned.
In addition, most lenses have an iris setting in which the aperture can be completely closed. Normally, the iris is left in the closed position when the camera is not in use. The closed iris setting can also be used for aperture fades, in which an image is faded up from black by opening the aperture or faded out to black by gradually closing it.

FIGURE 6.6 F-Stop Numbers and Aperture Size
Many consumer-quality camcorders eliminate manually operated apertures and f-stop settings in favor of an automatic iris system. In some cases, the automatic system can be overridden by using the “backlight” control, which opens up the aperture one or two additional stops to correct lighting problems when the background light is brighter than the subject you are trying to photograph. An additional manual override for the automatic iris may also be present, but on inexpensive camcorders the range of possible adjustments to the iris is often limited. Both the backlight and manual iris controls are usually found on the side of the camcorder housing rather than on the lens assembly. The manual iris control is operated by turning it to the left or right. This will cause the aperture to open (let in more light) or close (let in less light).
Other Lens Components
Before beginning a discussion of the control of the aesthetics of the image, several other lens components ought to be mentioned. The lens hood, attached to the end of the lens, works like the visor on a hat to prevent unwanted light from hitting the lens and causing lens flare. A lens flare is an optical aberration that is caused when light bounces off the elements within a lens. Most often, it is caused by pointing the camera directly at the sun or other light source with the effect of causing a glaring point of light to appear in the picture. (See Figure 6.7.) The lens cap is a covering that can be attached to the end of the lens. The lens cap has two functions: it protects the glass in the lens from damage when the camera is not in operation, and it prevents any light from hitting the image sensor. The lens cap should always be used when the camera is not in operation. It should be used when transporting the camera and when the camera is turned off between shots. It is the single most important safety feature on a portable camera.

FIGURE 6.7 Lens Flare
Lens Filters
A variety of lens filters and range extenders are available for use with existing lens systems. Many camera operators attach a clear filter to the front of the lens to protect the outside lens element from physical damage such as scratching or chipping. Other special-effects filters are used to change the quality or amount of light passing through the lens, allowing the camera operator to manipulate the incoming light in a number of ways. Among the most commonly used special-effects filters are fog filters and star filters.
Aspect Ratio Converter
An increasing number of professional-quality ENG/EFP lenses now come equipped with an aspect ratio converter, a two-position switch with which the videographer can select either the traditional NTSC 4:3 ratio or the widescreen 16:9 ratio.
Lens Care
In addition to placing the lens cap on the lens for protection when the camera is not in use, care should be taken not to damage the face of the lens. In some shooting conditions, the lens may get wet or dirty; if by looking through the viewfinder and closely examining the lens it becomes apparent that dust or dirt is present, the lens should be cleaned. Special lens-cleaning solutions are available from photographic or video supply houses. The solution can be sprayed onto the lens and then removed with special nonabrasive lens paper. Common tissue paper should not be used to clean the lens. It usually leaves some lint residue behind and, depending on the quality of the paper, may be abrasive as well.
ZOOM LENS
OPERATION
Zoom Lens Focus
Presetting the focus on a zoom lens is a fairly simple matter. Turn on the power to the camera (so that an image is visible in the viewfinder) and, with the camera in the automatic aperture mode, zoom in as close as possible to the object you plan to shoot. Turn the focus ring until the image appears to be in focus. Then zoom out and frame up your shot. Do not adjust the focus ring again. You can now zoom in and out on the subject, and it will remain in focus as long as its position remains constant in relation to the camera. If you move the camera or if the subject moves, you must reset the zoom focus.
Correct Exposure
Because the aperture setting affects not only the quality of the image but also the level of the video signal, it is extremely important to set the aperture accurately by finding the correct exposure for a scene. Opening the aperture too wide and letting too much light hit the image sensor washes out the details in the picture and causes extreme color distortion. In addition, overexposure often produces very bright, glowing spots, known as hot spots, in the picture. Image detail and correct color are lost in hot spots.
Hot spots are unacceptable for several reasons. First, the loss of image detail (unless this is a desired special effect) is extremely distracting to the viewer and unflattering to the subject. Second, in terms of the video signal, hot spots represent places in which the video signal is driven far above the maximum point for the peak white. Therefore, the video signal, as well as the image, is somewhat distorted. Conversely, if the exposure is too low, it will produce a picture with a lot of electronic noise, muddy or gray colors, and an inadequate video signal.
How can you know which aperture setting is correct? There are a number of approaches you can take. Perhaps the most commonly used method is eyeballing. With this method, you literally look at the viewfinder image to see what the scene looks like. With the lighting you will use in place, open the aperture until the viewfinder produces the best picture, one with good contrast between the bright and dark areas, and without any hot spots. If you have a color monitor, it is extremely helpful to look at the color picture to see whether the colors are reproduced accurately. Slight corrections in the aperture setting often make dramatic changes in color reproduction.
Some consumer camcorders are equipped with a light meter display in the camera viewfinder (see Figure 6.8). The light meter tells you whether the scene is too bright, too dark, or just about right. However, remember that the camera’s light meter usually works as an averaging meter. The light meter senses the brightest and darkest parts of the image and sets the exposure at a middle point. The average brightness on the scene may or may not give the correct exposure for the most important part of the scene, that is, the center of interest you are shooting. Usually, the light meter tells you if you are in the ballpark as far as exposure goes, and then you can make minor adjustments for the correct aperture setting.
All professional and many prosumer camera viewfinders contain a zebra-stripe exposure indicator. In this system, a series of black-and-white lines appears over the brightest portion of the picture when the maximum video level (100 percent) has been reached. In some camera viewfinders, the zebra stripes are set to appear when correct exposure for Caucasian skin tone is achieved (approximately 70 percent of peak white). On some cameras you can switch between the two zebra-stripe settings (100 percent/70 percent).
The most accurate way to set the aperture is to use a waveform monitor in conjunction with a good camera monitor. This allows you to monitor the parameters of the video signal. Some camera viewfinders produce a waveform display superimposed over the viewfinder image. However, remember that the way the image looks is every bit as important as how good the waveform looks. You do not want to adjust every scene so that the peak white is at 100 percent if you have some scenes that are indeed darker than others. A scene shot in outdoor daylight looks different (aesthetically and technically) from a scene shot in a candlelit room. The waveform monitor is extremely useful, however, in determining whether you are exceeding the 100 percent video level. Exceeding this level distorts the picture, and the waveform monitor can help you avoid this distortion and keep the signal within its normal limits.

APERTURE CONTROL
AND DEPTH OF FIELD
Aperture Control
The lens iris, like the zoom lens control, can be operated manually or automatically. With manual aperture (or manual iris) control, the camera operator looks into the viewfinder and manually adjusts the aperture until a good picture appears in the viewfinder. In a lens equipped with an automatic aperture (or automatic iris), a small light meter in the camera controls the size of the aperture opening. The picture area is sampled for brightness and an average brightness is calculated. The iris opening is then adjusted automatically for this scene. If the lighting changes, the lens automatically responds and makes the appropriate iris correction. Camera operators often use the automatic aperture feature of the lens to establish a preliminary exposure for a shot, and then shift to the manual aperture mode to make fine adjustments in the exposure.
Automatic aperture can be a helpful feature to have, but the videographer should always keep two things in mind: contrast range and center of interest. Contrast range, expressed as a ratio of brightness to darkness, refers to the video system’s ability to reproduce a range of different values of brightness. A contrast ratio of between 30:1 and 40:1 is normal for most portable color video cameras. That is, the brightest part of the scene must not be any more than 40 to 50 times brighter than the darkest part of the scene. If the ratio is greater than 50:1, the camera will not be able to handle it, and the very bright parts of the scene will wash out or turn into glowing hot spots. Compare the video contrast ratio with the contrast ratio possible with the human eye (100:1). The eye is significantly better able to handle extreme contrast than is a video camera.
Contrast ratio is mentioned here (as well as when lighting is discussed) because it is very important when one is trying to find the correct aperture setting. When the camera is set on automatic aperture, it samples the picture for brightness and, as stated earlier, averages these brightness values to set the correct iris setting. The automatic iris, however, cannot determine the brightness for only the part of the frame most important to you. It simply takes an average reading. Sometimes a particular spot or point in the frame is important in terms of what you are trying to communicate; it is the center of interest in the frame. To correctly expose for it, you may have to set the aperture manually. Subjects photographed against a very bright background may appear in silhouette with the lens in the automatic iris mode. This exposure problem can often be corrected simply by zooming in to a tighter shot of the subject and eliminating as much of the bright background from the picture as possible. (See Figure 6.9.)

FIGURE 6.9 Silhouetting Caused by Bright Background
When the aperture is set on automatic, the camera compensates for any change in the lighting or brightness of the image. Suppose you are shooting an interview outdoors with the lens on automatic aperture, when a large white truck drives by in the background. The automatic aperture responds to the increased brightness caused by the presence of the truck and closes down the iris accordingly. When the truck disappears from the frame, the aperture adjusts again and reopens to the previous setting. The effect of the aperture closing and opening is that the face of the person being interviewed gets darker when the truck enters the frame and then brighter again when the truck leaves the frame. At best, this is very distracting to the viewer.
Some lenses have a feature called automatic aperture lock. This locks in the setting first calculated by the automatic aperture and prevents the camera from responding to any subsequent changes in brightness. Going back to our example, with the camera in the automatic aperture mode, you prepare your shot of the person to be interviewed. You focus the shot and then engage the aperture lock. This holds the facial exposure that has been automatically set. When the white truck drives by in the background, the camera does not respond to it, and the exposure on the subject’s face remains constant. On cameras without the automatic aperture lock feature, you can shut off the automatic iris simply by switching to the manual iris mode.
A word of caution is necessary at this point. If the lighting changes radically while the camera is in the aperture lock or manual iris mode, picture quality will suffer greatly. The camera operator must constantly monitor the image and make aperture corrections when necessary.
Depth of Field
Depth of field refers to the portion of the scene that is in focus in front of the camera (see Figure 6.10). Depth of field can be very long or very short, depending on the amount of available light, the aperture setting, the distance between the subject and camera, and the zoom lens setting. Table 6.1 shows these relationships.
Perhaps the easiest way to explain these depth-of-field relationships is through the use of examples. We will consider two different lighting situations: one outdoors, in which the depth of field is long, and one indoors, in which the depth of field is shallow.
Example 1: Daylight Outdoors. Let’s briefly discuss the way the elements of aperture, focal length of the lens, and distance from camera to subject affect the depth of field. Let’s assume that you plan to videotape a football game. You take the camcorder to the field and are given a camera position on the 50-yard line at the top of the grandstand. This puts you and your camera at a considerable distance from the action. It is a bright, beautiful autumn day.

| + amount of available light + f-stop number (– aperture size) – focal length of the lens + distance from camera to subject |
Depth of field increasesa | |
| – amount of available light – f-stop number (+ aperture size) + focal length of the lens – distance from camera to subject |
Depth of field decreasesb |
a Read as: With increase in amount of available light, f-stop number also increases (aperture size decreases) and depth of field increases. With decrease in focal length of lens, depth of field increases. With increase in distance from camera to subject, depth of field increases.
a Read as: With decrease in amount of available light, f-stop number also decreases (aperture size increases) and depth of field decreases. With increase in focal length of lens, depth of field decreases. With decrease in distance from camera to subject, depth of field decreases.
Now, let’s analyze each of the variables that affect the depth of field. First, let’s consider the amount of light falling on the scene. Because it is early afternoon on a beautiful, cloudless day and you are shooting in full sunlight, we can assume you have more than enough light to shoot your video. Because you have a lot of light, you set your camera iris at f-16, a fairly normal setting for a bright day. This aperture setting (with a high f-stop number) gives you a fairly small aperture opening. This makes sense because on a very bright day, you want to limit the amount of light hitting the camera image sensor so that you do not overexpose the scene (see Table 6.1). The first rule of the relationship among amount of available light, f-stop number, and depth of field tells us that as the amount of available light increases, the f-stop number increases, aperture size decreases, and, as a result, depth of field increases. These relationships are apparent in the example, and you will discover that your depth of field under these conditions is quite long.
Next, let’s consider the focal length of the lens. From your vantage point, you are able to zoom in or out on the scene below. To provide a cover shot of the action, you can zoom out the lens to its widest possible shot. This effectively sets the zoom lens on its shortest focal length and enables you to cover a great deal of the field. In this position, the second rule of relationship becomes apparent: as focal length of the lens decreases (as the lens is zoomed out to a wide shot), depth of field increases. In the light described, all of the action below is in focus with the wide-angle lens setting. As a matter of fact, everything from about three feet in front of the lens to infinity in the distance is in focus. You are shooting in a situation that gives you virtually the greatest possible depth of field. (See Figure 6.11.)
Depth of field is enhanced because the camera is positioned a considerable distance from the action. Again, as distance from the subject to the camera increases, so does depth of field. All of these factors contribute to great depth of field as you shoot this football game.

FIGURE 6.11 Depth of Field
Now let’s consider changing one variable: the focal length of the lens. At times during the game you want to zoom in on the action, thereby effectively increasing the focal length of the lens. The zoom in makes the lens act like a long-focal-length telephoto lens. It magnifies the scene, and instead of showing you all the action in a long shot, it shows only a part of it in close-up detail. As you zoom in, you notice that the depth of field decreases significantly. On the long shot, you were able to keep all the action across the field in focus. Now as you shoot while zoomed in, you find that some of the field and players in the foreground (closer to the camera) are out of focus, as are some of the players in the background. You have to work the focus ring to keep the center of interest—the player with the ball—in focus, particularly if the player runs toward either side of the field (toward or away from the camera) rather than in a straight line toward the end zone.
Example 2: Low Light Indoors. Let’s contrast the brightly lit outdoor scene with another scene in which all the elements contribute to give you very short depth of field (see Figure 6.11). Let’s assume that you are now recording an evening scene indoors, using only the light available in the room. The room in which you are to record is dimly lit. To produce an acceptable picture with your camera, you are forced to open the aperture as wide as it will go, in this case to f-1.4. In addition, since you are working in a small room, your camera is significantly closer to the action than it was at the football game, when you were positioned high in the grandstand.
All these elements produce a situation in which the depth of field is extremely short. There is very little available light, and to compensate for this and give the camera enough light to make an acceptable picture, you have opened up the aperture (large aperture = small f-stop number). In addition, the distance from the camera to the subject is short. As you look through the viewfinder, you find that if you focus on one person, the background and foreground go out of focus. It is very difficult to keep in focus all the people standing at different distances in front of the camera. This becomes even more apparent when you zoom in (increase the focal length of the lens) on the scene. The only way to improve the situation—to increase the depth of field—is to increase the amount of available light, which allows you to shut down the lens slightly (decrease the aperture size).
PART TWO
VISUALIZATION
AND COMPOSITION
AESTHETICS OF
VISUAL COMPOSITION
Have you ever noticed that not all television programs look alike? Different programs and different movies often have a particular look or style that results from the way that particular program or film was visualized by the camera operator. The most significant elements of visualization include the impact of lighting and editing (to be discussed in later chapters) and the way in which the camera and its lens are used to create the visual images to which we respond. The rest of this chapter will concentrate on this last element.
How does the camera operator decide whether or not a shot is good? We have standards that determine whether something is technically good (Is the color accurate? Is the video signal adequate? Is the contrast range accurate?), but we seldom talk about the aesthetics of visual composition. At a seminar given several years ago, a leading Hollywood camera operator said that he trained his eye for composition by going to art museums and looking at the paintings. (We should note here that he was a fan of portraits, not modern art.) His point was an interesting one: How do you know how to shoot a scene? What should it look like? Some people seem to know intuitively, and we often say that a good photographer has a “good eye.” But how does someone get a good eye? Is it something that you are born with? Or is it something that is learned? It is probably a combination of both.
This discussion will examine some of the factors you should take into consideration when composing images for video, including screen size and aspect ratio, focus, field of view, framing and balance, the rule of thirds, and camera movement. This is not a comprehensive list, but it will help you get started in thinking about the ways to structure the composition of the individual images in your production.
Screen Size and Aspect Ratio
Two primary considerations for anyone working with video images are the size and aspect ratio of the television screen. There are two inescapable constants: most television screens are small, and they all have the same aspect ratio. By aspect ratio, we mean relationship of the width to the height of the screen. For television, this is a fixed ratio of 4:3 (four units high by three units wide) or 16:9.
Screen Size. Let’s talk about size first. As was noted, in comparison to motion picture screen displays, the television screen is relatively small. Traditional cathode ray tube (CRT) television/video displays typically range in size from 13 inches in diameter to a maximum size of approximately 36 inches. While the number of large flat screen video displays has increased dramatically in recent years, the market for flat screen displays as small as 13 inches remains strong. Overall, large screen systems greater than 42 inches constitute a small percentage of the actual number of television display systems at use in home, office, and school settings.
What does this mean in terms of the composition of images? For one thing, it means that close-ups are important. Since the screen is so small, a long shot cannot provide a lot of detail. Therefore, if detail is important to your production, it usually must be shown in close-up. If you are producing a tape about a new medical procedure or a new type of electronic component, to present your subject matter to the audience effectively, you are going to have to shoot it in close-up detail. A long shot of the operating room or manufacturing facility may help establish the location, but a transition to a close-up of the event is essential to communicate your subject matter effectively to your audience.
The lens plays some important functions with respect to image size; the zoom lens or a fixed-focal-length macro lens can be used to magnify objects. This magnification is important because it makes elements of the scene more visible by magnifying them. It also eliminates or reduces other visual distractions because a close-up often eliminates the other elements in the frame from the field of view.
Aspect Ratio. The fixed 4:3 or 16:9 aspect ratio of the television screen is important in defining the visual potential of the medium because the screen is always wider than it is tall. The screen has a basic stable, horizontal orientation that approximates the normal field of vision produced by our eyes. However, this horizontal screen orientation makes it somewhat difficult to accurately shoot extremely vertical subjects such as buildings, tall people, and so on. In using the camera to frame something that is taller than it is wide, we either have to cut off part of the object or person to make it fit into the aspect ratio of the screen (see Figure 6.12) or pull out to a wider shot.
The 4:3 and 16:9 aspect ratios of video provide static rectangular frames in which to compose the picture. Videographers have learned to create more dynamic frames within the boundaries of the screen by using silhouettes, doorways, or crowds of people in the extreme foreground (see Figure 6.13).

Focus
The use of the lens focus is important in directing the audience’s attention to what is important in a shot. If everything in a shot is relatively the same size and everything is in focus, all parts of the shot appear to be of equal importance to the viewer. Focus can be used to isolate the more important parts of a shot from those less important or to direct the audience’s attention to one part of the shot.

Focus and Depth
We see the world in three dimensions when we look at it through our eyes. However, the world as it is presented on the television screen has only two dimensions: height and width. The third dimension, depth, is really an illusion because the television screen surface is actually flat. Because our normal experience of the world is in three dimensions, video images seem more realistic when they also appear to be three-dimensional. To create the sense of depth on the television screen, it is important to construct images that are divided into distinct foreground, middleground, and background reas. Focus is one technique that can be used to separate these three planes. The technique through which the camera focuses on one of these planes and lets the others go out of focus is known as selective focus (see Figure 6.10). Selective focus is most commonly used with a short depth of field created through the use of a zoom lens zoomed in to the telephoto position.
Field of View
A basic terminology is used to describe the types of shots found in video production. The following shot descriptions refer to the field of view apparent in the shot (how much of the scene the shot shows) and to the number of people visible in the shot. It is important to have a terminology for shots because these shot descriptions are used by writers to describe shots in written scripts and by directors or videographers to communicate to the other crew members how they want a shot or scene to look. (See Figure 6.14.)

Extreme Long Shot. The extreme long shot (XLS) gives the audience an overall view of the large scene. It provides a panorama of the elements of the scene or shot. Although we may not be able to see all of the significant individual details in the shot, the XLS is nevertheless important for establishing the relationship between the parts and the whole or creating impact through the use of wide-open spaces.
Long Shot. The long shot (LS) is not as wide as the extreme long shot. When people are involved in an LS, it shows us the positional relationship between the actors and their setting. Extreme long shots and long shots are often referred to as establishing shots, because they establish locale and the relationships between the individual parts of the shot.
Medium Shot. The medium shot (MS) is tighter (closer) than the long shot but not as tight as a close-up. The medium shot is used to show the relationship between people in a shot or scene but generally does not present as much information about the setting as a long shot. When people are shown in a medium shot, they are usually cut off somewhere between the knees and the waist.
Medium Close-Up. The medium close-up (MCU) is one of the most frequently used shots in video production. It consists of a head-and-shoulders shot that ends at the chest of the subject. The medium close-up gives full-face detail on the subject but without the extreme impact of the close-up.
Close-Up. The close-up (CU) is an extremely powerful shot that gives an extremely tight shot of the subject’s head. A close-up of an object practically fills the screen. The close-up is one of the most effective shots available for providing a close view of the details of a face or object.
Extreme Close-Up or Tight Close-Up. The extreme close-up (ECU) or tight close-up (TCU) is the tightest shot possible of your subject. On a person, the extreme close-up frames the subject’s eyes and nose or mouth. If both the eyes and mouth will not fit in the frame, it is usually better to frame the shot to include the eyes and nose rather than the nose and mouth.
1-Shot, 2-Shot, and 3-Shot. This terminology refers to the number of people seen in a shot. Thus, a medium 2-shot is a medium shot that includes two people; a long 3-shot is a long shot that includes three people; and so on.
Composition through Framing
Framing refers to the placement of a person or object within the video frame. When a person is the subject of a shot, two compositional elements related to framing are headroom and noseroom.
Headroom. Headroom refers to the distance between the top of the person’s head and the top edge of the frame. In gauging the correct amount of headroom, the camera operator usually tries not to leave too much or too little space at the top of the frame. With too little headroom, the person appears to stick to the top of the frame. This simply looks wrong to the viewer. (See Figure 6.15.) Similarly, if the subject is placed too low in the frame, the person appears to be sinking out of the frame. There is no formula for determining how much headroom is correct, although more headroom is appropriate on longer shots, and less headroom works better on close-ups.

FIGURE 6.15 Headroom
You should pay particular attention to headroom whenever you zoom in or out on a subject. Typically, as you zoom out and the subject becomes smaller, headroom will increase. Therefore, you will need to tilt the camera down to compensate for this. On the other hand, as you zoom in and the subject becomes larger, the amount of headroom will decrease. In this situation you may need to tilt up to correct the framing.
Noseroom. The concept of noseroom is similar to the concept of head-room. (See Figure 6.16.) Noseroom refers to the distance between the edge of the nose of the person in the shot and the edge of the video frame. In reality, eyeroom might be a better term than noseroom,because it is the person’s eyes, not the nose, that create a powerful force within the frame. Correct framing is based on the direction of the eyes (where they are focused), the dynamics of the story being told, and the graphic composition of the picture.
For example, if the subject looks to one side of the frame, the rules of normal composition dictate that the camera pans slightly to allow sufficient eyeroom (or noseroom) so that the person does not appear glued to the frame’s side. If, however, within the context of the story we know that the subject is being pursued and is about to be overtaken, framing the person without sufficient eyeroom reinforces the idea that this person is trapped. This technique is commonly used in horror films and television programs of that genre; when the picture cuts to a close-up as the subject struggles to escape, the end is near. Similarly, if the camera pans to create space behind the subject, rather than in front, the audience knows something is going to happen in the space behind the subject.
Background Objects. Finally, the camera operator should pay attention to the outlines of people or objects in a shot. Because most shots commonly have a background with detail in it, the outline of foreground objects should overlap, rather than coincide, with the outline of background objects. For example, consider a shot of someone sitting in a chair with a painting on the wall in the background. It is best to frame the shot so that the outline of the head either does not reach up to the bottom of the painting or instead blocks part of the painting from view. If the outline of the top of the head touches the outline of the bottom of the painting, the resulting image will be distracting, if not comical (see Figure 6.17). Trees and poles in the background that appear to grow out of someone’s head should also be avoided for similar reasons.

FIGURE 6.16 Noseroom

Framing and Balance
The way in which a shot is framed and composed affects the viewer’s perception of the balance of the shot. Balance refers to the relative weight created by objects or people in the frame. These weights may be distributed evenly (symmetrical balance) or unevenly (asymmetrical balance). (See Figure 6.18.) Symmetrical framing, in which the graphic weight of objects in the frame is symmetrically balanced, is very stable and tells the viewer that the situation is at rest or under control. Asymmetrical framing, in which the graphic masses are asymmetrically balanced, creates a sense of imbalance and instability. It produces tension and suggests that something is about to happen.

The Rule of Thirds
There are few lasting “rules of composition” because story context and audience expectations constantly change. “Rules” reflect current practices and change as audiences become too familiar with them and they lose their effectiveness. One such formerly common practice was called the rule of thirds because the screen area was divided into three equal parts both horizontally and vertically (see Figure 6.19). The four points located one-third of the distance from the four parts of the frame were considered to be the optimum location for objects and persons of importance to the story. In practice, this type of composition offers an unobstructed view of the objects or persons central to the story but with a relatively neutral treatment. The balance of the shot is quite symmetrical.
A more asymmetrical balance related to the application of the rule of thirds can be seen in the typical MCU or CU shot of an individual. These shots place an important compositional element—in this case, the eyes of the subject—on one of the intersecting sets of division points (see Figure 6.20).


FIGURE 6.20 Rule of Thirds: Asymmetrical Balance
CAMERA
MOVEMENT
Camera Head and
Zoom Lens Movement
There are two basic types of camera movements: (1) movements of the camera head or zoom lens, with the camera itself in a fixed position; and (2) movements of the entire camera and its support system. The two most common camera head movements are panning and tilting. A pan is a horizontal movement of the camera head only. The word pan is short for panorama, and the purpose of the pan is to reveal a scene with a sweeping horizontal motion of the camera head. (See Figure 6.21.) A tilt is a vertical (up-and-down) movement of the camera head. Again, it is usually accomplished with the camera in a fixed position. The zoom is accomplished by simply moving the zoom lens assembly, causing the lens to zoom in or zoom out. The effect of the zoom is to bring the scene closer to the viewer or to move it farther away from the viewer.

Zoom lenses were developed to allow the camera operator to change the field of view without changing lenses. Thus, technically speaking, the zoom lens made production more efficient because the camera operator could get new shots set up quickly. Beyond this, however, the zoom movement itself has found considerable popularity in video productions and is particularly useful when shooting with a single camera.
A word of caution is in order here: do not overuse the zoom. The zoom can be extremely effective when it is used properly, but the zoom must have a reason for its use. The scene must call for it—it must be motivated or introduced to present new information in a shot. It is extremely bad practice to simply zoom in and out to add movement to a scene. Not only will constant zooming nauseate your audience but it will also create difficulty when editing the videotape because it is usually easier to cut between two still shots than between two moving shots.
Zoom speed is also an important variable. A fast zoom draws attention to the zoom and the image, whereas a slow zoom may hardly be noticed, as it subtly directs the viewer’s attention to the content of the shot.
Movement of the Camera
and Its Support Unit
Movement of the camera and its support unit (often a tripod with a three-wheel dolly attached to the legs) produces the movement of dolly, truck, and arc. (See Figure 6.21.) A dolly in or out is the movement of the entire camera and its support toward or away from the scene. A truck left or right is the horizontal movement of the camera and its support in front of the scene. An arc is a semicircular movement of the camera and its support around the scene. These terms can also be used if the camera is handheld, although the movements will not be as smooth because the up-and-down walking motion of the camera operator will be visible in the shot.
Trucking shots are also sometimes called tracking shots, in reference to the practice of constructing a set of rigid tracks for a camera dolly to roll on in locations where the ground or floor is not smooth enough to allow the use of a wheeled dolly. The technique of constructing tracks for camera movement is frequently used in the production of television commercials, dramas, and music video productions when smooth, level movement of the camera in a field location is required.
Smooth, effective camera motion can also be achieved by using some rather untraditional methods of moving the camera. Grocery carts, wheel-chairs, and bicycles can provide steady support for moving camera shots, as can shooting out of the window or sunroof of an automobile.
Increasingly, when smooth camera movement is called for in small-scale, single-camera field productions, a Steadicam® or other gyroscopic camera support will be used. Tripod dollies require a smooth surface for the wheels to roll across, and outdoor locations are seldom smooth and level. Track systems take considerable time to set up and allow movement only along the area defined by the track. On the other hand, a camera can be quickly mounted on a Steadicam®, allowing the camera operator to handhold the camera and move with the action wherever it goes. Whether the location terrain is smooth or uneven, the camera seems to float effortlessly through the scene, and the camera’s ability to stay close to the action is limited only by the camera person’s energy and stamina.
Handheld versus Tripod-Mounted
Camera Movement
There are differences between movements accomplished with a handheld or shoulder-mounted camera and those done with a camera mounted on a tripod dolly or other stable yet movable mounting device. The differences are both physical and psychological. A camera mounted on a tripod is extremely stable. Because it is so stable, the camera becomes an invisible, objective observer of the scene. The purpose of the camera in television studio presentations such as news programs and interviews is to record what happens, not to participate in the event. For this reason, tripod- or pedestal-mounted cameras are almost always used for these kinds of programs.
If the lens is zoomed out all the way, it is easier to control the perceived effect of camera movement than if it is zoomed in. Nevertheless, when the camera is handheld, it becomes significantly less stable. As a result, the viewer becomes aware of the movement of the camera and consequently also becomes aware of the presence of the camera. The camera participates significantly more in the event because its presence is apparent. It is no longer an invisible observer without an effect on the scene. The effect of the camera is now visible and the viewer can see how it responds to the scene. Thus, the decision to mount a camera on a tripod or to hold it should be made with a great amount of forethought.
SHOOTING
TO EDIT
In almost all single-camera video field productions, the camera operator shoots material that will be edited together in postproduction. The camera operator has a responsibility to give the editor material that can be coherently assembled. The following guidelines should be considered when shooting material that is going to be edited in postproduction.
Shoot Establishing Shots
The function of the establishing shot is to set the scene; it tells the viewer where the action is happening. Establishing shots, most often in the form of extreme long shots or long shots, show the relationship of the parts to each other and to the scene as a whole. An establishing shot is essential if the viewer, who otherwise has no knowledge of the scene or setting, is to make sense of the scene.
Cover the Action
When you look at a situation or scene, try to identify the principal action or event. Break scenes or events down into their principal components and then try to cover them. For example, if you are commissioned to videotape a friend’s wedding, you could break that event into components like these:
1. Prewedding activities—bride dressing, arrival of groom at church, bride’s drive to church, and so on
2. Ceremony—arrival of bride, walk down the aisle into church, ceremony including exchange of rings and traditional kiss, and so on
3. After ceremony—walk down the aisle and out of church, throwing rice or birdseed at bride and groom, drive to reception, reception line, cutting the cake, and so on
By breaking the event into component parts, you can determine what you need to cover to faithfully capture the essence of the event. Breaking an event into components also tells you whether you need one camera or more. If you have only one camera, you can decide which parts of the event are most important and plan to cover those.
Repeat the Action If Possible
If you have only one camera to shoot an event and the participants are willing and able to repeat the action, you can shoot the same event from different angles. In traditional Hollywood-film-style shooting, the director provides a master shot of the entire scene, shot on a wide-angle lens. Then the scene is repeated from several additional angles to provide close-up detail of the major characters or actions in the scene. In a television studio program utilizing multiple cameras, one camera usually holds a wide shot and the others are set on close-ups of the details of the action. The director then cuts from one camera to another as the scene unfolds.
Because you typically have only one camera for shooting in the field, it is helpful to shoot multiple takes. This is often easy to arrange. For example, if you are recording a musical group, you can do one take of a song on a wide shot, then shoot a close-up of the lead singer, and then perhaps do a third take, shooting each of the instrumentalists during his or her solo segment. For editing, this provides a cover shot (the long shot of the whole group) plus repeated action of the significant details from which to assemble your segment.
Whether your subject can repeat the action depends to a certain extent on the nature of the action. Product demonstrations and dramatic scenes lend themselves quite readily to multiple takes of repeated action. You will most likely have more success in arranging multiple takes with the music recording session just described than with your local hockey team’s score of a game-winning goal. Instant replays, unfortunately, are not a characteristic of real life.
If you are shooting a program from a script that involves dialogue or action, then the technique of overlapping should be used. Begin each new shot by repeating the action or dialogue that ended the previous shot. This technique of shooting overlapping action and dialogue greatly simplifies the editor’s task.
Shoot Essential Details
In addition to the overall action or principal elements of a scene, what are the essential details? Shoot close-up shots of essential details of the event to be used as cut-ins, and shoot other related details that are not parts of the scene itself to be used as cutaways. For example, if you are shooting an interview with a painter who is discussing current projects, you might also shoot some footage of the artist at work. Shots at work might include wide shots of the painter in the studio as well as close-ups of the brush moving against the canvas. A cut from a shot of the painter talking on camera during the interview to a shot of the painter at work is a cutaway. A cut from the wide shot of the artist in the studio to a close-up of the brush moving is a cut-in.
Another common type of cutaway shot in an interview scene is the reaction shot. Shoot some footage of the interviewer responding to the painter. A cutaway from the painter to the reaction shot will show the audience how the interviewer is responding to what is being said.
If the artist demonstrates the techniques used, you should shoot some close-ups of this activity. You can then cut in from a wide or medium shot of the artist in the studio to a close-up shot of the artist’s hands at work.
Another term frequently used to describe cutaway shots in interview sequences is B-roll. The term is also widely used in news production to describe the visual footage that covers the reporter’s voice-over. Cutaway, or B-roll, footage is used extensively in video production to enhance the interview or news-story voice information (the A-roll) with appropriate visual sequences. Cutaways provide a visual alternative to “talking heads.”
When working with interview-based material, it is generally preferable to record the interviews first and then to use the subjects’ answers to questions to identify appropriate B-roll footage to shoot to be used as cutaways. This cutaway material should allow the editor to create appropriate shot sequences. It’s not sufficient to shoot only one long shot or closeup of the projected B-roll material. Rather, you should change angles and record a variety of shots so that they can be edited together into a sequence to tell a part of the story visually.
Shoot Material for Transitions
You should have a good idea of the way in which you are going to achieve your transitions from one segment or scene to another when you go into the field to shoot. Let’s assume that you are constructing a program out of interviews of people involved in the debate over the safety of nuclear energy. You shoot a series of interviews in two towns that are several hundred miles apart. The people in town A are almost unanimously opposed to nuclear energy because there have been several accidents at the reactor in their community, and they fear for their own safety and the safety of their children. The people in town B get most of their electrical energy from the plant but live far enough away that they do not have to worry about radiation leaks. They are almost unanimously in favor of nuclear energy and the continued operation of the plant in question.
When you assemble your program, how will you make the transition from the antinuclear interviews to the pronuclear interviews? This is the function of transitional material. Perhaps you will use an on-camera narrator to bridge the gap. Or you might use a cover or establishing shot of the locale or a shot taken from the window of a car driving down the main street of the town. Whatever device you use, you should have an idea of what the transition shot is going to be before you go out to shoot so that you can be sure to get the appropriate footage on tape.
Shoot Segments Long Enough
for Editing
The mechanics of most video editing systems require that any segment of tape to be used during editing must have at least five seconds of preroll material. This means that you must focus your camera and begin recording for a minimum of five seconds before you will have usable video. This is necessary for several reasons. When a videotape is played back in a VCR, it usually takes about five seconds for the tape to get up to speed and for the image to stabilize. If you are using a videotape-based linear editing system, the edit control units that govern the playback and editing VCRs need this preroll time to cue up the tapes and execute edits. If you are using a digital nonlinear editing system, you will want to have at least five additional seconds of material at the head and tail of each shot, not only to allow the playback VCR to get up to speed before you transfer your footage into the computer in which you will perform the edits, but also to provide additional shot material in case you want to add transition effects (e.g., dissolves or wipes [discussed in Chapter 9]) to the beginning or end of a shot as you are editing. All shots should therefore be 10 seconds and preferably much longer to ensure that you have enough usable video to edit.
Shoot Shots That Utilize Matched
Camera Movements
If, for example, you are shooting landscapes or building exteriors, start with a long shot of the scene and hold it for 10 or 15 seconds. Then zoom in slowly to an important detail or focal point and hold that; then zoom out slowly at the same rate you used to zoom in to the closer shot, and hold that again. Repeat the procedure for as many different locations as you need to photograph. Or, you may want to pan instead of zoom. Use the same technique: hold the shot for 10 to 15 seconds at the beginning of the pan, pan across the scene, hold it for 10 to 15 seconds, pan in the reverse direction, and hold the shot again. Make sure to shoot any subsequent shots at the same panning speed. These shots can then be cut together into the most effective sequence of shots with matched camera action.
Shooting Uncontrolled Events
News videographers face a different set of challenges because they do not have much, if any, control over the events they are asked to cover, and they will have only one camera to cover the action. This requires the cameraperson to quickly assess the situation to determine what needs to be recorded first. Typically, you will want to get footage of the main action (news conference, accident, fire, etc.). Shoot one or more establishing shots as well as details of the action. Interviews with individuals important to the action can be recorded after the event itself has been captured. These interviews may include individuals who were affected by the event, official personnel (firefighters, police, legislators) who responded to the event, eye-witnesses who can describe the sequence of events that led to the event, and so on.
Specific Suggestions
for Shooting Interviews
One of the most common single-camera situations is the on-site or remote interview. Some specific camera blocking (position) setups will be discussed, but here the focus is on some basic strategic decisions that should be made before you begin shooting. First, decide whether the interviewer is going to be seen on camera. Also, decide whether the questions are going to be heard on camera or whether you plan to edit them out and allow your audience to hear only the subject’s answers. If the questions are to be heard on the tape, will the interviewer be seen?
Let’s assume that you want to show the interviewer asking the questions and that you plan to edit the questions and answers together into a continuous sequence. Shoot the interview with the camera focused on the subject and with the background slightly out of focus. This forces the viewer’s attention on the subject.
Background details that are visible should be arranged to provide pleasing picture composition and, if possible, to provide additional environmental information about the subject. For example, in an interview with a biologist you might place a microscope on a table in the background and light it to make it visible. If the interview subject is a judge, state and national flags in the background will lend an additional air of authority to the scene. A hard light (spotlight) focused across the flags will bring out the texture in them and give the shot more depth. Make sure that whatever is visible in the frame supports the interview subject, and remember that if the background focus is too sharp, your audience’s attention may wander.
Vary the lens angle (zoom in and out) at appropriate points in the interview. For example, you might want to pull out a little when a question is asked and then zoom in as the question is answered. Or, if the subject makes a startling or personal revelation, you might want to slowly zoom in for emphasis.
Because you have kept the camera focused on the subject during the interview, you will need to shoot some additional material for cutaways. After the interview is over, shoot several over-the-shoulder shots (also called reverse shots or reversals) of the interviewer and interviewee. You do not even need to record sound. Just shoot both people from several different angles (see Figure 6.22). After the interview is over, you can shoot the interviewer asking the questions. This technique of question re-ask is frequently used in television news and documentary production. Make sure the questions are re-asked in the same location and with the same background as the original interview. Also make sure that the re-asked questions are the same as the original questions! If the questions are in a script, the interviewer can simply re-ask them into the camera after the real interview has been completed. If the questions are ad-libbed, a production assistant should make a record of the questions while the interview is in progress. If there is any doubt about what actually was asked, you can always refer to the video itself, because the interviewee’s microphone will have picked up the questions even if the interviewer did not wear a microphone. News producers have an ethical and legal responsibility to make sure that the questions that are re-asked and the answers that are given in the edited version of the program correspond to what was actually asked and answered in the original interview.

SUBJECT–CAMERA
RELATIONSHIPS
Above-,At-,and Below-
Eye-Level Positions
Because camera position has a profound impact on the audience’s perception of the subject, determining the position of the camera in relation to the subject is extremely important. So-called objective videography places the camera at the eye level of the subject. At-eye-level camera position makes the viewer and the subject equal in terms of their relative height. The viewer looks directly at the subject rather than up or down. At-eye-level camera position is probably the most commonly used camera position. Almost all studio presentations shoot at eye level, and most typical kinds of remote footage—such as news, documentaries, and on-site interviews—place the camera in this neutral, objective position.
When the camera is positioned above or below the eye level of the subject, the dynamics of the audience’s perception of the subject change radically. When the camera is placed in the above-eye-level camera position, it shoots down at the subject. Because the audience views the shot from the perspective of the camera, the audience assumes a position of superiority over the subject. If you want to make someone seem smaller, less significant, or less important, shoot from above the eye level of the subject.
Conversely, when the camera is placed in the below-eye-level camera position, it shoots up at the subject. Again, the audience views the shot from the perspective of the camera, which now places the viewer below the subject. The viewer looks up at the subject, who now towers over the camera. Below-eye-level camera position increases the power, significance, and perceived size of the subject. The effect is almost the exact opposite of shooting from above eye level.
Objective and Subjective Cameras
The camera can either observe an event or participate in it. When the function of the camera is simply to observe an event, we classify it as an objective camera. The perspective of the objective camera viewpoint is from outside the scene. The camera acts as an unseen observer, and the participants within the scene seem unaware of its presence. Two examples of the use of the objective camera are a documentary in which the camera records an event, and a dramatic program such as a soap opera in which the characters play to each other and are oblivious to the camera. Most programs are shot from this perspective.
Subjective camera refers to the use of the camera as a participant in the scene. This may take a number of forms. The camera may act as the eyes of a person in a scene, or the characters may talk directly into the camera. Imagine a dramatic scene shot from the point of view of a wounded soldier who is brought to a medical unit for treatment. The audience sees everything through the eyes of the wounded soldier, from the time he arrives via helicopter at the beginning of the scene to the time he leaves the hospital at the scene’s conclusion. Throughout the scene, the camera acts as the soldier’s eyes and makes the audience experience the scene through its (the camera’s) and his (the soldier’s) point of view.
When used appropriately, the subjective camera is an extremely powerful production technique. The video camcorder has the mobility demanded by the subjective camera technique and is therefore easily used in this context. However, care must be exercised so that the technique is not overused, as overuse may well diminish its effectiveness.
Many programs use a combination of both objective and subjective camera viewpoints. An easily understood example of programming that frequently combines these techniques is the on-site television news report. Typically, at the beginning of the report, the reporter introduces the story by speaking directly to the camera and the audience. This is a classic example of the use of subjective camera. Then a voice-over accompanies shots of the event that is being reported. Here, the camera assumes the position of the objective observer. The techniques complement each other to present a news report that is both personal and informative.
Principal Action Axis
When shooting any type of dramatic scene, interview, or event that will be edited in postproduction, the videographer must determine the position of the principal action axis. The camera must be kept on one side of the principal action axis while recording the scene to maintain continuity in the direction of action and position of the scene. This principal action axis is sometimes referred to as the principal vector line, and keeping the camera to one side of the axis is sometimes called the 180-degree rule. These three terms are interchangeable.
To identify the principal action axis, look at the direction of the action in a scene and draw a line tracing it. For example, in a football or basketball game, the principal action moves the ball and the players from one end of the field or court to the other. This motion to one end and back again creates the principal action axis (see Figure 6.23 on page 194). To position your camera correctly and to maintain continuity of direction from shot to shot, the camera must shoot all coverage of the action from one side of the action axis. The camera may be positioned on either side of the action axis, and as long as all action is shot from the same side of the line, directional continuity will be maintained. If, however, the camera moves to the other side of the line, the action will appear to be reversed (see Figure 6.23 on page 194).
Another way to think about the principal action axis is to consider the establishing shot that you recorded while covering an event. Typically a long or wide shot, this shot establishes the scene and the first position of the camera. Other shots of the scene will need to be recorded from the same side of the scene/action that the camera was in for the first shot. Of course you can always move to a different position later on and shoot a new establishing shot when the scene or location changes.

ON-SITE
INTERVIEW SETUP
One of the most common remote shooting situations is the on-site interview. Since video equipment has become so portable, it is a rather simple operation to travel to the home or office of the person you want to interview and shoot the interview in the subject’s normal environment, rather than in the artificial studio environment. Almost all on-site interviews are shot with a single camera, and as a result, the videographer must shoot all the angles needed to edit the interview into a coherent sequence. The interview must have both content and visual continuity. The remainder of our discussion here will focus on visual continuity.
The following factors should be considered when setting up an on-site interview.
1. Position of the subject
2. Position of the interviewer
4. Principal action axis
Position of the Subject. When you travel to the home or office of the subject of your interview, you are able to show the subject in his or her normal working or living environment. The subject should be placed comfortably, facing the camera, where you can take advantage of the surroundings to provide rich background detail to the interview. In many cases, particularly when the interview takes place in an office, your subject will be sitting behind a desk. In the home, the subject will normally be sitting in a chair or on a couch. With your subject in position for the interview, examine the background to be sure that it does not detract from the subject. Lamps and pictures on the wall often provide unwanted distractions. If they interfere with the composition of your shot, move them into a more favorable position.
Be careful not to position the subject in front of a window. If there is a window in the background and you cannot move the subject so that the window is out of the shot, close the window blinds or draperies when shooting during the day to avoid silhouetting the subject.
Position of the Interviewer. There are two possible positions in which to place the interviewer—next to the subject or somewhat in front of the subject with the interviewer’s back to the camera. The best place for the interviewer is in front of the subject, back to the camera (see Figure 6.24). Placement of the interviewer next to the subject may make the subject feel more comfortable, because this approximates a normal sitting position for conversations, but it will consistently present the camera with a poor view of the subject because he or she will have a tendency to turn toward the interviewer and away from the camera.

FIGURE 6.24 Blocking the On-Site Interview and Resulting Shots
Position of the Camera. The camera should be positioned behind the interviewer and slightly off to one side. In this position, the camera can easily shoot a three-quarter profile of the subject as well as an over-the-shoulder shot of the interviewer and subject. From this position, the subject will always be able to maintain easy eye contact with the interviewer and will present the camera with an almost full-face shot.
Be careful to keep the interviewer close to the camera. The farther away from the side of the camera the interviewer moves, the farther offscreen the subject will appear to be looking. (See Figure 6.25.)
Principal Action Axis. A principal action axis is formed in an interview setting just as it is in an action-oriented scene. The principal action axis extends from the subject to the interviewer (see Figure 6.26). To maintain continuity when you shoot question re-asks or reaction shots, the camera must remain in the 180-degree semicircle formed by the principal action axis. If you keep this in mind, you will be able to move the camera during or after the interview to shoot additional material of your subjects from different angles and still present your editor with material that retains continuity when edited.
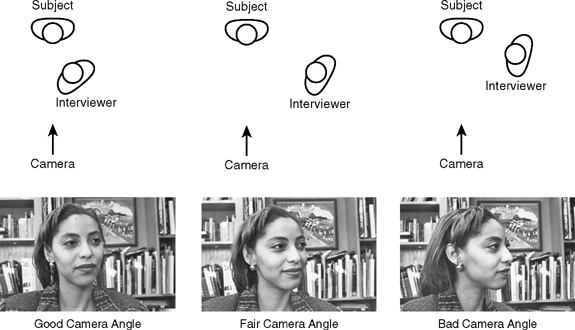
FIGURE 6.25 Good and Bad Interview Camera Angles Subject

Figure 6.27 on page 198 presents another blocking diagram of an interview; however, this one is not arranged as well as the previous examples. In news or on-the-street interviews, where the interviewer is forced to hold the microphone that is recording the sound, or when the interviewer must face the camera directly to introduce the subject, it is common for the interviewer to stand next to the subject. The difficulty with this blocking arrangement is that it is natural for the subject to talk to the interviewer rather than to the camera when answering the questions. As a result, the camera is left with a poor shot of the subject—the infamous ear shot—in which any zoom in to a close-up reveals the subject’s face in profile rather than from the front. Because the eyes of the subject convey significantly more information to the audience than does an ear, try to avoid this situation whenever possible.

Shooting for Depth
As mentioned earlier, we try to increase the sensation of depth in video images to make them seem more realistic because we know that objects in the real world are three-dimensional rather than flat. Following three simple shooting rules can increase the sense of depth in television images. First, always try to compose images that have a distinct foreground, middleground, and background. Place objects between the camera and your subject, as well as behind your subject, to draw attention to depth. Second, when staging a scene, or even when simply setting up the position of interviewer and subject, try to stage for depth by placing the subjects at different distances away from the camera. And third, whenever possible, bring action toward or away from the camera rather than moving it horizontally in front of the camera. (See Figure 6.28.) Although it is not possible (or advisable) to adhere to these rules all of the time, you can improve the look of your video presentations by using them in situations that call for them.
